Java30:SpringBoot3
一:SprintBoot3简介:
到目前为止,已经学习了多种配置 Spring 程序的方式。但是无论使用 XML、注解、Java 配置类还是他们的混合用法,你都会觉得配置文件过于复杂和繁琐,让人头疼!
SpringBoot 帮我们简单、快速地创建一个独立的、生产级别的 Spring 应用(说明:SpringBoot底层是 Spring),大多数 SpringBoot 应用只需要编写少量配置即可快速整合 Spring 平台以及第三方技术!
SpringBoot 的主要目标是:
为所有 Spring 开发提供更快速、可广泛访问的入门体验。
开箱即用,设置合理的默认值,但是也可以根据需求进行适当的调整提供一系列大型项目通用的非功能性程序(如嵌入式服务器、安全性、指标、运行检查等)约定大于配置,甚本不需要主动编写配置类、也不需要 XML 配置文件。
总结:简化开发,简化配置,简化整合,简化部署,简化监控,简化运维。
二:快速入门程序:
步骤1:创建工程并导入配置和依赖:
<parent><groupId>org.springframework.boot</groupId><artifactId>spring-boot-starter-parent</artifactId><version>3.0.5</version></parent>
<dependencies><dependency><groupId>org.springframework.boot</groupId><artifactId>spring-boot-starter-web</artifactId></dependency>
步骤2:创建启动类:
//@SpringBootConfiguration 配置类
//@EnableAutoConfiguration 自动加载配置
//@ComponentScan  默认是当前类所在包
@SpringBootApplication
public class Main {public static void main(String[] args) {SpringApplication.run(Main.class,args);//自动创建ioc容器,启动tomcat服务器软件}
}
步骤3:创建controller
@RestController
@RequestMapping("boot")
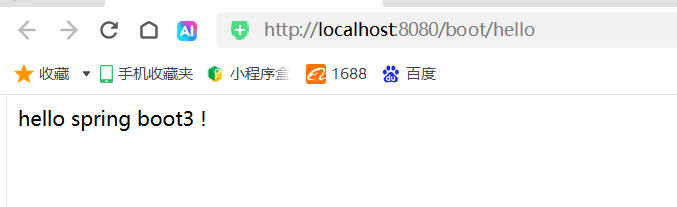
public class HelloController {@GetMapping("hello")public String hello(){return "hello spring boot3";}
}
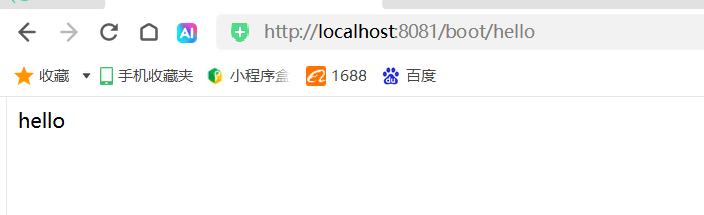
步骤4:测试:运行步骤3的main方法,并在浏览器输入访问地址:
三:统一配置管理:
1.说明:
SpringBoot 工程下,进行统一的配置管理,你想设置的任何参数(端口号、项目根路径、数据库连接信息等等)都集中到一个固定位置和命名的配置文件(application.properties 或
application.yml)中!配置文件应该放置在 Spring Boot 工程的 src/main/resources 目录下。这是因为src/main/resources 目录是Spring Boot默认的类路径(classpath),配置文件会被自动加载并可供应用程序访问。
2.properties实例:
步骤1:在resources目录下创建配置文件:application.properties
#使用springboot提供的配置,修改程序参数,key是固定的
server.port=80
server.servlet.context-path=/zhangsan#自定义配置
zzx.info.name=zhangsan
zzx.info.age=18
步骤2:创建项目并添加依赖:
<parent><groupId>org.springframework.boot</groupId><artifactId>spring-boot-starter-parent</artifactId><version>3.0.5</version></parent>
<dependencies><dependency><groupId>org.springframework.boot</groupId><artifactId>spring-boot-starter-web</artifactId></dependency>
步骤3:创建controller
package com.cn.boot.contrloller;import org.springframework.beans.factory.annotation.Value;
import org.springframework.web.bind.annotation.GetMapping;
import org.springframework.web.bind.annotation.RequestMapping;
import org.springframework.web.bind.annotation.RestController;@RestController
@RequestMapping("boot")
public class HelloController {//读取配置文件并给属性赋值@Value("${zzx.info.name}")private String name;@Value("${zzx.info.age}")private int age;@GetMapping("hello")public String hello(){return "hello springboot3";}@GetMapping("hello2")public String hello2(){System.out.println(name);System.out.println(age);return "hello2"+name+age;}
}
步骤4:设置启动类:
package com.cn.boot;import org.springframework.boot.SpringApplication;
import org.springframework.boot.autoconfigure.SpringBootApplication;@SpringBootApplication
public class Main {public static void main(String[] args) {SpringApplication.run(Main.class,args);}
}
步骤5:使用新的地址访问:

3.yaml实例:
yaml 语法说明
a.数据结构用树形结构呈现,通过缩进来表示层级,b.连续的项目(集合)通过减号”。”来表示c.犍值结构里面的 key/value 对用冒号 ”:”来分隔。d. YAML 配置文件的扩展名是 yaml 或 yml
yaml配置文件:
 # server.port=80# server.servlet.context-path=/zhangsan#yaml 有层次,可以继承的配置文件格式
server:port: 80servlet:context-path: /boot# zzx.info.name=zhangsan
# zzx.info.age=18
# zzx.info.username=root# zzx.info.password=123456zzx:info:name: zhangsan #key:空格值age: 18username: rootpassword: 123456
4.批量读取配置文件:
批量配置读取: @ConfigurationProperties(prefix = "zzx.info")通用的前缀
步骤1:创建项目和导入依赖后,创建yaml文件 :application.yaml
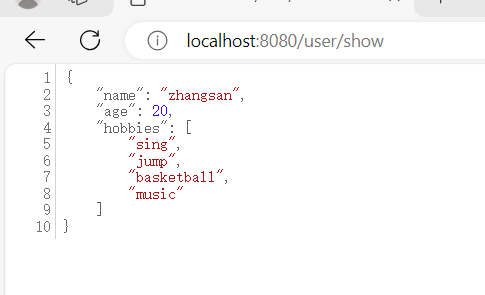
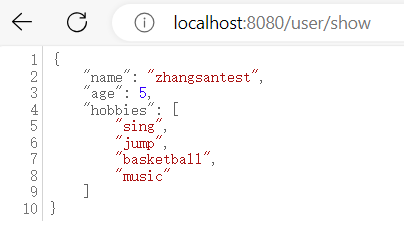
zzx:info:name: zhangsanage: 20hobbies:- sing- jump- basketball- music
步骤2:创建实体类:
package com.cn.boot.pojo;import lombok.Data;
import org.springframework.boot.context.properties.ConfigurationProperties;
import org.springframework.stereotype.Component;import java.util.List;/*
* 读取配置文件方式1:@Valule
* 直接在属性上添加即可
* @Value(key必须写全了)
* @Value(只能读取单个值)
* 批量配置读取:
@ConfigurationProperties(prefix = "zzx.info")通用的前缀
* 实体类
* 属性名等于最后一个key的值
* 优势1:方便不用一个一个读取
* 优势2:可以给集合类型赋值
*
* */
@Component
@Data
@ConfigurationProperties(prefix = "zzx.info")
public class User {private String name;private int age;private List<String> hobbies;
}
步骤3:创建controller类:
package com.cn.boot.controller;
import com.cn.boot.pojo.User;
import org.springframework.beans.factory.annotation.Autowired;
import org.springframework.web.bind.annotation.GetMapping;
import org.springframework.web.bind.annotation.RequestMapping;
import org.springframework.web.bind.annotation.RestController;@RestController
@RequestMapping("user")
public class UserController {@Autowiredprivate User user;@GetMapping("show")public User show(){return user;}}
步骤4:创建启动类
package com.cn.boot;import org.springframework.boot.SpringApplication;
import org.springframework.boot.autoconfigure.SpringBootApplication;@SpringBootApplication
public class Main {public static void main(String[] args){SpringApplication.run(Main.class,args);}
}
步骤5:测试
5.多环境配置和激活:
多个yaml 文件格式: application-{key}.yaml
激活多配置:在application.yaml 加如下配置:
spring:profiles:active: test,dev #application的{key}值
步骤1:创建项目并导入依赖:同上
步骤2:创建实体类:同上
步骤3:创建controller类:同上
步骤4:创建启动类:同上
步骤5:创建多个yaml文件:
application-test.yaml
zzx:info:name: zhangsantest
application-dev.yaml
zzx:info:age: 5
application.yaml
zzx:info:hobbies:- sing- jump- basketball- musicspring:profiles:active: test,dev #激活外部配置 application-test|application-dev#外部配置的key和application key 重复,外部覆盖内部
步骤6:测试:
四:整合SpringMvc:
1.配置服务器端口号和根路径
2.修改静态资源访问地址
3.配置过滤器
步骤1:创建项目并添加依赖:
<parent><groupId>org.springframework.boot</groupId><artifactId>spring-boot-starter-parent</artifactId><version>3.0.5</version></parent>
<dependencies><dependency><groupId>org.springframework.boot</groupId><artifactId>spring-boot-starter-web</artifactId></dependency>
步骤2:创建启动器:
package com.cn.boot;import org.springframework.boot.SpringApplication;
import org.springframework.boot.autoconfigure.SpringBootApplication;@SpringBootApplication
public class Main {public static void main(String[] args) {SpringApplication.run(Main.class,args);}
}
步骤3:创建controller
package com.cn.boot.controller;import org.springframework.web.bind.annotation.GetMapping;
import org.springframework.web.bind.annotation.RestController;@RestController
public class UserController {@GetMapping("hello")public String hello(){return "hello";}}
步骤4:创建applicaton.yaml 配置文件:
#配置端口号和根路径
server:port: 8081servlet:context-path: /bootspring:web:resources:static-locations: classpath:/webapp #改变静态资源访问路径,默认为static文件夹
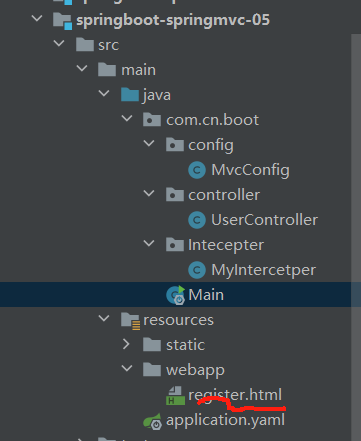
步骤5:创建配置类和过滤器实现类:
package com.cn.boot.config;import com.cn.boot.Intecepter.MyIntercetper;
import org.springframework.context.annotation.Configuration;
import org.springframework.web.servlet.config.annotation.InterceptorRegistry;
import org.springframework.web.servlet.config.annotation.WebMvcConfigurer;@Configuration
public class MvcConfig implements WebMvcConfigurer {@Overridepublic void addInterceptors(InterceptorRegistry registry) {registry.addInterceptor(new MyIntercetper());}
}
package com.cn.boot.Intecepter;import jakarta.servlet.http.HttpServletRequest;
import jakarta.servlet.http.HttpServletResponse;
import org.springframework.web.servlet.HandlerInterceptor;public class MyIntercetper implements HandlerInterceptor {@Overridepublic boolean preHandle(HttpServletRequest request, HttpServletResponse response, Object handler) throws Exception {System.out.println("request = " + request + ", response = " + response + ", handler = " + handler);return true;}
}
步骤6:测试:
实现过滤器:

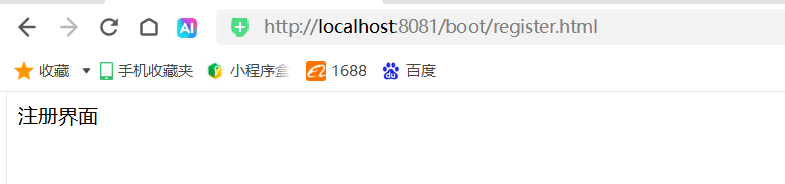
修改静态资源文件夹:
五:整合Druid连接池:
整合druid连接池,并查询所有雇员信息
步骤1:创建项目并导入依赖:
<parent><artifactId>spring-boot-starter-parent</artifactId><groupId>org.springframework.boot</groupId><version>3.0.5</version></parent>
<dependencies><dependency><groupId>org.springframework.boot</groupId><artifactId>spring-boot-starter-web</artifactId></dependency><dependency><groupId>org.springframework.boot</groupId><artifactId>spring-boot-starter-jdbc</artifactId></dependency><dependency><groupId>mysql</groupId><artifactId>mysql-connector-java</artifactId><version>8.0.28</version></dependency><dependency><groupId>com.alibaba</groupId><artifactId>druid-spring-boot-3-starter</artifactId><version>1.2.20</version></dependency><dependency><groupId>org.projectlombok</groupId><artifactId>lombok</artifactId><version>1.18.28</version></dependency>
</dependencies>
步骤2:创建启动器:
package com.cn.boot;import org.springframework.boot.SpringApplication;
import org.springframework.boot.autoconfigure.SpringBootApplication;@SpringBootApplication
public class Main {public static void main(String[] args) {SpringApplication.run(Main.class,args);}
}
步骤3:创建实体类:
package com.cn.boot.pojo;import jdk.jfr.DataAmount;
import lombok.Data;@Data
public class Employee {private int empId;private String empName;private Double empSalary;
}
步骤4:创建contrloller类:
package com.cn.boot.controller;import com.cn.boot.pojo.Employee;
import org.springframework.beans.factory.annotation.Autowired;
import org.springframework.jdbc.core.BeanPropertyRowMapper;
import org.springframework.jdbc.core.JdbcTemplate;
import org.springframework.web.bind.annotation.GetMapping;
import org.springframework.web.bind.annotation.RequestMapping;
import org.springframework.web.bind.annotation.RestController;import java.util.List;@RestController
@RequestMapping("emp")
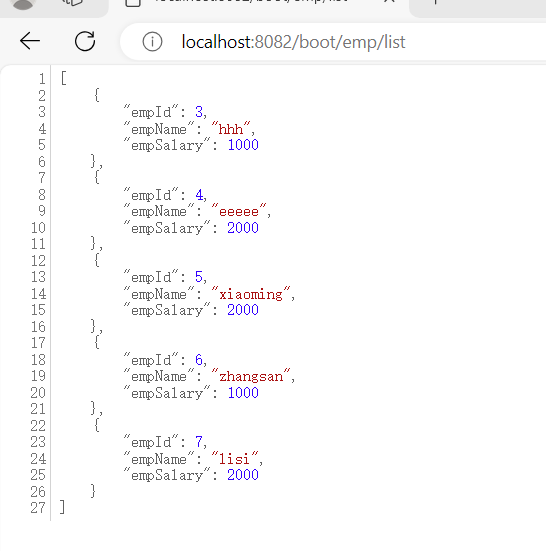
public class EmpController {@Autowiredprivate JdbcTemplate jdbcTemplate;@GetMapping("list")public List<Employee> findAll(){String sql= " select * from t_emp";List<Employee> query = jdbcTemplate.query(sql, new BeanPropertyRowMapper<>(Employee.class));return query;}
}
步骤5:创建application.yaml配置文件:
spring:datasource:type: com.alibaba.druid.pool.DruidDataSourcedruid:username: rootpassword: rootdriver-class-name: com.mysql.cj.jdbc.Driverurl: jdbc:mysql://localhost:3306/studb?useUnicode=true&characterEncoding=utf-8
server:port: 8082servlet:context-path: /boot
步骤6:测试
六:整合Mybatis:
步骤1: 创建项目并导入依赖:
<parent><artifactId>spring-boot-starter-parent</artifactId><groupId>org.springframework.boot</groupId><version>3.0.5</version></parent><dependencies><dependency><groupId>org.springframework.boot</groupId><artifactId>spring-boot-starter-web</artifactId></dependency><dependency><groupId>org.springframework.boot</groupId><artifactId>spring-boot-starter-jdbc</artifactId></dependency><dependency><groupId>mysql</groupId><artifactId>mysql-connector-java</artifactId><version>8.0.28</version></dependency><dependency><groupId>com.alibaba</groupId><artifactId>druid-spring-boot-3-starter</artifactId><version>1.2.20</version></dependency><dependency><groupId>org.projectlombok</groupId><artifactId>lombok</artifactId><version>1.18.28</version></dependency><dependency><groupId>org.mybatis.spring.boot</groupId><artifactId>mybatis-spring-boot-starter</artifactId><version>3.0.1</version></dependency>
</dependencies>
步骤2:在配置文件applicaiton.yaml中配置数据库连接信息及mybatis配置信息:
#druid配置spring:datasource:type: com.alibaba.druid.pool.DruidDataSourcedruid:username: rootpassword: rootdriver-class-name: com.mysql.cj.jdbc.Driverurl: jdbc:mysql://localhost:3306/studb?useUnicode=true&characterEncoding=utf-8
#mybatis配置
#彻底抛弃mybatis-config.xml
mybatis:mapper-locations: classpath:/mapper/*.xml #指定mapper.xml文件位置type-aliases-package: com.cn.boot.pojoconfiguration:map-underscore-to-camel-case: true #启用驼峰映射auto-mapping-behavior: full #启用完全自动映射行为log-impl: org.apache.ibatis.logging.slf4j.Slf4jImpl
步骤3:创建实体类及对应的数据库表
package com.cn.boot.pojo;import lombok.Data;@Data
public class Employee {private int empId;private String empName;private Double empSalary;
}
create table t_emp(
emp_id int auto_increment,
emp_name varchar(20),
emp_salary double(10,5),
primary key(emp_id));
insert into t_emp (emp_name,emp_salary)values
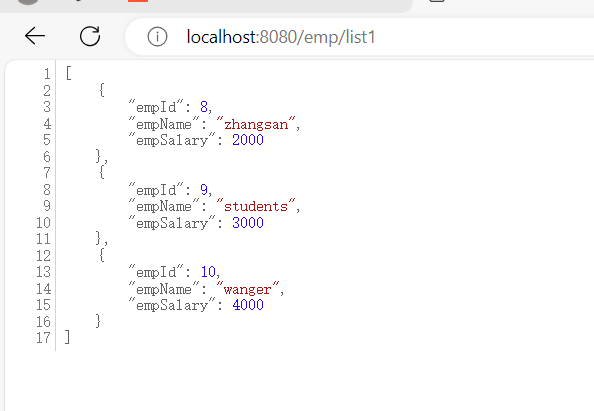
("zhangsan",2000.00),
("students" ,3000.00),
("wanger",4000.00)
步骤4:创建mapper接口:
package com.cn.boot.mapper;import com.cn.boot.pojo.Employee;import java.util.List;public interface EmpMapper {public List<Employee> querryAll();
}
步骤5:创建mapper.xml
<?xml version="1.0" encoding="UTF-8" ?>
<!DOCTYPE mapperPUBLIC "-//mybatis.org//DTD Mapper 3.0//EN""https://mybatis.org/dtd/mybatis-3-mapper.dtd">
<mapper namespace="com.cn.boot.mapper.EmpMapper"><select id="querryAll" resultType="employee">select * from t_emp</select>
</mapper>
步骤6:创建启动类,并添加注解@MapperScan("com.cn.boot.mapper"),扫描mapper接口
package com.cn.boot;import org.mybatis.spring.annotation.MapperScan;
import org.springframework.boot.SpringApplication;
import org.springframework.boot.autoconfigure.SpringBootApplication;@MapperScan("com.cn.boot.mapper")
@SpringBootApplication
public class Main {public static void main(String[] args) {SpringApplication.run(Main.class,args);}
}
步骤7:创建controller类并调用mapper接口,实现数据库操作
package com.cn.boot.controller;import com.cn.boot.mapper.EmpMapper;
import com.cn.boot.pojo.Employee;
import org.springframework.beans.factory.annotation.Autowired;
import org.springframework.web.bind.annotation.GetMapping;
import org.springframework.web.bind.annotation.RequestMapping;
import org.springframework.web.bind.annotation.RestController;import java.util.List;
@RestController
@RequestMapping("emp")
public class EmpController {@Autowiredprivate EmpMapper empMapper;@GetMapping("list1")public List<Employee> findAll(){List<Employee> empMappers = empMapper.querryAll();return  empMappers;}
}
步骤8:测试
七:TX和aop整合:
1.整合事务:
步骤1:创建项目并导入依赖:
<dependency><groupId>org.springframework.boot</groupId><artifactId>spring-boot-starter-jdbc</artifactId></dependency>
步骤2:创建service方法并添加事务
package com.cn.boot.service;import com.cn.boot.mapper.EmpMapper;
import org.springframework.beans.factory.annotation.Autowired;
import org.springframework.stereotype.Service;
import org.springframework.transaction.annotation.Transactional;@Service
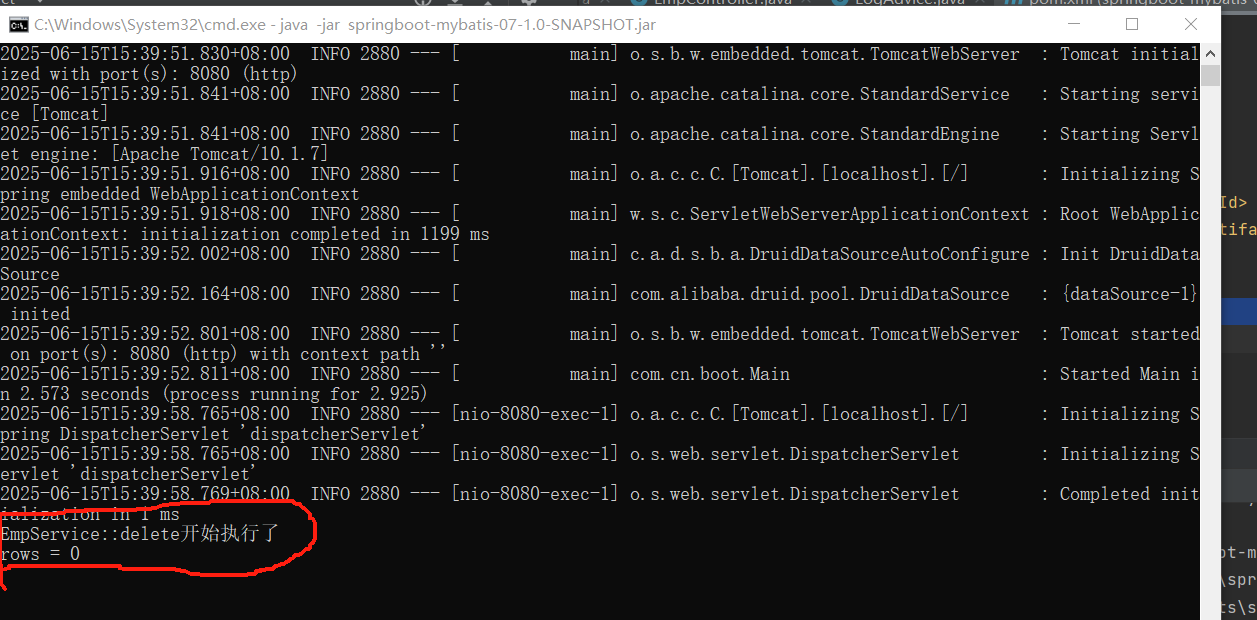
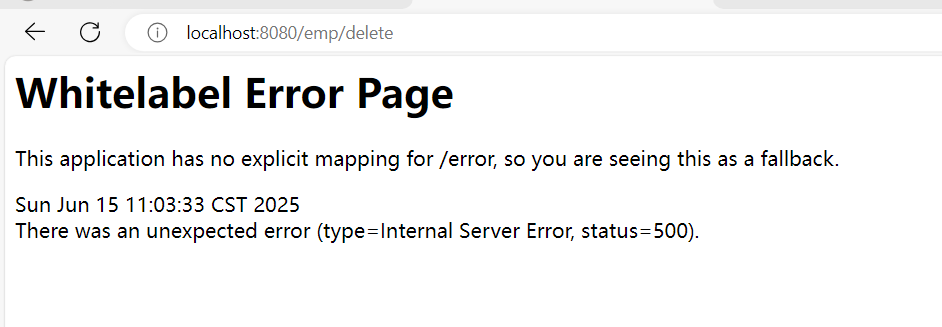
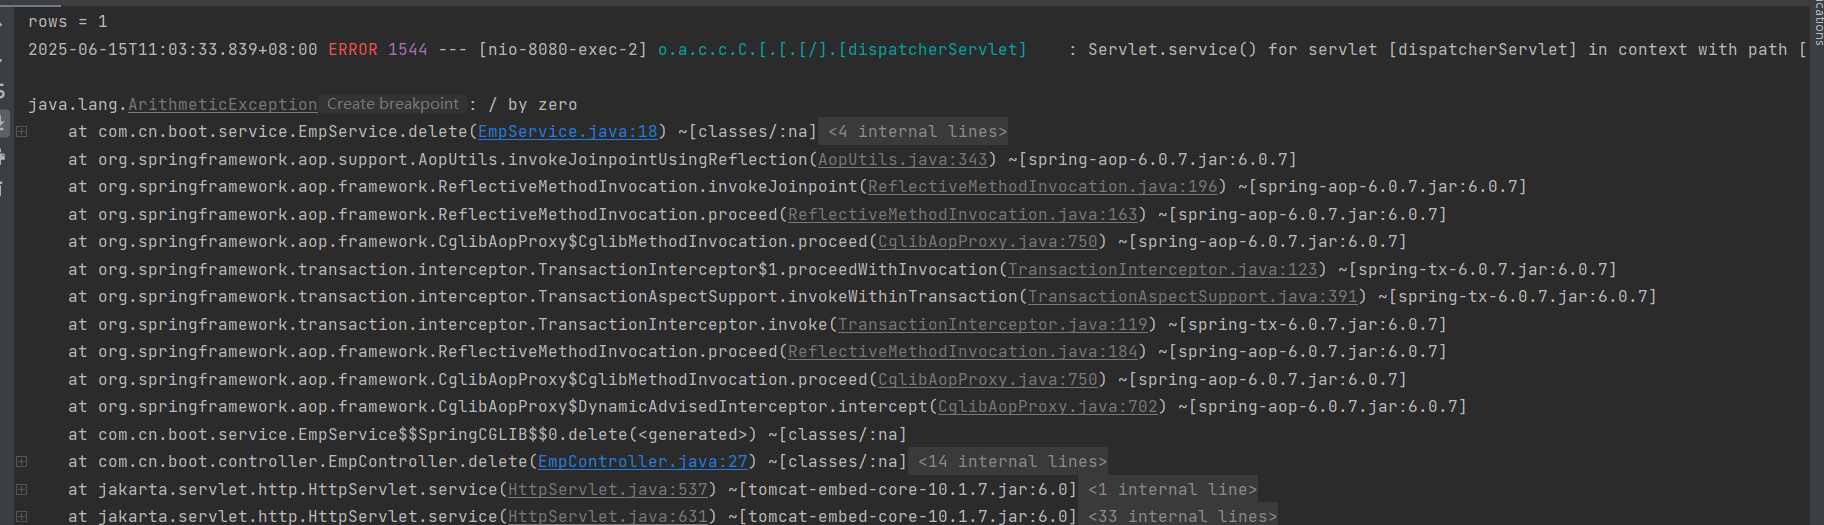
public class EmpService {@Autowiredprivate EmpMapper empMapper;@Transactionalpublic int delete(){int rows= empMapper.remove(1);System.out.println("rows = " + rows);int i=1/0;return rows;}
}
步骤3:创建mapper接口和mapper.xml
public interface EmpMapper {int remove(int id);
}
<?xml version="1.0" encoding="UTF-8" ?>
<!DOCTYPE mapperPUBLIC "-//mybatis.org//DTD Mapper 3.0//EN""https://mybatis.org/dtd/mybatis-3-mapper.dtd">
<mapper namespace="com.cn.boot.mapper.EmpMapper"><delete id="remove">delete  from t_emp where emp_id=#{emp_id}</delete>
</mapper>
步骤4:创建controller类调用:
package com.cn.boot.controller;import com.cn.boot.mapper.EmpMapper;
import com.cn.boot.pojo.Employee;
import com.cn.boot.service.EmpService;
import org.springframework.beans.factory.annotation.Autowired;
import org.springframework.web.bind.annotation.GetMapping;
import org.springframework.web.bind.annotation.RequestMapping;
import org.springframework.web.bind.annotation.RestController;import java.util.List;
@RestController
@RequestMapping("emp")
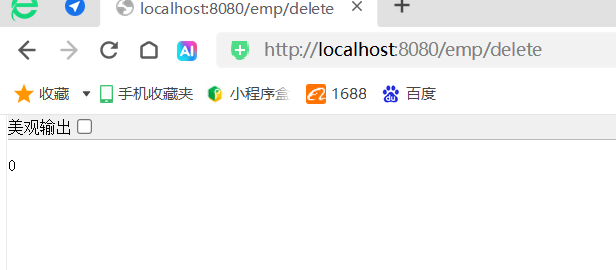
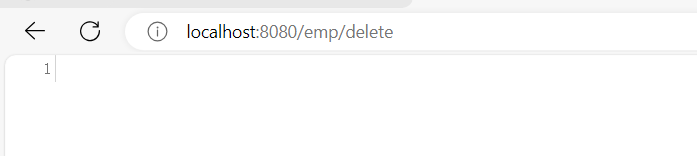
public class EmpController {@Autowiredprivate EmpService empService;@GetMapping("delete")public int delete(){int rows = empService.delete();return rows;}
}
步骤6:启动类同上,测试(数据库第一条信息未删除,出现异常回滚)
2.整合aop:
实现方法执行前打印执行日志:
步骤1:创建项目并导入依赖
<dependency><groupId>org.springframework.boot</groupId><artifactId>spring-boot-starter-aop</artifactId></dependency>
步骤2:创建增强:
package com.cn.boot.Advice;import org.aspectj.lang.JoinPoint;
import org.aspectj.lang.annotation.Aspect;
import org.aspectj.lang.annotation.Before;
import org.springframework.context.annotation.EnableAspectJAutoProxy;
import org.springframework.stereotype.Component;@Component
@Aspect
public class LogAdvice {@Before("execution(* com..service.*.*(..))")public  void before(JoinPoint point){String simpleName = point.getTarget().getClass().getSimpleName();String method = point.getSignature().getName();System.out.println(simpleName+"::"+method+"开始执行了");}}
步骤3:启动类,服务类(方法注释异常),控制层和事务增强相同
步骤4:测试:

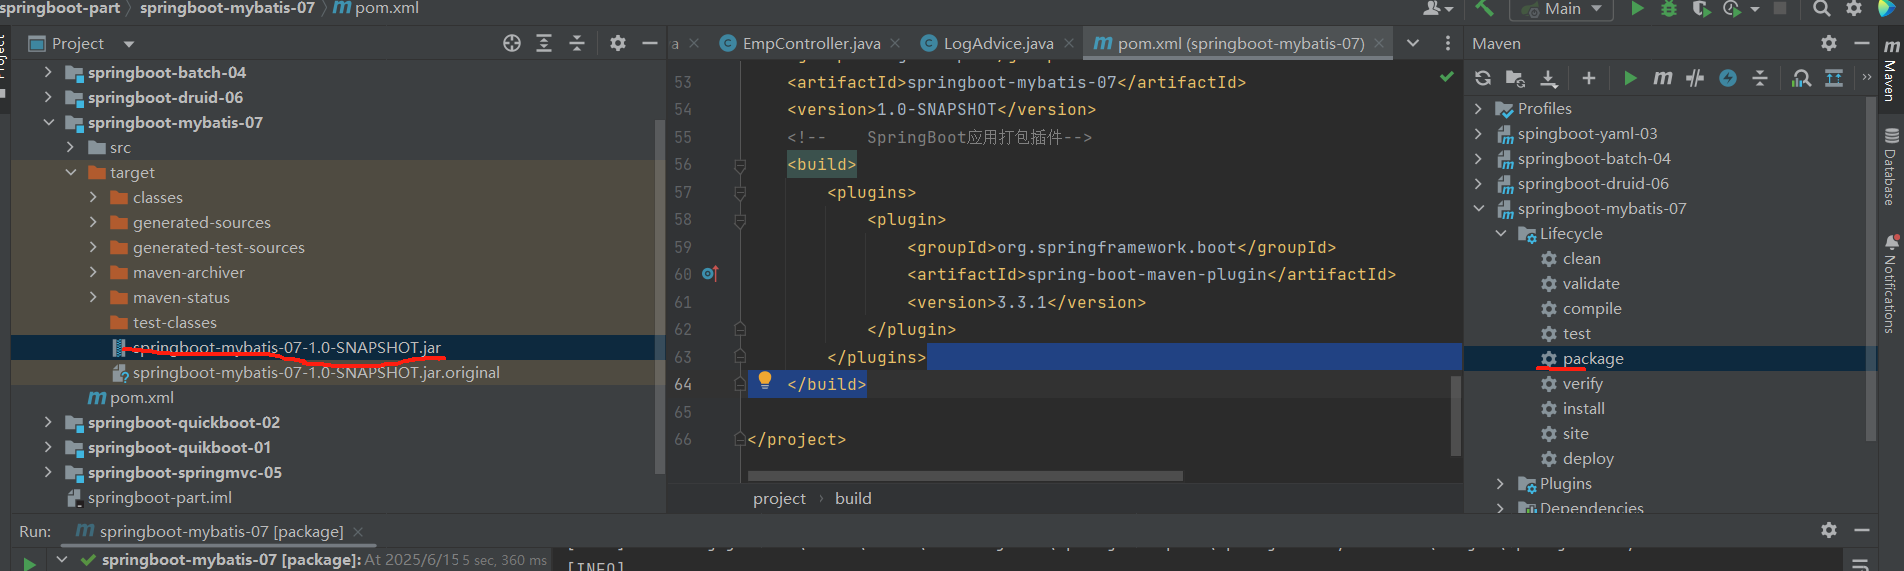
八:工程打包和快速部署命令:
步骤1:添加插件:
<build><plugins><plugin><groupId>org.springframework.boot</groupId><artifactId>spring-boot-maven-plugin</artifactId><version>3.3.1</version></plugin></plugins>
</build>
步骤2: 执行打包:
在idea点击package进行打包
可以在编译的target文件中查看jar包
步骤3:启动命令和参数:
`java -jar`命令用于在Java环境中执行可执行的JAR文件。下面是关于`java -jar`命令的说明:
```XML
命令格式:java -jar [选项] [参数] <jar文件名>
```
1. `-D<name>=<value>`:设置系统属性,可以通过`System.getProperty()`方法在应用程序中获取该属性值。例如:`java -jar -Dserver.port=8080 myapp.jar`。
2. `-X`:设置JVM参数,例如内存大小、垃圾回收策略等。常用的选项包括:
- `-Xmx<size>`:设置JVM的最大堆内存大小,例如 `-Xmx512m` 表示设置最大堆内存为512MB。
- `-Xms<size>`:设置JVM的初始堆内存大小,例如 `-Xms256m` 表示设置初始堆内存为256MB。
3. `-Dspring.profiles.active=<profile>`:指定Spring Boot的激活配置文件,可以通过`application-<profile>.properties`或`application-<profile>.yml`文件来加载相应的配置。例如:`java -jar -Dspring.profiles.active=dev myapp.jar`。
步骤4:测试:命令参数:java -jar springboot-mybatis-07-1.0-SNAPSHOT.jar