【Git】Linux-ubuntu 22.04 初步认识 -> 安装 -> 基础操作
文章目录
- Git 初识
- Git 安装
- Linux-centos
- Linux-ubuntu
- Windows
- Git 基本操作
- 配置 Git
- 认识工作区、暂存区、版本库
- 添加文件 -- 场景一
- 查看 .git 文件
- 添加文件 -- 场景二
- 修改文件
- 版本回退
- 撤销修改
- 情况一:对于工作区的代码,还没有 add
- 情况二:已经 add ,但没有 commit
- 情况三:已经 add ,并且也 commit 了
- 删除文件
Git 初识
提出问题
不知道你工作或学习时,有没有遇到这样的情况:我们在编写各种文档时,为了防止文档丢失,更改失误,失误后能恢复到原来的版本,不得不复制出一个副本,比如:
“报告-v1”
“报告-v2”
“报告-v3”
“报告-确定版”
“报告-最终版”
“报告-究极进化版”
…
每个版本有各自的内容,但最终会只有一份报告需要被我们使用 。
但在此之前的工作都需要这些不同版本的报告,于是每次都是复制粘贴副本,产出的文件就越来越多,文件多不是问题,问题是:随着版本数量的不断增多,你还记得这些版本各自都是修改了什么吗?
文档如此,我们写的项目代码,也是存在这个问题的!!
如何解决–版本控制器
为了能够更方便我们管理这些不同版本的文件,便有了版本控制器。所谓的版本控制器,就是能让你了解到一个文件的历史,以及它的发展过程的系统。通俗的讲就是一个可以记录工程的每一次改动和版本迭代的一个管理系统,同时也方便多人协同作业。
目前最主流的版本控制器就是 Git 。Git 可以控制电脑上所有格式的文件,例如 doc、excel、dwg、dgn、rvt等等。对于我们开发人员来说,Git 最重要的就是可以帮助我们管理软件开发项目中的源代码文件!
注意事项
还需要再明确⼀点,所有的版本控制系统,Git 也不例外,其实只能跟踪文本文件的改动,比如 TXT 文件,网页,所有的程序代码等等。版本控制系统可以告诉你每次的改动,比如在第5行加了一个单词 “Linux”,在第8行删了一个单词 “Windows”。 而图片、视频这些二进制文件,虽然也能由版本控制系统管理,但没法跟踪文件的变化,只能把⼆进制文件每次改动串起来,也就是只知道图片从100KB改成了120KB,但到底改了啥,版本控制系统不知道,也没法知道。
Git 安装
Git 是开放源代码的代码托管工具,最早是在Linux下开发的。开始也只能应用于Linux平台,后面慢慢的被移植到windows下,现在,Git可以在Linux、Unix、Mac和Windows这几大平台上正常运行了。
Linux-centos
如果你的的平台是centos,安装git相当简单,以我的centos7.6为例:
首先,你可以试着输入Git,看看系统有没有安装Git:
$ git-bash: git: command not found
出现像上面的结果,Linux会友好地告诉你Git没有安装。
安装 Git:
$ sudo yum -y install git
查看 Git 安装的版本:
$ git --version
Linux-ubuntu
如果你的的平台是ubuntu,安装git相当简单,以我的ubuntu22.04为例:
首先,你可以试着输入git,看看系统有没有安装Git:
$ gitCommand 'git' not found, but can be installed with:sudo apt install git
出现像上面的结果,Linux会友好地告诉你Git没有安装,还会告诉你如何安装Git。
安装 Git:
$ sudo apt-get install git -y
查看 git 安装的版本:
$ git --version
Windows
参考链接: Windows安装Git-点击即可https://www.bilibili.com/video
Git 基本操作
创建 Git 本地仓库
要提前说的是,仓库是进行版本控制的一个文件目录。我们要想对文件进行版本控制,就必须先创建一个仓库出来。
创建一个 Git 本地仓库对应的命令为 git init ,注意命令要在文件目录下执行,例如:
[root@MyComputer:~]# mkdir gitcode
[root@MyComputer:~]# cd gitcode
[root@MyComputer:gitcode]# pwd
/root/gitcode
[root@MyComputer:gitcode]# git init
hint: Using 'master' as the name for the initial branch. This default branch name
hint: is subject to change. To configure the initial branch name to use in all
hint: of your new repositories, which will suppress this warning, call:
hint:
hint:   git config --global init.defaultBranch <name>
hint:
hint: Names commonly chosen instead of 'master' are 'main', 'trunk' and
hint: 'development'. The just-created branch can be renamed via this command:
hint:
hint:   git branch -m <name>
Initialized empty Git repository in /root/gitcode/.git/
[root@MyComputer:gitcode]# ll -a
total 12
drwxr-xr-x  3 root root 4096 Jul 27 23:30 ./
drwx------ 14 root root 4096 Jul 27 23:30 ../
drwxr-xr-x  7 root root 4096 Jul 27 23:30 .git/
我们发现,当前目录下多了一个 .git 的隐藏文件, .git 目录是 Git 来跟踪管理仓库的,不要手动修改这个目录里面的文件,不然改乱了,就把 Git 仓库给破坏了。
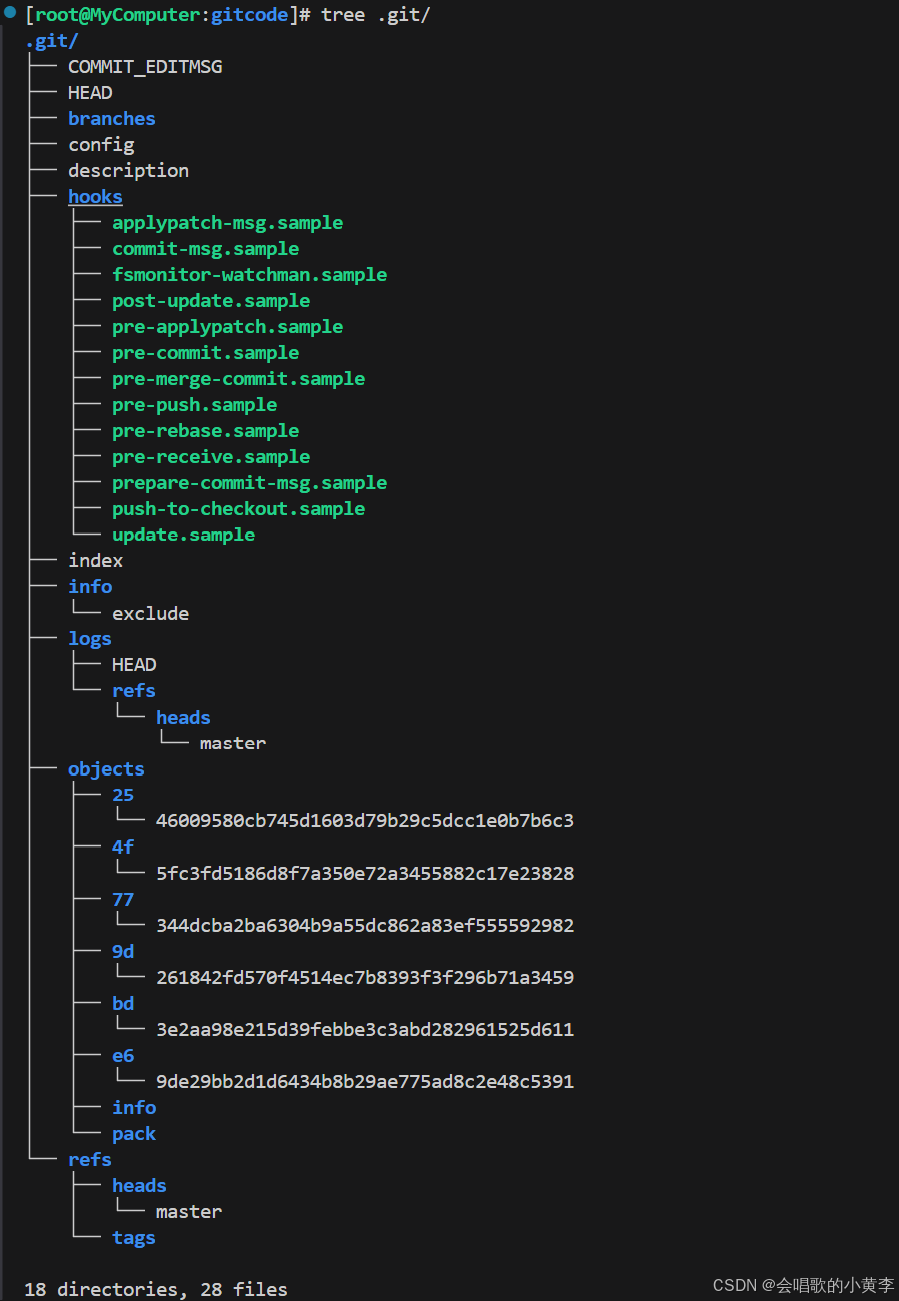
其中包含 Git 仓库的诸多细节,有兴趣的同学可以进入看看。
[root@MyComputer:gitcode]# tree .git/
.git/
├── HEAD
├── branches
├── config
├── description
├── hooks
│   ├── applypatch-msg.sample
│   ├── commit-msg.sample
│   ├── fsmonitor-watchman.sample
│   ├── post-update.sample
│   ├── pre-applypatch.sample
│   ├── pre-commit.sample
│   ├── pre-merge-commit.sample
│   ├── pre-push.sample
│   ├── pre-rebase.sample
│   ├── pre-receive.sample
│   ├── prepare-commit-msg.sample
│   ├── push-to-checkout.sample
│   └── update.sample
├── info
│   └── exclude
├── objects
│   ├── info
│   └── pack
└── refs├── heads└── tags
配置 Git
当安装 Git 后首先要做的事情是设置你的 用户名称 和 e-mail 地址,这是非常重要的。配置命令为:
git config [--global] user.name "Your Name"git config [--global] user.email "email@example.com"# 把 Your Name 改成你的昵称# 把 email@example.com 改成邮箱的格式,只要格式正确即可。
查看配置命令为:
git config -l
删除对应的配置命令为:
git config [--global] --unset user.namegit config [--global] --unset user.email
[root@MyComputer:gitcode]# git config user.name "lwz" //配置你的名字
[root@MyComputer:gitcode]# git config user.email "2244514959@qq.com"  //配置你的邮箱
[root@MyComputer:gitcode]# git config -l  //查看配置
core.repositoryformatversion=0
core.filemode=true
core.bare=false
core.logallrefupdates=true
user.name=lwz
user.email=2244514959@qq.com
[root@MyComputer:gitcode]# git config --unset user.name //重置你的名字
[root@MyComputer:gitcode]# git config --unset user.email //重置你的邮箱
[root@MyComputer:gitcode]# git config -l //查看配置
core.repositoryformatversion=0
core.filemode=true
core.bare=false
core.logallrefupdates=true
[root@MyComputer:gitcode]# git config --global user.email "2244514959@qq.com"
[root@MyComputer:gitcode]# git config --global user.name "lwz"
[root@MyComputer:gitcode]# git config -l
user.email=2244514959@qq.com
user.name=lwz
core.repositoryformatversion=0
core.filemode=true
core.bare=false
core.logallrefupdates=true
[root@MyComputer:gitcode]# git config --global --unset user.email
[root@MyComputer:gitcode]# git config --global --unset user.name
[root@MyComputer:gitcode]# git config -l
core.repositoryformatversion=0
core.filemode=true
core.bare=false
core.logallrefupdates=true
其中 --global 是⼀个可选项。如果使用了该选项,表示这台机器上所有的 Git 仓库都会使用这个配置。如果你希望在不同仓库中使用不同的 name 或 e-mail ,可以不要 --global 选项,但要注意的是,执行命令时必须要在仓库里。
认识工作区、暂存区、版本库
- 工作区:是在电脑上你要写代码或文件的目录。
- 暂存区:英文叫 stage 或 index。一般存放在 .git 目录下的 index 文件(.git/index)中,我们把暂存区有时也叫作索引(index)。
- 版本库:又名仓库,英文名 repository 。工作区有一个隐藏目录 .git ,它不算工作区,而是 Git 的版本库。这个版本库里面的所有文件都可以被 Git管理起来,每个文件的修改、删除,Git都能跟踪,以便任何时刻都可以追踪历史,或者在将来某个时刻可以“还原”。
注意!!!!!!这句话一定要看!!!!!!!!!根据上面这个版本库的定义,我们在这一篇文章中就可以看待成 本地仓库 == 版本库 == .git 目录
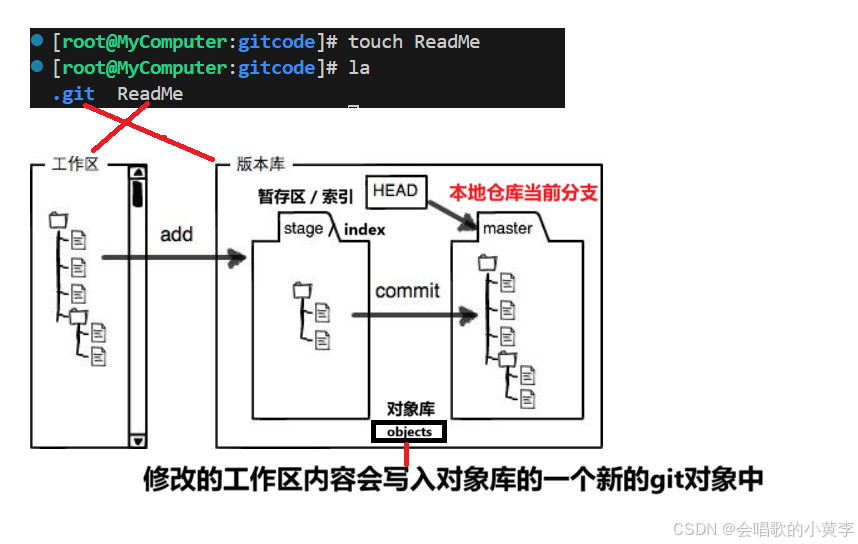
下面这个图展示了工作区、暂存区和版本库之间的关系:
-
图中左侧为工作区,右侧为版本库。Git 的版本库里存了很多东西,其中最重要的就是暂存区。
-
在创建 Git 版本库时,Git 会为我们自动创建一个唯一的 master 分支,以及指向 master 的一个指针叫HEAD。
-
当对工作区修改(新增、修改、删除)的文件执行
git add命令时,暂存区目录树的文件索引会被更新。 -
当执行提交操作
git commit时,master 分支会做相应的更新,也就是将暂存区的内容提交到版本库的master分支,可以简单理解为暂存区的目录树才会被真正写到版本库中。
由上述描述我们便能得知:通过新建或粘贴进目录的文件,并不能称之为向仓库中新增文件,而只是在工作区新增了文件。必须要通过使用 git add 和 git commit 命令才能将文件添加到版本库中进行管理!!!
添加文件 – 场景一
在包含 .git 的目录下新建一个 ReadMe 文件,我们可以使用 git add 命令可以将文件添加到暂存区:
- 添加一个或多个文件到暂存区: git add [file1] [file2] …
- 添加指定目录到暂存区,包括子目录: git add [dir]
- 添加当前目录下的所有文件改动到暂存区: git add .
再使用 git commit 命令将暂存区内容添加到版本库中:
- 提交暂存区全部内容到版本库中: git commit -m “message”
- 提交暂存区的指定文件到版本库中: git commit [file1] [file2] … -m “message”
注意 git commit 后面的 -m 选项,要跟上描述本次提交的 message,由用户自己完成,这部分内容绝对不能省略,并要好好描述,是用来记录你的提交细节,是给我们人看的。
例如:
[root@MyComputer:gitcode]# vim ReadMe
[root@MyComputer:gitcode]# cat ReadMe
Hello lwz
Hello lwz
[root@MyComputer:gitcode]# git add ReadMe
[root@MyComputer:gitcode]# git commit -m "commit my first file"
[master (root-commit) 77344dc] commit my first file1 file changed, 2 insertions(+)create mode 100644 ReadMe
git commit 命令执行成功后会告诉我们,1个文件被改动(就是我们新添加的ReadMe文件),插入了两行内容(ReadMe有两行内容)。
我们还可以多次 add 不同的文件,而只 commit 一次便可以提交所有文件,是因为需要提交的文件是通通被 add 到暂存区中,然后一次性 commit 暂存区的所有修改。如:
[root@MyComputer:gitcode]# touch file1 file2 file3
[root@MyComputer:gitcode]# git add file1 file2 file3
[root@MyComputer:gitcode]# git commit -m "add 3 file"
[master bd3e2aa] add 3 file3 files changed, 0 insertions(+), 0 deletions(-)create mode 100644 file1create mode 100644 file2create mode 100644 file3
截至目前为止,我们已经更够将代码直接提交至版本库了。我们可以使用 git log 命令,来查看下历史提交记录:
[root@MyComputer:gitcode]# git log
commit bd3e2aa98e215d39febbe3c3abd282961525d611 (HEAD -> master)
Author: lwz <2244514959@qq.com>
Date:   Mon Jul 28 10:26:00 2025 +0800add 3 filecommit 77344dcba2ba6304b9a55dc862a83ef555592982
Author: lwz <2244514959@qq.com>
Date:   Mon Jul 28 10:23:31 2025 +0800commit my first file
如果这里不退出,最后一行就一个冒号,在英文输入状态下,按 q键即可。
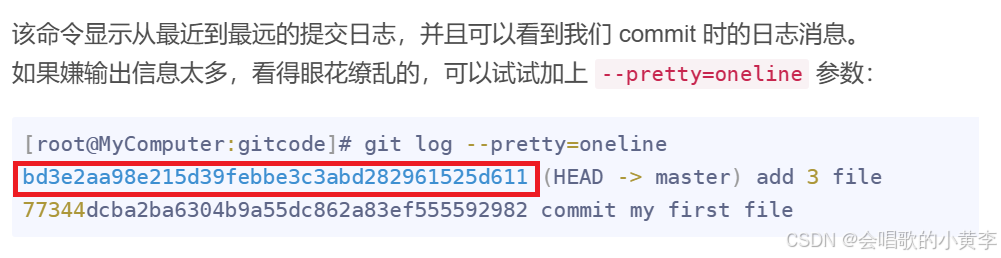
该命令显示从最近到最远的提交日志,并且可以看到我们 commit 时的日志消息。
如果嫌输出信息太多,看得眼花缭乱的,可以试试加上 --pretty=oneline 参数:
[root@MyComputer:gitcode]# git log --pretty=oneline
bd3e2aa98e215d39febbe3c3abd282961525d611 (HEAD -> master) add 3 file
77344dcba2ba6304b9a55dc862a83ef555592982 commit my first file
需要说明的是,我们看到的一大串类似 23807c5…56eed6 的是每次提交的 commit id (版本号),Git 的commit id 不是1,2,3……递增的数字,而是一个 SHA1 计算出来的一个非常大的数字,用十六进制表示(你看到的 commit id 和我的肯定不⼀样,以你自己的为准哦)
查看 .git 文件
先来看看我们的 .git 的目录结构:
- index 就是我们的暂存区,add 后的内容都是添加到这里的。
- HEAD 就是我们的默认指向 master 分支的指针:
[root@MyComputer:gitcode]# cat .git/HEAD
ref: refs/heads/master
而默认的 master 分支,其实就是: 细心的人就知道这是什么了,往上翻一下就看到了,保存的就是当前最新的 commit id 。
[root@MyComputer:gitcode]# cat .git/refs/heads/master
bd3e2aa98e215d39febbe3c3abd282961525d611
- objects 为 Git 的对象库,里面包含了创建的各种版本库对象及内容。当执行
git add命令时,暂存区的目录树被更新,同时工作区修改(新增、修改、删除)的文件内容被写入到对象库中的一个新的对象中,就位于 “.git/objects” 目录下,让我们来看看这些对象有何用处:
[root@MyComputer:gitcode]# ls .git/objects/
25  4f  77  9d  bd  e6  info  pack
查找 object 时要将 commit id 分成2部分,其前2位是文件夹名称,后38位是文件名称。
找到这个文件之后,一般不能直接看到里面是什么,该类文件是经过 sha (安全哈希算法)加密过的文件,好在我们可以使用 git cat-file 命令来查看版本库对象的内容,后面跟一个-p选项指的是打印出来的内容更优雅,更好看,其实就是-pretty:
[root@MyComputer:gitcode]# git cat-file -p bd3e2aa98e215d39febbe3c3abd282961525d611
tree 2546009580cb745d1603d79b29c5dcc1e0b7b6c3
parent 77344dcba2ba6304b9a55dc862a83ef555592982
author lwz <2244514959@qq.com> 1753669560 +0800
committer lwz <2244514959@qq.com> 1753669560 +0800add 3 file # 这就是我们最近一次的提交!
其中,还有一行 tree 2546009580cb745d1603d79b29c5dcc1e0b7b6c3 ,我们使用同样的方法,看看结果:
[root@MyComputer:gitcode]# git cat-file -p 2546009580cb745d1603d79b29c5dcc1e0b7b6c3
100644 blob 9d261842fd570f4514ec7b8393f3f296b71a3459    ReadMe
100644 blob e69de29bb2d1d6434b8b29ae775ad8c2e48c5391    file1
100644 blob e69de29bb2d1d6434b8b29ae775ad8c2e48c5391    file2
100644 blob e69de29bb2d1d6434b8b29ae775ad8c2e48c5391    file3
在看 ReadMe 对应的 9d261842fd570f4514ec7b8393f3f296b71a3459 :
[root@MyComputer:gitcode]# git cat-file -p 9d261842fd570f4514ec7b8393f3f296b71a3459
Hello lwz
Hello lwz
# 这是我们对ReadMe做的修改!!被git记录了下来!!
总结一下,在本地的 git 仓库中,有几个文件或者目录很特殊:
- index: 暂存区,
git add后会更新该内容。 - HEAD: 默认指向 master 分支的一个指针。
refs/heads/master: 文件里保存当前 master 分支的最新 commit id 。- objects: 包含了创建的各种版本库对象及内容,可以简单理解为放了 git 维护的所有修改。
后面再学习过程中,最好能将常见的 git 操作与 .git 目录当中的结构内容变化对应起来,这样有利于我们理解git 细节流程。我们后面还会学习什么分支,标签什么的,那我想后面就应该学习对应着研究了!
添加文件 – 场景二
学习到这里,我们已经清楚了如何向版本库中添加文件,并且对于工作区、暂存区、版本库也有了一定的认识。那么我们再展示一种添加文件的场景,能加深对工作区、暂存区、版本库的理解,示例如下:
[root@MyComputer:gitcode]# touch file6
[root@MyComputer:gitcode]# git add file6
[root@MyComputer:gitcode]# touch file7
[root@MyComputer:gitcode]# git commit -m "add new file"
[master b26397e] add new file1 file changed, 0 insertions(+), 0 deletions(-)create mode 100644 file6
提交后发现打印了 1 file changed, 0 insertions(+), 0 deletions(-) ,意思是只有一个文件改变了,这时我们提出了疑问,不是新增了两个文件吗?
再来回忆下, git add 是将文件添加到暂存区, git commit 是将暂存区的内容添加到版本库中。由于我们并没有使用 git add file7 ,file7 就不在暂存区中维护,所以我们 commit 的时候其实只是把已经在暂存区的 file6 提交了,而遗漏了工作区的 file7。如何提交 file7 呢?很简单,再次add , commit 即可。
[root@MyComputer:gitcode]# git add file7
[root@MyComputer:gitcode]# git commit -m "add file7"
[master fa52354] add file71 file changed, 0 insertions(+), 0 deletions(-)create mode 100644 file7
修改文件
Git 比其他版本控制系统设计得优秀,因为 Git 跟踪并管理的是修改,而非文件。
什么是修改?比如你新增了一行,这就是一个修改,删除了一行,也是一个修改,更改了某些字符,也是一个修改,删了一些又加了一些,也是一个修改,甚至创建一个新文件,也算一个修改。
让我们将 ReadMe 文件进行一次修改:
[root@MyComputer:gitcode]# vim ReadMe
[root@MyComputer:gitcode]# cat ReadMe
Hello lwz
Hello lwz
Hello world!!!!
此时,版本库中的 ReadMe 和我们工作区的 ReadMe 是不同的,如何查看版本库的状态呢?
git status 命令用于查看在你上次提交之后是否有对文件进行再次修改。
[root@MyComputer:gitcode]# git status
On branch master
Changes not staged for commit:(use "git add <file>..." to update what will be committed)(use "git restore <file>..." to discard changes in working directory)modified:   ReadMeno changes added to commit (use "git add" and/or "git commit -a")
上面的结果告诉我们,ReadMe 被修改过了,但还没有完成添加与提交。
目前,我们只知道文件被修改了,如果能知道具体哪些地方被修改了,就更好了。有人就会说,我刚改的我知道呀!可是,你还记得你三天前写了什么代码吗?或者没写?
[root@MyComputer:gitcode]# git diff ReadMe
diff --git a/ReadMe b/ReadMe
index 9d26184..ee54fe7 100644
--- a/ReadMe                       # 原始文件
+++ b/ReadMe                       # 修改后文件
@@ -1,2 +1,3 @@                 # 原始文件第1行开始的2行 → 修改后第1行开始的3行Hello lwz                        # 未修改行Hello lwz                        # 未修改行
+Hello world!!!!                  # 新增行
git diff [file] 命令用来显示暂存区和工作区文件的差异,显示的格式正是Unix通用的diff格式。也可以使用 git diff HEAD -- [file] 命令来查看版本库和工作区文件的区别。
知道了对 ReadMe 做了什么修改后,再把它提交到本地仓库就放心多了。
git add 之后,就没有看到上面 no changes added to commit (use “git add” and/or “git commit -a”) 的消息了。接下来让我们继续 git commit 即可:
[root@MyComputer:gitcode]# git add ReadMe
[root@MyComputer:gitcode]# git status
On branch master
Changes to be committed:(use "git restore --staged <file>..." to unstage)modified:   ReadMe[root@MyComputer:gitcode]# git commit -m "Modify ReadMe"
[master 59ac2b9] Modify ReadMe1 file changed, 1 insertion(+)
[root@MyComputer:gitcode]# git status
On branch master
nothing to commit, working tree clean
版本回退
之前我们也提到过,Git 能够管理文件的历史版本,这也是版本控制器重要的能力。如果有一天你发现之前的工作做的出现了很大的问题,需要在某个特定的历史版本重新开始,这个时候,就需要版本回退的功能了。
执行 git reset 命令用于回退版本,可以指定退回某一次提交的版本。要解释一下“回退”本质是要将版本库中的内容进行回退,工作区或暂存区是否回退由命令参数决定:
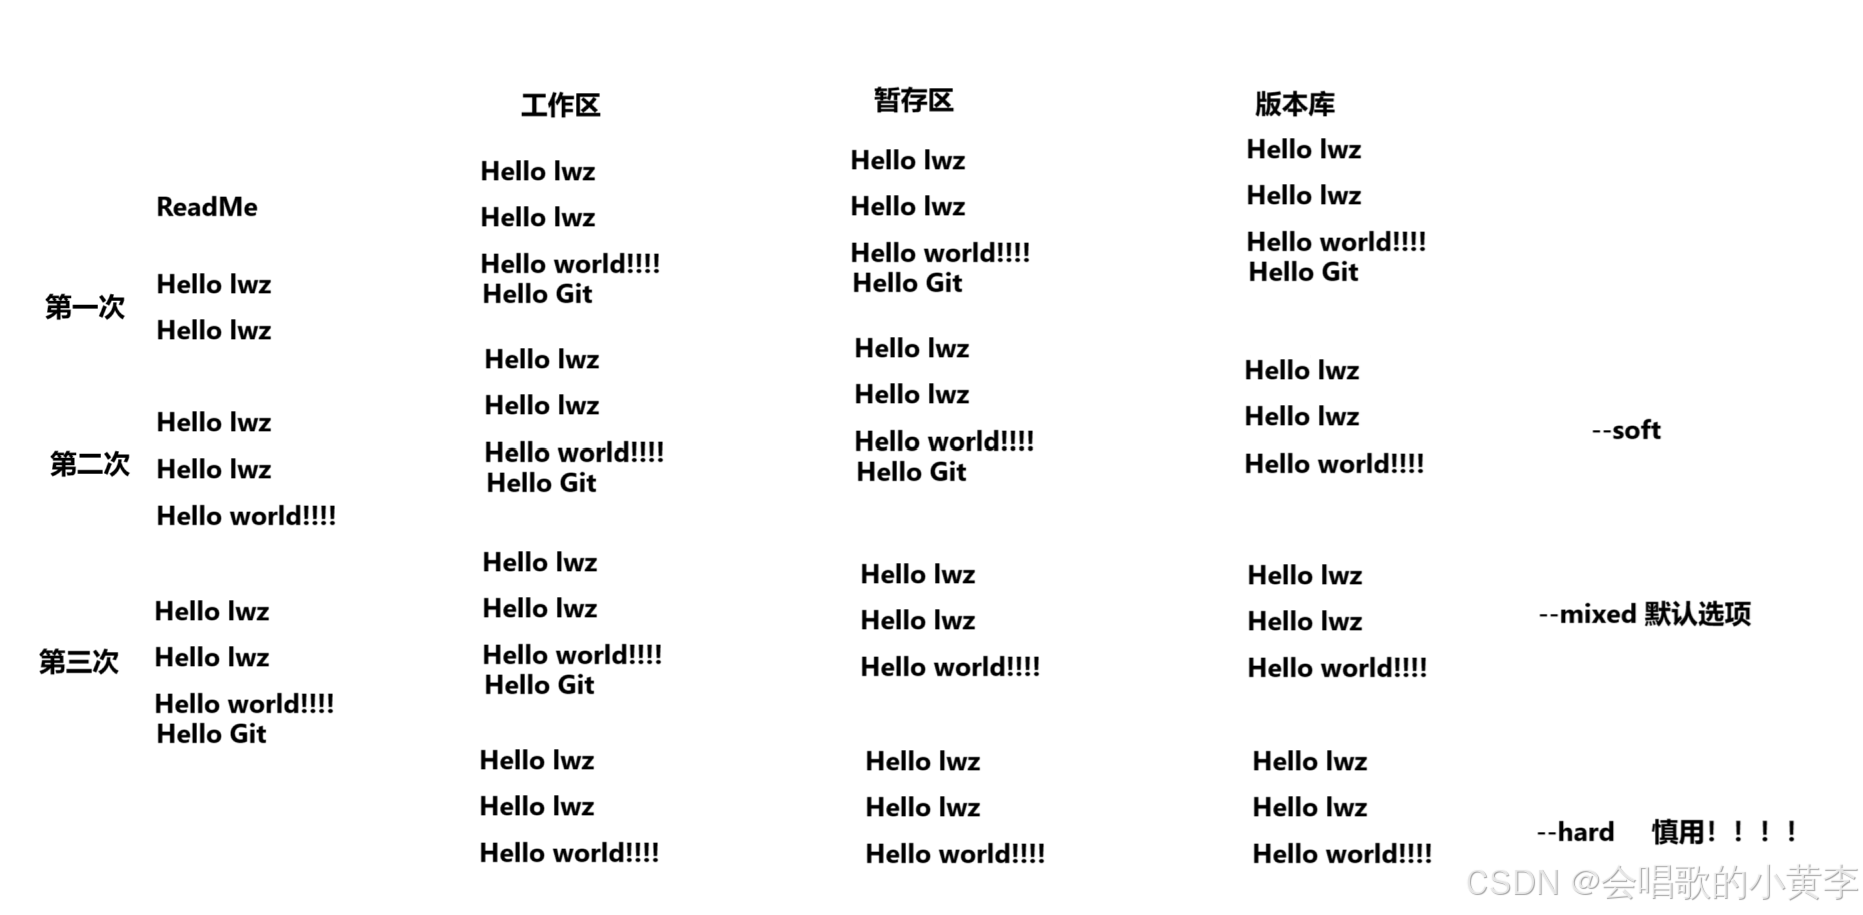
git reset 命令语法格式为: git reset [--soft | --mixed | --hard] [HEAD]
-
–mixed 为默认选项,使用时可以不用带该参数。该参数将暂存区的内容退回为指定提交版本内容,工作区文件保持不变。
-
–soft 参数对于工作区和暂存区的内容都不变,只是将版本库回退到某个指定版本。
-
–hard 参数将暂存区与工作区都退回到指定版本。切记工作区有未提交的代码时不要用这个命令,因为工作区会回滚,你没有提交的代码就再也找不回了,所以使用该参数前一定要慎重。
-
HEAD 说明:
◦ 可直接写成 commit id,表示指定退回的版本
◦ HEAD 表示当前版本
◦ HEAD^ 上一个版本
◦ HEAD^^ 上上一个版本
◦ 以此类推… -
可以使用 〜数字表示:
◦ HEAD~0 表示当前版本
◦ HEAD~1 上一个版本
◦ HEAD^2 上上一个版本
◦ 以此类推…
为了便于表述,方便测试回退功能,我们先做一些准备工作:更新3个版本的 ReadMe,并分别进行3次提交,如下所示:
[root@MyComputer:gitcode]# git add ReadMe
[root@MyComputer:gitcode]# git commit -m "add version1"
[master b1daad2] add version11 file changed, 1 insertion(+)
[root@MyComputer:gitcode]# vim ReadMe
[root@MyComputer:gitcode]# git add ReadMe
[root@MyComputer:gitcode]# git commit -m "add version2"
[master 8d1af5b] add version21 file changed, 1 insertion(+)
[root@MyComputer:gitcode]# vim ReadMe
[root@MyComputer:gitcode]# git add ReadMe
[root@MyComputer:gitcode]# git commit -m "add version3"
[master d68ea84] add version31 file changed, 1 insertion(+)
[root@MyComputer:gitcode]# git log --pretty=oneline
d68ea84a1142d3d517478ff5715b428a5d32657d (HEAD -> master) add version3
8d1af5b1c416062bbf068fa904b83e7dd71edbc7 add version2
b1daad2ede33dd5fdb39fffe4b29383103eacdf4 add version1
现在,如果我们在提交完 version3 后, 发现 version3 编写错误,想回退到 version2,重新基于 version2 开始编写。由于我们在这里希望的是将工作区的内容也回退到 version2 版本,所以需要用到 --hard 参数,示例如下:
[root@MyComputer:gitcode]# git reset --hard 8d1af5b1c416062bbf068fa904b83e7dd71edbc7
HEAD is now at 8d1af5b add version2
我们惊奇的发现,此时 ReadMe 文件的内容,已经回退到 version2 了!,当前,我们再次用 git log 查看一下提交日志,发现 HEAD 指向了version2,如下所示:
[root@MyComputer:gitcode]# git log --pretty=oneline
8d1af5b1c416062bbf068fa904b83e7dd71edbc7 (HEAD -> master) add version2
b1daad2ede33dd5fdb39fffe4b29383103eacdf4 add version1
到这里一般回退功能就演示完了,但现在如果我后悔了,想再回到 version 3 怎么办?
我们可以继续使用 git reset 命令,回退到 version3 版本,但我们必须要拿到 version 3 的 commit id 去指定回退的版本。
但我们看到了 git log 并不能打印出 version3 的 commit id ,运气好的话我们可以从终端上去找找之前的记录,运气不好的话 commit id 已经被我们搞丢了。
Git 还提供了一个 git reflog 命令能补救一下,该命令用来记录本地的每一次命令。
8d1af5b (HEAD -> master) HEAD@{0}: reset: moving to 8d1af5b1c416062bbf068fa904b83e7dd71edbc7
d68ea84 HEAD@{1}: commit: add version3
8d1af5b (HEAD -> master) HEAD@{2}: commit: add version2
b1daad2 HEAD@{3}: commit: add version1
这样,你就可以很方便的找到你的所有操作记录了,但 d68ea84 这个是啥东西?
这个是 version3 的 commit id 的部分。没错,Git 版本回退的时候,也可以使用部分 commit id 来代表目标版本。示例如下:
# 退回到version3
[root@MyComputer:gitcode]# git reset --hard d68ea84
HEAD is now at d68ea84 add version3
# 查看log
[root@MyComputer:gitcode]# git log --pretty=oneline
d68ea84a1142d3d517478ff5715b428a5d32657d (HEAD -> master) add version3
8d1af5b1c416062bbf068fa904b83e7dd71edbc7 add version2
b1daad2ede33dd5fdb39fffe4b29383103eacdf4 add version1
可往往是理想很丰满,现实很骨感。在实际开发中,由于长时间的开发了,导致 commit id 早就找不到了,可突然某一天,我又想回退到 version3,那该如何操作呢?貌似现在不可能了。。。
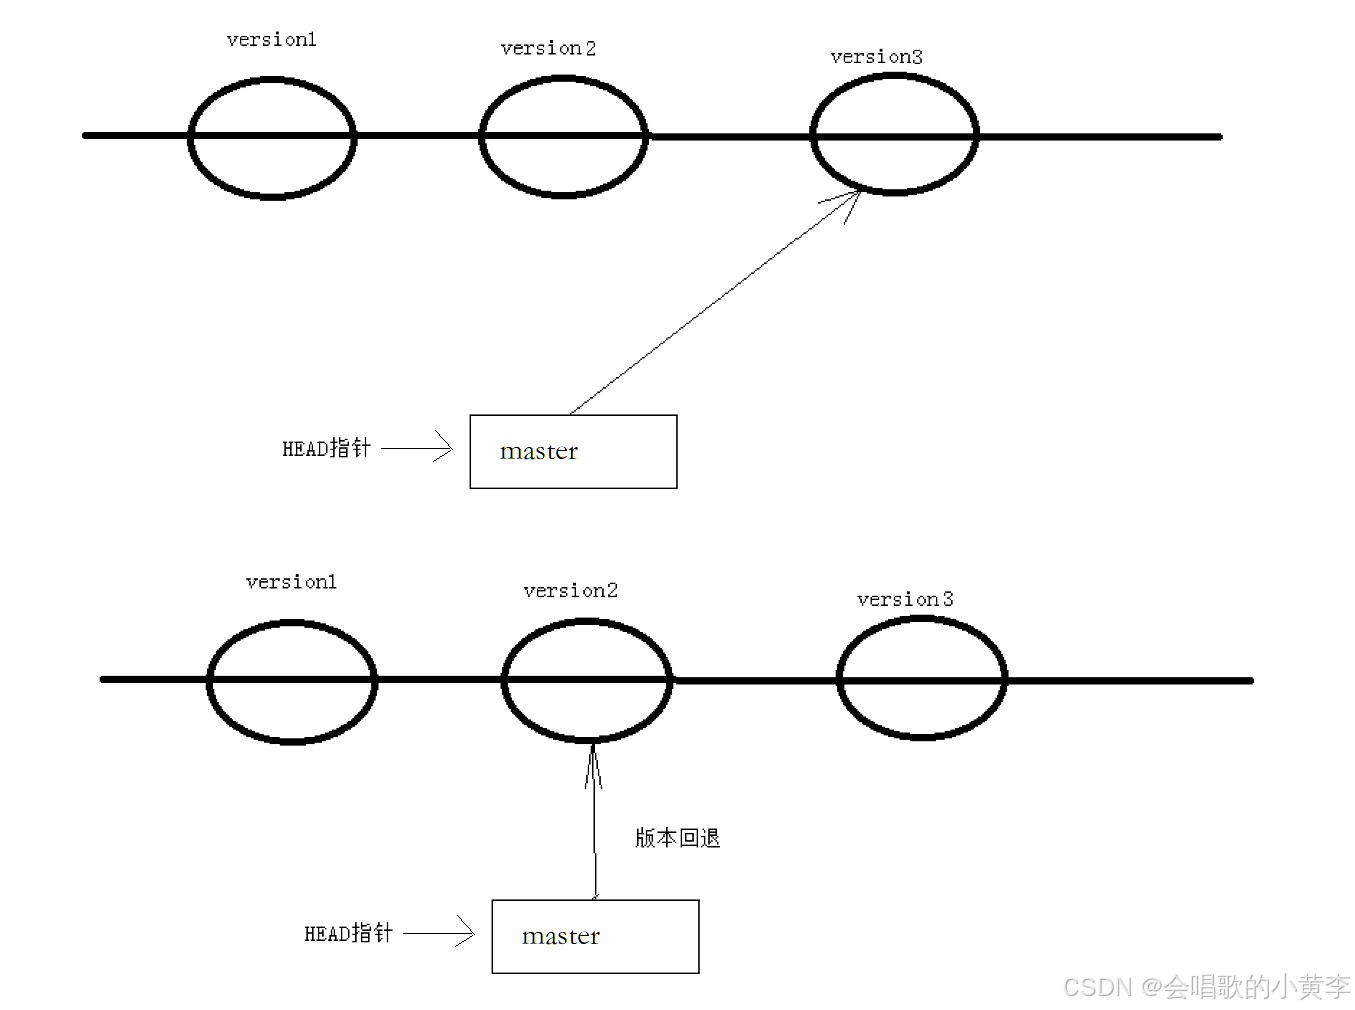
值得说的是,Git 的版本回退速度非常快,因为 Git 在内部有个指向当前分支(此处是master)的 HEAD 指针, refs/heads/master 文件里保存当前 master 分支的最新 commit id 。当我们在回退版本的时候,Git 仅仅是给 refs/heads/master 中存储一个特定的version,可以简单理解成如下示意图:
撤销修改
如果我们在我们的工作区写了很长时间代码,越写越写不下上一个版本。
情况一:对于工作区的代码,还没有 add
你当然可以直接删掉你目前在工作区新增的代码,像这样:
[root@MyComputer:gitcode]# git status
On branch master
nothing to commit, working tree clean
[root@MyComputer:gitcode]# vim ReadMe
[root@MyComputer:gitcode]# cat ReadMe
Hello lwz
Hello lwz
Hello world!!!!
Hello Git
Hello version1
Hello version2
Hello version3
This piece of code is like shit #新增代码
[root@MyComputer:gitcode]#  git status
On branch master
Changes not staged for commit:(use "git add <file>..." to update what will be committed)(use "git restore <file>..." to discard changes in working directory)modified:   ReadMeno changes added to commit (use "git add" and/or "git commit -a")# 直接删除代码
[root@MyComputer:gitcode]# vim ReadMe
[root@MyComputer:gitcode]# cat ReadMe
Hello lwz
Hello lwz
Hello world!!!!
Hello Git
Hello version1
Hello version2
Hello version3
[root@MyComputer:gitcode]# git status
On branch master
nothing to commit, working tree clean
幸亏我们工作效率不高,才写了一行代码就发现不行了,要是你写了3天,一直都没有提交,该怎么删掉呢?你自己都忘了自己新增过哪些,有人会说,我可以 git diff xxx 一下,看看差别在删啊,那你肯定又要花3天时间删代码了,并且很大的概率还会改出bug。一周过去了,你怎么向你的老板交代呢?
Git 其实还为我们提供了更好的方式,我们可以使用 git checkout -- [file] 命令让工作区的文件回到最近一次 add 或 commit 时的状态。 要注意 git checkout -- [file] 命令中的 -- 很重要,切记不要省略,一旦省略,该命令就变为其他意思了,后面我们再说。示例如下:
[root@MyComputer:gitcode]# cat ReadMe
Hello lwz
Hello lwz
Hello world!!!!
Hello Git
Hello version1
Hello version2
Hello version3
This piece of code is like shit #新增代码# 恢复到上一次 add 或 commit
[root@MyComputer:gitcode]# git checkout -- ReadMe
[root@MyComputer:gitcode]# cat ReadMe
Hello lwz
Hello lwz
Hello world!!!!
Hello Git
Hello version1
Hello version2
Hello version3
情况二:已经 add ,但没有 commit
add 后还是保存到了暂存区呢?怎么撤销呢?
[root@MyComputer:gitcode]# vim ReadMe
[root@MyComputer:gitcode]# cat ReadMe
Hello lwz
Hello lwz
Hello world!!!!
Hello Git
Hello version1
Hello version2
Hello version3
This piece of code is like shit #新增代码# add 存⼊暂存区
[root@MyComputer:gitcode]# git add ReadMe
[root@MyComputer:gitcode]# git status
On branch master
Changes to be committed:(use "git restore --staged <file>..." to unstage)modified:   ReadMe
让我们来回忆一下学过的 git reset 回退命令,该命令如果使用 --mixed 参数,可以将暂存区的内容退回为指定的版本内容,但工作区文件保持不变。那我们就可以回退下暂存区的内容了!!!示例如下:
这个git reset HEAD ReadMe命令作用:
- 取消暂存:如果之前使用 git add ReadMe 将 ReadMe 文件添加到了暂存区(stage/index),执行 git reset HEAD ReadMe 后,该文件会从暂存区中移除。
- 工作目录不受影响:此命令仅修改暂存区,不会改变工作目录中的文件内容。因此,对 ReadMe 文件的修改仍然存在,只是不再处于待提交状态。
注意哦,HEAD:表示当前分支master的最新提交。
# --mixed 是默认参数,使用时可以省略
[root@MyComputer:gitcode]# git reset HEAD ReadMe
Unstaged changes after reset:
M       ReadMe
用 git status 查看一下,发现现在暂存区是干净的,工作区有修改。
[root@MyComputer:gitcode]# git status
On branch master
Changes not staged for commit:(use "git add <file>..." to update what will be committed)(use "git restore <file>..." to discard changes in working directory)modified:   ReadMeno changes added to commit (use "git add" and/or "git commit -a")
还记得如何丢弃工作区的修改吗?
[root@MyComputer:gitcode]# cat ReadMe
Hello lwz
Hello lwz
Hello world!!!!
Hello Git
Hello version1
Hello version2
Hello version3
This piece of code is like shit #新增代码[root@MyComputer:gitcode]# git checkout -- ReadMe[root@MyComputer:gitcode]# git status
On branch master
nothing to commit, working tree clean[root@MyComputer:gitcode]# cat ReadMe
Hello lwz
Hello lwz
Hello world!!!!
Hello Git
Hello version1
Hello version2
Hello version3
恢复了!
情况三:已经 add ,并且也 commit 了
不要担心,我们可以 git reset --hard HEAD^ 回退到上一个版本!不过,这是有条件的,就是你还没有把自己的本地仓库推送到远程仓库。还记得Git是分布式版本控制系统吗?我们后面会讲到远程仓库,一旦你推送到远程仓库,你就真的惨了……
[root@MyComputer:gitcode]# vim ReadMe
[root@MyComputer:gitcode]# cat ReadMe
Hello lwz
Hello lwz
Hello world!!!!
Hello Git
Hello version1
Hello version2
Hello version3
This piece of code is like shit #新增代码
[root@MyComputer:gitcode]# git add ReadMe
[root@MyComputer:gitcode]# git commit -m "test quash"
[master 084197a] test quash1 file changed, 1 insertion(+)
[root@MyComputer:gitcode]# git reset --hard HEAD^
HEAD is now at d68ea84 add version3
[root@MyComputer:gitcode]# cat ReadMe
Hello lwz
Hello lwz
Hello world!!!!
Hello Git
Hello version1
Hello version2
Hello version3
删除文件
在 Git 中,删除也是一个修改操作,我们实战一下, 如果要删除 file5 文件,怎么搞呢?如果你这样做了:
[root@MyComputer:gitcode]# la
.git  ReadMe  file1  file2  file3  file4  file5  file6  file7
[root@MyComputer:gitcode]# rm file5
[root@MyComputer:gitcode]# la
.git  ReadMe  file1  file2  file3  file4  file6  file7
但这样直接删除是没有用的,反而徒增烦恼, git status 命令会立刻告诉你哪些文件被删除了:
[root@MyComputer:gitcode]# git status
On branch master
Changes not staged for commit:(use "git add/rm <file>..." to update what will be committed)(use "git restore <file>..." to discard changes in working directory)deleted:    file5no changes added to commit (use "git add" and/or "git commit -a")
此时,工作区和版本库就不一致了,要删文件,目前除了要删工作区的文件,还要清除版本库的文件。
一般走到这里,有两种可能:
- 确实要从版本库中删除该文件
- 不小心删错了
对第二种情况,很明显误删,需要使用 git 来进行恢复,很简单,我们刚学过(删除也是修改):
[root@MyComputer:gitcode]# git checkout -- file5
[root@MyComputer:gitcode]# la
.git  ReadMe  file1  file2  file3  file4  file5  file6  file7
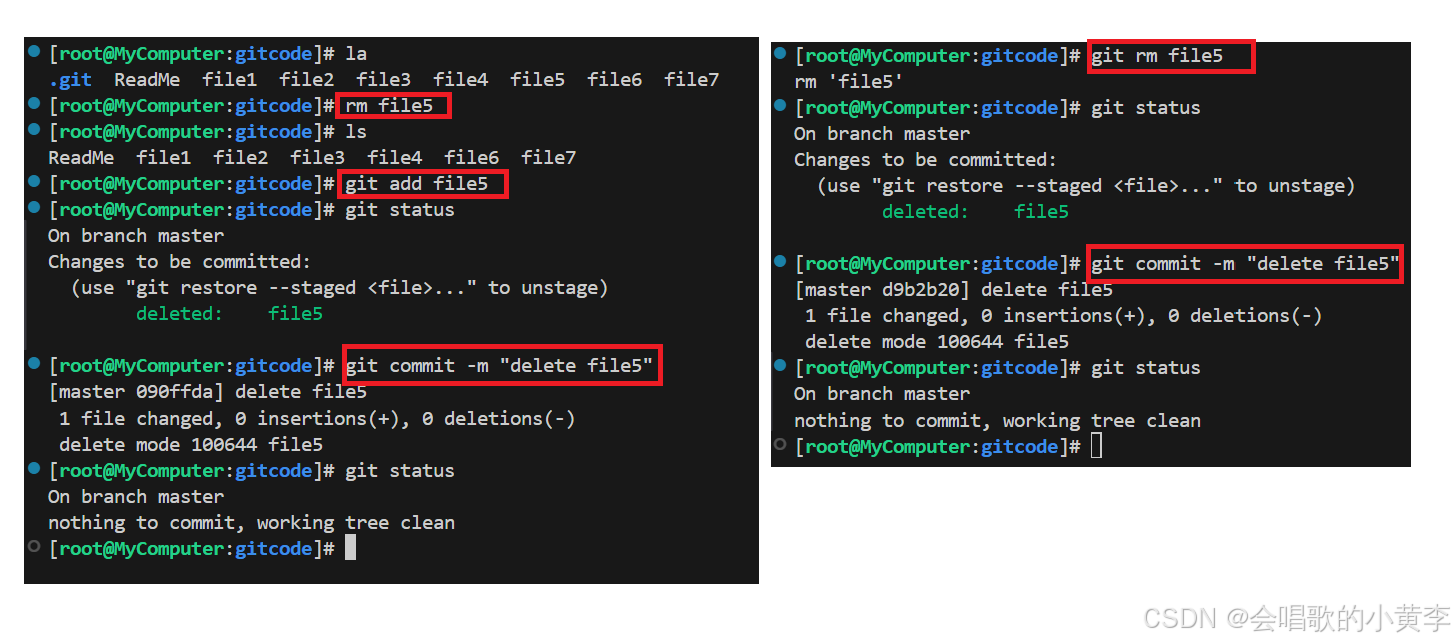
对于第一种情况,很明显是没有删完,我们只删除了工作区的文件。这时就需要使用 git rm 将文件从暂存区和工作区中删除,并且 commit :
[root@MyComputer:gitcode]# git rm file5
rm 'file5'
[root@MyComputer:gitcode]# git status
On branch master
Changes to be committed:(use "git restore --staged <file>..." to unstage)deleted:    file5[root@MyComputer:gitcode]# git commit -m "deleted file5"
[master fef2e2e] deleted file51 file changed, 0 insertions(+), 0 deletions(-)delete mode 100644 file5
[root@MyComputer:gitcode]# git status
On branch master
nothing to commit, working tree clean
现在,文件就从版本库中被删除了。
我们删除的本质就是将工作区、暂存区、版本库全部同步的内容全部删除,我们删除第一个方法就是要三步,第二种方法就是两步。所以更推荐第二种方法。