手写 Spring
01 - 原始版本的 IOC 容器
IOC 容器的作用是自动创建对象,降低系统间的耦合度
core
public interface Resource extends Iterator<Object>{
}
外部的配置信息都当成 Resource (资源)来进行抽象
public class ClassPathXmlResource implements Resource {Document document;Element rootElement;Iterator<Element> elementIterator;public ClassPathXmlResource(String fileName) {// 通过类加载器获取资源路径URL url = this.getClass().getClassLoader().getResource(fileName);try {SAXReader reader = new SAXReader();// 读取 xml 文件document = reader.read(url);rootElement = document.getRootElement();elementIterator = rootElement.elementIterator();} catch (DocumentException e) {throw new RuntimeException(e);}}@Overridepublic Object next() {return elementIterator.next();}@Overridepublic boolean hasNext() {return elementIterator.hasNext();}
}
从 xml 读取配置信息
beans
public class BeanDefinition {private String id;private String className;}
xml 配置信息在内存种对应的信息
public class XmlBeanDefinitionReader {BeanFactory beanFactory;public XmlBeanDefinitionReader(BeanFactory beanFactory) {this.beanFactory = beanFactory;}public void loadBeanDefinitions(Resource resource) {while (resource.hasNext()) {Element next = (Element) resource.next();String id = next.attributeValue("id");String className = next.attributeValue("className");beanFactory.registerBeanDefinition(new BeanDefinition(id, className));}}
}
解析 xml 里的配置信息,转换为 BeanDefinition
public interface BeanFactory {Object getBean(String beanName) throws NoSuchBeanDefinitionException, ClassNotFoundException;void registerBeanDefinition(BeanDefinition beanDefinition);
}
bean 工厂,用于创建 bean
public class SimpleBeanFactory implements BeanFactory {private List<BeanDefinition> beanDefinitions = new ArrayList<>();private List<String> beanNames = new ArrayList<>();private Map<String, Object> singletons = new HashMap<>();@Overridepublic Object getBean(String beanName) throws NoSuchBeanDefinitionException {Object object = singletons.get(beanName);if (object == null) {int i = beanNames.indexOf(beanName);if (i == -1) {throw new NoSuchBeanDefinitionException();}BeanDefinition beanDefinition = beanDefinitions.get(i);try {object = Class.forName(beanDefinition.getClassName()).newInstance();singletons.put(beanDefinition.getId(), object);} catch (InstantiationException | IllegalAccessException | ClassNotFoundException e) {throw new RuntimeException(e);}}return object;}@Overridepublic void registerBeanDefinition(BeanDefinition beanDefinition) {beanDefinitions.add(beanDefinition);beanNames.add(beanDefinition.getId());}
}
一个简单的 BeanFactoy 实现类
context
public class ClassPathXmlApplicationContext implements BeanFactory {BeanFactory beanFactory;public ClassPathXmlApplicationContext(String fileName) {// 抽象为资源Resource res = new ClassPathXmlResource(fileName);// bean 工厂BeanFactory bf = new SimpleBeanFactory();XmlBeanDefinitionReader reader = new XmlBeanDefinitionReader(bf);// 解析资源reader.loadBeanDefinitions(res);this.beanFactory = bf;}@Overridepublic Object getBean(String beanName) throws NoSuchBeanDefinitionException, ClassNotFoundException {return beanFactory.getBean(beanName);}@Overridepublic void registerBeanDefinition(BeanDefinition beanDefinition) {this.beanFactory.registerBeanDefinition(beanDefinition);}
}
02 - 扩展 Bean

03 - 依赖注入:如何给Bean注入值并解决循环依赖问题?
给 Bean 注入属性
<bean id="aservice" className="lbwxxc.com.minis.test.AServiceImpl"><constructor-arg type="String" name="name" value="abc"/><constructor-arg type="Integer" name="level" value="3"/><property type="String" name="property1" value="Someone says"/><property type="String" name="property2" value="Hello World!"/><property type="lbwxxc.com.minis.test.BaseService" name="ref1" ref="baseservice"/></bean>
设置 Bean
public class PropertyValue {private final String type;private final String name;private final Object value;private final boolean isRef;public PropertyValue(String type, String name, Object value, boolean isRef) {this.type = type;this.name = name;this.value = value;this.isRef = isRef;}public String getType() {return type;}public String getName() {return name;}public Object getValue() {return value;}public boolean isRef() {return isRef;}
}
属于对应 Java 的 实体类
public void loadBeanDefinitions(Resource resource) {while (resource.hasNext()) {Element element = (Element) resource.next();String id = element.attributeValue("id");String className = element.attributeValue("className");BeanDefinition beanDefinition = new BeanDefinition(id, className);List<Element> property = element.elements("property");ArrayList<String> refs = new ArrayList<>();PropertyValues PVS = new PropertyValues();for (Element propertyElement : property) {String pType = propertyElement.attributeValue("type");String pName = propertyElement.attributeValue("name");String pValue = propertyElement.attributeValue("value");// 属性是否为其它 BeanString ref = propertyElement.attributeValue("ref");String pV = "";boolean isRef = false;if (ref != null && !ref.isEmpty()) {pV = ref;isRef = true;refs.add(ref);} else {pV = pValue;}PVS.addPropertyValue(new PropertyValue(pType, pName, pV, isRef));}beanDefinition.setPropertyValues(PVS);// 依赖beanDefinition.setDependsOn(refs.toArray(new String[0]));List<Element> constructorArg = element.elements("constructor-arg");ArgumentValues AVS = new ArgumentValues();for (Element constructorArgElement : constructorArg) {String pType = constructorArgElement.attributeValue("type");String pName = constructorArgElement.attributeValue("name");String pValue = constructorArgElement.attributeValue("value");AVS.addArgumentValue(new ArgumentValue(pType, pName, pValue));}beanDefinition.setConstructorArgumentValues(AVS);beanFactory.registerBeanDefinition(beanDefinition);}}
// 设置属性private void handleProperties(BeanDefinition bd, Class<?> clz, Object obj) {// 设置属性PropertyValues propertyValues = bd.getPropertyValues();if (!propertyValues.isEmpty()) {for (PropertyValue propertyValue : propertyValues.getPropertyValues()) {String pType = propertyValue.getType();String pName = propertyValue.getName();Object pValue = propertyValue.getValue();boolean ref = propertyValue.isRef();Class<?>[] paraTypes = new Class[1];Object[] paraValues = new Object[1];if (!ref) {if (pType.equals("String")) {paraTypes[0] = String.class;} else if (pType.equals("int")) {paraTypes[0] = int.class;} else if (pType.equals("Integer")) {paraTypes[0] = Integer.class;} else {continue;}paraValues[0] = pValue;} else {try {paraTypes[0] = Class.forName(pType);} catch (ClassNotFoundException e) {throw new RuntimeException(e);}paraValues[0] = getBean((String) pValue);}String methodName = "set" + pName.substring(0, 1).toUpperCase() + pName.substring(1);try {Method method = clz.getMethod(methodName, paraTypes);method.invoke(obj, paraValues);} catch (NoSuchMethodException | InvocationTargetException | IllegalAccessException e) {throw new RuntimeException(e);}}}}
直接反射进行硬编码设置属性
解决循环依赖

<bean id="basebaseservice" className="lbwxxc.com.minis.test.BaseBaseService"><property type="lbwxxc.com.minis.test.AServiceImpl" name="as" ref="aservice" /></bean><bean id="aservice" className="lbwxxc.com.minis.test.AServiceImpl"><constructor-arg type="String" name="name" value="abc"/><constructor-arg type="Integer" name="level" value="3"/><property type="String" name="property1" value="Someone says"/><property type="String" name="property2" value="Hello World!"/><property type="lbwxxc.com.minis.test.BaseService" name="ref1" ref="baseservice"/></bean><bean id="baseservice" className="lbwxxc.com.minis.test.BaseService"><property type="lbwxxc.com.minis.test.BaseBaseService" name="bbs" ref="basebaseservice" /></bean>
将创建对象和设置属性相分离
创建对象
private Object doCreateBean(BeanDefinition beanDefinition) {Class<?> clz;Object obj;Constructor<?> con;// 创建对象try {// 获取构造参数ArgumentValues argumentValues = beanDefinition.getConstructorArgumentValues();Class<?>[] paraTypes = new Class[argumentValues.getArgumentCount()];Object[] paraValues = new Object[argumentValues.getArgumentCount()];if (argumentValues.getArgumentCount() != 0) {for (int i = 0; i < argumentValues.getArgumentCount(); i++) {ArgumentValue indexedArgumentValue = argumentValues.getIndexedArgumentValue(i);if (indexedArgumentValue.getType().equals("String")) {paraTypes[i] = String.class;paraValues[i] = indexedArgumentValue.getValue();} else if (indexedArgumentValue.getType().equals("int")) {paraTypes[i] = int.class;paraValues[i] = Integer.valueOf((String) indexedArgumentValue.getValue());} else if (indexedArgumentValue.getType().equals("Integer")) {paraTypes[i] = Integer.class;paraValues[i] = Integer.valueOf((String) indexedArgumentValue.getValue());} else {paraTypes[i] = String.class;paraValues[i] = indexedArgumentValue.getValue();}}}clz = Class.forName(beanDefinition.getClassName());con = clz.getConstructor(paraTypes);obj = con.newInstance(paraValues);} catch (ClassNotFoundException | NoSuchMethodException | InvocationTargetException | InstantiationException |IllegalAccessException e) {throw new RuntimeException(e);}System.out.println(beanDefinition.getId() + " bean created. " + beanDefinition.getClassName() + " : " + obj);return obj;}
通过反射获取构造方法,然后通过构造方法创建对象,然后放到 earlySingletonObjects 中
// 创建毛胚对象Object obj = doCreateBean(beanDefinition);earlySingletonObjects.put(beanDefinition.getId(), obj);
设置属性
//设置属性handleProperties(beanDefinition, clz, obj);
// 设置属性private void handleProperties(BeanDefinition bd, Class<?> clz, Object obj) {// 设置属性PropertyValues propertyValues = bd.getPropertyValues();if (!propertyValues.isEmpty()) {for (PropertyValue propertyValue : propertyValues.getPropertyValues()) {String pType = propertyValue.getType();String pName = propertyValue.getName();Object pValue = propertyValue.getValue();boolean ref = propertyValue.isRef();Class<?>[] paraTypes = new Class[1];Object[] paraValues = new Object[1];if (!ref) {if (pType.equals("String")) {paraTypes[0] = String.class;} else if (pType.equals("int")) {paraTypes[0] = int.class;} else if (pType.equals("Integer")) {paraTypes[0] = Integer.class;} else {continue;}paraValues[0] = pValue;} else {try {paraTypes[0] = Class.forName(pType);} catch (ClassNotFoundException e) {throw new RuntimeException(e);}paraValues[0] = getBean((String) pValue);}String methodName = "set" + pName.substring(0, 1).toUpperCase() + pName.substring(1);try {Method method = clz.getMethod(methodName, paraTypes);method.invoke(obj, paraValues);} catch (NoSuchMethodException | InvocationTargetException | IllegalAccessException e) {throw new RuntimeException(e);}}}}
创建完对象后存放在 earlySingletonObjects 后,再设置属性,避免循环依赖
04 - 增强IoC容器:如何让我们的Spring支持注解?
@Target(ElementType.FIELD)
@Retention(RetentionPolicy.RUNTIME)
public @interface Autowired {
}
public class AutowiredAnnotationBeanPostProcessor implements BeanPostProcessor {private AutowireCapableBeanFactory beanFactory;@Overridepublic Object postProcessAfterInitialization(Object bean, String beanName) throws BeansException {Object result = bean;Class<?> beanClass = result.getClass();Field[] fields = beanClass.getDeclaredFields();for (Field field : fields) {boolean isAutowired = field.isAnnotationPresent(Autowired.class);if (isAutowired) {String fieldName = field.getName();Object objAutowired = this.getBeanFactory().getBean(fieldName);if (objAutowired != null) {try {field.setAccessible(true);field.set(result, objAutowired);System.out.println("autowire " + fieldName + " for bean " + beanName);} catch (IllegalAccessException e) {throw new RuntimeException(e);}}}}return result;}@Overridepublic Object postProcessBeforeInitialization(Object bean, String beanName) throws BeansException {return null;}public AutowireCapableBeanFactory getBeanFactory() {return beanFactory;}public void setBeanFactory(AutowireCapableBeanFactory beanFactory) {this.beanFactory = beanFactory;}
}
以处理器的方式处理注解
public class AutowireCapableBeanFactory extends AbstractBeanFactory {private final List<AutowiredAnnotationBeanPostProcessor> beanPostProcessors = new ArrayList<>();public void addBeanPostProcessor(AutowiredAnnotationBeanPostProcessor beanPostProcessor) {this.beanPostProcessors.remove(beanPostProcessor);this.beanPostProcessors.add(beanPostProcessor);}public int getBeanPostProcessorCount() {return this.beanPostProcessors.size();}public List<AutowiredAnnotationBeanPostProcessor> getBeanPostProcessors() {return this.beanPostProcessors;}@Overridepublic Object applyBeanPostProcessorsAfterInitialization(Object existingBean, String beanName) throws BeansException {Object result = existingBean;for (AutowiredAnnotationBeanPostProcessor beanProcessor : getBeanPostProcessors()) {beanProcessor.setBeanFactory(this);result = beanProcessor.postProcessAfterInitialization(result, beanName);if (result == null) {return result;}}return result;}@Overridepublic Object applyBeanPostProcessorsBeforeInitialization(Object existingBean, String beanName) throws BeansException {Object result = existingBean;for (BeanPostProcessor beanProcessor : getBeanPostProcessors()) {result = beanProcessor.postProcessBeforeInitialization(result, beanName);if (result == null) {return result;}}return result;}}
Bean 工厂内部有 List<AutowiredAnnotationBeanPostProcessor> beanPostProcessors
public Object getBean(String beanName) {Object singleton = this.getSingleton(beanName);if (singleton == null) {singleton = this.earlySingletonObjects.get(beanName);if (singleton == null) {System.out.println("get bean null -------------- " + beanName);BeanDefinition bd = beanDefinitionMap.get(beanName);singleton = createBean(bd);this.registerBean(beanName, singleton);//beanpostprocessor//step 1 : postProcessBeforeInitializationapplyBeanPostProcessorsBeforeInitialization(singleton, beanName);//step 2 : init-methodif (bd.getInitMethodName() != null && !bd.getInitMethodName().equals("")) {invokeInitMethod(bd, singleton);}//step 3 : postProcessAfterInitializationapplyBeanPostProcessorsAfterInitialization(singleton, beanName);}}if (singleton == null) {throw new BeansException("bean is null.");}return singleton;}
在创建 Bean 时,会执行处理器
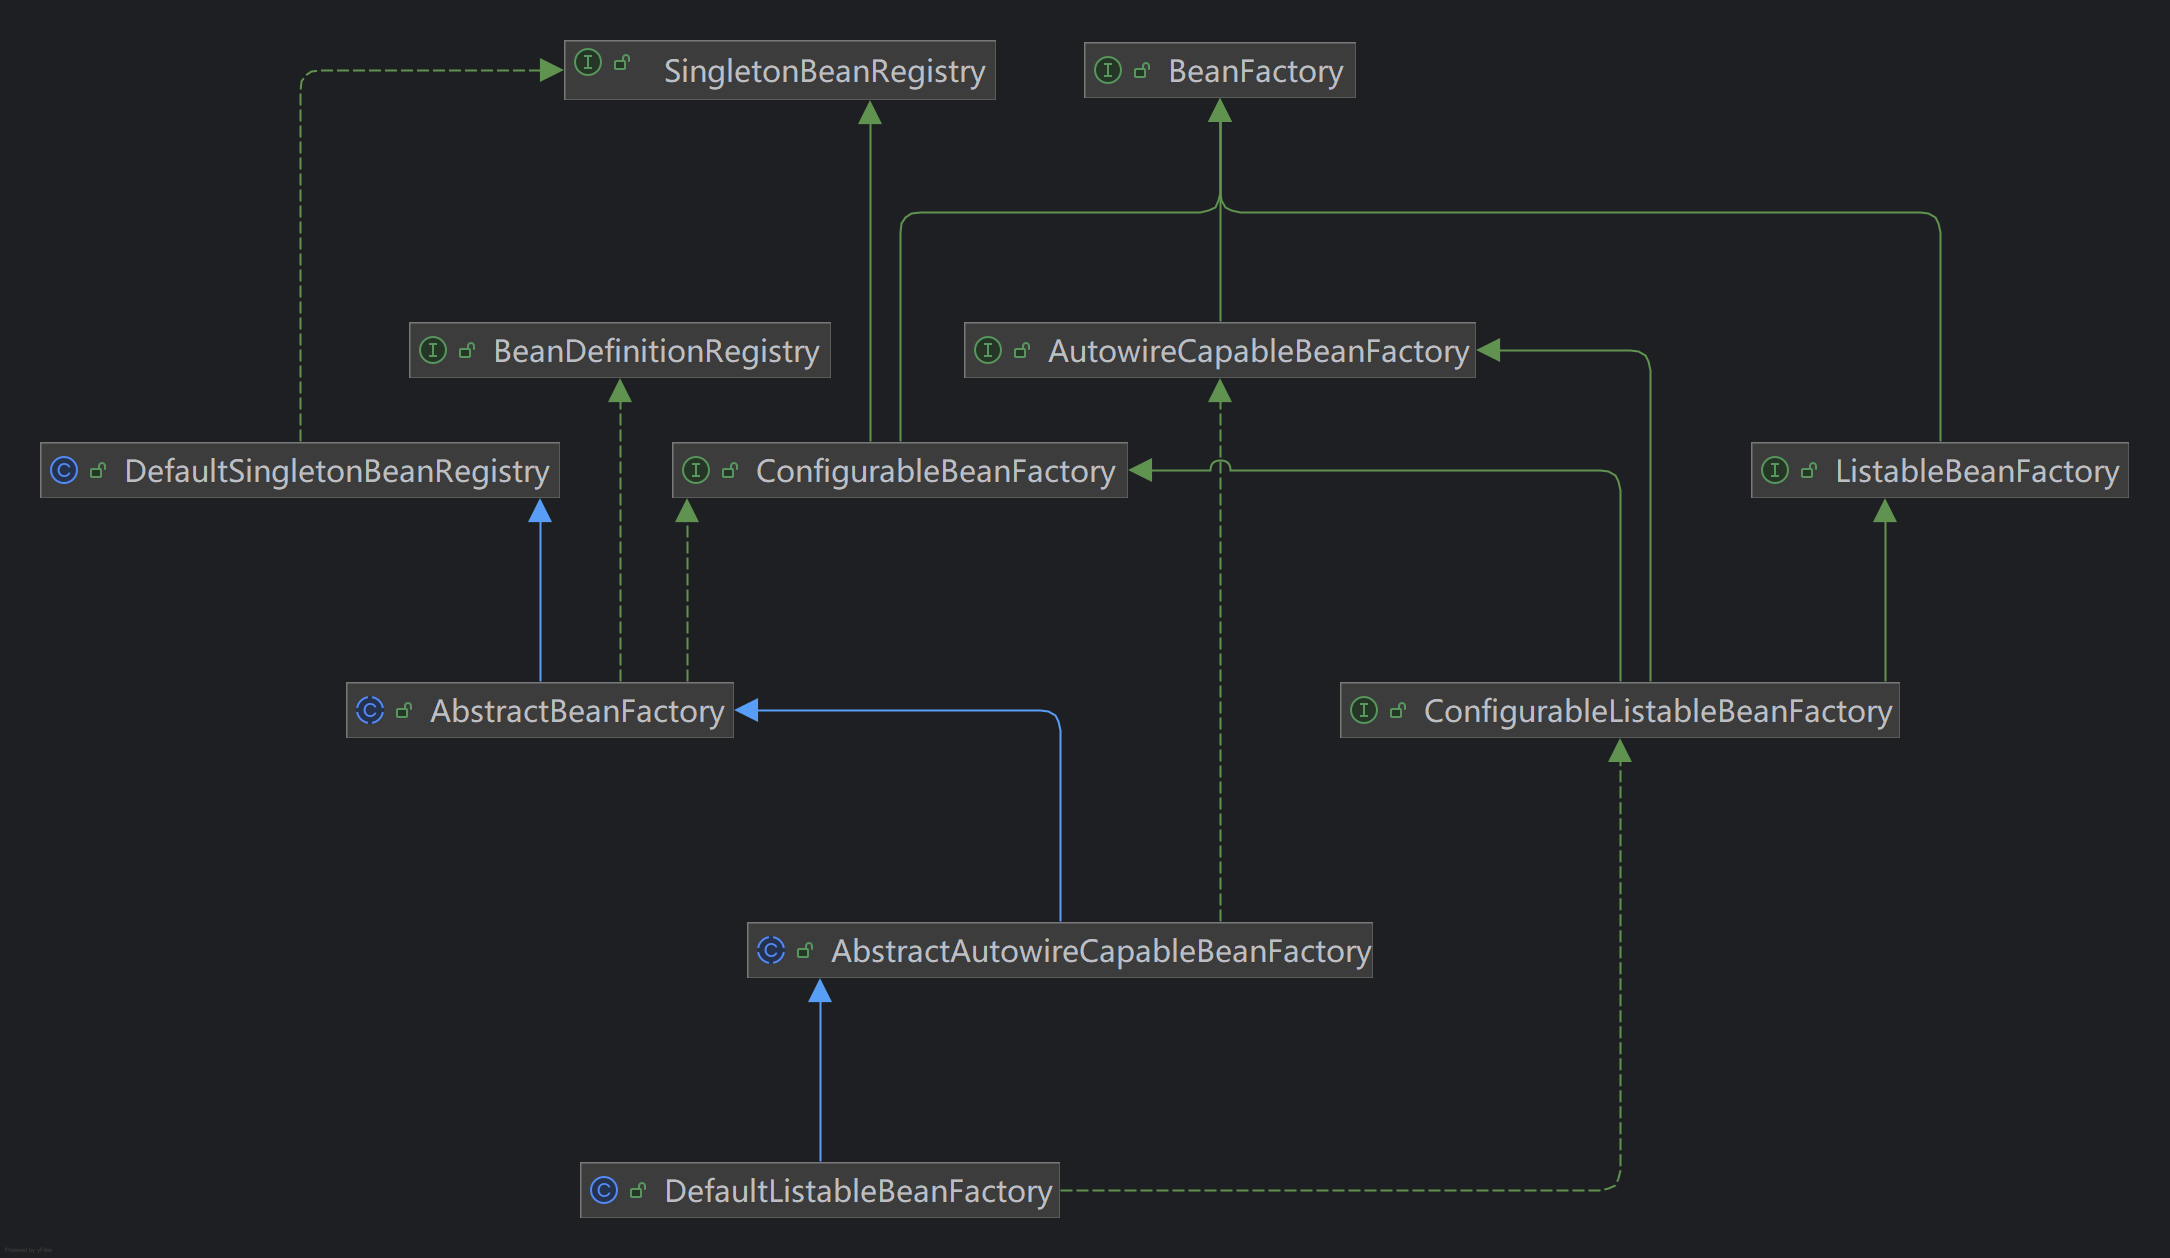
05 实现完整的IoC容器: 构建工厂体系并添加容器事件
- ListableBeanFactory : 将Factory内部管理的Bean作为一个集合来对待,获取Bean的数量, 得到所有Bean的名字,按照某个类型获取Bean列表等等。
- ConfigurableBeanFactory : 将维护Bean之间的依赖关系以及支持Bean处理器也看作一个独立的特性
- ConfigurableListableBeanFactory : 把 AutowireCapableBeanFactory、ListableBeanFactory和ConfigurableBeanFactory合并在一起
在 Java 语言的设计中, 一个 Interface 代表的是一种特性或者能力,我们把这些特性或能力一个个抽取出来, 各自独立互不干扰。如果一个具体的类,想具备某些特性或者能力,就去实现这些 interface, 随意组合。这是一种良好的设计原则,叫 interface segregation (接口隔离原则)。这 条原则在 Spring 框架中用得很多,你可以注意一下。
Spring的这个 interface-abstract-class 模式是值得我们学习的,它极大地增强了框架的扩 展性。
07 原始 MVC: 如何通过单一的 Servlet 拦截请求分派任务?
public class DispatcherServlet extends HttpServlet {private Map<String, MappingValue> mappingValues;private Map<String, Class<?>> mappingClz = new HashMap<>();private String sContextConfigLocation;private final List<String> packageNames = new ArrayList<>();private final Map<String,Object> controllerObjs = new HashMap<>();private final List<String> controllerNames = new ArrayList<>();private final Map<String,Class<?>> controllerClasses = new HashMap<>();private final List<String> urlMappingNames = new ArrayList<>();private final Map<String,Object> mappingObjs = new HashMap<>();private final Map<String,Method> mappingMethods = new HashMap<>();public DispatcherServlet() {super();}@Overridepublic void init(ServletConfig config) throws ServletException {super.init(config);System.out.println("初始化");String path = "D:\\project\\MiniSpring\\src\\main\\resources\\web\\WEB-INF\\minisMVC-servlet.xml";this.packageNames.addAll(XmlScanComponentHelper.getNodeValue(path));refresh();}private void refresh() {initController();initMapping();}protected void initController() {this.controllerNames.addAll(scanPackages(packageNames));for (String controllerName : this.controllerNames) {Object obj = null;Class<?> clz = null;try {clz = Class.forName(controllerName);this.controllerClasses.put(controllerName,clz);} catch (ClassNotFoundException e) {e.printStackTrace();}try {if (clz != null) {obj = clz.newInstance();}this.controllerObjs.put(controllerName, obj);} catch (InstantiationException | IllegalAccessException e) {e.printStackTrace();}}}private List<String> scanPackages (List<String> packageNames) {List<String> tempControllerNames = new ArrayList<>();for (String packageName : packageNames) {tempControllerNames.addAll(scanPackage(packageName));}return tempControllerNames;}private List<String> scanPackage(String packageName) {List<String> tempControllerNames = new ArrayList<>();String packageNameAfter = packageName.replaceAll("\\.", "/");URL url = this.getClass().getClassLoader().getResource("/" + packageNameAfter);File dir = new File(url.getFile());for (File file : dir.listFiles()) {if(file.isDirectory()){scanPackage(packageName+"."+file.getName());}else{String controllerName = packageName +"." +file.getName().replace(".class", "");tempControllerNames.add(controllerName);}}return tempControllerNames;}protected void initMapping() {for (String controllerName : this.controllerNames) {Class<?> clazz = this.controllerClasses.get(controllerName);Object obj = this.controllerObjs.get(controllerName);Method[] methods = clazz.getDeclaredMethods();for (Method method : methods) {boolean isRequestMapping = method.isAnnotationPresent(RequestMapping.class);if (isRequestMapping) {String urlmapping = method.getAnnotation(RequestMapping.class).value();this.urlMappingNames.add(urlmapping);this.mappingObjs.put(urlmapping, obj);this.mappingMethods.put(urlmapping, method);}}}}@Overrideprotected void doGet(HttpServletRequest req, HttpServletResponse resp) throws IOException {String servletPath = req.getServletPath();if (servletPath == null || servletPath.equals("/")) {resp.sendError(HttpServletResponse.SC_NOT_FOUND);return;}System.out.println("servletPath: " + servletPath);Object objectResult = null;try {Method method = mappingMethods.get(servletPath);Object obj = mappingObjs.get(servletPath);objectResult = method.invoke(obj);} catch (InvocationTargetException | IllegalAccessException e) {throw new RuntimeException(e);}resp.getWriter().append(objectResult.toString());}
}
Servlet: 俗理解成运行在Web服务器上的程序
MVC的基本思路是屏蔽Servlet的概念,让程序员主要写业务逻辑代码。浏览器访问的URL通过映射 机制找到实际的业务逻辑方法。按照Servlet规范,可以通过 Filter 拦截,也可以通过Servlet 拦截。 MiniSpring 的实现过程中,我模仿 Spring MVC 通过 Servlet 拦截所有请求,处理映射关系,调用业务 逻辑代码,处理返回值回递给浏览器。程序员写的业务逻辑程序,也叫做Bean。
08 整合 IoC 和 MVC: 如何在Web环境中启动IoC容器?
public class AnnotationConfigWebApplicationContext extends ClassPathXmlApplicationContext implements WebApplicationContext {private ServletContext servletContext;public AnnotationConfigWebApplicationContext(String fileName) {super(fileName);}@Overridepublic ServletContext getServletContext() {return servletContext;}@Overridepublic void setServletContext(ServletContext servletContext) {this.servletContext = servletContext;}
}
public class ContextLoaderListener implements ServletContextListener {public static final String CONFIG_LOCATION_PARAM = "contextConfigLocation";AnnotationConfigWebApplicationContext context = null;@Overridepublic void contextInitialized(ServletContextEvent sce) {System.out.println("初始化上下文");ServletContextListener.super.contextInitialized(sce);initWebApplicationContext(sce.getServletContext());}private void initWebApplicationContext(ServletContext servletContext) {String sContextLocation = servletContext.getInitParameter(CONFIG_LOCATION_PARAM);sContextLocation = "beans.xml";AnnotationConfigWebApplicationContext awc = new AnnotationConfigWebApplicationContext(sContextLocation);this.context = awc;servletContext.setAttribute(WebApplicationContext.ROOT_WEB_APPLICATION_CONTEXT_ATTRIBUTE, awc);}
}
这节课,我们把MVC与IoC整合在了一起。具体过程是这样的:在T omcat启动的过程中先拿 context-param, 初始化Listener,在初始化过程中,创建IoC容器构建WAC (WebApplicationContext), 加载所管理的Bean对象,并把WAC关联到servlet context里。
然后在DispatcherServlet初始化的时候, 从sevletContext里获取属性拿到WAC,放到servlet的属 性中,然后拿到Servlet的配置路径参数, 之后再扫描路径下的包,调用refresh()方法加载Bean,最 后配置url mapping。
我们之所以有办法整合这二者, 核心的原因是Servlet规范中规定的时序,从listerner到filter再到 servlet, 每一个环节都预留了接口让我们有机会干预,写入我们需要的代码。我们在学习过程中, 更重要的是要学习如何构建可扩展体系的思路, 在我们自己的软件开发过程中, 记住不要将程序流程固定死, 那样没有任何扩展的余地, 而应该想着预留出一些接口理清时序, 让别人在关节处也可以插入自己的逻辑。
容器是一个框架,之所以叫做框架而不是应用程序,关键就在于这套可扩展的体系
09 分解Dispatcher:如何把专⻔的事情交给专门的部件去做?
这节课我们的主要工作就是拆解Dispatcher。首先拆解的是ApplicationContext,现在我们有了两 级上下文,一级用于IoC容器,我们叫parent上下文,一级用于Web上下文,
WebApplicationContext持有对parent上下文的引用。方便起⻅,我们还增加了@RequestMapping 注解来声明URL映射,然后新增RequestMappingHandlerMapping 与 RequestMappingHandlerAdapter,分别包装URL映射关系和映射后的处理过程
bug
要进行判空处理
10 数据绑定: 如何自动转换传入的参数?
将 reuqest 携带的参数转换为 Java 实体类
public class CustomNumberEditor implements PropertyEditor {private Class<? extends Number> numberClass;private NumberFormat numberFormat;private boolean allowEmpty;private Object value;public CustomNumberEditor(Class<? extends Number> numberClass, boolean allowEmpty) {this(numberClass, null, allowEmpty);}public CustomNumberEditor(Class<? extends Number> numberClass, NumberFormat numberFormat, boolean allowEmpty) {this.numberClass = numberClass;this.numberFormat = numberFormat;this.allowEmpty = allowEmpty;}@Overridepublic void setAsText(String text) {if (this.allowEmpty && !StringUtils.hasText(text)) {// Treat empty String as null value.setValue(null);}else if (this.numberFormat != null) {// Use given NumberFormat for parsing text.setValue(NumberUtils.parseNumber(text, this.numberClass, this.numberFormat));}else {// Use default valueOf methods for parsing text.setValue(NumberUtils.parseNumber(text, this.numberClass));}}@Overridepublic void setValue(Object value) {if (value instanceof Number) {this.value = NumberUtils.convertNumberToTargetClass((Number) value, this.numberClass);} else {this.value = value;}}@Overridepublic String getAsText() {Object value = this.value;if (value == null) {return "";}if (this.numberFormat != null) {// Use NumberFormat for rendering value.return this.numberFormat.format(value);}else {// Use toString method for rendering value.return value.toString();}}@Overridepublic Object getValue() {return this.value;}}
这个类是一个在文本 (String) 和不同类型的数字 (Number) 之间进行自定义转换 ↔️ 的“翻译器”。
public class PropertyEditorRegistrySupport {private Map<Class<?>, PropertyEditor> defaultEditors;private Map<Class<?>, PropertyEditor> customEditors;public PropertyEditorRegistrySupport() {registerDefaultEditors();}protected void registerDefaultEditors() {createDefaultEditors();}public PropertyEditor getDefaultEditor(Class<?> requiredType) {return this.defaultEditors.get(requiredType);}private void createDefaultEditors() {this.defaultEditors = new HashMap<>(64);// Default instances of collection editors.this.defaultEditors.put(int.class, new CustomNumberEditor(Integer.class, false));this.defaultEditors.put(Integer.class, new CustomNumberEditor(Integer.class, true));this.defaultEditors.put(long.class, new CustomNumberEditor(Long.class, false));this.defaultEditors.put(Long.class, new CustomNumberEditor(Long.class, true));this.defaultEditors.put(float.class, new CustomNumberEditor(Float.class, false));this.defaultEditors.put(Float.class, new CustomNumberEditor(Float.class, true));this.defaultEditors.put(double.class, new CustomNumberEditor(Double.class, false));this.defaultEditors.put(Double.class, new CustomNumberEditor(Double.class, true));this.defaultEditors.put(BigDecimal.class, new CustomNumberEditor(BigDecimal.class, true));this.defaultEditors.put(BigInteger.class, new CustomNumberEditor(BigInteger.class, true));this.defaultEditors.put(String.class, new StringEditor(String.class, true));}public void registerCustomEditor(Class<?> requiredType,  PropertyEditor propertyEditor) {if (this.customEditors == null) {this.customEditors = new LinkedHashMap<>(16);}this.customEditors.put(requiredType, propertyEditor);}public PropertyEditor findCustomEditor( Class<?> requiredType) {Class<?> requiredTypeToUse = requiredType;return getCustomEditor(requiredTypeToUse);}public boolean hasCustomEditorForElement( Class<?> elementType) {// No property-specific editor -> check type-specific editor.return (elementType != null && this.customEditors != null && this.customEditors.containsKey(elementType));}public PropertyEditor getCustomEditor(Class<?> requiredType) {if (requiredType == null || this.customEditors == null) {return null;}// Check directly registered editor for type.PropertyEditor editor = this.customEditors.get(requiredType);return editor;}
}
注册一些默认的翻译器,也提供方法实习自定义注册器
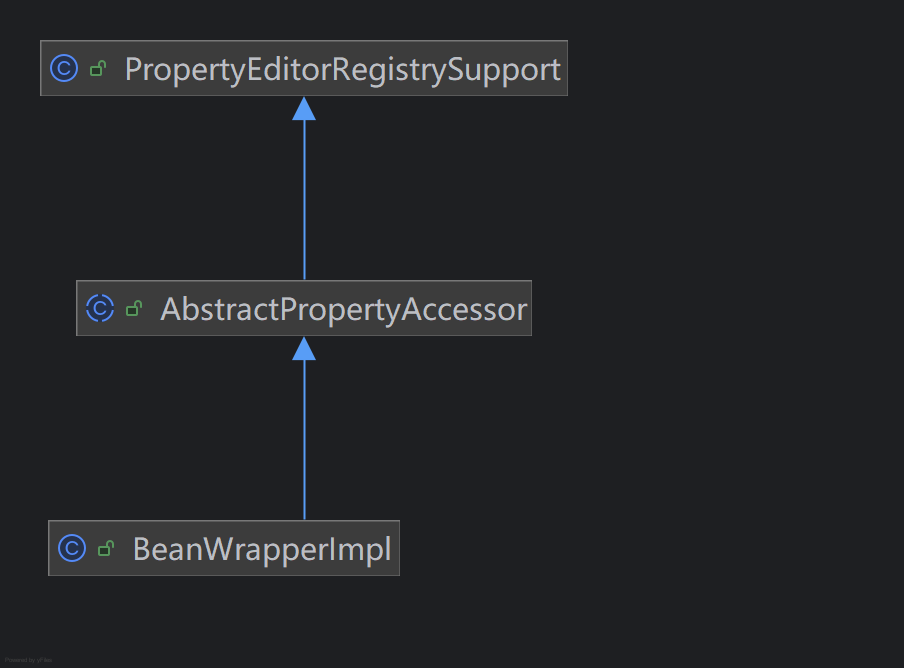
public abstract class AbstractPropertyAccessor extends PropertyEditorRegistrySupport {PropertyValues pvs;public AbstractPropertyAccessor() {super();}public void setPropertyValues(PropertyValues pvs) {this.pvs = pvs;for (PropertyValue pv : this.pvs.getPropertyValues()) {setPropertyValue(pv);}}public abstract void setPropertyValue(PropertyValue pv) ;
}
抽象类,实现一些基本方法,实现代码复用
public class BeanWrapperImpl extends AbstractPropertyAccessor {Object wrappedObject;Class<?> clz;public BeanWrapperImpl(Object object) {super();this.wrappedObject = object;this.clz = object.getClass();}@Overridepublic void setPropertyValue(PropertyValue pv) {BeanPropertyHandler propertyHandler = new BeanPropertyHandler(pv.getName());PropertyEditor pe = this.getCustomEditor(propertyHandler.getPropertyClz());if (pe == null) {pe = this.getDefaultEditor(propertyHandler.getPropertyClz());}if (pe != null) {pe.setAsText((String) pv.getValue());propertyHandler.setValue(pe.getValue());}else {propertyHandler.setValue(pv.getValue());}}class BeanPropertyHandler {Method writeMethod = null;Method readMethod = null;Class<?> propertyClz = null;public Class<?> getPropertyClz() {return propertyClz;}public BeanPropertyHandler(String propertyName) {try {Field field = clz.getDeclaredField(propertyName);propertyClz = field.getType();this.writeMethod = clz.getDeclaredMethod("set"+ propertyName.substring(0, 1).toUpperCase()+ propertyName.substring(1), propertyClz);this.readMethod = clz.getDeclaredMethod("get"+ propertyName.substring(0,1).toUpperCase()+ propertyName.substring(1));} catch (NoSuchFieldException | NoSuchMethodException e) {throw new RuntimeException(e);}}public Object getValue() {Object result = null;writeMethod.setAccessible(true);try {result =  readMethod.invoke(wrappedObject);} catch (IllegalAccessException | InvocationTargetException | IllegalArgumentException e) {e.printStackTrace();}return result;}public void setValue(Object value) {writeMethod.setAccessible(true);try {writeMethod.invoke(wrappedObject, value);} catch (IllegalAccessException | IllegalArgumentException | InvocationTargetException e) {e.printStackTrace();}}}
}
这个类是一个JavaBean 的属性控制器。它的核心功能是让你能够通过属性名称(一个字符串)来动态地获取或设置一个 Java 对象的属性值
13 JDBC 访问框架:如何抽取JDBC模板并隔离数据库?
public Object query(String sql, Object[] args, PreparedStatementCallback callback) {Connection con = null;PreparedStatement stmt = null;ResultSet rs = null;Object result = null;try {Class.forName("com.microsoft.sqlserver.jdbc.SQLServerDriver");con = DriverManager.getConnection("jdbc:sqlserver://localhost:3307;databasename=my_sql_study;user=root;password=123456;");stmt = con.prepareStatement(sql);int len = args.length;for (int i = 0; i < len; i++) {if (args[i] instanceof Integer) {stmt.setInt(i + 1, (Integer) args[i]);} else if (args[i] instanceof String) {stmt.setString(i + 1, (String) args[i]);}}return callback.doInPreparedStatement(stmt);} catch (ClassNotFoundException | SQLException e) {throw new RuntimeException(e);} finally {try {if (con != null) {con.close();}if (stmt != null) {stmt.close();}} catch (SQLException ignored) {}}}
public class UserService {JdbcTemplate jdbcTemplate = new JdbcTemplate();public User getUser(int id) {String sql = "select * from user where id = ?";return (User) jdbcTemplate.query(sql, new Object[]{new Integer(id)}, (ptsmt) -> {User user = new User();try {ResultSet resultSet = ptsmt.executeQuery();while (resultSet.next()) {user.setId(resultSet.getInt("id"));user.setName(resultSet.getString("name"));}} catch (SQLException e) {throw new RuntimeException(e);}return user;});}
}
函数回调
14 增强模板:如何抽取专⻔的部件完成专⻔的任务?
public class PooledDataSource implements DataSource {private List<PooledConnection> connections = null;private String driverClassName;private String url;private String username;private String password;private int initialSize = 2;private Properties connectionProperties;	public PooledDataSource() {}private void initPool() {this.connections = new ArrayList<>(initialSize);try {for(int i = 0; i < initialSize; i++){Connection connect = DriverManager.getConnection(url, username, password);PooledConnection pooledConnection = new PooledConnection(connect, false);this.connections.add(pooledConnection);
System.out.println("********add connection pool*********");				}} catch (Exception e) {		e.printStackTrace();}}@Overridepublic Connection getConnection() {return getConnectionFromDriver(getUsername(), getPassword());}@Overridepublic Connection getConnection(String username, String password) {return getConnectionFromDriver(username, password);}protected Connection getConnectionFromDriver(String username, String password) {Properties mergedProps = new Properties();Properties connProps = getConnectionProperties();if (connProps != null) {mergedProps.putAll(connProps);}if (username != null) {mergedProps.setProperty("user", username);}if (password != null) {mergedProps.setProperty("password", password);}if (this.connections == null) {initPool();}PooledConnection pooledConnection= getAvailableConnection();while(pooledConnection == null){pooledConnection = getAvailableConnection();if(pooledConnection == null){try {TimeUnit.MILLISECONDS.sleep(30);} catch (InterruptedException e) {e.printStackTrace();}}}return pooledConnection;}private PooledConnection getAvailableConnection() {for(PooledConnection pooledConnection : this.connections){if (!pooledConnection.isActive()){pooledConnection.setActive(true);return pooledConnection;}}return null;}protected Connection getConnectionFromDriverManager(String url, Properties props) throws SQLException {return DriverManager.getConnection(url, props);}public String getDriverClassName() {return driverClassName;}public void setDriverClassName(String driverClassName) {this.driverClassName = driverClassName;try {Class.forName(this.driverClassName);}catch (ClassNotFoundException ex) {throw new IllegalStateException("Could not load JDBC driver class [" + driverClassName + "]", ex);}}public String getUrl() {return url;}public void setUrl(String url) {this.url = url;}public String getUsername() {return username;}public void setUsername(String username) {this.username = username;}public String getPassword() {return password;}public void setPassword(String password) {this.password = password;}public int getInitialSize() {return initialSize;}public void setInitialSize(int initialSize) {this.initialSize = initialSize;}public Properties getConnectionProperties() {return connectionProperties;}public void setConnectionProperties(Properties connectionProperties) {this.connectionProperties = connectionProperties;}@Overridepublic PrintWriter getLogWriter() throws SQLException {return null;}@Overridepublic int getLoginTimeout() throws SQLException {return 0;}@Overridepublic Logger getParentLogger() throws SQLFeatureNotSupportedException {// TODO Auto-generated method stubreturn null;}@Overridepublic void setLogWriter(PrintWriter arg0) throws SQLException {}@Overridepublic void setLoginTimeout(int arg0) throws SQLException {}@Overridepublic boolean isWrapperFor(Class<?> arg0) throws SQLException {return false;}@Overridepublic <T> T unwrap(Class<T> arg0) throws SQLException {return null;}}
线程池
17 动态代理:如何在运行时插入逻辑?
仿照 Spring 创建一个工厂
public interface FactoryBean<T> {T getObject();Class<?> getObjectType();default boolean isSingleton() {return true;}
}
一个用 JDK 实现的动态代理
public class JdkDynamicAopProxy implements AopProxy, InvocationHandler {Object object;public JdkDynamicAopProxy(Object object) {this.object = object;}@Overridepublic Object getProxy() {//object.getClass().getInterfaces(): 这就是为什么标准的 JDK 动态代理只能为实现了至少一个接口的对象工作的根本原因。代理需要通过接口来了解它应该暴露哪些方法ClassLoader classLoader = JdkDynamicAopProxy.class.getClassLoader();Class<?>[] interfaces = object.getClass().getInterfaces();Object proxy = null;try {proxy = Proxy.newProxyInstance(classLoader, interfaces, this);} catch (Exception e) {throw new RuntimeException(e);}return proxy;}@Overridepublic Object invoke(Object proxy, Method method, Object[] args) throws Throwable {if (method.getName().equals("doAction")) {System.out.println("-----before call real object, dynamic proxy........");return method.invoke(object, args);}return null;}
}
@Overridepublic Object getBean(String beanName) {Object singleton = this.getSingleton(beanName);if (singleton == null) {singleton = this.earlySingletonObjects.get(beanName);if (singleton == null) {System.out.println("get bean null -------------- " + beanName);BeanDefinition bd = beanDefinitionMap.get(beanName);if (bd != null) {singleton = createBean(bd);this.registerBean(beanName, singleton);//beanpostprocessor//step 1 : postProcessBeforeInitializationapplyBeanPostProcessorsBeforeInitialization(singleton, beanName);//step 2 : init-methodif (bd.getInitMethodName() != null && !bd.getInitMethodName().equals("")) {invokeInitMethod(bd, singleton);}//step 3 : postProcessAfterInitializationapplyBeanPostProcessorsAfterInitialization(singleton, beanName);} else {return null;}}}if (singleton == null) {throw new BeansException("bean is null.");}if (singleton instanceof FactoryBean) {return getObjectForBeanInstance(singleton, beanName);}return singleton;}
if (singleton instanceof FactoryBean) {return getObjectForBeanInstance(singleton, beanName);}
在获取 bean 的最后,会检测是否为 FactoryBean,如果是工厂会生成一个一个代理对象