centos7 安装 zabbix6 -proxy
centos7 离线安装 zabbix6 -proxy
1.在线配置yum
# mkdir /etc/yum.repos.d/bak
# mv /etc/yum.repos.d/* /etc/yum.repos.d/bak/
# curl -o /etc/yum.repos.d/CentOS-Base.repo https://mirrors.aliyun.com/repo/Centos-7.repo
# rpm -Uvh https://repo.zabbix.com/zabbix/6.0/rhel/7/x86_64/zabbix-release-latest.el7.noarch.rpm
# cat MariaDB.repo[mariadb]
name=Mariadb Repository - $basearch
baseurl=https://mirrors.aliyun.com/mariadb/yum/10.5/centos/$releasever/$basearch
enabled=1
gpgcheck=0
2.下载离线包
1.下载zabbix-proxy
# yum install zabbix-proxy-mysql zabbix-sql-scripts zabbix-selinux-policy --downloadonly --downloaddir=/soft# lsfping-5.1-1.el7.x86_64.rpm             OpenIPMI-modalias-2.0.27-1.el7.x86_64.rpm          zabbix-selinux-policy-6.0.35-release1.el7.x86_64.rpm
OpenIPMI-2.0.27-1.el7.x86_64.rpm       unixODBC-2.3.1-14.el7.x86_64.rpm                   zabbix-sql-scripts-6.0.35-release1.el7.noarch.rpm
OpenIPMI-libs-2.0.27-1.el7.x86_64.rpm  zabbix-proxy-mysql-6.0.35-release1.el7.x86_64.rpm2.下载mariadb# yum install MariaDB-server MariaDB-client --downloadonly --downloaddir=/soft/mariadb
3.上传包配置yum
4.安装依赖
1.安装zabbix proxy # cd /soft
# yum install net-snmp
# yum -y install libevent
# rpm -ivh *.rpm2.数据库
# cd /soft/mariadb# rpm -ivh socat-1.7.3.2-2.el7.x86_64.rpm
# rpm -ivh boost-program-options-1.53.0-28.el7.x86_64.rpm
# rpm -ivh galera-4-26.4.19-1.el7.centos.x86_64.rpm
# rpm -ivh MariaDB-*
warning: MariaDB-client-10.5.26-1.el7.centos.x86_64.rpm: Header V4 RSA/SHA512 Signature, key ID c74cd1d8: NOKEY
error: Failed dependencies:mariadb-libs < 1:10.1.0 conflicts with MariaDB-compat-10.5.26-1.el7.centos.x86_64mariadb-libs <= 1:10.1.48-1.el7.centos is obsoleted by MariaDB-compat-10.5.26-1.el7.centos.x86_64# yum remove mariadb-libs
# rpm -ivh MariaDB-*# systemctl enable mariadb && systemctl start mariadb
5.创建初始数据库
# mysql_secure_installationNOTE: RUNNING ALL PARTS OF THIS SCRIPT IS RECOMMENDED FOR ALL MariaDBSERVERS IN PRODUCTION USE! PLEASE READ EACH STEP CAREFULLY!In order to log into MariaDB to secure it, we'll need the current
password for the root user. If you've just installed MariaDB, and
haven't set the root password yet, you should just press enter here.Enter current password for root (enter for none):
OK, successfully used password, moving on...Setting the root password or using the unix_socket ensures that nobody
can log into the MariaDB root user without the proper authorisation.You already have your root account protected, so you can safely answer 'n'.Switch to unix_socket authentication [Y/n] n... skipping.You already have your root account protected, so you can safely answer 'n'.Change the root password? [Y/n] y
New password:
Re-enter new password:
Password updated successfully!
Reloading privilege tables..... Success!By default, a MariaDB installation has an anonymous user, allowing anyone
to log into MariaDB without having to have a user account created for
them. This is intended only for testing, and to make the installation
go a bit smoother. You should remove them before moving into a
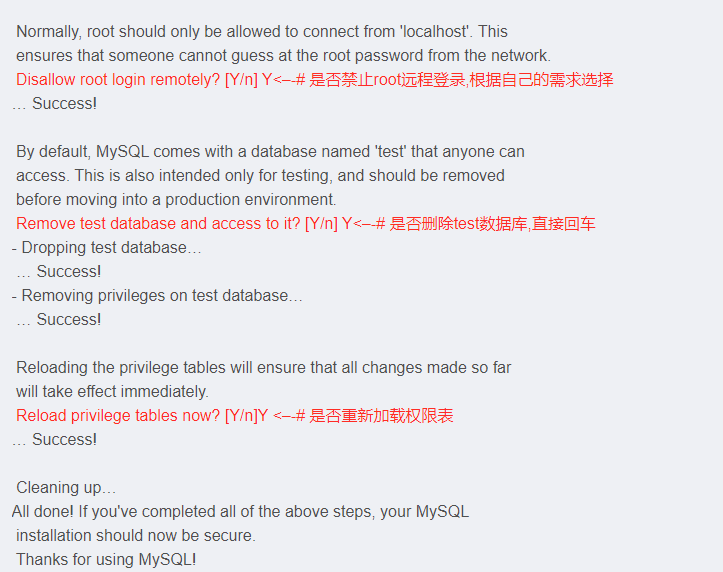
production environment.Remove anonymous users? [Y/n] y... Success!Normally, root should only be allowed to connect from 'localhost'. This
ensures that someone cannot guess at the root password from the network.Disallow root login remotely? [Y/n] n... skipping.By default, MariaDB comes with a database named 'test' that anyone can
access. This is also intended only for testing, and should be removed
before moving into a production environment.Remove test database and access to it? [Y/n] y- Dropping test database...... Success!- Removing privileges on test database...... Success!Reloading the privilege tables will ensure that all changes made so far
will take effect immediately.Reload privilege tables now? [Y/n] y... Success!Cleaning up...All done! If you've completed all of the above steps, your MariaDB
installation should now be secure.Thanks for using MariaDB!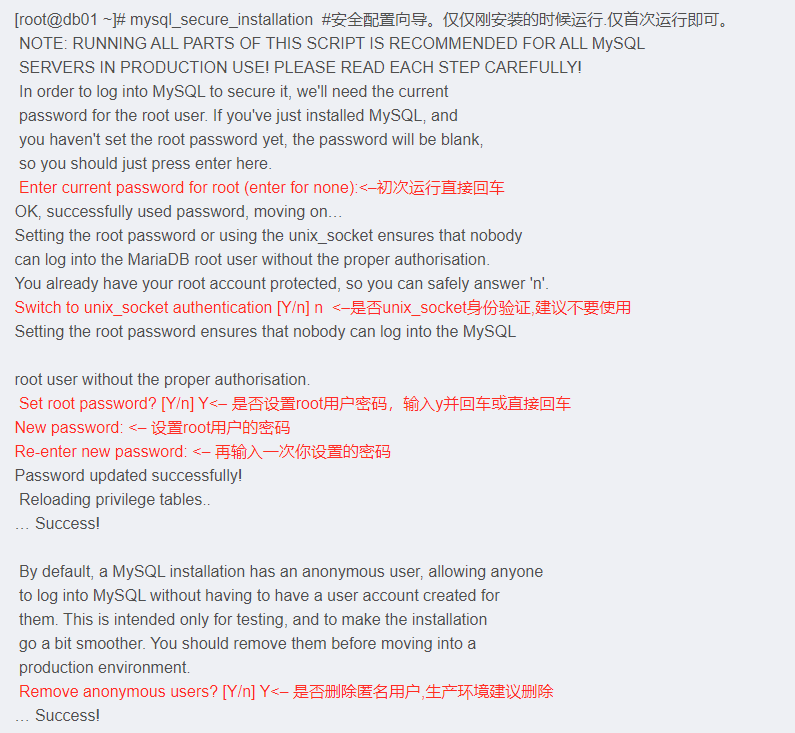
6.初始化数据库
# mysql -uroot -pEnter password:
Welcome to the MariaDB monitor.  Commands end with ; or \g.
Your MariaDB connection id is 10
Server version: 10.5.26-MariaDB MariaDB ServerCopyright (c) 2000, 2018, Oracle, MariaDB Corporation Ab and others.Type 'help;' or '\h' for help. Type '\c' to clear the current input statement.MariaDB [(none)]> create database zabbix_proxy character set utf8mb4 collate utf8mb4_bin;
Query OK, 1 row affected (0.001 sec)MariaDB [(none)]> create user zabbix@localhost identified by 'Root_123!';
Query OK, 0 rows affected (0.001 sec)MariaDB [(none)]> grant all privileges on zabbix_proxy.* to zabbix@localhost;
Query OK, 0 rows affected (0.001 sec)MariaDB [(none)]> set global log_bin_trust_function_creators = 1;
Query OK, 0 rows affected (0.000 sec)MariaDB [(none)]> quit
Bye
导入初始架构和数据,系统将提示您输入新创建的密码。
# yum localinstall zabbix-proxy-mysql-6.0.35-release1.el7.x86_64.rpm
# yum localinstall zabbix-sql-scripts-6.0.35-release1.el7.noarch.rpm# cat /usr/share/zabbix-sql-scripts/mysql/proxy.sql | mysql --default-character-set=utf8mb4 -uzabbix -p zabbix_proxy
# mysql -uroot -p
password
mysql> set global log_bin_trust_function_creators = 0;
mysql> quit;
7.配置 Zabbix proxy
编辑配置文件 /etc/zabbix/zabbix_proxy.conf
cat > /etc/zabbix/zabbix_proxy.conf <<'EOF'
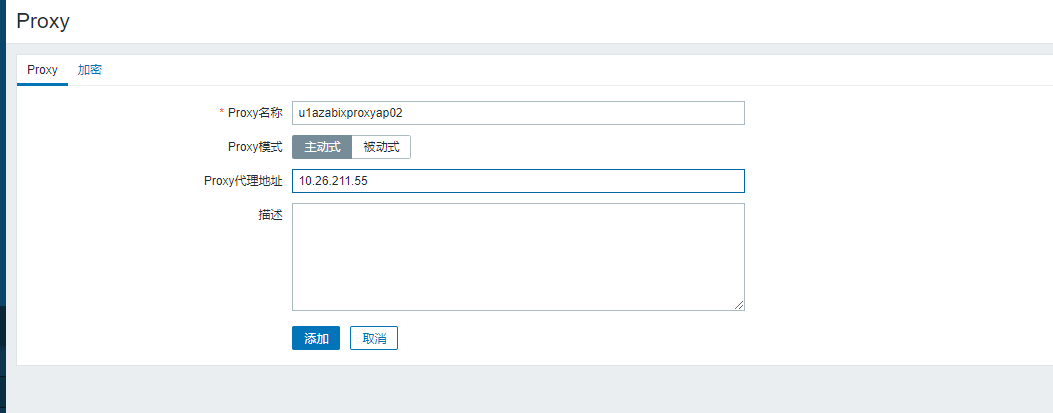
ProxyMode=0 # 代理模式,0 主动, 1 被动
Server=10.26.211.56 # 填入zabbix-server地址
ServerPort=10051 # 填入zabbix-server端口
Hostname=u1azabxproxy02 # 填入主机名
LogFile=/var/log/zabbix/zabbix_proxy.log
LogFileSize=0
PidFile=/var/run/zabbix/zabbix_proxy.pid
SocketDir=/var/run/zabbix
DBHost=localhost
DBName=zabbix_proxy
DBUser=zabbix
DBPassword=Root_123!
ConfigFrequency=60 # proxy多久和server同步配置信息
DataSenderFrequency=5 # proxy多久发送一次自己的数据给server
EOF8.启动zabbix-proxy
# systemctl restart zabbix-proxy
# systemctl enable zabbix-proxy
9.界面配置
创建代理