《100天精通Python——基础篇 2025 第22天:Python 多进程编程入门与实战详解》
目录
- 一、进程相关概念回顾
- 二、多进程初体验
- 2.1 使用multiprocessing模块创建进程
- 2.2 使用Process子类创建进程
- 2.3 使用进程池Pool创建进程
- 2.4 concurrent.futures包
- 三、进程通信
- 3.1 Pipe类
- 3.2 进程队列
- 3.2.1 队列简介
- 3.2.2 多进程队列的使用
- 四、多进程优化图片下载器各个模块
- 4.1 代码改写
- 4.2 多进程、多线程的选择
- 五、【拓展】CPU核数、并发数与性能的关系
- 5.1 统筹方法
- 5.2 阿姆达尔定律(Amdahl's Law)
一、进程相关概念回顾
进程起源于操作系统,它是操作系统最核心的概念。早期的计算机只有一个 CPU,同一时间只能够处理一个任务,为了实现并发处理的能力,系统将一个单独的 CPU 设计成多个虚拟的 CPU,以便实现多任务并发处理的能力。一个进程就是一个正在运行的任务。例如,对于单核 CPU 来说,同一时间只能处理一个任务,如果要实现多个任务的并发处理,可以在多个任务之间轮换执行,这样可以保证在同一个很短的时间段中每个任务都在执行,模拟出多个任务并发处理的效果。
进程和程序: 进程(process)是计算机中已运行程序的实体。进程与程序不同,程序本身只是指令、数据及其组织形式的描述,进程才是程序(指令和数据)的真正运行实例。例如,在没有打开 QQ 时,QQ 只是程序。打开 QQ 后,操作系统就为 QQ 开启了一个进程。再打开一个 QQ,则又开启了一个进程,虽然是同一个软件,但是它们分别属于不同的进程,都可以聊天,如下图所示:

并发和并行: 并行和并发都是同时运行的意思,区别如下:
- 并发: 伪并行,即看起来是同时运行,实际上仍然为串行。单个 CPU 利用多道技术可以模拟出并行效果。
- 并行: 同时运行,与串行相对应。只有具备多核 CPU 的系统才能实现并行。
在单核下,可以利用多道技术模拟并行处理;在多核下,每个核都可以利用多道技术模拟并行处理。例如,有四核的 CPU,处理 6 个任务,这样同一时间有 4 个任务被执行,假设 4 个任务分别被分配给了 CPU1、CPU2、CPU3、CPU4,一旦任务1遇到 I/O 就被迫中断执行,此时任务5就拿到 CPU1 的时间片去执行,这就是单核下的多道技术,而一旦任务1的 I/O 结束了,操作系统会重新调用它,可能被分配给 4 个 CPU 中的任意一个去执行。
现代计算机经常会在同一时间做很多件事,一个用户的计算机,无论单核 CPU,还是多核 CPU,都可以同时运行多个任务,一个任务可以理解为一个程序。例如:
- 启动一个进程来杀毒(360 软件)
- 启动一个进程来看电影(暴风影音)
- 启动一个进程来聊天(腾讯 QQ)
所有这些进程都需要被管理,于是一个支持多进程的多道程序管理系统是至关重要的。所谓多道技术,就是在内存中同时存入多道(多个)程序,CPU 从一个进程快速切换到另外一个,使每个进程各自运行几十或几百亳秒,虽然在某一个瞬间,一个 CPU 只能执行一个任务,但在 1 秒内,CPU 却可以运行多个进程,这就使人产生了并行的错觉,即伪并发,以此来区分多处理器操作系统的真正硬件并行,即多个 CPU 共享同一个物理内存。
二、多进程初体验
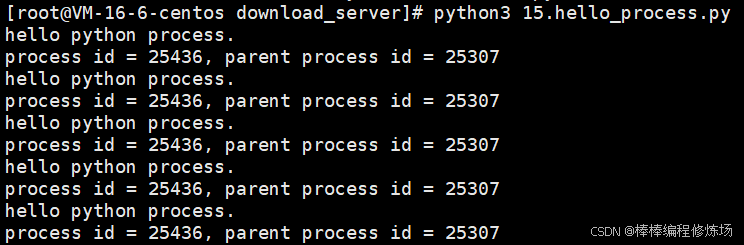
打印进程 id 与父进程 id,示例代码如下:
# -*- coding: utf-8 -*-
# @Time    : 2025-05-27 17:55
# @Author  : bb_bcxlc
# @File    : 15.hello_process.py
# @Software: PyCharm
# @Blog: https://blog.csdn.net/xw1680import os
import timedef loop():while True:print('hello python process.')print('process id = {}, parent process id = {}'.format(os.getpid(), os.getppid()))time.sleep(1)if __name__ == '__main__':loop()
程序执行结果如下图所示:

在 Python 中有多个模块可以创建进程,比较常用的有 os.fork() 函数、multiprocessing 模块和 Pool/ProcessPoolExecutor 进程池。由于 os.fork() 函数只适用于 Unix/Linux/Mac 系统上运行,在 Windows 操作系统中不可用,所以本小结重点介绍 multiprocessing 模块和 Pool/ProcessPoolExecutor 进程池这3个跨平台模块。
2.1 使用multiprocessing模块创建进程
multiprocessing 模块提供了一个 Process 类来代表一个进程对象,语法如下:
C:\Users\amoxiang>ipython
Python 3.12.8 (tags/v3.12.8:2dc476b, Dec  3 2024, 19:30:04) [MSC v.1942 64 bit (AMD64)]
Type 'copyright', 'credits' or 'license' for more information
IPython 8.32.0 -- An enhanced Interactive Python. Type '?' for help.In [1]: import multiprocessingIn [2]: multiprocessing.Process?
Init signature:
multiprocessing.Process(group=None,target=None,name=None,args=(),kwargs={},*,daemon=None,
)
Docstring:
Process objects represent activity that is run in a separate processThe class is analogous to `threading.Thread`
File:           d:\devtools\python\python312\lib\multiprocessing\context.py
Type:           type
Subclasses:Process 类的参数说明如下:
# 1.group: 参数未使用,值始终为None
# 2.target: 表示当前进程启动时执行的可调用对象。一般为可执行方法或函数
# 3.name: 进程名称,相当于给当前进程取一个别名
# 4.args: 表示传递给target函数的位置参数。
# 格式为元组,例如: target 是函数a,它有两个参数m、n,那么args就传入(m,n)即可
# 5.kwargs: 表示传递给target函数的关键字参数,格式为字典
示例代码:
# -*- coding: utf-8 -*-
# @Time : 2025-05-27 19:00
# @Author : bb_bcxlc
# @File : 16.create_process_demo1.py
# @Software: PyCharm
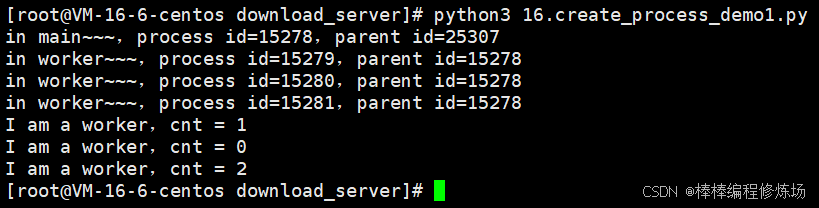
# @Blog: https://blog.csdn.net/xw1680import multiprocessing # 导入进程管理模块
import timedef worker(cnt): # 任务处理函数print('in worker~~~')time.sleep(2)print('I am a worker,cnt = %d' % cnt)def main():print('in main~~~') # 主进程for i in range(3): # 创建三个子进程p = multiprocessing.Process(target=worker, args=(i,))p.start()if __name__ == '__main__':main()
程序运行结果如下图所示:

Process 对象包含的实例方法如下:
- is_alive():判断进程实例是否还在执行
- join([timeout]):阻塞进程执行,直到进程终止,或者等待一段时间,具体时间由 timeout(可选参数)设置,单位为秒。
- start():启动进程实例(创建子进程)
- run():如果没有给定 target 参数,对这个对象调用 start() 方法时,就将执行对象中的 run() 方法
- terminate():不管任务是否完成,立即终止
Process 类还有如下常用属性:
- name:当前进程实例别名,默认为 Process-N,N为从1开始递增的整数
- pid:进程 ID,在进程被创造前返回 None
- exitcode:进程的退出码,如果进程没有结束,那么返回 None;如果进程被信号 N 终结,则返回负数 -N
- authkey:进程的认证密钥,为一个字节串。当多进程初始化时,主进程被使用 os.urandom() 指定一个随机字符串。当进程被创建时,从它的父进程中继承认证密钥,尽管可以通过设定密钥来更改它
- sentinel:当进程结束时变为 ready 状态,可用于同时等待多个事件,否则用 join() 更简单些
- daemon:与线程的 setDaemon 功能一样。将父进程设置为守护进程,当父进程结束时,子进程也结束
下面通过一个简单示例演示 Process 类的方法和属性的使用,创建2个子进程,分别使用 os 模块和 time 模块输出父进程和子进程的 ID 以及子进程的时间,并调用 Process 类的 name 和 pid 属性,代码如下:
from multiprocessing import Process
import time
import os# 两个子进程将会调用的两个函数
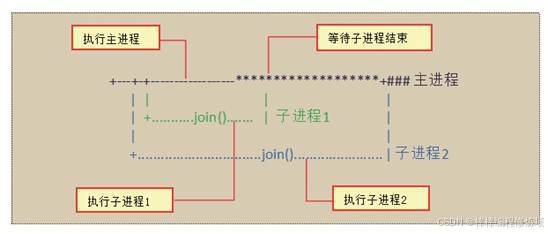
def child_1(interval):print("子进程 {} 开始执行,父进程为 {}".format(os.getpid(), os.getppid()))t_start = time.time() # 计时开始time.sleep(interval) # 程序将会被挂起interval秒t_end = time.time() # 计时结束print("子进程(%s)执行时间为'%0.2f'秒" % (os.getpid(), t_end - t_start))def child_2(interval):print("子进程(%s)开始执行,父进程为(%s)" % (os.getpid(), os.getppid()))t_start = time.time() # 计时开始time.sleep(interval) # 程序将会被挂起interval秒t_end = time.time() # 计时结束print("子进程(%s)执行时间为'%0.2f'秒" % (os.getpid(), t_end - t_start))if __name__ == '__main__':print("------父进程开始执行-------")print("当前进程PID: {},父进程PID: {}".format(os.getpid(), os.getppid())) # 输出当前程序的PIDp1 = Process(target=child_1, args=(1,)) # 实例化进程p1p2 = Process(target=child_2, name="child_2", args=(2,)) # 实例化进程p2p1.start() # 启动进程p1p2.start() # 启动进程p2# 同时父进程仍然往下执行,如果p2进程还在执行,将会返回Trueprint("p1.is_alive=%s" % p1.is_alive())print("p2.is_alive=%s" % p2.is_alive())# 输出p1和p2进程的别名和PIDprint("p1.name=%s" % p1.name)print("p1.pid=%s" % p1.pid)print("p2.name=%s" % p2.name)print("p2.pid=%s" % p2.pid)print("------等待子进程-------")p1.join() # 等待p1进程结束p2.join() # 等待p2进程结束print("------父进程执行结束-------")
程序运行流程示意图如下图所示:
2.2 使用Process子类创建进程
对于一些简单的小任务,通常使用 Process(target=test) 方式实现多进程。但是如果要处理复杂任务的进程,通常定义一个类,使其继承 Process 类,每次实例化这个类的时候,就等同于实例化一个进程对象。下面,通过一个示例来学习一下如何通过使用 Process 子类创建多个进程。
# -*- coding: utf-8 -*-
# @Time    : 2025-05-27 20:07
# @Author  : bb_bcxlc
# @File    : 16.create_process_demo2.py
# @Software: PyCharm
# @Blog: https://blog.csdn.net/xw1680from multiprocessing import Process
import time
import os# 继承Process类
class SubProcess(Process):# 由于Process类本身也有__init__初始化方法,这个子类相当于重写了父类的这个方法def __init__(self, interval, name=''):Process.__init__(self)  # 调用Process父类的初始化方法self.interval = interval  # 接收参数intervalif name:  # 判断传递的参数name是否存在self.name = name  # 如果传递参数name,则为子进程创建name属性,否则使用默认属性# 重写了Process类的run()方法def run(self):print("子进程(%s) 开始执行,父进程为(%s)" % (os.getpid(), os.getppid()))t_start = time.time()time.sleep(self.interval)t_stop = time.time()print("子进程(%s)执行结束,耗时%0.2f秒" % (os.getpid(), t_stop - t_start))if __name__ == "__main__":print("------父进程开始执行-------")print("父进程PID: {}".format(os.getpid()))  # 输出当前程序的IDp1 = SubProcess(interval=1, name='p1')p2 = SubProcess(interval=2)# 对一个不包含target属性的Process类执行start()方法,就会运行这个类中的run()方法# 所以这里会执行p1.run()p1.start()  # 启动进程p1p2.start()  # 启动进程p2# 输出p1和p2进程的执行状态,如果真正进行,返回True;否则返回Falseprint("p1.is_alive=%s" % p1.is_alive())print("p2.is_alive=%s" % p2.is_alive())# 输出p1和p2进程的别名和PIDprint("p1.name=%s" % p1.name)print("p1.pid=%s" % p1.pid)print("p2.name=%s" % p2.name)print("p2.pid=%s" % p2.pid)print("------等待子进程-------")p1.join()  # 等待p1进程结束p2.join()  # 等待p2进程结束print("------父进程执行结束-------")
2.3 使用进程池Pool创建进程
在前面的两个小节中,我们使用 Process 类创建进程。如果要创建几十个或者上百个进程,则需要实例化更多个 Process 类。有没有更好的创建进程的方式解决这类问题呢?答案就是使用 multiprocessing 模块提供的 Pool 类,即 Pool 进程池。为了更好的理解进程池,可以将进程池比作水池,如下图所示:

我们需要完成放满10个水盆的水的任务,而在这个水池中,最多可以安放3个水盆接水,也就是同时可以执行3个任务,即开启3个进程。为更快完成任务,现在打开3个水龙头开始放水,当有一个水盆的水接满时,即该进程完成1个任务,我们就将这个水盆的水倒入水桶中,然后继续接水,即执行下一个任务。如果3个水盆每次同时装满水,那么在放满第9盆水后,系统会随机分配1个水盆接水,另外2个水盆空闲。具体语法格式如下:
class multiprocessing.pool.Pool([processes[, initializer[, initargs[, maxtasksperchild[, context]]]]])
参数简单说明如下:
-
processes:设置可工作的进程数。如果为 None,会使用运行环境的 CPU 核心数作为默认值,可以通过 os.cpu_count() 查看。
import osprint(os.cpu_count()) # 16 -
initializer:如果 initializer 不为 None,那么每一个工作进程在开始时会调用 initializer(*initargs)
-
maxtasksperchild:工作进程退出之前可以完成的任务数,完成后用一个新的工作进程来替代原进程,让闲置的资源被释放。maxtasksperchild 默认是 None,意味着只要 Pool 存在,工作进程就会一直存活
-
context:用来指定工作进程启动时的上下文,一般使用 multiprocessing.Pool() 或者一个 context 对象的 Pool() 方法来创建一个进程池,两种方法都会被适当设置 context
Pool 常用实例方法说明如下:
- apply_async(func[, args[, kwds]]) :使用非阻塞方式调用 func() 函数(并行执行,堵塞方式必须等待上一个进程退出才能执行下一个进程),args 为传递给 func() 函数的参数列表,kwds 为传递给 func() 函数的关键字参数列表
- apply(func[, args[, kwds]]):使用阻塞方式调用 func() 函数
- close():关闭 Pool,使其不再接受新的任务
- terminate():不管任务是否完成,立即终止
- join():主进程阻塞,等待子进程的退出, 必须在 close 或 terminate 之后使用
- map(func,iterable[,chunksize=None):使进程阻塞直到结果返回,参数 iterable 是一个选代器,该方法将 iterable 内的每一个对象作为单独的任务提交给进程池
- map_async():与 map 用法一致,但它是非阻塞的
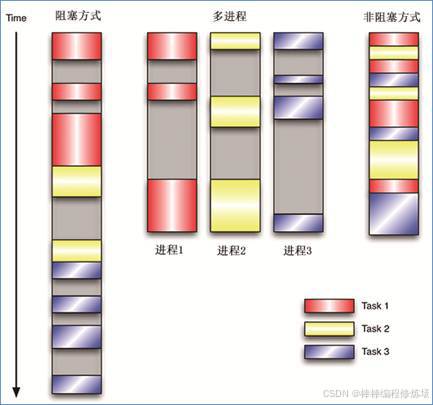
在上面的方法提到 apply_async() 使用非阻塞方式调用函数,而 apply() 使用阻塞方式调用函数。那么什么又是阻塞和非阻塞呢?在下图中,分别使用阻塞方式和非阻塞方式执行3个任务。如果使用阻塞方式,必须等待上一个进程退出才能执行下一个进程,而使用非阻塞方式,则可以并行执行3个进程。
示例1:
# -*- coding: utf-8 -*-
# @Time    : 2025-05-29 14:57
# @Author  : bb_bcxlc
# @File    : mutiprocess_pool1.py
# @Software: PyCharm
# @Blog: https://blog.csdn.net/xw1680import multiprocessing  # 导入multiprocessing包def func(msg):  # 进程处理函数print("开始进程: ", msg)# time.sleep(3)  # 阻塞3秒print("结束进程: ", msg)if __name__ == "__main__":  # 主进程pool = multiprocessing.Pool(processes=3)  # 创建进程池for i in range(4):msg_ = f"ID {i}"# 应用非阻塞进程# 维持执行的进程总数为processes,当一个进程执行完毕后会,再添加新的进程进去pool.apply_async(func, (msg_,))  #print("并发执行: ")pool.close()  # 关闭进程池pool.join()  # 调用join之前,先调用close函数,否则会出错# 执行完close后,不会有新的进程加入到pool,join函数等待所有子进程结束print("子进程全部结束")
示例2:
# -*- coding: utf-8 -*-
# @Time    : 2025-05-29 15:04
# @Author  : bb_bcxlc
# @File    : mutiprocess_pool2.py
# @Software: PyCharm
# @Blog: https://blog.csdn.net/xw1680import time  # 导入时间模块
from multiprocessing import Pool  # 导入Pool类def run(n):  # 进程处理函数time.sleep(1)  # 阻塞1秒return n * n  # 返回浮点数的平方if __name__ == "__main__":  # 主进程test_fl = [1, 2, 3, 4, 5, 6]  # 待处理的数列print('顺序执行:')  # 顺序执行,也就是串行执行,单进程s = time.time()  # 计时开始for fn in test_fl:run(fn)e1 = time.time()  # 计时结束print("顺序执行时间:", int(e1 - s))  # 计算所用时差print('并行执行:')  # 创建多个进程,并行执行pool = Pool(6)  # 创建拥有6个进程数量的进程池# testFL是要处理的数据列表,run是处理testFL列表中数据的函数rl = pool.map(run, test_fl)  # 并发执行运算pool.close()  # 关闭进程池,不再接受新的进程pool.join()  # 主进程阻塞等待子进程的退出e2 = time.time()  # 计时结束'''顺序执行:顺序执行时间: 6并行执行:并行执行时间: 1[1, 4, 9, 16, 25, 36]'''print("并行执行时间:", int(e2 - e1))  # 计算所用时差print(rl)  # 打印计算结果
2.4 concurrent.futures包
concurrent.futures 是 Python 标准库中用于简化并发编程的模块,主要提供 线程池(ThreadPoolExecutor) 和 进程池(ProcessPoolExecutor) 两种方式来并发执行任务。它于 Python 3.2 引入,是更现代的并发编程方式,相比 threading 和 multiprocessing 更加易用。核心组件:
-
ThreadPoolExecutor:使用线程实现并发,适合 I/O 密集型任务(如网络请求、文件读写)
def __init__(self, max_workers=None, thread_name_prefix='',initializer=None, initargs=()): -
ProcessPoolExecutor:使用进程实现并发,适合 CPU 密集型任务(如数据计算、图像处理)
class ProcessPoolExecutor(_base.Executor):def __init__(self, max_workers=None, mp_context=None,initializer=None, initargs=(), *, max_tasks_per_child=None):
实例化参数对比表:
| 参数名 | ThreadPoolExecutor | ProcessPoolExecutor | 说明 |
|---|---|---|---|
max_workers | ✅ 支持 | ✅ 支持 | 池中至多创建max_workers个线程或者进程的池来同时异步执行,返回Executor实例。支持上下文,进入时返回自己,退出时调用shutdown(wait=True),该参数是用的最多的,其他了解即可 |
thread_name_prefix | ✅ 支持 | ❌ 不支持 | 线程名前缀(仅线程池有意义) |
initializer | ✅ 支持 | ✅ 支持 | 每个线程/进程启动时执行的函数 |
initargs | ✅ 支持 | ✅ 支持 | initializer 的参数元组。 |
mp_context | ❌ 不支持 | ✅ 支持 | 指定使用的 multiprocessing 上下文(如 "fork", "spawn") |
max_tasks_per_child | ❌ 不支持 | ✅ 支持(Python 3.7+) | 每个子进程执行的最大任务数,超出后会重启子进程。 |
以下方法在两个类中均可使用(继承自 _base.Executor 抽象基类):
| 方法名 | 描述 |
|---|---|
submit(fn, *args, **kwargs) | 异步提交单个执行的函数及其参数,如有空闲开启 daemon 线程,返回 Future 类的实例 |
map(func, *iterables, timeout=None, chunksize=1) | 并发映射多个任务,返回结果迭代器 |
shutdown(wait=True, cancel_futures=False) | 优雅关闭线程/进程池,wait 表示是否等待到任务线程/进程完成,wait=False 可异步关闭 |
__enter__() / __exit__() | 支持 with 语法自动管理资源 |
基类中 __enter__() 与 __exit__() 的实现:
def __enter__(self):return selfdef __exit__(self, exc_type, exc_val, exc_tb):self.shutdown(wait=True)return False
Future 对象常用方法(submit 返回):
| 方法名 | 返回值类型 | 详细描述 |
|---|---|---|
result(timeout=None) | 任意(任务的返回值) | 获取任务的执行结果。若任务尚未完成,则会阻塞当前线程直到任务完成或超时。若任务抛出异常,该方法会在调用时重新抛出异常。⚠️:若设置了 timeout(秒数)且超时,抛出 concurrent.futures.TimeoutError |
exception(timeout=None) | BaseException 或 None | 返回任务在执行过程中抛出的异常对象,如果没有异常则返回 None。若任务尚未完成,则阻塞直到完成或超时。⚠️:若设置 timeout 且任务未完成,则抛出 TimeoutError |
done() | bool | 判断任务是否已经执行完成(无论成功或异常)。立即返回,不阻塞 |
cancel() | bool | 试图取消任务。如果任务还未开始运行,则成功取消并返回 True。如果任务已经开始运行,则无法取消,返回 False |
cancelled() | bool | 判断该任务是否已被成功取消(即 cancel() 返回 True) |
running() | bool | 判断任务是否正在运行中(已开始但尚未完成)。不常用,更多用于调试 |
add_done_callback(fn) | None | 给 Future 添加一个回调函数,当任务完成后自动调用。函数 fn 应接受一个参数(即该 Future 对象本身)。常用于非阻塞式的通知机制或异步处理 |
ThreadPoolExecutor 示例:
# -*- coding: utf-8 -*-
# @Time    : 2025-05-27 22:23
# @Author  : bb_bcxlc
# @File    : 18.thread_pool_executor_demo.py
# @Software: PyCharm
# @Blog: https://blog.csdn.net/xw1680from concurrent.futures import ThreadPoolExecutor
import datetime
import loggingFORMAT = "%(asctime)s [%(processName)s %(threadName)s] %(message)s"
logging.basicConfig(format=FORMAT, level=logging.INFO)def calc(base):result = basefor j in range(1000000000):  # 10亿result += 1logging.info(result)return resultstart = datetime.datetime.now()
executor = ThreadPoolExecutor(3)
fs = []
for i in range(3):future = executor.submit(calc, i * 100)fs.append(future)print('-' * 30)for f in fs:print(f, f.done())print('=' * 30)
delta = (datetime.datetime.now() - start).total_seconds()
print('程序总耗时: {} 秒!'.format(delta))
程序运行结果:
------------------------------
<Future at 0x2714524dc70 state=running> False
<Future at 0x27143de65a0 state=running> False
<Future at 0x271464f0860 state=running> False
==============================
程序总耗时: 0.900201 秒!
2025-05-29 07:07:08,757 [MainProcess ThreadPoolExecutor-0_2] 1000000200
2025-05-29 07:07:10,077 [MainProcess ThreadPoolExecutor-0_0] 1000000000
2025-05-29 07:07:11,556 [MainProcess ThreadPoolExecutor-0_1] 1000000100
可以看出程序执行的结果不符合我们的预期,怎么可能整个程序执行完成才 0.900201秒,由于主线程通知子线程完成任务之后,没有额外操作,则不会阻塞等待,继续向下执行,直接执行了时间计算及打印的语句,然而此时子线程还没有完成任务,这样统计是不准确的,所以我们需要对其进行优化,如下图所示:
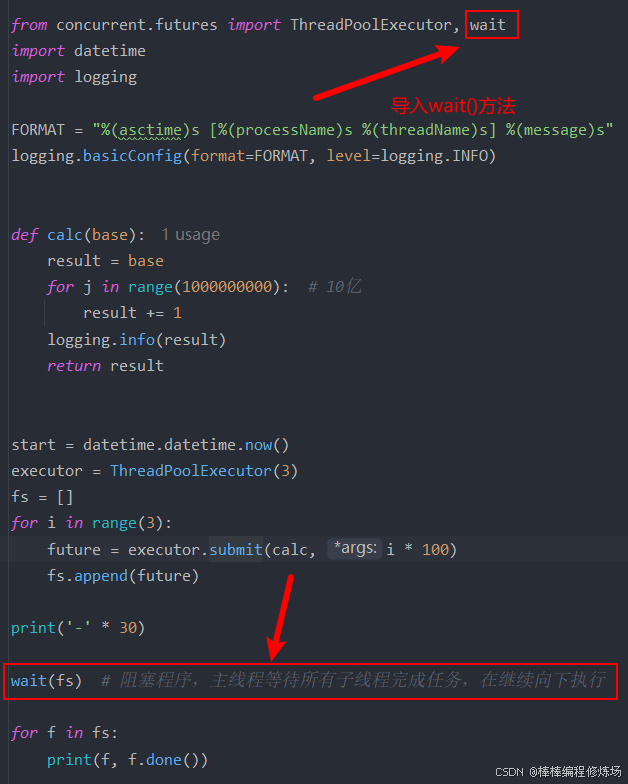
改进之后的程序执行结果如下:
------------------------------
2025-05-29 07:13:58,352 [MainProcess ThreadPoolExecutor-0_0] 1000000000
2025-05-29 07:14:03,545 [MainProcess ThreadPoolExecutor-0_2] 1000000200
2025-05-29 07:14:03,782 [MainProcess ThreadPoolExecutor-0_1] 1000000100
<Future at 0x1685ff1dc70 state=finished returned int> True
<Future at 0x16861240710 state=finished returned int> True
<Future at 0x168612408c0 state=finished returned int> True
==============================
程序总耗时: 112.138473 秒!
程序执行结果符合我们的预期。前面我们说过 ThreadPoolExecutor 类支持 with 语法,改进:
from concurrent.futures import ThreadPoolExecutor
import datetime
import loggingFORMAT = "%(asctime)s [%(processName)s %(threadName)s] %(message)s"
logging.basicConfig(format=FORMAT, level=logging.INFO)def calc(base):result = basefor j in range(1000000000):  # 10亿result += 1logging.info(result)return resultstart = datetime.datetime.now()
executor = ThreadPoolExecutor(3)with executor:fs = []for i in range(3):future = executor.submit(calc, i * 100)fs.append(future)print('-' * 30)
for f in fs:print(f, f.done())print('=' * 30)
delta = (datetime.datetime.now() - start).total_seconds()
print('程序总耗时: {} 秒!'.format(delta))
再次执行程序,结果如下:
2025-05-29 07:18:25,968 [MainProcess ThreadPoolExecutor-0_2] 1000000200
2025-05-29 07:18:34,959 [MainProcess ThreadPoolExecutor-0_0] 1000000000
------------------------------
<Future at 0x2c2ffb3b590 state=finished returned int> True
<Future at 0x2c2fe76c620 state=finished returned int> True
<Future at 0x2c2ffb60b90 state=finished returned int> True
==============================
程序总耗时: 116.703488 秒!
2025-05-29 07:18:37,098 [MainProcess ThreadPoolExecutor-0_1] 1000000100
可以发现程序执行结果符合我们的预期,那么这里我们明明没有调用 wait() 方法,为什么主线程会等待所有子线程完成任务呢?是因为程序会在退出 with 块时阻塞,直到线程池中的所有任务全部完成。看源码:
def __exit__(self, exc_type, exc_val, exc_tb):self.shutdown(wait=True)return False
如果我们想要获取函数的返回值,可以使用 result() 方法,该方法也会阻塞:
from concurrent.futures import ThreadPoolExecutor
import datetime
import loggingFORMAT = "%(asctime)s [%(processName)s %(threadName)s] %(message)s"
logging.basicConfig(format=FORMAT, level=logging.INFO)def calc(base):result = basefor j in range(1000000000):  # 10亿result += 1logging.info(result)return resultstart = datetime.datetime.now()
executor = ThreadPoolExecutor(3)fs = []
for i in range(3):future = executor.submit(calc, i * 100)fs.append(future)print('-' * 30)
for f in fs:# result()方法会阻塞,获取函数执行完成之后的返回值,done()方法不会阻塞,print(f, f.done(), f.result())print('=' * 30)
delta = (datetime.datetime.now() - start).total_seconds()
print('程序总耗时: {} 秒!'.format(delta))
程序执行结果:
# 发现我们未调用wait()方法,程序一样阻塞住了,且打印了函数的返回值
# 程序执行结果符合我们的预期
------------------------------
2025-05-29 07:25:38,388 [MainProcess ThreadPoolExecutor-0_2] 1000000200
2025-05-29 07:25:48,351 [MainProcess ThreadPoolExecutor-0_1] 1000000100
2025-05-29 07:25:48,561 [MainProcess ThreadPoolExecutor-0_0] 1000000000
<Future at 0x235e26bf110 state=finished returned int> False 1000000000
<Future at 0x235e0159190 state=finished returned int> True 1000000100
<Future at 0x235e26e0920 state=finished returned int> True 1000000200
==============================
程序总耗时: 107.195626 秒!
用 ProcessPoolExecutor 改写上面的程序:
# -*- coding: utf-8 -*-
# @Time    : 2025-05-27 22:29
# @Author  : bb_bcxlc
# @File    : 19.process_pool_executor_demo.py
# @Software: PyCharm
# @Blog: https://blog.csdn.net/xw1680from concurrent.futures import ProcessPoolExecutor
import datetime
import loggingFORMAT = "%(asctime)s [%(processName)s %(threadName)s] %(message)s"
logging.basicConfig(format=FORMAT, level=logging.INFO)def calc(base):result = basefor j in range(1000000000):  # 10亿result += 1logging.info(result)return resultif __name__ == '__main__':start = datetime.datetime.now()with ProcessPoolExecutor(3) as executor:fs = []for i in range(3):future = executor.submit(calc, i * 100)fs.append(future)print('-' * 30)for f in fs:print(f, f.done(), f.result())print('=' * 30)delta = (datetime.datetime.now() - start).total_seconds()print('程序总耗时: {} 秒!'.format(delta))
程序执行结果如下:
2025-05-29 07:32:19,482 [SpawnProcess-2 MainThread] 1000000100
2025-05-29 07:32:19,597 [SpawnProcess-3 MainThread] 1000000200
2025-05-29 07:32:19,617 [SpawnProcess-1 MainThread] 1000000000
------------------------------
<Future at 0x2b3e59f41d0 state=finished returned int> True 1000000000
<Future at 0x2b3e4643380 state=finished returned int> True 1000000100
<Future at 0x2b3e6eca5a0 state=finished returned int> True 1000000200
==============================
程序总耗时: 39.999766 秒!
可以看出多进程在执行计算密集型任务的时候有明显的优势。总的来说,concurrent.futures 模块统一了线程池、进程池调用,简化了编程,是 Python 简单的思想哲学的体现。
三、进程通信
先来看一个例子:
# -*- coding: utf-8 -*-
# @Time    : 2025-05-29 12:50
# @Author  : bb_bcxlc
# @File    : test.py
# @Software: PyCharm
# @Blog: https://blog.csdn.net/xw1680import multiprocessing
import time
import oscnt = 0def consumer():global cntwhile True:if cnt <= 0:time.sleep(1)continuecnt -= 1print('I am a consumer, cnt = {}, process_id = {}'.format(cnt, os.getpid()))time.sleep(1)def producer():global cntwhile True:time.sleep(1)cnt += 1print('I am a producer, cnt = {}, process_id = {}'.format(cnt, os.getpid()))time.sleep(1)if __name__ == '__main__':p1 = multiprocessing.Process(target=producer)p2 = multiprocessing.Process(target=consumer)p1.start()p2.start()
程序运行结果:
I am a producer, cnt = 1, process_id = 21724
I am a producer, cnt = 2, process_id = 21724
I am a producer, cnt = 3, process_id = 21724
I am a producer, cnt = 4, process_id = 21724
I am a producer, cnt = 5, process_id = 21724
.......
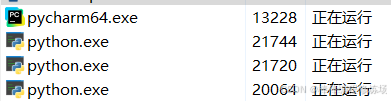
为什么没有看到消费呢?难道是我们的代码写的有问题,再次确认逻辑发现没有问题,并且在 Windows 下打开任务管理器,发现是有三个进程存在的,如下图所示:
在 consumer 函数 while 循环中添加测试打印代码,看一下是哪里的问题:
def consumer():global cntwhile True:# 添加调试语句print('in consumer cnt = {}~~~'.format(cnt))if cnt <= 0:time.sleep(1)continuecnt -= 1print('I am a consumer, cnt = {}, process_id = {}'.format(cnt, os.getpid()))time.sleep(1)
执行程序发现 consumer 函数中的 cnt 一直是 0,那每次都跳过此次循环,就走不到下面的消费语句,再结合 producer 函数中 cnt 一直在递增,从这里说明 cnt 这个变量没有被共享,每个函数都是用的自己独有的,这说明:
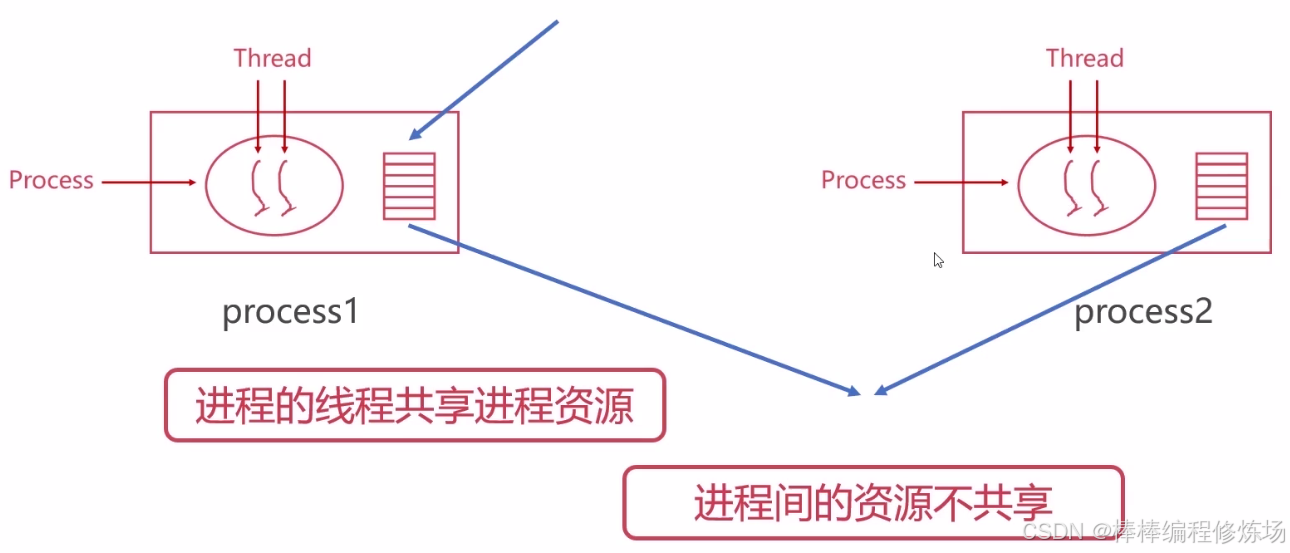
进程间的资源不共享,那么进程间想要通信怎么办呢?
Python 在进程间同步提供了和线程同步一样的类,使用的方法一样,使用的效果也类似。不过,进程间代价要高于线程间,而且系统底层实现是不同的,只不过 Python 屏蔽了这些不同之处,让用户简单使用多进程。multiprocessing 还提供共享内存、服务器进程来共享数据,还提供了用于进程间通讯的 Queue 队列、 Pipe 管道。
通信方式不同:
- 多进程就是启动多个解释器进程,进程间通信必须序列化、反序列化
- 数据的线程安全性问题。如果每个进程中没有实现多线程,GIL 可以说没什么用了


3.1 Pipe类
Pipe 可以创建管道,常用于在两个进程之间进行通信,两个进程分别位于管道的两端。具体语法格式如下:
In [2]: multiprocessing.Pipe?
Signature: multiprocessing.Pipe(duplex=True)
Docstring: Returns two connection object connected by a pipe
File:      d:\devtools\python\python312\lib\multiprocessing\context.py
Type:      method
Pipe(duplex=True) 该方法将返回两个连接对象 (con1,con2),代表管道的两端。参数 duplex 为可选,默认值为 True。
- 如果 duplex 为 True,那么该管道是全双工模式,即 con1 和 con2 均可收发消息。
- 如果 duplex 为 False,con1 只负责接收消息,con2 只负责发送消息。
实例化的 Pipe 对象拥有 connection 的方法,以下为常用方法:
- send(obj):发送数据
- recv():接收数据。如果没有消息可接收,recv() 方法会一直阻塞。如果管道已经被关闭,那么 recv() 方法会抛出 EOFError 错误
- poll([timeout]):查看缓冲区是否有数据,可设置时间。如果 timeout 为 None,则会无限超时
- send_bytes(buffer[,offset[,size]]):发送二进制字节数据
- recv_bytes([maxlength]):接收二进制字节数据
【示例1】使用 Pipe() 方法创建两个连接对象,然后通过管道功能,一个对象可以发送消息,另一个对象可以接收消息。
# -*- coding: utf-8 -*-
# @Time    : 2025-05-29 13:26
# @Author  : bb_bcxlc
# @File    : pipe_demo1.py
# @Software: PyCharm
# @Blog: https://blog.csdn.net/xw1680from multiprocessing import Pipea, b = Pipe(True)
a.send('hi, b~~~')
print(b.recv())
a, b = Pipe(False)  # 禁止全双工模式,只能够在b端发送消息,只能在a端接收消息
b.send('hi, a~~~')
# a.send('hi, b~~~')  # OSError: connection is read-only
print(a.recv())
【示例 2】调用 multiprocessing.Pipe() 方法创建一个管道,管道两端连接两个对象 con1 和 con2,然后使用 multiprocessing.Process() 方法创建两个进程,在进程中分别绑定 con1 和 con2 两个对象,那么通过 send() 和 recv() 方法,就可以在两个通道之间进行通信。
# -*- coding: utf-8 -*-
# @Time    : 2025-05-29 13:31
# @Author  : bb_bcxlc
# @File    : pipe_demo2.py
# @Software: PyCharm
# @Blog: https://blog.csdn.net/xw1680from multiprocessing import Process, Pipe  # 导入Process和Pipe类def send(pipe):  # 调用进程函数1pipe.send("发送端的消息")  # 在管道中发出一个消息pipe.close()  # 关闭连接对象def recv(pipe):  # 调用进程函数2reply = pipe.recv()  # 接收管道中的消息print('接收端: {}'.format(reply))  # 打印消息if __name__ == '__main__':con1, con2 = Pipe()  # 创建管道对象# 创建进程1sender = Process(target=send, name='send', args=(con1,))sender.start()  # 开始执行调用对象# 创建进程2child = Process(target=recv, name='recv', args=(con2,))child.start()  # 开始执行调用对象
【示例3】利用管道的特性实现生产者一消费者模型设计。
# -*- coding: utf-8 -*-
# @Time    : 2025-05-29 13:35
# @Author  : bb_bcxlc
# @File    : pipe_demo3.py
# @Software: PyCharm
# @Blog: https://blog.csdn.net/xw1680import multiprocessing  # 导入multiprocessing
import random  # 导入随机数模块
import time  # 导入时间模块def producer(pipe):  # 生产者函数while True:time.sleep(1)  # 睡眠item = random.randint(1, 10)  # 生成随机数print('产品编号:{}'.format(item))  # 打印产品信息pipe.send(item)  # 发送消息time.sleep(1)  # 睡眠def consumer(pipe):  # 消费者函数while True:time.sleep(1)  # 睡眠item = pipe.recv()  # 接收消息print('接收产品:{}'.format(item))  # 显示消息time.sleep(1)  # 睡眠if __name__ == "__main__":p1 = multiprocessing.Pipe()  # 实例化通道对象process_producer = multiprocessing.Process(  # 创建进程1target=producer, args=(p1[0],))process_consumer = multiprocessing.Process(  # 创建进程2target=consumer, args=(p1[1],))process_producer.start()  # 执行进程1process_consumer.start()  # 执行进程2process_producer.join()  # 阻塞进程1process_consumer.join()  # 阻塞进程2
3.2 进程队列
3.2.1 队列简介
队列(Queue)就是模仿现实中的排队。例如学生在食堂排队买饭。新来的学生排到队伍最后,最前面的学生买完饭走开,后面的学生跟上。可以看出队列有两个特点:
- 新来的学生都排在队尾
- 最前面的学生完成后离队,后面一个跟上
根据以上特点,可以归纳出队列的结构如下图所示:

3.2.2 多进程队列的使用
Queue 可以创建共享的进程队列,使用 Queue 能够实现多进程之间的数据传递。底层队列使用管道和锁定实现,具体语法格式如下:
In [3]: multiprocessing.Queue?
Signature: multiprocessing.Queue(maxsize=0)
Docstring: Returns a queue object
File:      d:\devtools\python\python312\lib\multiprocessing\context.py
Type:      method
初始化 Queue() 时(例如:q=Queue(num)),若括号中没有指定最大可接收的消息数量,或数量为负值,那么就代表可接受的消息数量没有上限(直到内存的尽头)。Queue 实例对象的常用方法说明如下:
- Queue.qsize():返回当前队列包含的消息数量
- Queue.empty():如果队列为空,返回 True;反之返回 False
- Queue.full():如果队列满了,返回 True;反之返回 False
- Queue.get([block[, timeout]]):获取队列中的一条消息,然后将其从列队中移除,block 默认值为 True
- 如果 block 使用默认值,且没有设置 timeout(单位秒),消息列队为空,此时程序将被阻塞(停在读取状态),直到从消息列队读到消息为止。如果设置了 timeout,则会等待 timeout 秒,若还没读取到任何消息,则抛出
"Queue.Empty"异常 - 如果 block 值为 False,消息列队为空,则会立刻抛出
"Queue.Empty"异常
- 如果 block 使用默认值,且没有设置 timeout(单位秒),消息列队为空,此时程序将被阻塞(停在读取状态),直到从消息列队读到消息为止。如果设置了 timeout,则会等待 timeout 秒,若还没读取到任何消息,则抛出
- Queue.get_nowait():相当 Queue.get(False)
- Queue.put(item,[block[, timeout]]):将 item 消息写入队列,block 默认值为 True
- 如果 block 使用默认值,且没有设置 timeout(单位秒),消息列队如果已经没有空间可写入,此时程序将被阻塞(停在写入状态),直到从消息列队腾出空间为止,如果设置了 timeout,则会等待 timeout 秒,若还没空间,则抛出
"Queue.Full"异常 - 如果 block 值为 False,消息列队没有空间可写入,则会立刻抛出
"Queue.Full"异常
- 如果 block 使用默认值,且没有设置 timeout(单位秒),消息列队如果已经没有空间可写入,此时程序将被阻塞(停在写入状态),直到从消息列队腾出空间为止,如果设置了 timeout,则会等待 timeout 秒,若还没空间,则抛出
- Queue.put_nowait(item):相当 Queue.put(item, False)
示例1:
# -*- coding: utf-8 -*-
# @Time    : 2025-05-29 13:52
# @Author  : bb_bcxlc
# @File    : mutiprocess_queue.py
# @Software: PyCharm
# @Blog: https://blog.csdn.net/xw1680from multiprocessing import Queue  # 导入Queue类q = Queue()  # 创建一个队列对象
# 使用put方法往队列里面放值
q.put(1)  # 添加数字1
q.put(2)  # 添加数字2
q.put(3)  # 添加数字3
# 使用get方法从队列里面取值
print(q.get())  # 打印 1
print(q.get())  # 打印 2
print(q.get())  # 打印 3
q.put(4)  # 添加数字4
q.put(5)  # 添加数字5
print(q.get())  # 打印 4
示例2:
# -*- coding: utf-8 -*-
# @Time    : 2025-05-29 14:02
# @Author  : bb_bcxlc
# @File    : mutiprocess_queue2.py
# @Software: PyCharm
# @Blog: https://blog.csdn.net/xw1680from multiprocessing import Queue  # 导入Queue类q = Queue(3)  # 创建一个队列对象,设置最大项数为3
# 使用put方法往队列里面放值
q.put(1)  # 添加数字1
q.put(2)  # 添加数字2
q.put(3)  # 添加数字3
# q.put(4)  # 如果队列已经满了,程序就会停在这里,
# 等待数据被人取走,再将数据放入队列。如果队列中数据不被取走,程序就会永远停在这里。try:q.put_nowait(3)  # 可以使用put_nowait方法,如果队列满了不会阻塞,但是会因为队列满了而报错。
except:  # 因此可以用一个try语句来处理这个错误。# 这样程序不会一直阻塞下去,但是会提示这个消息。print('队列已经满了')
# 因此在放入数据之前,可以先看一下队列的状态,如果已经满了,就不继续put了。
print(q.full())  # 提示满了
print(q.get())  # 打印 1
print(q.get())  # 打印 2
print(q.get())  # 打印 3
# print(q.get()) 	# 同put方法一样,如果队列已经空了,那么继续取就会出现阻塞。
try:q.get_nowait(3)  # 可以使用get_nowait方法,如果队列满了不会阻塞,# 但是会因为没取到值而报错。
except:  # 使用try处理错误。这样程序就不会一直阻塞下去。print('队列已经空了')
print(q.empty())  # 提示空了
示例3:
# -*- coding: utf-8 -*-
# @Time    : 2025-05-29 14:02
# @Author  : bb_bcxlc
# @File    : mutiprocess_queue3.py
# @Software: PyCharm
# @Blog: https://blog.csdn.net/xw1680from multiprocessing import Process, Queue  # 导入Process、Queue类def f(q, name, age):  # 进程函数q.put([name, age])  # 调用主函数中p进程传递过来的进程参数,# 使用put向队列中添加一条数据。
if __name__ == '__main__':queue = Queue()  # 创建一个Queue对象p = Process(target=f, args=(queue, '张三', 18))  # 创建一个进程p.start()  # 执行进程print(queue.get())  # 打印消息,输出为:['张三', 18]p.join()  # 阻塞进程
示例4:
# -*- coding: utf-8 -*-
# @Time    : 2025-05-29 14:02
# @Author  : bb_bcxlc
# @File    : mutiprocess_queue4.py
# @Software: PyCharm
# @Blog: https://blog.csdn.net/xw1680from multiprocessing import Process, Queue  # 导入Process、Queue类
import time  # 导入时间模块
import random  # 导入随机生成器模块def producer(q, name, food):  # 生产者函数for i in range(3):print(f'{name}生产了{food}{i}')time.sleep((random.randint(1, 3)))  # 随机阻塞一点时间res = f'{food}{i}'q.put(res)  # 在队列中添加数据def consumer(q, name):  # 消费者函数while True:res = q.get(timeout=5)if res is None:break  # 判断队列拿出的是不是生产者放的结束生产的标识,# 如果是则不取,直接退出,结束程序time.sleep((random.randint(1, 3)))  # 随机阻塞一点时间print(f'{name}吃了{res}')  # 打印消息if __name__ == '__main__':q = Queue()  # 为的是让生产者和消费者使用同一个队列,# 使用同一个队列进行通讯# 多个生产者进程p1 = Process(target=producer, args=(q, '张三', '巧克力'))p2 = Process(target=producer, args=(q, '李四', '冰激凌'))p3 = Process(target=producer, args=(q, '王五', '可乐'))# 多个消费者进程c1 = Process(target=consumer, args=(q, '小朱'))c2 = Process(target=consumer, args=(q, '小刘'))# 告诉操作系统启动生产者进程p1.start()p2.start()p3.start()# 告诉操作系统启动消费者进程c1.start()c2.start()# 阻塞进程p1.join()p2.join()p3.join()# 结束生产,几个消费者就put几次q.put(None)q.put(None)
四、多进程优化图片下载器各个模块
4.1 代码改写
common.py 模块 BaseModule 类中添加方法 _process_multi_process,具体实现如下:
def _process_multi_process(self, pic_url_list):raise NotImplementedError
executors.py 模块中导入 ProcessPoolExecutor,并基于其创建进程池,具体如下:
from concurrent.futures import ThreadPoolExecutor, ProcessPoolExecutorMAX_WORKERS = 10
thread_pool_executor = ThreadPoolExecutor(max_workers=MAX_WORKERS)
process_pool_executor = ProcessPoolExecutor(max_workers=MAX_WORKERS)
downloader.py 模块中 Downloader 类重写父类 _process_multi_process 方法:
def _process_multi_process(self, pic_url_list):from .executors import process_pool_executorimg_list = []futures = []for pic_url in pic_url_list:_future = process_pool_executor.submit(self._process, pic_url)futures.append(_future)for _future in futures:img_list.append(_future.result())return img_list
hasher.py 模块中 Hasher 类重写父类 _process_multi_process 方法:
def _process_multi_process(self, pics):from .executors import process_pool_executorpic_md5_list = []futures = []for pic in pics:_future = process_pool_executor.submit(self._process, pic)futures.append(_future)for _f in futures:if _f.result():pic_md5_list.append(_f.result())return pic_md5_list
storager.py 模块中 Storager 类重写父类 _process_multi_process 方法:
def _process_multi_process(self, item_list):from .executors import process_pool_executorfutures = []for item in item_list:_future = process_pool_executor.submit(self._process, item)futures.append(_future)for _f in futures:_f.result()
在 scheduler.py 模块中修改 Scheduler 类的 statistics 方法:
def statistics(self, sing_log, multi_log, multiprocess_log):table = pt.PrettyTable(['类型', '单线程总耗时', '多线程总耗时','多线程提升率', '多进程总耗时', '多进程提升率'])network_row = ['network']cpu_row = ['cpu']disk_row = ['disk']# 获取单线程各个模块执行时间single_network_time = sing_log['network_time'][0]single_cpu_time = sing_log['cpu_time'][0]single_disk_time = sing_log['disk_time'][0]network_row.append(single_network_time)cpu_row.append(single_cpu_time)disk_row.append(single_disk_time)# 获取多线程各个模块执行时间multi_network_time = multi_log['network_time'][0]multi_cpu_time = multi_log['cpu_time'][0]multi_disk_time = multi_log['disk_time'][0]network_row.append(multi_network_time)cpu_row.append(multi_cpu_time)disk_row.append(multi_disk_time)# 多线程转换率multi_network_time_rate = '%.4f%%' % ((single_network_time - multi_network_time)/ single_network_time * 100)multi_cpu_time_rate = '%.4f%%' % ((single_cpu_time - multi_cpu_time)/ single_cpu_time * 100)multi_disk_time_rate = '%.4f%%' % ((single_disk_time - multi_disk_time) / single_disk_time * 100)network_row.append(multi_network_time_rate)cpu_row.append(multi_cpu_time_rate)disk_row.append(multi_disk_time_rate)# TODO 2025.5.29 ==> 获取多进程各个模块执行时间multiprocess_network_time = multiprocess_log['network_time'][0]multiprocess_cpu_time = multiprocess_log['cpu_time'][0]multiprocess_disk_time = multiprocess_log['disk_time'][0]network_row.append(multiprocess_network_time)cpu_row.append(multiprocess_cpu_time)disk_row.append(multiprocess_disk_time)# TODO 2025.5.29 ==> 多进程转换率multiprocess_network_time_rate = '%.4f%%' % ((single_network_time - multiprocess_network_time)/ single_network_time * 100)multiprocess_cpu_time_rate = '%.4f%%' % ((single_cpu_time - multiprocess_cpu_time)/ single_cpu_time * 100)multiprocess_disk_time_rate = '%.4f%%' % ((single_disk_time - multiprocess_disk_time) / single_disk_time * 100)network_row.append(multiprocess_network_time_rate)cpu_row.append(multiprocess_cpu_time_rate)disk_row.append(multiprocess_disk_time_rate)table.add_row(network_row)table.add_row(cpu_row)table.add_row(disk_row)print(table)
在 scheduler.py 模块中添加 main() 函数:
def main():scheduler = Scheduler()# 单线程运行scheduler.set_calc_type(CalcType.SingleThread)single_thread_time = scheduler.process()# 多线程运行scheduler.set_calc_type(CalcType.MultiThread)multi_thread_time = scheduler.process()# 多进程运行scheduler.set_calc_type(CalcType.MultiProcess)multiprocess_time = scheduler.process()# 合并时间数据scheduler.statistics(single_thread_time, multi_thread_time, multiprocess_time)
调用 main() 函数,程序执行结果如下:
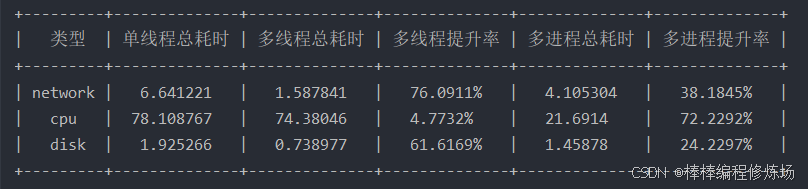
从执行结果可以看出多进程相比单线程有明显优化效果,多进程对 CPU 哈希模块有明显优化效果,除 CPU 哈希模块,多进程优化效果不及多线程优化效果。这是为什么呢?测试:
# -*- coding: utf-8 -*-
# @Time    : 2025-05-29 12:03
# @Author  : bb_bcxlc
# @File    : test_switch_time.py
# @Software: PyCharm
# @Blog: https://blog.csdn.net/xw1680import threading
import queue
from multiprocessing import Process, Queuedef test_process_context_switch():def pass_token1(queue1, queue2):for i in range(1000000):queue1.put(0)queue2.get()def pass_token2(queue1, queue2):for i in range(1000000):queue2.put(1)queue1.get()q1 = Queue()q2 = Queue()p1 = Process(target=pass_token1, args=(q1, q2))p2 = Process(target=pass_token2, args=(q1, q2))p1.start()p2.start()def test_thread_context_switch():def pass_token1(queue1, queue2):for i in range(1000000):queue1.put(0)queue2.get()def pass_token2(queue1, queue2):for i in range(1000000):queue2.put(1)queue1.get()q1 = queue.Queue()q2 = queue.Queue()t1 = threading.Thread(target=pass_token1, args=(q1, q2))t2 = threading.Thread(target=pass_token2, args=(q1, q2))t1.start()t2.start()if __name__ == '__main__':'''[root@VM-16-6-centos ~]# time python3 test_switch_time.py real	1m23.252suser	1m44.708ssys	0m33.380s'''# test_process_context_switch()'''[root@VM-16-6-centos ~]# time python3 test_switch_time.py real	0m36.538suser	0m35.025ssys	0m18.151s'''test_thread_context_switch()
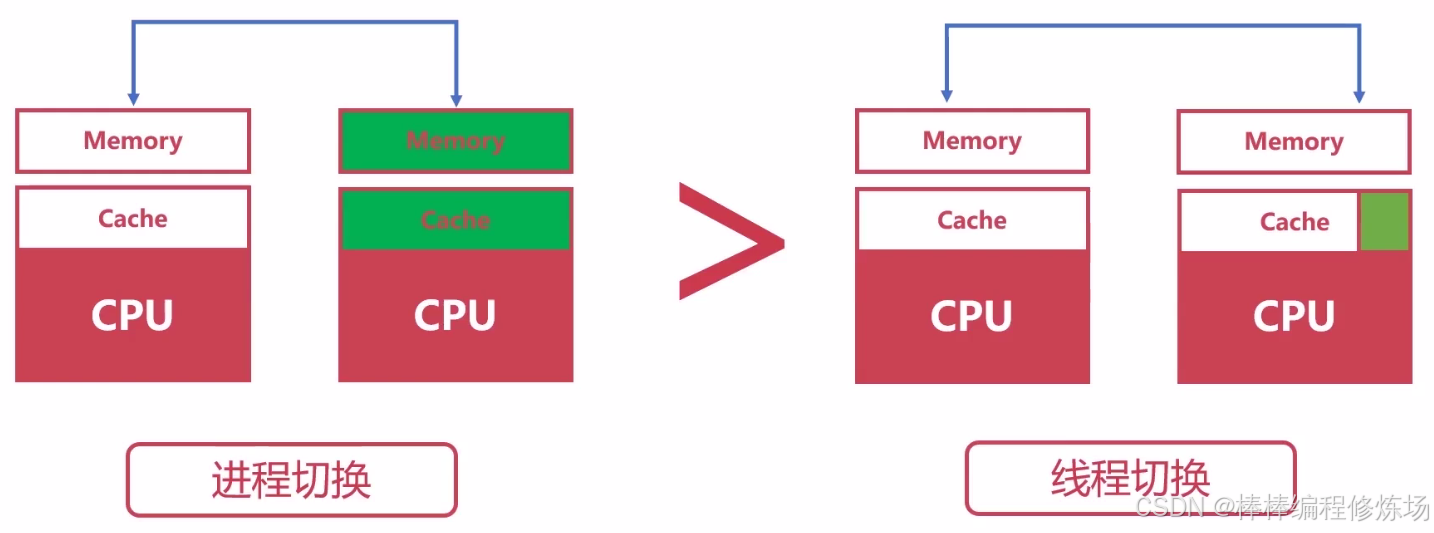
使用多进程需要考虑多进程切换的成本,多进程上下文切换的成本远大于多线程上下文切换的成本。
4.2 多进程、多线程的选择
- CPU 密集型:CPython 中使用到了 GIL,多线程的时候锁相互竞争,且多核优势不能发挥,选用 Python 多进程效率更高。
- IO 密集型:在 Python 中适合使用多线程,可以减少多进程间 IO 的序列化开销。且在 IO 等待的时候,切换到其他线程继续执行,效率不错。
应用:请求/应答模型:WEB 应用中常见的处理模型。master 启动多个worker 工作进程,一般和 CPU 数目相同,发挥多核优势。worker 工作进程中,往往需要操作网络 IO 和磁盘 IO,启动多线程,提高并发处理能力。worker 处理用户的请求,往往需要等待数据,处理完请求还要通过网络 IO 返回响应。这就是 nginx 工作模式。
五、【拓展】CPU核数、并发数与性能的关系
5.1 统筹方法
"统筹方法" 是理解并发和系统资源分配中的一个核心思想,但很多人对它的印象停留在 "听起来像个宏观概念",实际上它是 有数学依据、有工程指导意义的。 什么是统筹方法?
统筹方法(英文:Operations Research / Optimization and Scheduling Theory),是一种通过全面安排各类资源与任务的逻辑先后顺序,以达到最优效率的科学方法。最早由中国数学家
"华罗庚"在 1950 年代提出:统筹方法就是用最少的资源,在最短的时间内,把事情办得最好。它强调两个关键点:
- 系统思维(不是单个任务最优,而是整体最优)
- 优化决策(有限资源下,如何最大化产出)
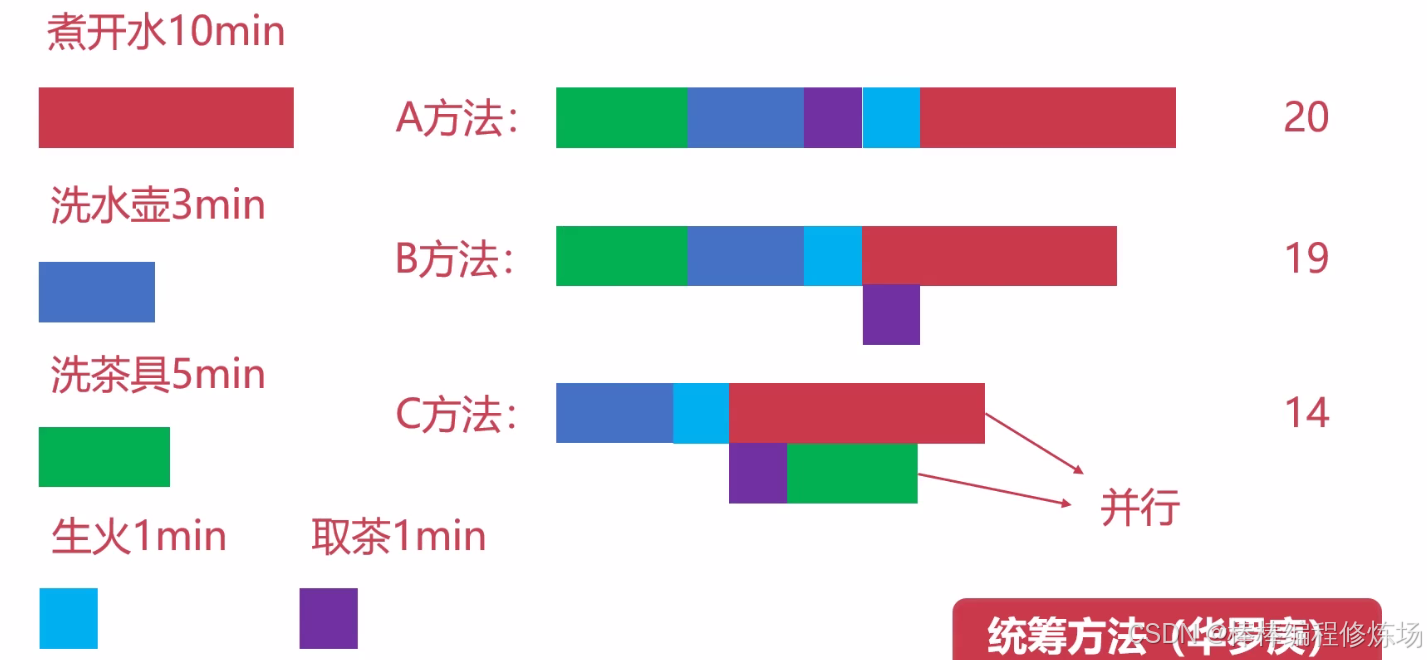
假设你要盖一栋房子,包括以下工作:
| 工序 | 所需时间 | 必须顺序 |
|---|---|---|
| 打地基 | 5天 | 无前置 |
| 砌墙 | 3天 | 必须在地基后 |
| 装门窗 | 2天 | 必须在砌墙后 |
| 涂漆 | 1天 | 必须在装门窗后 |
| 买材料 | 1天 | 可以提前做 |
错误做法: 所有人等地基做完才去买材料,总耗时 = 5+3+2+1+1 = 12天
统筹做法: 材料可以在打地基的同时进行准备,最后总时间:5+3+2+1 = 11天
这就体现了统筹方法中著名的 "关键路径" 思想 —— 只优化关键路径才能缩短总工期。我们再看一个煮茶的例子:
再来看一个复杂傅里叶变换运算的过程:
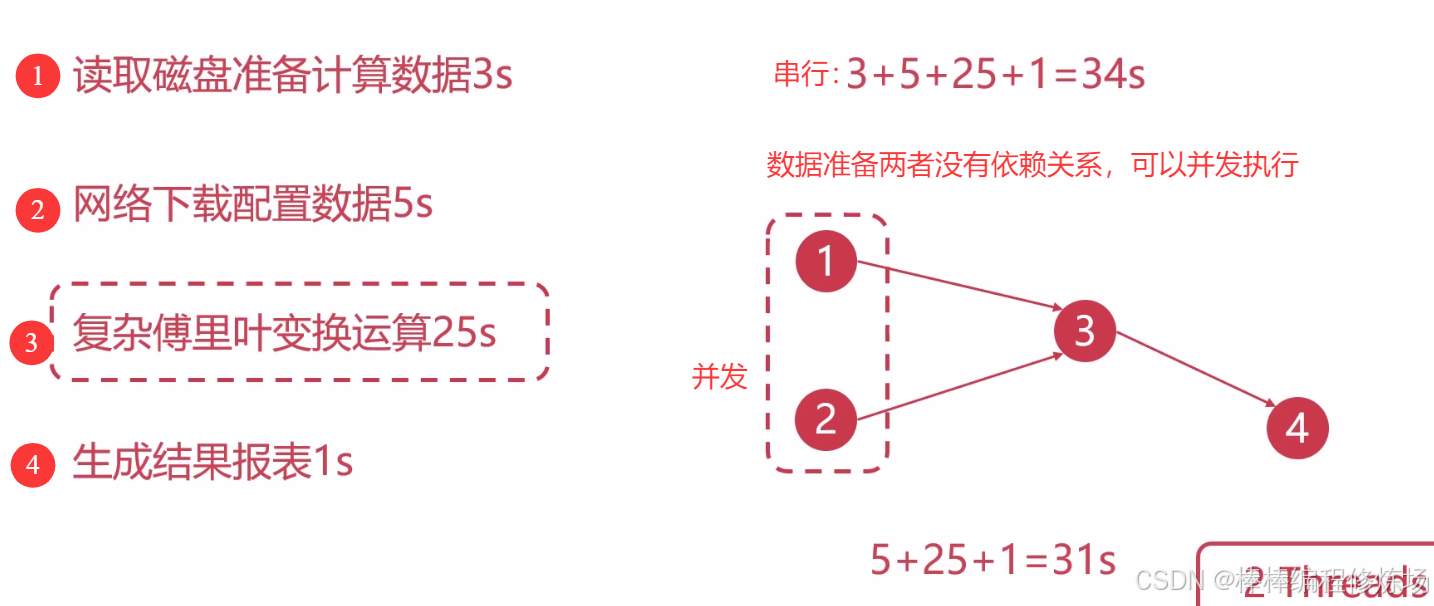
优化第 ③ 步的运算过程:
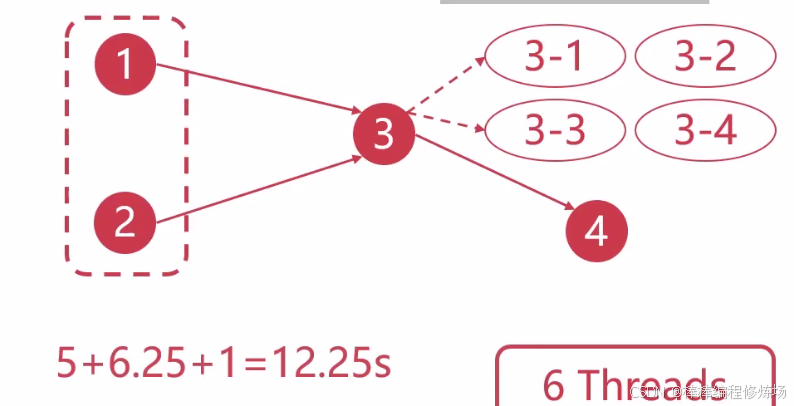
理论最大加速比:31 / 12.25 * 100% = 253.06%
5.2 阿姆达尔定律(Amdahl’s Law)
阿姆达尔定律说明:并发性能的提升,受限于程序中串行部分的占比。数学表达式:
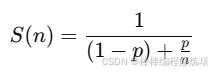
S(n):n 个核心带来的加速比(整体提升倍数)
p:程序中可并行的部分比例(0~1)
n:并发线程数或核心数
使用阿姆达尔定律计算复杂傅里叶变换加速比:
p = 25 / 31 ≈ 0.8065
S(4) = 1/(1-0.8065)+(0.8065/4) = 1 / 0.3951 ≈ 2.531 ≈ 2.531 * 100 = 253.1%
# 可以看出和我们前面计算出来的理论最大加速比是差不多的
图例:

小结:线程越多,性能越好? 线程数和 CPU 核是有关系的,线程数远大于核心数 → 上下文切换开销大,反而变慢(线程过多会引起线程之间竞争 CPU)

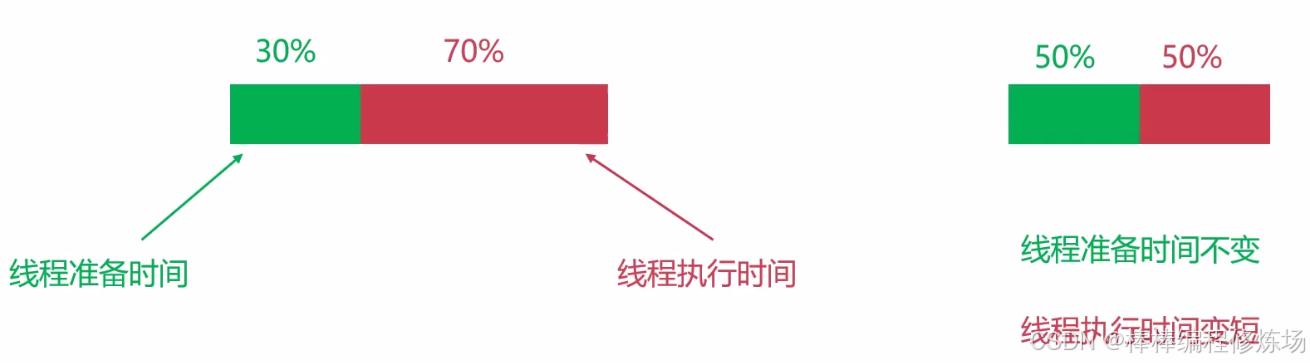
线程数远小于核心数 → 没有发挥硬件优势;线程数量合理匹配 → 性能最优!
CPU密集型: N + 1
IO密集型: 2N + 1
至此今天的学习就到此结束了,笔者在这里声明,笔者写文章只是为了学习交流,以及让更多学习Python语言的读者少走一些弯路,节省时间,并不用做其他用途,如有侵权,联系博主删除即可。感谢您阅读本篇博文,希望本文能成为您编程路上的领航者。祝您阅读愉快!

好书不厌读百回,熟读课思子自知。而我想要成为全场最靓的仔,就必须坚持通过学习来获取更多知识,用知识改变命运,用博客见证成长,用行动证明我在努力。
如果我的博客对你有帮助、如果你喜欢我的博客内容,请点赞、评论、收藏一键三连哦!听说点赞的人运气不会太差,每一天都会元气满满呦!如果实在要白嫖的话,那祝你开心每一天,欢迎常来我博客看看。
编码不易,大家的支持就是我坚持下去的动力。点赞后不要忘了关注我哦!