【Java Web】5.Mybatis

📘博客主页:程序员葵安
🫶感谢大家点赞👍🏻收藏⭐评论✍🏻

文章目录
一、Mybatis入门
1.1 概述
1.2 入门程序
1.3 JDBC介绍
1.4 数据库连接池
1.5 lombok
二、Mybatis基础操作
1.1 需求
1.2 准备
1.3 删除
1.5 更新
1.6 查询
三、Mybatis的XML映射文件
3.1 XML映射文件规范
2.2 XML配置文件实现
2.3 MybatisX的使用
2.4 注解与XML的选择
四、Mybatis动态SQL
4.1 什么是动态SQL
4.2 动态SQL-if
4.4 动态SQL-sql&include
一、Mybatis入门
1.1 概述
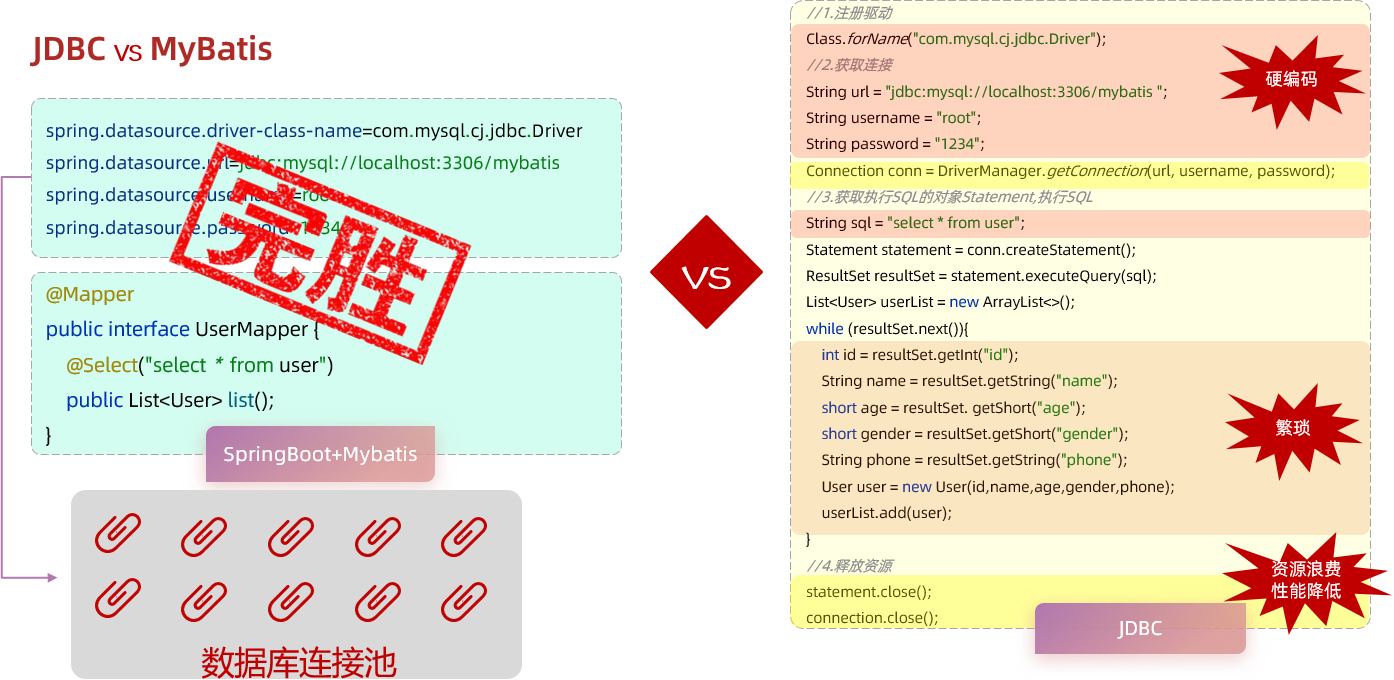
MyBatis是一款优秀的持久层框架,用于简化JDBC的开发
MyBatis本是 Apache的一个开源项目iBatis,2010年这个项目由apache迁移到了google code,并且改名为MyBatis 。2013年11月迁移到Github。
官网:https://mybatis.org/mybatis-3/zh/index.html
1.2 入门程序
使用Mybatis查询所有用户数据
Mybatis操作数据库的步骤:
-
准备工作(创建springboot工程、数据库表user、实体类User)
-
引入Mybatis的相关依赖,配置Mybatis(数据库连接信息)
-
编写SQL语句(注解/XML)
创建springboot工程,并导入 mybatis的起步依赖、mysql的驱动包。

项目工程创建完成后,自动在pom.xml文件中,导入Mybatis依赖和MySQL驱动依赖
<!-- 仅供参考:只粘贴了pom.xml中部分内容 -->
<dependencies><!-- mybatis起步依赖 --><dependency><groupId>org.mybatis.spring.boot</groupId><artifactId>mybatis-spring-boot-starter</artifactId><version>2.3.0</version></dependency><!-- mysql驱动包依赖 --><dependency><groupId>com.mysql</groupId><artifactId>mysql-connector-j</artifactId><scope>runtime</scope></dependency><!-- spring单元测试 (集成了junit) --><dependency><groupId>org.springframework.boot</groupId><artifactId>spring-boot-starter-test</artifactId><scope>test</scope></dependency>
</dependencies>
创建用户表user,并创建对应的实体类User。
用户表
-- 用户表
create table user(id int unsigned primary key auto_increment comment 'ID',name varchar(100) comment '姓名',age tinyint unsigned comment '年龄',gender tinyint unsigned comment '性别, 1:男, 2:女',phone varchar(11) comment '手机号'
) comment '用户表';-- 测试数据
insert into user(id, name, age, gender, phone) VALUES (null,'白眉鹰王',55,'1','18800000000');
insert into user(id, name, age, gender, phone) VALUES (null,'金毛狮王',45,'1','18800000001');
insert into user(id, name, age, gender, phone) VALUES (null,'青翼蝠王',38,'1','18800000002');
insert into user(id, name, age, gender, phone) VALUES (null,'紫衫龙王',42,'2','18800000003');
insert into user(id, name, age, gender, phone) VALUES (null,'光明左使',37,'1','18800000004');
insert into user(id, name, age, gender, phone) VALUES (null,'光明右使',48,'1','18800000005');
实体类
public class User {private Integer id;   //id(主键)private String name;  //姓名private Short age;    //年龄private Short gender; //性别private String phone; //手机号//省略GET, SET方法
}
配置数据库的连接信息

编写SQL语句
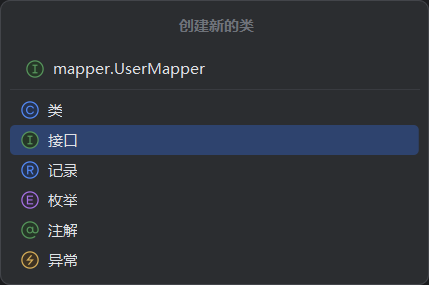
在创建出来的springboot工程中,在引导类所在包下,在创建一个包 mapper。在mapper包下创建一个接口 UserMapper ,这是一个持久层接口(Mybatis的持久层接口规范一般都叫 XxxMapper)。
UserMapper:
import com.itheima.pojo.User;
import org.apache.ibatis.annotations.Mapper;
import org.apache.ibatis.annotations.Select;
import java.util.List;@Mapper
public interface UserMapper {//查询所有用户数据@Select("select id, name, age, gender, phone from user")public List<User> list();}
@Mapper注解:表示是mybatis中的Mapper接口
程序运行时:框架会自动生成接口的实现类对象(代理对象),并给交Spring的IOC容器管理
@Select注解:代表的就是select查询,用于书写select查询语句
在创建出来的SpringBoot工程中,在src下的test目录下,已经自动帮我们创建好了测试类 ,并且在测试类上已经添加了注解 @SpringBootTest,代表该测试类已经与SpringBoot整合。
该测试类在运行时,会自动通过引导类加载Spring的环境(IOC容器)。我们要测试那个bean对象,就可以直接通过@Autowired注解直接将其注入进行,然后就可以测试了。
测试类代码如下:
@SpringBootTest
public class MybatisQuickstartApplicationTests {@Autowiredprivate UserMapper userMapper;@Testpublic void testList(){List<User> userList = userMapper.list();for (User user : userList) {System.out.println(user);}}}
运行结果:
User{id=1, name='白眉鹰王', age=55, gender=1, phone='18800000000'}
User{id=2, name='金毛狮王', age=45, gender=1, phone='18800000001'}
User{id=3, name='青翼蝠王', age=38, gender=1, phone='18800000002'}
User{id=4, name='紫衫龙王', age=42, gender=2, phone='18800000003'}
User{id=5, name='光明左使', age=37, gender=1, phone='18800000004'}
User{id=6, name='光明右使', age=48, gender=1, phone='18800000005'}
配置MySQL数据库连接
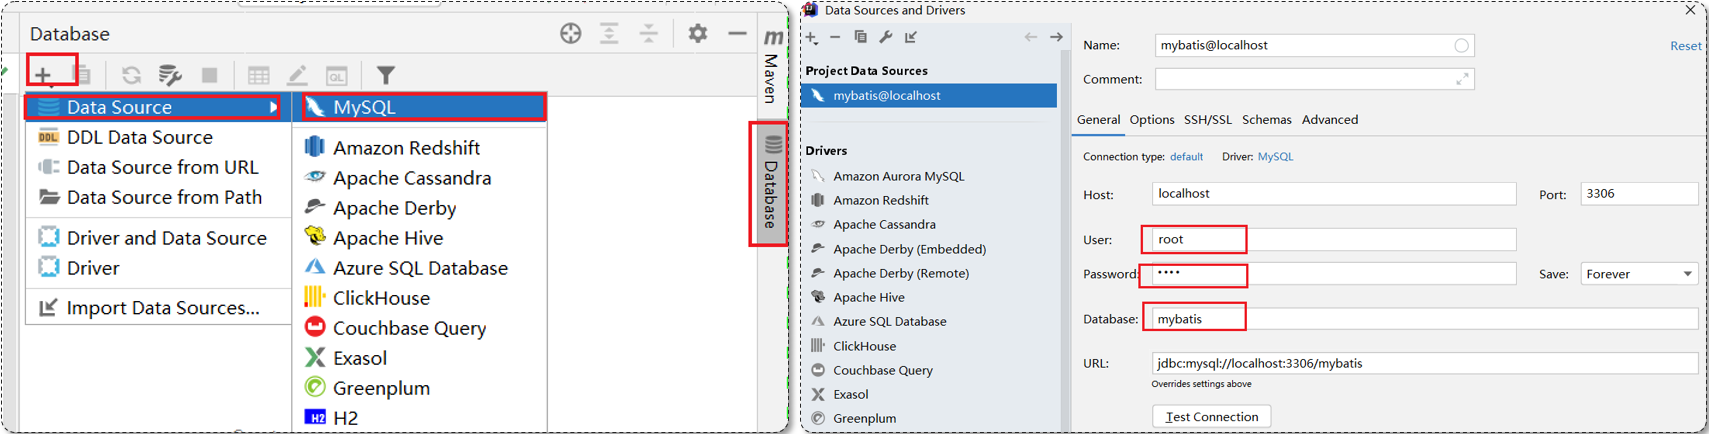
在配置的时候指定连接那个数据库,如上图所示连接的就是mybatis数据库。
1.3 JDBC介绍
JDBC: ( Java DataBase Connectivity ),就是使用Java语言操作关系型数据库的一套API。
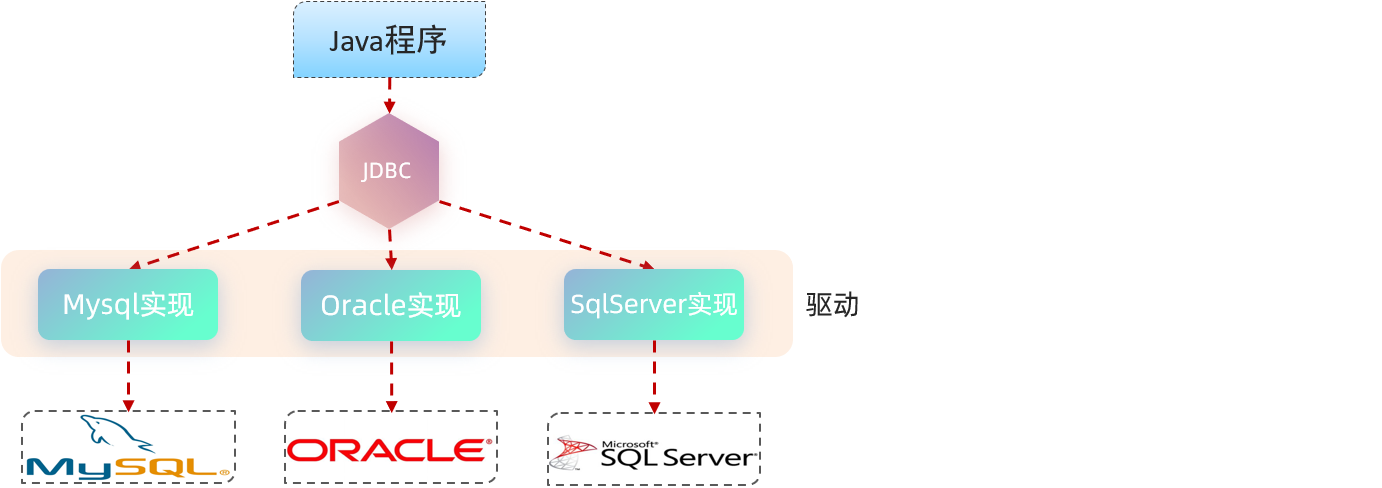
本质:
sun公司官方定义的一套操作所有关系型数据库的规范,即接口。
各个数据库厂商去实现这套接口,提供数据库驱动jar包。
我们可以使用这套接口(JDBC)编程,真正执行的代码是驱动jar包中的实现类。
原始的JDBC程序操作数据库的步骤如下:
-
注册驱动
-
获取连接对象
-
执行SQL语句,返回执行结果
-
处理执行结果
-
释放资源
1.4 数据库连接池
- 数据库连接池是个容器,负责分配、管理数据库连接(Connection)
- 它允许应用程序重复使用一个现有的数据库连接,而不是再重新建立一个
- 释放空闲时间超过最大空闲时间的连接,来避免因为没有释放连接而引起的数据库连接遗漏
优势
- 资源重用
- 提升系统响应速度
- 避免数据库连接遗漏
实现数据库连接池:标准接口——DateSource
常见的数据库连接池:
-
C3P0
-
DBCP
-
Druid
-
Hikari (springboot默认)
现在使用更多的是:Hikari、Druid (性能更优越)
- Hikari(追光者) [默认的连接池]

- Druid(德鲁伊)
Druid连接池是阿里巴巴开源的数据库连接池项目
功能强大,性能优秀,是Java语言最好的数据库连接池之一
如果我们想把默认的数据库连接池切换为Druid数据库连接池,只需要完成以下两步操作即可:
参考官方地址:https://github.com/alibaba/druid/tree/master/druid-spring-boot-starter
1.在pom.xml文件中引入依赖
<dependency><!-- Druid连接池依赖 --><groupId>com.alibaba</groupId><artifactId>druid-spring-boot-starter</artifactId><version>1.2.8</version>
</dependency>
2.在application.properties中引入数据库连接配置
方式1:
spring.datasource.druid.driver-class-name=com.mysql.cj.jdbc.Driver
spring.datasource.druid.url=jdbc:mysql://localhost:3306/mybatis
spring.datasource.druid.username=root
spring.datasource.druid.password=1234
方式2:
spring.datasource.driver-class-name=com.mysql.cj.jdbc.Driver
spring.datasource.url=jdbc:mysql://localhost:3306/mybatis
spring.datasource.username=root
spring.datasource.password=1234
1.5 lombok
| 注解 | 作用 |
|---|---|
| @Getter/@Setter | 为所有的属性提供get/set方法 |
| @ToString | 会给类自动生成易阅读的 toString 方法 |
| @EqualsAndHashCode | 根据类所拥有的非静态字段自动重写 equals 方法和 hashCode 方法 |
| @Data | 提供了更综合的生成代码功能(@Getter + @Setter + @ToString + @EqualsAndHashCode) |
| @NoArgsConstructor | 为实体类生成无参的构造器方法 |
| @AllArgsConstructor | 为实体类生成除了static修饰的字段之外带有各参数的构造器方法。 |
第1步:在pom.xml文件中引入依赖
<dependency><groupId>org.projectlombok</groupId><artifactId>lombok</artifactId>
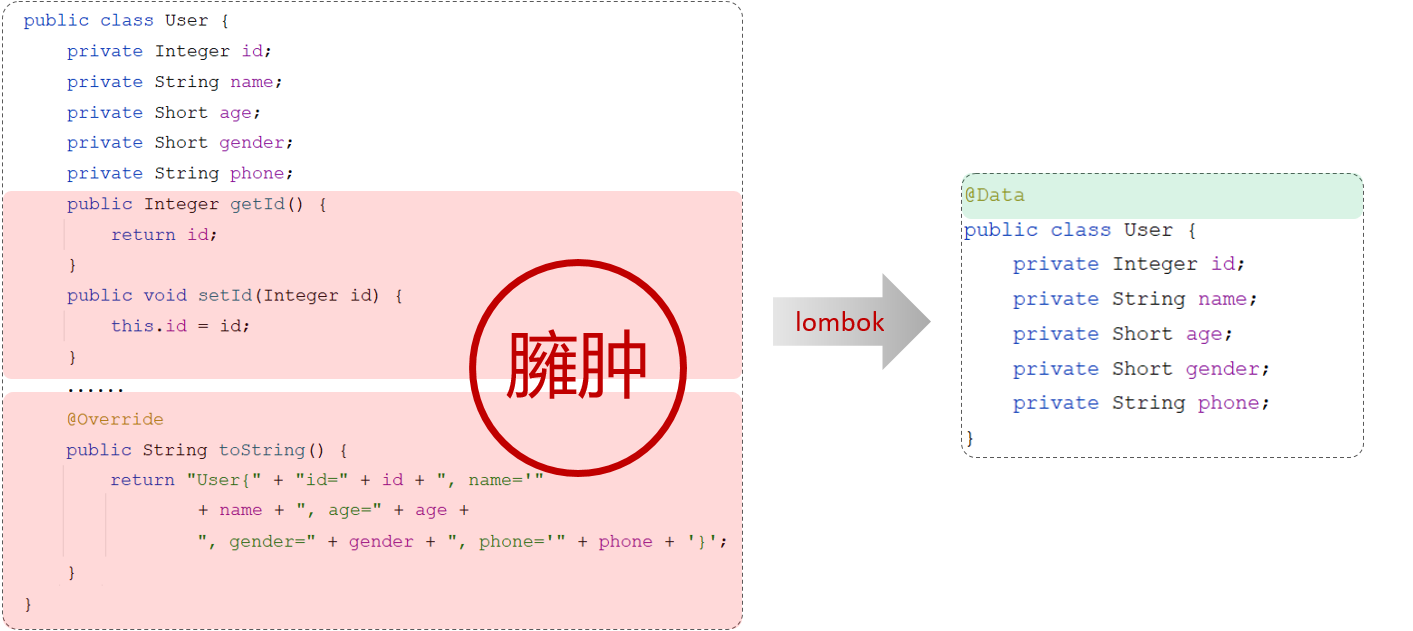
</dependency>第2步:在实体类上添加注解
import lombok.Data;@Data //getter方法、setter方法、toString方法、hashCode方法、equals方法
@NoArgsConstructor //无参构造
@AllArgsConstructor//全参构造
public class User {private Integer id;private String name;private Short age;private Short gender;private String phone;
}
@Data注解中不包含全参构造方法,通常在实体类上,还会添加上:全参构造、无参构造
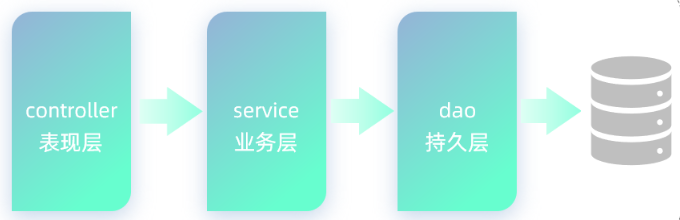
二、Mybatis基础操作
1.1 需求
需求说明:
-
根据资料中提供的《tlias智能学习辅助系统》页面原型及需求,完成员工管理的需求开发。
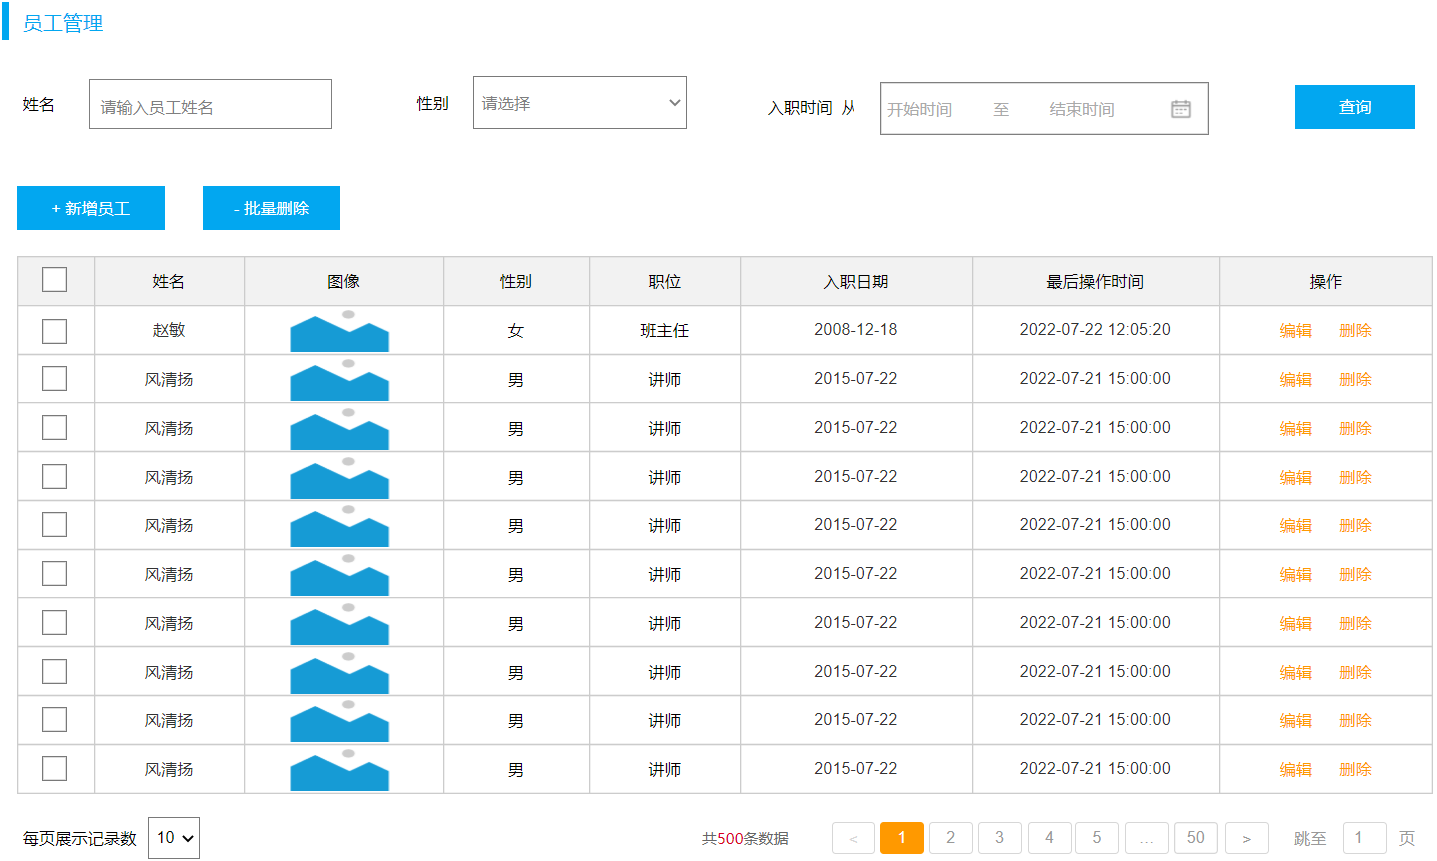
通过分析以上的页面原型和需求,我们确定了功能列表:
-
查询
-
根据主键ID查询
-
条件查询
-
-
新增
-
更新
-
删除
-
根据主键ID删除
-
根据主键ID批量删除
-
1.2 准备
实施前的准备工作:
-
准备数据库表
-
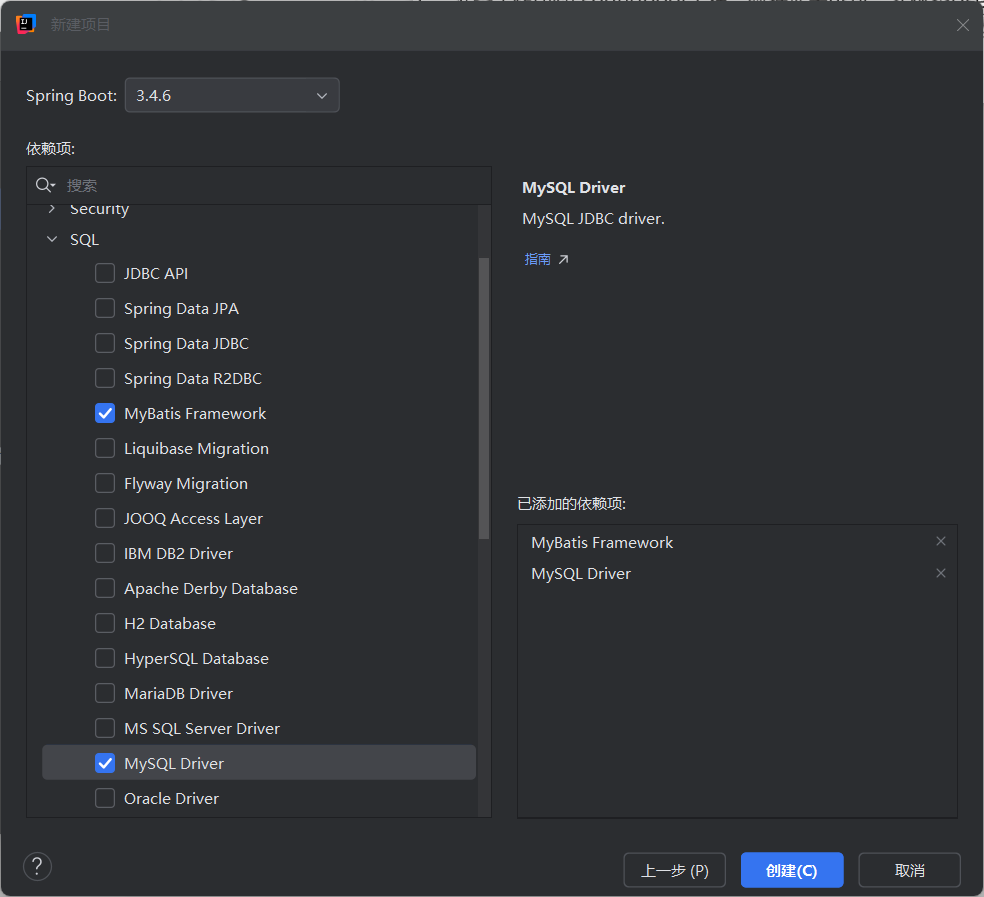
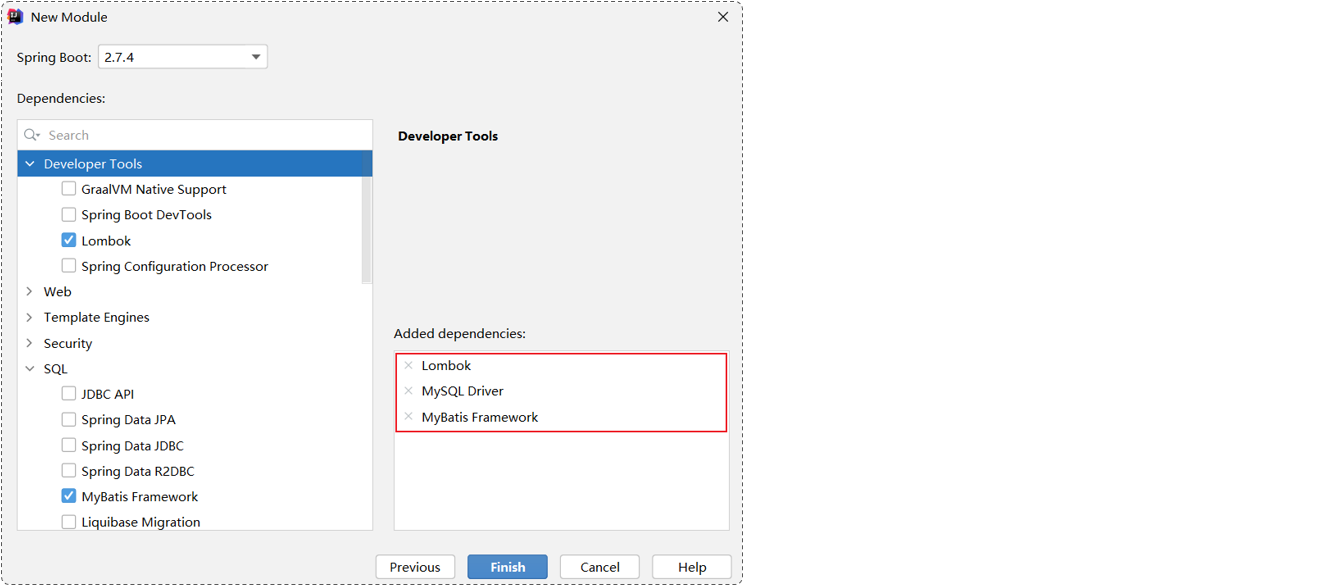
创建一个新的springboot工程,选择引入对应的起步依赖(mybatis、mysql驱动、lombok)
-
application.properties中引入数据库连接信息
-
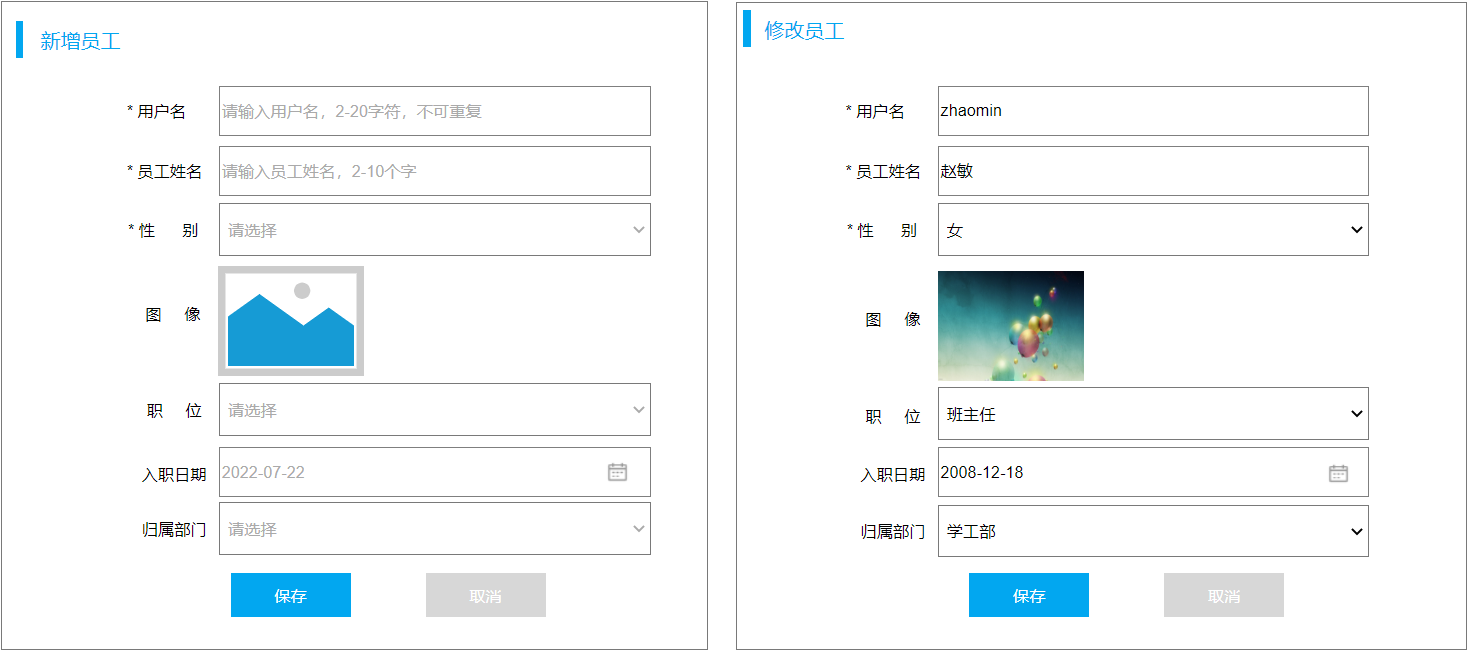
创建对应的实体类 Emp(实体类属性采用驼峰命名)
-
准备Mapper接口 EmpMapper
准备数据库表
-- 部门管理
create table dept
(id          int unsigned primary key auto_increment comment '主键ID',name        varchar(10) not null unique comment '部门名称',create_time datetime    not null comment '创建时间',update_time datetime    not null comment '修改时间'
) comment '部门表';
-- 部门表测试数据
insert into dept (id, name, create_time, update_time)
values (1, '学工部', now(), now()),(2, '教研部', now(), now()),(3, '咨询部', now(), now()),(4, '就业部', now(), now()),(5, '人事部', now(), now());-- 员工管理
create table emp
(id          int unsigned primary key auto_increment comment 'ID',username    varchar(20)      not null unique comment '用户名',password    varchar(32) default '123456' comment '密码',name        varchar(10)      not null comment '姓名',gender      tinyint unsigned not null comment '性别, 说明: 1 男, 2 女',image       varchar(300) comment '图像',job         tinyint unsigned comment '职位, 说明: 1 班主任,2 讲师, 3 学工主管, 4 教研主管, 5 咨询师',entrydate   date comment '入职时间',dept_id     int unsigned comment '部门ID',create_time datetime         not null comment '创建时间',update_time datetime         not null comment '修改时间'
) comment '员工表';
-- 员工表测试数据
INSERT INTO emp (id, username, password, name, gender, image, job, entrydate, dept_id, create_time, update_time)
VALUES
(1, 'jinyong', '123456', '金庸', 1, '1.jpg', 4, '2000-01-01', 2, now(), now()),
(2, 'zhangwuji', '123456', '张无忌', 1, '2.jpg', 2, '2015-01-01', 2, now(), now()),
(3, 'yangxiao', '123456', '杨逍', 1, '3.jpg', 2, '2008-05-01', 2, now(), now()),
(4, 'weiyixiao', '123456', '韦一笑', 1, '4.jpg', 2, '2007-01-01', 2, now(), now()),
(5, 'changyuchun', '123456', '常遇春', 1, '5.jpg', 2, '2012-12-05', 2, now(), now()),
(6, 'xiaozhao', '123456', '小昭', 2, '6.jpg', 3, '2013-09-05', 1, now(), now()),
(7, 'jixiaofu', '123456', '纪晓芙', 2, '7.jpg', 1, '2005-08-01', 1, now(), now()),
(8, 'zhouzhiruo', '123456', '周芷若', 2, '8.jpg', 1, '2014-11-09', 1, now(), now()),
(9, 'dingminjun', '123456', '丁敏君', 2, '9.jpg', 1, '2011-03-11', 1, now(), now()),
(10, 'zhaomin', '123456', '赵敏', 2, '10.jpg', 1, '2013-09-05', 1, now(), now()),
(11, 'luzhangke', '123456', '鹿杖客', 1, '11.jpg', 5, '2007-02-01', 3, now(), now()),
(12, 'hebiweng', '123456', '鹤笔翁', 1, '12.jpg', 5, '2008-08-18', 3, now(), now()),
(13, 'fangdongbai', '123456', '方东白', 1, '13.jpg', 5, '2012-11-01', 3, now(), now()),
(14, 'zhangsanfeng', '123456', '张三丰', 1, '14.jpg', 2, '2002-08-01', 2, now(), now()),
(15, 'yulianzhou', '123456', '俞莲舟', 1, '15.jpg', 2, '2011-05-01', 2, now(), now()),
(16, 'songyuanqiao', '123456', '宋远桥', 1, '16.jpg', 2, '2010-01-01', 2, now(), now()),
(17, 'chenyouliang', '123456', '陈友谅', 1, '17.jpg', NULL, '2015-03-21', NULL, now(), now());
创建一个新的springboot工程,选择引入对应的起步依赖(mybatis、mysql驱动、lombok)
application.properties中引入数据库连接信息
提示:可以把之前项目中已有的配置信息复制过来即可
#驱动类名称
spring.datasource.driver-class-name=com.mysql.cj.jdbc.Driver
#数据库连接的url
spring.datasource.url=jdbc:mysql://localhost:3306/mybatis
#连接数据库的用户名
spring.datasource.username=root
#连接数据库的密码
spring.datasource.password=1234
创建对应的实体类Emp(实体类属性采用驼峰命名)
@Data
@NoArgsConstructor
@AllArgsConstructor
public class Emp {private Integer id;private String username;private String password;private String name;private Short gender;private String image;private Short job;private LocalDate entrydate;     //LocalDate类型对应数据表中的date类型private Integer deptId;private LocalDateTime createTime;//LocalDateTime类型对应数据表中的datetime类型private LocalDateTime updateTime;
}
准备Mapper接口:EmpMapper
/*@Mapper注解:表示当前接口为mybatis中的Mapper接口程序运行时会自动创建接口的实现类对象(代理对象),并交给Spring的IOC容器管理
*/
@Mapper
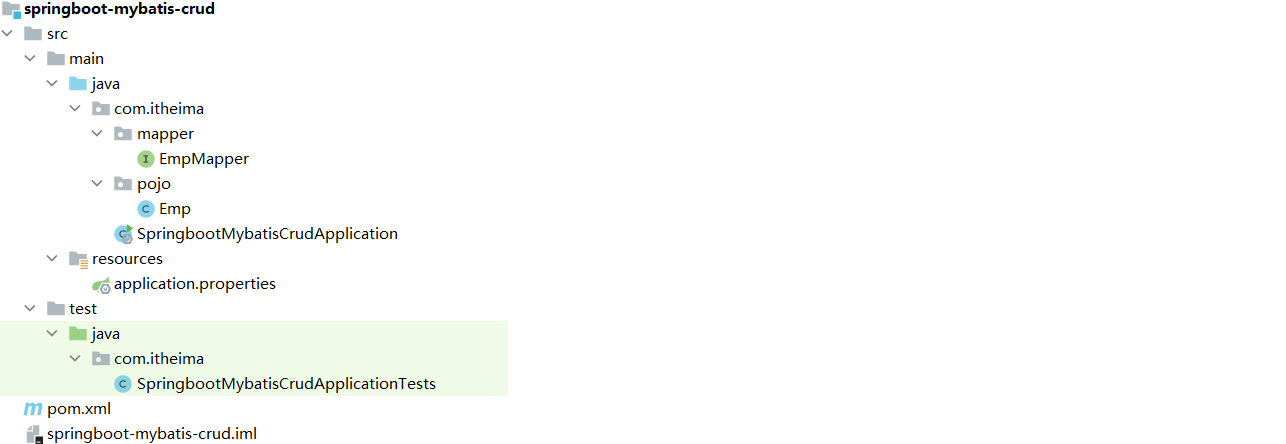
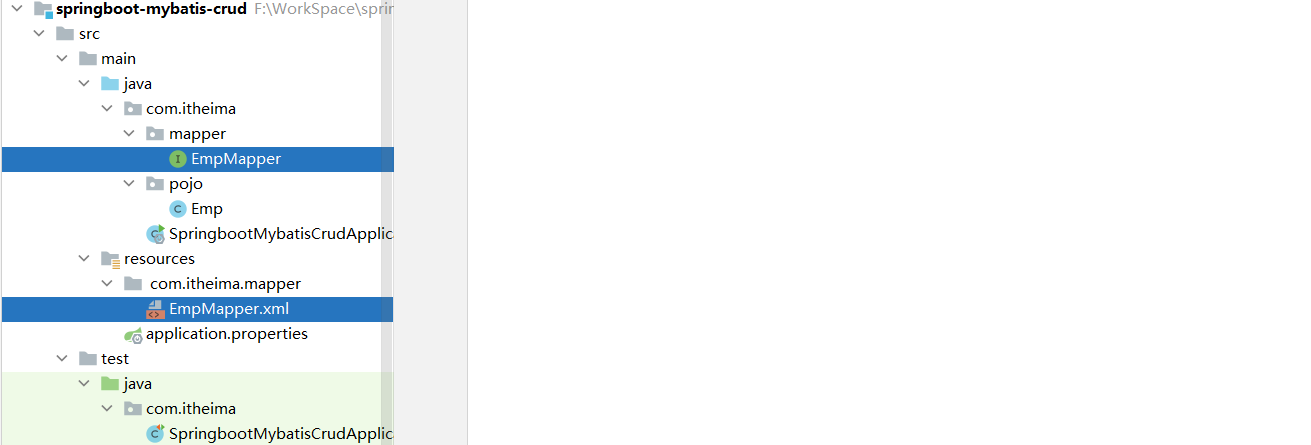
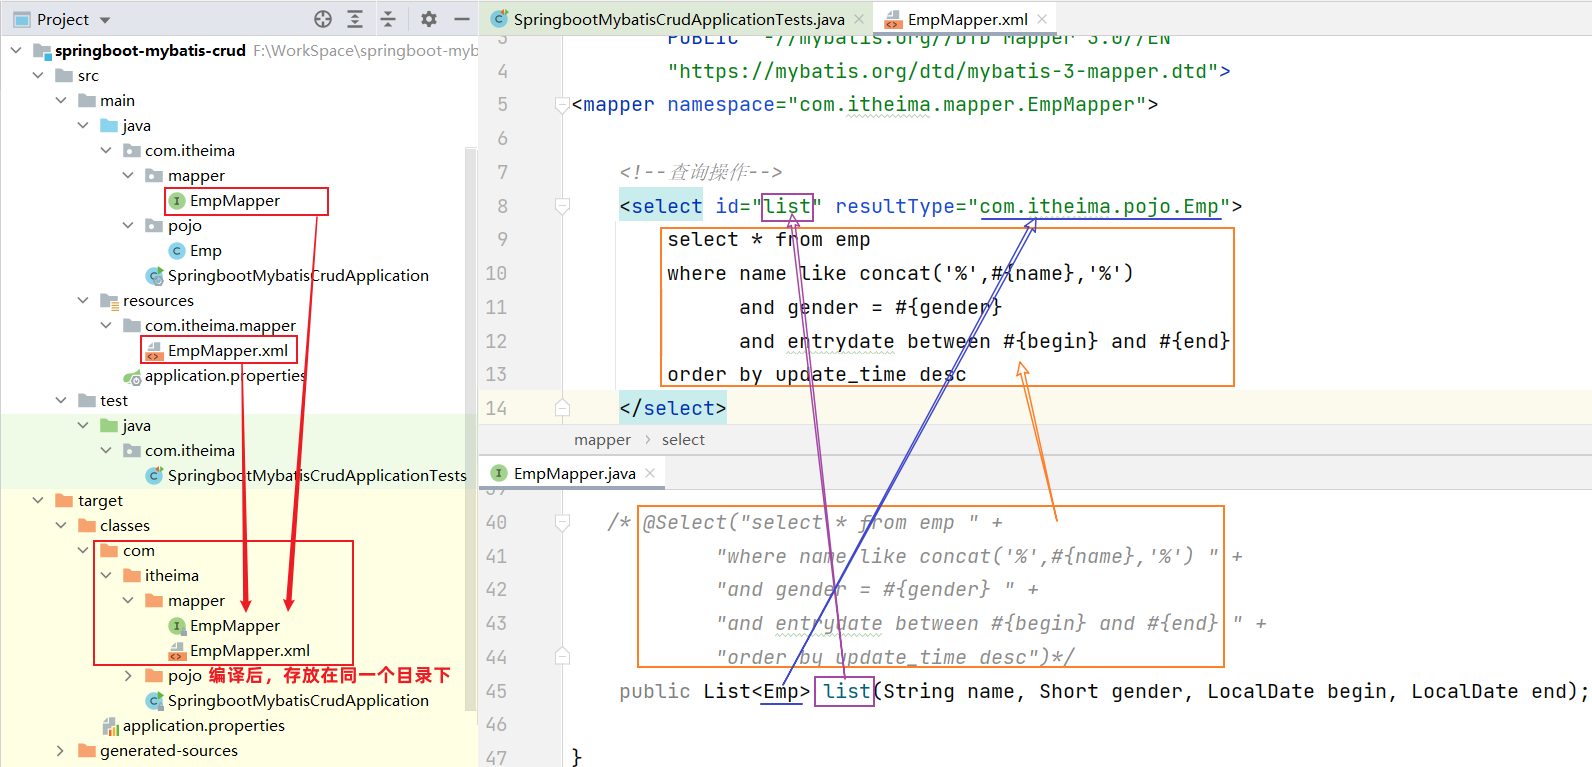
public interface EmpMapper {}完成以上操作后,项目工程结构目录如下:
1.3 删除
功能:根据主键删除数据
SQL语句
delete from emp where id = 17;接口方法
@Mapper
public interface EmpMapper {//根据ID删除数据@Delete("delete from emp where id = #{id}")// 使用#{id}方式获取方法中的参数值public void delete(Integer id);}
调试
在单元测试类中通过@Autowired注解注入EmpMapper类型对象
@SpringBootTest
class SpringbootMybatisCrudApplicationTests {@Autowiredprivate EmpMapper empMapper;@Testpublic void testDelete(){empMapper.delete(17);}
}
日志输出
在Mybatis当中我们可以借助日志,查看到sql语句的执行、执行传递的参数以及执行结果。
可以在application.properties中,打开mybatis的日志,并指定输出到控制台
mybatis.configuration.log-impl=org.apache.ibatis.logging.stdout.StdOutImpl
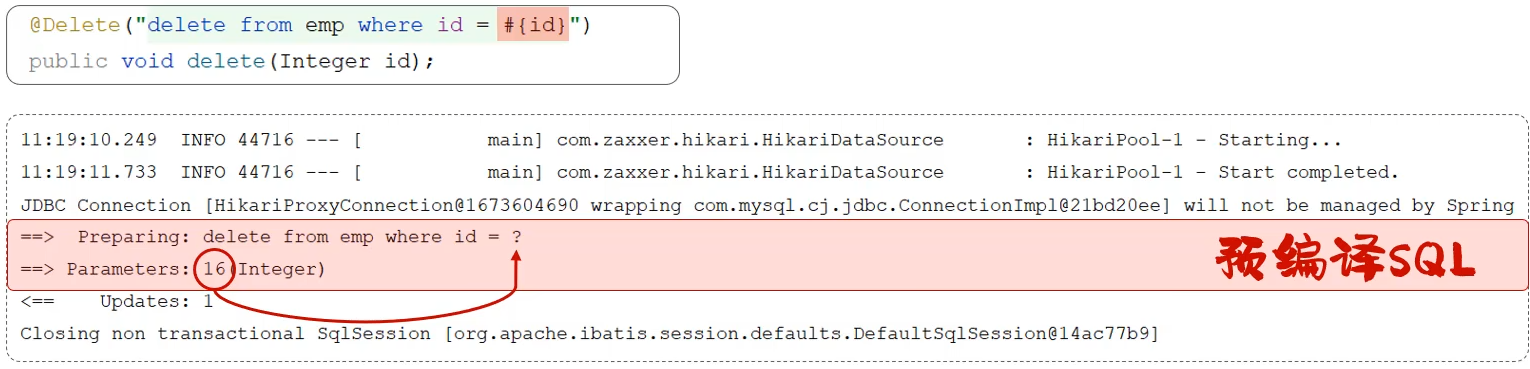
预编译SQL
优势
- 性能更高
- 更安全(防止SQL注入)
SQL注入是通过操作输入的数据来修改事先定义好的SQL语句,以达到执行代码对服务器进行攻击的方法。
参数占位符
在Mybatis中提供的参数占位符有两种:${...} 、#{...}
-
#{...}
-
执行SQL时,会将#{…}替换为?,生成预编译SQL,会自动设置参数值
-
使用时机:参数传递,都使用#{…}
-
-
${...}
-
拼接SQL。直接将参数拼接在SQL语句中,存在SQL注入问题
-
使用时机:如果对表名、列表进行动态设置时使用
-
注意事项:在项目开发中,建议使用#{...},生成预编译SQL,防止SQL注入安全。
1.4 新增
功能:新增员工信息
SQL语句
insert into emp(username, name, gender, image, job, entrydate, dept_id, create_time, update_time)
values('Tom','汤姆',1,'1.jpg',1,'2005-01-01',1,now(),now());
接口方法
@Mapper
public interface EmpMapper {@Insert("insert into emp(username, name, gender, image, job, entrydate, dept_id, create_time, update_time)" +"values(#{username},#{name},#{gender},#{image},#{job},#{entrydate},#{deptId},#{createTime},#{updateTime})")public void insert(Emp emp);}
测试类
import com.itheima.mapper.EmpMapper;
import com.itheima.pojo.Emp;
import org.junit.jupiter.api.Test;
import org.springframework.beans.factory.annotation.Autowired;
import org.springframework.boot.test.context.SpringBootTest;
import java.time.LocalDate;
import java.time.LocalDateTime;@SpringBootTest
class SpringbootMybatisCrudApplicationTests {@Autowiredprivate EmpMapper empMapper;@Testpublic void testInsert(){//创建员工对象Emp emp = new Emp();emp.setUsername("tom");emp.setName("汤姆");emp.setImage("1.jpg");emp.setGender((short)1);emp.setJob((short)1);emp.setEntrydate(LocalDate.of(2000,1,1));emp.setCreateTime(LocalDateTime.now());emp.setUpdateTime(LocalDateTime.now());emp.setDeptId(1);//调用添加方法empMapper.insert(emp);}
}
主键返回
概念:在数据添加成功后,需要获取插入数据库数据的主键。
主键返回代码实现:
@Mapper
public interface EmpMapper {//会自动将生成的主键值,赋值给emp对象的id属性@Options(useGeneratedKeys = true,keyProperty = "id")@Insert("insert into emp(username, name, gender, image, job, entrydate, dept_id, create_time, update_time) values (#{username}, #{name}, #{gender}, #{image}, #{job}, #{entrydate}, #{deptId}, #{createTime}, #{updateTime})")public void insert(Emp emp);}
1.5 更新
功能:修改员工信息
SQL语句
update emp set username = 'linghushaoxia', name = '令狐少侠', gender = 1 , image = '1.jpg' , job = 2, entrydate = '2012-01-01', dept_id = 2, update_time = '2022-10-01 12:12:12' where id = 18;接口方法
@Mapper
public interface EmpMapper {/*** 根据id修改员工信息* @param emp*/@Update("update emp set username = #{username}, name = #{name}, gender = #{gender}, image = #{image}," +" job = #{job}, entrydate = #{entrydate}, dept_id = #{deptId} , update_time = #{updateTime} where id = #{id}")public void update(Emp emp);}
测试类
@SpringBootTest
class SpringbootMybatisCrudApplicationTests {@Autowiredprivate EmpMapper empMapper;@Testpublic void testUpdate(){//要修改的员工信息Emp emp = new Emp();emp.setId(18);emp.setUsername("Tom1");emp.setName("汤姆1");emp.setImage("1.jpg");emp.setGender((short) 1);emp.setJob((short) 1);emp.setEntrydate(LocalDate.of(2000,1,1));emp.setUpdateTime(LocalDateTime.now());//调用方法,修改员工数据empMapper.update(emp);}
}
1.6 查询
根据ID查询
SQL语句
selecet * from emp where id = 20;接口方法
@Mapper
public interface EmpMapper {@Select("select id, username, password, name, gender, image, job, entrydate, dept_id, create_time, update_time from emp where id=#{id}")public Emp getById(Integer id);
}
测试类
@SpringBootTest
class SpringbootMybatisCrudApplicationTests {@Autowiredprivate EmpMapper empMapper;@Testpublic void testGetById(){Emp emp = empMapper.getById(1);System.out.println(emp);}
}
执行结果

数据封装
(deptId、createTime、updateTime)是没有数据值的
原因如下:
-
实体类属性名和数据库表查询返回的字段名一致,mybatis会自动封装。
-
如果实体类属性名和数据库表查询返回的字段名不一致,不能自动封装。
解决方案:
-
起别名
-
结果映射
-
开启驼峰命名
起别名:在SQL语句中,对不一样的列名起别名,别名和实体类属性名一样
@Select("select id, username, password, name, gender, image, job, entrydate, " +"dept_id AS deptId, create_time AS createTime, update_time AS updateTime " +"from emp " +"where id=#{id}")
public Emp getById(Integer id);手动结果映射:通过 @Results及@Result 进行手动结果映射
@Results({@Result(column = "dept_id", property = "deptId"),@Result(column = "create_time", property = "createTime"),@Result(column = "update_time", property = "updateTime")})
@Select("select id, username, password, name, gender, image, job, entrydate, dept_id, create_time, update_time from emp where id=#{id}")
public Emp getById(Integer id);开启驼峰命名(推荐):如果字段名与属性名符合驼峰命名规则,mybatis会自动通过驼峰命名规则映射
驼峰命名规则: abc_xyz => abcXyz
表中字段名:abc_xyz
类中属性名:abcXyz
//在application.properties中添加:
mybatis.configuration.map-underscore-to-camel-case=true
要使用驼峰命名前提是 实体类的属性 与 数据库表中的字段名严格遵守驼峰命名。
条件查询
SQL语句
select * from emp where name like '%张%' and gender = 1 and entrydate between '2010-01-01' and '2020-01-01'order by update_time desc;接口方法
@Mapper
public interface EmpMapper {@Select("select * from emp " +"where name like '%${name}%' " +"and gender = #{gender} " +"and entrydate between #{begin} and #{end} " +"order by update_time desc")public List<Emp> list(String name, Short gender, LocalDate begin, LocalDate end);
}
以上方式注意事项:
方法中的形参名和SQL语句中的参数占位符名保持一致
模糊查询使用${...}进行字符串拼接,这种方式呢,由于是字符串拼接,并不是预编译的形式,所以效率不高、且存在sql注入风险。
为解决SQL注入风险
可使用MySQL提供的字符串拼接函数:concat('%' , '关键字' , '%')
"where name like concat('%',#{name},'%') "
了解:@Param注解:指定SQL语句中的参数名
三、Mybatis的XML映射文件
Mybatis的开发有两种方式:
-
注解
-
XML
3.1 XML映射文件规范
- XML映射文件的名称与Mapper接口名称一致,并且将XML映射文件和Mapper接口放置在相同包下(同包同名)
- XML映射文件的namespace属性为Mapper接口全限定名一致
- XML映射文件中sql语句的id与Mapper接口中的方法名一致,并保持返回类型一致。
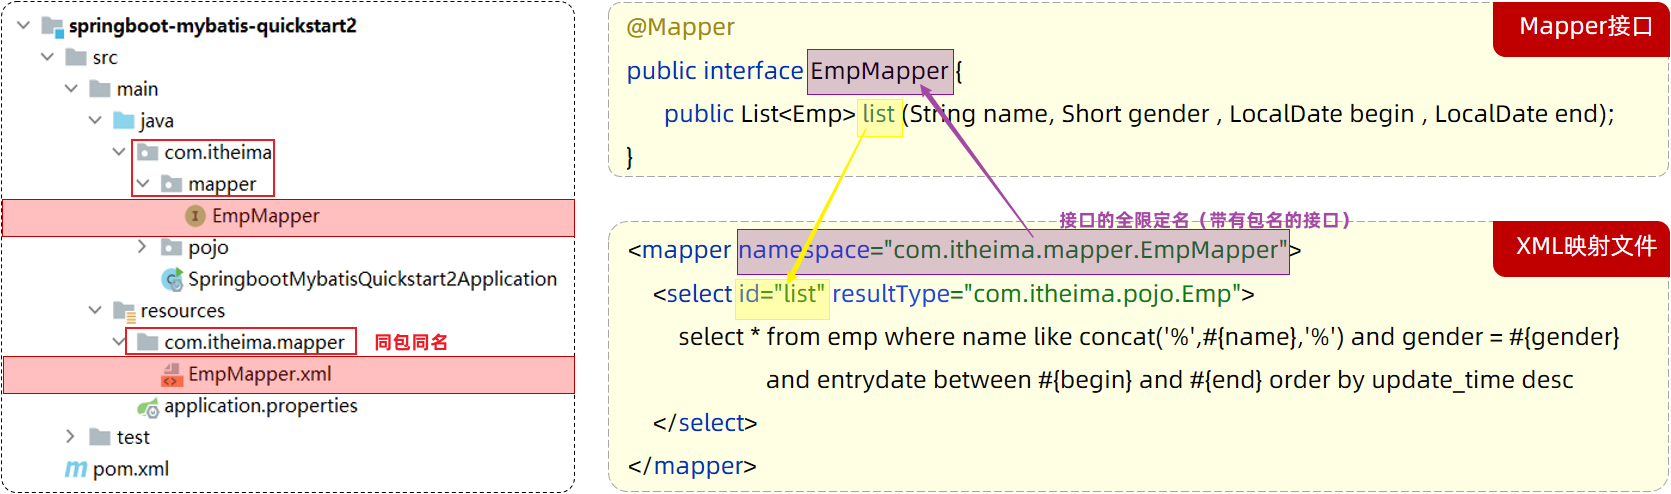
2.2 XML配置文件实现
第1步:创建XML映射文件
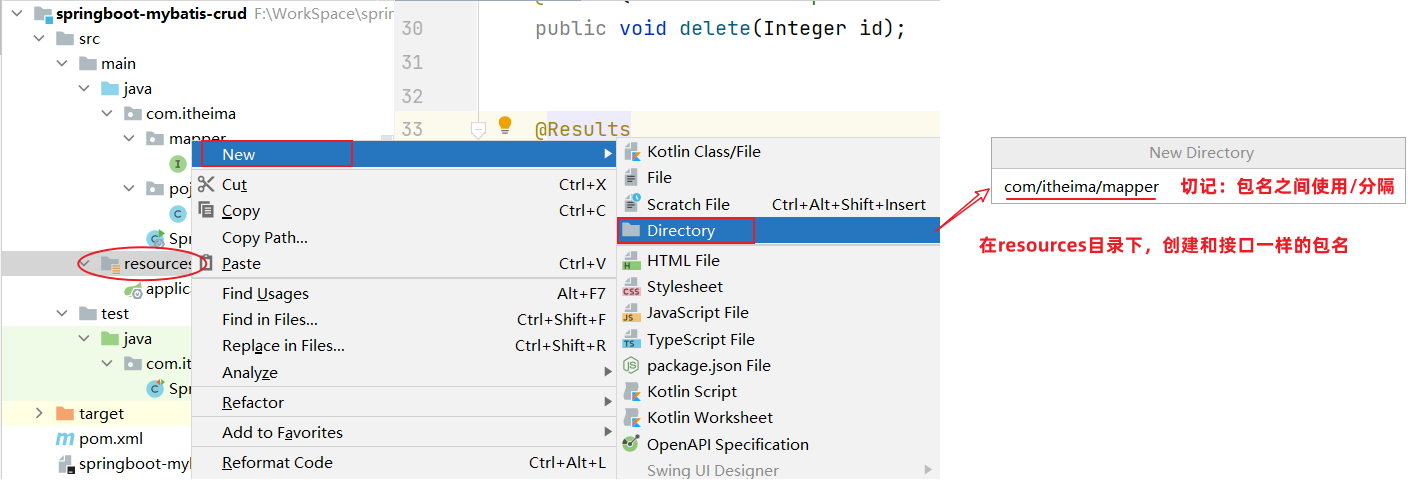
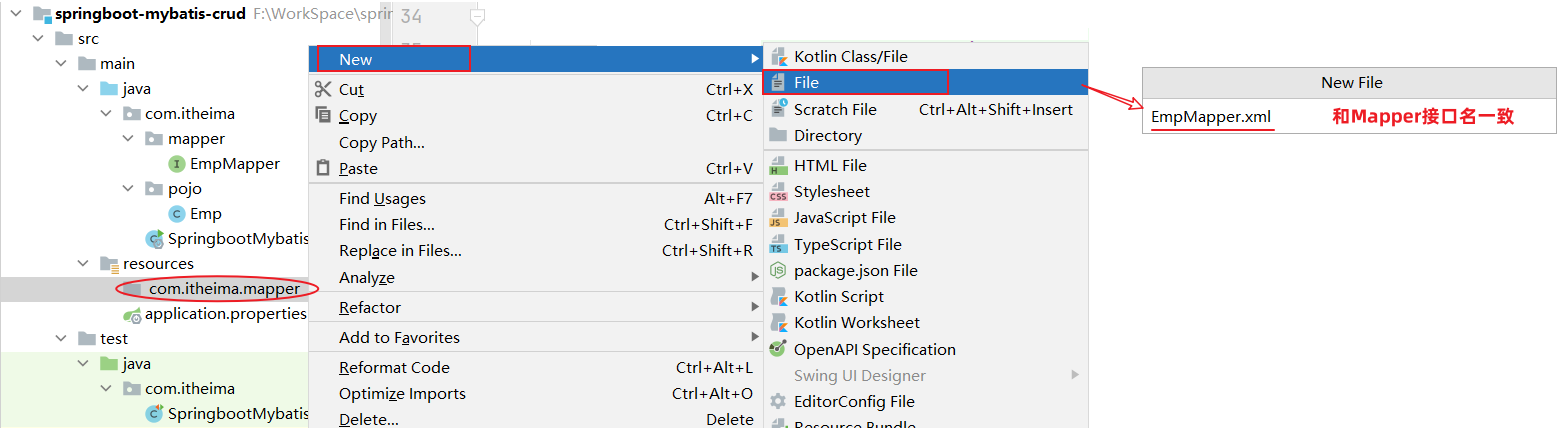
第2步:编写XML映射文件
xml映射文件中的dtd约束,直接从mybatis官网复制即可
<?xml version="1.0" encoding="UTF-8" ?>
<!DOCTYPE mapperPUBLIC "-//mybatis.org//DTD Mapper 3.0//EN""https://mybatis.org/dtd/mybatis-3-mapper.dtd">
<mapper namespace=""></mapper>
配置:XML映射文件的namespace属性为Mapper接口全限定名
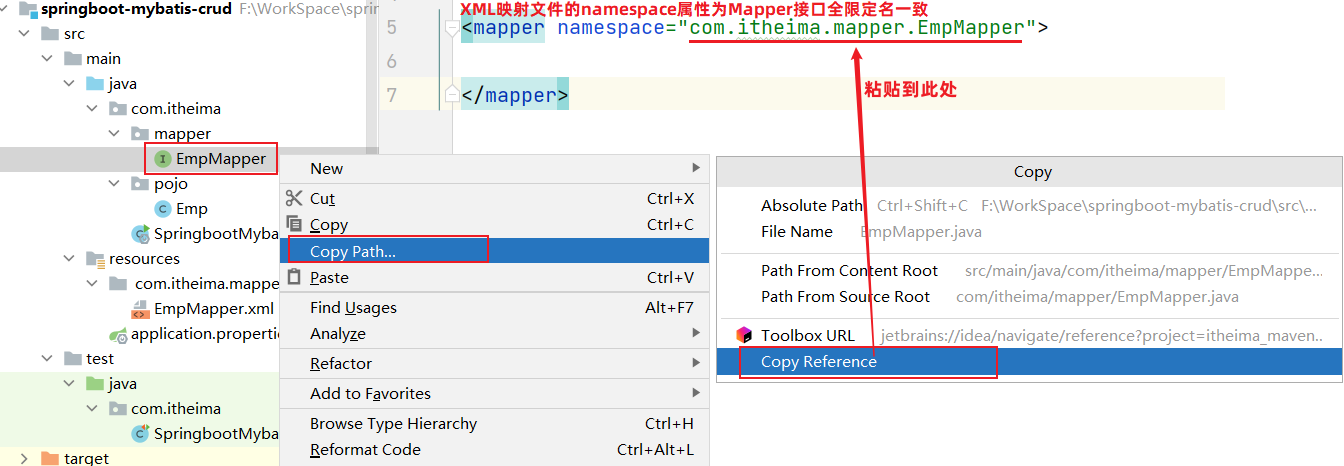
配置:XML映射文件中sql语句的id与Mapper接口中的方法名一致,并保持返回类型一致
2.3 MybatisX的使用
MybatisX是一款基于IDEA的快速开发Mybatis的插件,为效率而生。
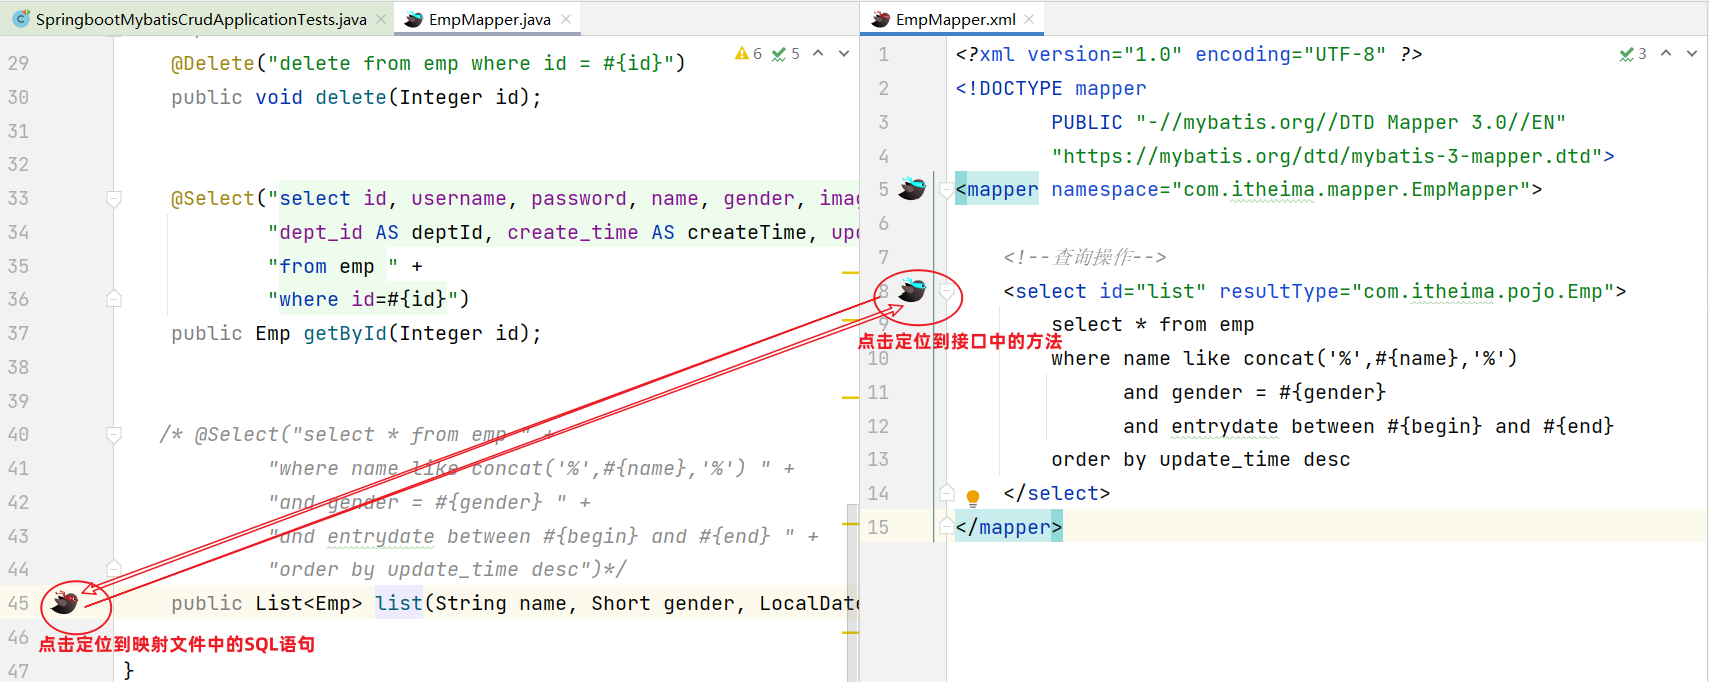
可以通过MybatisX快速定位:
2.4 注解与XML的选择
- 使用Mybatis的注解,主要是来完成一些简单的增删改查功能。
- 如果需要实现复杂的SQL功能,建议使用XML来配置映射语句。
四、Mybatis动态SQL
4.1 什么是动态SQL
SQL语句会随着用户的输入或外部条件的变化而变化,我们称为:动态SQL。
4.2 动态SQL-if
<if>用于判断条件是否成立。使用test属性进行条件判断,如果条件为true,则拼接SQL。
<if test="条件表达式">要拼接的sql语句
</if><!--常用-->
<if test="xxx != null"> … </if><where>where元素只会在子元素有内容的情况下才插入where子句,而且会自动去除子句的开头的AND或OR
<set>动态地在行首插入 SET 关键字,并会删掉额外的逗号。(用在update语句中)
4.3 动态SQL-foreach
<foreach>遍历
<foreach collection="集合名称" item="集合遍历出来的元素/项" separator="每一次遍历使用的分隔符" open="遍历开始前拼接的片段" close="遍历结束后拼接的片段">
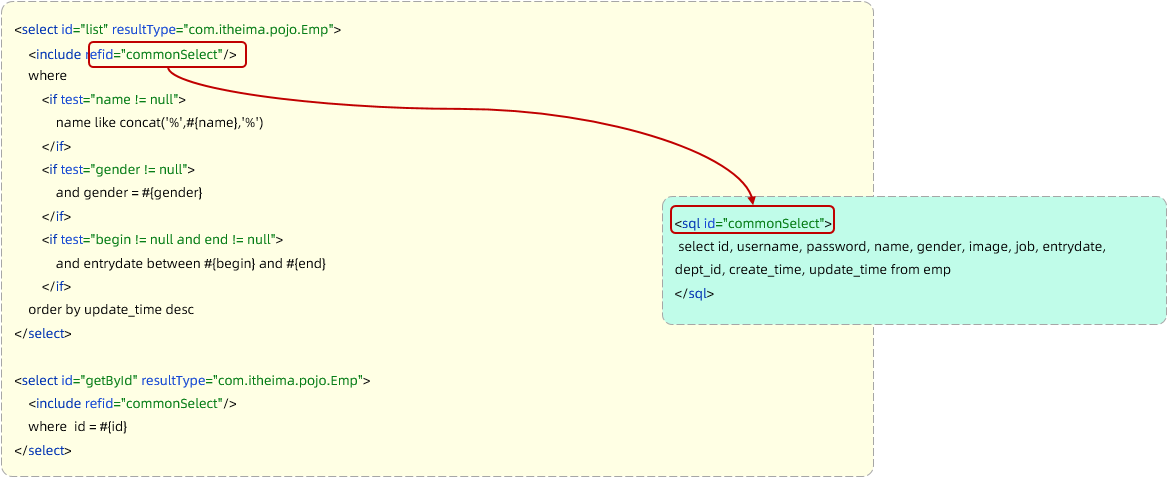
</foreach>4.4 动态SQL-sql&include
-
<sql>:定义可重用的SQL片段 -
<include>:通过属性refid,指定包含的SQL片段