Thread类的基本用法
线程创建
-
继承 Thread, 重写 run
package thread;class myThread extends Thread{@Overridepublic void run(){while (true) {System.out.println("hello thread");try {Thread.sleep(1000);}catch (InterruptedException e) {e.printStackTrace();}}}
}
public class Demo1 {public static void main(String[] args) {System.out.println("你好");myThread thread=new myThread();// thread.run();thread.start();//开启线程,执行run方法,输出}
}
2.实现 Runnable, 重写 run
package thread;
class myRunnable implements Runnable {@Overridepublic void run(){while (true){System.out.println("hello thread");try {Thread.sleep(1000);} catch (InterruptedException e) {e.printStackTrace();}}}
}public class Demo2 {public static void main(String[] args) throws InterruptedException {//Runnable是接口 myRunnable是自定义的类 注意写法Runnable runnable=new myRunnable();Thread thread=new Thread(runnable);thread.start();while (true){System.out.println("hello main");Thread.sleep(1000);}}
}
3.继承 Thread, 重写 run, 使用匿名内部类
package thread;
//继承 Thread, 重写 run, 使用匿名内部类
public class Demo3 {public static void main(String[] args) throws InterruptedException {Thread t =new Thread(){@Overridepublic void run(){while (true){System.out.println("hello thread");try {Thread.sleep(1000);} catch (InterruptedException e) {e.printStackTrace();}}}};t.start();while (true){System.out.println("hello main");Thread.sleep(1000);}}
}
4.实现 Runnable, 重写 run, 使用匿名内部类
package thread;public class Demo4 {public static void main(String[] args) throws InterruptedException {Runnable runnable=new Runnable() {@Overridepublic void run(){while (true){System.out.println("hello thread");try {Thread.sleep(1000);} catch (InterruptedException e) {e.printStackTrace();}}}};Thread thread=new Thread(runnable);thread.start();while (true){System.out.println("hello main");Thread.sleep(1000);}}
}
5.使用 lambda 表达式
package thread;public class Demo5 {public static void main(String[] args) {// 通过 lambda 表达式, 来创建线程Thread t = new Thread(() -> {while (true) {System.out.println("hello thread");try {Thread.sleep(1000);} catch (InterruptedException e) {// TODO Auto-generated catch blocke.printStackTrace();}}});t.start();while (true) {System.out.println("hello main");try {Thread.sleep(1000); } catch (InterruptedException e) {// TODO Auto-generated catch blocke.printStackTrace();}}}
}
线程中断
中断的方法:
·手动创建标志位
·线程内置的标志位isinterruptted
--true就是有人尝试终止线程等待线程休眠获取线程实例
·将标志位从false改成true
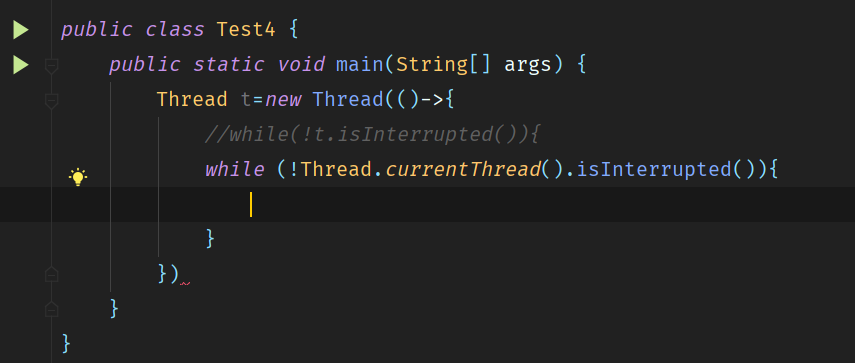
Thread thread = new Thread(() -> {while(!Thread.currentThread().isInterrupted()) {// 执行任务}
});
thread.start();// 中断线程
thread.interrupt();
这里要注意一个点:
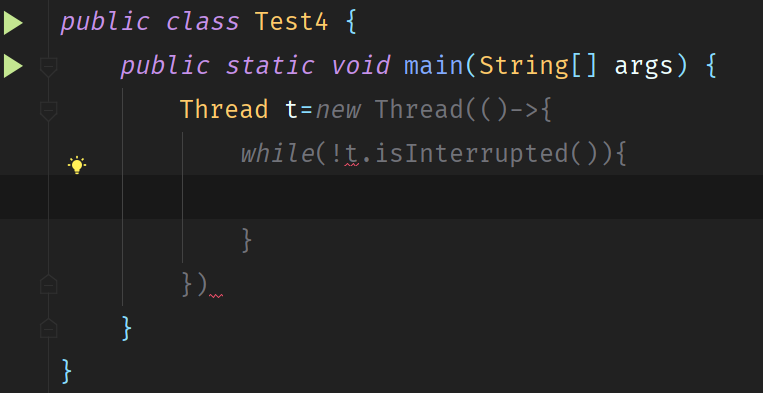
·不能直接引用:
--t这里可能还没初始化完成-->右侧的new Thread(...)lambda表达式要先完成构造,但这里构造器本身包含了t。
正确做法:在runnable中引用当前线程
·哪个线程调用这个方法就返回哪个线程对象的引用
·在t start了之后才会执行
结合睡眠的一个点:
·可能还没睡眠完就终止了。---如果t线程在sleep,然后main调用interrupt方法---提前唤醒
·catch里面的异常支持sleep提前唤醒---提前唤醒>触发异常>清空标志位(重置为false)抛出interruptedException>while执行
解决:
·加一个break,结束循环,让线程结束
·在catch里面的break之前可以加一些其他逻辑
·注意:如果直接throw new RuntimeException
不只是让t线程结束,而且会直接导致整个线程结束,没有人catch这个Runtime异常
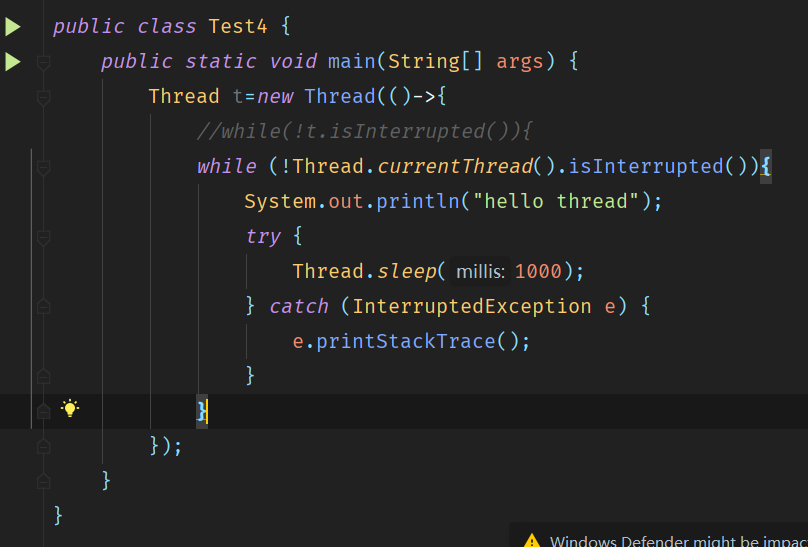
package thread;public class Test4 {public static void main(String[] args) throws InterruptedException {Thread t=new Thread(()->{//while(!t.isInterrupted()){while (!Thread.currentThread().isInterrupted()){System.out.println("hello thread");try {Thread.sleep(1000);} catch (InterruptedException e) {//e.printStackTrace();break;}}});t.start();Thread.sleep(2000);t.interrupt();}·interrupt被调用的时候t在休眠的话sleep()会立即抛出InterruptedException,执行catch中的break
线程等待
·join
·约定了结束的先后顺序
·在哪个线程调用join那这个线程就是等的一方,join前面是哪个引用那就是被等的一方
·join保证了被等的一方线程执行完毕
·如果被等的一方是死循环,那就一直阻塞状态
·join的等待是“死等”
·通常加一个最大等待时间:
public void join(long millis)//等待线程结束,最多等millis毫秒线程休眠
用sleep控制线程休眠
让线程变成阻塞状态,不参与cpu调度--->时间到了之后就回到就绪状态(不是立即执行)
获取线程实例
获取当前线程:currentThread
获取jvm中所有线程:getAllStackTraces()
获取所有活动进程:getAllStackTraces().keySet()
获取线程组中的线程:currentThread().getThreadGroup()