Gradio全解20——Streaming:流式传输的多媒体应用(6)——构建视频流目标检测系统
Gradio全解20——Streaming:流式传输的多媒体应用(6)——构建视频流目标检测系统
- 本篇摘要
- 20. Streaming:流式传输的多媒体应用
- 20.6 RT-DETR模型构建视频流目标检测系统
- 20.6.1 RT-DETR模型
- 1. 模型介绍
- 2. 使用示例
- 20.6.2 系统配置
- 20.6.3 推理函数实现
- 1. 视频读取与处理
- 2. 推理循环实现
- 20.6.4 Gradio演示界面实现
- 参考文献:
本章目录如下:
- 《Gradio全解20——Streaming:流式传输的多媒体应用(1)——流式传输音频:魔力8号球》;
- 《Gradio全解20——Streaming:流式传输的多媒体应用(2)——构建对话式聊天机器人》;
- 《Gradio全解20——Streaming:流式传输的多媒体应用(3)——实时语音识别技术》;
- 《Gradio全解20——Streaming:流式传输的多媒体应用(4)——基于Groq的带自动语音检测功能的多模态Gradio应用》;
- 《Gradio全解20——Streaming:流式传输的多媒体应用(5)——基于WebRTC的摄像头实时目标检测》;
- 《Gradio全解20——Streaming:流式传输的多媒体应用(6)——构建视频流目标检测系统》。
本篇摘要
本章讲述流式传输的应用,包括音频、图像和视频格式的流式传输。
20. Streaming:流式传输的多媒体应用
本章讲述流式传输的应用,包括音频、图像和视频格式的流式传输。音频应用包括流式传输音频、构建音频对话式聊天机器人、实时语音识别技术和自动语音检测功能;图像应用包括基于WebRTC的摄像头实时目标检测;视频应用包括构建视频流目标检测系统。
20.6 RT-DETR模型构建视频流目标检测系统
本指南将使用RT-DETR模型对用户上传视频进行实时目标检测,并借助Gradio 5.0全新视频流功能实现检测结果的实时传输。在开始之前,先了解下RT-DETR模型。
20.6.1 RT-DETR模型
RT-DETR(Real-Time DEtection TRansformer)模型在论文《DETRs Beat YOLOs on Real-time Object Detection》中提出,它是一种专注于实现实时性能同时保持高精度的目标检测模型。该模型基于Transformer架构(该架构在深度学习多个领域已展现出显著优势),通过对图像进行处理来识别并定位其中的多个目标。
1. 模型介绍
近年来,基于Transformer的端到端检测器(DETRs)已取得显著性能突破。然而,DETRs计算成本高的问题尚未得到有效解决,这限制了其实际应用,也阻碍了其充分发挥无需后处理的优势,如非极大值抑制NMS(non-maximum suppression)。论文《DETRs Beat YOLOs on Real-time Object Detection》首先分析了现代实时目标检测器中NMS对推理速度的影响,并建立了端到端速度基准。为避免NMS导致的推理延迟,论文提出了首个实时端到端目标检测器RT-DETR。
具体而言,RT-DETR模型在以下方面实现了突破:
- 设计了高效混合编码器,通过解耦尺度内交互与跨尺度融合来高效处理多尺度特征;
- 提出IoU感知查询选择机制,以优化目标查询的初始化;
- 提出的检测器支持通过灵活调整解码器层数(无需重新训练)来调节推理速度,提升了实时检测器的实用性。
实验表明:
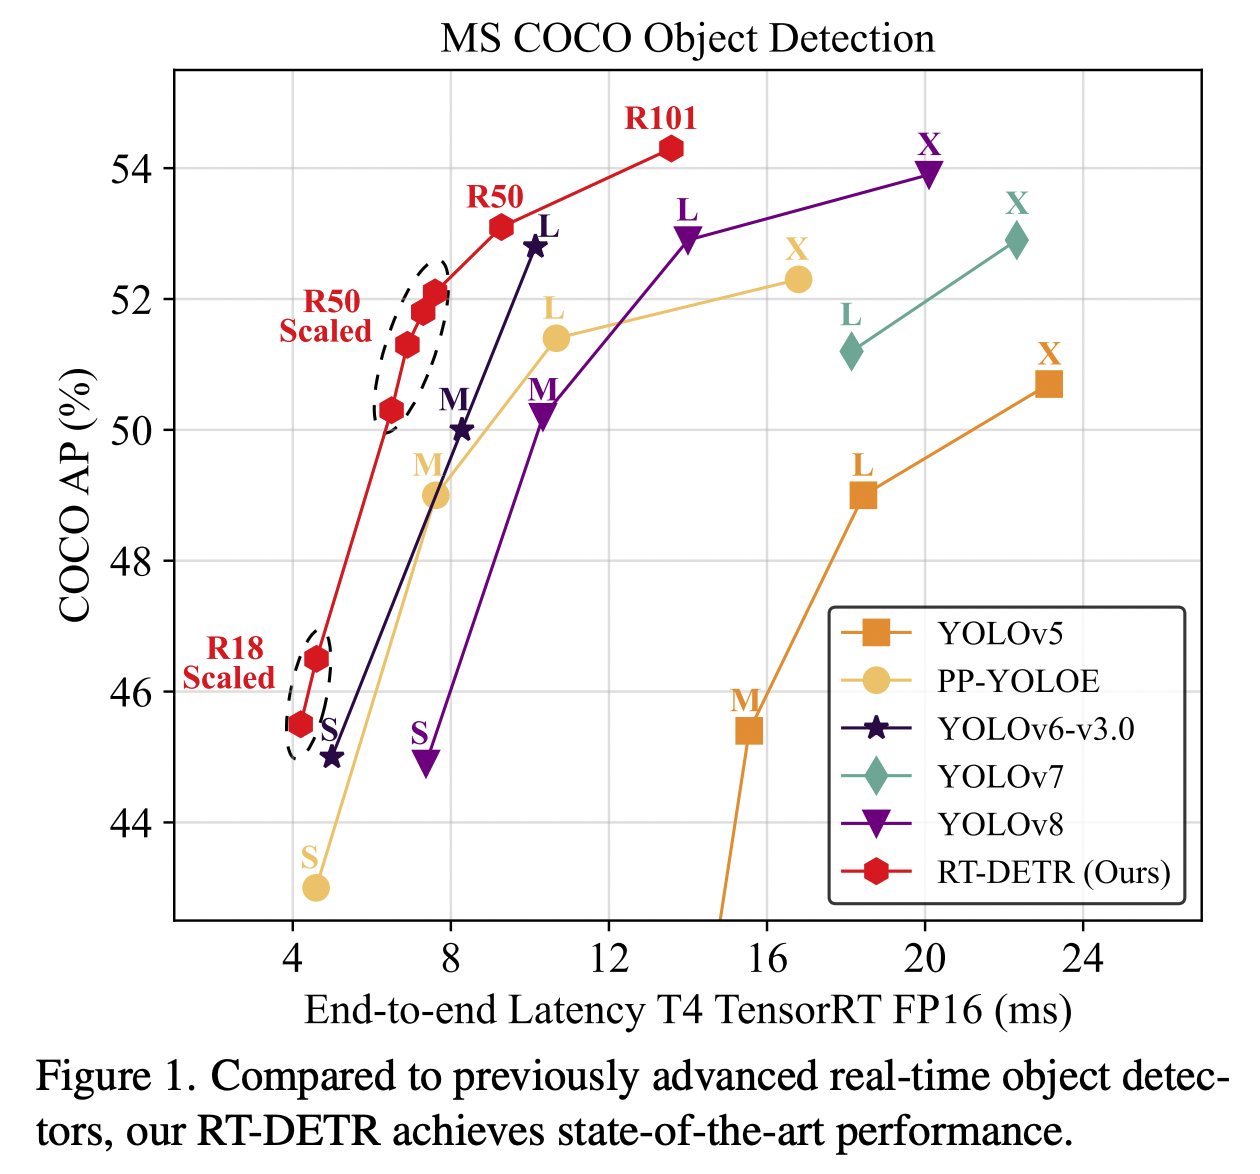
- RT-DETR-L在COCO val2017上达到53.0% AP(Average Precision),T4 GPU上实现114 FPS(Frame Per Second);RT-DETR-X达到54.8% AP与74 FPS。同规模下,两项指标均超越所有YOLO检测器;
- 此外,RT-DETR-R50以53.1% AP和108 FPS的表现,在精度上超越DINO-Deformable-DETR-R50达2.2% AP,速度提升约21倍。对比图如下:
RT-DETR系列的最新版本是RT-DETRv2模型,它在论文《RT-DETRv2: Improved Baseline with Bag-of-Freebies for Real-Time Detection Transformer 》中提出。RT-DETRv2通过以下改进优化了RT-DETR:引入可选择的多尺度特征提取,采用离散采样算子提升部署兼容性及改进训练策略(包括动态数据增强和尺度自适应超参数)。这些改进在保持实时性能的同时,显著增强了模型的灵活性和实用性。
2. 使用示例
RT-DETR系统首先采用预训练的卷积神经网络(基于原始代码中的ResNet-D改进架构)对输入图像进行处理,该网络会从模型最后三个层级提取多层次特征图。随后,通过混合编码器架构,将提取到的多尺度特征转换为序列化的图像特征表示,这种设计能有效保留不同尺度的空间信息。接着,使用配备了辅助预测头的解码器迭代优化目标查询,该过程可直接生成边界框,无需额外后续处理即可获取边界框的分类置信度(logits)和坐标。示例代码如下:
import torch
import requests
from PIL import Image
from transformers import RTDetrForObjectDetection, RTDetrImageProcessorurl = 'http://images.cocodataset.org/val2017/000000039769.jpg'
image = Image.open(requests.get(url, stream=True).raw)
# RT-DETR
image_processor = RTDetrImageProcessor.from_pretrained("PekingU/rtdetr_r50vd")
model = RTDetrForObjectDetection.from_pretrained("PekingU/rtdetr_r50vd")
# RT-DETRv2
# image_processor = RTDetrImageProcessor.from_pretrained("PekingU/rtdetr_v2_r18vd")
# model = RTDetrV2ForObjectDetection.from_pretrained("PekingU/rtdetr_v2_r18vd")
inputs = image_processor(images=image, return_tensors="pt")
with torch.no_grad():outputs = model(**inputs)results = image_processor.post_process_object_detection(outputs, target_sizes=torch.tensor([(image.height, image.width)]), threshold=0.3)
for result in results:for score, label_id, box in zip(result["scores"], result["labels"], result["boxes"]):score, label = score.item(), label_id.item()box = [round(i, 2) for i in box.tolist()]print(f"{model.config.id2label[label]}: {score:.2f} {box}")
输出如下:
sofa: 0.97 [0.14, 0.38, 640.13, 476.21]
cat: 0.96 [343.38, 24.28, 640.14, 371.5]
cat: 0.96 [13.23, 54.18, 318.98, 472.22]
remote: 0.95 [40.11, 73.44, 175.96, 118.48]
remote: 0.92 [333.73, 76.58, 369.97, 186.99]
以下是由Hugging Face官方及社区提供的资源列表,可以帮助我们快速入门RT-DETR:
- 使用Trainer或Accelerate微调RTDetrForObjectDetection的脚本可在此处获取: huggingface/transformers/examples/pytorch/object-detection;
- 另请参阅目标检测任务指南:Object detection;
- 关于RT-DETR在自定义数据集上进行推理和微调的Notebook可在此处查看: NielsRogge/Transformers-Tutorials/RT-DETR/RT-DETR notebooks。
更多成员函数及其它详细信息请参阅: Transformers - RT-DETR及RT-DETRv2。
20.6.2 系统配置
系统配置分为环境准备、模型获取及硬件加速三部分,如下:
- 环境准备:首先需安装以下系统依赖:
opencv-python
torch
transformers>=4.43.0
spaces
- 模型获取:从Hugging Face Hub下载预训练模型:
from transformers import RTDetrForObjectDetection, RTDetrImageProcessorimage_processor = RTDetrImageProcessor.from_pretrained("PekingU/rtdetr_r50vd")
model = RTDetrForObjectDetection.from_pretrained("PekingU/rtdetr_r50vd").to("cuda")
- 硬件加速:将模型通过代码**to(“cuda”)**加载至GPU显存以加速推理。本系统将部署在Hugging Face Spaces平台,利用其免费的ZeroGPU集群资源运行推理任务。
20.6.3 推理函数实现
我们的推理函数首先接收一个视频和用户设定的置信度阈值,目标检测模型会识别视频中多个对象并为每个对象分配置信度分数;置信度越低,出现误检的可能性就越高,因此允许用户根据需求自行设置这个置信度阈值。然后,该函数将遍历视频中的每一帧,并对每帧运行RT-DETR模型;我们会为帧中每个检测到的对象绘制边界框,并将帧保存到新的输出视频中,函数将以两秒为片段逐步生成输出视频。
由于存在基于时间的配额限制,所以需要在ZeroGPU上尽可能降低推理时间。我们可以在运行模型前将输出视频的原始帧率减半,并将输入帧的尺寸缩小为原尺寸的一半来降低推理时间。以下是完整的推理函数代码:
import spaces
import cv2
from PIL import Image
import torch
import time
import numpy as np
import uuid
from draw_boxes import draw_bounding_boxesSUBSAMPLE = 2
@spaces.GPU
def stream_object_detection(video, conf_threshold):cap = cv2.VideoCapture(video)fps = int(cap.get(cv2.CAP_PROP_FPS))desired_fps = fps // SUBSAMPLEwidth  = int(cap.get(cv2.CAP_PROP_FRAME_WIDTH)) // 2height = int(cap.get(cv2.CAP_PROP_FRAME_HEIGHT)) // 2# Use UUID to create a unique video fileoutput_video_name = f"output_{uuid.uuid4()}.mp4"# This means we will output mp4 videosvideo_codec = cv2.VideoWriter_fourcc(*"mp4v") # type: ignore    # Output Videooutput_video = cv2.VideoWriter(output_video_name, video_codec, desired_fps, (width, height)) # type: ignoreiterating, frame = cap.read()n_frames = 0batch = []while iterating:frame = cv2.resize( frame, (0,0), fx=0.5, fy=0.5)frame = cv2.cvtColor(frame, cv2.COLOR_BGR2RGB)if n_frames % SUBSAMPLE == 0:batch.append(frame)if len(batch) == 2 * desired_fps:inputs = image_processor(images=batch, return_tensors="pt").to("cuda")with torch.no_grad():outputs = model(**inputs)boxes = image_processor.post_process_object_detection(outputs,target_sizes=torch.tensor([(height, width)] * len(batch)),threshold=conf_threshold)for i, (array, box) in enumerate(zip(batch, boxes)):pil_image = draw_bounding_boxes(Image.fromarray(array), box, model, conf_threshold)frame = np.array(pil_image)# Convert RGB to BGRframe = frame[:, :, ::-1].copy()output_video.write(frame)batch = []output_video.release()yield output_video_nameoutput_video_name = f"output_{uuid.uuid4()}.mp4"output_video = cv2.VideoWriter(output_video_name, video_codec, desired_fps, (width, height)) # type: ignoreiterating, frame = cap.read()n_frames += 1
下面逐段解析代码。
1. 视频读取与处理
本应用将使用OpenCV处理视频,因为它是Python中处理视频的行业标准。通过OpenCV的VideoCapture型变量cap读取输入视频,每次调用cap.read()都会获取视频的下一帧。
为了实现Gradio视频流传输,我们需要为每个输出视频"块(chunk)"生成不同的视频文件,这里使用output_video = cv2.VideoWriter(output_video_name, video_codec, desired_fps, (width, height))创建要写入的下一个视频文件。其中video_codec用于指定视频文件类型,目前仅支持"mp4"和"ts"格式的视频流传输。
2. 推理循环实现
对于视频中的每一帧,我们都会将其尺寸缩小一半。由于OpenCV以BGR格式读取文件,需要先转换为transformer预期的RGB格式,这正是while循环前两行代码所实现的功能。
我们每隔一帧采集一次,并将帧添加至批处理列表,从而使输出视频的帧率减半。当批处理视频内容累计达到两秒时,就会运行模型推理。选择两秒阈值是为了确保每批处理时间足够短,既能实现服务器上的视频流畅显示,又不需要进行过多独立的前向传播。同时需要注意的是,为了使Gradio视频流正常工作,批处理时长至少需要1秒。
运行模型的前向传播后,我们使用模型的post_process_object_detection方法将检测到的边界框缩放到输入帧的原始尺寸。通过自定义函数绘制边界框,之后需要将RGB格式转换回BGR格式才能写回输出视频。完成当前批处理后,我们会为下一批处理创建新的输出视频文件。其中绘制边界框函数draw_bounding_boxes源码如下:
from PIL import ImageDraw, ImageFont  # type: ignore
import colorsysdef get_color(label):# Simple hash function to generate consistent colors for each labelhash_value = hash(label)hue = (hash_value % 100) / 100.0saturation = 0.7value = 0.9rgb = colorsys.hsv_to_rgb(hue, saturation, value)return tuple(int(x * 255) for x in rgb)def draw_bounding_boxes(image, results: dict, model, threshold=0.3):draw = ImageDraw.Draw(image)font = ImageFont.load_default()for score, label_id, box in zip(results["scores"], results["labels"], results["boxes"]):if score > threshold:label = model.config.id2label[label_id.item()]box = [round(i, 2) for i in box.tolist()]color = get_color(label)# Draw bounding boxdraw.rectangle(box, outline=color, width=3) # type: ignore# Prepare texttext = f"{label}: {score:.2f}"text_bbox = draw.textbbox((0, 0), text, font=font)text_width = text_bbox[2] - text_bbox[0]text_height = text_bbox[3] - text_bbox[1]# Draw text backgrounddraw.rectangle([box[0], box[1] - text_height - 4, box[0] + text_width, box[1]], # type: ignorefill=color, # type: ignore)# Draw textdraw.text((box[0], box[1] - text_height - 4), text, fill="white", font=font)return image
20.6.4 Gradio演示界面实现
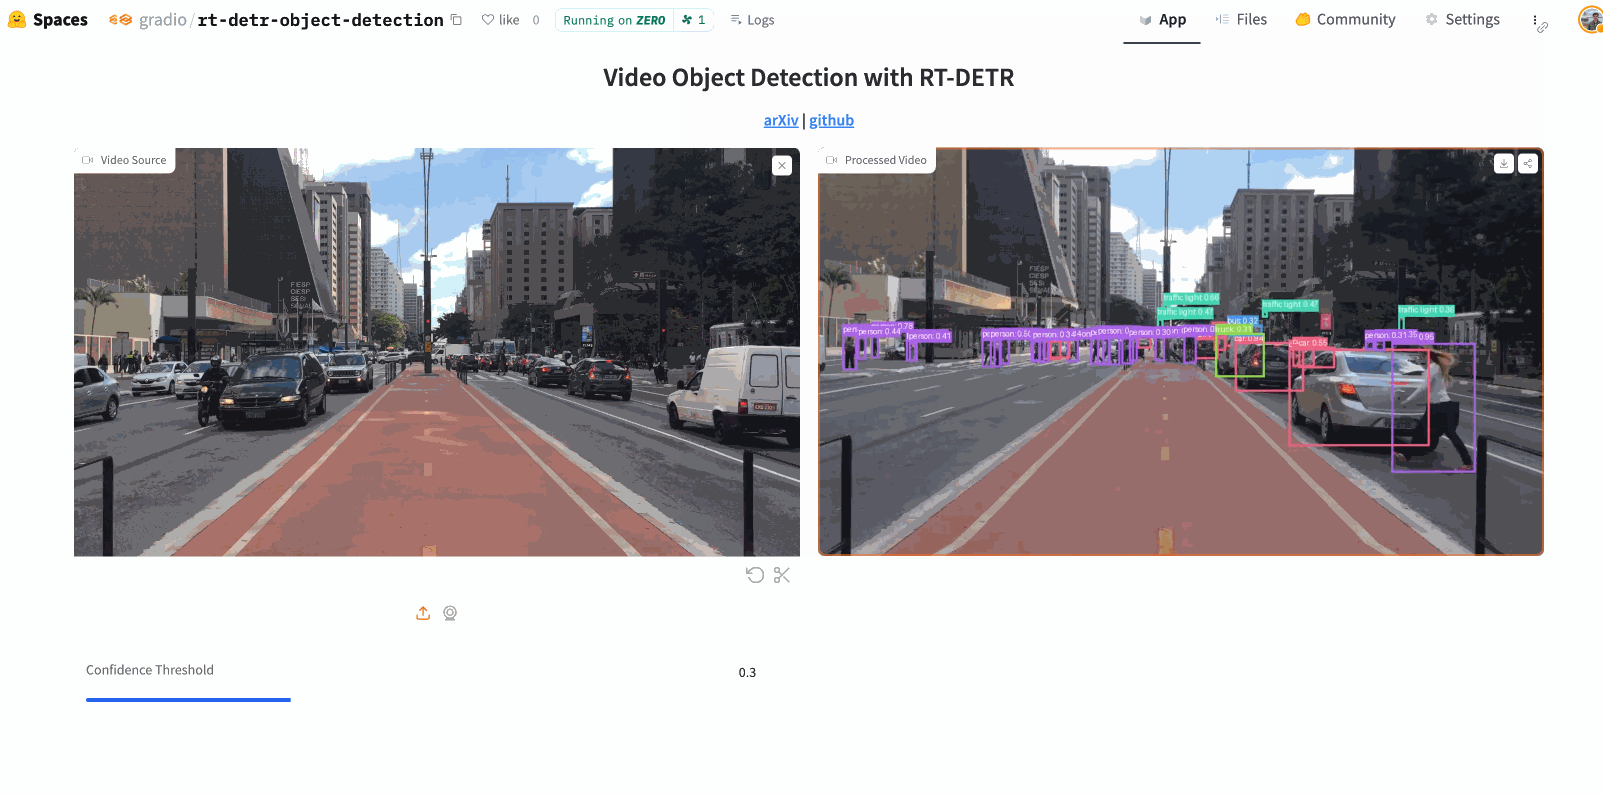
该UI代码与标准Gradio应用基本一致,我们将采用经典的双栏布局,使用户可以并排查看输入和输出视频。要实现流式传输功能,必须在输出视频组件中设置streaming=True参数,另外参数autoplay虽然并非必需配置,但启用该选项可显著提升用户观感。
import gradio as grwith gr.Blocks() as app:gr.HTML("""<h1 style='text-align: center'>Video Object Detection with <a href='https://huggingface.co/PekingU/rtdetr_r101vd_coco_o365' target='_blank'>RT-DETR</a></h1>""")with gr.Row():with gr.Column():video = gr.Video(label="Video Source")conf_threshold = gr.Slider(label="Confidence Threshold",minimum=0.0,maximum=1.0,step=0.05,value=0.30,)with gr.Column():output_video = gr.Video(label="Processed Video", streaming=True, autoplay=True)video.upload(fn=stream_object_detection,inputs=[video, conf_threshold],outputs=[output_video],)
最后,我们可以在此处查看在Hugging Face Spaces上托管的演示:gradio/rt-detr-object-detection。运行截图如下:
参考文献:
- Streaming AI Generated Audio
- Run Inference on servers
- Spaces ZeroGPU: Dynamic GPU Allocation for Spaces