云计算学习笔记——Linux系统网络配置与远程管理(ssh)篇
《云计算学习日记Day14》—— 从零开始的云计算之旅
今天是系统学习云计算的第十四天,记录了关于我的云计算学习,后续将每日更新我的笔记。欢迎大家一起来学习,如果内容有遗漏和错误,还请大家多多指正和包涵,谢谢大家
配置Linux网络
网络参数配置
配置静态主机名
方法一:修改配置文件
/etc/hostname
在配置文件中修改,固定保存的主机名,对本机有效,需要重新登录
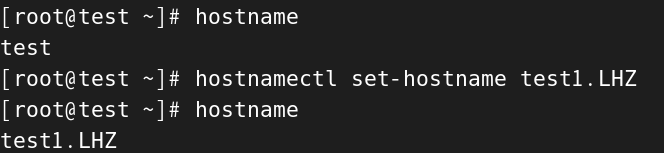
方法二:使用命令修改
命令:hostnamectl set-hostname 新主机名
重新打开命令终端就可更新
[root@test ~]# hostname
test
[root@test ~]# hostnamectl set-hostname test1.LHZ
[root@test ~]# hostname
test1.LHZ
准备软件
安装httpd、Network-Manger
查看网络连接
命令:nmcli
具体代码看以下操作
使用show指令
- nmcli connection show
- nmcli connection show “连接名”
[root@test1 ~]# nmcli connection show
NAME   UUID                                  TYPE      DEVICE
ens33  e8f85c43-f231-39fc-a980-9f1d199e0a66  ethernet  ens33
lo     36570a58-3db2-441d-9ae7-0ea28c24610c  loopback  lo

修改网络连接配置
修改配置有三个方式:
-nmcli
-nmtui
-修改网卡配置文件
这里我们使用nmcli,因为nmtui是图形化的修改方式,没有什么技术含金量
nmcli使用原则:nmcli必须为网卡再起一个名字,起的新名字一般和网卡名字一样
修改网卡命名规则
关于网卡的命名,现在的大多数应用程序或脚本对于网卡的命名依赖于传统的eth*,大多数老用户也保留了这种命名习惯,所以为了方便兼容更多的程序和脚本,这里我也将网卡以传统方式命名,具体操作如下
核心:修改内核引导文件/etc/default/grub
#打开内核引导文件,并对其进行修改[
[root@test1 ~]# vim /etc/default/grub#修改的内容:在GRUB_CMDLINE_LINUX的末尾添加net.ifnames=0  bisodevname=0
[root@test1 ~]# cat /etc/default/grub
GRUB_TIMEOUT=5
GRUB_DISTRIBUTOR="(sed 's, release .*,g' /etc/system-release)"
GRUB_DEFAULT=saved
GRUB_DISABLE_SUBMENU=true
GRUB_TERMINAL_OUTPUT="console"
GRUB_CMDLINE_LINUX="crashkernel=1G-4G:192M,4G-64G:256M,64G-:512M resume=/dev/mapper/r_l_bogon-swap rd.lvm.lv=r_l_bogon/root rd.lvm.lv=r_l_bogon/swap rhgb quiet net.ifnames=0 biosdevname=0"
GRUB_DISABLE_RECOVERY="true"
GRUB_ENABLE_BLSCFG=true #重新生成网卡命名规则
[root@test1 ~]# grub2-mkconfig -o /boot/grub2/grub.cfg --update-bls-cmdline
Generating grub configuration file ...
Adding boot menu entry for UEFI Firmware Settings ...
done #重启
[root@test1 ~]# reboot
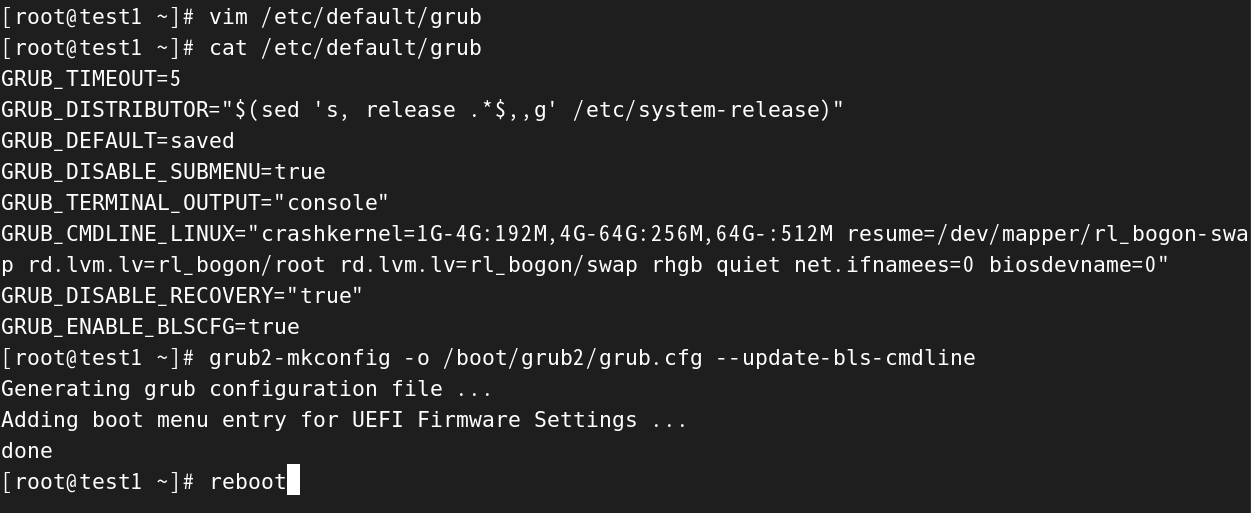
(图中打错了,net.ifnames=0打成了net.ifnamees=0,多打了yige字母e)
修改并更新完之后,重启就完成了
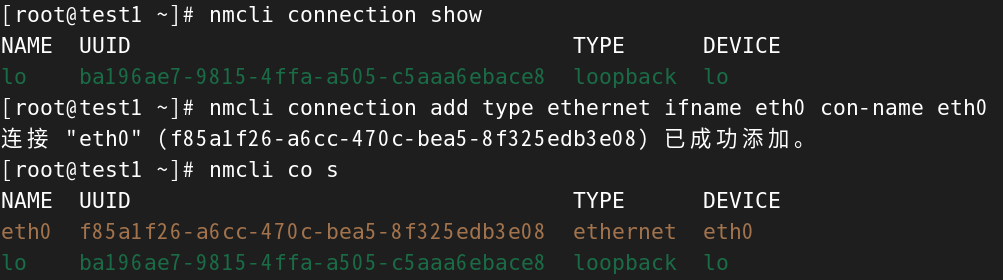
删除旧网卡、添加新的网卡
命令:nmcli connection add:添加
命令:nmcli connection delete 网卡:删除
首先查看网卡
[root@test1 ~]# nmcli connection show
NAME   UUID                                  TYPE      DEVICE
lo     ba196ae7-9815-4ffa-a505-c5aaa6ebace8  loopback  lo
ens33  e8f85c43-f231-39fc-a980-9f1d199e0a66  ethernet  --

最开始的旧网卡ens33没有用处了,我们把它删掉
[root@test1 ~]# nmcli connection delete ens33
成功删除连接 "ens33" (e8f85c43-f231-39fc-a980-9f1d199e0a66)。

删除之后我们在添加新的网卡
添加的同时,一起改名,为什么改名上面已经讲过了,这是使用nmcli的原则
来解释一下下面添加新网卡的命令的含义
命令:nmcli connrction add type ethernet ifname eth0 con-name eth0
解释:nmcli connection 添加 类型 以太网设备 网卡设备名eth0 nmcli命名为eth0
[root@test1 ~]# nmcli connection show
NAME  UUID                                  TYPE      DEVICE
lo    ba196ae7-9815-4ffa-a505-c5aaa6ebace8  loopback  lo
[root@test1 ~]# nmcli connection add type ethernet ifname eth0 con-name eth0
连接 "eth0" (f85a1f26-a6cc-470c-bea5-8f325edb3e08) 已成功添加。
[root@test1 ~]# nmcli co s
NAME  UUID                                  TYPE      DEVICE
eth0  f85a1f26-a6cc-470c-bea5-8f325edb3e08  ethernet  eth0
lo    ba196ae7-9815-4ffa-a505-c5aaa6ebace8  loopback  lo
修改网络连接配置-nmcli设置网卡IP地址等网络参数
指令:mkdify
- nmcli connection modify “nmcli命名的名称” 参数1 值1……..
- 常用参数:
- ipv4.address:配置IP地址
- ipv4.gateway:配置网关
- ipv4.dns:配置dns地址
- ipv4.method auto|manual:配置方法:自动|手动
- autoconnect yes|no:每次开机是否自动启用以上所有参数
#修改网卡配置信息
[root@test1 ~]# nmcli connection modify eth0 ipv4.method manual ipv4.addresses 192.168.99.10/24 ipv4.gateway 192.168.99.254 autoconnect yes**#修改完之后需要重新激活网卡,具体命令下面讲**
[root@test1 ~]# nmcli connection up eth0
连接已成功激活(D-Bus 活动路径:/org/freedesktop/NetworkManager/ActiveConnection/17)

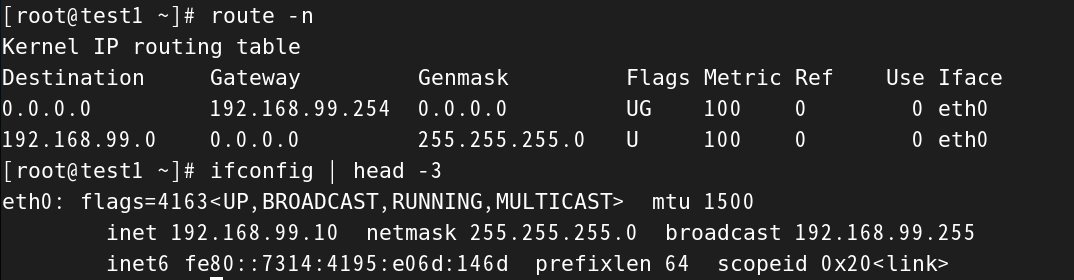
查看检查
修改完之后,我们再查看一下网关和网卡的IP,看看是否为我们修改的地址
#查看网关
[root@test1 ~]# route -n
Kernel IP routing table
Destination     Gateway         Genmask         Flags Metric Ref    Use Iface
0.0.0.0         192.168.99.254  0.0.0.0         UG    100    0        0 eth0
192.168.99.0    0.0.0.0         255.255.255.0   U     100    0        0 eth0#查看网卡eth0的IP地址
[root@test1 ~]# ifconfig | head -3
eth0: flags=4163<UP,BROADCAST,RUNNING,MULTICAST>  mtu 1500inet 192.168.99.10  netmask 255.255.255.0  broadcast 192.168.99.255inet6 fe80::7314:4195:e06d:146d  prefixlen 64  scopeid 0x20<link>
激活/禁用网络连接
使用up/down指令
- 禁用:nmcli connection down “连接名”
- 激活:nmcli connection up “连接名”
为本机指定DNS服务器
指定dns服务器等操作也需要集成到上面的命令里
[root@test1 ~]# nmcli connection modify eth0 ipv4.dns 8.8.8.8 autoconnect yes
也可以对dns的配置文件进行修改,文件地址:/etc/resolv.conf
常用的网络工具
- 查看IP地址
- ip address show
- 添加IP地址
- ip address add xxx.xxx.xxx.xxx/xx dev 网卡名
- ping命令
- ping 选项 xxx.xxx.xxx.xxx
- 选项-c:发送数据包的个数
- 选项-i:发送数据包间隔时间
远程管理Linux主机
SSH引入
介绍一下ssh远程管理:SSH(Secure Shell)是一种安全通道协议,主要用来实现字符界面 的远程登陆、远程复制等功能,为客户机提供安全的shell环境
默认port端口:TCP 22
依赖软件:openssh
服务名称:sshd
使用ssh客户端
首先想要使用ssh,我们必须要有两台以上的机器,所以我们把我们之前的虚拟机克隆两个
第一步:修改主机名
因为我们是克隆的机器,所以三台机器的所有的配置都一样
将另外两台机器分别改名为test2.LHZ和test3.LHZ,便于区分
第二步:修改IP地址信息
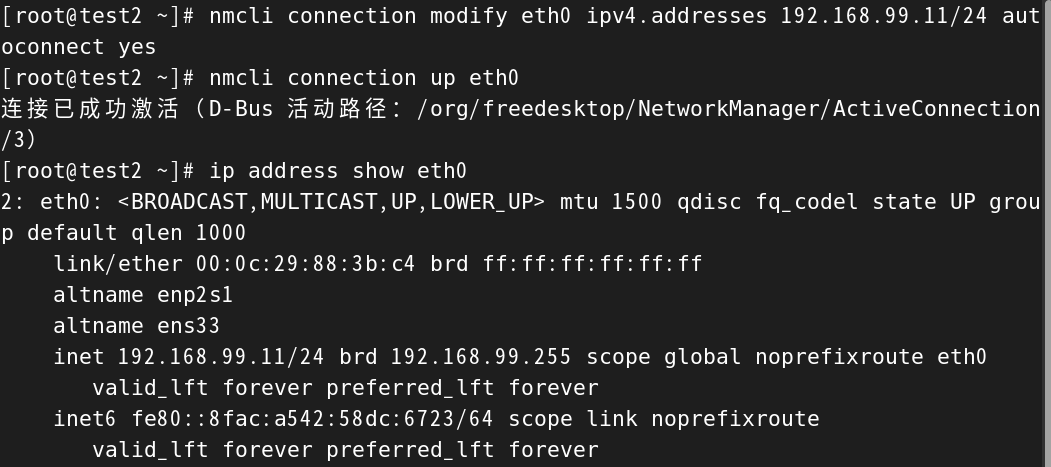
这里以test2.LHZ为例,
#修改网卡eth0的信息,修改它的IP地址
[root@test2 ~]# nmcli connection modify eth0 ipv4.addresses 192.168.99.11/24 autoconnect yes#修改完之后重新激活网卡eth0
[root@test2 ~]# nmcli connection up eth0
连接已成功激活(D-Bus 活动路径:/org/freedesktop/NetworkManager/ActiveConnection/3)#使用ip address show查看网卡的IP是否成功修改
[root@test2 ~]# ip address show eth0
2: eth0: <BROADCAST,MULTICAST,UP,LOWER_UP> mtu 1500 qdisc fq_codel state UP group default qlen 1000link/ether 00:0c:29:88:3b:c4 brd ff:ff:ff:ff:ff:ffaltname enp2s1altname ens33inet 192.168.99.11/24 brd 192.168.99.255 scope global noprefixroute eth0valid_lft forever preferred_lft foreverinet6 fe80::8fac:a542:58dc:6723/64 scope link noprefixroute valid_lft forever preferred_lft forever
第三步:安装ssh相关软件
可以先使用yum provides ssh 来查看提供ssh的软件,然后用rpm -q 软件名来查看是否安装软件,若没有则安装
第四步:使用ssh客户端
- 命令:
- ssh [选项]… 服务器
- ssh [选项]… 用户名@服务器
- ssh [选项]… -l 用户名 服务器
我们先使用test1远程控制特殊test2
[root@test1 ~]# ssh root@192.168.99.11
The authenticity of host '192.168.99.11 (192.168.99.11)' can't be established.
ED25519 key fingerprint is SHA256:lA1s6pUxkF28uQbqSsqh+plmyZFByyTBw9XPaKoYYgQ.
This key is not known by any other names
Are you sure you want to continue connecting (yes/no/[fingerprint])? yes
Warning: Permanently added '192.168.99.11' (ED25519) to the list of known hosts.
root@192.168.99.11's password:
Permission denied, please try again.
root@192.168.99.11's password:
Permission denied, please try again.
root@192.168.99.11's password:
root@192.168.99.11: Permission denied (publickey,gssapi-keyex,gssapi-with-mic,password).
[root@test1 ~]#
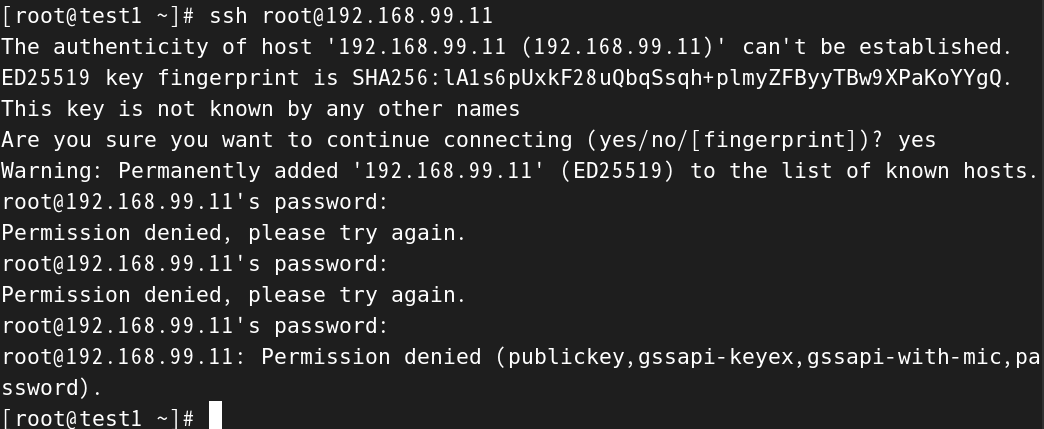
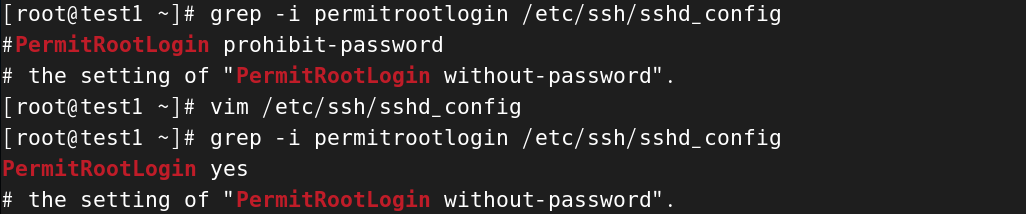
很遗憾没有连接成功,为什么呢?思考一下,如果工作生活中遇到这种问题,软件我们安装了,ip地址我们也配置了,程序也运行了,我们输入的命令也没有出现错误,那可能就是权限的问题了,所以我们查看一下关于ssh的配置文件:/etc/ssh/sshd_config
我们可以在他的配置文件里面找到一条PermitRootLogin,意思是允许root用户登入,后面的选项Prohibit-password意思是禁止使用密码,这里我们把它修改为yes
#查看原有配置信息
[root@test1 ~]# grep -i permitrootlogin /etc/ssh/sshd_config
#PermitRootLogin prohibit-password
# the setting of "PermitRootLogin without-password".
[root@test1 ~]# vim /etc/ssh/sshd_config#查看修改后的配置信息
[root@test1 ~]# grep -i permitrootlogin /etc/ssh/sshd_config
PermitRootLogin yes
# the setting of "PermitRootLogin without-password".
我们现在已经把test1的配置修改完成了,然后重启一下sshd
[root@test1 ~]# systemctl restart sshd
使用虚拟机test2远程管理一下test1
[root@test2 ~]# ssh root@192.168.99.10
root@192.168.99.10's password:
Activate the web console with: systemctl enable --now cockpit.socketLast failed login: Tue Sep  2 11:21:59 CST 2025 from 192.168.99.11 on ssh:notty
There were 3 failed login attempts since the last successful login.
Last login: Mon Sep  1 21:26:04 2025
[root@test1 ~]#
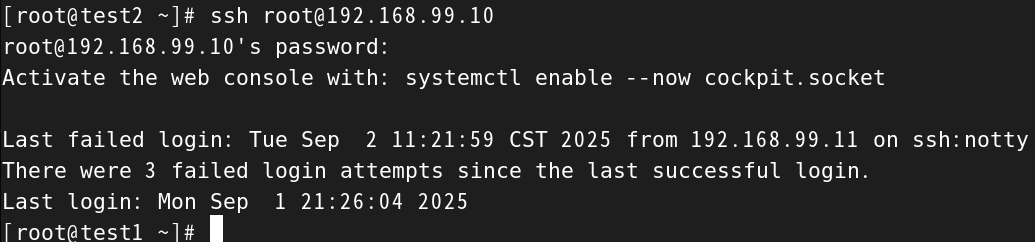
好,到这里我们就远程管理成功了
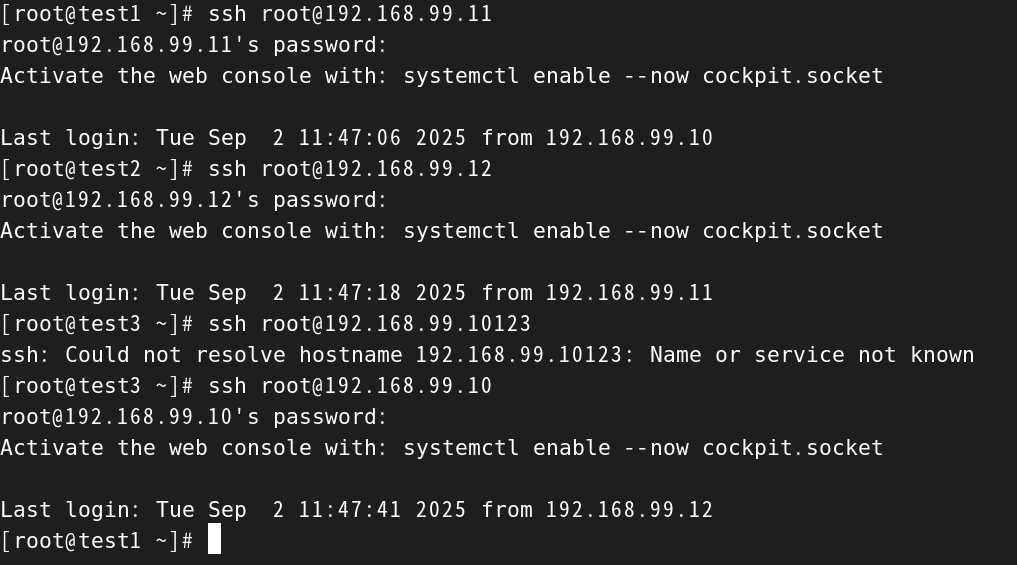
最后我们对虚拟机test2和test3分别进行相同的设置,让他们之间可以相互远程控制
配置好后测试一下
#使用test1远程控制test2
[root@test1 ~]# ssh root@192.168.99.11
root@192.168.99.11's password:
Activate the web console with: systemctl enable --now cockpit.socketLast login: Tue Sep  2 11:47:06 2025 from 192.168.99.10#test1远程控制test2,让test2远程控制test3
[root@test2 ~]# ssh root@192.168.99.12
root@192.168.99.12's password:
Activate the web console with: systemctl enable --now cockpit.socketLast login: Tue Sep  2 11:47:18 2025 from 192.168.99.11#test1远程控制test2远程控制test3,让test3再远程控制test1
[root@test3 ~]# ssh root@192.168.99.10
root@192.168.99.10's password:
Activate the web console with: systemctl enable --now cockpit.socketLast login: Tue Sep  2 11:47:41 2025 from 192.168.99.12#远程控制成功,成功形成闭环
[root@test1 ~]#
使用scp远程复制工具
安全复制工具scp
- scp [-r] 用户名@服务器:路径 本地路径
- scp [-r] 本地路径 用户名@服务器:路径
- scp [-r] 要传输的文件的地址 要传输到的位置
#将test1的目录/mnt复制到test2的目录/opt下
[root@test1 ~]# scp -r /mnt root@192.168.99.11:/opt
root@192.168.99.11's password:
[root@test1 ~]# ssh root@192.168.99.11
root@192.168.99.11's password:
Activate the web console with: systemctl enable --now cockpit.socketLast login: Tue Sep  2 14:44:00 2025 from 192.168.99.10
[root@test2 ~]# ls /opt
mnt
[root@test2 ~]#

实现ssh无密码验证
- 实现办法:部署公钥和私钥(可以将公钥理解为锁,私钥理解为钥匙)
- 理解:比如
- 过程:
- 生成公钥与私钥
- 传递公钥到对方主机
生成公钥和私钥
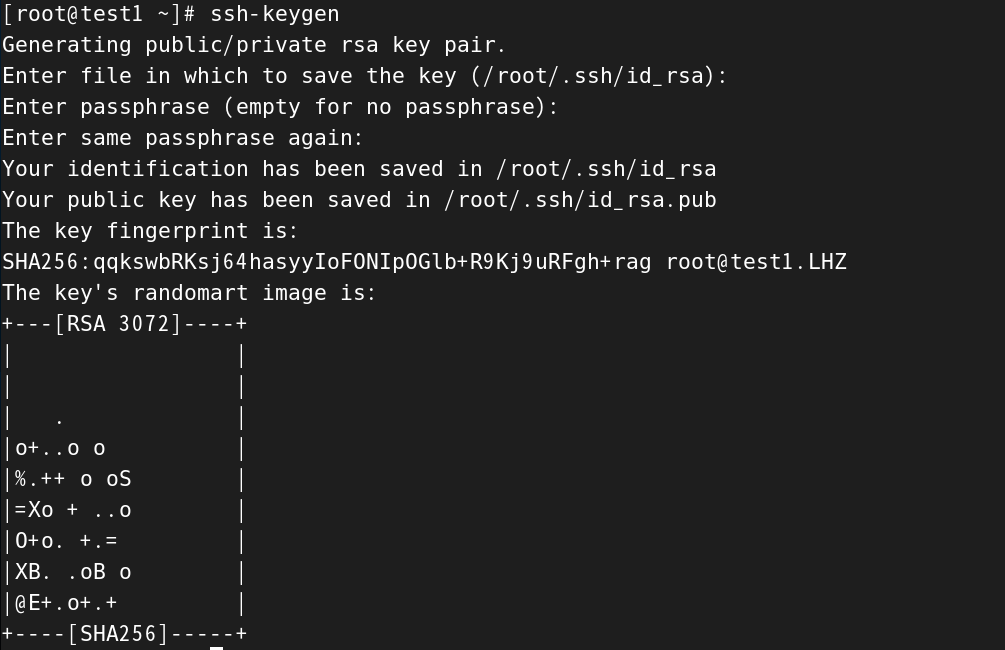
#输入生成公钥和私钥的指令
[root@test1 ~]# ssh-keygen
Generating public/private rsa key pair.
#设置默认的保存位置
Enter file in which to save the key (/root/.ssh/id_rsa):
#设置密码,这里设置为空
Enter passphrase (empty for no passphrase):
Enter same passphrase again:
Your identification has been saved in /root/.ssh/id_rsa
Your public key has been saved in /root/.ssh/id_rsa.pub
The key fingerprint is:
SHA256:qqkswbRKsj64hasyyIoFONIpOGlb+R9Kj9uRFgh+rag root@test1.LHZ
The key's randomart image is:
+---[RSA 3072]----+
|                 |
|                 |
|   .             |
|o+..o o          |
|%.++ o oS        |
|=Xo + ..o        |
|O+o. +.=         |
|XB. .oB o        |
|@E+.o+.+         |
+----[SHA256]-----+
根据上面设置的默认的保存位置,我们查看一下就可以找到公钥(id_rsa.pub)和私钥(id_rsa)
[root@test1 ~]# ls /root/.ssh
id_rsa  id_rsa.pub  known_hosts  known_hosts.old
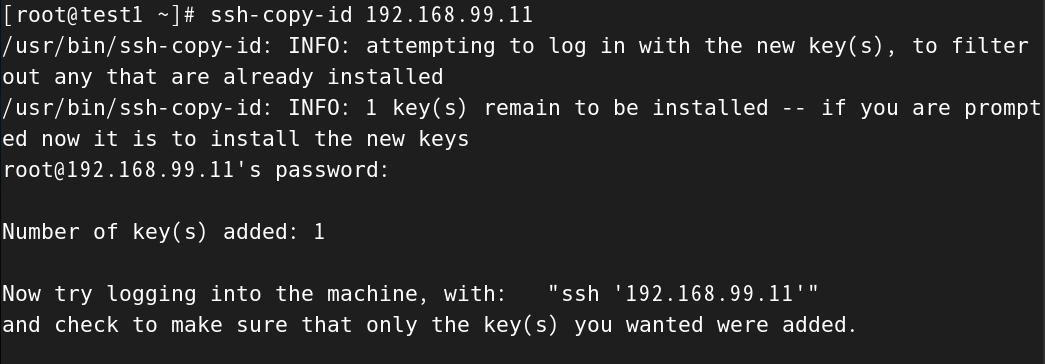
然后我们将test1生成的公钥传送到虚拟机test2上,庆幸的是sshd服务给我们提供了专门传输公钥的命令:ssh-copy-id 地址
[root@test1 ~]# ssh-copy-id 192.168.99.11
/usr/bin/ssh-copy-id: INFO: attempting to log in with the new key(s), to filter out any that are already installed
/usr/bin/ssh-copy-id: INFO: 1 key(s) remain to be installed -- if you are prompted now it is to install the new keys
root@192.168.99.11's password: Number of key(s) added: 1Now try logging into the machine, with:   "ssh '192.168.99.11'"
and check to make sure that only the key(s) you wanted were added.
怎么检测我们传输公钥是否成功呢?
这里拓展一下,如果成功,那么再test2中的/root/.ssh目录下会出现一个authorized_key文件,专门又来存放别的机器传输过来的公钥。打开虚拟机test2,检查一下
[root@test2 ~]# ls /root/.ssh/
authorized_keys  known_hosts  known_hosts.old
[root@test2 ~]# cat /root/.ssh/authorized_keys
ssh-rsa AAAAB3NzaC1yc2EAAAADAQABAAABgQDH2K9aVeqxxibSnb/IjE7+I88Enqim9uLsHWTIvd/BROU6SuGfvWxbc9zXx/9gKMdBqfhCaW+5FteiZ1UHIKhqpJb5fAiwNrj91wrFEfKZHLcNWSWFk+9h582QmmgZVtS4nUnLD1LD5T+mviSqBPU841iAROoET48KWrqjCsdE1cVnyno4mo5mqTAm+AAhJnSS/A8xKy0a/rdIe773q2ThFNW0Dj/LEj73OYZrLGb7yZbteF6NY+9qNCQkx3/W3lFOJ0wGoCVLPlpGEazb/UM+9Iklv97ZFM7VDPZP+ktUBNeTsF049CvicqBrbqjM8Hzlg9XvprUDu607CAFjctPzvOpIXkd22B+2QOcBajXIVnthN6V+FtgF+zowd5sNdHcdJ3+X9I71Ud1xj88apb276Kol+feY+p7bpN6ZAMLaCy9UfJPQ2qF8pQegfzEoZ2Eq+Pnx9+DKPiP0xibKFGepdwsOVUNgMSBv1bFRdxTPvG0pclG8DzDlYCR5Cl1ul88= root@test1.LHZ
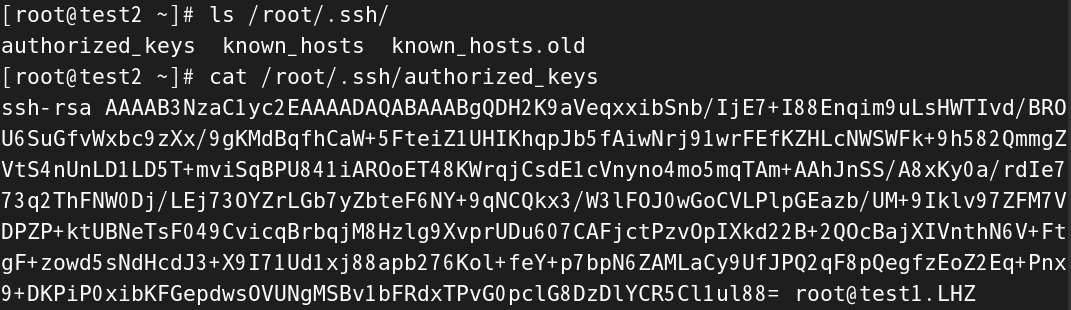
关于公钥,我们看不懂,但是在最后我们可以看到root@test1.LHZ,这也能说明成功,现在就可以进行免密远程控制了
Windows→Linux远程访问
远程登陆工具
- MobaXterm
- WindTerm
- Wishom
- Putty等等