c#联合halcon的基础教程(案例:亮度计算、角度计算和缺陷检测)(含halcon代码)
目录
1.环境配置
2.案例一:亮度计算
halcon代码:
主界面代码:
3.案例二: 角度计算
halcon代码:
主界面代码:
4.案例三:缺陷检测
halcon代码:
主界面代码:
通过网盘分享的文件:halcon-25.05.0.0-x64-win64
链接: 百度网盘 请输入提取码
提取码: whek
1.环境配置
A.创建新c# winform 项目,点击添加引用。
(halcon安装目录"D:\halcon\HALCON-25.05-Progress\bin\dotnet35\halcondotnet.dll")
B.把halcondotnet.dll拖到工具箱。
C.把"D:\halcon\HALCON-25.05-Progress\bin\x64-win64\halcon.dll"复制到项目的Debug文件夹中
D.项目属性生成中:取消勾选 首选32

2.案例一:亮度计算
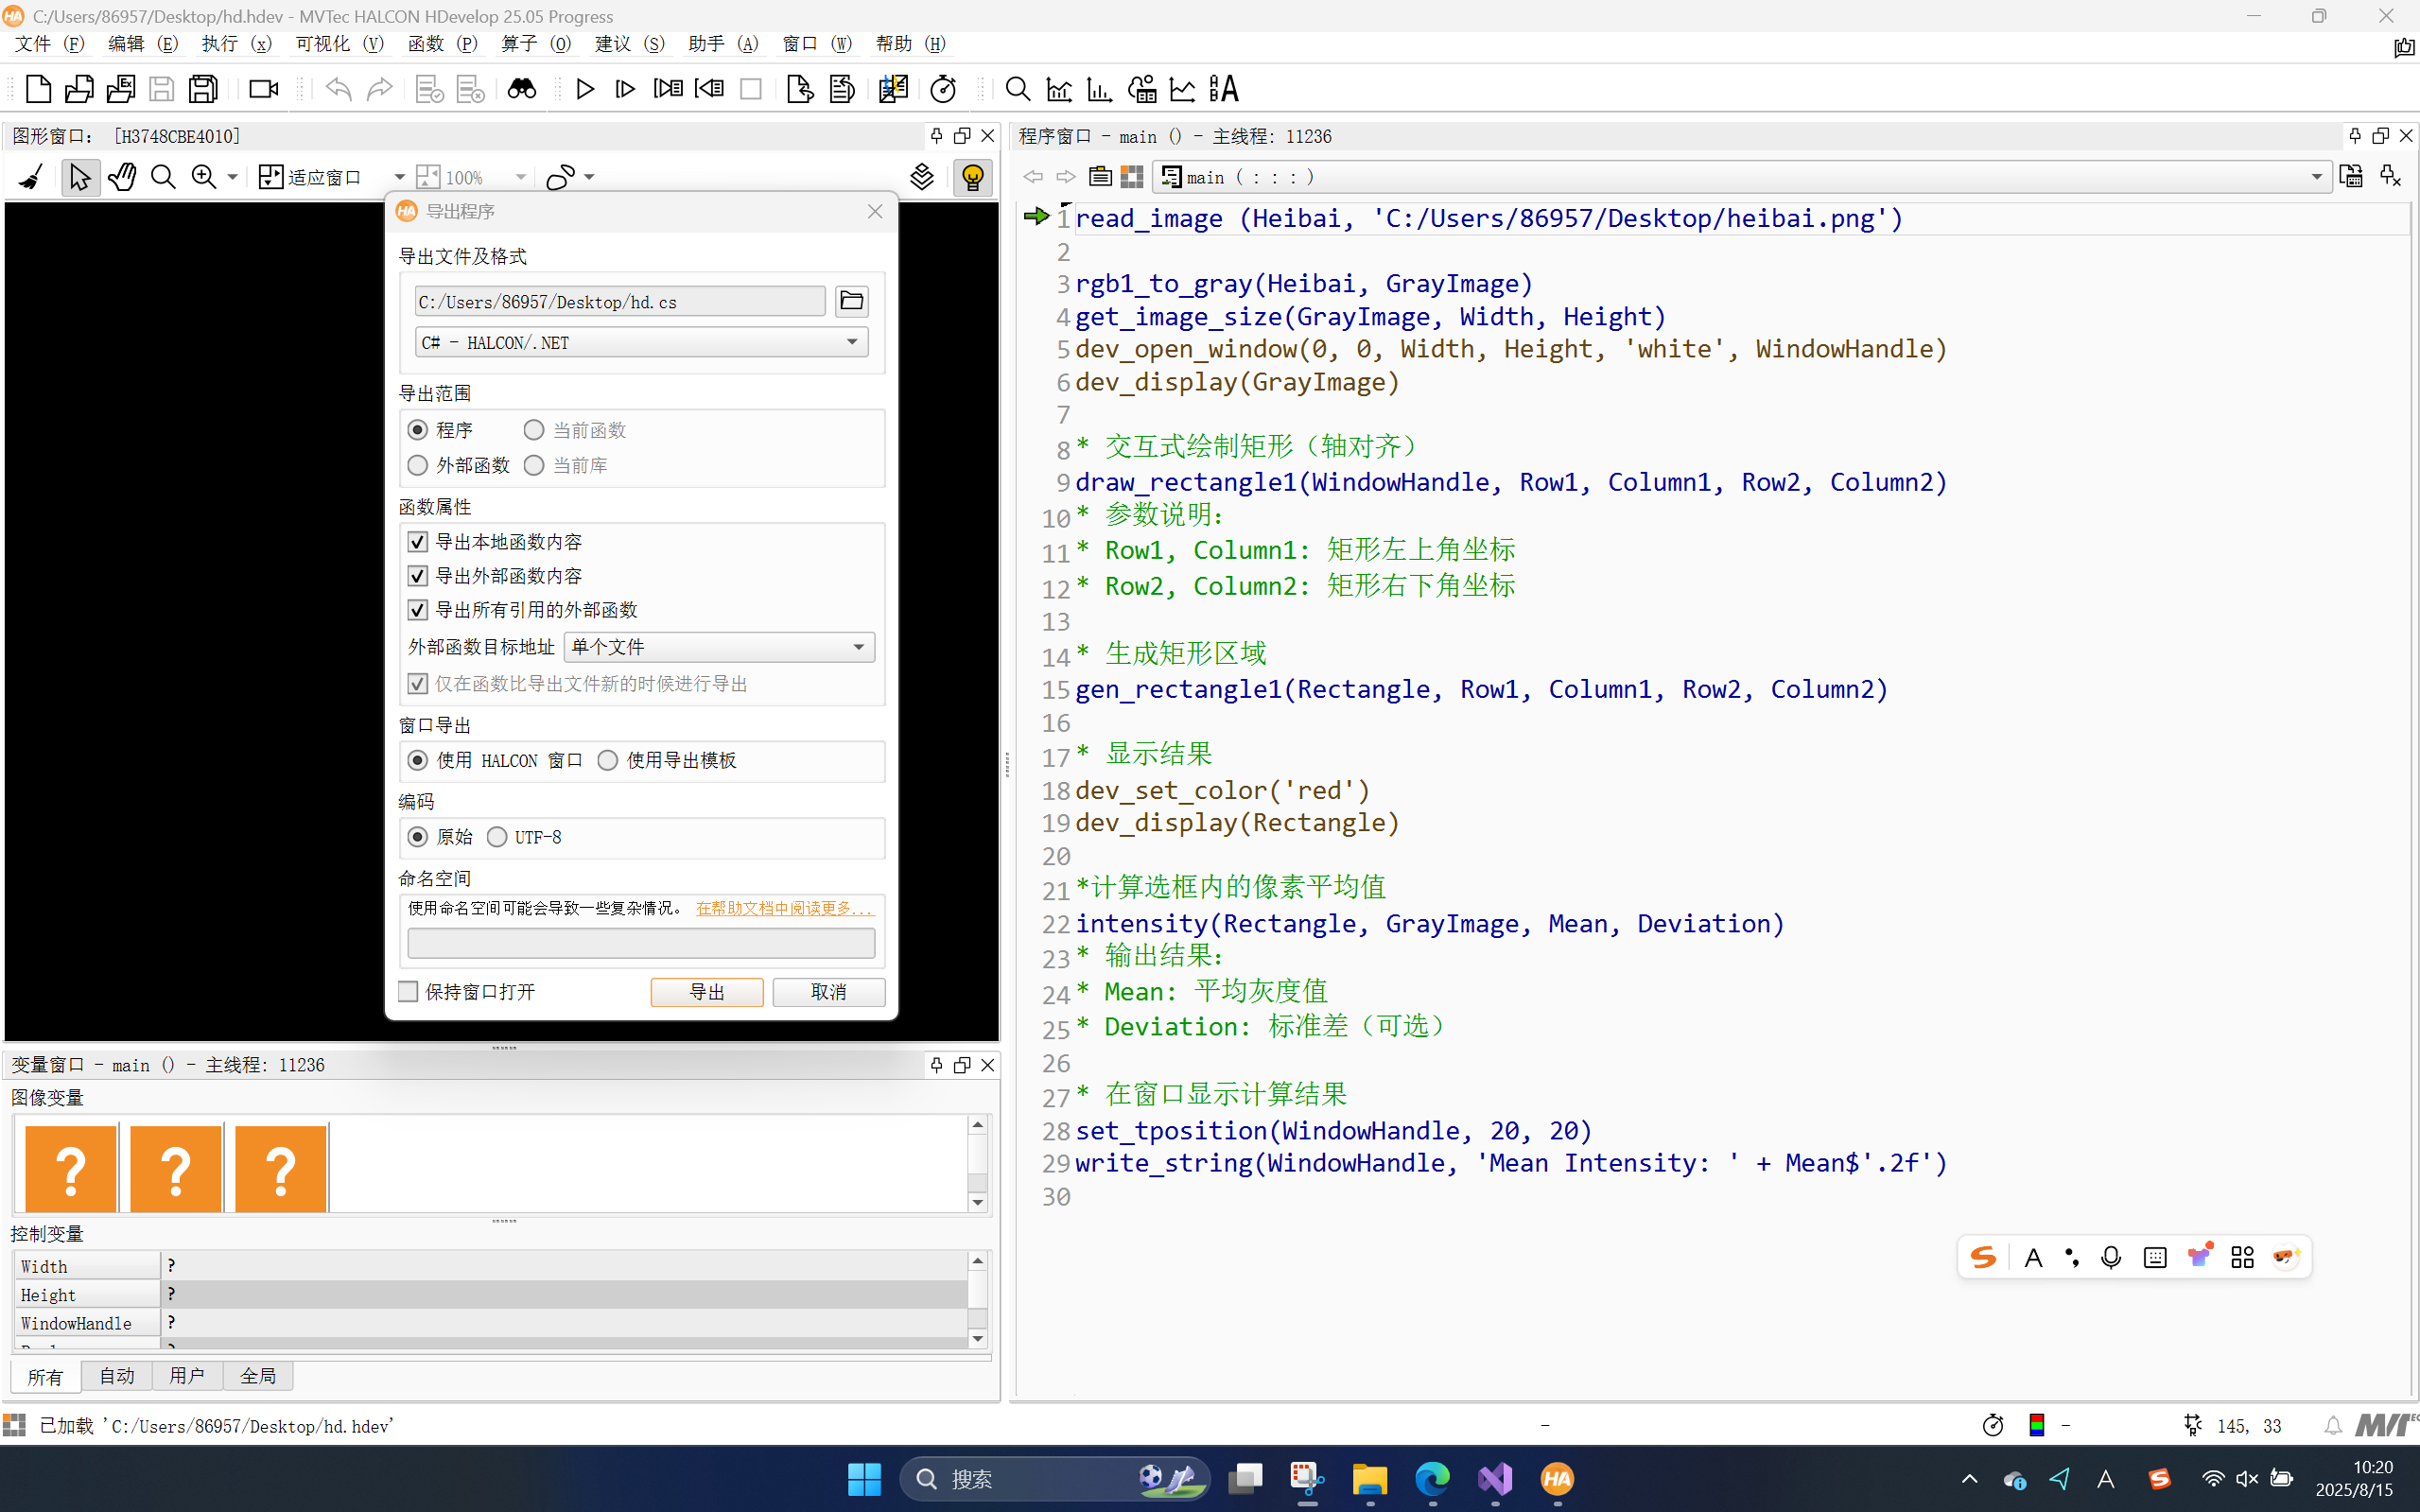
如图,计算 选框区域的亮度。

c#上添加几个控件
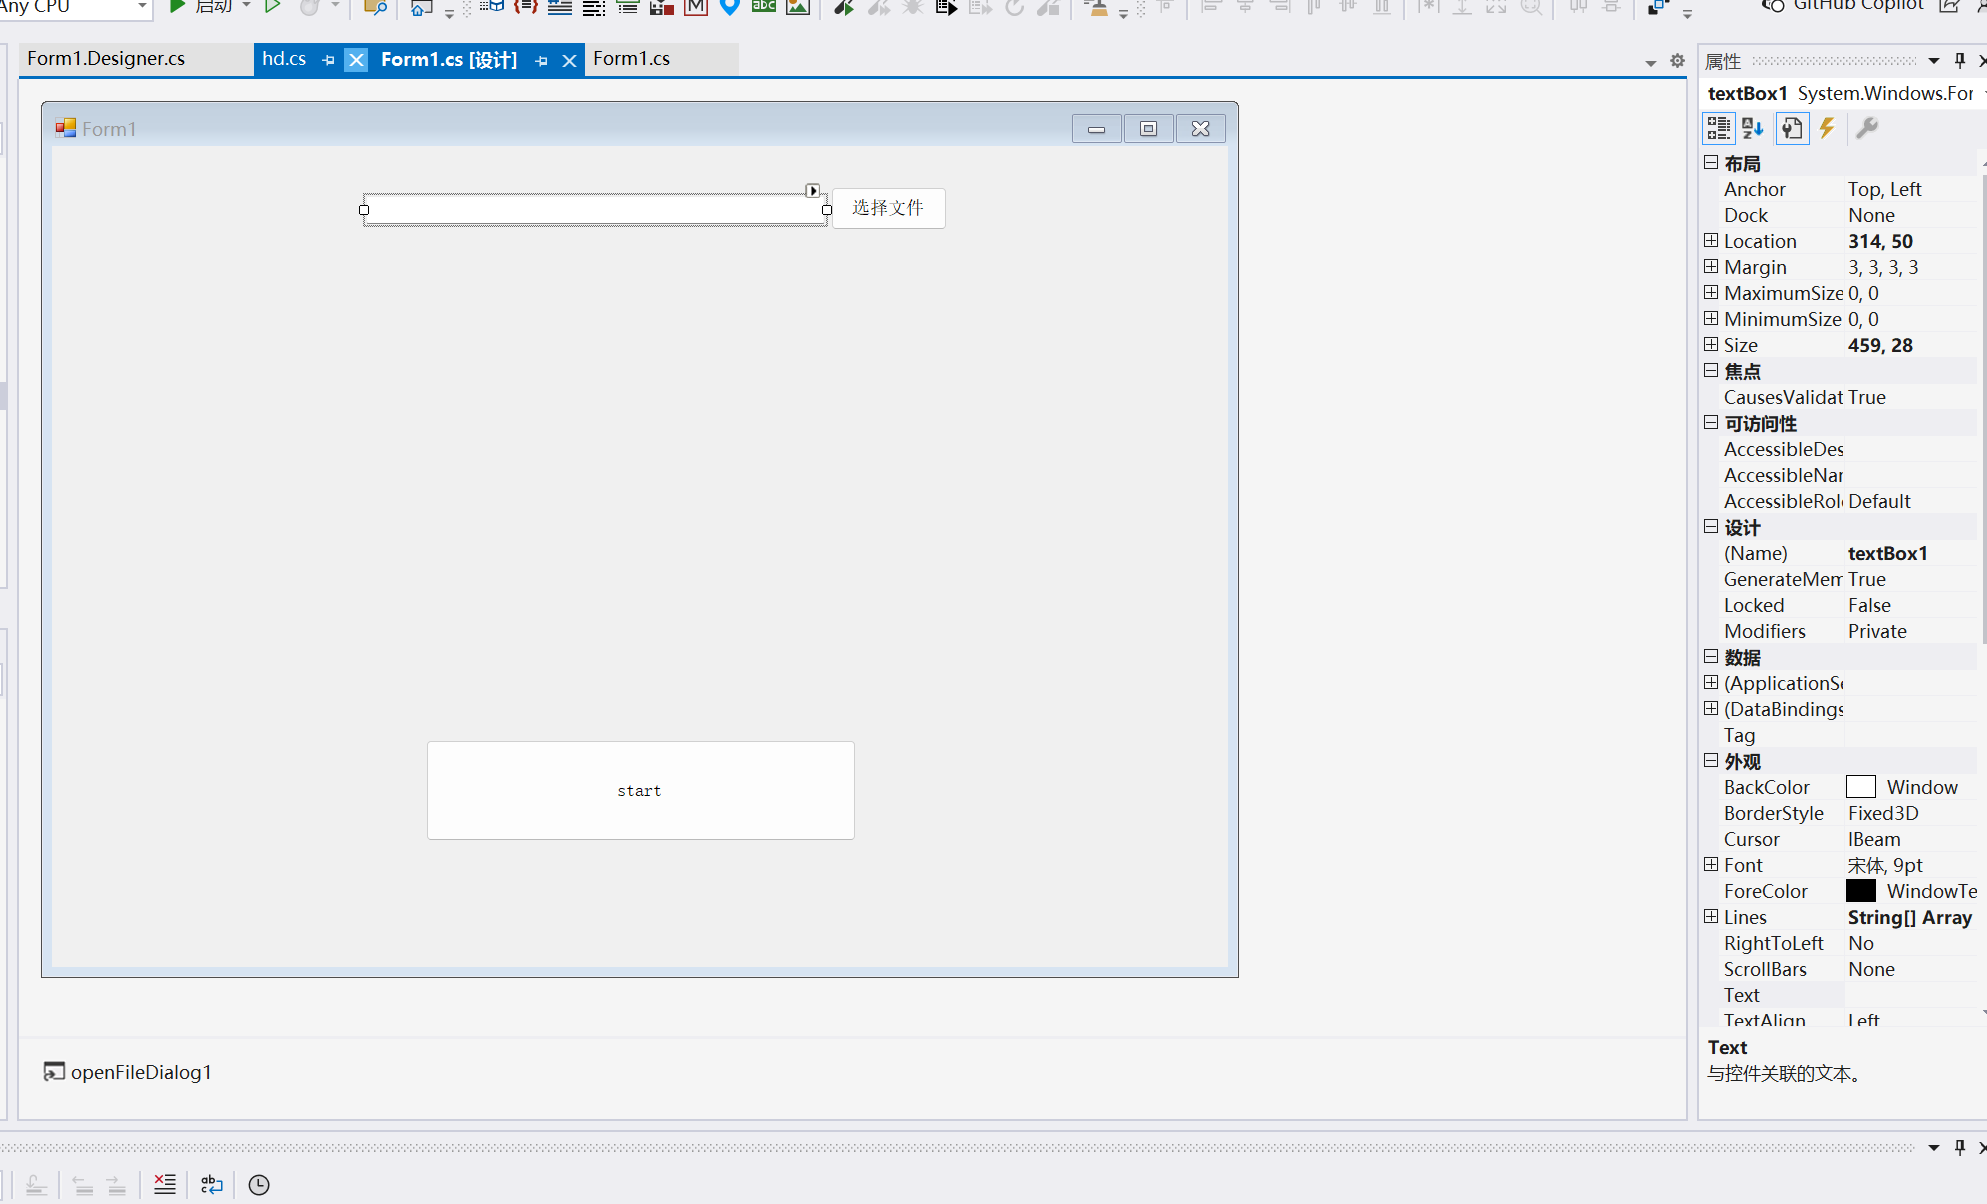
添加openfiledialog控件
点击选择文件后把地址放在textbox1
private void button2_Click(object sender, EventArgs e)
{
using (OpenFileDialog openFileDialog = new OpenFileDialog())
{
openFileDialog.Filter = "所有文件|*.*";
openFileDialog.Title = "选择文件";
if (openFileDialog.ShowDialog() == DialogResult.OK)
{
string filePath = openFileDialog.FileName;
textBox1.Text = filePath;
}
}
}
打开halcon软件,完成项目功能
halcon代码:
read_image (Heibai, 'C:/Users/86957/Desktop/heibai.png')rgb1_to_gray(Heibai, GrayImage)
get_image_size(GrayImage, Width, Height)
dev_open_window(0, 0, Width, Height, 'white', WindowHandle)
dev_display(GrayImage)* 交互式绘制矩形(轴对齐)
draw_rectangle1(WindowHandle, Row1, Column1, Row2, Column2)
* 参数说明:
* Row1, Column1: 矩形左上角坐标
* Row2, Column2: 矩形右下角坐标* 生成矩形区域
gen_rectangle1(Rectangle, Row1, Column1, Row2, Column2)* 显示结果
dev_set_color('red')
dev_display(Rectangle)*计算选框内的像素平均值
intensity(Rectangle, GrayImage, Mean, Deviation)
* 输出结果:
* Mean: 平均灰度值
* Deviation: 标准差(可选)* 在窗口显示计算结果
set_tposition(WindowHandle, 20, 20)
write_string(WindowHandle, 'Mean Intensity: ' + Mean$'.2f')
点击文件,导出程序。
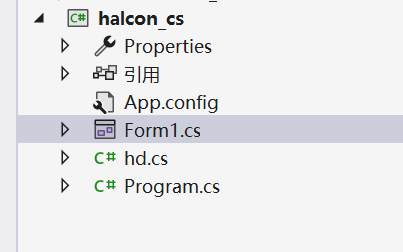
把导出的.cs文件,复制到项目中。并进行修改。
我们只需要action();并把他放入项目的命名空间;还需要增加输入str filepath。
原来的hd.cs:
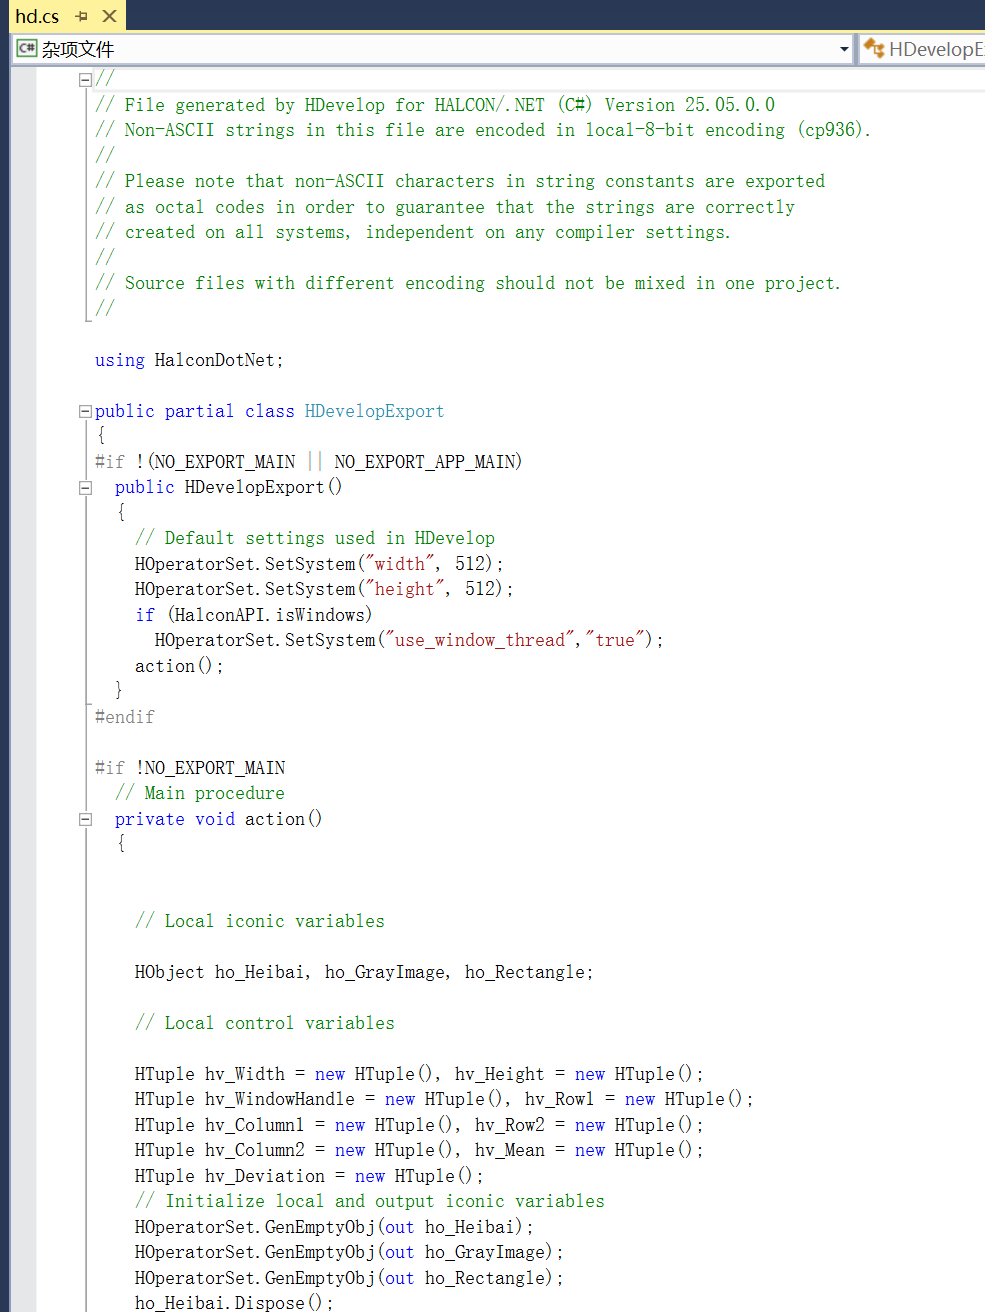
修改后的hd.cs如下:
//
// File generated by HDevelop for HALCON/.NET (C#) Version 25.05.0.0
// Non-ASCII strings in this file are encoded in local-8-bit encoding (cp936).
//
// Please note that non-ASCII characters in string constants are exported
// as octal codes in order to guarantee that the strings are correctly
// created on all systems, independent on any compiler settings.
//
// Source files with different encoding should not be mixed in one project.
//using HalconDotNet;
namespace halcon_cs
{public partial class HDevelopExport{// Main procedure public void action(string filepath){// Local iconic variables HObject ho_Heibai, ho_GrayImage, ho_Rectangle;// Local control variables HTuple hv_Width = new HTuple(), hv_Height = new HTuple();HTuple hv_WindowHandle = new HTuple(), hv_Row1 = new HTuple();HTuple hv_Column1 = new HTuple(), hv_Row2 = new HTuple();HTuple hv_Column2 = new HTuple(), hv_Mean = new HTuple();HTuple hv_Deviation = new HTuple();// Initialize local and output iconic variables HOperatorSet.GenEmptyObj(out ho_Heibai);HOperatorSet.GenEmptyObj(out ho_GrayImage);HOperatorSet.GenEmptyObj(out ho_Rectangle);ho_Heibai.Dispose();HOperatorSet.ReadImage(out ho_Heibai, filepath);ho_GrayImage.Dispose();HOperatorSet.Rgb1ToGray(ho_Heibai, out ho_GrayImage);hv_Width.Dispose(); hv_Height.Dispose();HOperatorSet.GetImageSize(ho_GrayImage, out hv_Width, out hv_Height);HOperatorSet.SetWindowAttr("background_color", "white");HOperatorSet.OpenWindow(0, 0, hv_Width, hv_Height, 0, "visible", "", out hv_WindowHandle);HDevWindowStack.Push(hv_WindowHandle);if (HDevWindowStack.IsOpen()){HOperatorSet.DispObj(ho_GrayImage, HDevWindowStack.GetActive());}//交互式绘制矩形(轴对齐)hv_Row1.Dispose(); hv_Column1.Dispose(); hv_Row2.Dispose(); hv_Column2.Dispose();HOperatorSet.DrawRectangle1(hv_WindowHandle, out hv_Row1, out hv_Column1, out hv_Row2,out hv_Column2);//参数说明://Row1, Column1: 矩形左上角坐标//Row2, Column2: 矩形右下角坐标//生成矩形区域ho_Rectangle.Dispose();HOperatorSet.GenRectangle1(out ho_Rectangle, hv_Row1, hv_Column1, hv_Row2, hv_Column2);//显示结果if (HDevWindowStack.IsOpen()){HOperatorSet.SetColor(HDevWindowStack.GetActive(), "red");}if (HDevWindowStack.IsOpen()){HOperatorSet.DispObj(ho_Rectangle, HDevWindowStack.GetActive());}//计算选框内的像素平均值hv_Mean.Dispose(); hv_Deviation.Dispose();HOperatorSet.Intensity(ho_Rectangle, ho_GrayImage, out hv_Mean, out hv_Deviation);//输出结果://Mean: 平均灰度值//Deviation: 标准差(可选)//在窗口显示计算结果HOperatorSet.SetTposition(hv_WindowHandle, 20, 20);using (HDevDisposeHelper dh = new HDevDisposeHelper()){HOperatorSet.WriteString(hv_WindowHandle, "Mean Intensity: " + (hv_Mean.TupleString(".2f")));}ho_Heibai.Dispose();ho_GrayImage.Dispose();ho_Rectangle.Dispose();hv_Width.Dispose();hv_Height.Dispose();hv_WindowHandle.Dispose();hv_Row1.Dispose();hv_Column1.Dispose();hv_Row2.Dispose();hv_Column2.Dispose();hv_Mean.Dispose();hv_Deviation.Dispose();}}
}
主界面代码:
如下:
using System;
using System.Collections.Generic;
using System.ComponentModel;
using System.Data;
using System.Drawing;
using System.Linq;
using System.Text;
using System.Threading.Tasks;
using System.Windows.Forms;
using HalconDotNet;
namespace halcon_cs
{public partial class Form1 : Form{public Form1(){InitializeComponent();}private void button1_Click(object sender, EventArgs e){string filepath = textBox1.Text;HDevelopExport hd = new HDevelopExport();hd.action(filepath);}private void button2_Click(object sender, EventArgs e){using (OpenFileDialog openFileDialog = new OpenFileDialog()){openFileDialog.Filter = "所有文件|*.*";openFileDialog.Title = "选择文件";if (openFileDialog.ShowDialog() == DialogResult.OK){string filePath = openFileDialog.FileName;textBox1.Text = filePath;}}}}
}
设计器代码如下:
using HalconDotNet;namespace halcon_cs
{partial class Form1{/// <summary>/// 必需的设计器变量。/// </summary>private System.ComponentModel.IContainer components = null;/// <summary>/// 清理所有正在使用的资源。/// </summary>/// <param name="disposing">如果应释放托管资源,为 true;否则为 false。</param>protected override void Dispose(bool disposing){if (disposing && (components != null)){components.Dispose();}base.Dispose(disposing);}#region Windows 窗体设计器生成的代码/// <summary>/// 设计器支持所需的方法 - 不要修改/// 使用代码编辑器修改此方法的内容。/// </summary>private void InitializeComponent(){this.button1 = new System.Windows.Forms.Button();this.openFileDialog1 = new System.Windows.Forms.OpenFileDialog();this.button2 = new System.Windows.Forms.Button();this.textBox1 = new System.Windows.Forms.TextBox();this.SuspendLayout();// // button1// this.button1.Location = new System.Drawing.Point(374, 594);this.button1.Name = "button1";this.button1.Size = new System.Drawing.Size(430, 101);this.button1.TabIndex = 1;this.button1.Text = "start";this.button1.UseVisualStyleBackColor = true;this.button1.Click += new System.EventHandler(this.button1_Click);// // openFileDialog1// this.openFileDialog1.FileName = "openFileDialog1";// // button2// this.button2.Location = new System.Drawing.Point(779, 41);this.button2.Name = "button2";this.button2.Size = new System.Drawing.Size(116, 43);this.button2.TabIndex = 4;this.button2.Text = "选择文件";this.button2.UseVisualStyleBackColor = true;this.button2.Click += new System.EventHandler(this.button2_Click);// // textBox1// this.textBox1.Location = new System.Drawing.Point(314, 50);this.textBox1.Name = "textBox1";this.textBox1.Size = new System.Drawing.Size(459, 28);this.textBox1.TabIndex = 5;// // Form1// this.AutoScaleDimensions = new System.Drawing.SizeF(9F, 18F);this.AutoScaleMode = System.Windows.Forms.AutoScaleMode.Font;this.ClientSize = new System.Drawing.Size(1176, 821);this.Controls.Add(this.textBox1);this.Controls.Add(this.button2);this.Controls.Add(this.button1);this.Name = "Form1";this.Text = "Form1";this.ResumeLayout(false);this.PerformLayout();}#endregionprivate System.Windows.Forms.Button button1;private System.Windows.Forms.OpenFileDialog openFileDialog1;private System.Windows.Forms.Button button2;private System.Windows.Forms.TextBox textBox1;}
}
运行后;
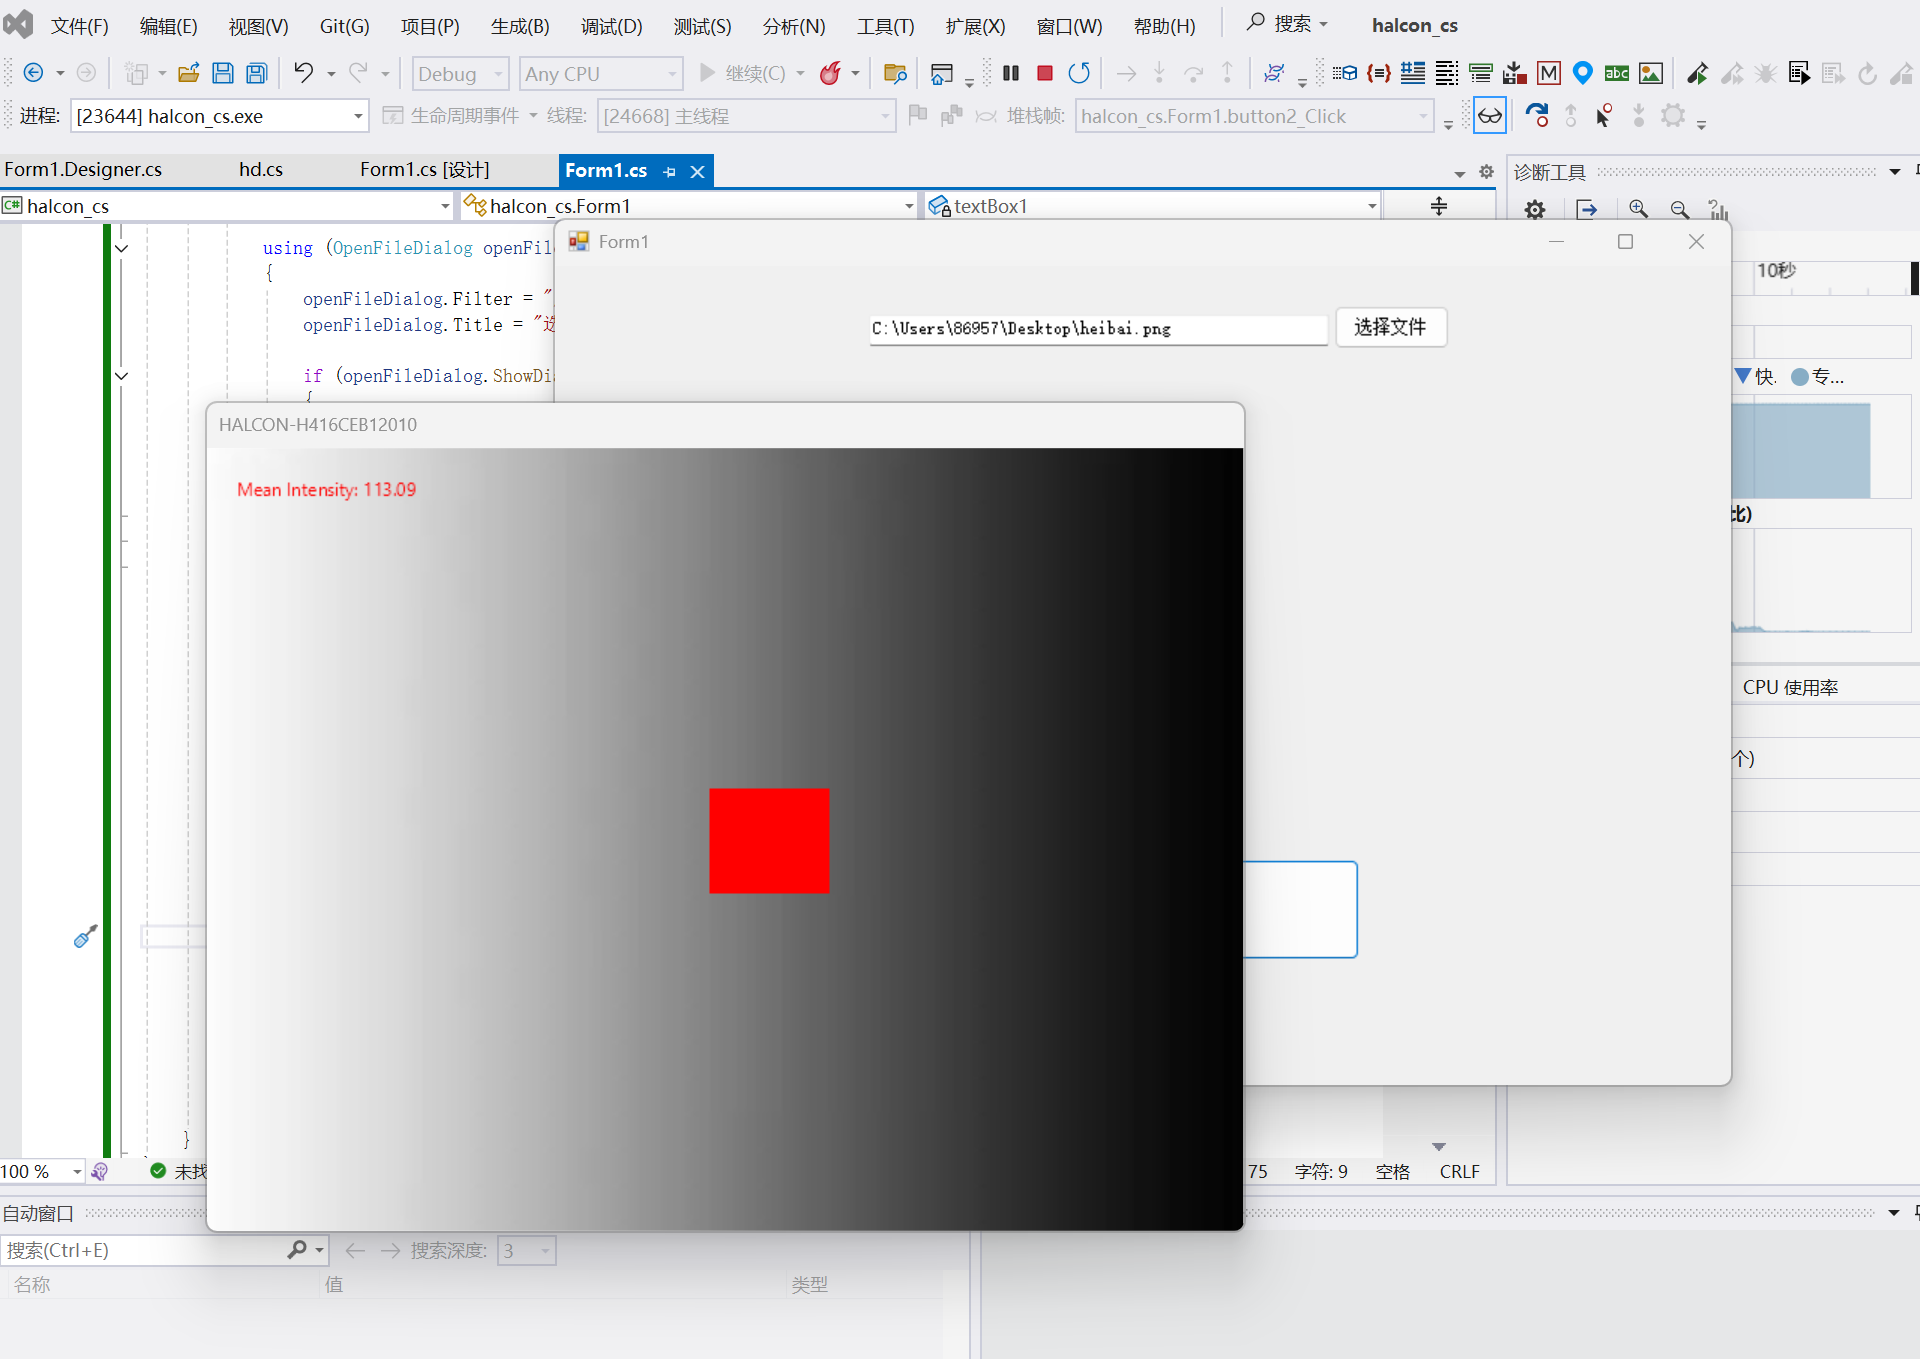
运行后,弹窗无法关闭,后续添加halcon控件来显示图像。
3.案例二: 角度计算
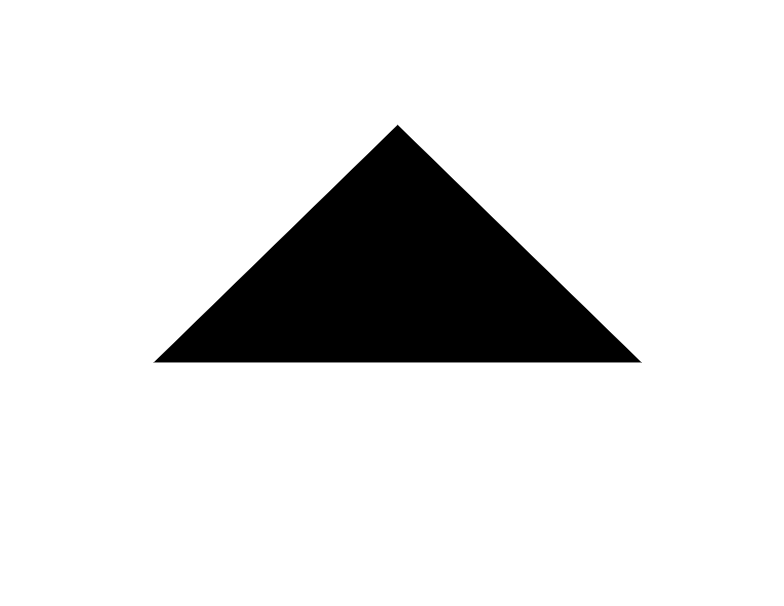
如图,计算三角形 三个角的角度。
在案例一的基础上,增加HWindowcontrol
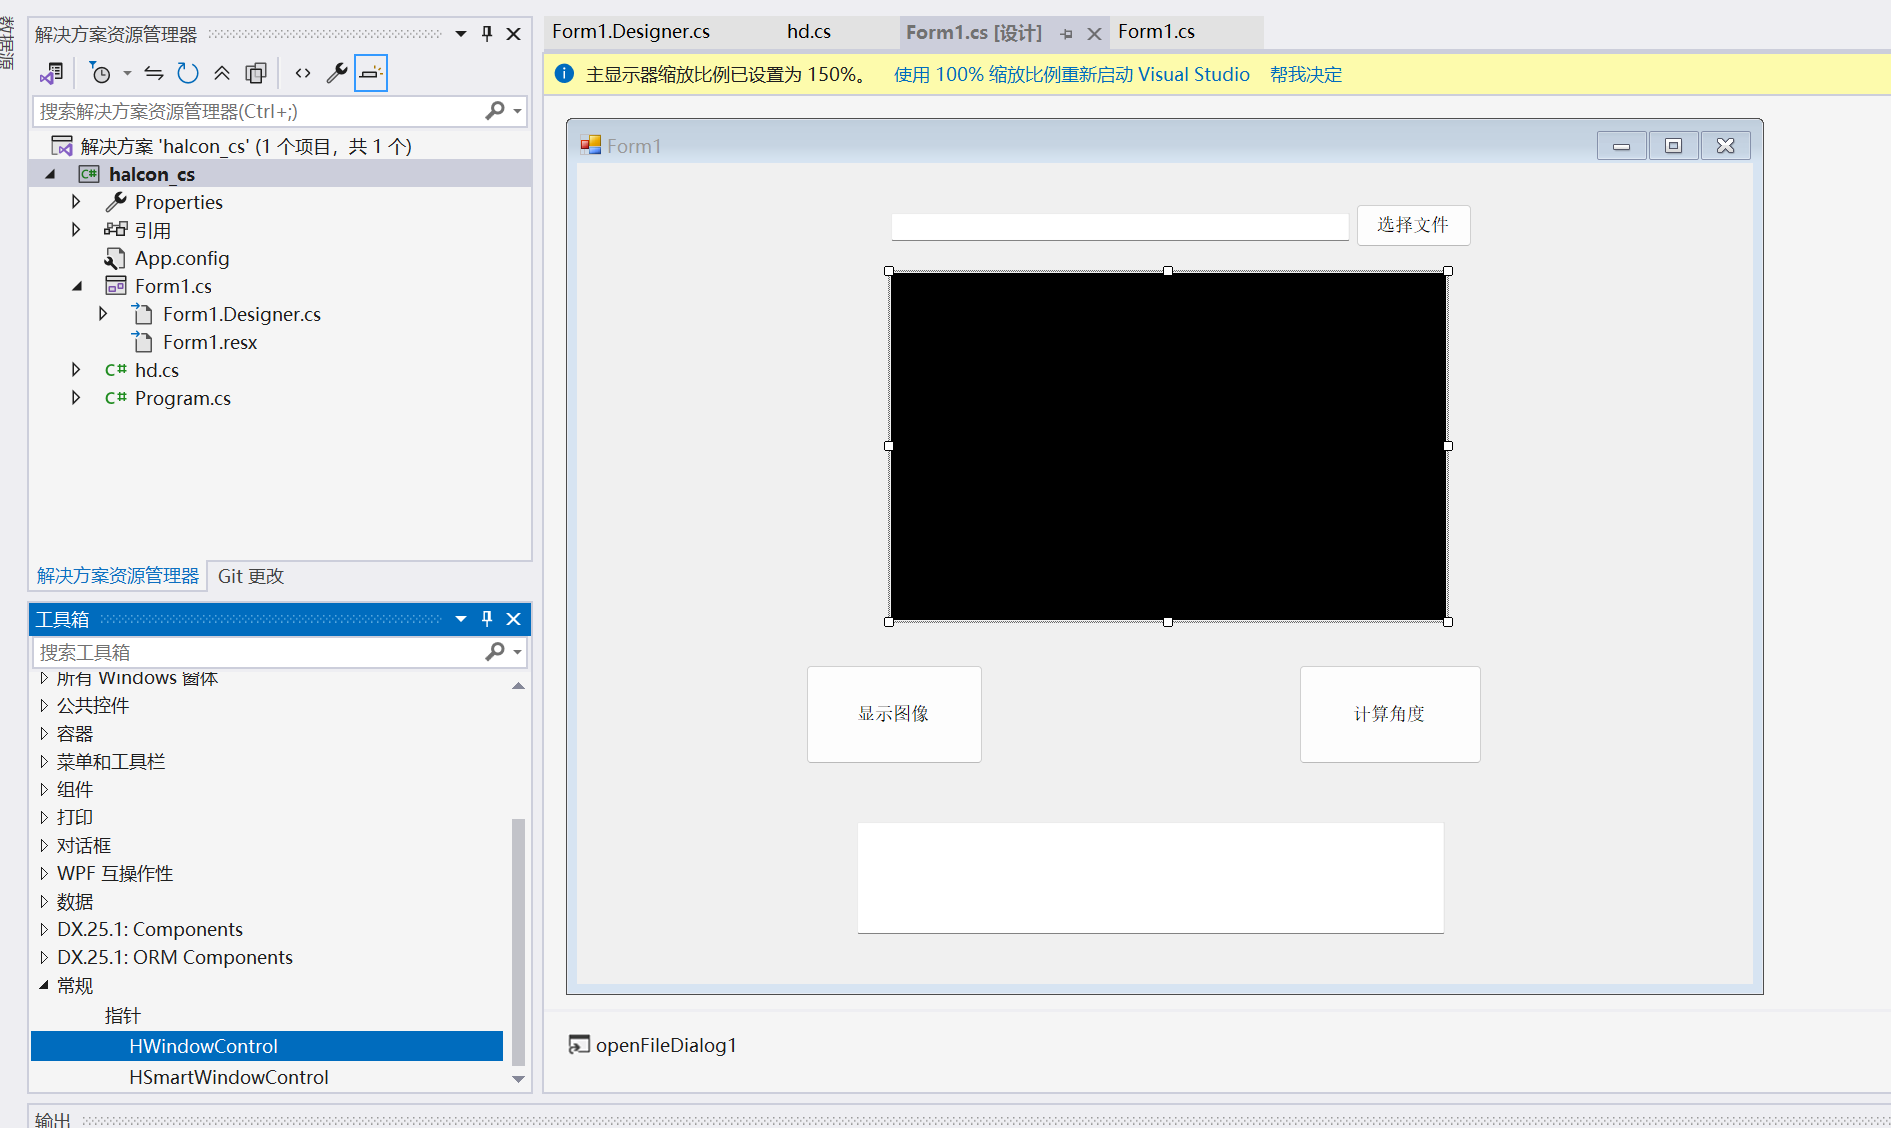
显示图像按钮:
private void button1_Click(object sender, EventArgs e){//读取文件HOperatorSet.ReadImage(out TestImage, textBox1.Text);//获取图片大小HTuple Width, Height;HOperatorSet.GetImageSize(TestImage, out Width, out Height);//设置图片显示范围 hWindowControl1.HalconWindow获得窗体句柄HOperatorSet.SetPart(hWindowControl1.HalconWindow, 0, 0, (Height - 1), (Width - 1)); //0,0, (Height - 1), (Width - 1)代表从0,0坐标到图片的宽高坐标,达到全屏显示//将图片投射到窗体上HOperatorSet.DispObj(TestImage, hWindowControl1.HalconWindow);//将TestImage变量投射到句柄窗口上}计算角度按钮:
private void button3_Click(object sender, EventArgs e){double[] result;HDevelopExport hDevelopExport = new HDevelopExport();result = hDevelopExport.action(textBox1.Text);foreach (double indexer in result) { textBox2.AppendText(indexer.ToString()+"\r\n");}}使用halcon代码转换成的action,计算角度。
主要方法为:
A获取区域轮廓
B将轮廓分割为线段
C得到线段的终点和起点
D计算线段交点
E根据三角形三个顶点,计算三个内角
运行后:
halcon代码:
read_image (Image, 'C:/Users/86957/Desktop/sanjiao.png')
rgb1_to_gray (Image, GrayImage)
threshold(GrayImage, TriangleRegion, 0, 128)
gen_contour_region_xld(TriangleRegion, Contour, 'border')
segment_contours_xld(Contour, Segments, 'lines_circles', 5, 4, 2)count_obj(Segments, NumSegments)
Angles := []for i := 1 to 3 by 1select_obj(Segments, Segment, i)fit_line_contour_xld(Segment, 'tukey', -1, 0, 5, 2, RowBegin, ColBegin, RowEnd, ColEnd, _, _, _)* 存储线段端点if (i == 1)Line1 := [RowBegin, ColBegin, RowEnd, ColEnd]elseif (i == 2)Line2 := [RowBegin, ColBegin, RowEnd, ColEnd]elseLine3 := [RowBegin, ColBegin, RowEnd, ColEnd]endifendforintersection_lines(Line1[0], Line1[1], Line1[2], Line1[3], Line2[0], Line2[1], Line2[2], Line2[3], RowV1, ColV1, IsOverlapping1)
intersection_lines(Line2[0], Line2[1], Line2[2], Line2[3], Line3[0], Line3[1], Line3[2], Line3[3], RowV2, ColV2, IsOverlapping2)
intersection_lines(Line3[0], Line3[1], Line3[2], Line3[3], Line1[0], Line1[1], Line1[2], Line1[3], RowV3, ColV3, IsOverlapping3) * 1. 计算三条边的长度
distance_pp(RowV1, ColV1, RowV2, ColV2, AB)
distance_pp(RowV1, ColV1, RowV3, ColV3, AC)
distance_pp(RowV2, ColV2, RowV3, ColV3, BC)* 2. 使用余弦定理计算角度
* 顶点A的角度 (对边BC)
cosAngleA := (AC*AC + AB*AB - BC*BC) / (2 * AC * AB)
AngleA := acos(cosAngleA) * 180 / 3.1415926535* 顶点B的角度 (对边AC)
cosAngleB := (AB*AB + BC*BC - AC*AC) / (2 * AB * BC)
AngleB := acos(cosAngleB) * 180 / 3.1415926535* 顶点C的角度 (对边AB)
cosAngleC := (AC*AC + BC*BC - AB*AB) / (2 * AC * BC)
AngleC := acos(cosAngleC) * 180 / 3.1415926535
转成c#程序,并修改 输入输出。
//
// File generated by HDevelop for HALCON/.NET (C#) Version 25.05.0.0
// Non-ASCII strings in this file are encoded in local-8-bit encoding (cp936).
//
// Please note that non-ASCII characters in string constants are exported
// as octal codes in order to guarantee that the strings are correctly
// created on all systems, independent on any compiler settings.
//
// Source files with different encoding should not be mixed in one project.
//using HalconDotNet;
namespace halcon_cs
{public partial class HDevelopExport{public double[] action(string imgpath ){// Local iconic variables HObject ho_Image, ho_GrayImage, ho_TriangleRegion;HObject ho_Contour, ho_Segments, ho_Segment = null;// Local control variables HTuple hv_NumSegments = new HTuple(), hv_Angles = new HTuple();HTuple hv_i = new HTuple(), hv_RowBegin = new HTuple();HTuple hv_ColBegin = new HTuple(), hv_RowEnd = new HTuple();HTuple hv_ColEnd = new HTuple(), hv__ = new HTuple(), hv_Line1 = new HTuple();HTuple hv_Line2 = new HTuple(), hv_Line3 = new HTuple();HTuple hv_RowV1 = new HTuple(), hv_ColV1 = new HTuple();HTuple hv_IsOverlapping1 = new HTuple(), hv_RowV2 = new HTuple();HTuple hv_ColV2 = new HTuple(), hv_IsOverlapping2 = new HTuple();HTuple hv_RowV3 = new HTuple(), hv_ColV3 = new HTuple();HTuple hv_IsOverlapping3 = new HTuple(), hv_AB = new HTuple();HTuple hv_AC = new HTuple(), hv_BC = new HTuple(), hv_cosAngleA = new HTuple();HTuple hv_AngleA = new HTuple(), hv_cosAngleB = new HTuple();HTuple hv_AngleB = new HTuple(), hv_cosAngleC = new HTuple();HTuple hv_AngleC = new HTuple(), hv___Tmp_Ctrl_0_5 = new HTuple();HTuple hv___Tmp_Ctrl_0_6 = new HTuple();// Initialize local and output iconic variables HOperatorSet.GenEmptyObj(out ho_Image);HOperatorSet.GenEmptyObj(out ho_GrayImage);HOperatorSet.GenEmptyObj(out ho_TriangleRegion);HOperatorSet.GenEmptyObj(out ho_Contour);HOperatorSet.GenEmptyObj(out ho_Segments);HOperatorSet.GenEmptyObj(out ho_Segment);ho_Image.Dispose();HOperatorSet.ReadImage(out ho_Image, imgpath);ho_GrayImage.Dispose();HOperatorSet.Rgb1ToGray(ho_Image, out ho_GrayImage);ho_TriangleRegion.Dispose();HOperatorSet.Threshold(ho_GrayImage, out ho_TriangleRegion, 0, 128);ho_Contour.Dispose();HOperatorSet.GenContourRegionXld(ho_TriangleRegion, out ho_Contour, "border");ho_Segments.Dispose();HOperatorSet.SegmentContoursXld(ho_Contour, out ho_Segments, "lines_circles",5, 4, 2);hv_NumSegments.Dispose();HOperatorSet.CountObj(ho_Segments, out hv_NumSegments);hv_Angles.Dispose();hv_Angles = new HTuple();for (hv_i = 1; (int)hv_i <= 3; hv_i = (int)hv_i + 1){ho_Segment.Dispose();HOperatorSet.SelectObj(ho_Segments, out ho_Segment, hv_i);hv_RowBegin.Dispose(); hv_ColBegin.Dispose(); hv_RowEnd.Dispose(); hv_ColEnd.Dispose(); hv__.Dispose(); hv___Tmp_Ctrl_0_5.Dispose(); hv___Tmp_Ctrl_0_6.Dispose();HOperatorSet.FitLineContourXld(ho_Segment, "tukey", -1, 0, 5, 2, out hv_RowBegin,out hv_ColBegin, out hv_RowEnd, out hv_ColEnd, out hv__, out hv___Tmp_Ctrl_0_5,out hv___Tmp_Ctrl_0_6);//存储线段端点if ((int)(new HTuple(hv_i.TupleEqual(1))) != 0){hv_Line1.Dispose();using (HDevDisposeHelper dh = new HDevDisposeHelper()){hv_Line1 = new HTuple();hv_Line1 = hv_Line1.TupleConcat(hv_RowBegin, hv_ColBegin, hv_RowEnd, hv_ColEnd);}}else if ((int)(new HTuple(hv_i.TupleEqual(2))) != 0){hv_Line2.Dispose();using (HDevDisposeHelper dh = new HDevDisposeHelper()){hv_Line2 = new HTuple();hv_Line2 = hv_Line2.TupleConcat(hv_RowBegin, hv_ColBegin, hv_RowEnd, hv_ColEnd);}}else{hv_Line3.Dispose();using (HDevDisposeHelper dh = new HDevDisposeHelper()){hv_Line3 = new HTuple();hv_Line3 = hv_Line3.TupleConcat(hv_RowBegin, hv_ColBegin, hv_RowEnd, hv_ColEnd);}}}using (HDevDisposeHelper dh = new HDevDisposeHelper()){hv_RowV1.Dispose(); hv_ColV1.Dispose(); hv_IsOverlapping1.Dispose();HOperatorSet.IntersectionLines(hv_Line1.TupleSelect(0), hv_Line1.TupleSelect(1), hv_Line1.TupleSelect(2), hv_Line1.TupleSelect(3), hv_Line2.TupleSelect(0), hv_Line2.TupleSelect(1), hv_Line2.TupleSelect(2), hv_Line2.TupleSelect(3), out hv_RowV1, out hv_ColV1, out hv_IsOverlapping1);}using (HDevDisposeHelper dh = new HDevDisposeHelper()){hv_RowV2.Dispose(); hv_ColV2.Dispose(); hv_IsOverlapping2.Dispose();HOperatorSet.IntersectionLines(hv_Line2.TupleSelect(0), hv_Line2.TupleSelect(1), hv_Line2.TupleSelect(2), hv_Line2.TupleSelect(3), hv_Line3.TupleSelect(0), hv_Line3.TupleSelect(1), hv_Line3.TupleSelect(2), hv_Line3.TupleSelect(3), out hv_RowV2, out hv_ColV2, out hv_IsOverlapping2);}using (HDevDisposeHelper dh = new HDevDisposeHelper()){hv_RowV3.Dispose(); hv_ColV3.Dispose(); hv_IsOverlapping3.Dispose();HOperatorSet.IntersectionLines(hv_Line3.TupleSelect(0), hv_Line3.TupleSelect(1), hv_Line3.TupleSelect(2), hv_Line3.TupleSelect(3), hv_Line1.TupleSelect(0), hv_Line1.TupleSelect(1), hv_Line1.TupleSelect(2), hv_Line1.TupleSelect(3), out hv_RowV3, out hv_ColV3, out hv_IsOverlapping3);}//1. 计算三条边的长度hv_AB.Dispose();HOperatorSet.DistancePp(hv_RowV1, hv_ColV1, hv_RowV2, hv_ColV2, out hv_AB);hv_AC.Dispose();HOperatorSet.DistancePp(hv_RowV1, hv_ColV1, hv_RowV3, hv_ColV3, out hv_AC);hv_BC.Dispose();HOperatorSet.DistancePp(hv_RowV2, hv_ColV2, hv_RowV3, hv_ColV3, out hv_BC);//2. 使用余弦定理计算角度//顶点A的角度 (对边BC)hv_cosAngleA.Dispose();using (HDevDisposeHelper dh = new HDevDisposeHelper()){hv_cosAngleA = (((hv_AC * hv_AC) + (hv_AB * hv_AB)) - (hv_BC * hv_BC)) / ((2 * hv_AC) * hv_AB);}hv_AngleA.Dispose();using (HDevDisposeHelper dh = new HDevDisposeHelper()){hv_AngleA = ((hv_cosAngleA.TupleAcos()) * 180) / 3.1415926535;}//顶点B的角度 (对边AC)hv_cosAngleB.Dispose();using (HDevDisposeHelper dh = new HDevDisposeHelper()){hv_cosAngleB = (((hv_AB * hv_AB) + (hv_BC * hv_BC)) - (hv_AC * hv_AC)) / ((2 * hv_AB) * hv_BC);}hv_AngleB.Dispose();using (HDevDisposeHelper dh = new HDevDisposeHelper()){hv_AngleB = ((hv_cosAngleB.TupleAcos()) * 180) / 3.1415926535;}//顶点C的角度 (对边AB)hv_cosAngleC.Dispose();using (HDevDisposeHelper dh = new HDevDisposeHelper()){hv_cosAngleC = (((hv_AC * hv_AC) + (hv_BC * hv_BC)) - (hv_AB * hv_AB)) / ((2 * hv_AC) * hv_BC);}hv_AngleC.Dispose();using (HDevDisposeHelper dh = new HDevDisposeHelper()){hv_AngleC = ((hv_cosAngleC.TupleAcos()) * 180) / 3.1415926535;}ho_Image.Dispose();ho_GrayImage.Dispose();ho_TriangleRegion.Dispose();ho_Contour.Dispose();ho_Segments.Dispose();ho_Segment.Dispose();hv_NumSegments.Dispose();hv_Angles.Dispose();hv_i.Dispose();hv_RowBegin.Dispose();hv_ColBegin.Dispose();hv_RowEnd.Dispose();hv_ColEnd.Dispose();hv__.Dispose();hv_Line1.Dispose();hv_Line2.Dispose();hv_Line3.Dispose();hv_RowV1.Dispose();hv_ColV1.Dispose();hv_IsOverlapping1.Dispose();hv_RowV2.Dispose();hv_ColV2.Dispose();hv_IsOverlapping2.Dispose();hv_RowV3.Dispose();hv_ColV3.Dispose();hv_IsOverlapping3.Dispose();hv_AB.Dispose();hv_AC.Dispose();hv_BC.Dispose();hv_cosAngleA.Dispose();hv_AngleA.Dispose();hv_cosAngleB.Dispose();hv_AngleB.Dispose();hv_cosAngleC.Dispose();hv_AngleC.Dispose();hv___Tmp_Ctrl_0_5.Dispose();hv___Tmp_Ctrl_0_6.Dispose();return new double[] { hv_AngleA,hv_AngleB,hv_AngleC };}}
}
主界面程序form1.cs
主界面代码:
using System;
using System.Collections.Generic;
using System.ComponentModel;
using System.Data;
using System.Drawing;
using System.Linq;
using System.Text;
using System.Threading.Tasks;
using System.Windows.Forms;
using HalconDotNet;
namespace halcon_cs
{public partial class Form1 : Form{HObject TestImage;public Form1(){InitializeComponent();}private void button2_Click(object sender, EventArgs e){using (OpenFileDialog openFileDialog = new OpenFileDialog()){openFileDialog.Filter = "所有文件|*.*";openFileDialog.Title = "选择文件";if (openFileDialog.ShowDialog() == DialogResult.OK){string filePath = openFileDialog.FileName;textBox1.Text = filePath;}}}private void button1_Click(object sender, EventArgs e){//读取文件HOperatorSet.ReadImage(out TestImage, textBox1.Text);//获取图片大小HTuple Width, Height;HOperatorSet.GetImageSize(TestImage, out Width, out Height);//设置图片显示范围 hWindowControl1.HalconWindow获得窗体句柄HOperatorSet.SetPart(hWindowControl1.HalconWindow, 0, 0, (Height - 1), (Width - 1)); //0,0, (Height - 1), (Width - 1)代表从0,0坐标到图片的宽高坐标,达到全屏显示//将图片投射到窗体上HOperatorSet.DispObj(TestImage, hWindowControl1.HalconWindow);//将TestImage变量投射到句柄窗口上}private void button3_Click(object sender, EventArgs e){double[] result;HDevelopExport hDevelopExport = new HDevelopExport();result = hDevelopExport.action(textBox1.Text);foreach (double indexer in result) { textBox2.AppendText(indexer.ToString()+"\r\n");}}}
}
主界面设计:
using HalconDotNet;namespace halcon_cs
{partial class Form1{/// <summary>/// 必需的设计器变量。/// </summary>private System.ComponentModel.IContainer components = null;/// <summary>/// 清理所有正在使用的资源。/// </summary>/// <param name="disposing">如果应释放托管资源,为 true;否则为 false。</param>protected override void Dispose(bool disposing){if (disposing && (components != null)){components.Dispose();}base.Dispose(disposing);}#region Windows 窗体设计器生成的代码/// <summary>/// 设计器支持所需的方法 - 不要修改/// 使用代码编辑器修改此方法的内容。/// </summary>private void InitializeComponent(){this.openFileDialog1 = new System.Windows.Forms.OpenFileDialog();this.button2 = new System.Windows.Forms.Button();this.textBox1 = new System.Windows.Forms.TextBox();this.hWindowControl1 = new HalconDotNet.HWindowControl();this.button1 = new System.Windows.Forms.Button();this.button3 = new System.Windows.Forms.Button();this.textBox2 = new System.Windows.Forms.TextBox();this.SuspendLayout();// // openFileDialog1// this.openFileDialog1.FileName = "openFileDialog1";// // button2// this.button2.Location = new System.Drawing.Point(779, 41);this.button2.Name = "button2";this.button2.Size = new System.Drawing.Size(116, 43);this.button2.TabIndex = 4;this.button2.Text = "选择文件";this.button2.UseVisualStyleBackColor = true;this.button2.Click += new System.EventHandler(this.button2_Click);// // textBox1// this.textBox1.Location = new System.Drawing.Point(314, 50);this.textBox1.Name = "textBox1";this.textBox1.Size = new System.Drawing.Size(459, 28);this.textBox1.TabIndex = 5;// // hWindowControl1// this.hWindowControl1.BackColor = System.Drawing.Color.Black;this.hWindowControl1.BorderColor = System.Drawing.Color.Black;this.hWindowControl1.ImagePart = new System.Drawing.Rectangle(0, 0, 640, 480);this.hWindowControl1.Location = new System.Drawing.Point(314, 110);this.hWindowControl1.Name = "hWindowControl1";this.hWindowControl1.Size = new System.Drawing.Size(555, 347);this.hWindowControl1.TabIndex = 6;this.hWindowControl1.WindowSize = new System.Drawing.Size(555, 347);// // button1// this.button1.Location = new System.Drawing.Point(229, 502);this.button1.Name = "button1";this.button1.Size = new System.Drawing.Size(177, 99);this.button1.TabIndex = 7;this.button1.Text = "显示图像";this.button1.UseVisualStyleBackColor = true;this.button1.Click += new System.EventHandler(this.button1_Click);// // button3// this.button3.Location = new System.Drawing.Point(722, 502);this.button3.Name = "button3";this.button3.Size = new System.Drawing.Size(183, 99);this.button3.TabIndex = 8;this.button3.Text = "计算角度";this.button3.UseVisualStyleBackColor = true;this.button3.Click += new System.EventHandler(this.button3_Click);// // textBox2// this.textBox2.Location = new System.Drawing.Point(280, 659);this.textBox2.Multiline = true;this.textBox2.Name = "textBox2";this.textBox2.Size = new System.Drawing.Size(588, 112);this.textBox2.TabIndex = 9;// // Form1// this.AutoScaleDimensions = new System.Drawing.SizeF(9F, 18F);this.AutoScaleMode = System.Windows.Forms.AutoScaleMode.Font;this.ClientSize = new System.Drawing.Size(1176, 821);this.Controls.Add(this.textBox2);this.Controls.Add(this.button3);this.Controls.Add(this.button1);this.Controls.Add(this.hWindowControl1);this.Controls.Add(this.textBox1);this.Controls.Add(this.button2);this.Name = "Form1";this.Text = "Form1";this.ResumeLayout(false);this.PerformLayout();}#endregionprivate System.Windows.Forms.OpenFileDialog openFileDialog1;private System.Windows.Forms.Button button2;private System.Windows.Forms.TextBox textBox1;private HWindowControl hWindowControl1;private System.Windows.Forms.Button button1;private System.Windows.Forms.Button button3;private System.Windows.Forms.TextBox textBox2;}
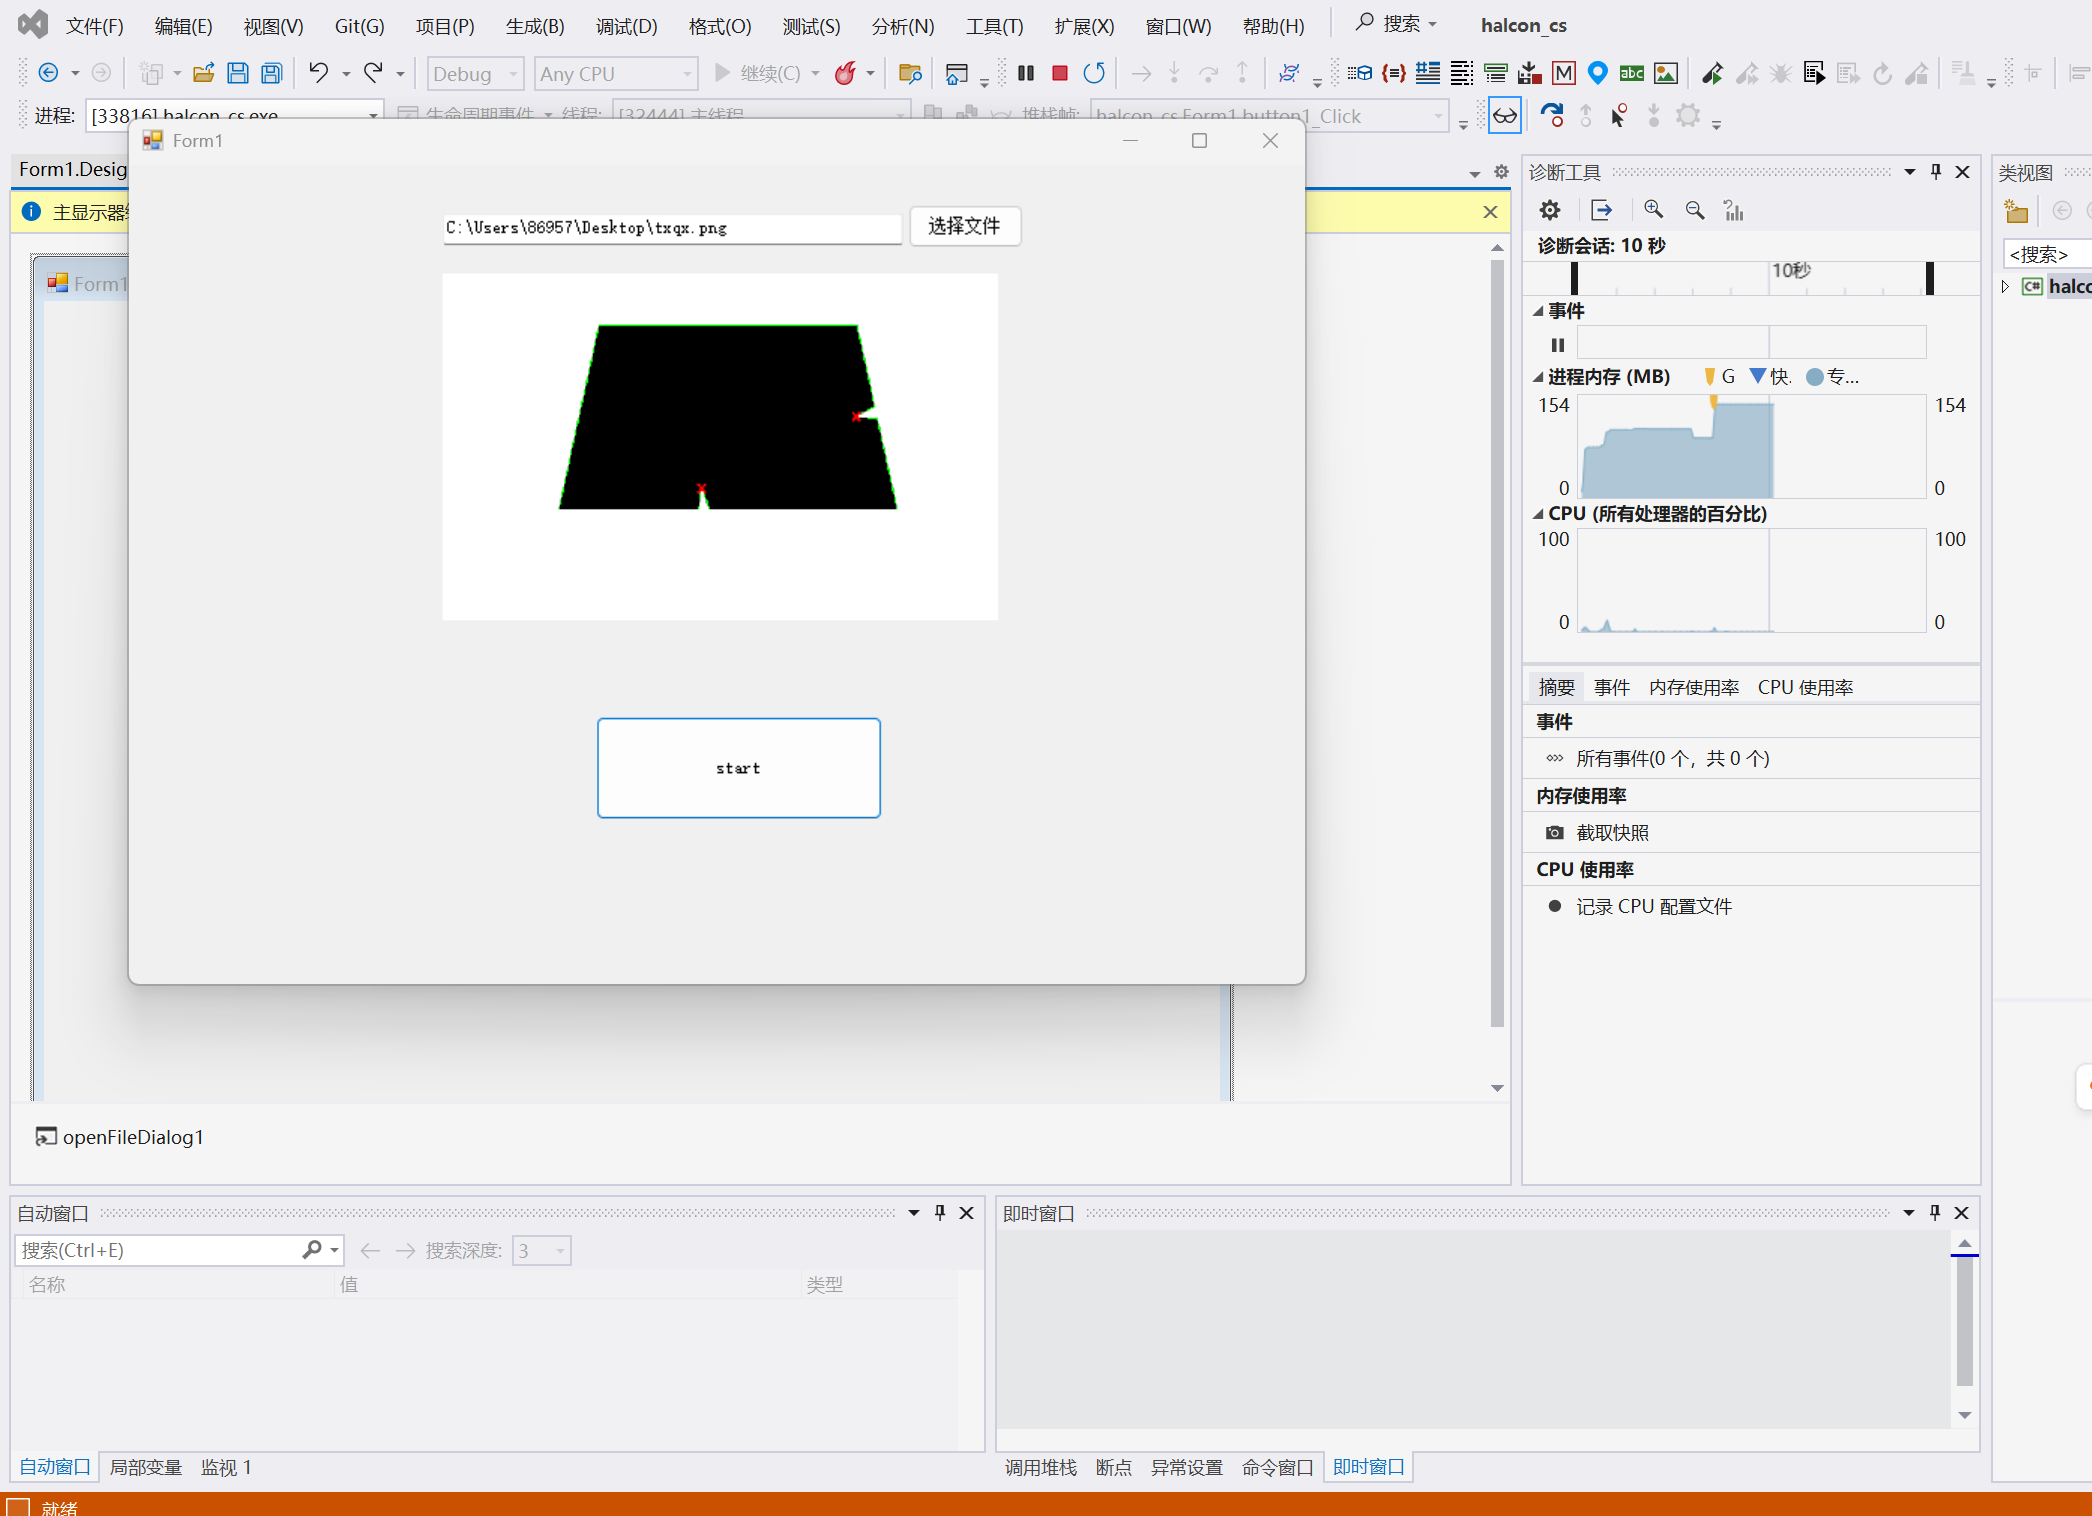
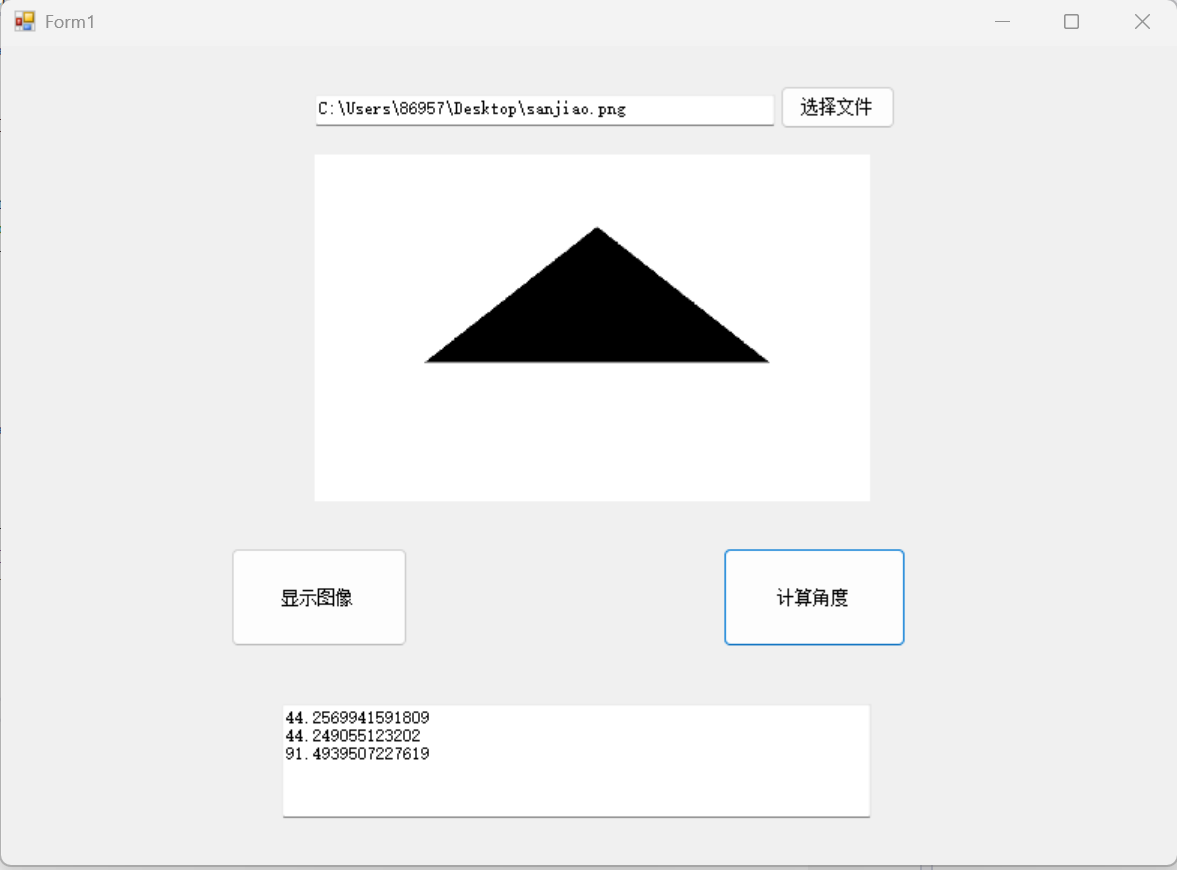
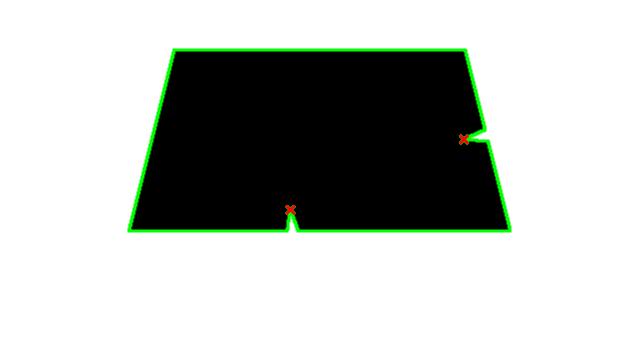
}4.案例三:缺陷检测
如图

一个四边形,边上有2个缺陷。要求:检查出缺陷所在。
方法:先找到整体的轮廓,然后基于轮廓曲率的变化,来判断缺陷。
halcon代码:
read_image(Image, 'C:/Users/86957/Desktop/txqx.png')
rgb1_to_gray(Image, GrayImage)
get_image_size (Image, Width, Height)
dev_open_window (0, 0, Width, Height, 'black', WindowHandle)threshold(GrayImage, Regions, 0, 127)
select_shape (Regions, SelectedRegions, 'area', 'and', 'min', 99999)
* 提取边界('inner' 表示内边界,'outer' 表示外边界)
boundary(SelectedRegions, RegionBorder, 'inner')* 设置绿色轮廓
dev_set_color('green')
dev_set_line_width(3)
* 显示原始图像
dev_display(GrayImage)
* 仅显示绿色轮廓(不填充)
dev_display(RegionBorder)
*绿色轮廓是一个标准的四边形。* 将区域边界转换为XLD轮廓
gen_contour_region_xld(RegionBorder, Contour, 'border')* 获取轮廓点坐标
get_contour_xld(Contour, Rows, Cols)* 计算轮廓点的方向角度 (使用5点平滑)
get_contour_angle_xld (Contour, 'abs', 'range', 3, AngleValues)* 计算相邻点的角度变化
tuple_length(AngleValues, NumPoints)
DiffAngles := []
for i := 1 to NumPoints-1 by 1* 处理角度跳变(π到-π)diff := abs(AngleValues[i] - AngleValues[i-1])if (diff > rad(180))diff := rad(360) - diffendifDiffAngles := [DiffAngles, diff]
endfor* 找出角度突变点 (阈值设为30度)
Threshold := rad(30)
DefectRows := []
DefectCols := []
for i := 1 to NumPoints-1 by 1if (DiffAngles[i-1] > Threshold)DefectRows := [DefectRows, Rows[i]]DefectCols := [DefectCols, Cols[i]]endif
endfor* 标记缺陷点
if (|DefectRows| > 0)gen_cross_contour_xld(Cross, DefectRows, DefectCols, 12, 0.785398)dev_set_color('red')dev_set_line_width(2)dev_display(Cross)
endif* 捕获窗口内容
dump_window_image(ResultImage, WindowHandle)
*保存
*write_image(ResultImage, 'png', 0, 'C:/Users/86957/Desktop/result_image.png')
dev_close_window()
效果如下:
将halcon代码输出为c#,并修改输入输出。
返回HObject类型。
在返回前,关闭窗口,避免弹窗一直存在。
using HalconDotNet;
namespace halcon_cs
{public partial class HDevelopExport{public HObject action(string imgpath){// Local iconic variables HObject ho_Image, ho_GrayImage, ho_Regions;HObject ho_SelectedRegions, ho_RegionBorder, ho_Contour;HObject ho_Cross = null, ho_ResultImage;// Local control variables HTuple hv_Width = new HTuple(), hv_Height = new HTuple();HTuple hv_WindowHandle = new HTuple(), hv_Rows = new HTuple();HTuple hv_Cols = new HTuple(), hv_AngleValues = new HTuple();HTuple hv_NumPoints = new HTuple(), hv_DiffAngles = new HTuple();HTuple hv_i = new HTuple(), hv_diff = new HTuple(), hv_Threshold = new HTuple();HTuple hv_DefectRows = new HTuple(), hv_DefectCols = new HTuple();// Initialize local and output iconic variables HOperatorSet.GenEmptyObj(out ho_Image);HOperatorSet.GenEmptyObj(out ho_GrayImage);HOperatorSet.GenEmptyObj(out ho_Regions);HOperatorSet.GenEmptyObj(out ho_SelectedRegions);HOperatorSet.GenEmptyObj(out ho_RegionBorder);HOperatorSet.GenEmptyObj(out ho_Contour);HOperatorSet.GenEmptyObj(out ho_Cross);HOperatorSet.GenEmptyObj(out ho_ResultImage);ho_Image.Dispose();HOperatorSet.ReadImage(out ho_Image, imgpath);ho_GrayImage.Dispose();HOperatorSet.Rgb1ToGray(ho_Image, out ho_GrayImage);hv_Width.Dispose(); hv_Height.Dispose();HOperatorSet.GetImageSize(ho_Image, out hv_Width, out hv_Height);HOperatorSet.SetWindowAttr("background_color", "black");HOperatorSet.OpenWindow(0, 0, hv_Width, hv_Height, 0, "visible", "", out hv_WindowHandle);HDevWindowStack.Push(hv_WindowHandle);ho_Regions.Dispose();HOperatorSet.Threshold(ho_GrayImage, out ho_Regions, 0, 127);ho_SelectedRegions.Dispose();HOperatorSet.SelectShape(ho_Regions, out ho_SelectedRegions, "area", "and", "min",99999);//提取边界('inner' 表示内边界,'outer' 表示外边界)ho_RegionBorder.Dispose();HOperatorSet.Boundary(ho_SelectedRegions, out ho_RegionBorder, "inner");//设置绿色轮廓if (HDevWindowStack.IsOpen()){HOperatorSet.SetColor(HDevWindowStack.GetActive(), "green");}if (HDevWindowStack.IsOpen()){HOperatorSet.SetLineWidth(HDevWindowStack.GetActive(), 3);}//显示原始图像if (HDevWindowStack.IsOpen()){HOperatorSet.DispObj(ho_GrayImage, HDevWindowStack.GetActive());}//仅显示绿色轮廓(不填充)if (HDevWindowStack.IsOpen()){HOperatorSet.DispObj(ho_RegionBorder, HDevWindowStack.GetActive());}//绿色轮廓是一个标准的四边形。//将区域边界转换为XLD轮廓ho_Contour.Dispose();HOperatorSet.GenContourRegionXld(ho_RegionBorder, out ho_Contour, "border");//获取轮廓点坐标hv_Rows.Dispose(); hv_Cols.Dispose();HOperatorSet.GetContourXld(ho_Contour, out hv_Rows, out hv_Cols);//计算轮廓点的方向角度 (使用5点平滑)hv_AngleValues.Dispose();HOperatorSet.GetContourAngleXld(ho_Contour, "abs", "range", 3, out hv_AngleValues);//计算相邻点的角度变化hv_NumPoints.Dispose();HOperatorSet.TupleLength(hv_AngleValues, out hv_NumPoints);hv_DiffAngles.Dispose();hv_DiffAngles = new HTuple();HTuple end_val34 = hv_NumPoints - 1;HTuple step_val34 = 1;for (hv_i = 1; hv_i.Continue(end_val34, step_val34); hv_i = hv_i.TupleAdd(step_val34)){//处理角度跳变(π到-π)hv_diff.Dispose();using (HDevDisposeHelper dh = new HDevDisposeHelper()){hv_diff = (((hv_AngleValues.TupleSelect(hv_i)) - (hv_AngleValues.TupleSelect(hv_i - 1)))).TupleAbs();}if ((int)(new HTuple(hv_diff.TupleGreater((new HTuple(180)).TupleRad()))) != 0){using (HDevDisposeHelper dh = new HDevDisposeHelper()){{HTupleExpTmpLocalVar_diff = ((new HTuple(360)).TupleRad()) - hv_diff;hv_diff.Dispose();hv_diff = ExpTmpLocalVar_diff;}}}using (HDevDisposeHelper dh = new HDevDisposeHelper()){{HTupleExpTmpLocalVar_DiffAngles = hv_DiffAngles.TupleConcat(hv_diff);hv_DiffAngles.Dispose();hv_DiffAngles = ExpTmpLocalVar_DiffAngles;}}}//找出角度突变点 (阈值设为30度)hv_Threshold.Dispose();using (HDevDisposeHelper dh = new HDevDisposeHelper()){hv_Threshold = (new HTuple(30)).TupleRad();}hv_DefectRows.Dispose();hv_DefectRows = new HTuple();hv_DefectCols.Dispose();hv_DefectCols = new HTuple();HTuple end_val47 = hv_NumPoints - 1;HTuple step_val47 = 1;for (hv_i = 1; hv_i.Continue(end_val47, step_val47); hv_i = hv_i.TupleAdd(step_val47)){if ((int)(new HTuple(((hv_DiffAngles.TupleSelect(hv_i - 1))).TupleGreater(hv_Threshold))) != 0){using (HDevDisposeHelper dh = new HDevDisposeHelper()){{HTupleExpTmpLocalVar_DefectRows = hv_DefectRows.TupleConcat(hv_Rows.TupleSelect(hv_i));hv_DefectRows.Dispose();hv_DefectRows = ExpTmpLocalVar_DefectRows;}}using (HDevDisposeHelper dh = new HDevDisposeHelper()){{HTupleExpTmpLocalVar_DefectCols = hv_DefectCols.TupleConcat(hv_Cols.TupleSelect(hv_i));hv_DefectCols.Dispose();hv_DefectCols = ExpTmpLocalVar_DefectCols;}}}}//标记缺陷点if ((int)(new HTuple((new HTuple(hv_DefectRows.TupleLength())).TupleGreater(0))) != 0){ho_Cross.Dispose();HOperatorSet.GenCrossContourXld(out ho_Cross, hv_DefectRows, hv_DefectCols,12, 0.785398);if (HDevWindowStack.IsOpen()){HOperatorSet.SetColor(HDevWindowStack.GetActive(), "red");}if (HDevWindowStack.IsOpen()){HOperatorSet.SetLineWidth(HDevWindowStack.GetActive(), 2);}if (HDevWindowStack.IsOpen()){HOperatorSet.DispObj(ho_Cross, HDevWindowStack.GetActive());}}//捕获窗口内容ho_ResultImage.Dispose();HOperatorSet.DumpWindowImage(out ho_ResultImage, hv_WindowHandle);//保存//write_image (ResultImage, 'png', 0, 'C:/Users/86957/Desktop/result_image.png')HOperatorSet.CloseWindow(hv_WindowHandle);return ho_ResultImage;      }}
}
使用 HOperatorSet.CloseWindow(hv_WindowHandle);直接关闭弹窗。
主界面代码:

using System;
using System.Collections.Generic;
using System.ComponentModel;
using System.Data;
using System.Drawing;
using System.Linq;
using System.Text;
using System.Threading.Tasks;
using System.Windows.Forms;
using HalconDotNet;
namespace halcon_cs
{public partial class Form1 : Form{HObject TestImage;public Form1(){InitializeComponent();}private void button2_Click(object sender, EventArgs e){using (OpenFileDialog openFileDialog = new OpenFileDialog()){openFileDialog.Filter = "所有文件|*.*";openFileDialog.Title = "选择文件";if (openFileDialog.ShowDialog() == DialogResult.OK){string filePath = openFileDialog.FileName;textBox1.Text = filePath;}}}private void button1_Click(object sender, EventArgs e){HDevelopExport hDevelopExport = new HDevelopExport();HObject result = hDevelopExport.action(textBox1.Text);//获取图片大小HTuple Width, Height;HOperatorSet.GetImageSize(result, out Width, out Height);//设置图片显示范围 hWindowControl1.HalconWindow获得窗体句柄HOperatorSet.SetPart(hWindowControl1.HalconWindow, 0, 0, (Height - 1), (Width - 1)); //0,0, (Height - 1), (Width - 1)代表从0,0坐标到图片的宽高坐标,达到全屏显示//将图片投射到窗体上HOperatorSet.DispObj(result, hWindowControl1.HalconWindow);}}
}
运行后: