【数据结构】单链表详解
一、链表介绍
01 链表的概念
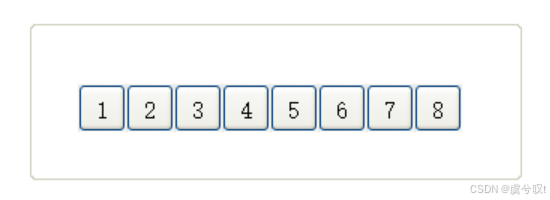
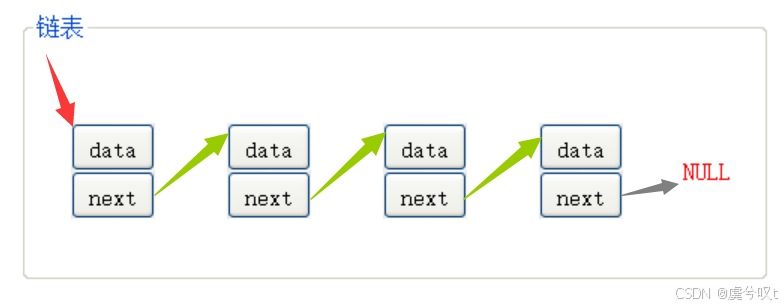
概念:链表是一种物理存储结构上非连续、非顺序的存储结构,数组元素的逻辑顺序是通过链表中的指针链接次序实现的。
02 顺序表和链表的优缺点
为什么顺序表和链表各自存在?
因为他们各有优点,是互补的。
顺序表的优点:
① 支持随机访问,有些算法需要支持随机访问,如二分查找和优化后的快排等。
② 数据按顺序存放,空间利用率高。
③ 通过下标可以直接访问,存取效率高。
顺序表的缺陷:
① 空间不够需要扩容,扩容是存在消耗的。
② 头部或中间位置的插入或删除,需要挪动数据,存在消耗。
③ 为避免频繁扩容,一般都是按倍数去扩容,可能存在一定的空间浪费。
链表的优点:
① 按需申请空间,不用就释放空间(使用空间更合理)。
② 头部或中间位置的插入或删除,效率更高。
③ 不存在空间浪费。
链表的缺陷:
① 每一个数据,都要额外存一个指针去链接后面的数据节点。
② 不支持随机访问。
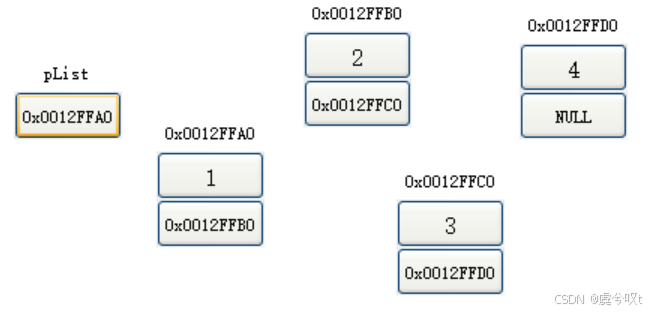
03 链表的结构
① 逻辑结构:便于更方便地理解而想像出来的
② 物理结构:在内存中不一定连续
二、单链表的定义
01 定义单链表
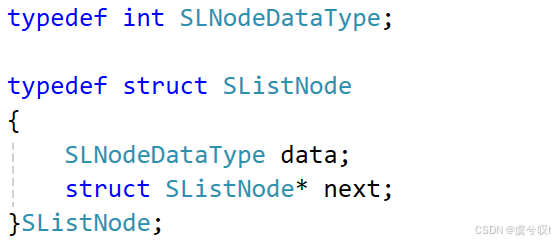
typedef int SLNodeDataType;typedef struct SListNode
{SLNodeDataType data; // 存放节点的数据struct SListNode* next; // 指向后继节点的指针
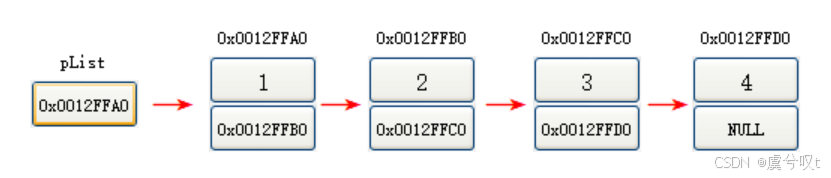
}SListNode;解读:在顺序表章节讲过,为了方便后续使用我们将类型 typedef 一下。首先创建结构体,因为叫单链表,所以我们将它取为 SListNode。结构体有两个变量,data 是用来存放节点的数据的变量,而 next 是用来指向后继节点指针的变量。我们详细来说说结构体指针 next,它的类型是 struct SListNode* 也就是自己本身,从而实现 "套娃" 的效果,这么一来它就拥有了 "链接" 的资本(既可以存数据,又可以存下一个节点的地址)。为了方便后续地使用,我们再把这个结构体重命名成 SListNode。
02 接口函数
这是需要实现的几个接口函数:
// 创建新节点
SListNode* CreateNewNode(SLNodeDataType x);
// 打印
void SListPrint(SListNode* pHead);
// 尾插
void SListPushBack(SListNode** ppHead, SLNodeDataType x);
// 头插
void SListPushFront(SListNode** ppHead, SLNodeDataType x);
// 尾删
void SListPopBack(SListNode** ppHead);
// 头删
void SListPopFront(SListNode** ppHead);
// 查找
SListNode* SListFind(SListNode* pHead, SLNodeDataType x);
// 指定位置后插
void SListInsertAfter(SListNode* pos, SLNodeDataType x);
// 删除指定位置之后的节点
void SListEraseAfter(SListNode* pos);
// 删除指定位置节点
void SListErase(SListNode** ppHead, SListNode* pos);
// 销毁
void SListDestory(SListNode** ppHead);
三、接口函数的实现
01 打印(SListPrint)
SList.h:
// 打印
void SListPrint(SListNode* pHead);
解读:用结构体指针 *pHead 接收,这里的 *pHead 表示头节点。
SList.c:
/* 打印 */
void SListPrint(SListNode* pHead)
{SListNode* cur = pHead;while (cur != NULL){printf("%d -> ", cur->data);cur = cur->next;}printf("NULL\n");
}
解读:我们想实现单链表的打印,就需要遍历整个链表。首先创建一个结构体指针 cur 来存放 pHead ,然后通过 cur 把整个链表走一遍。只要 cur 不为 NULL,就说明还没有走完,就进入循环,循环体内打印出当前 cur->data 的内容,这样就实现了打印节点中的内容,随后将 cur 赋值成 cur->next ,使得 cur 指向它后面的节点。当 cur 为 NULL 时说明已经走完了,则跳出循环。最后我们再打印一个 "NULL" 把链表的尾部表示出来。
02 尾插(SListPushBack)
SList.h:
// 尾插
void SListPushBack(SListNode** ppHead, SLNodeDataType x);
解读:函数参数为 SListNode** pHead ,这里用“二级指针”接收,是因为传入的是一个结构体指针的地址。在 C 语言中,函数参数的传递是值传递 —— 即函数接收的是实参的副本。如果传递的是一级指针,函数内部修改的只是这个指针副本,不会影响外部的原指针。为了能改变外部,所以我们要采用址传递。
SList.c:
/* 尾插 */
void SListPushBack(SListNode** ppHead, SLNodeDataType x)
{// 创建新节点SListNode* new_node = (SListNode*)malloc(sizeof(SListNode));if (new_node == NULL){printf("malloc failed\n");exit(-1);}new_node->data = x;new_node->next = NULL;// 如果链表为空if (*ppHead == NULL)*ppHead = new_node;else{SListNode* end = *ppHead;while (end->next != NULL)end = end->next;end->next = new_node;}
}
解读:
Step1:首先我们需要创建新的节点,定义一个新的结构体指针变量 new_node 作为新节点。这里我们 malloc 一块能放得下 SListNode 的空间就够了。这里我们检查下扩容是否失败。随后我们就可以往 new_node 里面放内容了, new_node->data 中存放我们要传入的数据。
Step2:当新节点创建完毕后,我们就可以开始写尾插了。如果链表没有数据的话我们就可以直接插入。所以我们先判断链表是否为空,这里记得对 **ppHead 解引用。如果链表是空的,我们就直接把 new_code 赋给 *ppHead 即可完成插入。如果链表是有数据的,我们要实现尾部插入,我们就要找到尾节点。这里我们创建一个寻尾指针 SListNode* end 作为工具人,来去找尾节点。思路也很简单,如果 end 的下一个节点不为空,就进入循环,令 end 指向后继节点。这样 end 就成功找到了尾节点,最后 end->next 就是尾节点了,我们把 new_code 赋给 end->next 即可完成插入。
Test.c:
void TestSList1()
{SListNode * pList = NULL;SListPushBack(&pList, 1);SListPushBack(&pList, 2);SListPushBack(&pList, 3);SListPushBack(&pList, 4);SListPushBack(&pList, 5);SListPrint(pList);
}
运行结果如下:

03 创建新节点(CreateNewNode)
SList.h:
// 创建新节点
SListNode* CreateNewNode(SLNodeDataType x);
SList.c:
/* 创建新节点 */
SListNode* CreateNewNode(SLNodeDataType x)
{// 创建新节点SListNode* new_node = (SListNode*)malloc(sizeof(SListNode));if (new_node == NULL){printf("malloc failed\n");exit(-1);}new_node->data = x;new_node->next = NULL;return new_node;
}
/* 尾插 */
void SListPushBack(SListNode** ppHead, SLNodeDataType x)
{SListNode* new_node = CreateNewNode(x);// 如果链表为空if (*ppHead == NULL)*ppHead = new_node;else{SListNode* end = *ppHead;while (end->next != NULL)end = end->next;end->next = new_node;}
}
04 头插(SListPushFront)
SList.h:
// 头插
void SListPushFront(SListNode** ppHead, SLNodeDataType x);
SList.c:
/* 头插 */
void SListPushFront(SListNode** ppHead, SLNodeDataType x)
{SListNode* new_node = CreateNewNode(x);new_node->next = *ppHead;*ppHead = new_node;
}
解读:
Step1:头插就很简单了,思路就是让新节点的 next 指向头结点,然后再让新节点做头节点即可。首先创建新节点,直接套用我们刚才创建的 CreateNewNode 函数即可。
Step2:创建完毕后,让新节点 new_node->next 指向头结点 *ppHead ,这样在物理上就实现了 "链接" 。最后我们再更新下头结点就可以了,把 new_node 赋给 *ppHead 。现在 new_node 就变成了新的头结点了,也就实现了头插的效果。
Test.c:
void TestSList1()
{SListNode* pList = NULL;SListPushBack(&pList, 1);SListPushBack(&pList, 2);SListPushBack(&pList, 3);SListPushBack(&pList, 4);SListPushBack(&pList, 5);SListPrint(pList);SListPushFront(&pList, 1);SListPushFront(&pList, 2);SListPushFront(&pList, 3);SListPushFront(&pList, 4);SListPrint(pList);
}
运行结果如下:

05 尾删(SListPopBack)
SList.h:
// 尾删
void SListPopBack(SListNode** ppHead);
SList.c:
① 方法1:prev 前驱指针
/* 尾删 */
void SListPopBack(SListNode** ppHead)
{// 防止节点为空assert(*ppHead != NULL);// 只有一个节点if ((*ppHead)->next == NULL){free(*ppHead);*ppHead = NULL;}else{// 两个及以上SListNode* prev = NULL;SListNode* end = *ppHead;while (end->next != NULL){prev = end;end = end->next;}free(end);end = NULL;prev->next = NULL;}
}
② 方法2:next->next 解决
/* 尾删 */
void SListPopBack (SListNode** ppHead)
{//防止结点为空assert(*ppHead != NULL);// 只有一个结点if ((*ppHead)->next == NULL){free(*ppHead);*ppHead = NULL;}else {  // 两个及两个以上结点SListNode* end = *ppHead;while (end->next->next){end = end->next;}free(end->next);end->next = NULL;}
}
Test.c:
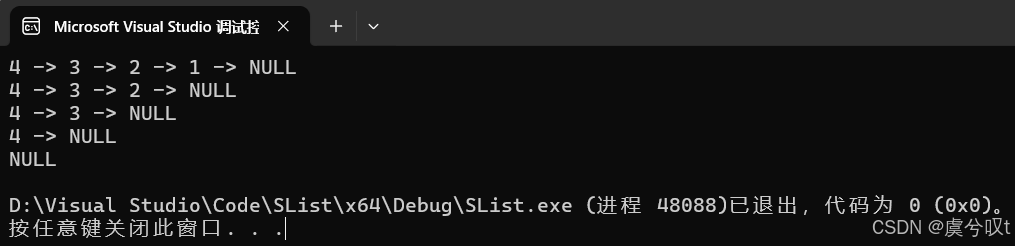
void TestSList2()
{SListNode* pList = NULL;SListPushFront(&pList, 1);SListPushFront(&pList, 2);SListPushFront(&pList, 3);SListPushFront(&pList, 4);SListPrint(pList);SListPopBack(&pList);SListPrint(pList);SListPopBack(&pList);SListPrint(pList);SListPopBack(&pList);SListPrint(pList);SListPopBack(&pList);SListPrint(pList);
}
运行结果如下:
06 头删(SListPopFront)
SList.h:
// 头删
void SListPopFront(SListNode** ppHead);
SList.c:
/* 头删 */
void SListPopFront(SListNode** ppHead)
{assert(*ppHead != NULL);SListNode* tmp = (*ppHead)->next;free(*ppHead);*ppHead = tmp;
}
解读:
Step1:首先防止头节点为空。
Step2:头删我们要注意的是不能直接 free 掉,因为直接删的话就会导致找不到下一个节点了。创建 tmp 指针,用来保存我们要删除的头结点 *pphead 指向的下一个结点的地址。保存好了之后我们就可以大胆的删除了,直接把头结点 free 掉即可。
Step3:更新头结点,将我们刚才保存的 tmp 赋值给 *pphead
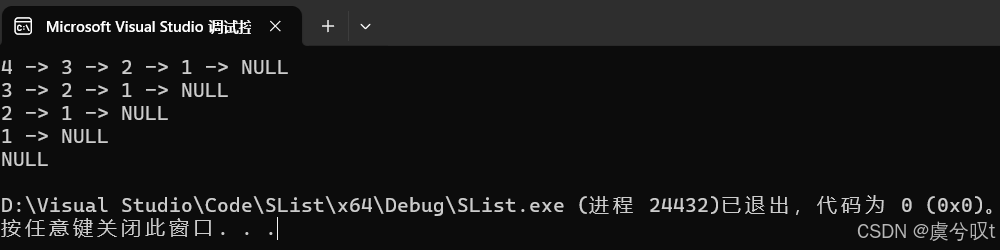
Test.c:
void TestSList3()
{SListNode* pList = NULL;SListPushFront(&pList, 1);SListPushFront(&pList, 2);SListPushFront(&pList, 3);SListPushFront(&pList, 4);SListPrint(pList);SListPopFront(&pList);SListPrint(pList);SListPopFront(&pList);SListPrint(pList);SListPopFront(&pList);SListPrint(pList);SListPopFront(&pList);SListPrint(pList);
}
运行结果如下:
07 查找(SListFind)
SList.h:
// 查找
SListNode* SListFind(SListNode* pHead, SLNodeDataType x);
SList.c:
/* 查找 */
SListNode* SListFind(SListNode* pHead, SLNodeDataType x)
{SListNode* cur = pHead;while (cur != NULL){if (cur->data == x)return cur;elsecur = cur->next;}return NULL;
}
解读:查找和打印函数一样,很简单,只需要创建一个 cur 遍历链表就可以了。如果 cur->data 和传入的 x 相同就返回 cur,cur 是带有值和地址的。如果整个链表都走完了还没有找到相同的值,就返回 NULL 。
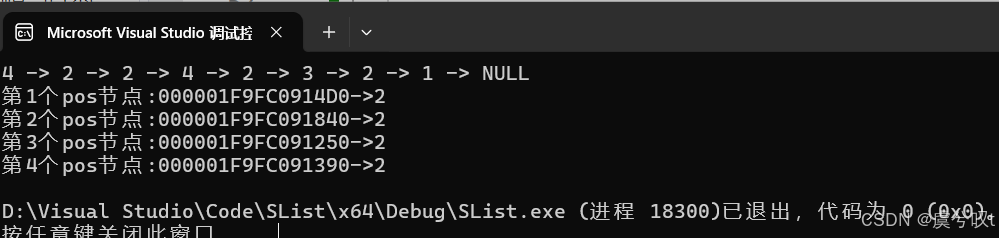
Test.c:
void TestSList4()
{SListNode* pList = NULL;SListPushFront(&pList, 1);SListPushFront(&pList, 2);SListPushFront(&pList, 3);SListPushFront(&pList, 2);SListPushFront(&pList, 4);SListPushFront(&pList, 2);SListPushFront(&pList, 2);SListPushFront(&pList, 4);SListPrint(pList);SListNode* pos = SListFind(pList, 2);int i = 1;while (pos){printf("第%d个pos节点:%p->%d\n", i++, pos, pos->data);pos = SListFind(pos->next, 2);}
}
运行结果如下:
08 删除指定位置节点(SListErase)
SList.h:
// 删除指定位置节点
void SListErase(SListNode** ppHead, SListNode* pos);
SList.c:
/* 删除指定位置节点 */
void SListErase(SListNode** ppHead, SListNode* pos)
{assert(*ppHead != NULL);assert(pos);// 只有一个节点if (*ppHead == pos)SListPopFront(ppHead);else{// 两个或两个以上SListNode* prev = *ppHead;while (prev->next != pos)prev = prev->next;prev->next = pos->next;free(pos);pos = NULL;}
}
解读:
Step1:防止头节点为空。因为我们要删除 pos 位置的值,所以还要防止传入的 pos 为空。
Step2:还是分为两种情况,一种是只有一个节点的情况,即头删的情况,我们直接调用 SListPopFront 即可。
Step3:第二种情况,我们定义一个结构体指针 prev 用来找 pos 。在删除之前我们要把 pos 前面和后面的数据链接起来,prev->next = pos->next ,最后再 free 掉 pos 即可。
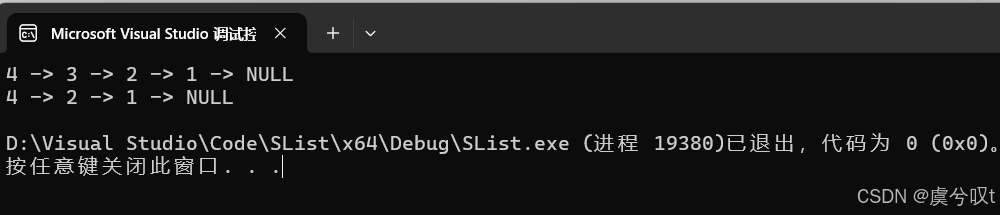
Test.c:
void TestSList5()
{SListNode* pList = NULL;SListPushFront(&pList, 1);SListPushFront(&pList, 2);SListPushFront(&pList, 3);SListPushFront(&pList, 4);SListPrint(pList);SListNode* pos = SListFind(pList, 3);if (pos)SListEarse(&pList, pos);SListPrint(pList);
}
运行结果如下:
09 销毁(SListDestory)
SList.h:
// 销毁
void SListDestory(SListNode** ppHead);
SList.c:
/* 销毁 */
void SListDestory(SListNode** ppHead)
{assert(*ppHead);SListNode* cur = *ppHead;while (cur != NULL){SListNode* next = cur->next;free(cur);cur = next;}*ppHead = NULL;
}
10 指定位置后插(SListInsertAfter)
SList.h:
// 指定位置后插
void SListInsertAfter(SListNode* pos, SLNodeDataType x);
SList.c:
/* 指定位置后插 */
void SListInsertAfter(SListNode* pos, SLNodeDataType x)
{assert(pos);SListNode* new_node = CreateNewNode(x);new_node->next = pos->next;pos->next = new_node;
}
11 删除指定位置后的节点(SListEraseAfter)
SList.h:
// 删除指定位置之后的节点
void SListEraseAfter(SListNode* pos);
SList.c:
/* 删除指定位置之后的节点 */
void SListEraseAfter(SListNode* pos)
{assert(pos && pos->next);SListNode* nx = pos->next;pos->next = nx->next;free(nx);
}
四、完整代码
SList.h:
#pragma once
#include <stdio.h>
#include <stdlib.h>
#include <assert.h>typedef int SLNodeDataType;typedef struct SListNode
{SLNodeDataType data;struct SListNode* next;
}SListNode;// 创建新节点
SListNode* CreateNewNode(SLNodeDataType x);
// 打印
void SListPrint(SListNode* pHead);
// 尾插
void SListPushBack(SListNode** ppHead, SLNodeDataType x);
// 头插
void SListPushFront(SListNode** ppHead, SLNodeDataType x);
// 尾删
void SListPopBack(SListNode** ppHead);
// 头删
void SListPopFront(SListNode** ppHead);
// 查找
SListNode* SListFind(SListNode* pHead, SLNodeDataType x);
// 指定位置后插
void SListInsertAfter(SListNode* pos, SLNodeDataType x);
// 删除指定位置之后的节点
void SListEraseAfter(SListNode* pos);
// 删除指定位置节点
void SListErase(SListNode** ppHead, SListNode* pos);
// 销毁
void SListDestory(SListNode** ppHead);
SList.c:
#include "SList.h"/* 创建新节点 */
SListNode* CreateNewNode(SLNodeDataType x)
{// 创建新节点SListNode* new_node = (SListNode*)malloc(sizeof(SListNode));if (new_node == NULL){printf("malloc failed\n");exit(-1);}new_node->data = x;new_node->next = NULL;return new_node;
}/* 打印 */
void SListPrint(SListNode* pHead)
{SListNode* cur = pHead;while (cur != NULL){printf("%d -> ", cur->data);cur = cur->next;}printf("NULL\n");
}/* 尾插 */
void SListPushBack(SListNode** ppHead, SLNodeDataType x)
{SListNode* new_node = CreateNewNode(x);// 如果链表为空if (*ppHead == NULL)*ppHead = new_node;else{SListNode* end = *ppHead;while (end->next != NULL)end = end->next;end->next = new_node;}
}/* 头插 */
void SListPushFront(SListNode** ppHead, SLNodeDataType x)
{SListNode* new_node = CreateNewNode(x);new_node->next = *ppHead;*ppHead = new_node;
}/* 尾删 */
void SListPopBack(SListNode** ppHead)
{// 防止节点为空assert(*ppHead != NULL);// 只有一个节点if ((*ppHead)->next == NULL){free(*ppHead);*ppHead = NULL;}else{// 两个及以上SListNode* prev = NULL;SListNode* end = *ppHead;while (end->next != NULL){prev = end;end = end->next;}free(end);end = NULL;prev->next = NULL;}
}/* 头删 */
void SListPopFront(SListNode** ppHead)
{assert(*ppHead != NULL);SListNode* tmp = (*ppHead)->next;free(*ppHead);*ppHead = tmp;
}/* 查找 */
SListNode* SListFind(SListNode* pHead, SLNodeDataType x)
{SListNode* cur = pHead;while (cur != NULL){if (cur->data == x)return cur;elsecur = cur->next;}return NULL;
}/* 指定位置后插 */
void SListInsertAfter(SListNode* pos, SLNodeDataType x)
{assert(pos);SListNode* new_node = CreateNewNode(x);new_node->next = pos->next;pos->next = new_node;
}/* 删除指定位置之后的节点 */
void SListEraseAfter(SListNode* pos)
{assert(pos && pos->next);SListNode* nx = pos->next;pos->next = nx->next;free(nx);
}/* 删除指定位置节点 */
void SListErase(SListNode** ppHead, SListNode* pos)
{assert(*ppHead != NULL);assert(pos);// 只有一个节点if (*ppHead == pos)SListPopFront(ppHead);else{// 两个或两个以上SListNode* prev = *ppHead;while (prev != NULL && prev->next != pos)prev = prev->next;prev->next = pos->next;free(pos);}
}/* 销毁 */
void SListDestory(SListNode** ppHead)
{assert(*ppHead);SListNode* cur = *ppHead;while (cur != NULL){SListNode* next = cur->next;free(cur);cur = next;}*ppHead = NULL;
}