小兔鲜儿项目
步骤:
1.创建项目
2.给项目添加一些目录
3.使用git进行管理(首先git init,然后git add . ,最后git commit -m "init")(在后续更改中也要持续进行红色文字操作)
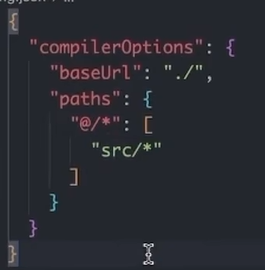
4.创建jsconfig.json文件用于统一引入文件格式使用@/这个文件要创建在根目录下,我创建项目里面自带。然后在里面编写代码如下(别名路径联想设置,这个文件只用于提示真正起作用的其实是vite.config.js里面)
5.安装element-plus并安装插件配置插件进行按需引入(查看文档)
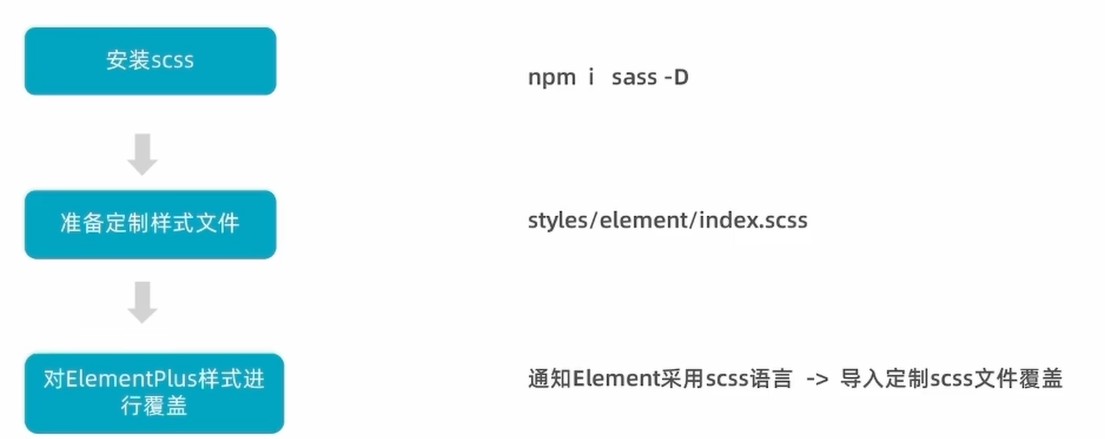
6.统一主题颜色
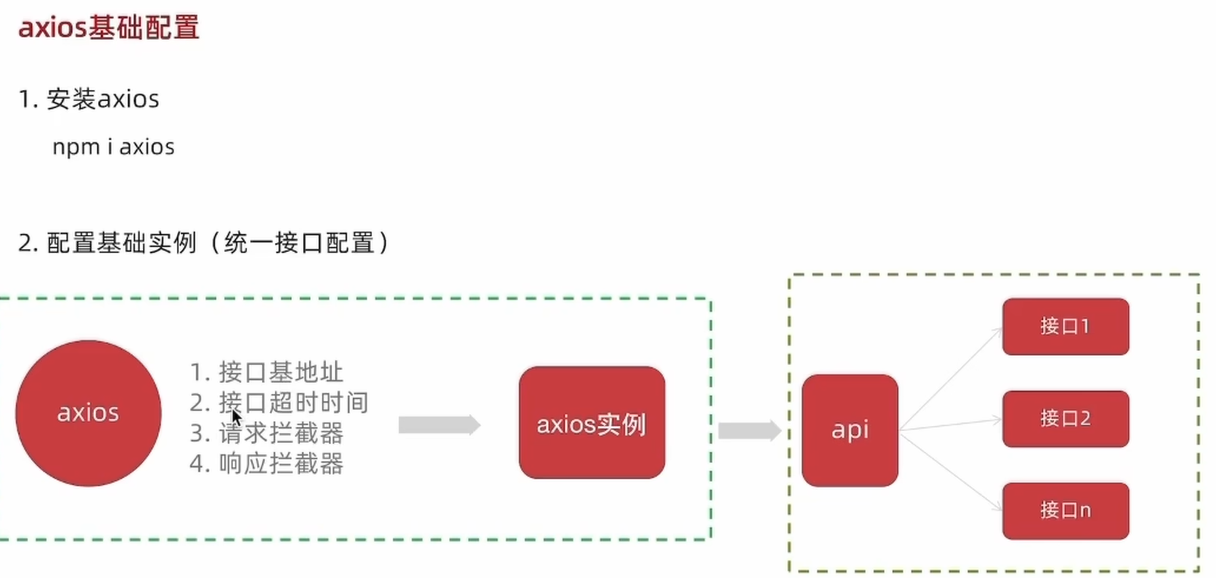
7.axios基础配置
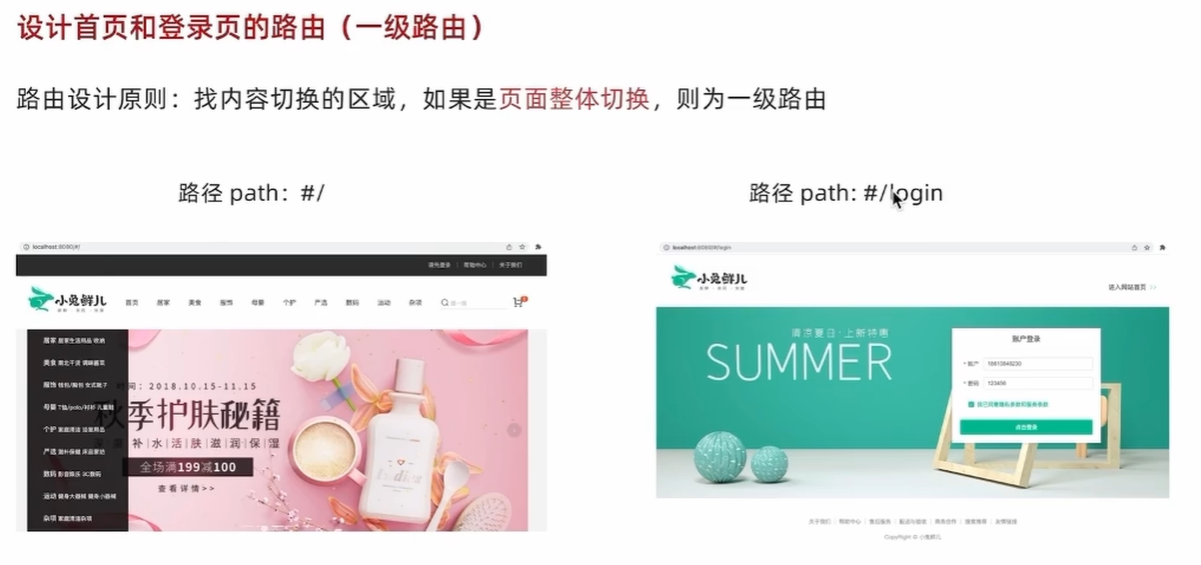
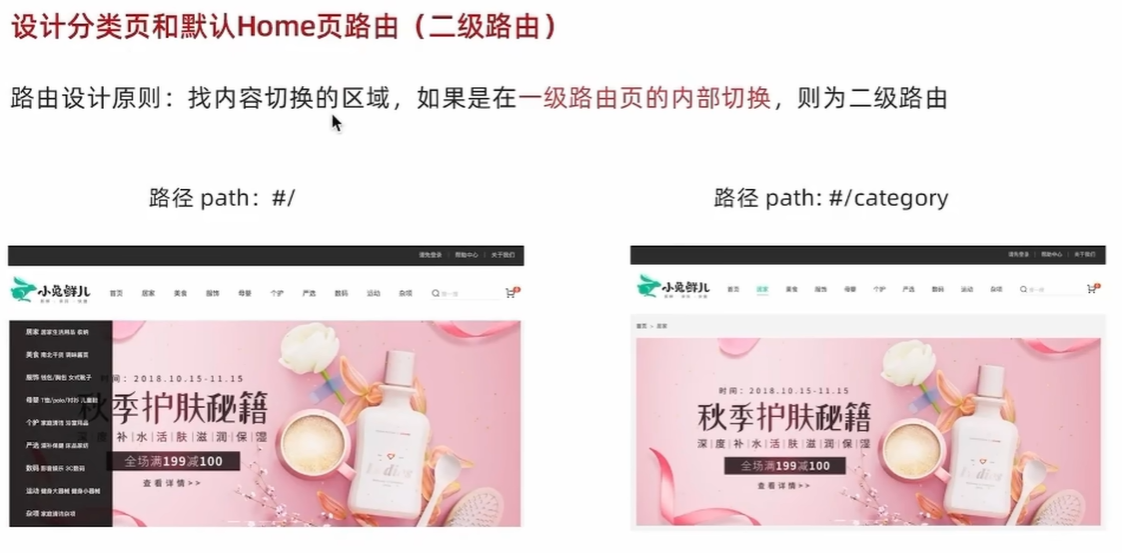
8.路由设计
9.编写layout静态结构
10.引入图标
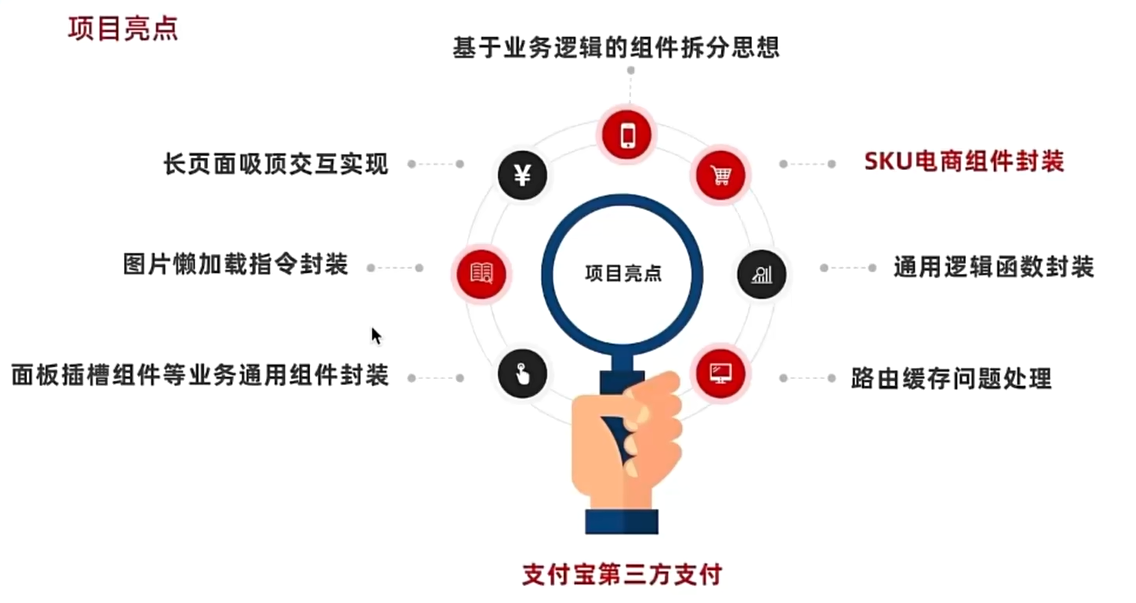
项目亮点:
需要具备的某些知识:

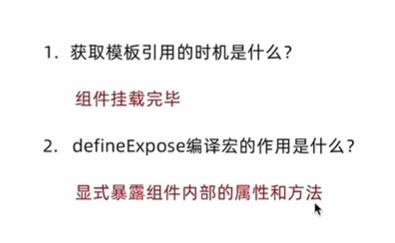
ref属性
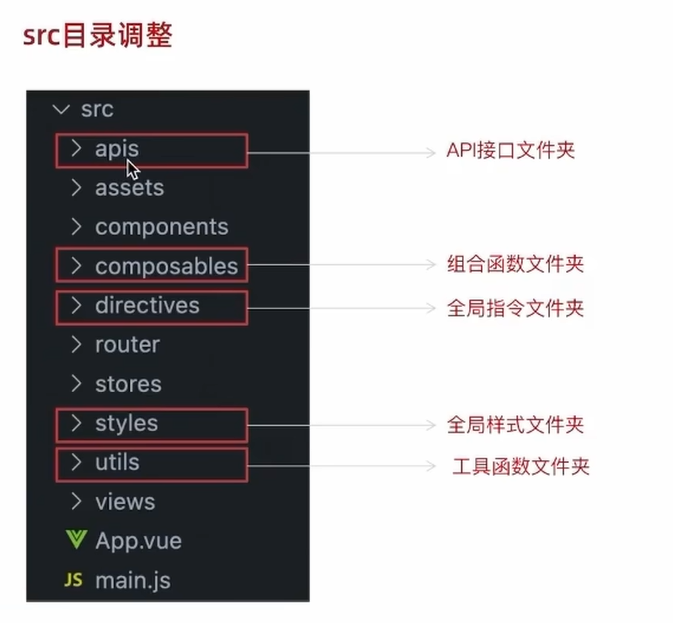
项目目录调整:
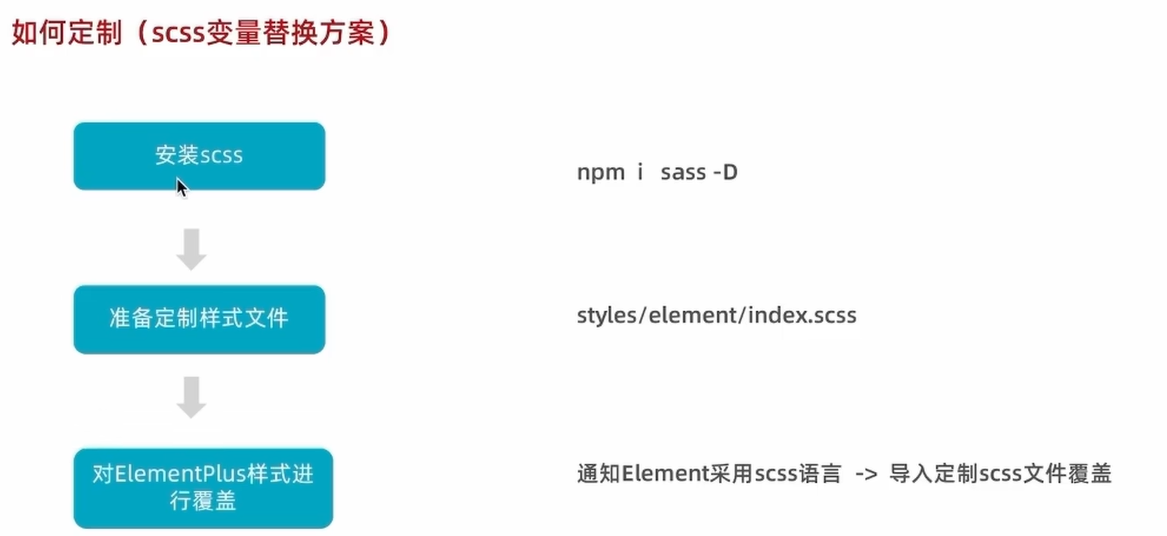
主题色定制:
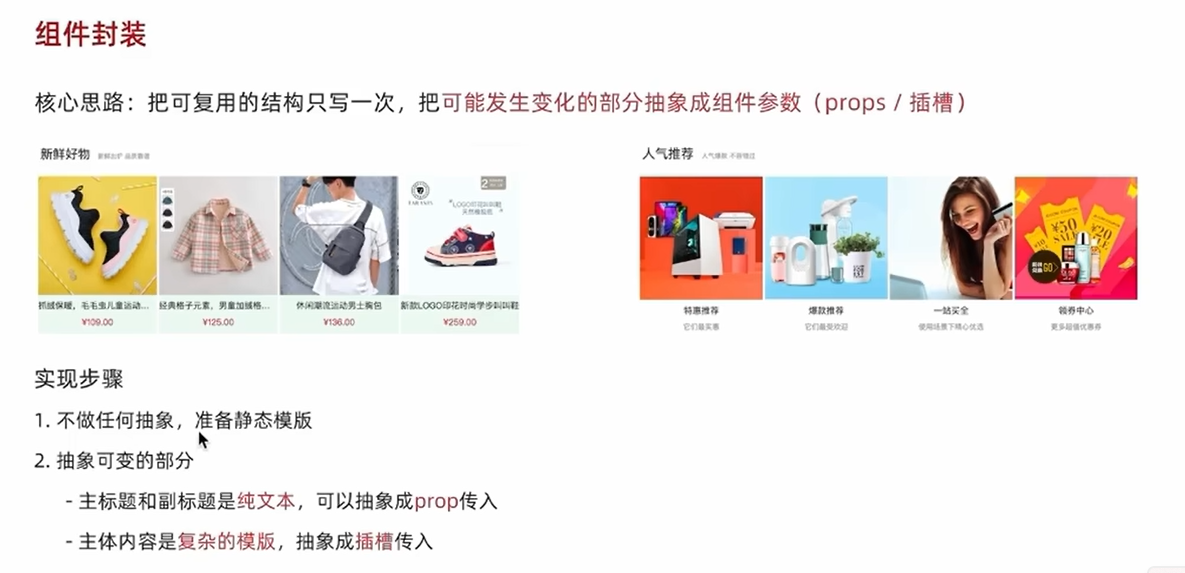
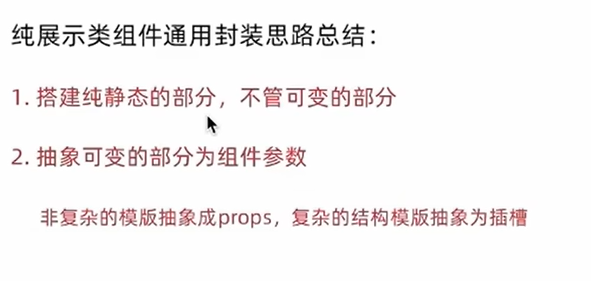
组件封装
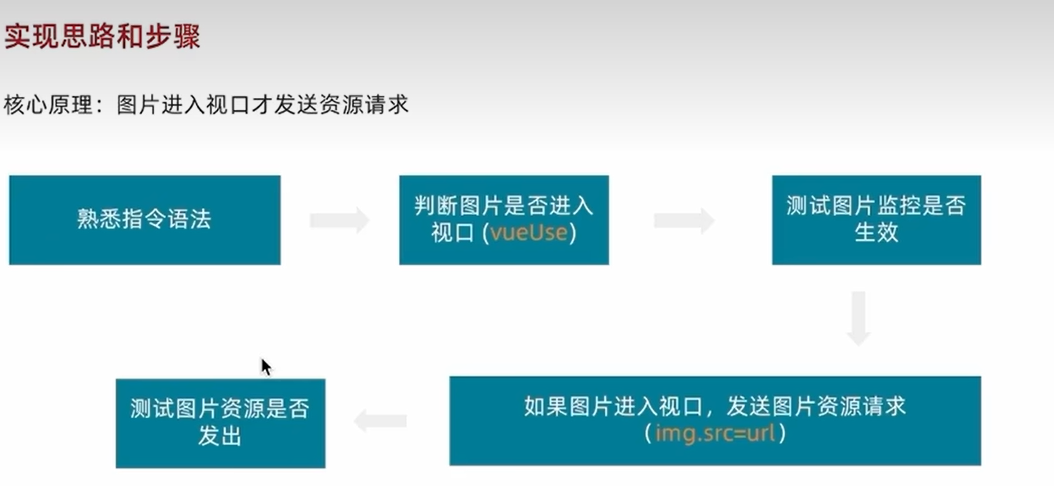
图片懒加载
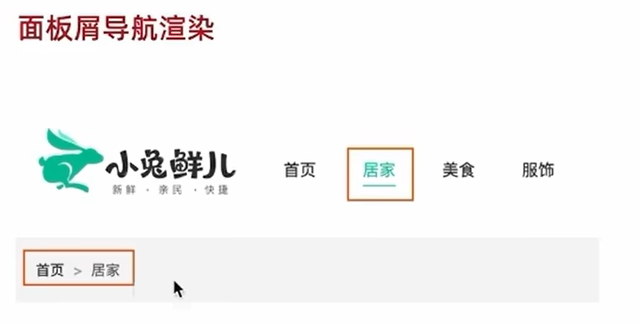
面板屑导航渲染

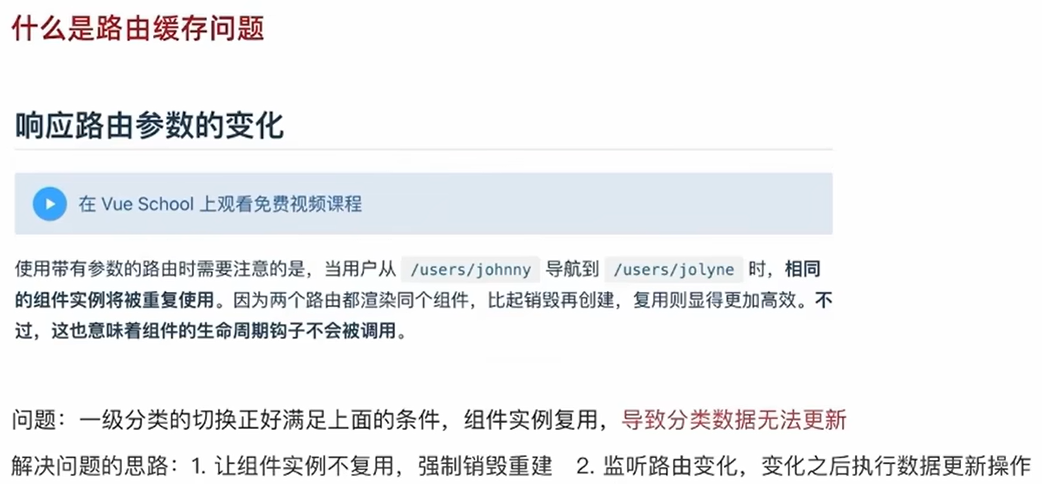
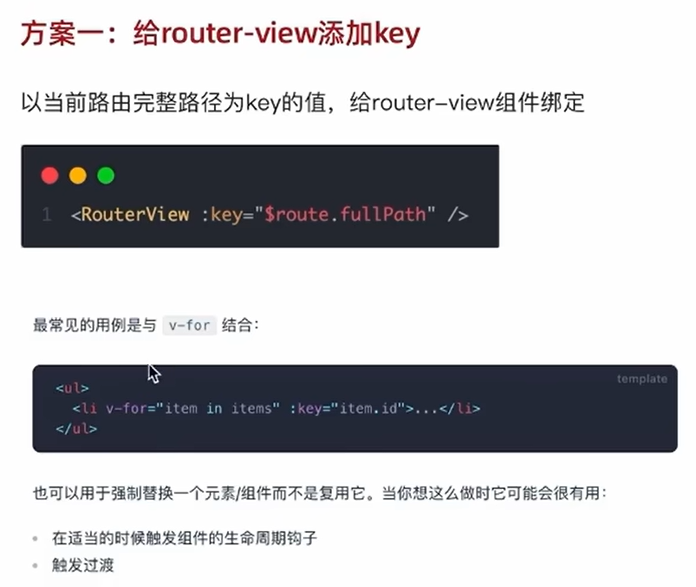
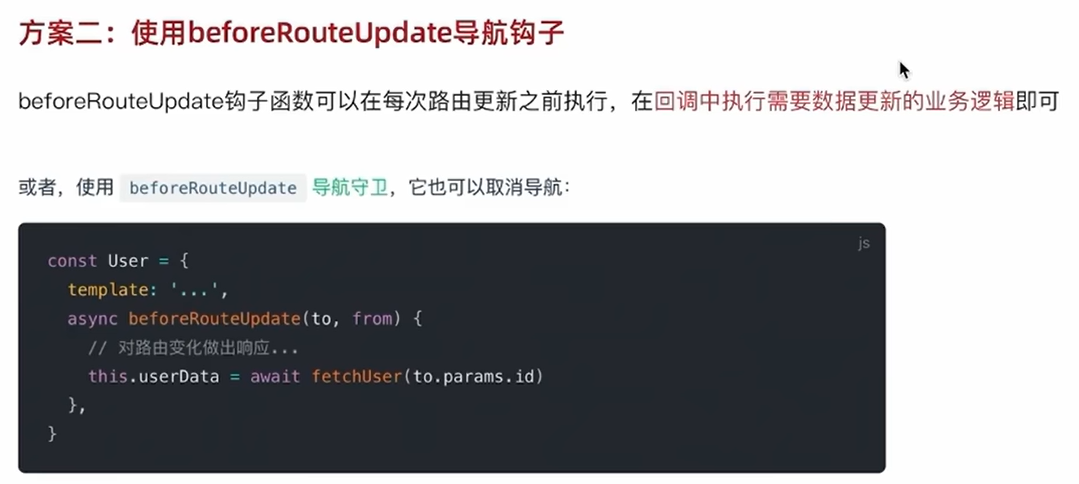
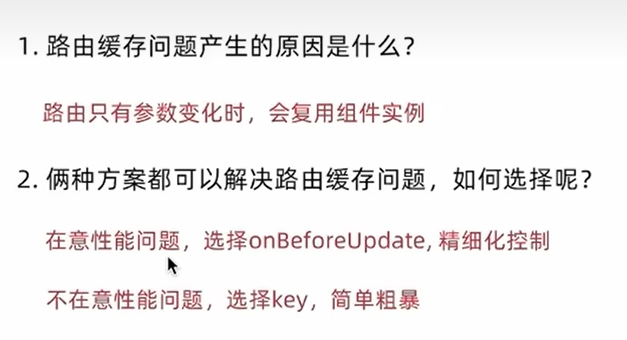
路由缓存问题
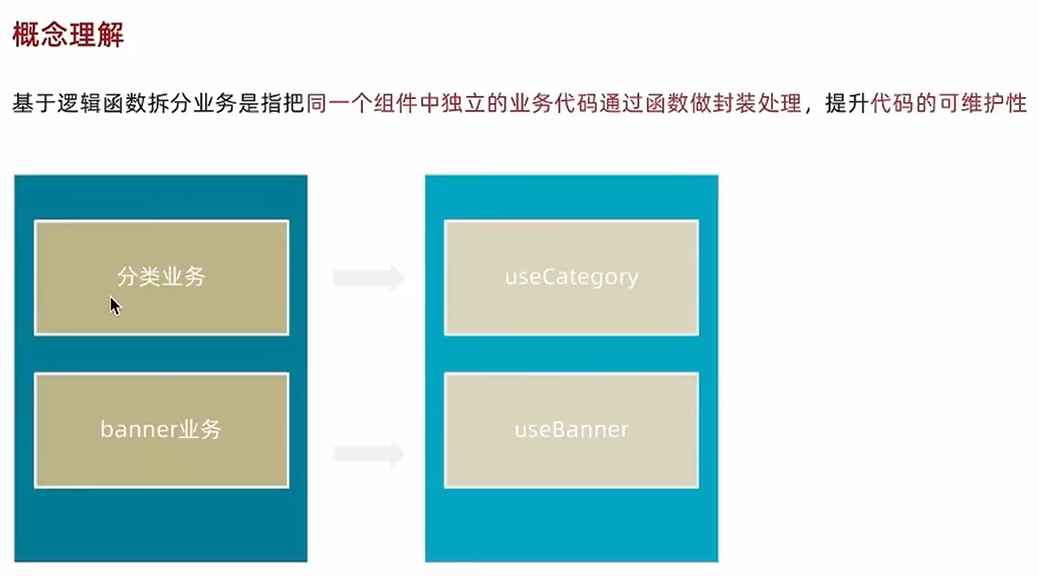
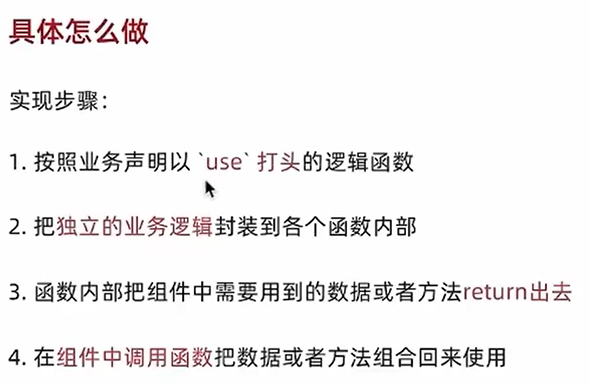
一级分类-使用逻辑函数拆分业务
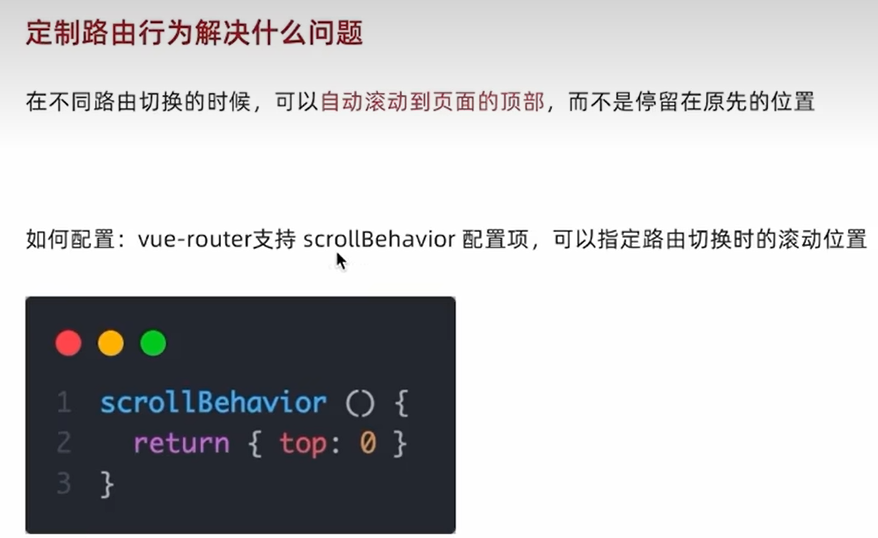
在路由跳转时自动切换到顶部

如果有可以复用的地方
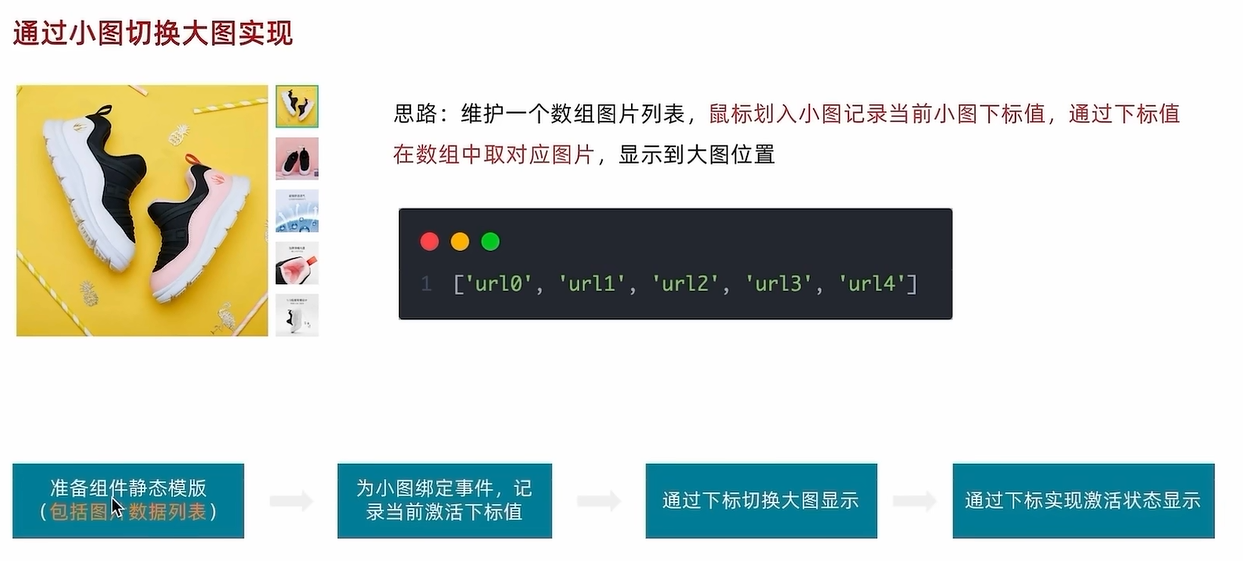
小图切换大图实现
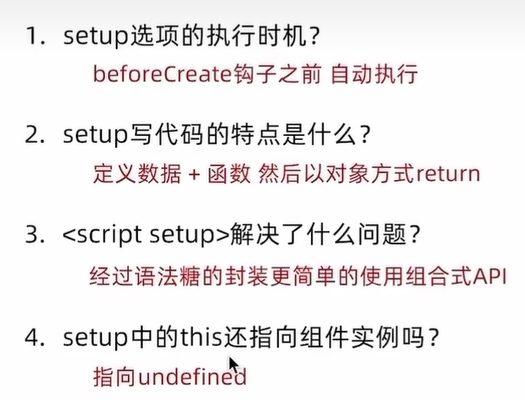
<script setup>
import { ref } from 'vue'
// 图片列表
const imageList = ["https://yanxuan-item.nosdn.127.net/d917c92e663c5ed0bb577c7ded73e4ec.png","https://yanxuan-item.nosdn.127.net/e801b9572f0b0c02a52952b01adab967.jpg","https://yanxuan-item.nosdn.127.net/b52c447ad472d51adbdde1a83f550ac2.jpg","https://yanxuan-item.nosdn.127.net/f93243224dc37674dfca5874fe089c60.jpg","https://yanxuan-item.nosdn.127.net/f881cfe7de9a576aaeea6ee0d1d24823.jpg"
]
const imageIndex = ref(0)
const enterhandler = (i) =>{imageIndex.value = i;
}
</script><template><div class="goods-image"><!-- 左侧大图--><div class="middle" ref="target"><img :src="imageList[imageIndex]" alt="" /><!-- 蒙层小滑块 --><div class="layer" :style="{ left: `0px`, top: `0px` }"></div></div><!-- 小图列表 --><ul class="small"><li v-for="(img, i) in imageList" :key="i" @mouseenter="enterhandler(i)"><img :src="img" alt="" /></li></ul><!-- 放大镜大图 --><div class="large" :style="[{backgroundImage: `url(${imageList[0]})`,backgroundPositionX: `0px`,backgroundPositionY: `0px`,},]" v-show="false"></div></div>
</template>
使用mouseenter事件来监听鼠标移动到哪个图片里面然后触发对应的enterhandler方法
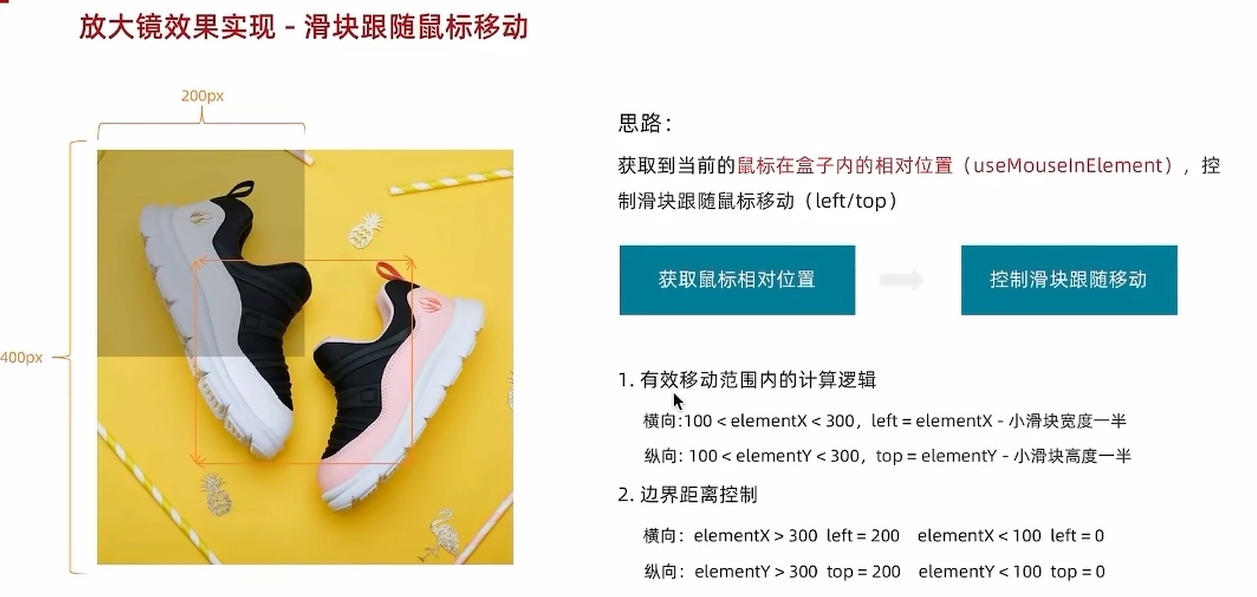
放大镜效果实现


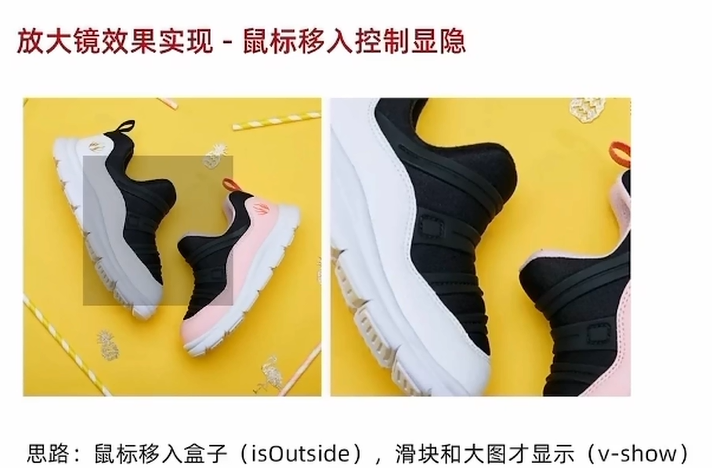
<script setup>
import { ref,watch } from 'vue'
import { useMouseInElement } from '@vueuse/core'
// 图片列表
const imageList = ["https://yanxuan-item.nosdn.127.net/d917c92e663c5ed0bb577c7ded73e4ec.png","https://yanxuan-item.nosdn.127.net/e801b9572f0b0c02a52952b01adab967.jpg","https://yanxuan-item.nosdn.127.net/b52c447ad472d51adbdde1a83f550ac2.jpg","https://yanxuan-item.nosdn.127.net/f93243224dc37674dfca5874fe089c60.jpg","https://yanxuan-item.nosdn.127.net/f881cfe7de9a576aaeea6ee0d1d24823.jpg"
]
//小图切大图显示
const imageIndex = ref(0)
const enterhandler = (i) =>{imageIndex.value = i;
}
//放大镜
const target = ref(null);
const {elementX , elementY , isOutside} = useMouseInElement(target);
//控制滑块跟随鼠标移动(监听elementX/Y变化,一旦变化 重新设置left/top)
const layerLeft = ref(0);
const layerTop = ref(0);
const largeLeft = ref(0);
const largeTop = ref(0);
watch([elementX,elementY],()=>{if(!isOutside.value){if(elementX.value>100 && elementX.value<300){layerLeft.value = elementX.value - 100;}else if(elementX.value<=100){layerLeft.value = 0;}else{layerLeft.value = 200;}if(elementY.value>100 && elementY.value<300){layerTop.value = elementY.value - 100;}else if(elementY.value<=100){layerTop.value = 0;}else{layerTop.value = 200;}largeLeft.value = layerLeft.value * 2;largeTop.value = layerTop.value * 2;}
})
</script><template><div class="goods-image"><!-- 左侧大图--><div class="middle" ref="target"><img :src="imageList[imageIndex]" alt="" /><!-- 蒙层小滑块 --><div class="layer" :style="{ left: `${layerLeft}px`, top: `${layerTop}px` }" v-show="!isOutside"></div></div><!-- 小图列表 --><ul class="small"><li v-for="(img, i) in imageList" :key="i" @mouseenter="enterhandler(i)" :class="{active: i==imageIndex}"><img :src="img" alt="" /></li></ul><!-- 放大镜大图 --><div class="large" :style="[{backgroundImage: `url(${imageList[imageIndex]})`,backgroundPositionX: `-${largeLeft}px`,backgroundPositionY: `-${largeTop}px`,},]" v-show="!isOutside"></div></div>
</template><style scoped lang="scss">
.goods-image {width: 480px;height: 400px;position: relative;display: flex;.middle {width: 400px;height: 400px;background: #f5f5f5;}.large {position: absolute;top: 0;left: 412px;width: 400px;height: 400px;z-index: 500;box-shadow: 0 0 10px rgba(0, 0, 0, 0.1);background-repeat: no-repeat;// 背景图:盒子的大小 = 2:1 将来控制背景图的移动来实现放大的效果查看 background-positionbackground-size: 800px 800px;background-color: #f8f8f8;}.layer {width: 200px;height: 200px;background: rgba(0, 0, 0, 0.2);// 绝对定位 然后跟随咱们鼠标控制left和top属性就可以让滑块移动起来left: 0;top: 0;position: absolute;}.small {width: 80px;li {width: 68px;height: 68px;margin-left: 12px;margin-bottom: 15px;cursor: pointer;&:hover,&.active {border: 2px solid $xtxColor;}}}
}
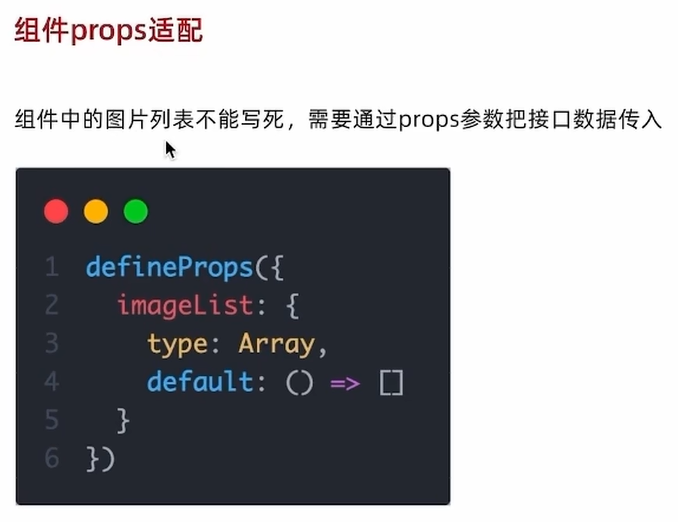
</style>组件props适配
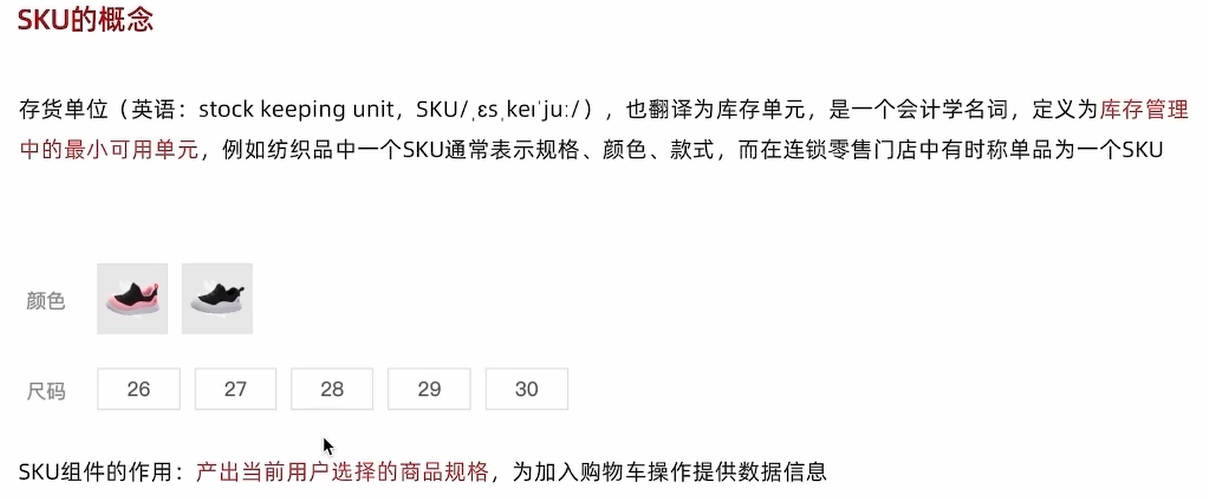
SKU
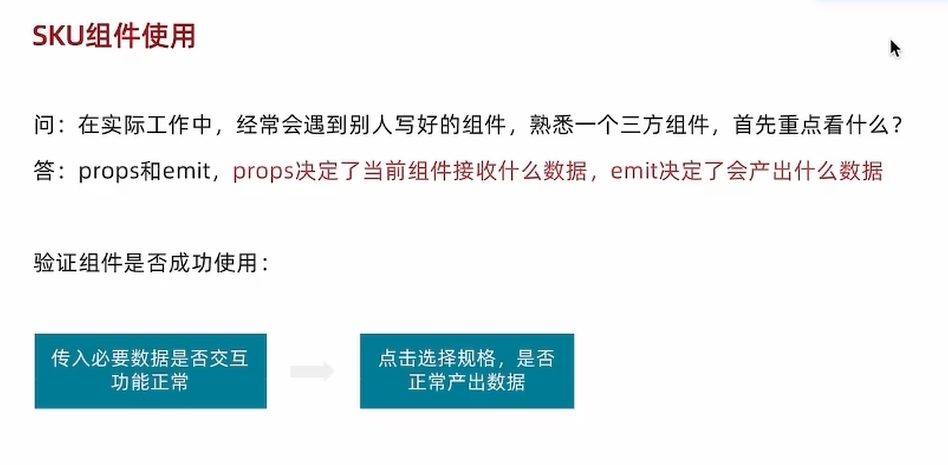
通用型组件的优化
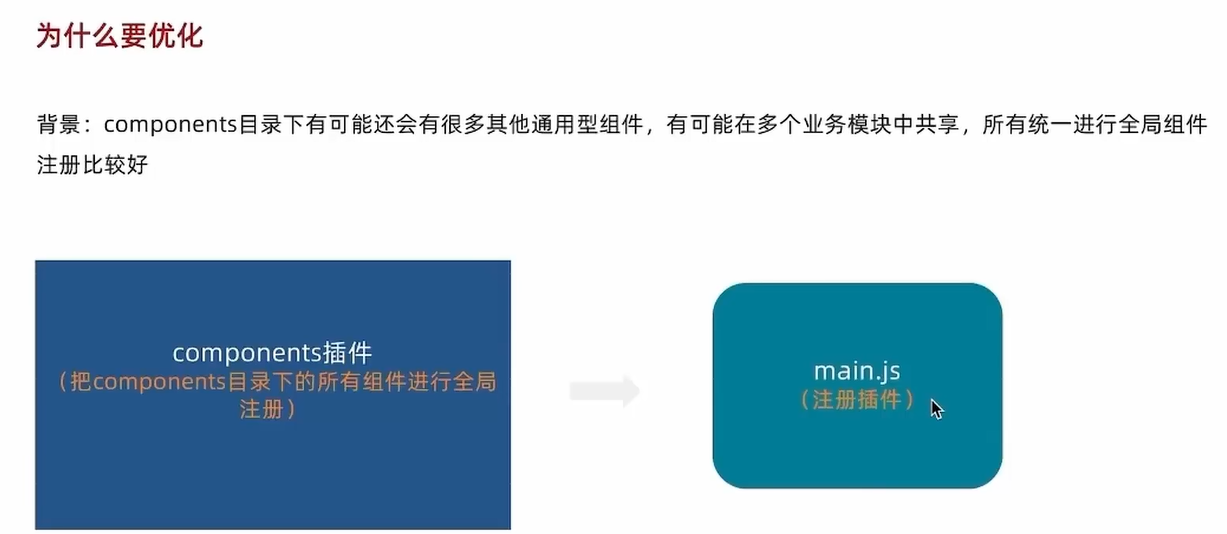
//把components中的所有组件都进行全局化注册
//通过插件的方式
import ImageView from './ImageView/index.vue'
import XtxSku from './XtxSku/index.vue'
export const componentPlugin = {install(app){app.component('XtxImageView',ImageView)app.component('XtxSku',XtxSku)}
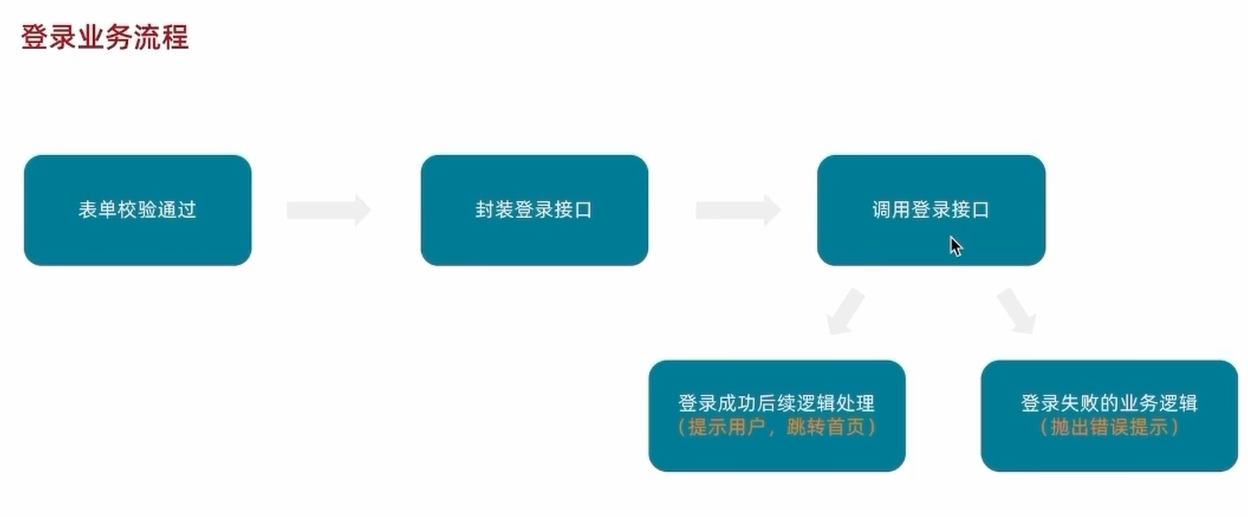
}登录页面

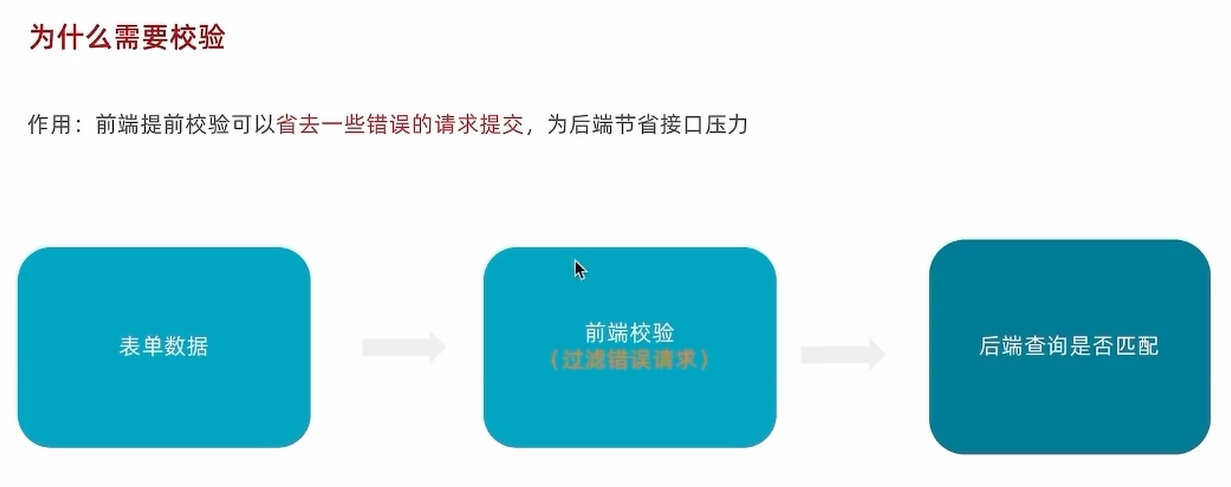
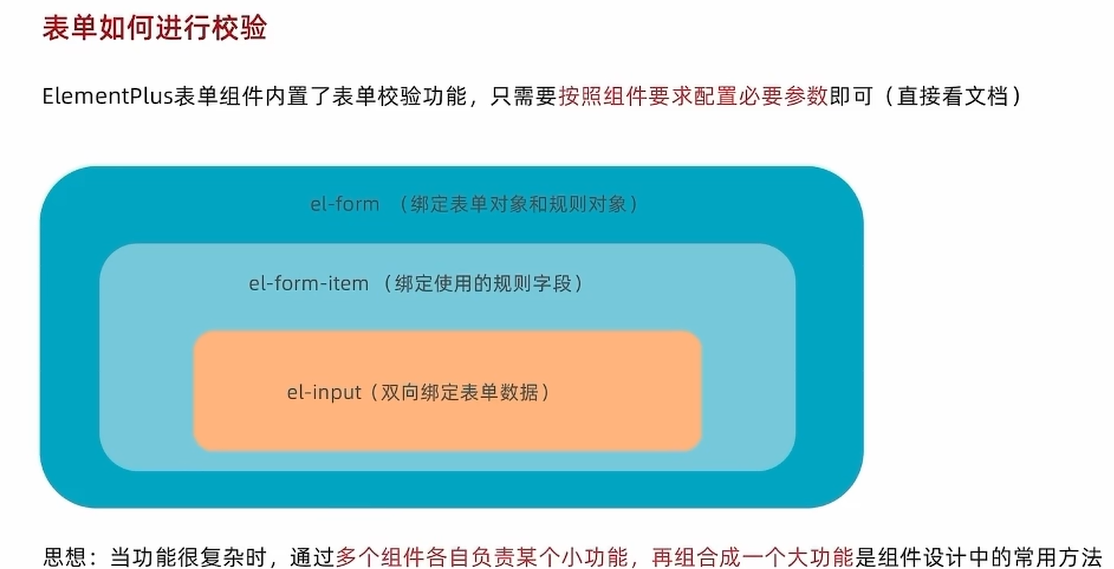
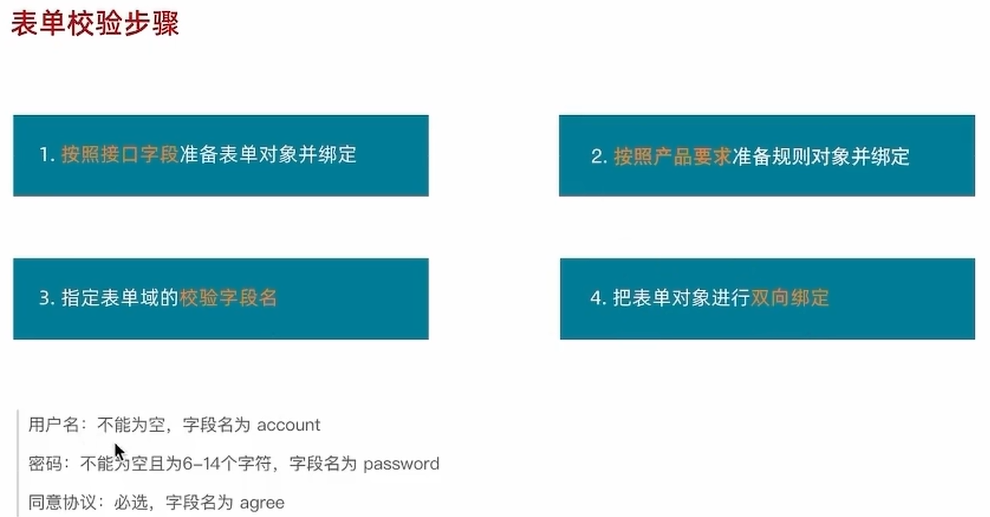
表单校验
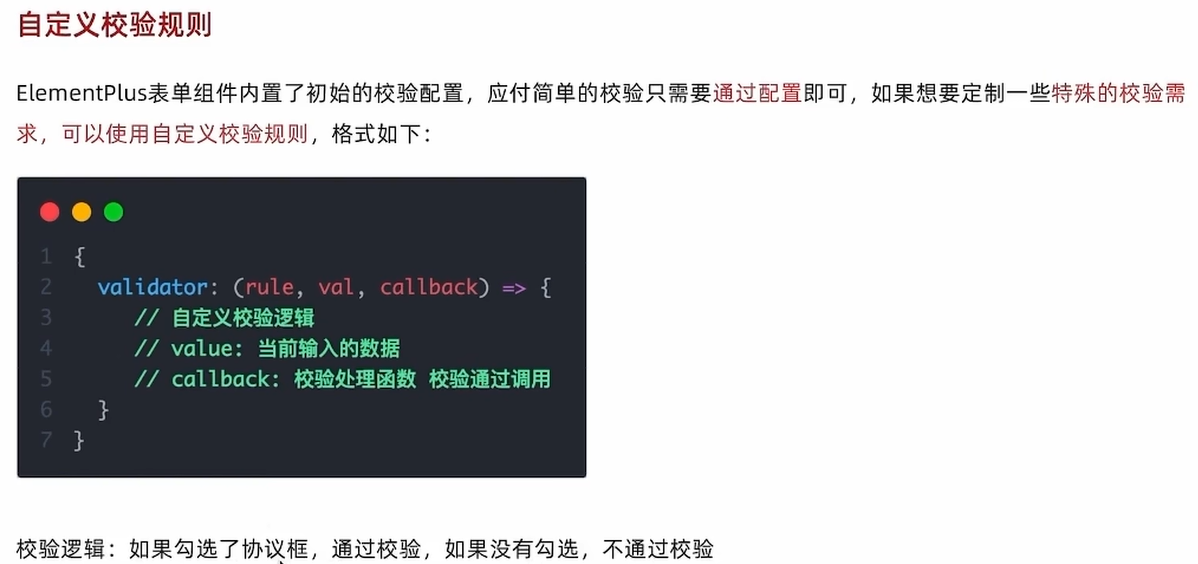
自定义校验规则
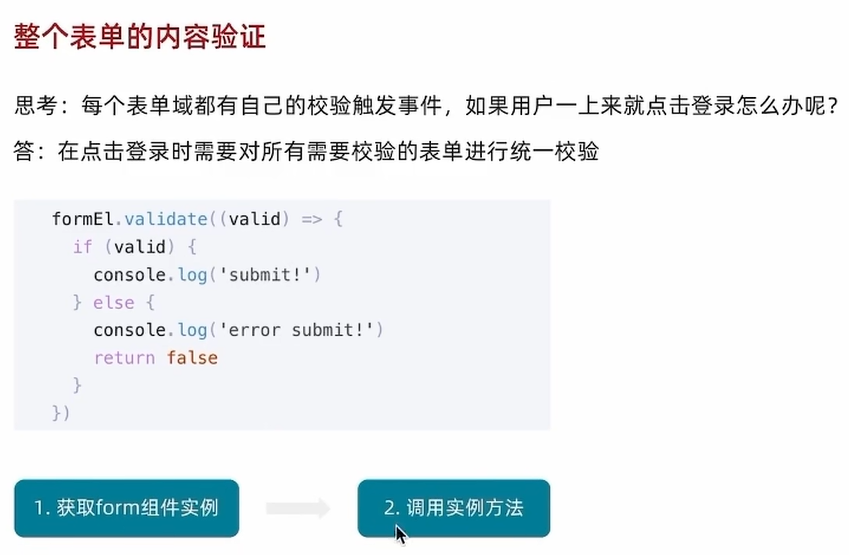
统一校验
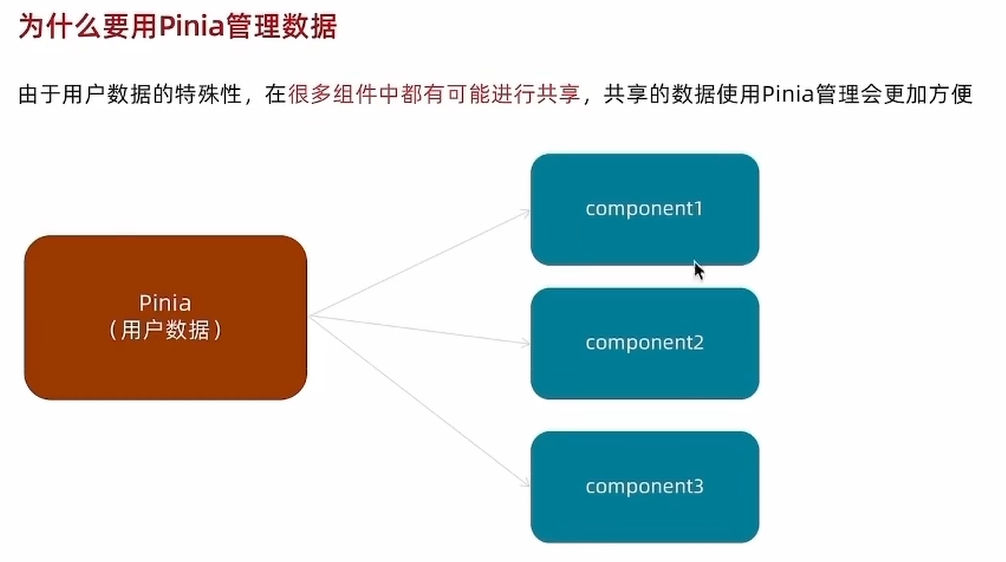
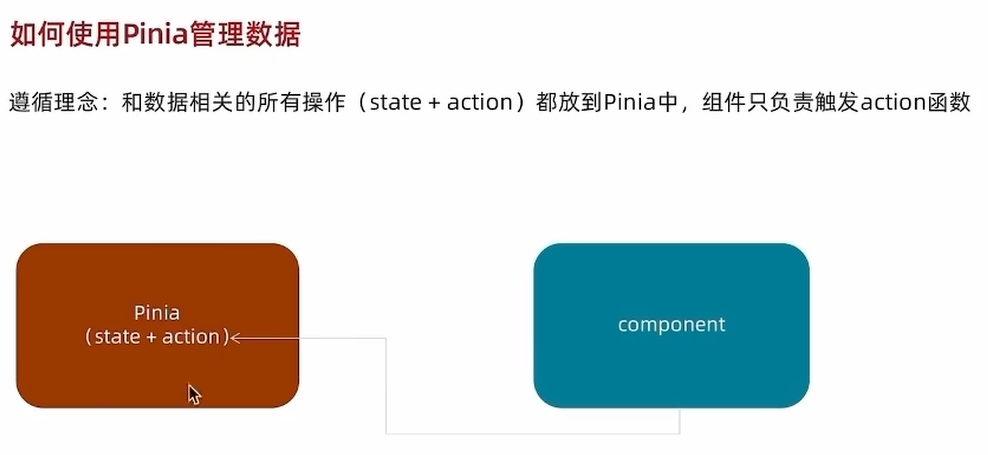
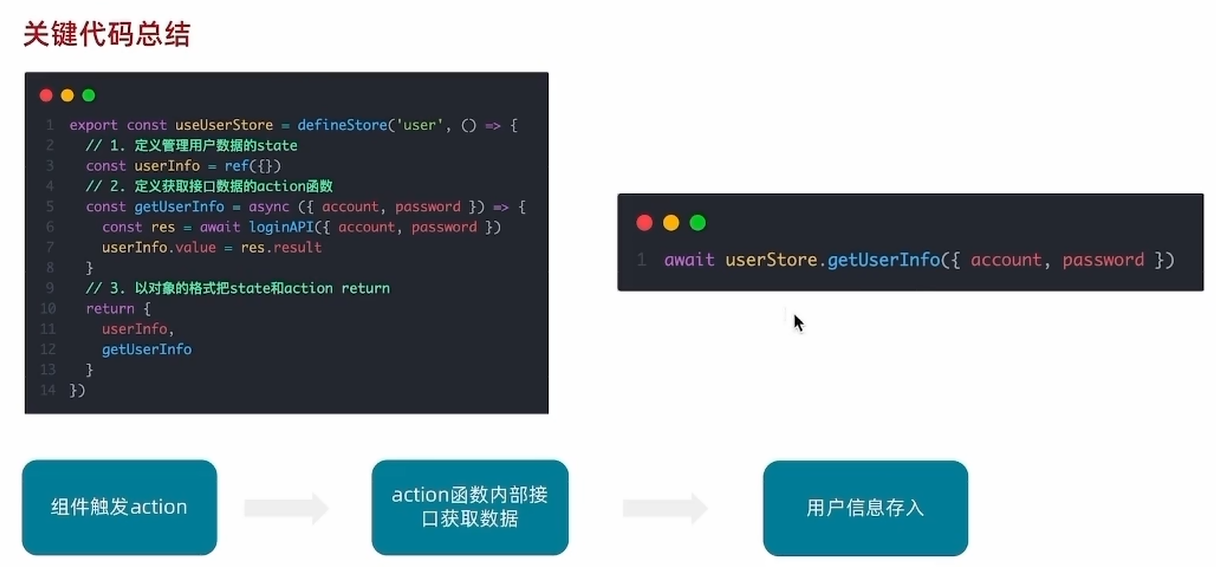
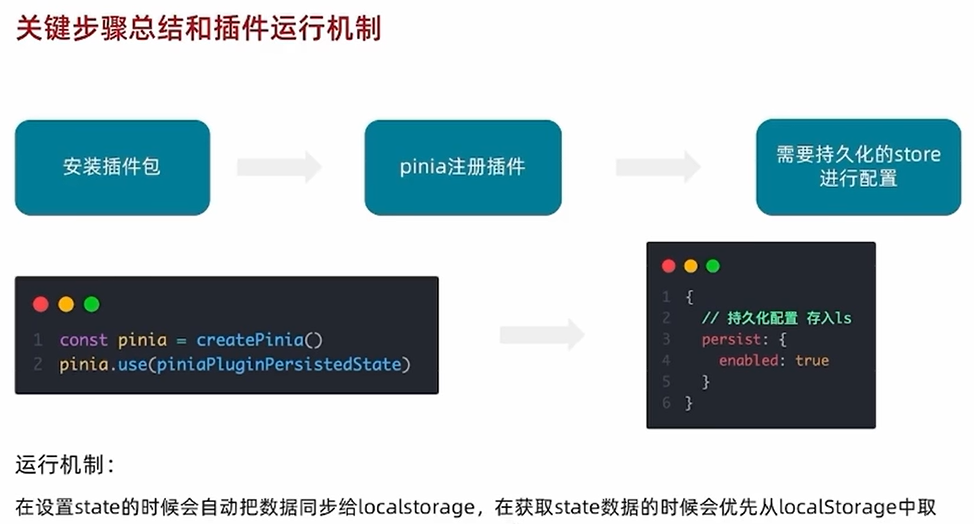
使用pinia管理数据
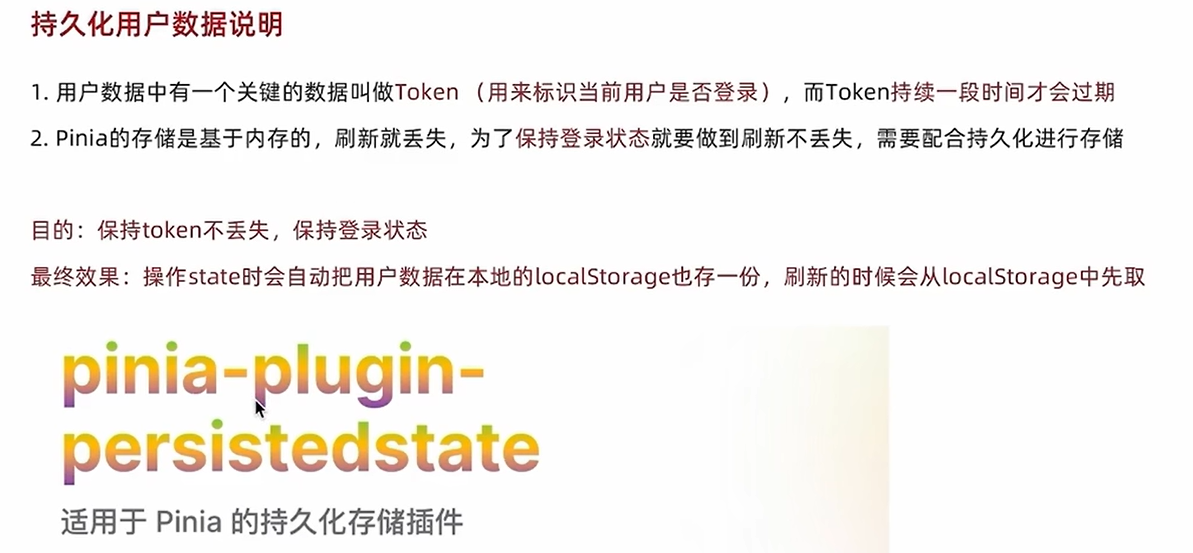
用户数据持久化
多模板适配

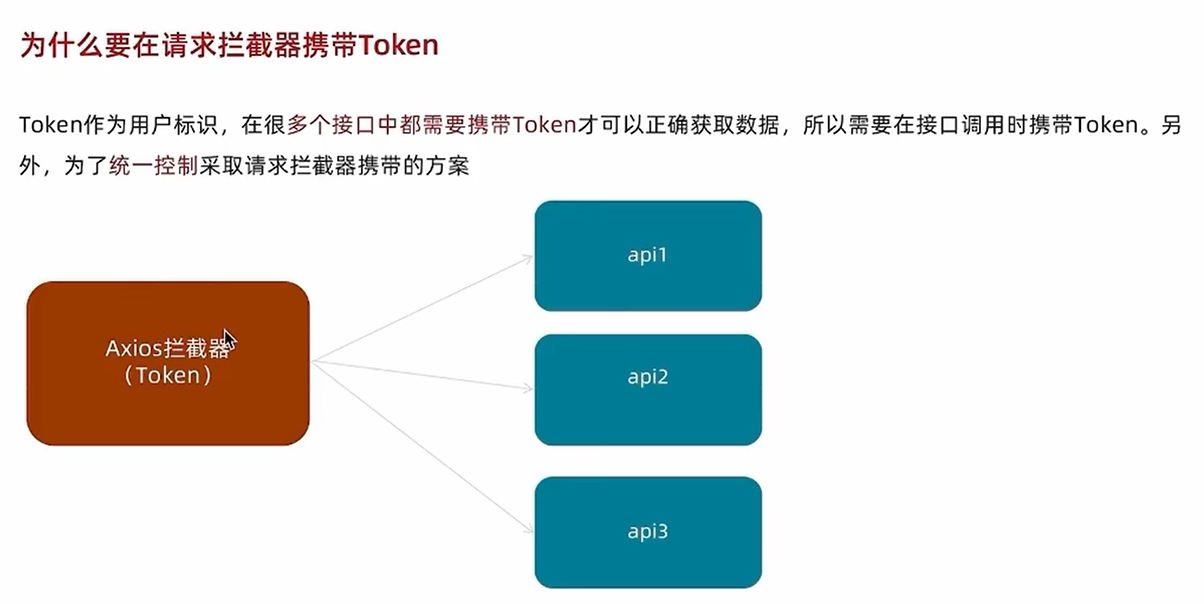
在请求拦截器中携带Token
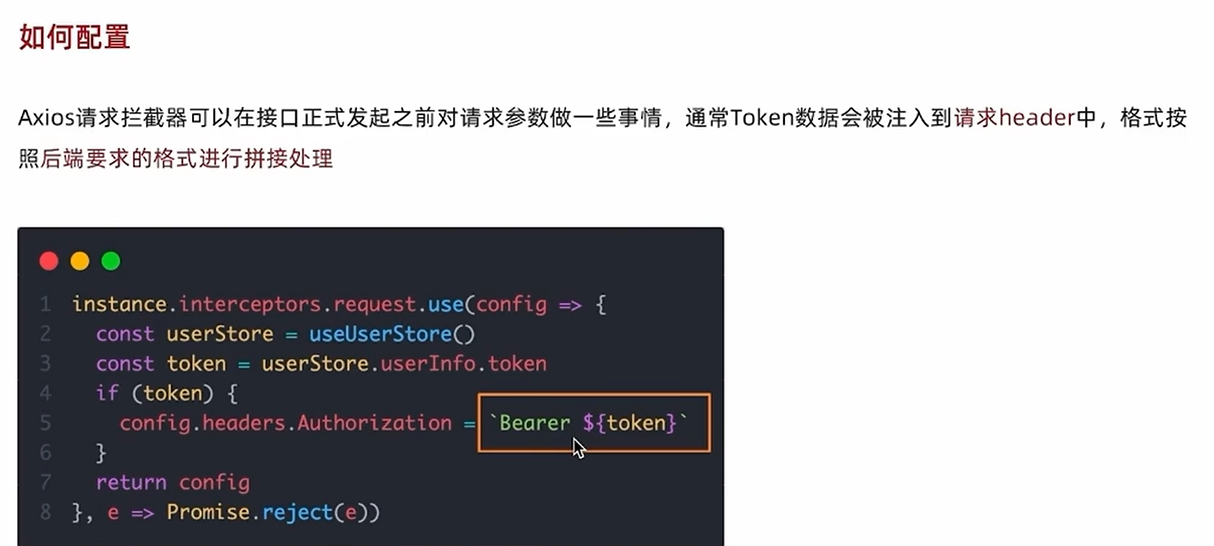
如何配置
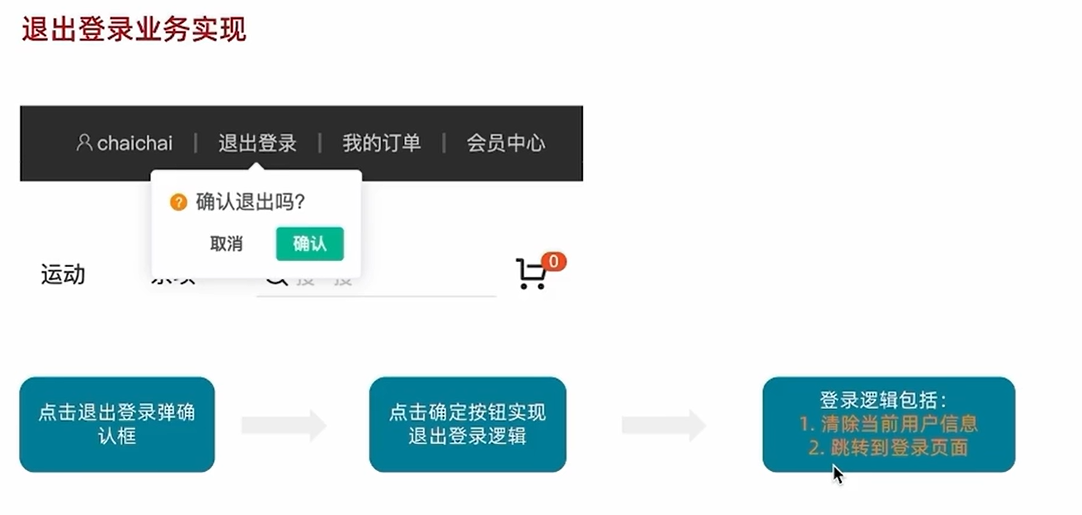
退出登录
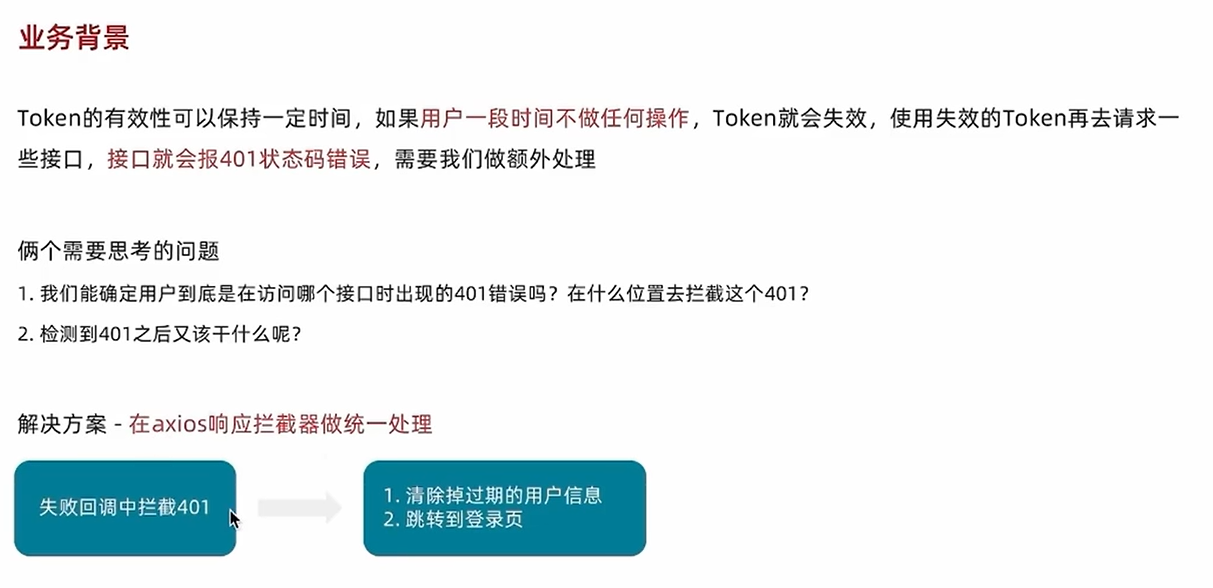
登录-Token失效401拦截
//axios基础封装
import axios from 'axios'
import { ElMessage } from 'element-plus'
import 'element-plus/theme-chalk/el-message.css'
import { useUserStore } from '@/stores/user'
import router from '@/router'
const httpInstance = axios.create({baseURL: 'http://pcapi-xiaotuxian-front-devtest.itheima.net',timeout:5000
})
//axios请求拦截器
httpInstance.interceptors.request.use(config => {//1.从pinia获取token数据const userStore = useUserStore()const token = userStore.userInfo.token//2.按照后端的要求拼接token数据if(token){config.headers.Authorization = `Bearer ${token}`}return config
},e=>Promise.reject(e))
//axios响应式拦截器
httpInstance.interceptors.response.use(res=>res.data,e=>{const userStore = useUserStore()ElMessage({type:'warning',message:e.response.data.message})//401Token失效处理//清除本地数据//跳转到登录页if(e.response.status === 401){userStore.clearUserInfo();router.push('/login')}return Promise.reject(e)
})
export default httpInstance;注意:这里的路由跳转是直接导入的router,没有使用useRouter。在组件内部的 setup 中,推荐使用 useRouter 和 useRoute;在非组件环境中,应该直接导入路由实例。
购物车功能实现
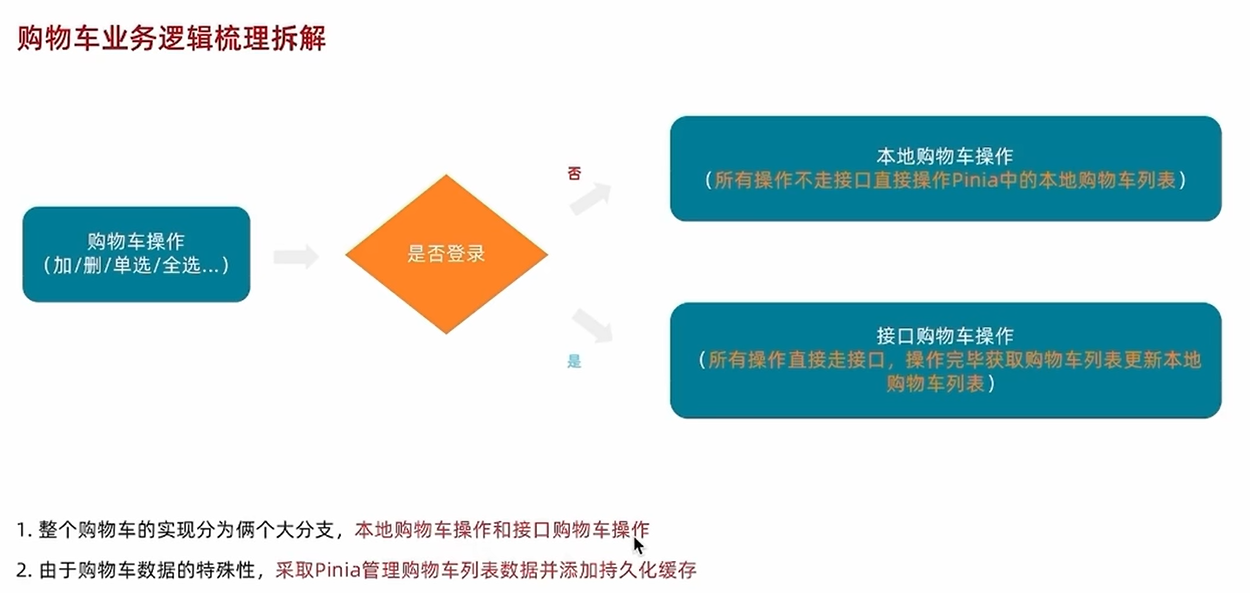
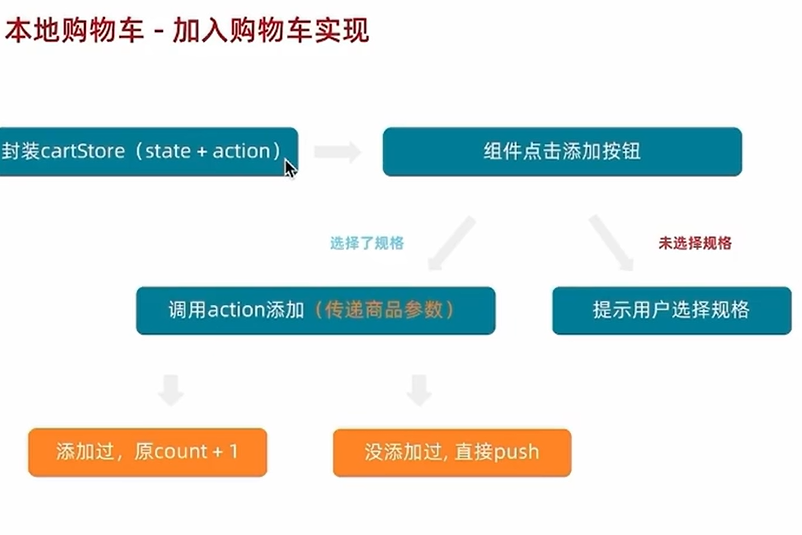
本地购物车-加入购物车
pinia中的逻辑
import { defineStore } from "pinia";
import { ref } from "vue";
export const useCartStore = defineStore('cart',()=>{//购物车列表const cartList = ref([]);const addCart = (goods)=>{const item = cartList.value.find((item)=>item.skuId===goods.skuId)//添加过count+添加的count;//没有添加过直接pushif(item){item.count = item.count+goods.count}else{cartList.value.push(goods)}}return {cartList,addCart}
})
这里有一个方法值得学习:
Array.find()方法的作用是查找数组中第一个满足条件的元素,所有返回的是元素不是boolean值
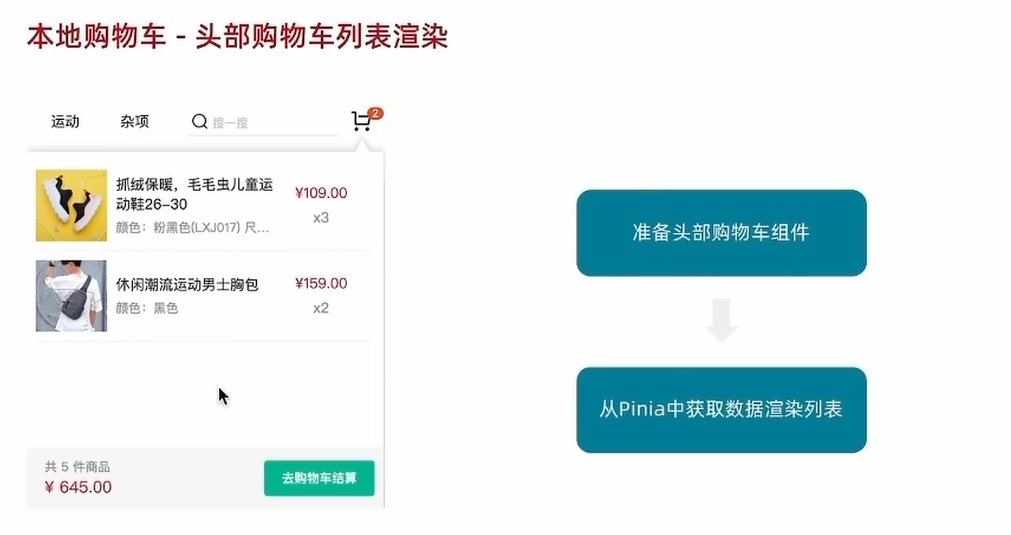
本地购物车-头部购物车列表渲染
本地购物车-头部购物车删除实现
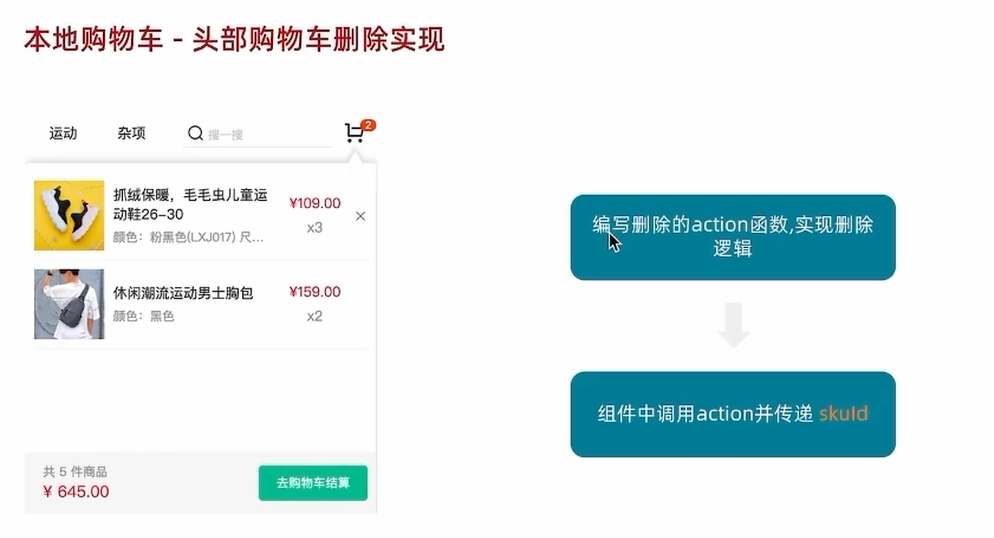
import { defineStore } from "pinia";
import { ref } from "vue";
export const useCartStore = defineStore('cart',()=>{//购物车列表const cartList = ref([]);const addCart = (goods)=>{const item = cartList.value.find((item)=>item.skuId===goods.skuId)//添加过count+添加的count;//没有添加过直接pushif(item){item.count = item.count+goods.count}else{cartList.value.push(goods)}}//购物车删除功能const delCart = (skuId) =>{const id = cartList.value.findIndex((item)=>item.skuId===skuId)cartList.value.splice(id,1);}return {cartList,addCart,delCart}
},{persist: true,},)同样这里也有一个值得我们学习的方法:Array.findIndex() 方法的作用是查找数组中第一个满足条件的元素的下标,所有返回的是元素不是boolean值
本地购物车-头部购物车统计计算
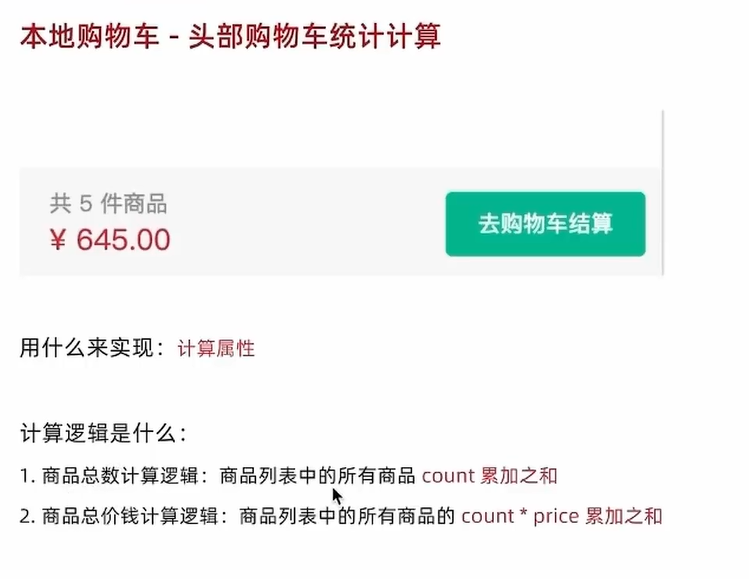
import { defineStore } from "pinia";
import { computed, ref } from "vue";
export const useCartStore = defineStore('cart',()=>{//购物车列表const cartList = ref([]);const addCart = (goods)=>{const item = cartList.value.find((item)=>item.skuId===goods.skuId)//添加过count+添加的count;//没有添加过直接pushif(item){item.count = item.count+goods.count}else{cartList.value.push(goods)}}//购物车删除功能const delCart = (skuId) =>{const id = cartList.value.findIndex((item)=>item.skuId===skuId)cartList.value.splice(id,1);}//计算总数量const allCount = computed(()=>cartList.value.reduce((a,c)=>a+c.count,0))//计算总价格const allPrice = computed(()=>cartList.value.reduce((a,c)=>a+c.count*c.price,0))return {cartList,allCount,allPrice,addCart,delCart,}
},{persist: true,},)
Array.reduce() 是 JavaScript 数组的一个高阶方法,主要用于将数组中的所有元素通过一个累加器函数进行处理,最终合并为一个单一的值。
还有一个就是这里价格要保留两位小数我们可以使用.toFixed(2)来使得它保留两位小数,例如:{{ cartStore.allPrice.toFixed(2)}}
本地购物车-列表购物车
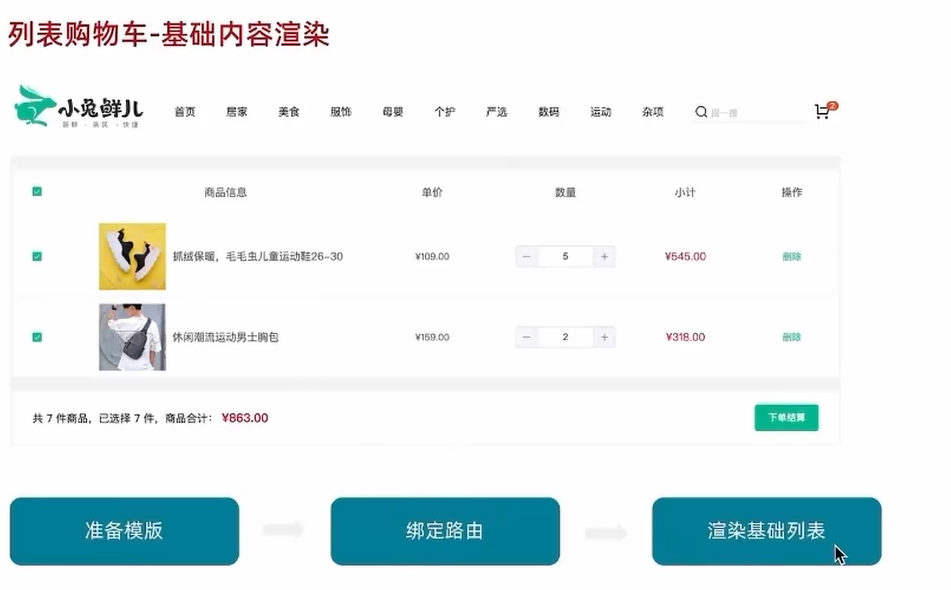
路由跳转可以使用$router.push('/cartlist'),如果是在script中进行跳转可以引入useRouter
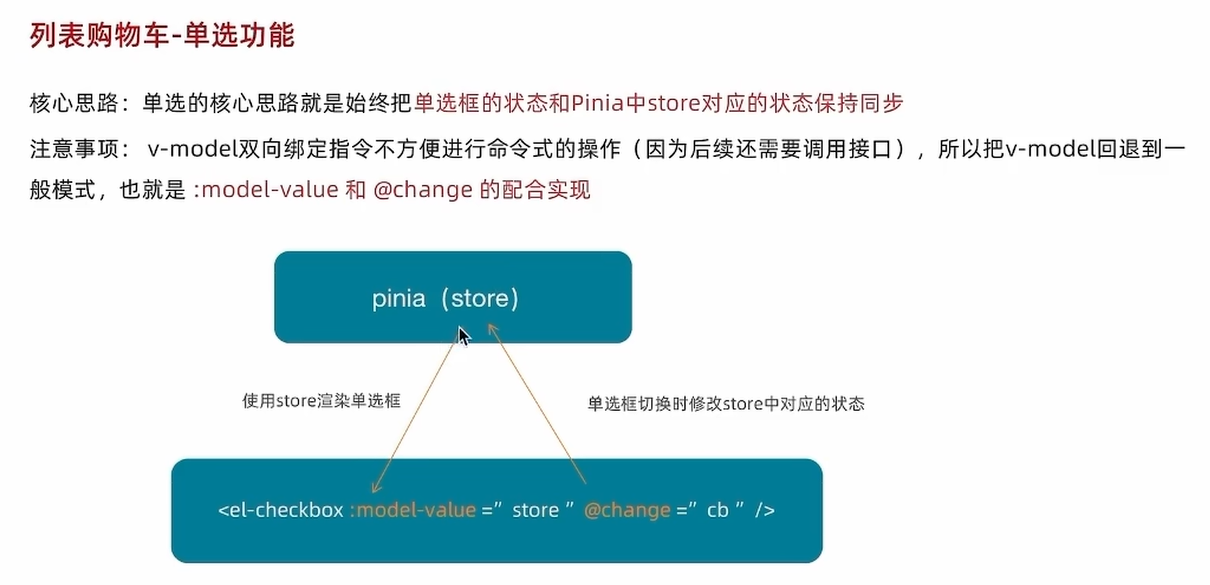
列表购物车单选功能
列表购物车全选功能
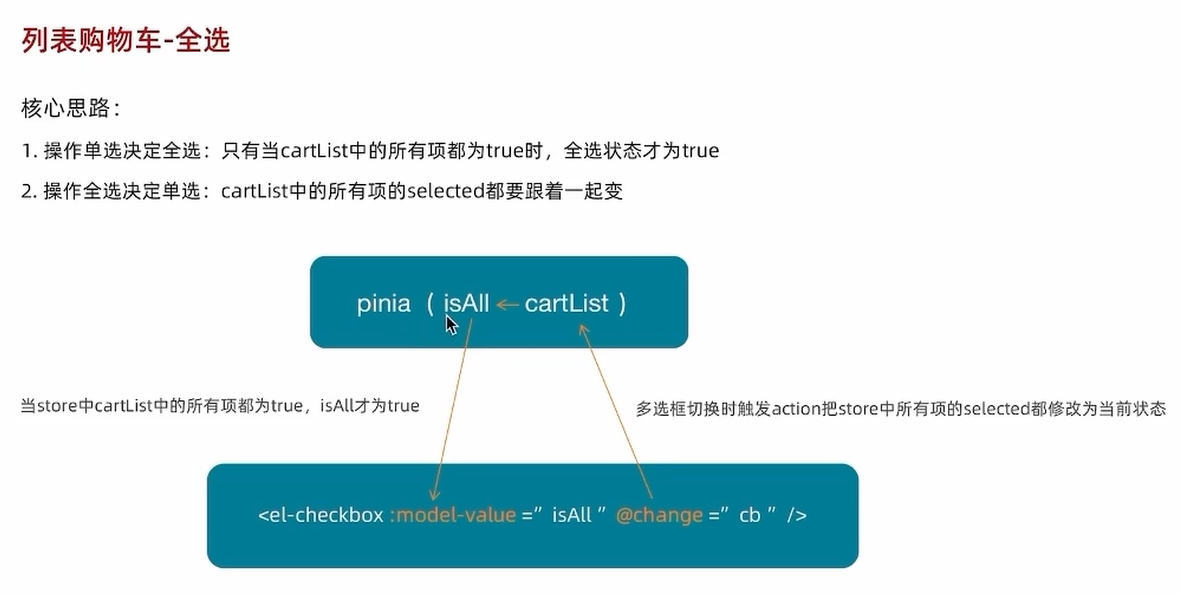
const allSelected = computed(()=>cartList.value.every((item)=>item.selected))使用every方法
列表购物车-统计数据实现
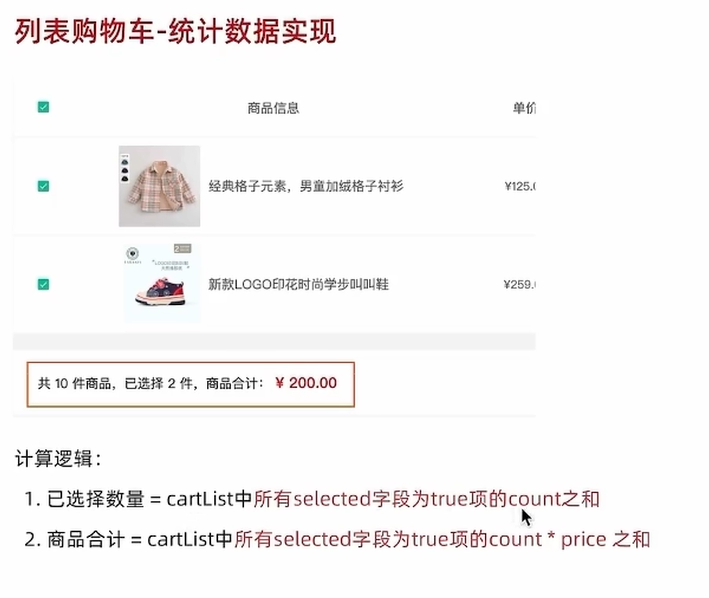
const checkCount = computed(() => cartList.value.filter(item => item.selected).reduce((a, c) => a + c.count, 0))
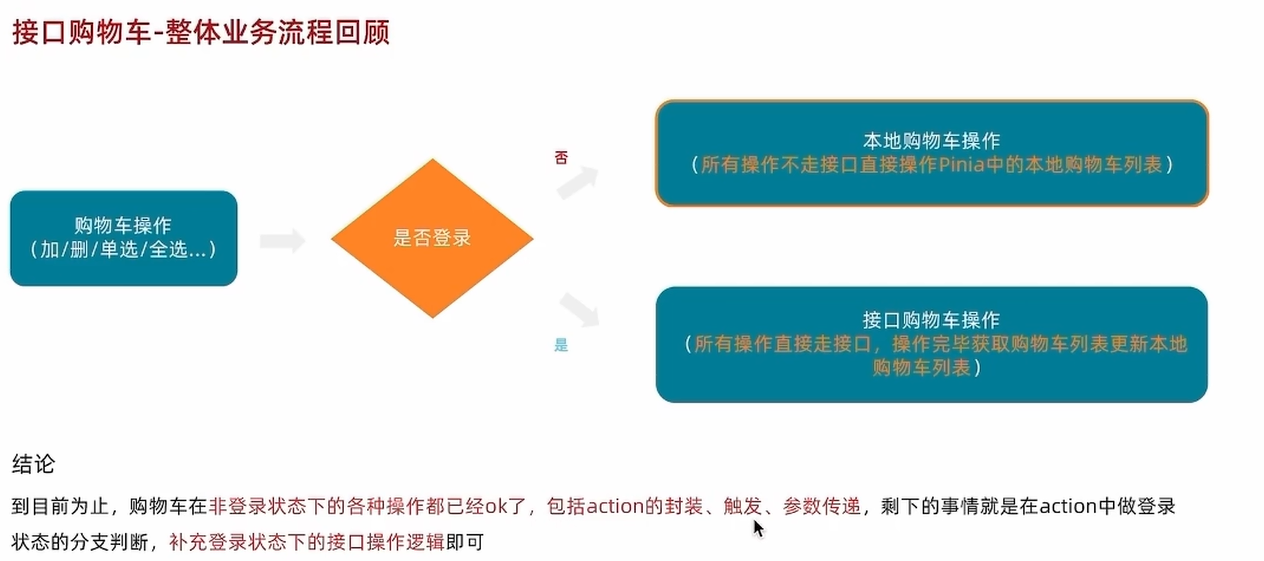
接口购物车
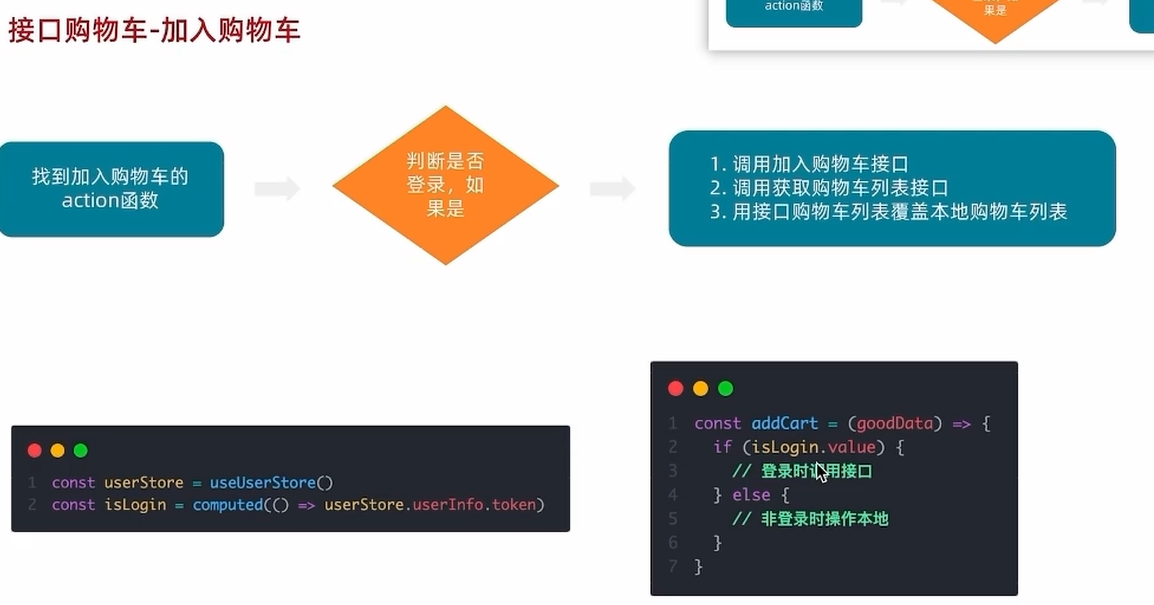
接口购物车-加入购物车
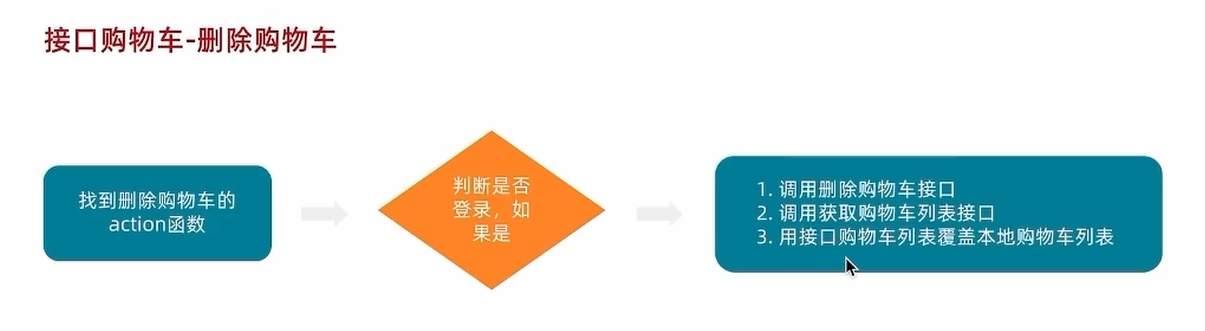
接口购物车-删除购物车
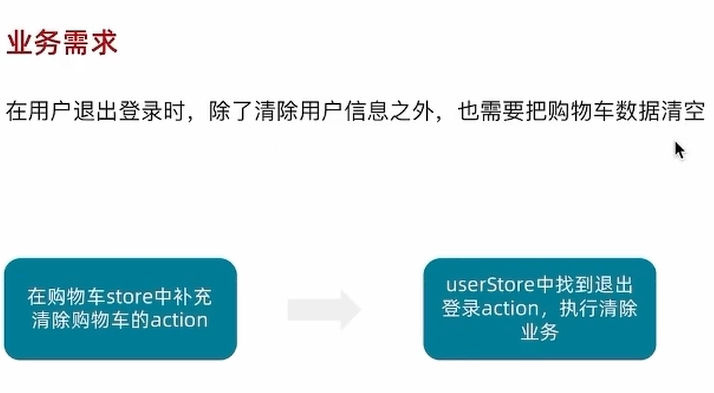
退出登录-清空购物车列表
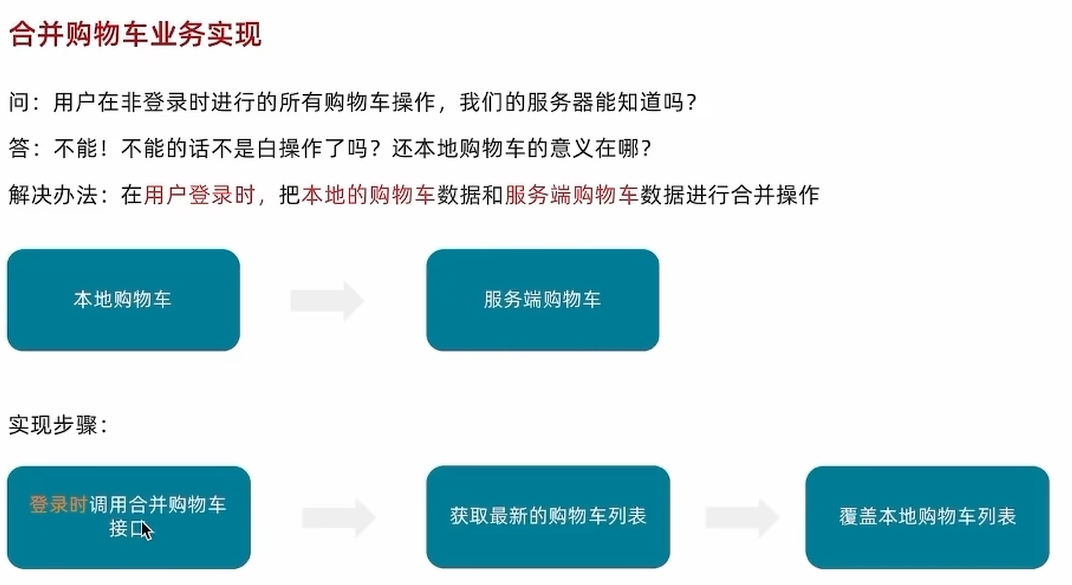
合并本地购物车到服务器
结算模块
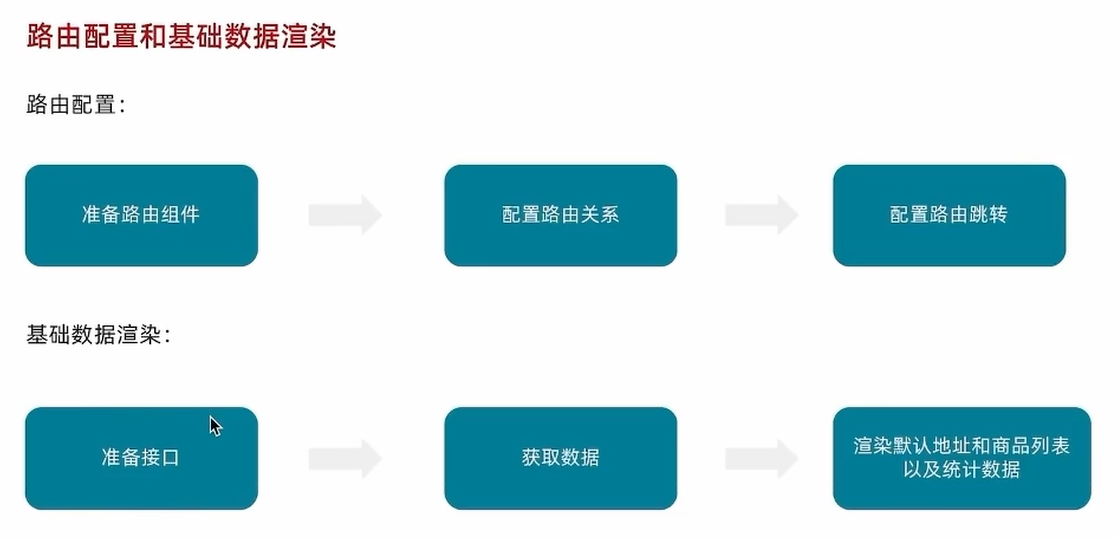
结算模块-路由配置和基础数据渲染
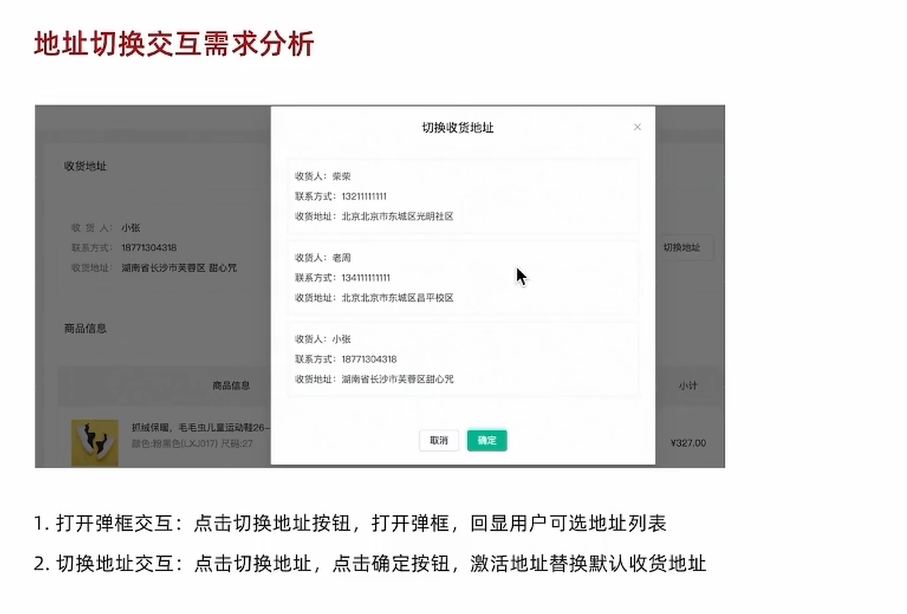
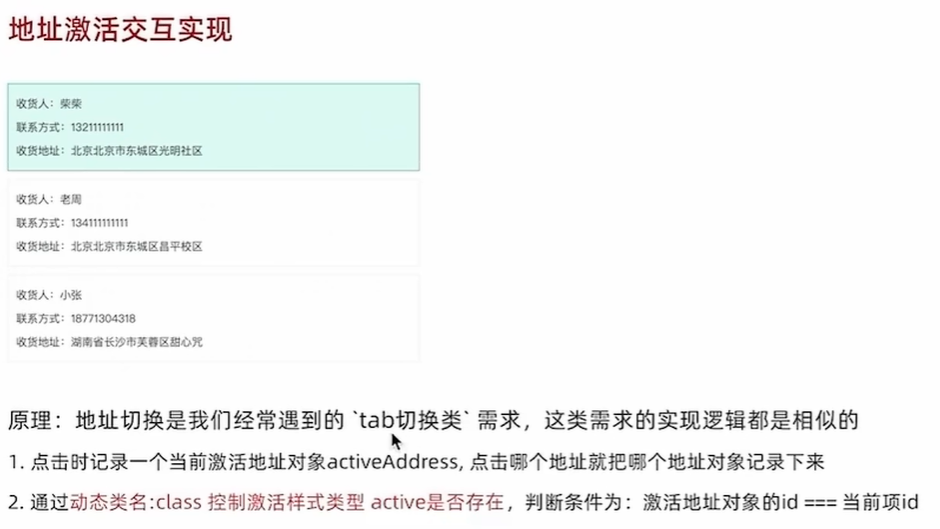
结算模块-地址切换交互实现


订单模块
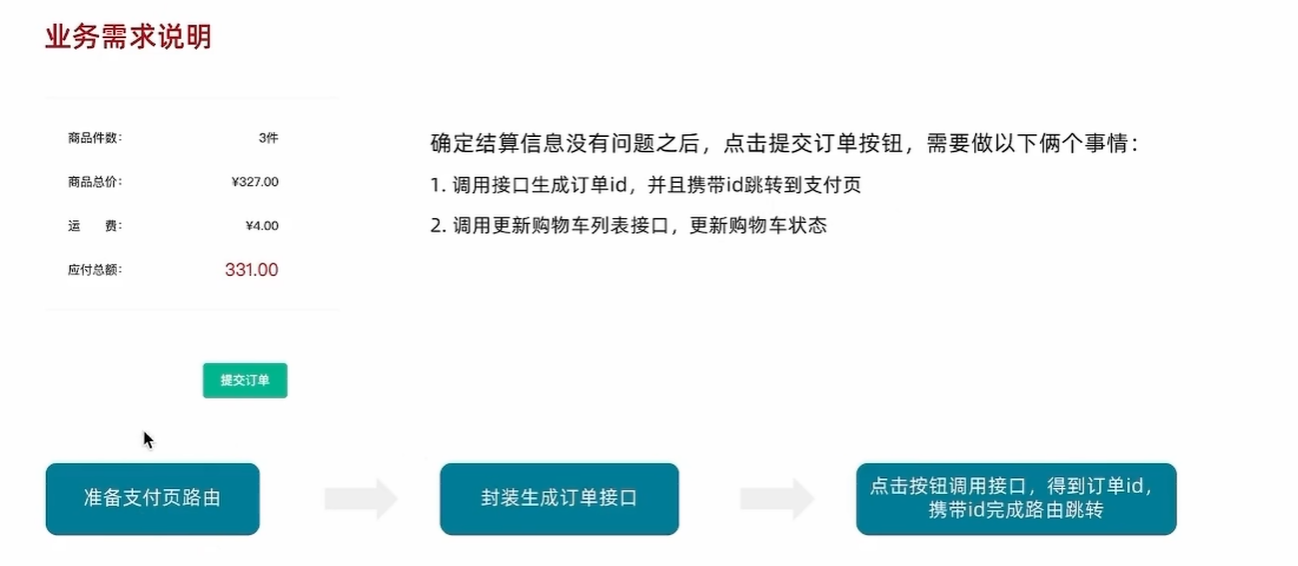
订单模块-生成订单功能实现
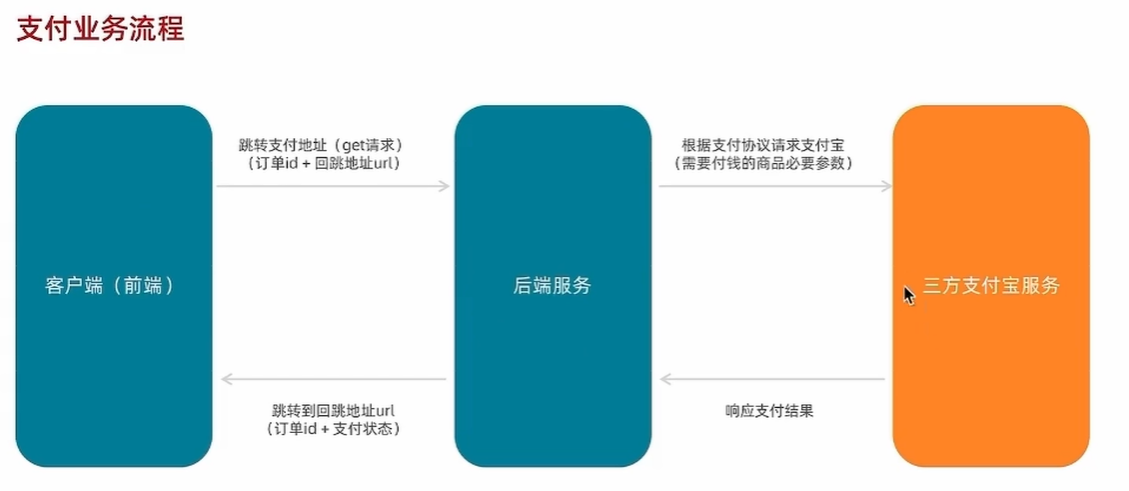
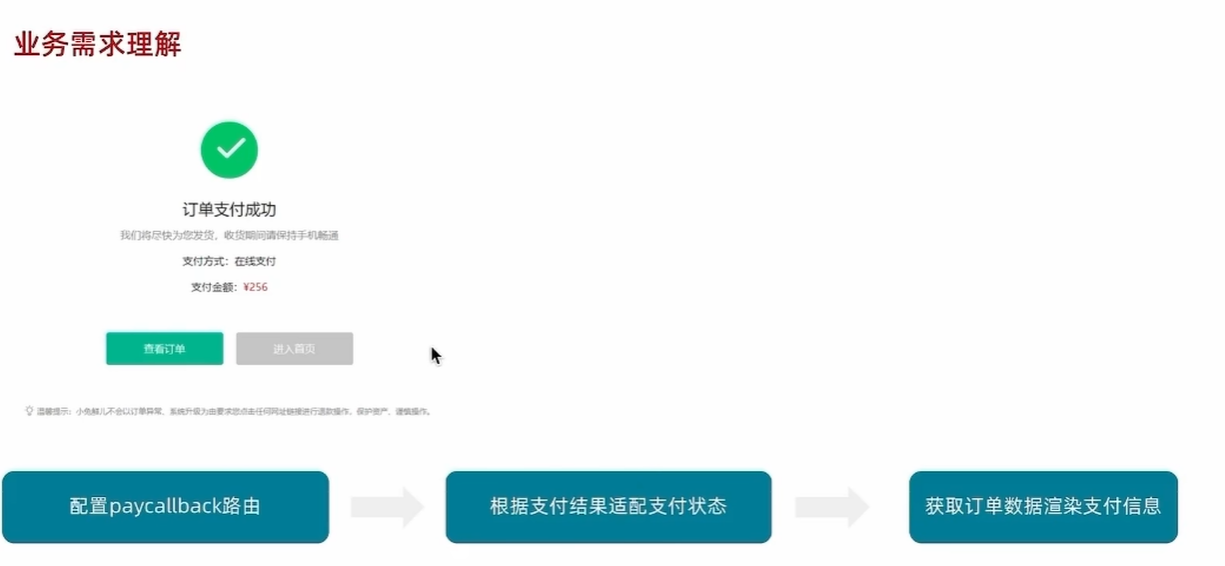
支付模块
支付模块-渲染基础数据

支付功能-实现支付功能
支付模块-支付结果展示
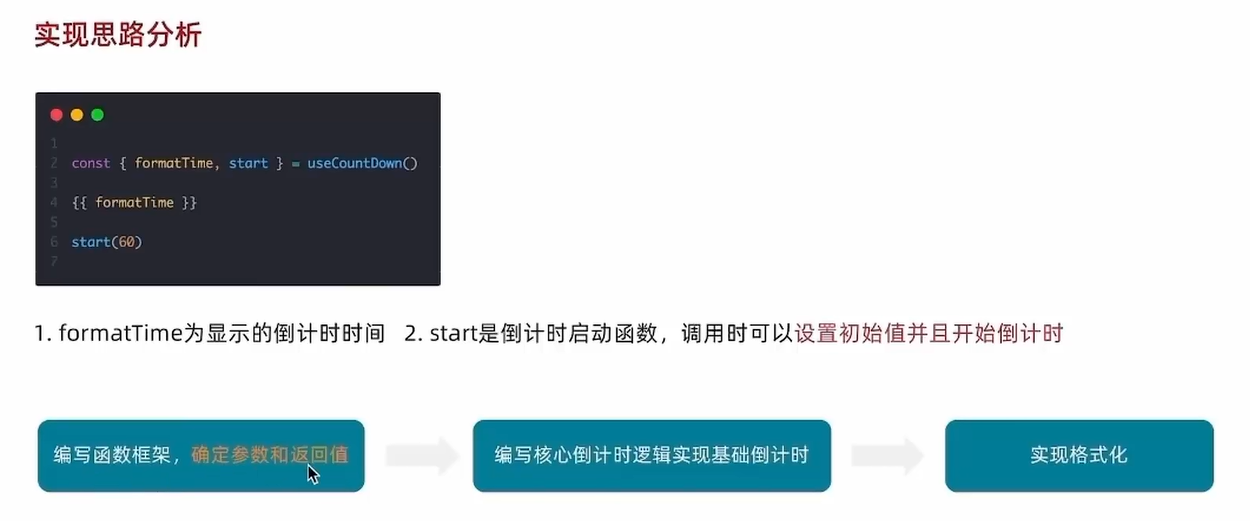
支付模块-封装倒计时函数
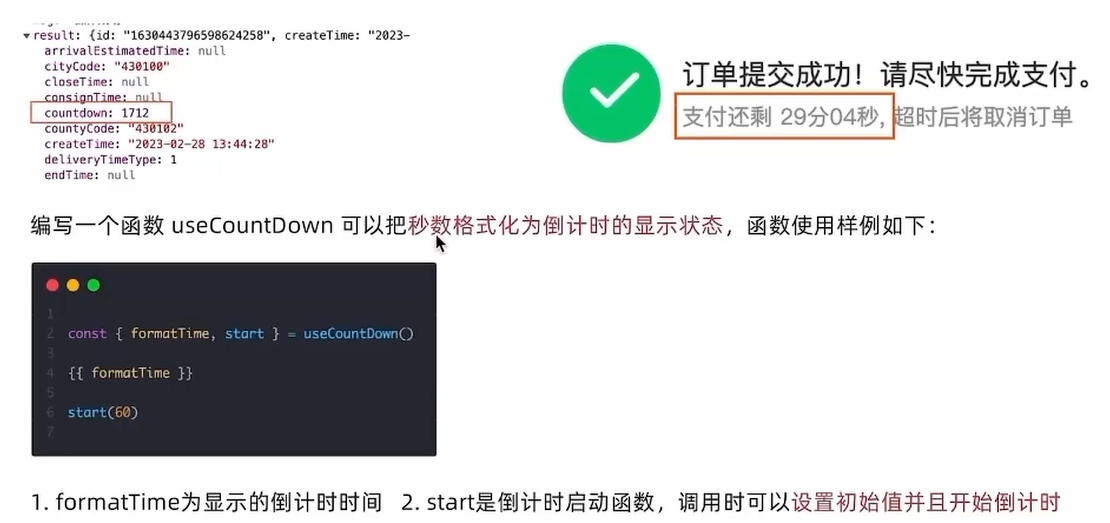
需要使用npm i dayjs然后import dayjs from 'dayjs'来写倒计时函数代码如下:
import {computed, onUnmounted, ref} from 'vue'
import dayjs from 'dayjs'
//封装倒计时逻辑函数
export const useCountDown = ()=>{let timer = null//响应式数据const time = ref(0)const formatTime = computed(()=>dayjs.unix(time.value).format('mm分ss秒'))//开始倒计时方法const start = (currentTime)=>{time.value = currentTime//开始倒计时逻辑timer = setInterval(()=>{time.value--;},1000)}//组件销毁时清除定时器onUnmounted(()=>{timer&& clearInterval(timer)})return {formatTime,start}
}
dayjs 是一个轻量级的 JavaScript 日期处理库,主要作用是简化日期时间的解析、格式化、计算和操作等操作。
JavaScript 原生的 Date 对象并没有内置 format() 方法,无法直接像 dayjs 那样通过简单的格式字符串(如 'YYYY-MM-DD')来格式化日期。
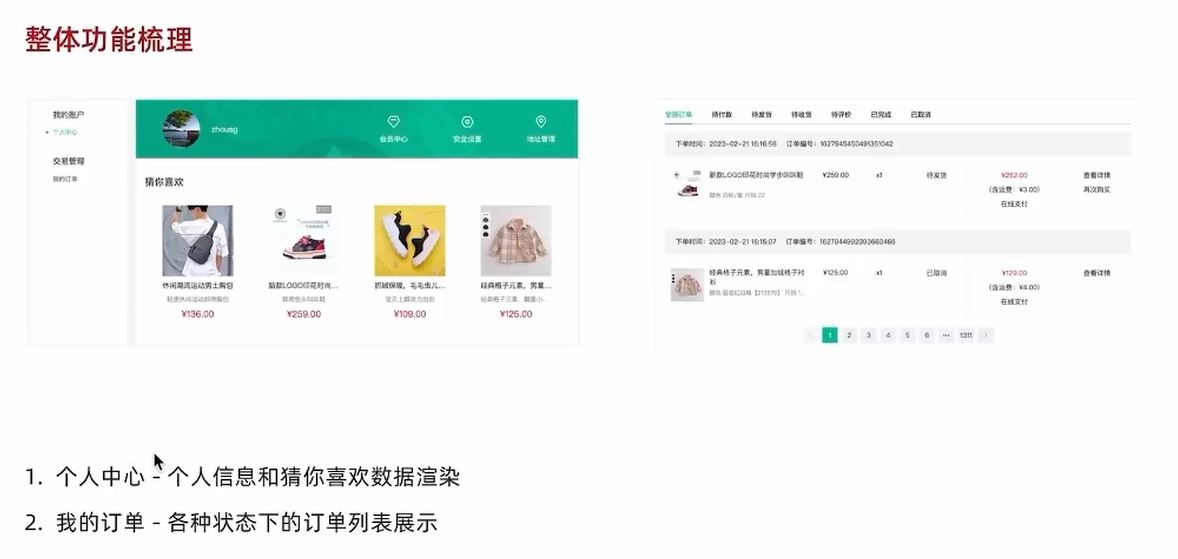
会员中心
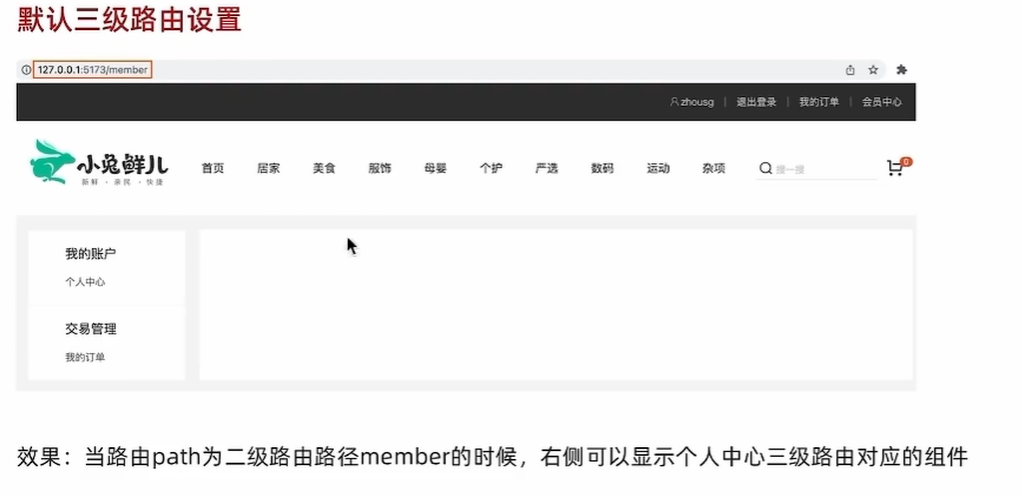
会员中心-整体功能梳理和路由配置
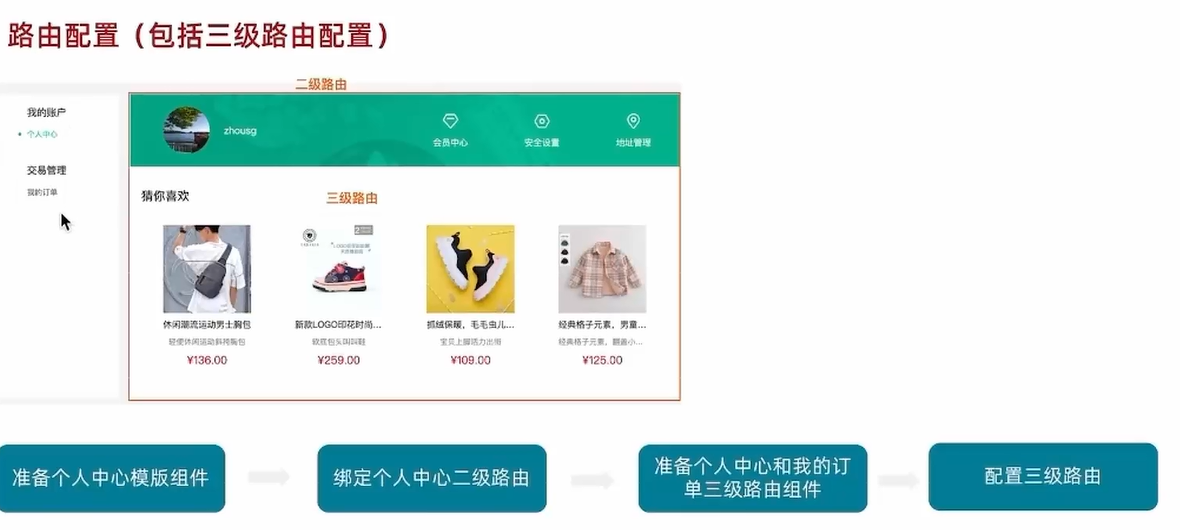
注意:在配置路由时子路由不需要添加/符号
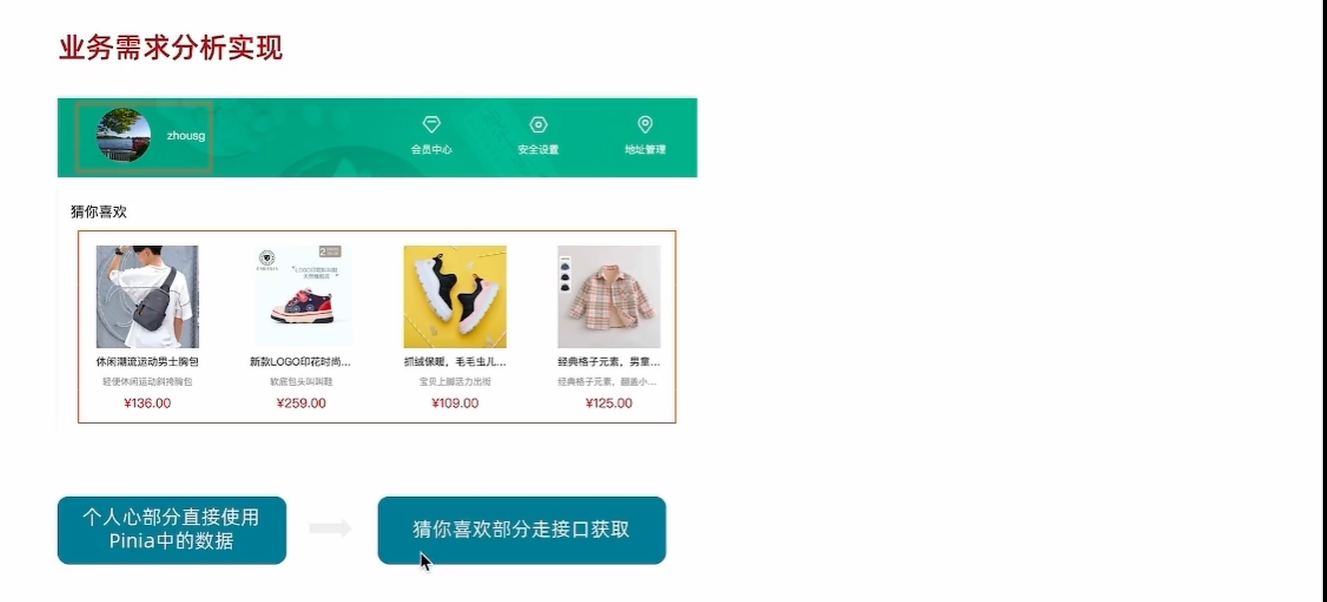
会员中心-个人中心信息渲染
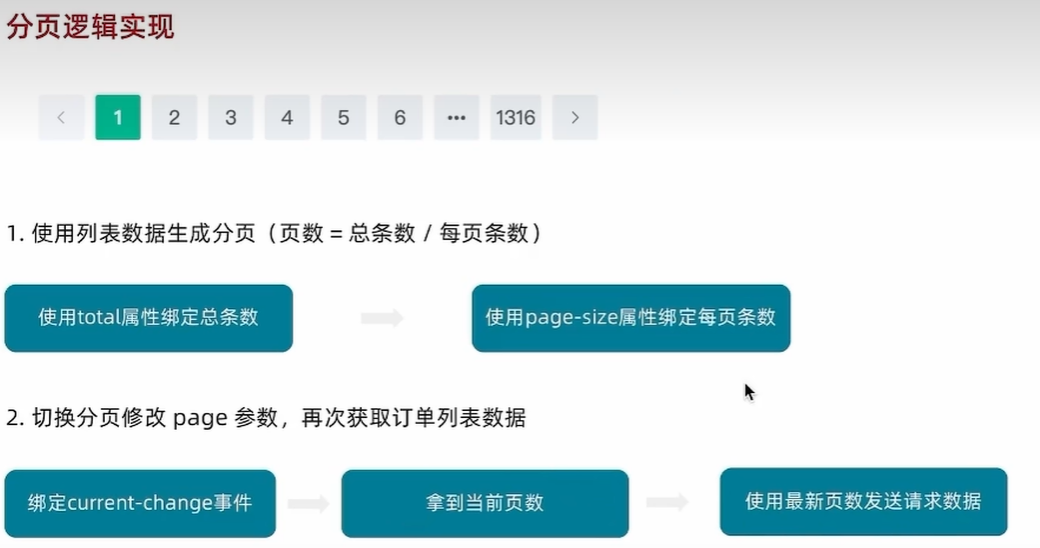
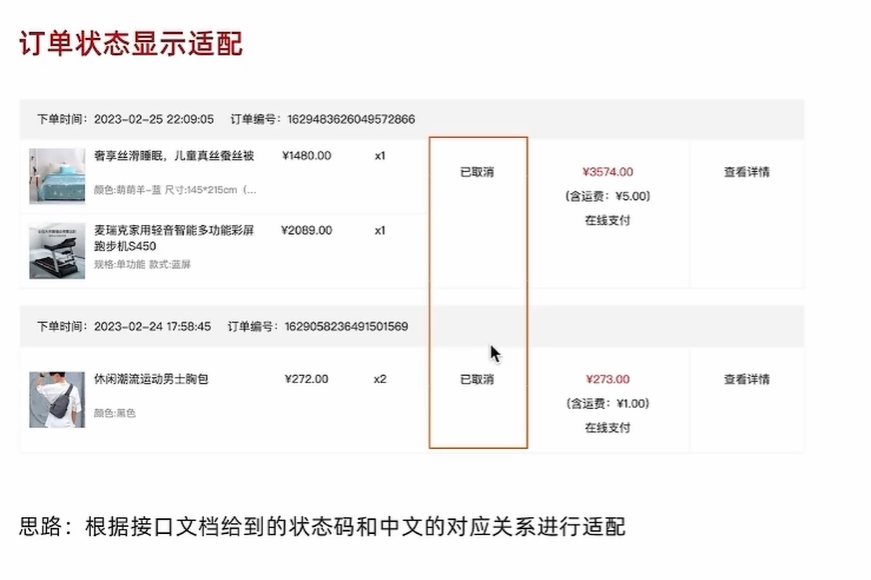
会员中心-我的订单

tab切换实现

分页实现
会员中心-细节优化
拓展
SKU组件封装

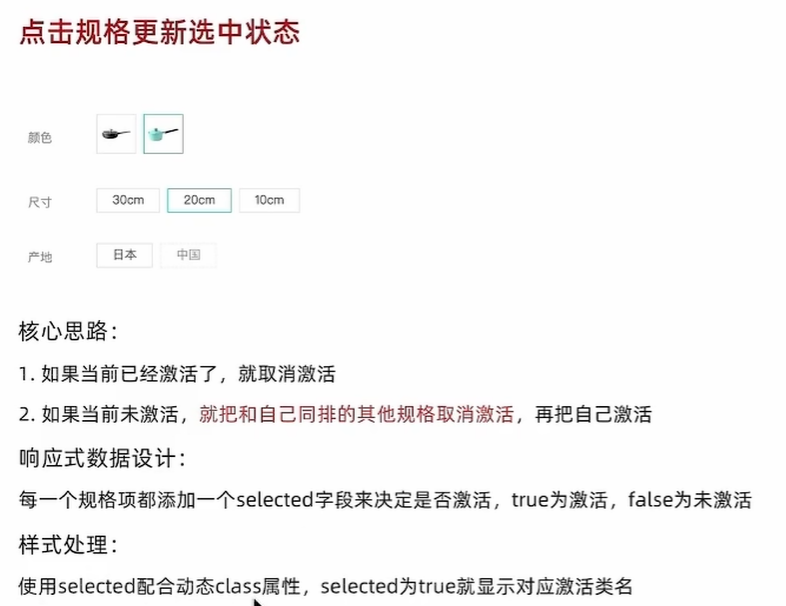
点击规格更新使用状态
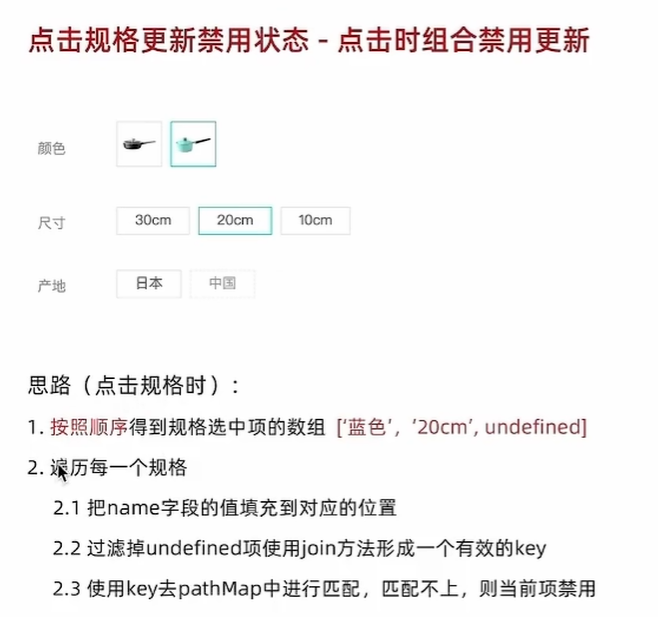
点击规格更新禁用状态
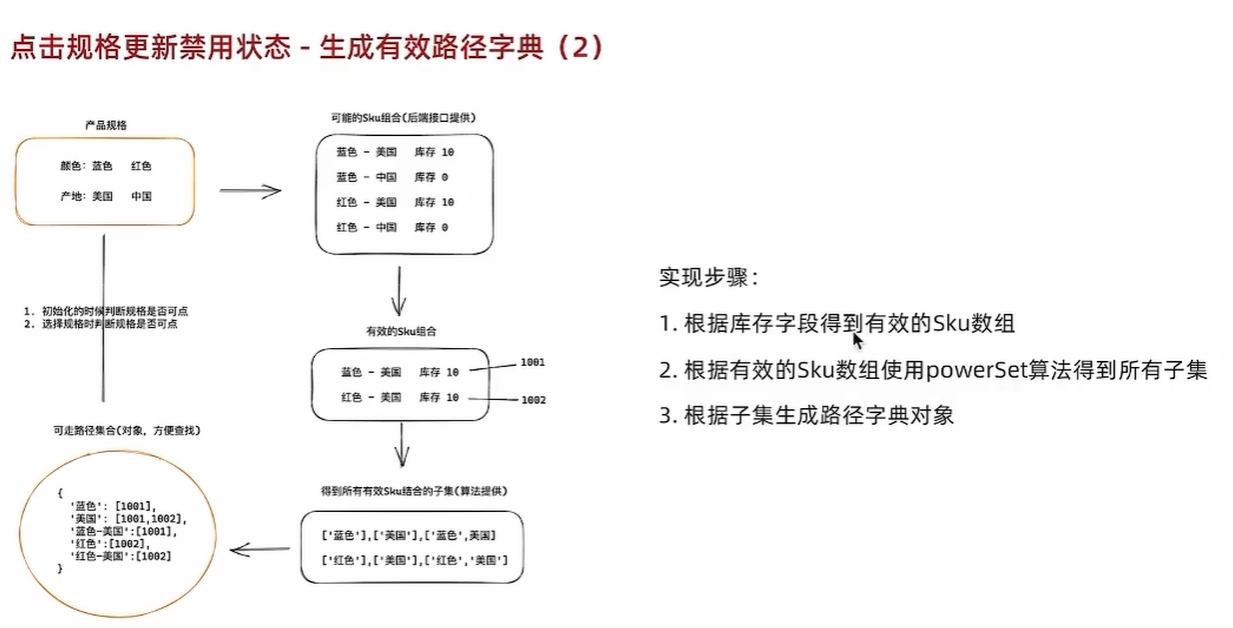
生成有效路径字典

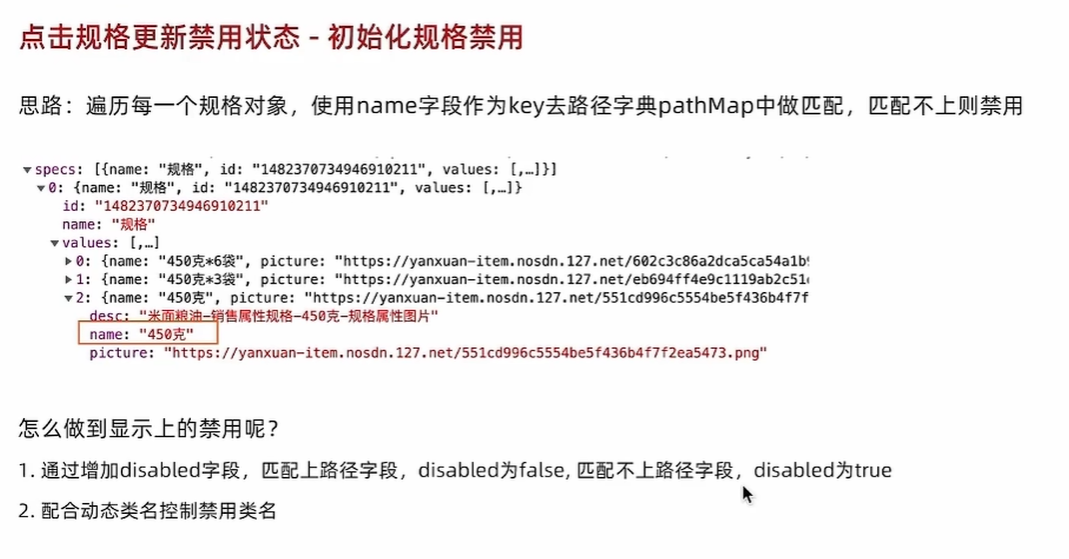
初始化规格禁用
点击时组合禁用更新
产出有效SKU信息

拓展完整代码如下:
export default function bwPowerSet(originalSet) {const subSets = []// We will have 2^n possible combinations (where n is a length of original set).// It is because for every element of original set we will decide whether to include// it or not (2 options for each set element).const numberOfCombinations = 2 ** originalSet.length// Each number in binary representation in a range from 0 to 2^n does exactly what we need:// it shows by its bits (0 or 1) whether to include related element from the set or not.// For example, for the set {1, 2, 3} the binary number of 0b010 would mean that we need to// include only "2" to the current set.for (let combinationIndex = 0; combinationIndex < numberOfCombinations; combinationIndex += 1) {const subSet = []for (let setElementIndex = 0; setElementIndex < originalSet.length; setElementIndex += 1) {// Decide whether we need to include current element into the subset or not.if (combinationIndex & (1 << setElementIndex)) {subSet.push(originalSet[setElementIndex])}}// Add current subset to the list of all subsets.subSets.push(subSet)}return subSets
}
<script setup>
import { onMounted, ref } from 'vue'
import axios from 'axios'
import powerSet from './powerSet'
// 商品数据
const goods = ref({})
let pathMap = {}
const getGoods = async () => {// 1135076  初始化就有无库存的规格// 1369155859933827074 更新之后有无库存项(蓝色-20cm-中国)const res = await axios.get('http://pcapi-xiaotuxian-front-devtest.itheima.net/goods?id=1369155859933827074')goods.value = res.data.resultpathMap = getPathMap(goods.value)console.log(pathMap);initDisabledStatus(goods.value.specs,pathMap)}
onMounted(() => getGoods())
//切换选中状态
const changeSku = (item,val)=>{if(val.disabled)returnif(val.selected){val.selected = false}else{item.values.forEach(val=>val.selected=false)val.selected = true}pathMap = getPathMap(goods.value)updateDisabledStatus(goods.value.specs,pathMap)//产出SKU对象数据const index = getSelectedValues(goods.value.specs).findIndex(item => item===undefined)if(index>-1){console.log('找到了,信息不完整');}else{console.log('没有找到,信息完整,可以产出');//获取SKU对象const key = getSelectedValues(goods.value.specs).join('-')const skuIds = pathMap[key]console.log(skuIds);//以skuId作为匹配项去goods.value.skus数组中找const skuObj = goods.value.skus.find(item=>item.id===skuIds[0])console.log(skuObj);}
}
//生成有效路径字典对象
const getPathMap = (goods)=>{const pathMap = {}//1.根据库存字段得到有效的Sku数组const effectiveSkus = goods.skus.filter(sku=>sku.inventory>0)//2.根据有效的Sku数组使用powerSet算法得到所有子集effectiveSkus.forEach(sku=>{//2.1获取匹配的valueName组成的数组const selectedValArr = sku.specs.map(val=>val.valueName)//2.2使用算法获取子集const valueArrPowerSet = powerSet(selectedValArr)//3.把得到子集生成最终的路径字典对象valueArrPowerSet.forEach(arr=>{//初始化key 数组join -> 字符串 对象的keyconst key = arr.join('-')//如果已经存在当前key了 就往数组中直接添加skuId 如果不存在key 直接做赋值if(pathMap[key]){pathMap[key].push(sku.id)}else{pathMap[key] = [sku.id]}})})//3.根据子集生成路径字典对象return pathMap
}
//初始化禁用状态
const initDisabledStatus = (specs,pathMap)=>{specs.forEach(spec=>{spec.values.forEach(val=>{if(pathMap[val.name]){val.disabled = false}else{val.disabled = true}})})
}
//获取选项中匹配数组
const getSelectedValues = (specs)=>{const arr = []specs.forEach(spec=>{const selectedVal = spec.values.find(item=>item.selected)arr.push(selectedVal?selectedVal.name:undefined)})return arr;
}
//切换时更新禁用状态
const updateDisabledStatus = (specs,pathMap)=>{specs.forEach((spec,index)=>{const selectedValues = getSelectedValues(specs)spec.values.forEach(val=>{selectedValues[index] = val.nameconst key = selectedValues.filter(value=>value).join('-')if(pathMap[key]){val.disabled = false}else{val.disabled = true}})})
}
</script><template><div class="goods-sku"><dl v-for="item in goods.specs" :key="item.id"><dt>{{ item.name }}</dt><dd><template v-for="val in item.values" :key="val.name"><!-- 图片类型规格 --><img v-if="val.picture" :src="val.picture" :title="val.name" @click="changeSku(item,val)" :class="{selected:val.selected,disabled:val.disabled}"><!-- 文字类型规格 --><span v-else @click="changeSku(item,val)" :class="{selected:val.selected,disabled:val.disabled}">{{ val.name }}</span></template></dd></dl></div>
</template><style scoped lang="scss">
@mixin sku-state-mixin {border: 1px solid #e4e4e4;margin-right: 10px;cursor: pointer;&.selected {border-color: #27ba9b;}&.disabled {opacity: 0.6;border-style: dashed;cursor: not-allowed;}
}.goods-sku {padding-left: 10px;padding-top: 20px;dl {display: flex;padding-bottom: 20px;align-items: center;dt {width: 50px;color: #999;}dd {flex: 1;color: #666;>img {width: 50px;height: 50px;margin-bottom: 4px;@include sku-state-mixin;}>span {display: inline-block;height: 30px;line-height: 28px;padding: 0 20px;margin-bottom: 4px;@include sku-state-mixin;}}}
}
</style>