SSH服务远程安全登录
一、SSH服务
- 提供安全的远程登录
- 是应用层协议
1.ssh服务相关参数
- 软件包:openssh
- 服务名:sshd
- 默认端口:22
- 主配置文件:/etc/ssh/sshd_config
- 日志配置文件:/var/log/secure
- 连接方式:ssh 用户名@IP地址
- 安全性:在数据传输过程中进行加密
2.对称加密和非对称加密
- 加密过程:原文——加密算法——密文
- 解密过程:密文——解密算法——原文
对称加密:(如ssh密码登录、压缩、电影、密码本等)
- 本质:加密秘钥和解密密钥使用同一套秘钥
- 优点:维护一种秘钥,加密解密速度快
- 不足:秘钥管理困难,容易泄露
非对称加密:(如ssh免密登录)
- 本质:公钥加密、私钥解密(密钥对=公钥+私钥)
- 公钥加密的密文只能通过对应的私钥进行解密
- 通过公钥推理出私钥的可能性非常小,复杂,安全性强
3.ssh远程登录过程
- 客户端发起连接请求
- 双方密钥交换、建立会话密钥(sessionKey,对称加密方式)
- 服务器端验证客户端身份(加密通道中传输)
- 验证客户端成功,安全会话建立
注:验证客户端身份的方式:通过密码验证;通过密钥验证,即免密登录
二、密码验证
1.密码验证原理

- 验证内容:服务器端公钥、客户端的用户名和密码(复杂性)
- 验证结果:第一次连接需要验证服务器公钥,保存公钥后,每次连接只需要输入用户名和密码
- 查看公钥:xshell——工具——主机秘钥管理者;~/.ssh/know-hosts
- 验证公钥:连公网服务器——搜信息;连局域网服务器——接收公钥、对比
建议:将图片分为上下两个部分来理解
2.密码验证方式
步骤一:准备两台客户机
客户机(77.78)——服务器(77.77)
步骤二:连接服务器
#第一次连接时会有一个接收服务器公钥的过程,这里我之前已经连接过了,所以可以直接输入密码
[root@localhost ~]# ssh 192.168.77.77
root@192.168.77.77's password:
Last login: Sat Sep  6 09:10:54 2025 from 192.168.77.1
[root@localhost ~]# exit
注销
Connection to 192.168.77.77 closed.[root@localhost ~]# ssh root@192.168.77.77
root@192.168.77.77's password:
Last login: Sat Sep  6 11:36:30 2025 from 192.168.77.78[root@localhost ~]# ip add2: ens160: <BROADCAST,MULTICAST,UP,LOWER_UP> mtu 1500 qdisc mq state UP group default qlen 1000link/ether 00:0c:29:f6:d2:16 brd ff:ff:ff:ff:ff:ffaltname enp3s0inet 192.168.77.77/24 brd 192.168.77.255 scope global noprefixroute ens160valid_lft forever preferred_lft foreverinet6 fe80::20c:29ff:fef6:d216/64 scope link noprefixroute valid_lft forever preferred_lft forever
步骤三:在未远程登录的情况下,操作服务器,开启httpd服务
客户端(77.78)
[root@localhost ~]# ssh 192.168.77.77 "systemctl start httpd"
The authenticity of host '192.168.77.77 (192.168.77.77)' can't be established.
ED25519 key fingerprint is SHA256:xex7q7p2YumsihMiHV+sWj+PcDMYRC0M8Dqls6KiZI0.
This key is not known by any other names
Are you sure you want to continue connecting (yes/no/[fingerprint])? yes
Warning: Permanently added '192.168.77.77' (ED25519) to the list of known hosts.
root@192.168.77.77's password:
[root@localhost ~]#
服务端(77.77)
[root@localhost ~]# ss -anpt | grep :80
LISTEN    0      511                *:80                *:*     users:(("httpd",pid=1757,fd=4),("httpd",pid=1756,fd=4),("httpd",pid=1755,fd=4),("httpd",pid=1753,fd=4))
注:省略模式下,默认以当前客户机上同名用户远程登录服务器
三、密钥验证
1.密钥验证原理
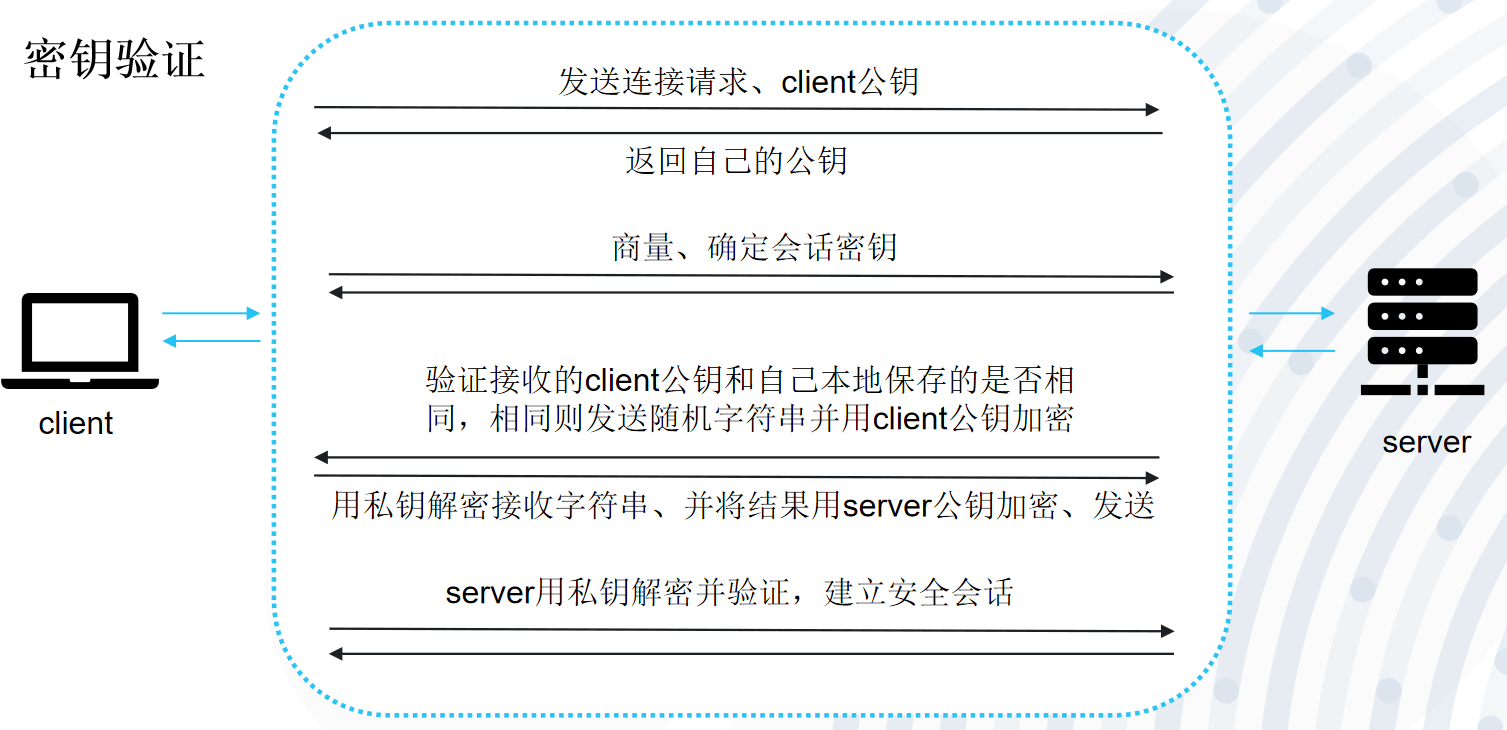
注:验证前需要先将客户端的公钥放到服务器端(ssh-copy-id命令);且正常情况下,公网和私网之间的服务器和客户端没有办法免密登录,因为私有ip可重复,无法进行身份认证。
- 优点:可以实现主机间的免密登录
- 验证内容:服务器端公钥、客户端公钥
相关密钥文件
- id_rsa:保存自己的私钥
- id_rsa.pub:保存自己的公钥
- know-hosts:保存已认证的服务器公钥
- authorized-keys:保存已授权的客户端公钥
2.密钥验证方式
步骤一:准备两台机器
客户端(77.79)——服务端(77.77)
步骤二:客户端生成密钥对文件
[root@localhost ~]# ssh-keygen -t rsa -b 2048
Generating public/private rsa key pair.
Enter file in which to save the key (/root/.ssh/id_rsa):
Enter passphrase (empty for no passphrase):
Enter same passphrase again:
Your identification has been saved in /root/.ssh/id_rsa
Your public key has been saved in /root/.ssh/id_rsa.pub
The key fingerprint is:
SHA256:1XSZKFlnx3wMquJc864Ri2A8N9qJBupG1/tsZDxVSP4 root@localhost.localdomain
The key's randomart image is:
+---[RSA 2048]----+
|         ..+o.=B.|
|         .+oo=o.=|
|          ooo   .|
|     .   ..o     |
|    ..=.S.= E    |
|  ...o.X=* =     |
| ...  ++*.o .    |
| ..  ....  o     |
| ..    oo ...    |
+----[SHA256]-----+
[root@localhost ~]# ls -a
.   anaconda-ks.cfg  .bash_logout   .bashrc  .config  .lesshst             ng.txt  .tcshrc
..  .bash_history    .bash_profile  cat.sh   .cshrc   nginx-1.26.3.tar.gz  .ssh    .viminfo
[root@localhost ~]# ls .ssh/
id_rsa id_rsa.pub- 客户端生成密钥对文件。-t指定加密类型(rsa或dsa)、-b指定密钥对加密长度
- 交互1:密钥对保存位置,默认在该用户家目录的.ssh目录下
- 交互2:是否对密钥文件加密。若加密在调用密钥文件时需要先验证密钥密码再使用密钥文件;若不加密则密钥文件可直接调用、整个登录过程不用输入任何密码,即免密登录
步骤三:客户端提前发送服务器一份公钥
#将公钥文件上传到服务器。-i指定上传的公钥文件位置和文件名,默认是id_rsa.pub
[root@localhost ~]# ssh-copy-id root@192.168.77.77
/usr/bin/ssh-copy-id: INFO: Source of key(s) to be installed: "/root/.ssh/id_rsa.pub"
/usr/bin/ssh-copy-id: INFO: attempting to log in with the new key(s), to filter out any that are already installed
/usr/bin/ssh-copy-id: INFO: 1 key(s) remain to be installed -- if you are prompted now it is to install the new keys
root@192.168.77.77's password: #输入服务器端密码Number of key(s) added: 1Now try logging into the machine, with:   "ssh 'root@192.168.77.77'"
and check to make sure that only the key(s) you wanted were added.[root@localhost ~]#
步骤四:查看客户端(id_rsa.pub)和发送给服务器端的公钥(authorized_keys)是否相等
客户端:
[root@localhost .ssh]# cat id_rsa.pub
ssh-rsa AAAAB3NzaC1yc2EAAAADAQABAAABAQCw/oSDyMsU/t7GBPLWE3paO11cVBhM5JECMHTpgWqFIl4hWzAnGLZMYaEkTlg+56kKjZPFzfWgkp14tqW8/SnxswVf8m4NORpjyLmykx4pQVmNGn0Ikot1+ZbO6cSoJTnLAVwCtr2kKtqCWhgVAuHDAEAJqFozWCOTiBCxUCE4DQg5cuHylBZLpsNCTpKQsW4YZRoi1PfewEtGOH8x0k5to4B/D+WL/Fmdwlv6nMiP1kdyg6nKTFc0ZOrXID3FM1u2wu+ZmPmSywYox0H/O6Mv1c8Ae5OCSDi/eChne1ROwZoia7WNN/yC808lmoo1n7YtYl0Ta7hKgiLc7oVa/2e1 root@localhost.localdomain
服务端:
[root@localhost .ssh]# cat authorized_keys
ssh-rsa AAAAB3NzaC1yc2EAAAADAQABAAABAQCw/oSDyMsU/t7GBPLWE3paO11cVBhM5JECMHTpgWqFIl4hWzAnGLZMYaEkTlg+56kKjZPFzfWgkp14tqW8/SnxswVf8m4NORpjyLmykx4pQVmNGn0Ikot1+ZbO6cSoJTnLAVwCtr2kKtqCWhgVAuHDAEAJqFozWCOTiBCxUCE4DQg5cuHylBZLpsNCTpKQsW4YZRoi1PfewEtGOH8x0k5to4B/D+WL/Fmdwlv6nMiP1kdyg6nKTFc0ZOrXID3FM1u2wu+ZmPmSywYox0H/O6Mv1c8Ae5OCSDi/eChne1ROwZoia7WNN/yC808lmoo1n7YtYl0Ta7hKgiLc7oVa/2e1 root@localhost.localdomain
步骤五:在客户端测试免密登录
[root@localhost .ssh]# ssh 192.168.77.77
Last login: Sat Sep  6 14:21:23 2025 from 192.168.77.77
[root@localhost ~]# ip add2: ens160: <BROADCAST,MULTICAST,UP,LOWER_UP> mtu 1500 qdisc mq state UP group default qlen 1000link/ether 00:0c:29:f6:d2:16 brd ff:ff:ff:ff:ff:ffaltname enp3s0inet 192.168.77.77/24 brd 192.168.77.255 scope global noprefixroute ens160
四、SSH服务配置
1.配置文件:/etc/ssh/sshd_config
- 禁止密码验证:PasswordAuthentication no(但免密登录成功设置后,还可以正常免密登录)
- 禁止使用root远程登录:PremitRootLogin no(普通用户依旧可以远程登录)
- 修改默认端口:Port 新端口(修改后,已连接的不会断,但退出后就无法通过22号端口登录)
- 显示ssh监听ip:ListenAddress 监听ip(0.0.0.0指可以监听任意一个ip;监听ip指的是本机网卡ip,可以设定只允许一张网卡远程登录)
2.保护ssh服务
- 修改配置文件选项
- 配置防护,如防火墙、TCP wrappers(B版)
补充:
1.安装虚拟机时,创建root用户后需要确定是否运行远程连接,即以下配置文件内容
[root@localhost ~]# vi /etc/ssh/sshd_config.d/01-permitrootlogin.conf # This file has been generated by the Anaconda Installer.
# Allow root to log in using ssh. Remove this file to opt-out.
PermitRootLogin yes
#设置为no代表不允许root用户远程访问
2.改端口后(假设将22改为2506),不同客户端登录的方式不一样
第一种

第二种

五、SSH相关命令
1.scp
- 加密传输,速度较慢
- 不占用资源
- 不提高系统负荷
格式:scp [-p 端口] 源文件路径 用户名@目标ip:目标位置路径
#上传
[root@localhost ~]# scp /root/123.txt root@192.168.77.77:/root/
#下载
[root@localhost ~]# scp root@192.168.77.77:/root/123.txt /root/
2.sftp
安全的文件传送协议
- 是ssh服务的一部分,依附ssh服务、没有单独的进程
- 用于linux下文件传输,采用加密技术、但传输效率较低
格式:sftp [-p 端口] 用户名@Server ip
[root@localhost ~]# sftp 192.168.77.77
root@192.168.77.77's password:     #密码
Connected to 192.168.77.77.
sftp> ls
add.txt           anaconda-ks.cfg   bik.d             cat.sh            cmatrix-1.2a      cut.txt           denglu.sh
jiance.sh         mail.txt          telephone.txt     test.txt          users.txt
sftp> get add.txt    #下载add.txt
Fetching /root/add.txt to add.txt
add.txt                                                                                     100%  717    46.8KB/s   00:00
sftp> exit
[root@localhost ~]# ls
add.txt  anaconda-ks.cfg  cat.sh
3.rsync
支持增量备份
算法:md5sum,可获取文件特征码,根据特征码变化判断是否需要备份
[root@localhost ~]# md5sum add.txt
70ebdfc945ce3b9d7a55c9ee7ffadf4a  add.txt[root@localhost ~]# echo "111" >> add.txt [root@localhost ~]# md5sum add.txt
336f51efc61404fd2845be680ba24efb  add.txt
常用选项
- -a:归档模式,表示以递归方式传输文件,并保持所有文件属性,等于-rlptgoD
- -v:详细模式输出
- -z:压缩
- --delete:如果源文件消失,目标文件也会被删除
rsync远程同步(客户端和服务端都需要安装rsync服务)
1.在基准服务器(源数据所在机器)上推送:
[root@localhost beifei]# ls
1.txt  2.txt  3.txt  4.txt  5.txt
[root@localhost beifei]# rsync -avz /root/beifei root@192.168.77.79:/root/
root@192.168.77.79's password:
bash: line 1: rsync: command not found
rsync: connection unexpectedly closed (0 bytes received so far) [sender]
rsync error: error in rsync protocol data stream (code 12) at io.c(228) [sender=3.2.3]

注:若/root/beifei最后加了/,即/root/beifei/,则最终备份的只有文件,没有目录
2.在备份服务器(备份数据所在的机器)上拉取:
#在77.77服务端删除3.txt文件,添加6.txt文件,再次备份
[root@localhost beifei]# rsync -avz --delete root@192.168.77.77:/root/beifei/ /root/beifei/
root@192.168.77.77's password:
receiving incremental file listsent 20 bytes  received 143 bytes  46.57 bytes/sec
total size is 0  speedup is 0.00
[root@localhost beifei]# ls
1.txt  2.txt  4.txt  5.txt  6.txt
注:这次备份只会备份修改后的文件,如果不添加--delete,则不会删除3.txt文件;数据目录后面有没有/是有影响的。