鸿蒙:状态管理V2(V2装饰器的学习)
前言:
1、我们一起来学习鸿蒙V2装饰器的使用。我们从官方文档和示例代码入手,学习并实践,看完这篇博客,你会有所收获。
2、本博客尽量以简单的方式呈现核心的用法,提供完整的运行效果和示例代码。
一、下方是官方文档和示例仓库的链接:
文档中心![]() https://developer.huawei.com/consumer/cn/doc/harmonyos-guides/arkts-mvvm-v2GitCode - 全球开发者的开源社区,开源代码托管平台GitCode是面向全球开发者的开源社区,包括原创博客,开源代码托管,代码协作,项目管理等。与开发者社区互动,提升您的研发效率和质量。
https://developer.huawei.com/consumer/cn/doc/harmonyos-guides/arkts-mvvm-v2GitCode - 全球开发者的开源社区,开源代码托管平台GitCode是面向全球开发者的开源社区,包括原创博客,开源代码托管,代码协作,项目管理等。与开发者社区互动,提升您的研发效率和质量。![]() https://gitcode.com/openharmony/applications_app_samples/tree/master/code/DocsSample/ArkUISample/StateMgmtV2MVVM二、下面是V2装饰器的用法,口语化版,不包准确:
https://gitcode.com/openharmony/applications_app_samples/tree/master/code/DocsSample/ArkUISample/StateMgmtV2MVVM二、下面是V2装饰器的用法,口语化版,不包准确:
1、@ComponentV2 修饰自定义组件(个人理解,和@Component的用法差不多,功能也相似,但是能在这个组件内使用别的V2装饰器,你就需要使用@ComponentV2修饰组件 )
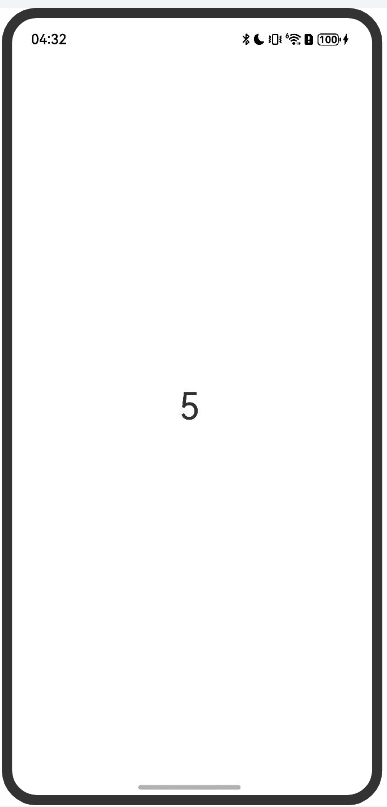
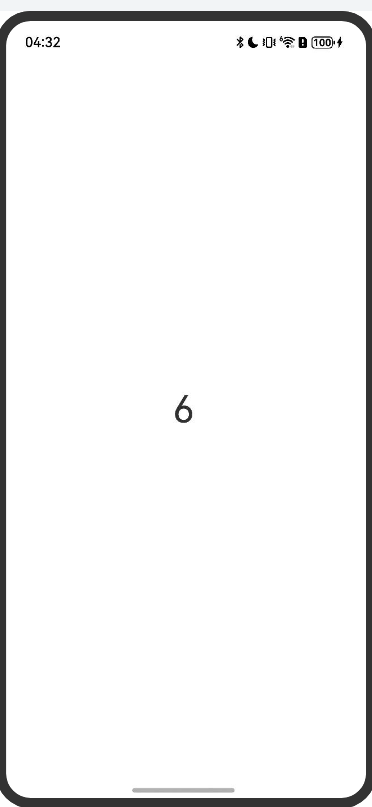
2、@Local 用法和@State差不多,用来修饰状态变量的。
LocalView.ets
@Entry
@ComponentV2
export struct LocalView {@Local isFinish: number = 0;build() {Column() {Text(this.isFinish.toString()).fontSize(40).margin({ bottom: 10 }).onClick(() => this.isFinish++)}.justifyContent(FlexAlign.Center).alignItems(HorizontalAlign.Center)}
}
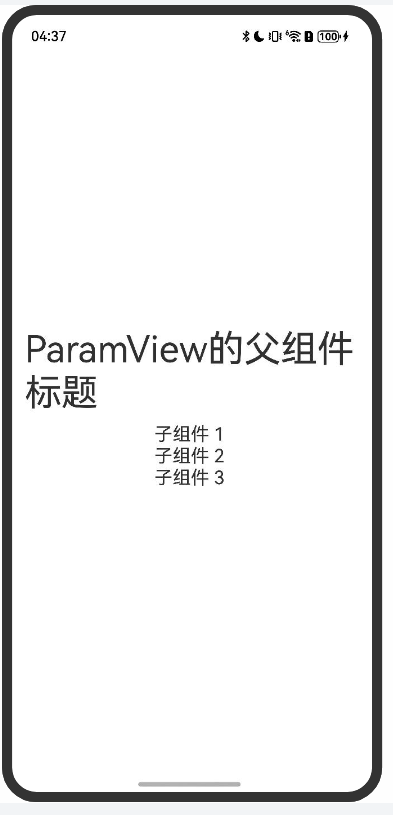
3、@Param 用在V2子组件,用来修饰变量,接收V2父组件传递的数据。
4、@Once 配合@Param使用,使子组件的参数变量变成状态变量,改变了值UI也会更新。
ParamView.ets
@ComponentV2
struct ParamViewItem {@Param taskName: string = '';@Param @Once isFinish: boolean = false;build() {Row() {Text(this.taskName).fontSize(20).decoration({ type: this.isFinish ? TextDecorationType.LineThrough : TextDecorationType.None })}.onClick(() => this.isFinish = !this.isFinish)}
}@Entry
@ComponentV2
export struct ParamView {build() {Column() {Text("ParamView的父组件标题").fontSize(40).margin({ bottom: 10 })ParamViewItem({ taskName: '子组件 1', isFinish: false })ParamViewItem({ taskName: '子组件 2', isFinish: false })ParamViewItem({ taskName: '子组件 3', isFinish: false })}}
}

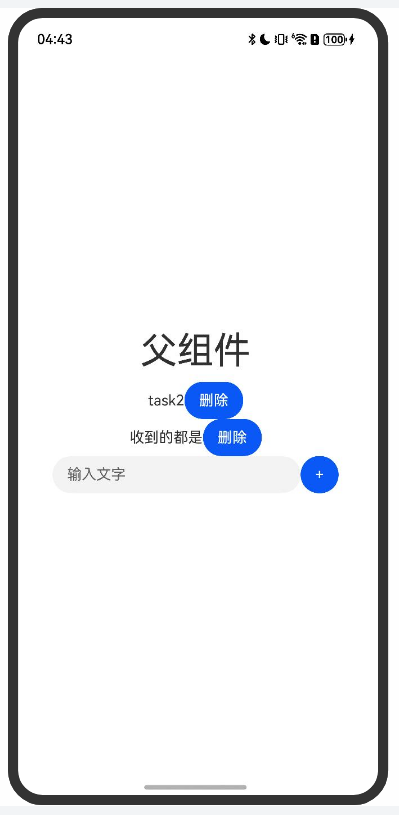
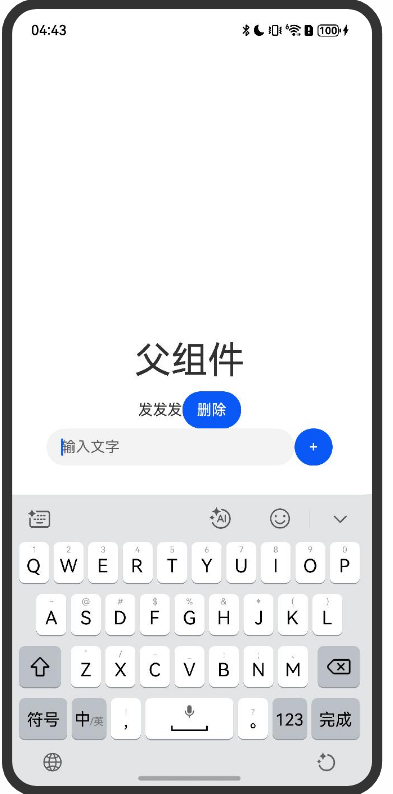
5、@Event 修饰V2子组件的方法,使得V2父组件可以传递方法进去。
EventView.ets
@ComponentV2
struct TaskItem {@Param taskName: string = '';@Param @Once isFinish: boolean = false;@Event deleteTask: () => void = () => {};build() {Row() {Text(this.taskName).decoration({ type: this.isFinish ? TextDecorationType.LineThrough : TextDecorationType.None })Button("删除").onClick(() => this.deleteTask())}.onClick(() => this.isFinish = !this.isFinish)}
}@Entry
@ComponentV2
export struct EventView {@Local tasks: string[] = ['task1', 'task2', 'task3'];@Local newTaskName: string = '';build() {Column() {Text("父组件").fontSize(40).margin({ bottom: 10 })ForEach(this.tasks, (task: string) => {TaskItem({taskName: task,isFinish: false,deleteTask: () => this.tasks.splice(this.tasks.indexOf(task), 1)})})Row() {TextInput({ placeholder: "输入文字", text: this.newTaskName }).onChange((value) => this.newTaskName = value).width('70%')Button('+').onClick(() => {this.tasks.push(this.newTaskName);this.newTaskName = '';})}}}
}
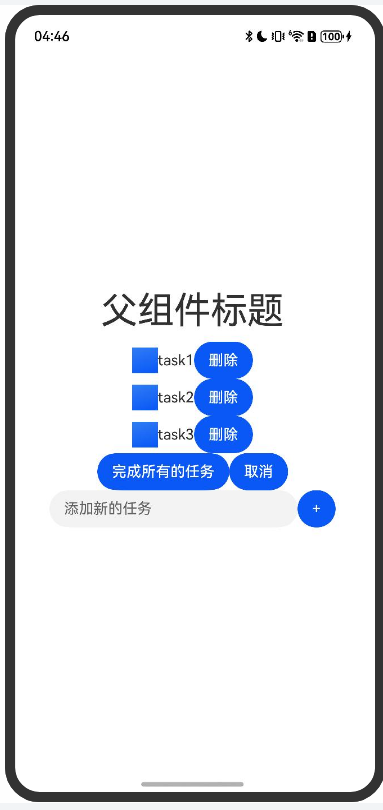
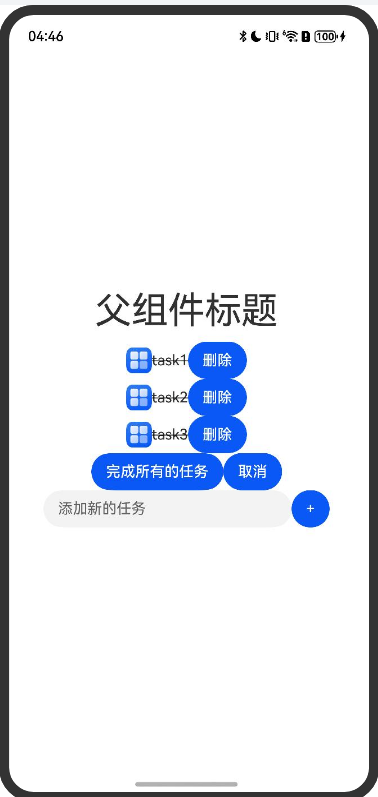
6、@ObservedV2 @Trace 这两个装饰器配合使用,检测类参数变化。
ObservedV2.ets
@ObservedV2
class Task {public taskName: string = '';@Trace public isFinish: boolean = false;constructor(taskName: string, isFinish: boolean) {this.taskName = taskName;this.isFinish = isFinish;}
}@ComponentV2
struct TaskItem {@Param task: Task = new Task('', false);@Event deleteTask: () => void = () => {};build() {Row() {Image(this.task.isFinish ? $r('app.media.startIcon') : $r('app.media.background')).width(28).height(28)Text(this.task.taskName).decoration({ type: this.task.isFinish ? TextDecorationType.LineThrough : TextDecorationType.None })Button("删除").onClick(() => this.deleteTask())}.onClick(() => this.task.isFinish = !this.task.isFinish)}
}@Entry
@ComponentV2
export struct ObservedV2View {@Local tasks: Task[] = [new Task('task1', false),new Task('task2', false),new Task('task3', false),];@Local newTaskName: string = '';finishAll(ifFinish: boolean) {for (let task of this.tasks) {task.isFinish = ifFinish;}}build() {Column() {Text("父组件标题").fontSize(40).margin({ bottom: 10 })Repeat<Task>(this.tasks).each((obj: RepeatItem<Task>) => {TaskItem({task: obj.item,deleteTask: () => this.tasks.splice(this.tasks.indexOf(obj.item), 1)})})Row() {Button("完成所有的任务").onClick(() => this.finishAll(true))Button("取消").onClick(() => this.finishAll(false))}Row() {TextInput({ placeholder: "添加新的任务", text: this.newTaskName }).onChange((value) => this.newTaskName = value).width('70%')Button('+').onClick(() => {this.tasks.push(new Task(this.newTaskName, false));this.newTaskName = '';})}}}
}
以上是个人经验分享