imx6ull-驱动开发篇20——linux互斥体实验
目录
实验程序编写
修改设备树文件
LED 驱动修改
mutex.c
测试mutexApp.c
Makefile 文件
运行测试
在之前的文章里,我们学习了:驱动开发篇16——信号量与互斥体。
本讲实验里,我们来使用互斥体mutex实现 LED 灯互斥访问的功能,编写驱动代码,并运行测试结果。
实验程序编写
修改设备树文件
和之前文章一致,GPIO子系统驱动LED,主要是以下几点:
- 添加 pinctrl 节点
- 添加 LED 设备节点
- 检查 PIN 是否被其他外设使用
LED 驱动修改
mutex.c
前面我们使用原子操作、自旋锁和信号量实现了对 LED 灯的互斥访问,但是最适合互斥的就是互斥体 mutex 了。
代码如下:
#include <linux/types.h>
#include <linux/kernel.h>
#include <linux/delay.h>
#include <linux/ide.h>
#include <linux/init.h>
#include <linux/module.h>
#include <linux/errno.h>
#include <linux/gpio.h>
#include <linux/cdev.h>
#include <linux/device.h>
#include <linux/of.h>
#include <linux/of_address.h>
#include <linux/of_gpio.h>
#include <linux/semaphore.h>
#include <asm/mach/map.h>
#include <asm/uaccess.h>
#include <asm/io.h>#define GPIOLED_CNT 1 /* 设备号个数 */
#define GPIOLED_NAME "gpioled" /* 名字 */
#define LEDOFF 0 /* 关灯 */
#define LEDON 1 /* 开灯 *//* gpioled设备结构体 */
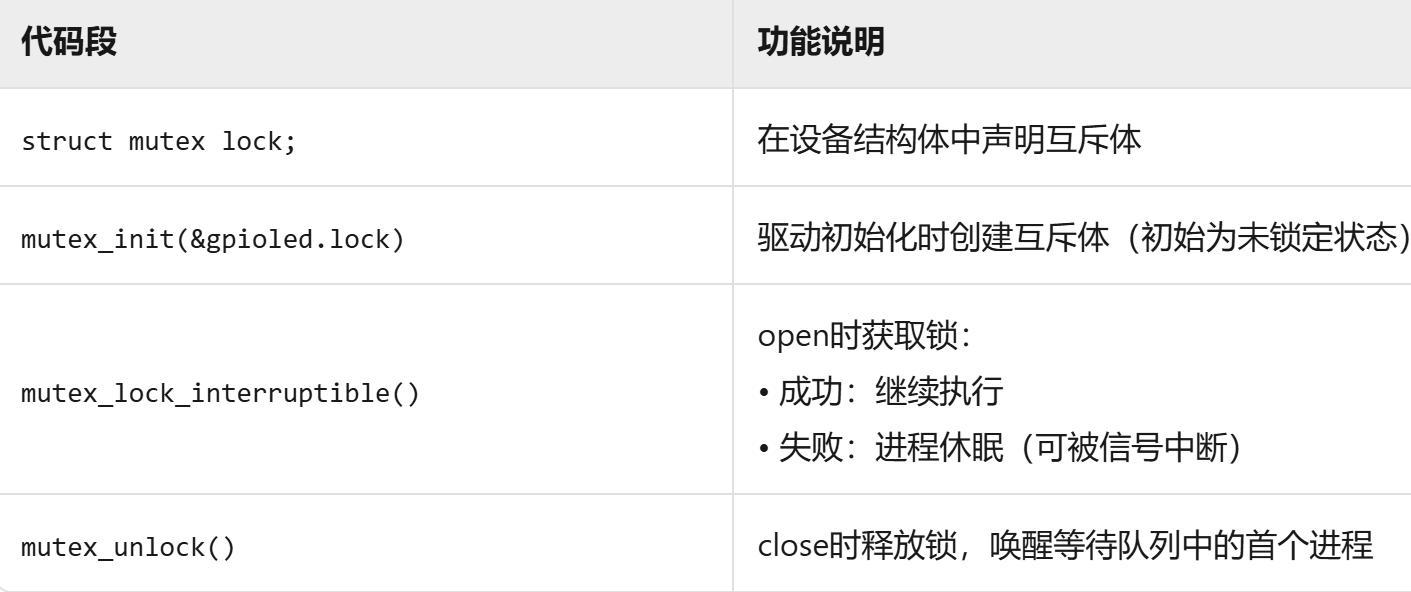
struct gpioled_dev{dev_t devid; /* 设备号 */struct cdev cdev; /* cdev */struct class *class; /* 类 */struct device *device; /* 设备 */int major; /* 主设备号 */int minor; /* 次设备号 */struct device_node *nd; /* 设备节点 */int led_gpio; /* led所使用的GPIO编号 */struct mutex lock; /* 互斥体 */
};struct gpioled_dev gpioled; /* led设备 *//** @description : 打开设备* @param - inode : 传递给驱动的inode* @param - filp : 设备文件,file结构体有个叫做private_data的成员变量* 一般在open的时候将private_data指向设备结构体。* @return : 0 成功;其他 失败*/
static int led_open(struct inode *inode, struct file *filp)
{filp->private_data = &gpioled; /* 设置私有数据 *//* 获取互斥体,可以被信号打断 */if (mutex_lock_interruptible(&gpioled.lock)) {return -ERESTARTSYS;}
#if 0mutex_lock(&gpioled.lock); /* 不能被信号打断 */
#endifreturn 0;
}/** @description : 从设备读取数据 * @param - filp : 要打开的设备文件(文件描述符)* @param - buf : 返回给用户空间的数据缓冲区* @param - cnt : 要读取的数据长度* @param - offt : 相对于文件首地址的偏移* @return : 读取的字节数,如果为负值,表示读取失败*/
static ssize_t led_read(struct file *filp, char __user *buf, size_t cnt, loff_t *offt)
{return 0;
}/** @description : 向设备写数据 * @param - filp : 设备文件,表示打开的文件描述符* @param - buf : 要写给设备写入的数据* @param - cnt : 要写入的数据长度* @param - offt : 相对于文件首地址的偏移* @return : 写入的字节数,如果为负值,表示写入失败*/
static ssize_t led_write(struct file *filp, const char __user *buf, size_t cnt, loff_t *offt)
{int retvalue;unsigned char databuf[1];unsigned char ledstat;struct gpioled_dev *dev = filp->private_data;retvalue = copy_from_user(databuf, buf, cnt);if(retvalue < 0) {printk("kernel write failed!\r\n");return -EFAULT;}ledstat = databuf[0]; /* 获取状态值 */if(ledstat == LEDON) { gpio_set_value(dev->led_gpio, 0); /* 打开LED灯 */} else if(ledstat == LEDOFF) {gpio_set_value(dev->led_gpio, 1); /* 关闭LED灯 */}return 0;
}/** @description : 关闭/释放设备* @param - filp : 要关闭的设备文件(文件描述符)* @return : 0 成功;其他 失败*/
static int led_release(struct inode *inode, struct file *filp)
{struct gpioled_dev *dev = filp->private_data;/* 释放互斥锁 */mutex_unlock(&dev->lock);return 0;
}/* 设备操作函数 */
static struct file_operations gpioled_fops = {.owner = THIS_MODULE,.open = led_open,.read = led_read,.write = led_write,.release = led_release,
};/** @description : 驱动入口函数* @param : 无* @return : 无*/
static int __init led_init(void)
{int ret = 0;/* 初始化互斥体 */mutex_init(&gpioled.lock);/* 设置LED所使用的GPIO *//* 1、获取设备节点:gpioled */gpioled.nd = of_find_node_by_path("/gpioled");if(gpioled.nd == NULL) {printk("gpioled node not find!\r\n");return -EINVAL;} else {printk("gpioled node find!\r\n");}/* 2、 获取设备树中的gpio属性,得到LED所使用的LED编号 */gpioled.led_gpio = of_get_named_gpio(gpioled.nd, "led-gpio", 0);if(gpioled.led_gpio < 0) {printk("can't get led-gpio");return -EINVAL;}printk("led-gpio num = %d\r\n", gpioled.led_gpio);/* 3、设置GPIO1_IO03为输出,并且输出高电平,默认关闭LED灯 */ret = gpio_direction_output(gpioled.led_gpio, 1);if(ret < 0) {printk("can't set gpio!\r\n");}/* 注册字符设备驱动 *//* 1、创建设备号 */if (gpioled.major) { /* 定义了设备号 */gpioled.devid = MKDEV(gpioled.major, 0);register_chrdev_region(gpioled.devid, GPIOLED_CNT, GPIOLED_NAME);} else { /* 没有定义设备号 */alloc_chrdev_region(&gpioled.devid, 0, GPIOLED_CNT, GPIOLED_NAME); /* 申请设备号 */gpioled.major = MAJOR(gpioled.devid); /* 获取分配号的主设备号 */gpioled.minor = MINOR(gpioled.devid); /* 获取分配号的次设备号 */}printk("gpioled major=%d,minor=%d\r\n",gpioled.major, gpioled.minor); /* 2、初始化cdev */gpioled.cdev.owner = THIS_MODULE;cdev_init(&gpioled.cdev, &gpioled_fops);/* 3、添加一个cdev */cdev_add(&gpioled.cdev, gpioled.devid, GPIOLED_CNT);/* 4、创建类 */gpioled.class = class_create(THIS_MODULE, GPIOLED_NAME);if (IS_ERR(gpioled.class)) {return PTR_ERR(gpioled.class);}/* 5、创建设备 */gpioled.device = device_create(gpioled.class, NULL, gpioled.devid, NULL, GPIOLED_NAME);if (IS_ERR(gpioled.device)) {return PTR_ERR(gpioled.device);}return 0;
}/** @description : 驱动出口函数* @param : 无* @return : 无*/
static void __exit led_exit(void)
{/* 注销字符设备驱动 */cdev_del(&gpioled.cdev);/* 删除cdev */unregister_chrdev_region(gpioled.devid, GPIOLED_CNT); /* 注销设备号 */device_destroy(gpioled.class, gpioled.devid);class_destroy(gpioled.class);
}module_init(led_init);
module_exit(led_exit);
MODULE_LICENSE("GPL");
MODULE_AUTHOR("huax");
在 open 函数中,调用 mutex_lock_interruptible 或者 mutex_lock 获取 mutex,成功的话就表示可以使用 LED 灯,失败的话就会进入休眠状态,和信号量一样。
static int led_open(struct inode *inode, struct file *filp)
{filp->private_data = &gpioled; /* 设置私有数据 *//* 获取互斥体,可以被信号打断 */if (mutex_lock_interruptible(&gpioled.lock)) {return -ERESTARTSYS;}
#if 0mutex_lock(&gpioled.lock);	/* 不能被信号打断 */
#endifreturn 0;
}
在 release 函数中,调用 mutex_unlock 函数释放 mutex,这样其他应用程序就可以获取 mutex 了。
static int led_release(struct inode *inode, struct file *filp)
{struct gpioled_dev *dev = filp->private_data;/* 释放互斥锁 */mutex_unlock(&dev->lock);return 0;
}
这段代码里,互斥体关键实现如下:
测试mutexApp.c
mutexApp.c测试代码和之前的一样,没有修改。
代码里模拟占用 25 秒 LED ,测试 APP 在获取到 LED 灯驱动的使用权以后会使用 25S,在使用的这段时间,如果有其他的应用也去获取 LED 灯使用权的话肯定会失败。
代码如下:
#include "stdio.h"
#include "unistd.h"
#include "sys/types.h"
#include "sys/stat.h"
#include "fcntl.h"
#include "stdlib.h"
#include "string.h"#define LEDOFF 	0
#define LEDON 	1/** @description		: main主程序* @param - argc 	: argv数组元素个数* @param - argv 	: 具体参数* @return 			: 0 成功;其他 失败*/
int main(int argc, char *argv[])
{int fd, retvalue;char *filename;unsigned char cnt = 0;unsigned char databuf[1];if(argc != 3){printf("Error Usage!\r\n");return -1;}filename = argv[1];fd = open(filename, O_RDWR);if(fd < 0){printf("file %s open failed!\r\n", argv[1]);return -1;}databuf[0] = atoi(argv[2]);	/* 要执行的操作:打开或关闭 *//* 向/dev/gpioled文件写入数据 */retvalue = write(fd, databuf, sizeof(databuf));if(retvalue < 0){printf("LED Control Failed!\r\n");close(fd);return -1;}/* 模拟占用25S LED */while(1) {sleep(5);cnt++;printf("App running times:%d\r\n", cnt);if(cnt >= 5) break;}printf("App running finished!");retvalue = close(fd); /* 关闭文件 */if(retvalue < 0){printf("file %s close failed!\r\n", argv[1]);return -1;}return 0;
}
Makefile 文件
makefile文件只需要修改 obj-m 变量的值,改为mutex.o
KERNELDIR := /home/huax/linux/linux_test/linux-imx-rel_imx_4.1.15_2.1.0_gaCURRENT_PATH := $(shell pwd)
obj-m := mutex.obuild: kernel_modules
kernel_modules:$(MAKE) -C $(KERNELDIR) M=$(CURRENT_PATH) modules
clean:$(MAKE) -C $(KERNELDIR) M=$(CURRENT_PATH) clean
运行测试
编译代码:
make -j32 //编译makefile文件arm-linux-gnueabihf-gcc mutexApp.c -o mutexApp //编译测试程序编译成功以后,就会生成一个名为“mutex.ko”的驱动模块文件,和mutexApp 这个应用程序。
将编译出来的 mutex.ko 和 mutexApp 这两个文件拷贝到 根文件 rootfs/lib/modules/4.1.15目录中,重启开发板。
进入到目录 lib/modules/4.1.15 中,输入如下命令加载 mutex.ko 驱动模块:
depmod //第一次加载驱动的时候需要运行此命令
modprobe mutex.ko //加载驱动
驱动加载成功以后,就可以使用 mutexApp 软件测试驱动是否工作正常:
./ mutexApp /dev/gpioled 1& //后台方式,打开 LED 灯在打开LED灯25s以内,关闭LED灯会失败:
./ mutexApp /dev/gpioled 0& //关闭 LED 灯这两个命令都是运行在后台,第一条命令先获取到互斥体,因此可以操作 LED 灯,将LED 灯打开,并且占有 25S。
第二条命令因为互斥体获取led资源失败而进入休眠状态,等待第一条命令运行完毕并释放互斥体以后才拥有 LED 灯使用权,将 LED 灯关闭。
要卸载驱动的话输入如下命令:
rmmod mutex.ko