学习日记-day18-5.28
完成目标:
继续学习下半段java课程
知识点:
1.多线程_优先级&守护&礼让&插入线程方法
void setPriority(int newPriority)   -> 设置线程优先级,优先级越高的线程,抢到CPU使用权的几率越大,但是不是每次都先抢到int getPriority()  -> 获取线程优先级void setDaemon(boolean on)  -> 设置为守护线程,当非守护线程执行完毕,守护线程就要结束,但是守护线程也不是立马结束,当非守护线程结束之后,系统会告诉守护线程人家结束了,你也结束吧,在告知的过程中,守护线程会执行,只不过执行到半路就结束了static void yield() -> 礼让线程,让当前线程让出CPU使用权void join() -> 插入线程或者叫做插队线程    ===================================================================================
### 1.线程优先级public class MyThread1 extends Thread{@Overridepublic void run() {for (int i = 0; i < 10; i++) {System.out.println(Thread.currentThread().getName()+"执行了......"+i);}}
}public class Test01 {public static void main(String[] args) {MyThread1 t1 = new MyThread1();t1.setName("金莲");MyThread1 t2 = new MyThread1();t2.setName("阿庆");/*获取两个线程的优先级MIN_PRIORITY = 1 最小优先级 1NORM_PRIORITY = 5 默认优先级 5MAX_PRIORITY = 10 最大优先级 10*///System.out.println(t1.getPriority());//System.out.println(t2.getPriority());//设置优先级t1.setPriority(1);t2.setPriority(10);t1.start();t2.start();}
}========================================================================### 2.守护线程public class Test01 {public static void main(String[] args) {MyThread1 t1 = new MyThread1();t1.setName("金莲");MyThread2 t2 = new MyThread2();t2.setName("阿庆");//将t2设置成守护线程t2.setDaemon(true);t1.start();t2.start();}
}public class MyThread1 extends Thread{@Overridepublic void run() {for (int i = 0; i < 10; i++) {System.out.println(Thread.currentThread().getName()+"执行了......"+i);}}
}public class MyThread2 extends Thread{@Overridepublic void run() {for (int i = 0; i < 100; i++) {System.out.println(Thread.currentThread().getName()+"执行了..."+i);}}
}===============================================================================### 3.礼让线程场景说明:如果两个线程一起执行,可能会执行一会儿线程A,再执行一会线程B,或者可能线程A执行完毕了,线程B在执行那么我们能不能让两个线程尽可能的平衡一点 -> 尽量让两个线程交替执行
注意:只是尽可能的平衡,不是绝对的你来我往,有可能线程A线程执行,然后礼让了,但是回头A又抢到CPU使用权了    public class Test01 {public static void main(String[] args) {MyThread1 t1 = new MyThread1();t1.setName("金莲");MyThread1 t2 = new MyThread1();t2.setName("阿庆");t1.start();t2.start();}
}public class MyThread1 extends Thread{@Overridepublic void run() {for (int i = 0; i < 10; i++) {System.out.println(Thread.currentThread().getName()+"执行了......"+i);Thread.yield();}}
}### 4.插入线程public class MyThread1 extends Thread{@Overridepublic void run() {for (int i = 0; i < 10; i++) {System.out.println(Thread.currentThread().getName()+"执行了......"+i);}}
}public class Test01 {public static void main(String[] args) throws InterruptedException {MyThread1 t1 = new MyThread1();t1.setName("金莲");t1.start();/*表示把t1插入到当前线程之前,t1要插到main线程之前,所以当前线程就是main线程*/t1.join();for (int i = 0; i < 10; i++) {System.out.println(Thread.currentThread().getName()+"执行了......"+i);}}
}| 知识点 | 核心内容 | 重点 |
| setPriority()方法 | 设置线程优先级(1-10),优先级越高抢到CPU使用权的几率越大 | 默认优先级为5,效果不绝对明显 |
| getPriority()方法 | 获取线程当前优先级 | 需注意Thread类中定义的MIN_PRIORITY(1)、NORM_PRIORITY(5)、MAX_PRIORITY(10)常量 |
| setDaemon()方法 | 将线程设置为守护线程(当所有非守护线程结束时自动终止) | 非立即终止,存在系统通知延迟执行现象 |
| yield()方法 | 礼让线程(让出当前CPU使用权) | 非绝对平衡,仍可能出现连续执行情况 |
| join()方法 | 插队线程(将指定线程插入当前线程前执行) | 需注意抛出的InterruptedException异常处理 |
| 线程优先级实战 | 通过t1.setPriority(1)和t2.setPriority(10)演示优先级差异 | 实际运行效果不明显,需注意CPU调度的随机性 |
| 守护线程应用场景 | QQ文件传输线程设置为守护线程(当聊天窗口关闭时自动终止传输) | 需理解守护线程的生命周期绑定特性 |
| 线程调度机制 | CPU时间片轮转调度的随机性和不确定性 | 礼让后仍可能抢到CPU,非完全交替执行 |
2.多线程_创建线程方式2_实现Runnable接口
1.创建类,实现Runnable接口
2.重写run方法,设置线程任务
3.利用Thread类的构造方法:Thread(Runnable target),创建Thread对象(线程对象),将自定义的类当参数传递到Thread构造中 -> 这一步是让我们自己定义的类成为一个真正的线程类对象
4.调用Thread中的start方法,开启线程,jvm自动调用run方法    public class Test01 {public static void main(String[] args) {MyRunnable myRunnable = new MyRunnable();/*Thread(Runnable target)*/Thread t1 = new Thread(myRunnable);//调用Thread中的start方法,开启线程t1.start();for (int i = 0; i < 10; i++) {System.out.println(Thread.currentThread().getName()+"...执行了"+i);}}
}public class MyRunnable implements Runnable{@Overridepublic void run() {for (int i = 0; i < 10; i++) {System.out.println(Thread.currentThread().getName()+"...执行了"+i);}}
}## 两种实现多线程的方式区别1.继承Thread:继承只支持单继承,有继承的局限性
2.实现Runnable:没有继承的局限性, MyThread extends Fu implements Runnable| 知识点 | 核心内容 | 重点 |
| 创建多线程的第二种方式 | 实现Runnable接口 | 第二种方式与继承Thread类的区别 |
| 实现Runnable接口步骤 | 1. 创建一个类实现Runnable接口; 2. 重写run方法设置线程任务; 3. 利用Thread类的构造方法,将实现类对象传入,创建线程对象; 4. 调用Thread对象的start方法开启线程 | 步骤的顺序和具体操作 |
| Runnable与Thread的关系 | Runnable是接口,Thread是类; 实现Runnable接口可以避免继承的局限性 | Runnable接口与Thread类的区别和联系 |
| 两种方式的区别 | 继承Thread类是单继承,有局限性; 实现Runnable接口可以同时继承其他父类 | 继承Thread与实现Runnable的对比 |
| 实现Runnable接口的优势 | 可以避免单继承的局限性,使自定义线程类可以同时继承其他父类 | 实现Runnable接口的具体优势 |
3.多线程_匿名内部类创建多线程
> 严格意义上来说,匿名内部类方式不属于创建多线程方式其中之一,因为匿名内部类形式建立在实现Runnable接口的基础上完成的匿名内部类回顾: 1.new 接口/抽象类(){重写方法}.重写的方法();2.接口名/类名 对象名 = new 接口/抽象类(){重写方法}对象名.重写的方法();public class Test02 {public static void main(String[] args) {/*Thread(Runnable r)Thread(Runnable target, String name) :name指的是给线程设置名字*/new Thread(new Runnable() {@Overridepublic void run() {for (int i = 0; i < 10; i++) {System.out.println(Thread.currentThread().getName()+"...执行了"+i);}}},"阿庆").start();new Thread(new Runnable() {@Overridepublic void run() {for (int i = 0; i < 10; i++) {System.out.println(Thread.currentThread().getName()+"...执行了"+i);}}},"金莲").start();}
}
| 知识点 | 核心内容 | 重点 |
| 匿名内部类创建多线程 | 通过new Thread(Runnable)构造方法实现,匿名内部类重写run()方法 | 严格来说不属于独立创建方式,本质仍是实现Runnable接口 |
| 匿名内部类语法结构 | 1. 接口/抽象类+{}重写方法; 2. 接口名 对象名=匿名类实例 | 需区分匿名对象与带名对象的调用方式 |
| 线程命名对比 | 标准方式:MyRunnable类实现接口; 匿名方式:new Thread(Runnable, "线程名") | 构造方法重载:Thread(Runnable target, String name) |
| 代码实现对比 | 原始方式: Thread t = new Thread(new MyRunnable()); 匿名方式: new Thread(new Runnable(){...}) | 匿名类直接替代MyRunnable类定义 |
| 执行效果验证 | 两种方式均可通过start()启动线程; 示例演示循环输出语句 | 匿名内部类代码更紧凑但复用性差 |
4.多线程_线程安全问题_同步代码块
public class MyTicket implements Runnable{//定义100张票int ticket = 100;@Overridepublic void run() {while(true){if (ticket>0){System.out.println(Thread.currentThread().getName()+"买了第"+ticket+"张票");ticket--;}}}
}public class Test01 {public static void main(String[] args) {MyTicket myTicket = new MyTicket();Thread t1 = new Thread(myTicket, "赵四");Thread t2 = new Thread(myTicket, "刘能");Thread t3 = new Thread(myTicket, "广坤");t1.start();t2.start();t3.start();}
}
解决线程安全问题的第一种方式(使用同步代码块)
1.格式:synchronized(任意对象){线程可能出现不安全的代码}
2.任意对象:就是我们的锁对象
3.执行:一个线程拿到锁之后,会进入到同步代码块中执行,在此期间,其他线程拿不到锁,就进不去同步代码块,需要在同步代码块外面等待排队,需要等着执行的线程执行完毕,出了同步代码块,相当于释放锁了,等待的线程才能抢到锁,才能进入到同步代码块中执行public class MyTicket implements Runnable{//定义100张票int ticket = 100;//任意new一个对象Object obj = new Object();@Overridepublic void run() {while(true){try {Thread.sleep(100L);} catch (InterruptedException e) {throw new RuntimeException(e);}synchronized (obj){if (ticket>0){System.out.println(Thread.currentThread().getName()+"买了第"+ticket+"张票");ticket--;}}}}
}public class Test01 {public static void main(String[] args) {MyTicket myTicket = new MyTicket();Thread t1 = new Thread(myTicket, "赵四");Thread t2 = new Thread(myTicket, "刘能");Thread t3 = new Thread(myTicket, "广坤");t1.start();t2.start();t3.start();}
}
| 知识点 | 核心内容 | 关键细节 | 代码示例 |
| 线程安全问题定义 | 多线程访问共享资源导致数据异常的现象 | 需区分"线程安全"与"线程不安全"的表述差异 | if(ticket>0){ System.out.println(...); ticket--; } |
| 线程安全问题案例 | 火车票超卖问题:三个购票渠道同时访问同一票号 | 资源竞争时机:在ticket--执行前发生线程切换 | [完整票务系统代码示例] |
| 同步代码块原理 | 通过synchronized(锁对象){...}建立临界区 | 锁对象必须唯一(实例变量 vs 局部变量) | private final Object lock = new Object(); |
| 锁机制类比 | 厕所门锁比喻: - 一个坑位=共享资源; - 门锁=同步机制 | 错误认知:多把锁仍会导致并发问题 | 图示说明锁竞争过程 |
| 同步代码块执行流程 | 1. 线程获取锁; 2. 执行临界区代码; 3. 释放锁 | 关键时序:ticket--必须包含在同步块内 | synchronized(lock){ if(ticket>0){...} } |
| 线程安全验证 | 对比测试: - 无锁版本出现重复票号; - 加锁后票号连续递减 | 典型错误:在同步块外创建锁对象 | [完整对比测试代码] |
| CPU切换影响 | 线程不安全根本原因: - 时间片轮转; - 操作非原子性 | 关键现象:三个线程同时通过ticket>0判断 | 添加Thread.sleep()放大问题 |
| 锁对象要求 | 必须满足: - 对象唯一性; - 多线程可见性 | 常见错误:使用new Object()作为局部变量锁 | 正确做法:成员变量+final修饰 |
5.多线程_线程安全问题_同步方法
### 1.普通同步方法_非静态1.格式:修饰符 synchronized 返回值类型 方法名(参数){方法体return 结果}
2.默认锁:thispublic class MyTicket implements Runnable{//定义100张票int ticket = 100;@Overridepublic void run() {while(true){try {Thread.sleep(100L);} catch (InterruptedException e) {throw new RuntimeException(e);}//method01();method02();}}/* public synchronized void method01(){if (ticket>0){System.out.println(Thread.currentThread().getName()+"买了第"+ticket+"张票");ticket--;}}*/public void method02(){synchronized(this){System.out.println(this+"..........");if (ticket>0){System.out.println(Thread.currentThread().getName()+"买了第"+ticket+"张票");ticket--;}}}}public class Test01 {public static void main(String[] args) {MyTicket myTicket = new MyTicket();System.out.println(myTicket);Thread t1 = new Thread(myTicket, "赵四");Thread t2 = new Thread(myTicket, "刘能");Thread t3 = new Thread(myTicket, "广坤");t1.start();t2.start();t3.start();}
}===========================================================================### 2.静态同步方法1.格式:修饰符 static synchronized 返回值类型 方法名(参数){方法体return 结果}
2.默认锁:class对象public class MyTicket implements Runnable{//定义100张票static int ticket = 100;@Overridepublic void run() {while(true){try {Thread.sleep(100L);} catch (InterruptedException e) {throw new RuntimeException(e);}//method01();method02();}}/*public static synchronized void method01(){if (ticket>0){System.out.println(Thread.currentThread().getName()+"买了第"+ticket+"张票");ticket--;}}*/public static void method02(){synchronized(MyTicket.class){if (ticket>0){System.out.println(Thread.currentThread().getName()+"买了第"+ticket+"张票");ticket--;}}}
}public class Test01 {public static void main(String[] args) {MyTicket myTicket = new MyTicket();Thread t1 = new Thread(myTicket, "赵四");Thread t2 = new Thread(myTicket, "刘能");Thread t3 = new Thread(myTicket, "广坤");t1.start();t2.start();t3.start();}
}| 知识点 | 核心内容 | 重点 |
| 同步方法解决线程安全问题 | 同步方法和同步代码块都可以解决线程不安全的问题 | 同步方法有两种:普通(非静态)和静态 |
| 普通同步方法 | 格式:修饰符 synchronized 返回值类型 方法名(参数) {方法体} | 默认锁对象是this |
| 普通同步方法示例 | 在run方法中调用同步方法,保证线程安全 | 需要在有线程不安全问题的代码段使用同步方法 |
| 非静态同步方法的锁对象 | 非静态同步方法默认锁对象是this | this代表当前对象,即创建类的实例 |
| 静态同步方法 | 格式:在方法前加static和synchronized | 默认锁对象是class对象 |
| 静态同步方法示例 | 静态同步方法不能直接访问非静态成员,需要将相关成员也声明为静态 | 静态同步方法保证类级别的线程安全 |
| StringBuilder与StringBuffer | StringBuilder线程不安全,StringBuffer线程安全 | StringBuffer的方法都是同步方法,因此线程安全 |
| StringBuffer线程安全原因 | StringBuffer的方法都加了synchronized关键字 | 同步方法保证线程安全 |
| StringBuilder与StringBuffer对比 | StringBuilder性能高,但线程不安全;StringBuffer线程安全,但性能相对较低 | 根据使用场景选择合适的类 |
6.多线程_死锁
public class LockA {public static LockA lockA = new LockA();
}public class LockB {public static LockB lockB = new LockB();
}public class DieLock implements Runnable{private boolean flag;public DieLock(boolean flag) {this.flag = flag;}@Overridepublic void run() {if (flag){synchronized (LockA.lockA){System.out.println("if...lockA");synchronized (LockB.lockB){System.out.println("if...lockB");}}}else{synchronized (LockB.lockB){System.out.println("else...lockB");synchronized (LockA.lockA){System.out.println("else...lockA");}}}}
}public class Test01 {public static void main(String[] args) {DieLock dieLock1 = new DieLock(true);DieLock dieLock2 = new DieLock(false);new Thread(dieLock1).start();new Thread(dieLock2).start();}
}
| 知识点 | 核心内容 | 重点 |
| 死锁定义 | 两个或以上线程因竞争同步锁导致的阻塞现象,若无外力作用无法继续执行 | 关键特征:互相持有对方所需资源且不释放 |
| 死锁产生条件 | 1. 线程一持有锁一需要锁二; 2. 线程二持有锁二需要锁一; 3. 资源互斥不释放 | 四个必要条件需同时满足(互斥/占有等待/非抢占/循环等待) |
| 现实案例演示 | 套间模型: - 小红(钥匙1)与外部门(锁1)/内部门(锁2); - 小绿(钥匙2)与外部门(锁2)/内部门(锁1) | 典型错误场景:同步代码块嵌套时钥匙分配冲突 |
| 代码实现要点 | 1. 创建静态锁对象LockA/LockB; 2. 线程类通过flag控制执行不同同步块嵌套; 3. flag=true执行LockA→LockB嵌套,false执行反向嵌套 | 易错点:线程启动顺序影响死锁发生概率 |
| 死锁避免方案 | 重点标注:避免同步代码块嵌套结构; 替代方案: - 锁排序; - 超时机制; - 资源预分配 | 破坏循环等待条件的具体措施 |
7.多线程_线程生命周期
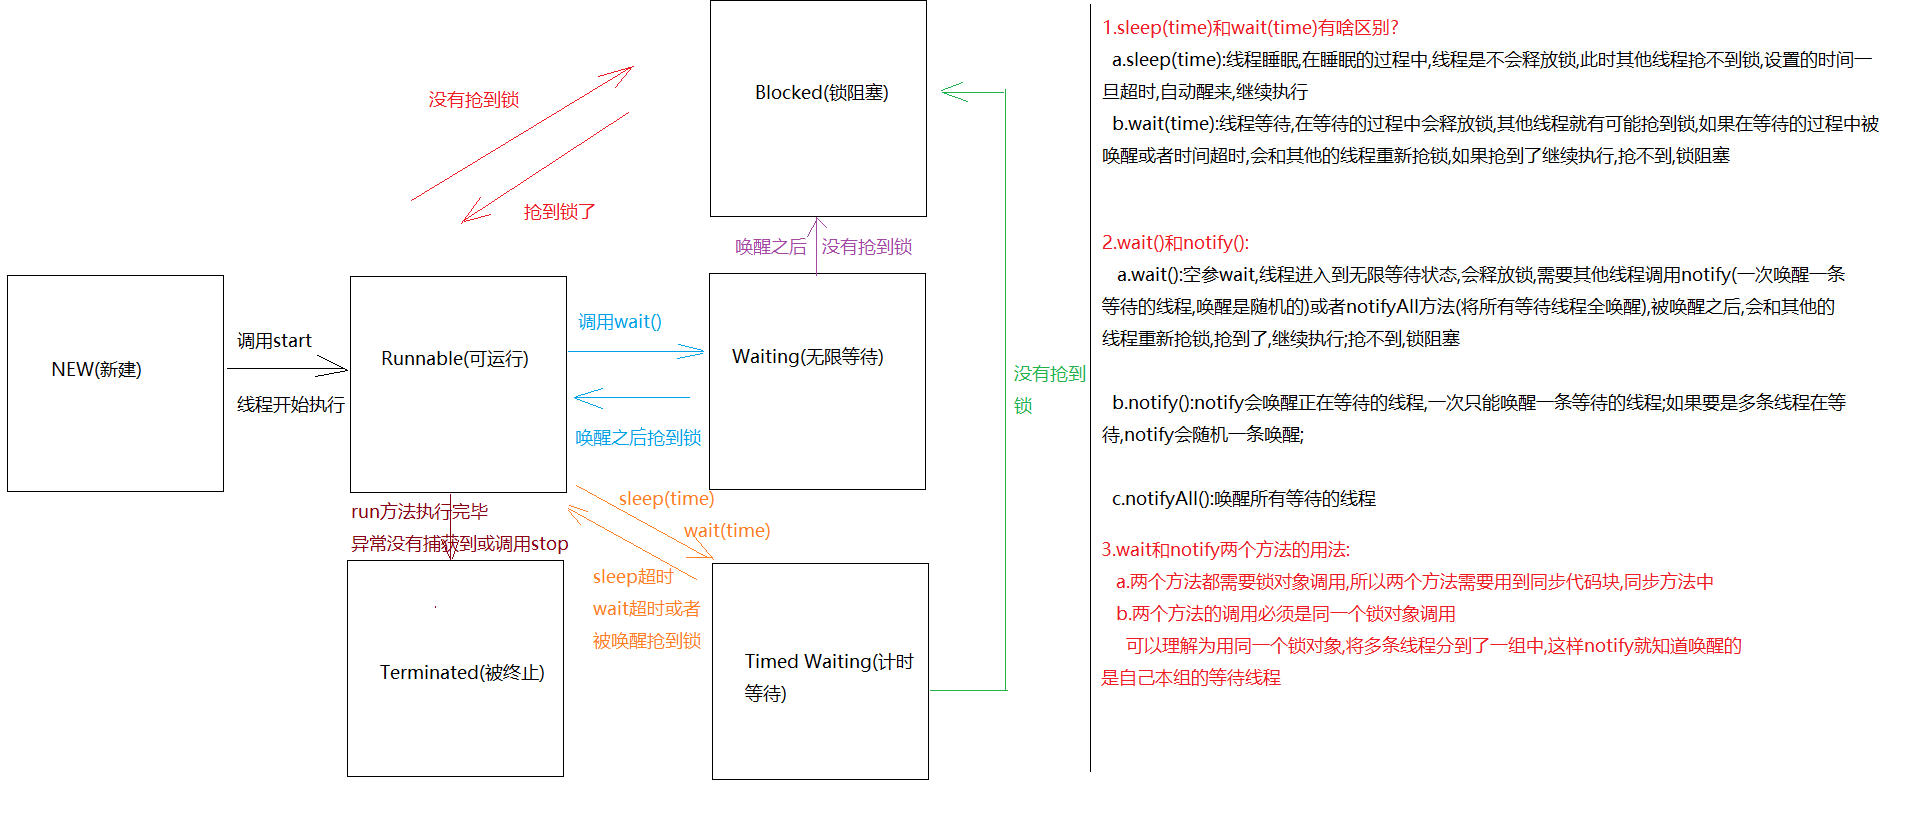
| 知识点 | 核心内容 | 重点 |
| 线程状态(生命周期) | 线程从创建到终止的6种状态:NEW(新建)、RUNNABLE(可运行)、BLOCKED(锁阻塞)、WAITING(无限等待)、TIMED_WAITING(计时等待)、TERMINATED(终止) | 状态转换条件(如start()触发NEW→RUNNABLE); 终止条件(run()结束/异常/stop()) |
| 状态转换图 | 六种状态的互相转换关系: - NEW→RUNNABLE:调用start(); - RUNNABLE→BLOCKED:未抢到锁; - RUNNABLE→TIMED_WAITING:调用sleep()或带超时的wait(); - RUNNABLE→WAITING:调用无参wait() | 关键转换路径: WAITING→RUNNABLE需notify()+抢锁成功; 易忽略点:sleep()不释放锁,wait()释放锁 |
| sleep() vs wait() | - sleep():线程睡眠,不释放锁,超时自动唤醒; - wait():线程等待,释放锁,需notify()唤醒或超时 | 核心区别:锁的释放行为; 常见错误:混淆两者唤醒后的锁状态(wait()需重新抢锁) |
| wait()与notify()机制 | - wait():使线程进入WAITING状态,需同一锁对象调用notify()唤醒; - notify():随机唤醒一条等待线程,notifyAll()唤醒所有 | 强制约束:必须在同步代码块/方法中使用; 易错点:不同锁对象调用导致唤醒失效 |
| 锁竞争与状态关联 | - 抢锁失败→BLOCKED状态; - 唤醒后未抢到锁→再次BLOCKED | 重点逻辑:唤醒不保证直接执行,需竞争锁 |
8.多线程_等待唤醒案例分析
/*count和flag可以定义成包装类但是要记得给count和flag手动赋值不然对于本案例来说,容易出现空指针异常*/
public class BaoZiPu {//代表包子的countprivate int count;//代表是否有包子的flagprivate boolean flag;public BaoZiPu() {}public BaoZiPu(int count, boolean flag) {this.count = count;this.flag = flag;}/*getCount 改造成消费包子方法直接输出count*/public void getCount() {System.out.println("消费了..............第"+count+"个包子");}/*setCount 改造成生产包子count++*/public void setCount() {count++;System.out.println("生产了...第"+count+"个包子");}public boolean isFlag() {return flag;}public void setFlag(boolean flag) {this.flag = flag;}
}public class Product implements Runnable{private BaoZiPu baoZiPu;public Product(BaoZiPu baoZiPu) {this.baoZiPu = baoZiPu;}@Overridepublic void run() {while(true){try {Thread.sleep(100L);} catch (InterruptedException e) {throw new RuntimeException(e);}synchronized (baoZiPu){//1.判断flag是否为true,如果是true,证明有包子,生产线程等待if (baoZiPu.isFlag()==true){try {baoZiPu.wait();} catch (InterruptedException e) {throw new RuntimeException(e);}}//2.如果flag为false,证明没有包子,开始生产baoZiPu.setCount();//3.改变flag状态,为true,证明生产完了,有包子了baoZiPu.setFlag(true);//4.唤醒消费线程baoZiPu.notify();}}}
}public class Consumer implements Runnable{private BaoZiPu baoZiPu;public Consumer(BaoZiPu baoZiPu) {this.baoZiPu = baoZiPu;}@Overridepublic void run() {while(true){try {Thread.sleep(100L);} catch (InterruptedException e) {throw new RuntimeException(e);}synchronized (baoZiPu){//1.判断flag是否为false,如果是false,证明没有包子,消费线程等待if (baoZiPu.isFlag()==false){try {baoZiPu.wait();} catch (InterruptedException e) {throw new RuntimeException(e);}}//2.如果flag为true,证明有包子,开始消费baoZiPu.getCount();//3.改变flag状态,为false,证明消费完了,没 有包子了baoZiPu.setFlag(false);//4.唤醒生产线程baoZiPu.notify();}}}
}public class Test01 {public static void main(String[] args) {BaoZiPu baoZiPu = new BaoZiPu();Product product = new Product(baoZiPu);Consumer consumer = new Consumer(baoZiPu);Thread t1 = new Thread(product);Thread t2 = new Thread(consumer);t1.start();t2.start();}
}| 知识点 | 核心内容 | 重点 |
| 多线程等待与唤醒机制 | 通过生产者-消费者案例演示线程交替执行(生产一个消费一个),需使用wait()、notify()、notifyAll()方法 | 锁对象必须一致; wait()会释放锁,notify()随机唤醒一条线程 |
| Object类线程控制方法 | wait():线程等待并释放锁; notify():唤醒单个等待线程; notifyAll():唤醒所有等待线程 | 方法需通过同步代码块中的锁对象调用 |
| 生产者-消费者案例设计 | 定义count记录包子数量,flag标记包子状态(true有包子/false无包子) | 防止连续生产/消费:通过flag判断后调用wait()或notify() |
| 线程通信逻辑 | 生产者:无包子时生产→修改flag→唤醒消费者; 消费者:有包子时消费→修改flag→唤醒生产者 | 交替执行关键:wait()与notify()的配对调用 |
| 同步代码块作用 | 加锁防止生产/消费过程被CPU切换打断,但仅加锁无法保证交替执行 | 需结合等待唤醒机制实现严格轮替 |
| 知识点 | 核心内容 | 重点 |
| 类的创建 | 创建包子铺、生产者、消费者三个类 | 类的命名与职责划分 |
| 属性定义 | 包子铺类包含count和flag两个属性 | 基本数据类型与包装类的选择 |
| 构造方法 | 提供无参构造和有参构造 | 构造方法的定义与使用 |
| 方法改造 | getCount改造为消费包的方法,setCount改造为生产包的方法 | 方法职责的重新划分 |
| 线程实现 | 生产者和消费者分别实现Runnable接口 | 线程的实现与启动 |
| 同步控制 | 使用同步代码块和锁对象保证线程安全 | 同步机制的理解与应用 |
| wait/notify使用 | 生产者与消费者通过wait/notify进行通信 | wait/notify的使用场景与限制 |
| 测试类编写 | 编写测试类,启动生产者和消费者线程 | 测试类的设计与执行 |
| 线程交替执行分析 | 分析生产者和消费者线程的交替执行过程 | 线程执行流程的理解 |
| 锁对象共享 | 确保生产者和消费者使用同一个锁对象 | 锁对象的共享与传递 |
9.多线程_同步方法实现等待唤醒案例
/*count和flag可以定义成包装类但是要记得给count和flag手动赋值不然对于本案例来说,容易出现空指针异常*/
public class BaoZiPu {//代表包子的countprivate int count;//代表是否有包子的flagprivate boolean flag;public BaoZiPu() {}public BaoZiPu(int count, boolean flag) {this.count = count;this.flag = flag;}/*getCount 改造成消费包子方法直接输出count*/public synchronized void getCount() {//1.判断flag是否为false,如果是false,证明没有包子,消费线程等待if (this.flag == false) {try {this.wait();} catch (InterruptedException e) {throw new RuntimeException(e);}}//2.如果flag为true,证明有包子,开始消费System.out.println("消费了..............第" + count + "个包子");//3.改变flag状态,为false,证明消费完了,没 有包子了this.flag = false;//4.唤醒生产线程this.notify();}/*setCount 改造成生产包子count++*/public synchronized void setCount() {//1.判断flag是否为true,如果是true,证明有包子,生产线程等待if (this.flag == true) {try {this.wait();} catch (InterruptedException e) {throw new RuntimeException(e);}}//2.如果flag为false,证明没有包子,开始生产count++;System.out.println("生产了...第" + count + "个包子");//3.改变flag状态,为true,证明生产完了,有包子了this.flag = true;//4.唤醒消费线程this.notify();}public boolean isFlag() {return flag;}public void setFlag(boolean flag) {this.flag = flag;}
}public class Product implements Runnable{private BaoZiPu baoZiPu;public Product(BaoZiPu baoZiPu) {this.baoZiPu = baoZiPu;}@Overridepublic void run() {while(true){try {Thread.sleep(100L);} catch (InterruptedException e) {throw new RuntimeException(e);}baoZiPu.setCount();}}
}public class Consumer implements Runnable{private BaoZiPu baoZiPu;public Consumer(BaoZiPu baoZiPu) {this.baoZiPu = baoZiPu;}@Overridepublic void run() {while(true){try {Thread.sleep(100L);} catch (InterruptedException e) {throw new RuntimeException(e);}baoZiPu.getCount();}}
}public class Test01 {public static void main(String[] args) {BaoZiPu baoZiPu = new BaoZiPu();Product product = new Product(baoZiPu);Consumer consumer = new Consumer(baoZiPu);Thread t1 = new Thread(product);Thread t2 = new Thread(consumer);t1.start();t2.start();}
}| 知识点 | 核心内容 | 重点 |
| 线程同步方法 | 将生产线程代码封装到同步方法set中,消费线程代码封装到同步方法get中 | 同步锁对象一致性(this默认锁)与wait/notify调用逻辑 |
| 生产-消费模型改造 | 通过flag状态判断包子存在与否,wait()使线程等待,notify()唤醒对方线程 | flag状态切换时机(生产后true,消费后false) |
| 同步代码块优化 | 移除显式同步代码块,直接使用同步方法简化结构 | 隐式锁对象this的作用范围 |
| 线程协作验证 | 输出结果无连续生产/消费,证明同步方法改造有效 | wait()与notify()必须持有同一把锁 |
10.多线程_多等待多唤醒案例
public class Test01 {public static void main(String[] args) {BaoZiPu baoZiPu = new BaoZiPu();Product product = new Product(baoZiPu);Consumer consumer = new Consumer(baoZiPu);new Thread(product).start();new Thread(product).start();new Thread(product).start();new Thread(consumer).start();new Thread(consumer).start();new Thread(consumer).start();}
}/*count和flag可以定义成包装类但是要记得给count和flag手动赋值不然对于本案例来说,容易出现空指针异常*/
public class BaoZiPu {//代表包子的countprivate int count;//代表是否有包子的flagprivate boolean flag;public BaoZiPu() {}public BaoZiPu(int count, boolean flag) {this.count = count;this.flag = flag;}/*getCount 改造成消费包子方法直接输出count*/public synchronized void getCount() {//1.判断flag是否为false,如果是false,证明没有包子,消费线程等待while (this.flag == false) {try {this.wait();} catch (InterruptedException e) {throw new RuntimeException(e);}}//2.如果flag为true,证明有包子,开始消费System.out.println("消费了..............第" + count + "个包子");//3.改变flag状态,为false,证明消费完了,没 有包子了this.flag = false;//4.唤醒所有等待线程this.notifyAll();}/*setCount 改造成生产包子count++*/public synchronized void setCount() {//1.判断flag是否为true,如果是true,证明有包子,生产线程等待while (this.flag == true) {try {this.wait();} catch (InterruptedException e) {throw new RuntimeException(e);}}//2.如果flag为false,证明没有包子,开始生产count++;System.out.println("生产了...第" + count + "个包子");//3.改变flag状态,为true,证明生产完了,有包子了this.flag = true;//4.唤醒所有等待线程this.notifyAll();}public boolean isFlag() {return flag;}public void setFlag(boolean flag) {this.flag = flag;}
}public class Product implements Runnable{private BaoZiPu baoZiPu;public Product(BaoZiPu baoZiPu) {this.baoZiPu = baoZiPu;}@Overridepublic void run() {while(true){try {Thread.sleep(100L);} catch (InterruptedException e) {throw new RuntimeException(e);}baoZiPu.setCount();}}
}public class Consumer implements Runnable{private BaoZiPu baoZiPu;public Consumer(BaoZiPu baoZiPu) {this.baoZiPu = baoZiPu;}@Overridepublic void run() {while(true){try {Thread.sleep(100L);} catch (InterruptedException e) {throw new RuntimeException(e);}baoZiPu.getCount();}}
}| 知识点 | 核心内容 | 重点 |
| 多线程生产消费模型 | 通过notifyAll()和while循环解决多线程下的连续生产/消费问题 | notify()与notifyAll()的唤醒机制差异 |
| 线程等待与唤醒机制 | wait()释放锁并进入等待,notifyAll()唤醒所有等待线程竞争锁 | if改为while的必要性(避免虚假唤醒) |
| 线程安全控制 | 通过flag标志位控制生产/消费的交替执行 | 多线程下flag的原子性判断与竞态条件 |
| 锁竞争问题 | 六条线程(3生产+3消费)通过synchronized抢锁执行 | 连续生产/消费的根本原因(未循环检查状态) |
| 解决方案对比 | notifyAll()+while vs notify()+if的稳定性差异 | notify()可能导致线程无限等待 |