threejs顶点UV坐标、纹理贴图
1. 创建纹理贴图
通过纹理贴图加载器TextureLoader的load()方法加载一张图片可以返回一个纹理对象Texture,纹理对象Texture可以作为模型材质颜色贴图.map属性的值。
const geometry = new THREE.PlaneGeometry(200, 100);
//纹理贴图加载器TextureLoader
const texLoader = new THREE.TextureLoader();
// .load()方法加载图像,返回一个纹理对象Texture
const texture = texLoader.load('./earth.jpg');
const material = new THREE.MeshLambertMaterial({// 设置纹理贴图:Texture对象作为材质map属性的属性值map: texture,//map表示材质的颜色贴图属性
});
颜色贴图属性.map
也可以通过颜色贴图属性.map直接设置纹理贴图,和材质的参数设置一样。
material.map = texture;
颜色贴图和color属性颜色值会混合
材质的颜色贴图属性.map设置后,模型会从纹理贴图上采集像素值,这时候一般来说不需要再设置材质颜色.color。.map贴图之所以称之为颜色贴图就是因为网格模型会获得颜色贴图的颜色值RGB。
颜色贴图map和color属性颜色值会混合。如果没有特殊需要,设置了颜色贴图.map,不用设置color的值,color默认白色0xffffff。
const material = new THREE.MeshLambertMaterial({// color: 0x00ffff,// 设置纹理贴图:Texture对象作为材质map属性的属性值map: texture,//map表示材质的颜色贴图属性
});
测试不同几何体添加纹理贴图的效果
你可以尝试把颜色纹理贴图映射到不同的几何体上查看渲染效果,至于为什么映射效果不同,其实和UV坐标相关,具体可以关注下节课关于UV坐标的讲解。
const geometry = new THREE.BoxGeometry(100, 100, 100); //长方体
const geometry = new THREE.SphereGeometry(60, 25, 25); //球体
注意!
注意最新版本,webgl渲染器默认编码方式已经改变,为了避免色差,纹理对象编码方式要修改为THREE.SRGBColorSpace
texture.colorSpace = THREE.SRGBColorSpace;//设置为SRGB颜色空间
相关代码:
// 引入three.js
import * as THREE from "three";// const geometry = new THREE.PlaneGeometry(200, 100); //矩形平面
// const geometry = new THREE.SphereGeometry(50); //矩形平面
const geometry = new THREE.BoxGeometry(100,100,100); //矩形平面
// 创建一个纹理加载器对象
const loadTex = new THREE.TextureLoader();
// 加载图片返回一个纹理对象Texture
const texture = loadTex.load("./earth.jpg");const material = new THREE.MeshLambertMaterial({// color: 0x00ffff, //黄色线条map: texture, // 设置材质的颜色贴图:把图片作为mesh材质的贴图
});
// material.map = texture
const mesh = new THREE.Mesh(geometry, material);export default mesh;
2. 自定义顶点UV坐标
学习自定义顶点UV坐标之前,首先保证你对BufferGeometry的顶点数据、纹理贴图都有一定的理解。
顶点UV坐标的作用
顶点UV坐标的作用是从纹理贴图上提取像素映射到网格模型Mesh的几何体表面上。
浏览器控制台查看threejs几何体默认的UV坐标数据。
const geometry = new THREE.PlaneGeometry(200, 100); //矩形平面
// const geometry = new THREE.BoxGeometry(100, 100, 100); //长方体
// const geometry = new THREE.SphereGeometry(100, 30, 30);//球体
console.log('uv',geometry.attributes.uv);
纹理贴图UV坐标范围
顶点UV坐标可以在0~1.0之间任意取值,纹理贴图左下角对应的UV坐标是(0,0),右上角对应的坐标(1,1)。

自定义顶点UVgeometry.attributes.uv
顶点UV坐标geometry.attributes.uv和顶点位置坐标geometry.attributes.position是一一对应的,
UV顶点坐标你可以根据需要在0~1之间任意设置,具体怎么设置,要看你想把图片的哪部分映射到Mesh的几何体表面上。
/**纹理坐标0~1之间随意定义*/
const uvs = new Float32Array([0, 0, //图片左下角1, 0, //图片右下角1, 1, //图片右上角0, 1, //图片左上角
]);
// 设置几何体attributes属性的位置normal属性
geometry.attributes.uv = new THREE.BufferAttribute(uvs, 2); //2个为一组,表示一个顶点的纹理坐标
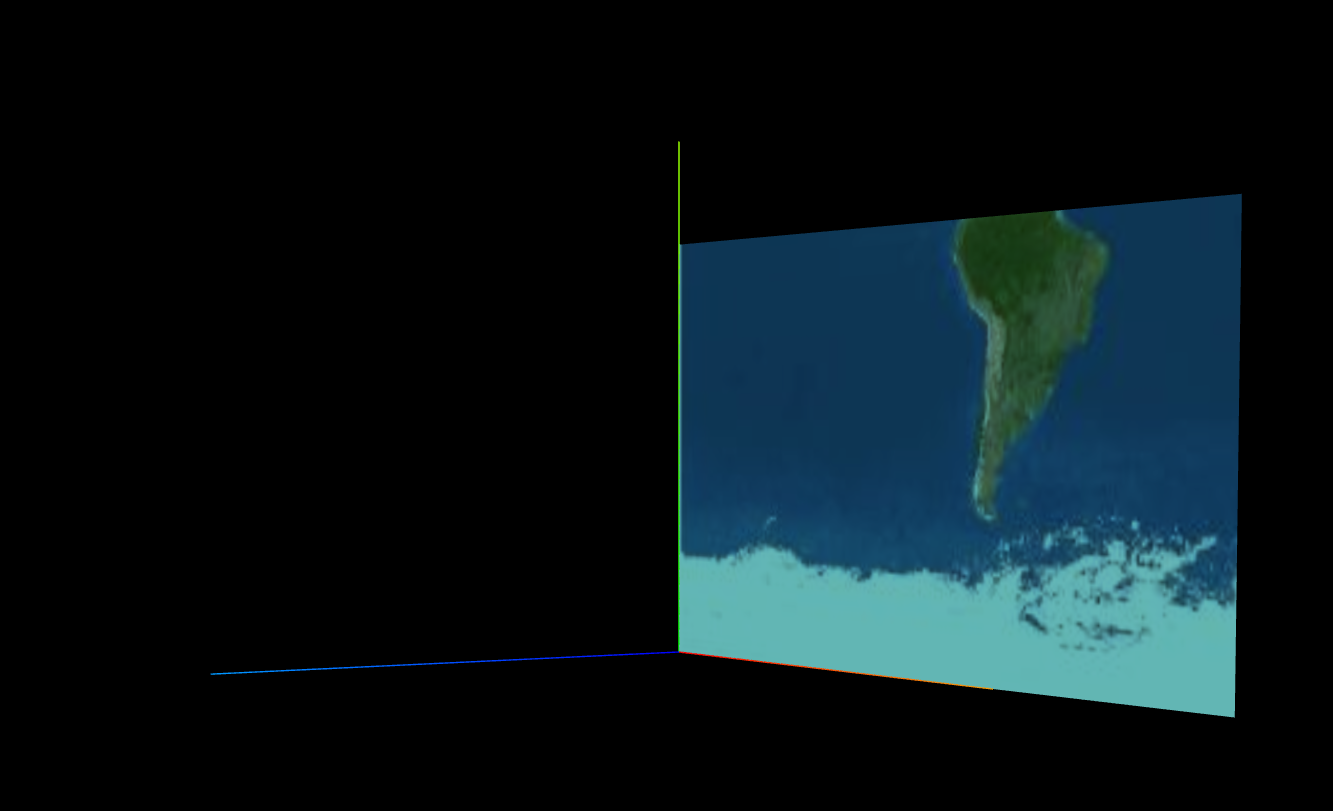
获取纹理贴图四分之一
获取纹理贴图左下角四分之一部分的像素值
const uvs = new Float32Array([0, 0, 0.5, 0, 0.5, 0.5, 0, 0.5,
]);
代码:
import * as THREE from 'three'
// 创建一个空的几何体顶对象
const geometry = new THREE.BufferGeometry()
// 添加顶点数据
// 类型化数组定义的一组顶点坐标数据
const vertices = new Float32Array([// 矩形平面的第一个三角形0, 0, 0, //顶点1坐标  0  索引160, 0, 0, //顶点2坐标  1160, 80, 0, //顶点3坐标  20, 80, 0, //顶点6坐标  3
])// BufferAttribute属性缓冲对象表示顶点数据
// 这个地方三个表示一个顶点坐标
const attribute = new THREE.BufferAttribute(vertices, 3)// 设置几何体的顶点位置属性
geometry.attributes.position = attributeconst normals = new Float32Array([0, 0, 1, //顶点1法向量0, 0, 1, //顶点2法向量0, 0, 1, //顶点3法向量0, 0, 1, //顶点4法向量
])
// 定义了顶点法线数据或者说顶点法向量数据
geometry.attributes.normal = new THREE.BufferAttribute(normals, 3)// 类型化数组创建顶点数据
const indexes = new Uint16Array([0,1,2,0,2,3
])// 这个地方,一个索引表示一个顶点坐标
// 几何体顶点索引的定义
geometry.index = new THREE.BufferAttribute(indexes,1)const uvs = new Float32Array([// 矩形平面的第一个三角形0, 0, //顶点1坐标  0  索引0.5, 0, //顶点2坐标  10.5, 0.5, //顶点3坐标  20, 0.5, //顶点6坐标  3
])
geometry.attributes.uv = new THREE.BufferAttribute(uvs, 2)// 创建一个纹理加载器对象
const loadTex = new THREE.TextureLoader();
// 加载图片返回一个纹理对象Texture
const texture = loadTex.load("./earth.jpg");
// 用网格模型mesh渲染自定义的几何体BufferGeometry
// MeshBasicMaterial
const material = new THREE.MeshLambertMaterial({// color: 0x00ffff, //黄色线条// side: THREE.DoubleSide, //双面可见   BackSide 背面可见map: texture,
})const mesh = new THREE.Mesh(geometry,material)
export default mesh
效果如下:扣出了这个地图的一部分
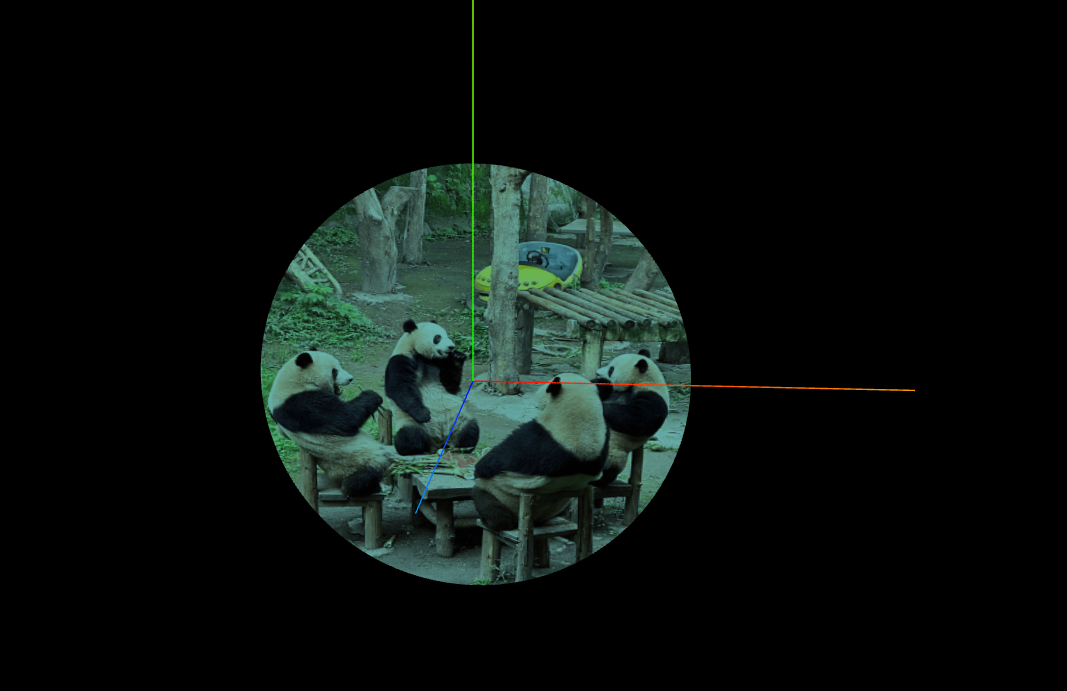
3. 圆形平面设置纹理贴图
你可以思考下,怎么实现矩形图片剪裁为圆形渲染。
其实很简单,可以通过圆形几何体CircleGeometry创建一个网格模型Mesh,把一张图片作为圆形Mesh材质的颜色贴图,这样就可以把一张方形图片剪裁渲染为圆形效果。
//CircleGeometry的顶点UV坐标是按照圆形采样纹理贴图
const geometry = new THREE.CircleGeometry(60, 100);
//纹理贴图加载器TextureLoader
const texLoader = new THREE.TextureLoader();
const texture = texLoader.load('./texture.jpg');
const material = new THREE.MeshBasicMaterial({map: texture,//map表示材质的颜色贴图属性side:THREE.DoubleSide,
});
const mesh = new THREE.Mesh(geometry, material);
本质原理
CircleGeometry的UV坐标会对颜色纹理贴图.map进行提取,CircleGeometry的UV坐标默认提取的就是一个圆形轮廓。
代码:
// 引入three.js
import * as THREE from "three";// const geometry = new THREE.PlaneGeometry(100, 100); //矩形平面
// const geometry = new THREE.SphereGeometry(50); //矩形平面
// const geometry = new THREE.BoxGeometry(100,100,100); //矩形平面
// console.log('', geometry.attributes.uv);
const geometry = new THREE.CircleGeometry(50, 100);
// geometry.attributes.uv = 可以更改
// 创建一个纹理加载器对象
const texLoader = new THREE.TextureLoader();
// 加载图片返回一个纹理对象Texture
const texture = texLoader.load("./texture.jpg");const material = new THREE.MeshLambertMaterial({// color: 0x00ffff, //黄色线条map: texture, // 设置材质的颜色贴图:把图片作为mesh材质的贴图
});
// material.map = texture
const mesh = new THREE.Mesh(geometry, material);export default mesh;
效果图:
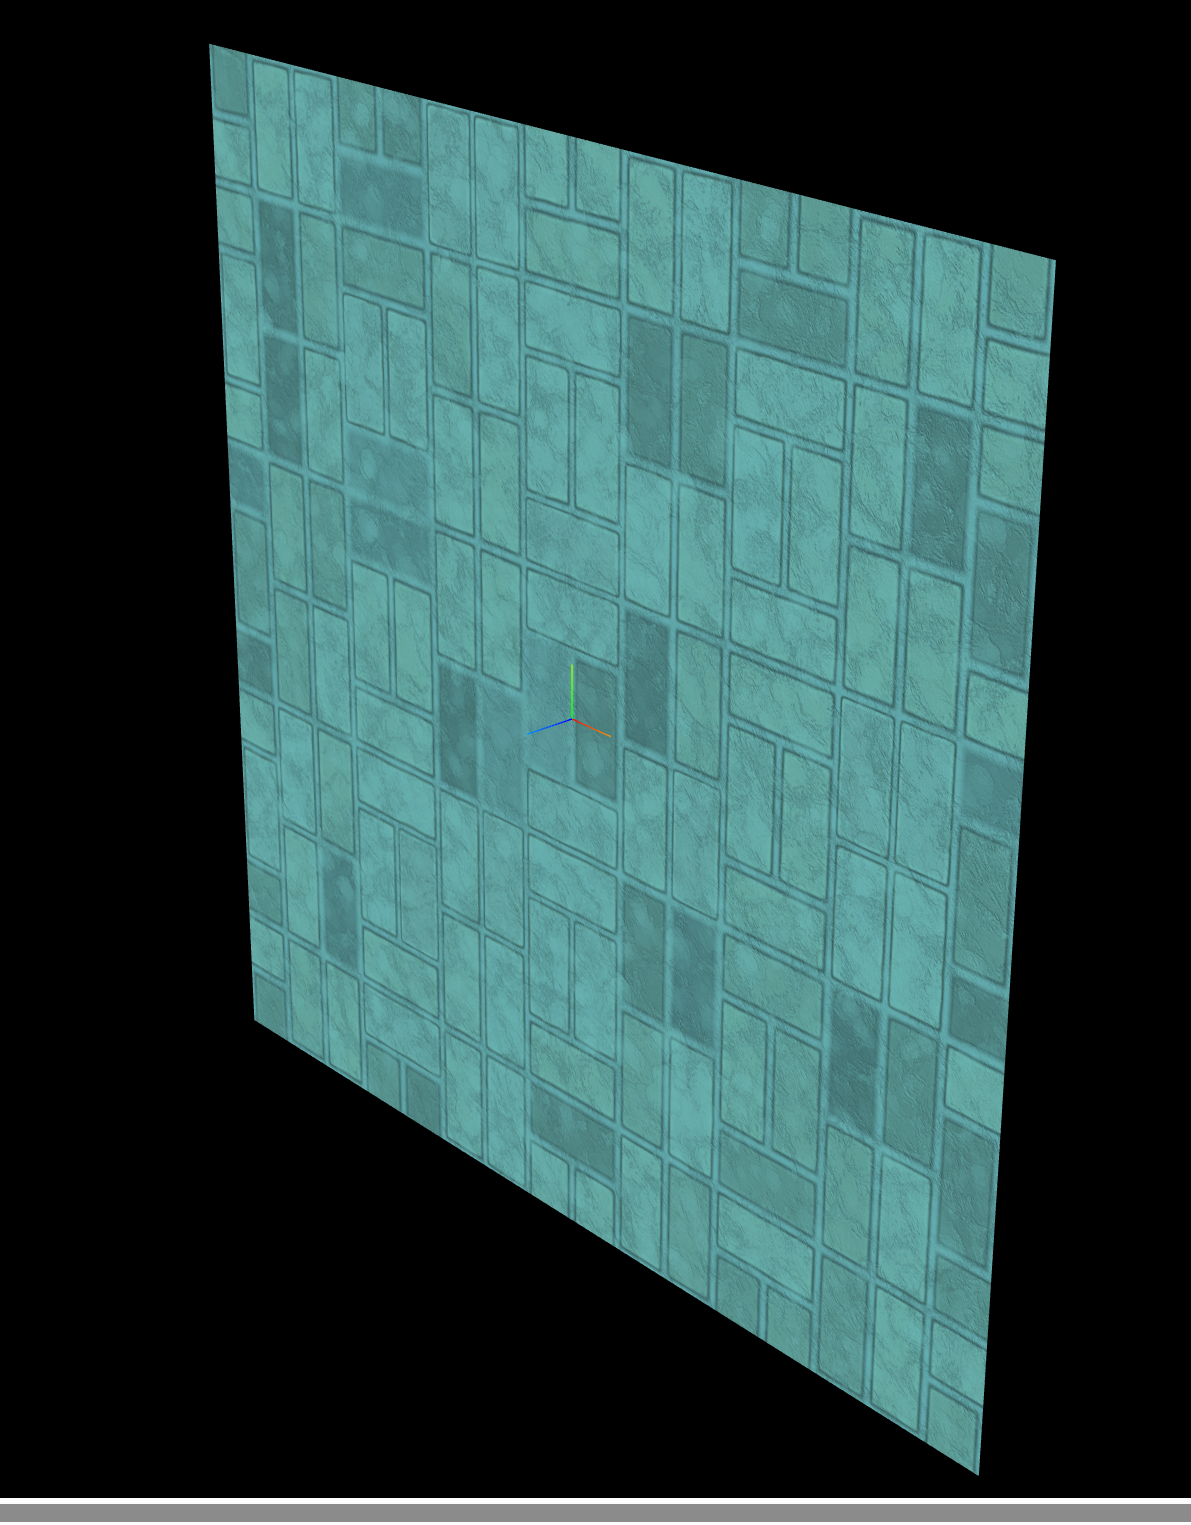
4. 纹理对象Texture阵列
使用threejs纹理对象Texture的阵列功能+矩形平面几何体PlaneGeometry实现一个地面瓷砖效果。
矩形平面设置颜色贴图
const geometry = new THREE.PlaneGeometry(2000, 2000);
//纹理贴图加载器TextureLoader
const texLoader = new THREE.TextureLoader();
// .load()方法加载图像,返回一个纹理对象Texture
const texture = texLoader.load('./瓷砖.jpg');
const material = new THREE.MeshLambertMaterial({// 设置纹理贴图:Texture对象作为材质map属性的属性值map: texture,//map表示材质的颜色贴图属性
});
const mesh = new THREE.Mesh(geometry, material);
纹理对象Texture的阵列功能
// .load()方法加载图像,返回一个纹理对象Texture
const texture = texLoader.load('./瓷砖.jpg');
// 设置阵列模式
texture.wrapS = THREE.RepeatWrapping;
texture.wrapT = THREE.RepeatWrapping;
// uv两个方向纹理重复数量
texture.repeat.set(12,12);//注意选择合适的阵列数量
旋转矩形平面
注意旋转方向影响矩形平面背面还是正面朝上,threejs默认渲染正面,不渲染背面。
// 旋转矩形平面
mesh.rotateX(-Math.PI/2);
设置之前效果
代码:
// 引入three.js
import * as THREE from "three";const geometry = new THREE.PlaneGeometry(2000, 2000); //矩形平面
// const geometry = new THREE.SphereGeometry(50); //矩形平面
// const geometry = new THREE.BoxGeometry(100,100,100); //矩形平面
// console.log('', geometry.attributes.uv);
// const geometry = new THREE.CircleGeometry(50, 100);
// 正好默认图片中间剪裁的,可以打印uv值,刚开始的8个uv值都是一样的
// geometry.attributes.uv = 可以更改
// 创建一个纹理加载器对象
const texLoader = new THREE.TextureLoader();
// .load 方法加载图像,返回一个纹理对象Texture
const texture = texLoader.load("./瓷砖.jpg");
// 允许阵列模式
texture.wrapS = THREE.RepeatWrapping;
texture.wrapT = THREE.RepeatWrapping;
texture.repeat.set(30, 30); //设置每个方向有多少个const material = new THREE.MeshLambertMaterial({// color: 0x00ffff, //黄色线条map: texture, // 设置材质的颜色贴图:把图片作为mesh材质的贴图
});
// material.map = texture
const mesh = new THREE.Mesh(geometry, material);
mesh.rotateX(-Math.PI/2)
export default mesh;
设置之后

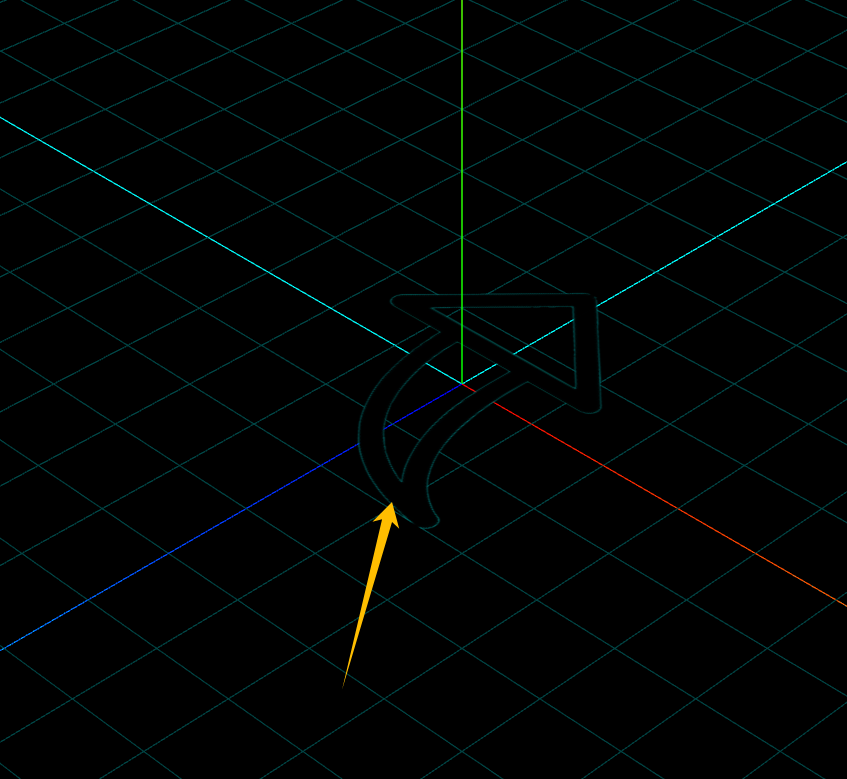
5. 矩形Mesh+背景透明png贴图
three.js项目开发中,把一个背景透明的.png图像作为平面矩形网格模型Mesh的颜色贴图是一个非常有用的功能,通过这样一个功能,可以对three.js三维场景进行标注。
整体思路:创建一个矩形平面,设置颜色贴图.map,注意选择背景透明的.png图像作为颜色贴图,同时材质设置transparent: true,这样png图片背景完全透明的部分不显示。
// 矩形平面网格模型设置背景透明的png贴图
const geometry = new THREE.PlaneGeometry(60, 60); //默认在XOY平面上
const textureLoader = new THREE.TextureLoader();
const material = new THREE.MeshBasicMaterial({map: textureLoader.load('./指南针.png'),        transparent: true, //使用背景透明的png贴图,注意开启透明计算
});
const mesh = new THREE.Mesh(geometry, material);
mesh.rotateX(-Math.PI / 2);
网格地面辅助观察GridHelper
// 添加一个辅助网格地面
const gridHelper = new THREE.GridHelper(300, 25, 0x004444, 0x004444);
矩形平面PlaneGeometry设置颜色贴图
const geometry = new THREE.PlaneGeometry(60, 60);
const textureLoader = new THREE.TextureLoader();
const material = new THREE.MeshBasicMaterial({map: textureLoader.load('./指南针.png'),
});
const mesh = new THREE.Mesh(geometry, material);
开启透明transparent: true
const material = new THREE.MeshBasicMaterial({map: textureLoader.load('./指南针.png'),   //transparent: true:使用背景透明的png贴图,注意允许透明   transparent: true,
});
旋转平移矩形平面
PlaneGeometry矩形平面默认是在XOY平面上,如果你想平行于XOZ平面,就需要手动旋转。
mesh.rotateX(-Math.PI/2);//平行地面:矩形Mesh默认单面可见,注意旋转-Math.PI / 2
如果你不想矩形平面Mesh与地面网格线重合,可以通过位置属性.position偏移。
mesh.position.y = 1;//适当偏移,不与地面重合
代码:
// 引入three.js
import * as THREE from "three";const geometry = new THREE.PlaneGeometry(50, 50); //矩形平面
// const geometry = new THREE.SphereGeometry(50); //矩形平面
// const geometry = new THREE.BoxGeometry(100,100,100); //矩形平面
// console.log('', geometry.attributes.uv);
// const geometry = new THREE.CircleGeometry(50, 100);
// 正好默认图片中间剪裁的,可以打印uv值,刚开始的8个uv值都是一样的
// geometry.attributes.uv = 可以更改
// 创建一个纹理加载器对象
const textureLoader = new THREE.TextureLoader();
// .load 方法加载图像,返回一个纹理对象Texture
// const texture = texLoader.load("./瓷砖.jpg");
// // 允许阵列模式
// texture.wrapS = THREE.RepeatWrapping;
// texture.wrapT = THREE.RepeatWrapping;
// texture.repeat.set(30, 30); //设置每个方向有多少个const material = new THREE.MeshLambertMaterial({color: 0x00ffff, //黄色线条map: textureLoader.load('./转弯.jpg'), // 设置材质的颜色贴图:把图片作为mesh材质的贴图transparent: true
});
// material.map = texture
const mesh = new THREE.Mesh(geometry, material);
mesh.rotateX(-Math.PI/2)
mesh.rotateZ(Math.PI/2)
mesh.position.y = 1
export default mesh;
效果
6. UV动画
本节课通过纹理对象的偏移属性.offset给大家实现一个UV动画效果。
纹理对象.offset属性
纹理对象Texture的.offset的功能是偏移贴图在Mesh上位置,本质上相当于修改了UV顶点坐标。
texture.offset.x +=0.5;//纹理U方向偏移
texture.offset.y +=0.5;//纹理V方向偏移
纹理对象.wrapS或.wrapT与.offset组合使用
你可以对比,当你通过.offset设置了纹理映射偏移后,是否把.wrapS或.wrapT设置为重复映射模式THREE.RepeatWrapping,两种情况的渲染效果差异。
wrapS与x偏移量结合
texture.offset.x +=0.5;//纹理U方向偏移
// 设置.wrapS也就是U方向,纹理映射模式(包裹模式)
texture.wrapS = THREE.RepeatWrapping;//对应offste.x偏移
wrapT与y偏移量结合
texture.offset.y +=0.5;//纹理V方向偏移
// 设置.wrapT也就是V方向,纹理映射模式
texture.wrapT = THREE.RepeatWrapping;//对应offste.y偏移
效果:
纹理UV动画
纹理对象Texture的.offset的功能是偏移贴图在Mesh上位置。
// 渲染循环
function render() {texture.offset.x +=0.001;//设置纹理动画:偏移量根据纹理和动画需要,设置合适的值renderer.render(scene, camera);requestAnimationFrame(render);
}
render();
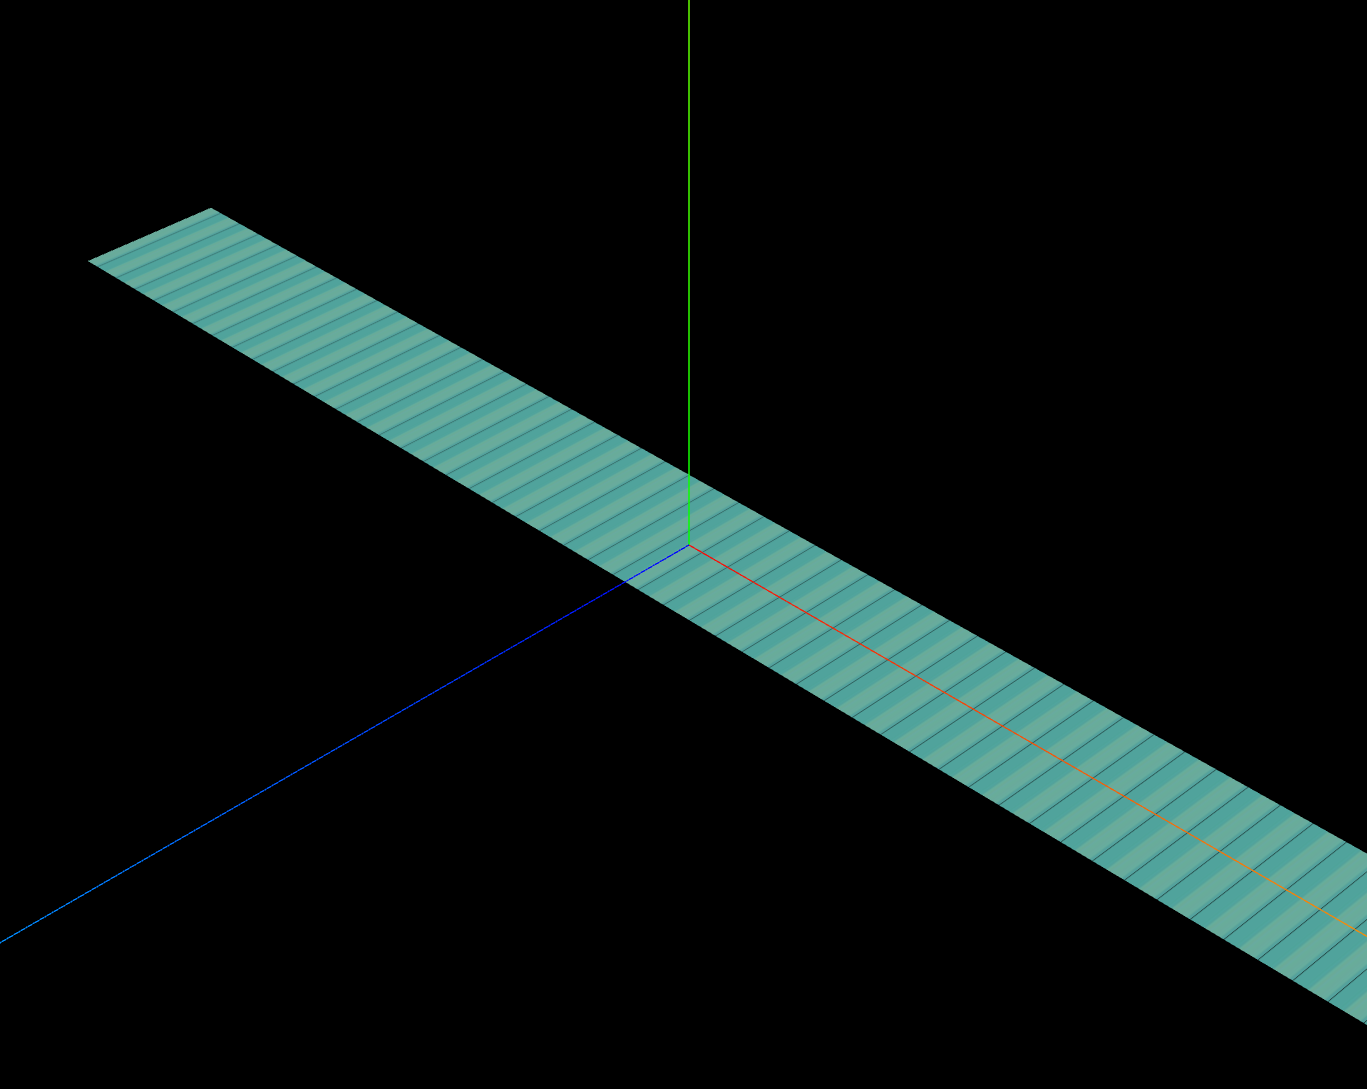
纹理贴图阵列 + UV动画
通过阵列纹理贴图设置.map,这样的话贴图像素可以更小一些。
// 设置U方向阵列模式
texture.wrapS = THREE.RepeatWrapping;
// uv两个方向纹理重复数量
texture.repeat.x=50;//注意选择合适的阵列数量
// 渲染循环
function render() {texture.offset.x +=0.1;//设置纹理动画:偏移量根据纹理和动画需要,设置合适的值renderer.render(scene, camera);requestAnimationFrame(render);
}
render();
index.js,循环渲染
// 引入threejs
import * as THREE from "three";
// 引入轨道控制器扩展库OrbitControls.js
import { OrbitControls } from "three/addons/controls/OrbitControls.js";
import { mesh, texture } from "./model.js";// 创建一个三维场景scene
const scene = new THREE.Scene();
scene.add(mesh);// 创建一个三维坐标轴
const axesHelper = new THREE.AxesHelper(100);
scene.add(axesHelper); //将坐标轴对象添加到三维场景中// 创建一个辅助网格地面的效果
// const girdHelper = new THREE.GridHelper(600, 50, 0x00ffff,0x004444);
// scene.add(girdHelper);// 创建一个光源对象  点光源
const pointLight = new THREE.PointLight(0xffffff, 1.0);
pointLight.decay = 0.0; //不随着距离的改变而衰减
pointLight.position.set(400, 200, 300); //偏移光源位置,观察渲染效果变化
// scene.add(pointLight); //点光源添加到场景中//可视化点光源
// const pointLightHelper = new THREE.PointLightHelper(pointLight, 10);
// scene.add(pointLightHelper);
// 添加一个环境光
const ambient = new THREE.AmbientLight(0xffffff, 0.4);
scene.add(ambient); //没有方向,也就没有立体的// 删除
// scene.remove(ambient, model);
// scene.remove(ambient)
// scene.remove(model)// 添加一个平行光
const directionalLight = new THREE.DirectionalLight(0xfffff, 0.8);
directionalLight.position.set(100, 100, 100); //棱角很弱,跟每个面的夹角都一样
directionalLight.position.set(100, 60, 50); //可以看出每个面的棱角不一样
// directionalLight.target = mesh; //默认坐标原点
scene.add(directionalLight);// 定义相机输出画布的尺寸(单位:像素px)
const width = window.innerWidth;
const height = window.innerHeight;
// 设置相机的四个参数// 创建一个透视投影相机对象
const camera = new THREE.PerspectiveCamera(30, width / height, 0.1, 8000);
// 设置相机的位置
camera.position.set(200, 200, 200); //相机在Three.js三维坐标系中的位置
// 相机的视线,观察目标点的坐标
camera.lookAt(0, 0, 0); //坐标原点// 创建一个WebGL渲染器
const renderer = new THREE.WebGLRenderer({antialias: true, //启用抗锯齿,线条更加流畅,减少锯齿状
});
renderer.setSize(width, height); //canvas画布的宽高度
renderer.render(scene, camera); //执行一个渲染操作,类比相机的拍照动作 咔
//把渲染结果canvas画布,也就是所谓的“照片”,添加到网页的页面上
document.body.appendChild(renderer.domElement);
// 插入到任意的html元素中
// document.getElementById("webgl").appendChild(renderer.domElement)console.log("查看当前屏幕设备像素比", window.devicePixelRatio); //查看当前屏幕设备像素比 2
// 告诉threejs你的屏幕的设备像素比window.devicePixelRatio,针对与像素接近于1的设置下面的语句可能不是很明显,对于屏幕比例是2的,高清屏这种,设置的效果会很明显,减少模糊
renderer.setPixelRatio(window.devicePixelRatio); //会很清晰,遇到模糊了不要忘记设置这个
// renderer.setClearColor(0x444444);// 渲染循环
function render() {// 可以与wrapS结合一起思考,拼接的作用效果,会让第一张图片拼接完了之后,剩余的部分依然存在图片// 每次累加texture.offset.x += 0.1;// model.rotateY(0.01); //周期性旋转,每次旋转0.01弧度renderer.render(scene, camera); //周期性执行相机渲染功能,更新canvas画布上的内容requestAnimationFrame(render);
}
render();// 创建一个相机控件对象
const controls = new OrbitControls(camera, renderer.domElement);
// controls.target.set(1000, 0, 1000); //默认为0,0,0
controls.update();
// 如果OrbitControls改变了相机参数,重新调用渲染器渲染三维场景
controls.addEventListener("change", function () {// console.log(camera.position);// 每当发生改变的时候就重新渲染renderer.render(scene, camera); //执行渲染操作
});window.onresize = function () {// 更新canvas画布的尺寸renderer.setSize(window.innerWidth, window.innerHeight);// 相机的视椎体宽高比一定和画布保持一致,否则物体就会扭曲camera.aspect = window.innerWidth / window.innerHeight;camera.updateProjectionMatrix();
};
model.js
// 引入three.js
import * as THREE from "three";const geometry = new THREE.PlaneGeometry(200, 20); //矩形平面
// const geometry = new THREE.SphereGeometry(50); //矩形平面
// const geometry = new THREE.BoxGeometry(100,100,100); //矩形平面// 创建一个纹理加载器对象
const textureLoader = new THREE.TextureLoader();
const texture = textureLoader.load("./纹理3.jpg");
const material = new THREE.MeshLambertMaterial({// color: 0x00ffff, //黄色线条map: texture,
});const mesh = new THREE.Mesh(geometry, material);
mesh.rotateX(-Math.PI / 2);
// 纹理对象的偏移属性
// texture.offset.x = 0.5; //UV坐标的 u方向偏移 其余部分会被砍掉
// texture.offset.y = -0.5; //UV坐标的 v方向偏移
// 映射之后,会将多余的挪动到后面并拼接起来
texture.wrapS = THREE.RepeatWrapping; //改变包裹,或者说映射方式
// 不阵列的话,那么一整个图片就会缩放在这个地方
texture.repeat.x = 50; //
export { mesh, texture };
index.html
<!DOCTYPE html>
<html lang="en"><head><meta charset="UTF-8" /><meta name="viewport" content="width=device-width, initial-scale=1.0" /><title>Document</title></head><body><!-- <div id="webgl" style="margin-top: 100px;margin-left: 200px;"></div> --><script type="importmap">{"imports": {"three": "../../three.js-r148/build/three.module.js","three/addons/": "../../three.js-r148/examples/jsm/"}}</script><script type="module" src="./index.js"></script></body>
</html>
模拟传送带的效果,动图,滚动的效果