第六章 文件的其他操作命令
6.1 文本内容统计 wc
wc 命令用于统计指定文本文件的行数、字数或字节数,语法为: wc [ 选项 ] 文件名称
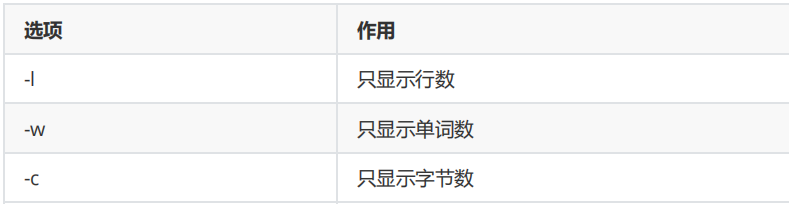
在 Linux 系统中, /etc/passwd 是用于保存系统账户信息的文件,要统计当前系统中有多少个用户,可以使用下面的命令来进行查询,是不是很神奇:
[root@kongd ~]# wc -l /etc/passwd
45 /etc/passwd
6.2 复制、移动文件
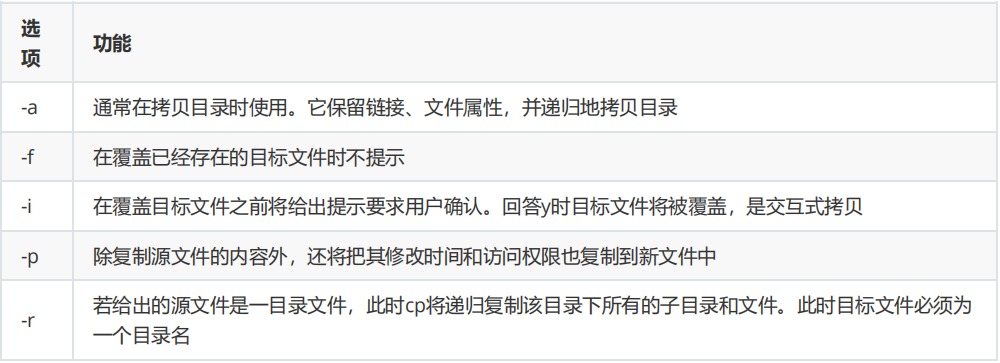
1 、复制文件或目录 语法: cp [ 选项 ] 源文件 目标文件
2 、移动文件或目录
mv 命令用于剪切或重命名文件,语法为: mv [ 选项 ] 源文件名称 目标文件名称
剪切操作不同于复制操作,因为它会把源文件删除掉,只保留剪切后的文件。如果在同一个目录中将某个文件剪切后还粘贴到当前目录下,其实本质就是对文件进行了重命名操作。
[root@kongd ~]# mv x.log linux.log
[root@kongd ~]# ls
install.log linux.log
6.3 查找文件的路径
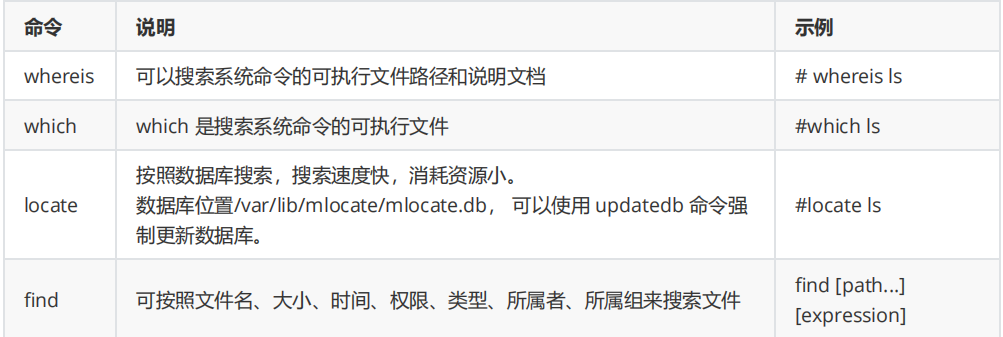
find 详解: find 命令默认接的命令是 -print ,它默认以 \n 将找到的文件分隔。可以使用 -print0 来使用 \0 分隔,这样就不会分行了。但是一定要注意,-print0 针对的是 \n 转 \0 ,如果查找的文件名本身就含有空格,则 find 后 -print0 仍然会显示空格。
1. 按照文件名搜索
[root@localhost ~]# find 路径 [选项] 搜索内容
选项:
-name: 按照文件名搜索
-iname: 按照文件名搜索,不区分文件名大小写
-inum: 按照 inode 号搜索
[root@kongd ~]# find /etc -name "host*" -print
/etc/host.conf
/etc/hosts
/etc/hosts.allow
/etc/hosts.deny
/etc/avahi/hosts
/etc/hostname
[root@shell ~]# find /etc -path "*ssh/ssh*"
/etc/ssh/ssh_config
/etc/ssh/ssh_config.d
/etc/ssh/ssh_config.d/05-redhat.conf
/etc/ssh/sshd_config
/etc/ssh/ssh_host_ed25519_key
/etc/ssh/ssh_host_ed25519_key.pub
/etc/ssh/ssh_host_ecdsa_key
/etc/ssh/ssh_host_ecdsa_key.pub
/etc/ssh/ssh_host_rsa_key
/etc/ssh/ssh_host_rsa_key.pub
#从结果中排除目录自身
[root@shell ~]# find /tmp/test ! -path /tmp/test
[root@shell ~]# find . ! -path .[root@shell ~]# find . -name file
./file
./dir1/file
./test/file
[root@shell ~]# find ~+ -name file
/root/file
/root/dir1/file
/root/test/file
[root@shell ~]# find $PWD -name file
/root/file
/root/dir1/file
/root/test/file
[root@shell ~]# find $(pwd) -name file
/root/file
/root/dir1/file
/root/test/file 2. 按照文件大小搜索
[root@localhost ~]# find 搜索路径 [选项] 搜索内容
选项:
-size [+|-]大小: 按照指定大小搜索文件,这里的“+”的意思是搜索比指定大小还要大的文件, “-”的意思是搜
索比指定大小还要小的文件
注意:-size 0可以查找大小为0的普通文件。如果要查找没有任何文件的目录或者空的普通文件可以使用-empty
[root@master ~]# find . -size +10M 3. 按照修改时间搜索 Linux 中的文件有访问时间( atime )、数据修改时间( mtime )、状态修改时间( ctime )这三个时间,我们可以按照时间来搜索文件。
[root@localhost ~]# find 搜索路径 [选项] 搜索内容
选项:
-atime [+|-]时间: 按照文件访问时间搜索
-mtime [+|-]时间: 按照文件数据修改时间搜索
-ctime [+|-]时间: 按照文件状态修改时间搜索
-newer file: 把比file修改时间更新的文件列出来
-newerXY:如果所考虑的文件的时间戳X比文件引用的时间戳Y新,则成功。字母X和Y可以是以下任意字母。
a文件引用的访问时间
B文件引用的出生时间
c索引节点状态更改参考时间
m文件引用的修改时间
t将所指定的参数理解为一个具体的时间值
示例:搜索/test下2021-06-03到2021-06-06之间修改过的文件
[root@localhost ~]# find /test -type f -newermt 2021-06-03 -a ! -newermt 2021-06-06
-5 :代表 5 天内修改的文件。
5 :代表前 5 ~ 6 天那一天修改的文件。
+5 :代表 6 天前修改的文件。

4. 按照权限搜索
[root@localhost ~]# find 搜索路径 [选项] 搜索内容
选项:
-perm 权限模式: 查找文件权限刚好等于“权限模式”的文件
-perm -权限模式: 查找文件权限全部包含“权限模式”的文件
-perm +权限模式: 查找文件权限包含“权限模式”的任意一个权限的文件
如果要在整个系统中搜索权限中包括 SUID 权限的所有文件,只需使用 -4000 即可:
[root@kongd ~]# find / -perm -4000 -print
/usr/bin/fusermount
/usr/bin/chage
………………省略部分输出信息………………
5. 按照所有者和所属组搜索
[root@localhost ~]# find 搜索路径 [选项] 搜索内容
选项:
-uid 用户 ID: 按照用户 ID 查找所有者是指定 ID 的文件
-gid 组 ID: 按照用户组 ID 查找所属组是指定 ID 的文件
-user 用户名: 按照用户名查找所有者是指定用户的文件
-group 组名: 按照组名查找所属组是指定用户组的文件
-nouser: 查找没有所有者的文件
6. 按照文件类型搜索
[root@localhost ~]# find 搜索路径 [选项] 搜索内容
选项:
-type d: 查找目录
-type f: 查找普通文件
-type l: 查找软链接文件
7. 逻辑运算符
[root@localhost ~]# find 搜索路径 [选项] 搜索内容
选项:
-a: and 逻辑与
-o: or 逻辑或
-not: not 逻辑非
优先级:与>或>非
8. 其他选项

这里需要重点讲解一下 -exec 参数重要的作用。这个参数用于把 find 命令搜索到的结果交由紧随其后的命令作进一步处理,它十分类似于管道符技术,并且由于find 命令对参数的特殊要求,因此虽然 exec 是长格式形式,但依然只需要一个减号(- )。
示例:在整个文件系统中找出所有归属于 kongd 用户的文件并复制到 /root/findresults 目录
[root@shell ~]# find /root -printf "%f\n"
[root@kongd ~]# find / -user kongd -exec cp -a {} /root/findresults/ \;
6.3.1 拓展阅读
注:此部分内容不作要求,学有余力的同学可自行拓展阅读
上面 exec 可以使用 xargs 来替代 。
xargs (英文全拼: eXtended ARGuments ), xargs 可以将管道或标准输入( stdin )数据传递给另外一个命令作为参数,默认情况下,xargs 将换行符和空格作为分隔符,把标准输入分解成一个个命令行参数,并且 xargs 后面的命令默认是echo 。 xargs 对于数据的处理顺序是先分割再分批,然后传递参数。
之所以能用到这个命令,关键是由于很多命令不支持 | 管道来传递参数,而日常工作中有有这个必要,所以就有了xargs 命令,例如: find /sbin - perm +700 |ls - l # 这个命令是错误的 find /sbin - perm +700 |xargs ls - l # 这样才是正确的
[root@master ~]# cat file
this is first line
this is second line
the 3nd line
the end
[root@master ~]# cat file | xargs
this is first line this is second line the 3nd line the end
[root@master ~]# cat file | xargs echo
this is first line this is second line the 3nd line the end
( 1 ) -a 选项 :从文件中读取数据作为 stdin
[root@master ~]# xargs -a file
this is first line this is second line the 3nd line the end
( 2 ) -p 选项 :当每次执行一个命令的时候询问一次用户
[root@master ~]# cat file | xargs -p
echo this is first line this is second line the 3nd line the end ?...n
( 3 ) -t 选项 :先打印命令,然后再执行
[root@master ~]# cat file | xargs -t
echo this is first line this is second line the 3nd line the end
this is first line this is second line the 3nd line the end
( 4 ) -d 选项 :默认情况下, xargs 将换行符和空格作为分隔符,把标准输入分解成一个个命令行参数, -d 选项可以更改分隔符
[root@master ~]# echo a1b1c2 | xargs -d '1'
a b c2
( 5 ) -n 选项 :指定每次将多少项作为命令行参数,默认是所有的项
[root@master ~]# echo {0..9} | xargs -n 2 echo
0 1
2 3
4 5
6 7
8 9
( 6 ) -L 选项 :如果标准输入包含多行, -L 参数指定多少行作为一个命令行参数
[root@master ~]# cat file | xargs -L 2
this is first line this is second line
the 3nd line the end
( 7 ) -E 选项 :指定分隔符【有的地方可能是 -e 】,当 xargs 分析到含有分隔符这个标志的时候就停止
[root@master ~]# cat file | xargs -E "is"
this
( 8 ) -I 选项 :如果 xargs 要将命令行参数传给多个命令,可以使用 - I 参数(也可以使用 -i ,但是 -i 默认使用大括号作为替换符,-I 可以使用任意字符)
[root@master ~]# echo a b c | xargs -I test sh -c 'echo test;touch test'
a b c
[root@master ~]# ll
total 0
-rw-r--r-- 1 root root 0 May 6 09:37 a
-rw-r--r-- 1 root root 0 May 6 09:37 b
-rw-r--r-- 1 root root 0 May 6 09:37 c
说明:也可以将上面的test字符串使用{}代替。
复制所有图片文件到 /data/images 目录下:
[root@master ~]#ls *.jpg | xargs -n1 -I {} cp {} /data/images
( 9 ) -0 选项 :由于 xargs 默认将空格作为分隔符,所以不太适合处理文件名,因为文件名可能包含空格。 - 0 参数表示用 null 当作分隔符
示例 1 :
删除所有的.txt文档
find . -name "*.txt" -exec rm {} \;
find . -name "*.txt" | xargs rm {}
以上两个命令的区别:
-exec
1.参数是一个一个传递的,传递一个参数执行一次rm
2.文件名有空格等特殊字符也能处理
xargs
1.一次将参数传给命令,可以使用-n控制参数个数
2.处理特殊文件名需要采用如下方式:
find . -name "*.txt" print0 |xargs -0 rm {}
说明:find命令的参数-print0,指定输出的文件列表以null分隔。
示例 2 :
统计一个源代码目录中所有 php 文件的个数:
find . -type f -name "*.php" -print0 | xargs -0 wc -l
查找所有的 jpg 文件,并且压缩它们:
find . -type f -name "*.jpg" -print | xargs tar -czvf images.tar.gz
( 10 ) -P 选项 :指定并行执行的数量,默认只有一个处理进程,不会提升效率,可以指定为 N 个子进程,或者指定为0表示尽可能多的利用 cpu 。
ls --hide proc / | xargs -i -P 0 find /{} -type f -name "*Find.pm"
说明:ls的--hide表示不显示文件中和shell指定模式匹配的,会被-a,-A选项覆盖
xargs 其他应用:
假如你有一个文件包含了很多你希望下载的 URL,你能够使用 xargs下载所有链接:
cat url-list.txt | xargs wget -c
6.4 压缩和解压缩
6.4.1 zip 和 unzip 命令
zip: 可以压缩文件和目录。 语法: zip FILE 语法: unzip FILE
素材准备:
[root@localhost ~]# mkdir /test
[root@localhost ~]# cd /test
[root@localhost test]# for i in {1..5};do echo "test$i" > test$i.txt;done
[root@localhost test]# ls
test1.txt test2.txt test3.txt test4.txt test5.txt
[root@localhost test]# mkdir dir1
[root@localhost test]# cp /etc/fstab dir1/
实例1: 使用zip压缩文件test1.txt
[root@localhost test]# zip test1.zip test1.txt
adding: test1.txt (stored 0%)
[root@localhost test]# ls test1*
test1.txt test1.zip
压缩率为最高压缩test2.txt
[root@localhost test]# zip -9 test2.zip test2.txt
adding: test2.txt (stored 0%)
[root@localhost test]# ls test2*
test2.txt test2.zip
实例2: 将当前目录dir1连同目录下文件一起压缩
[root@localhost test]# zip -r dir1.zip dir1/
adding: dir1/ (stored 0%)
adding: dir1/fstab (deflated 44%)
[root@localhost test]# ls dir1*
dir1.zip
dir1:
fstab
实例3: 向压缩文件中test1.zip中添加test2. txt文件
[root@localhost test]# zip -m test1.zip test2.txt
adding: test2.txt (stored 0%)
实例4: 删除压缩文件中的文件
[root@localhost test]# zip -d test1.zip test2.txt
实例5: 压缩文件时排除某个文件
[root@localhost test]# zip test.zip *.txt -x test1.txt
adding: test3.txt (stored 0%)
adding: test4.txt (stored 0%)
adding: test5.txt (stored 0%)
实例6: 解压文件test2.zip
[root@localhost test]# unzip test2.zip
Archive: test2.zip
extracting: test2.txt
实例7:将压缩文件text.zip在指定目录dir1下解压缩
[root@localhost test]# unzip test.zip -d dir1
Archive: test.zip
extracting: dir1/test3.txt
extracting: dir1/test4.txt
extracting: dir1/test5.txt
实例8: 查看压缩文件目录,但不解压
[root@localhost test]# unzip -v test.zip
Archive: test.zip
Length Method Size Cmpr Date Time CRC-32 Name
-------- ------ ------- ---- ---------- ----- -------- ----
6 Stored 6 0% 06-17-2017 17:53 4e6f5599 test3.txt
6 Stored 6 0% 06-17-2017 17:53 012ec35e test4.txt
6 Stored 6 0% 06-17-2017 17:53 1835f21f test5.txt
-------- ------- --- -------
18 18 0% 3 files
6.4.2 gzip 和 gunzip 命令
gzip(gunzip=gzip -d)命令
实例1: 使用gzip压缩文件
[root@localhost test]# gzip test1.txt
[root@localhost test]# ls test1*
test1.txt.gz test1.zip
实例2: 使用gzip压缩目录下文件
[root@localhost test]# gzip -r dir1/
[root@localhost test]# ls dir1
fstab.gz test3.txt.gz test4.txt.gz test5.txt.gz
#注意: 以上压缩之后原始文件就没有了。
实例3: 压缩但保留原始文件
[root@localhost test]# gzip -c test2.txt > test2.txt.gz
[root@localhost test]# ls test2*
test2.txt test2.txt.gz test2.zip
注:查看压缩过的文本文件内容: zcat 、 zless 。 zcat 文件名 .gz
6.4.3 bzip2 、 bunzip2 命令
bzip2、bunzip2(=bzip2 -d)是更新的Linux压缩工具,比gzip有着更高的压缩率。
bzip2、bunzip2示例如下:
[root@localhost test]# bzip2 man.config //将man.config以bzip2压缩,此时man.config变成
man.config.bz2
[root@localhost test]# bzip2 -9 -c man.config > man.config.bz2 //将man.config用最佳的压缩比
压缩,并保留原本的档案
[root@localhost test]# bzip2 -d man.config.bz2 //将man.config.bz2解压缩,可用bunzip2取代
bzip2 -d
[root@localhost test]#bunzip2 man.config.bz2 //将man.config.bz2解压缩
注:查看压缩过的文件内容: bzcat 、 bzless 。 bzcat 文件名 .bz2
6.4.4 xz 、 unxz 命令
实例1:压缩文件
[root@localhost test]# xz test1.txt
[root@localhost test]# ls test1.txt.xz
test1.txt.xz
实例2:压缩dir1目录下文件
[root@localhost test]# xz dir1/*
[root@localhost test]# ls dir1
fstab.xz test3.txt.xz test4.txt.xz test5.txt.xz
实例3:查看压缩文件内容
[root@localhost test]# xzcat test1.txt.xz
test1
实例4:解压缩(xz -d等价于unxz)
[root@localhost test]# unxz test1.txt.xz
实例5:解压缩目录dir1下文件
[root@localhost test]# xz -d dir1/*
[root@localhost test]# ls dir1
fstab test3.txt test4.txt test5.txt
注:查看压缩过的文件内容: xzcat 、 xzless 。 xzcat 文件名 .xz
6.5 tar 归档命令
格式: tar [ 选项 ] [args]…… 选项:任选其一
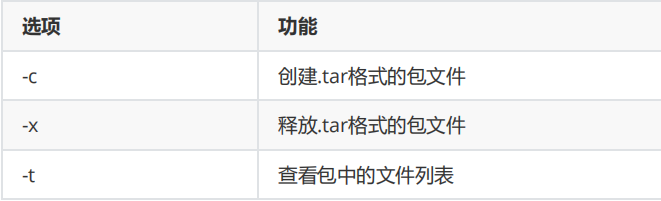
必选项:
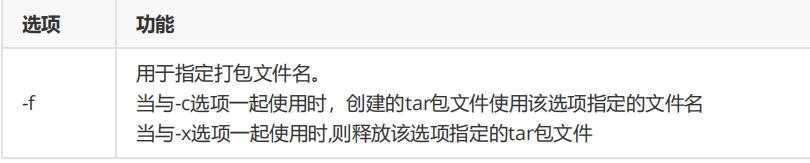
辅助选项:
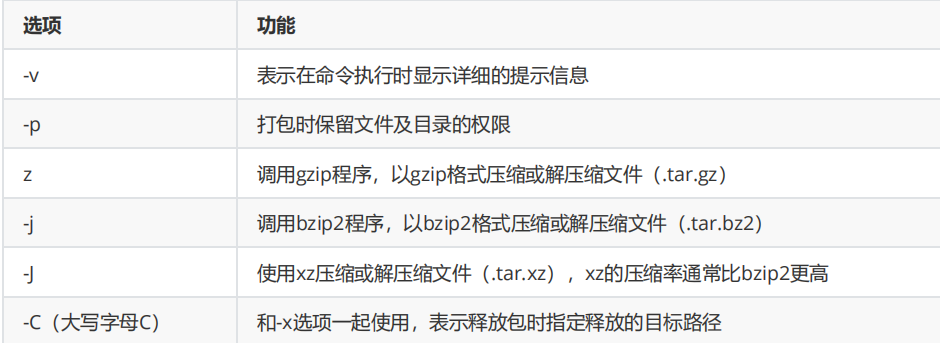
额外的选项:
#打包时排除某个文件
tar cf 文件名.tar --exclude=路径/文件 路径
注:此处的路径前后需要保持保持一致,统一使用绝对路径或者相对路径
1. 创建 ( 非压缩的 ) 打包文件,将指定的一个或多个文件或目录备份生成为一个指定的包文件
tar cvf/cfv/-cvf 文件名.tar 要打包的目录或文件名列表…… 2. 列出包文件中的文件列表
tar t[v]f 包文件名 3. 创建带压缩的包文件,为节省存储空间,通常需要生成压缩格式的 tar 包文件, tar 命令支持三种不同的压缩方式
tar czf/-czf 文件名.tar.gz 要打包压缩的目录或文件名……
tar cjf/-cjf 文件名.tar.bz2 要打包压缩的目录或文件名……
tar cJf/-cJf 文件名.tar.xz 要打包压缩的目录或文件名……
4. 提取包文件到指定目录
tar xf/-xf/-xzf 文件名.tar.gz [-C 目标路径]
tar xf/-xf/-xjf 文件名.tar.bz2 [-C 目标路径]
tar xf/-xf/-xJf 文件名.tar.xz [-C 目标路径]
6.6 文件上传下载
1 、 xftp 工具
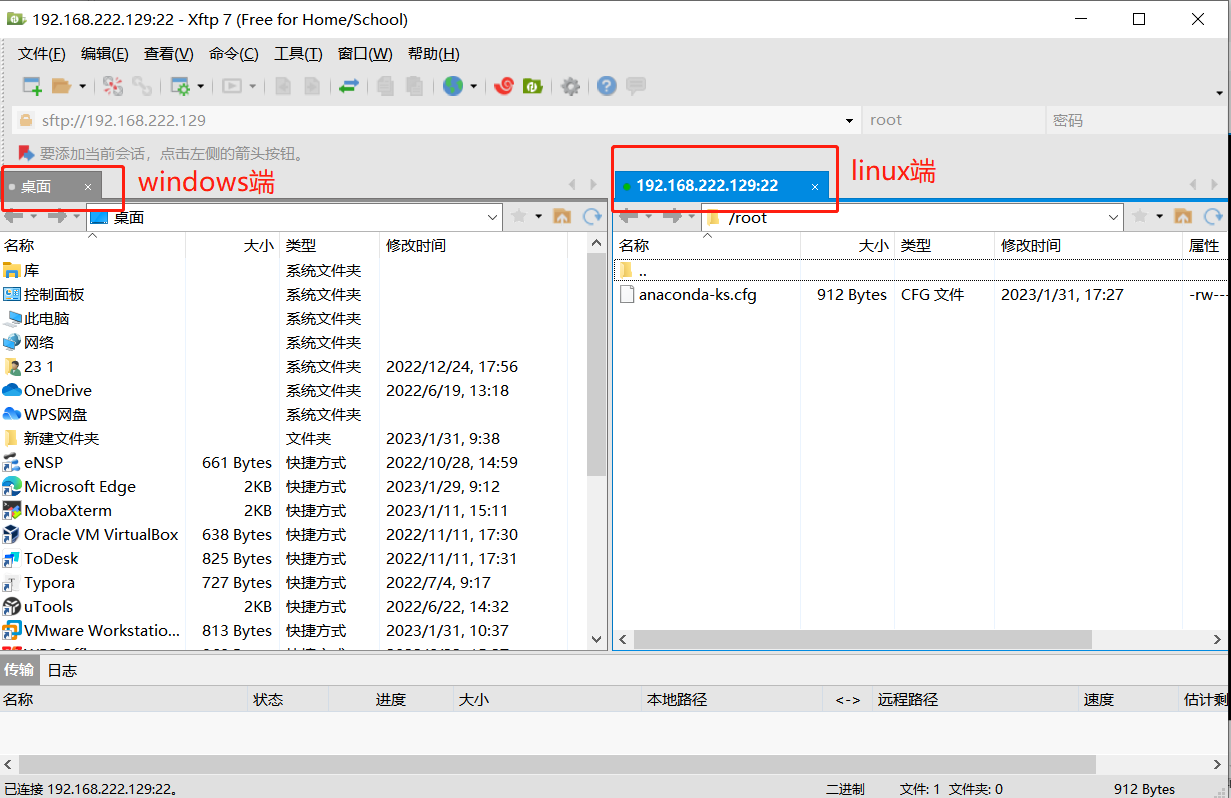
2 、 sftp 是一个交互式文件传输程式
它类似于 ftp 传输协议,属于 ssh, 但它进行加密传输,相对 FTP 来讲有更高的安全性。
如果有服务器的端口不是默认的 22 ,请在 sftp 后面加 -P 端口号。
\# sftp root@223.6.6.6
The authenticity of host ‘223.6.6.6 (223.6.6.6)’ can’t be established.
ECDSA key fingerprint is SHA256:Hl/dKTFzL4lOlF8DIG5itaV4OAsZunC2AWlFGLjLfsg.
Are you sure you want to continue connecting (yes/no)? yes【输入yes回车】
Warning: Permanently added ‘223.6.6.6’ (ECDSA) to the list of known hosts.
root@223.6.6.6’s password:【输入223.6.6.6的root密码并回车】
Connected to 223.6.6.6.
sftp>
将 223.6.6.6 服务器文件下载到 223.5.5.5 的 home 目录 ;
sftp> get /var/www/renwole.txt /home/ 将 223.5.5.5 服务器文件上传到 223.6.6.6 服务器的 mnt 目录 ;
sftp> put /home/renwole.txt /mnt/ 你如果不知道远程主机的目录是什么样, ls 命令可以列出 223.6.6.6 服务器的当前目录列表。例如:
sftp> ls //和查看本地操作命令一样
sftp> pwd //查询223.6.6.6的当前工作目录
如果想知道本地主机( 223.5.5.5 )的目录是什么样,可以使用下面的命令,例如:
sftp> lls
sftp> lpwd
如果想退出,例如:
exit //退出机器,返回你原始机器界面。