OminiScenes代码阅读
DataLoader 部分:
加载的数据如下:包括 相机内外参 和 Metric3D V2 估计的深度值
data_dict["imgs"] = batch["inputs"]["rgb"].to(device_id, dtype=self.dtype)# for pixel-gsrays_o = batch["inputs_pix"]["rays_o"].to(device_id, dtype=self.dtype)rays_d = batch["inputs_pix"]["rays_d"].to(device_id, dtype=self.dtype)data_dict["rays_o"] = rays_odata_dict["rays_d"] = rays_ddata_dict["pluckers"] = self.plucker_embedder(rays_o, rays_d)## 相机的内参数 fx, fy, cx,cydata_dict["fxs"] = batch["inputs_pix"]["fx"].to(device_id, dtype=self.dtype)data_dict["fys"] = batch["inputs_pix"]["fy"].to(device_id, dtype=self.dtype)data_dict["cxs"] = batch["inputs_pix"]["cx"].to(device_id, dtype=self.dtype)data_dict["cys"] = batch["inputs_pix"]["cy"].to(device_id, dtype=self.dtype)data_dict["c2ws"] = batch["inputs_pix"]["c2w"].to(device_id, dtype=self.dtype)## cks 就是相机的内参矩阵data_dict["cks"] = batch["inputs_pix"]["ck"].to(device_id, dtype=self.dtype)## metric3d V2 估计的深度值data_dict["depths"] = batch["inputs_pix"]["depth_m"].to(device_id, dtype=self.dtype)data_dict["confs"] = batch["inputs_pix"]["conf_m"].to(device_id, dtype=self.dtype)
特征提取
使用预训练的 ResNet-50 + DINO feature 去进行图像的特征提取:
假设输入的图像的 res:[224,400,3]
img_feats = self.extract_img_feat(img=img, status="test")gaussians_pixel, gaussians_feat = self.pixel_gs(rearrange(img_feats[0], "b v c h w -> (b v) c h w"),data_dict["depths"], data_dict["confs"], data_dict["pluckers"],data_dict["rays_o"], data_dict["rays_d"])
pixel Gaussian 预测
Pixel-gaussian 的预测是一个 Unet 的结构,每一个 Pixel 预测一个 Gaussian (我们可以预测两个),
- 将图像送入的 DINO feature 进行 上采样
img_feats = self.upsampler(img_feats)
- 得到 Plucker 的 embedding, 并和图像的 feature 相加
plucker_embeds = self.plucker_to_embed(pluckers)
img_feats = img_feats + self.cams_embeds[None, :, None, None] + plucker_embeds
- 得到 读取 metric3D 预测的 depth 和 conf 图像, 并和前面的feature concat 起来
 depths_in = rearrange(depths_in, "b v h w -> (b v) () h w")
confs_in = rearrange(confs_in, "b v h w -> (b v) () h w")
img_feats = torch.cat([img_feats, depths_in / 20.0, confs_in], dim=1)
- 将这些feature 送入到 Unet 中进行 卷积
sample = img_feats
down_block_res_samples = (sample,)for block_id, down_block in enumerate(self.down_blocks):if self.use_checkpoint and status != "test":sample, res_samples = torch.utils.checkpoint.checkpoint(down_block, sample, use_reentrant=False)else:sample, res_samples = down_block(sample)down_block_res_samples += res_samples# middilesample = self.mid_block(sample)# upsamplefor block_id, up_block in enumerate(self.up_blocks):res_samples = down_block_res_samples[-len(up_block.resnets):]down_block_res_samples = down_block_res_samples[:-len(up_block.resnets)]if self.use_checkpoint and status != "test":input_vars = (sample, res_samples)sample = torch.utils.checkpoint.checkpoint(up_block, *input_vars, use_reentrant=False)else:sample = up_block(sample, res_samples)
- 得到的feature map 预测 pixel-align 的 高斯
gaussians = self.to_gaussians(features)
gaussians = rearrange(gaussians, "(b v) (n c) h w -> b (v h w n) c",b=bs, v=self.num_cams, n=1, c=self.gs_channels)
offsets = gaussians[..., :3]
opacities = self.opt_act(gaussians[..., 3:4])
scales = self.scale_act(gaussians[..., 4:7])
rotations = self.rot_act(gaussians[..., 7:11])
rgbs = self.rgb_act(gaussians[..., 11:14])
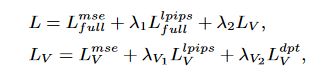
Decompose 的 Loss 的计算
根据 Volume 的范围,会筛选掉 在 BBX 之外的 Gs, 对于 Pixel-GS 和 Volume-GS 进行 Decomposition:
## 求出 BBX 之内的 逐 像素的 Mask
elif self.loss_args.mask_dptm and self.loss_args.recon_loss_vol_type == "l2_mask":
output_positions = data_dict["output_positions"]
mask_dptm = (output_positions[..., 0] >= x_start) & (output_positions[..., 0] <= x_end) & \
(output_positions[..., 1] >= y_start) & (output_positions[..., 1] <= y_end) & \
(output_positions[..., 2] >= z_start) & (output_positions[..., 2] <= z_end)
mask_dptm = mask_dptm.float()