Maven插件学习(五)—— 将项目构建生成的 OSGi Bundles(或 Features)发布到一个 P2 仓库
发布OSGi Bundles到一个 P2 仓库
读取项目中properties文件中的属性
<plugin><groupId>org.codehaus.mojo</groupId><artifactId>properties-maven-plugin</artifactId><version>1.0-alpha-2</version><executions><execution><phase>initialize</phase><goals><goal>read-project-properties</goal></goals><configuration><files><file>${basedir}/../config/xxxxxx.properties</file></files></configuration></execution></executions>
</plugin>
下载依赖包到target/source/plugins目录
<plugin><groupId>org.apache.maven.plugins</groupId><artifactId>maven-dependency-plugin</artifactId><version>2.9</version><executions><execution><id>copy-can-bundle-for-publishing</id><phase>process-resources</phase><goals><goal>copy</goal></goals><configuration><artifactItems><artifactItem><groupId>myapp.group</groupId><artifactId>myapp.artifact</artifactId><version>myapp.version</version></artifactItem></artifactItems><stripVersion>true</stripVersion><outputDirectory>${project.basedir}/target/source/plugins</outputDirectory></configuration></execution></executions>
</plugin>
重命名依赖包,拷贝依赖到指定目录
<plugin><groupId>org.apache.maven.plugins</groupId><artifactId>maven-antrun-plugin</artifactId><executions><execution><id>setup</id><phase>process-resources</phase><goals><goal>run</goal></goals><configuration><tasks><move file="target/source/plugins/com.codeminders.hidapi.jar" tofile="target/source/plugins/com.codeminders.hidapi_${com.codeminders.hidapi.version}.jar"/></tasks></configuration></execution><execution><id>install-commons</id><phase>install</phase><goals><goal>run</goal></goals><configuration><tasks><delete dir="../../target-definition/common/"/><mkdir dir="../../target-definition/common/repository"/><copy todir="../../target-definition/common/repository"><fileset dir="${project.build.directory}/repository"/></copy><copy todir="../../target-definition/common/source"><fileset dir="${project.build.directory}/source"/></copy></tasks></configuration></execution></executions>
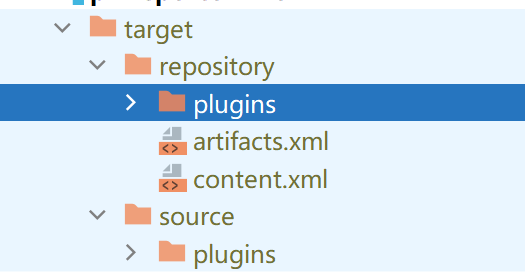
</plugin>将项目构建生成的 OSGi Bundles(或 Features)发布到一个 P2 仓库(Eclipse 的插件分发格式),便于后续通过 P2 更新机制部署或安装。 tycho-p2-extras-plugin插件默认读取maven构建文件夹${project.build.directory}/source/plugins下的依赖包
<plugin><groupId>org.eclipse.tycho.extras</groupId><artifactId>tycho-p2-extras-plugin</artifactId><version>0.26.0</version><executions><execution><phase>prepare-package</phase><goals><goal>publish-features-and-bundles</goal></goals></execution></executions><configuration><compress>false</compress></configuration>
</plugin>
执行这个插件后生成的P2仓库如截图所示。
P2仓库介绍
P2(Provisioning Platform)是 Eclipse 基金会 开发的软件部署和更新系统,用于管理 OSGi Bundles(插件)、Features(功能集)和产品(Products)的分发和依赖。P2 仓库是存储这些组件的特殊仓库格式,类似于 Maven 仓库,但专为 Eclipse/OSGi 生态设计。
1. P2 仓库的核心作用
-
依赖管理:解决 OSGi Bundles 之间的依赖关系(如版本冲突、可选依赖)。
-
软件分发:发布 Eclipse 插件、RCP 应用、IDE 功能扩展等。
-
增量更新:支持用户通过 P2 机制自动更新已安装的软件。
-
原子化部署:确保所有依赖项被正确安装或回滚。
2. P2 仓库的目录结构
一个标准的 P2 仓库包含以下文件:
repository/
├── artifacts.jar       # 二进制文件索引(压缩格式)
├── content.jar        # 元数据索引(压缩格式)
├── plugins/           # 存放所有 OSGi Bundles(.jar 文件)
│   └── *.jar
└── features/ # 存放 Feature 定义(.jar 文件)└── *.jar如果禁用压缩(compress=false),则会生成 artifacts.xml 和 content.xml 代替 .jar 文件。
3. P2 仓库的关键文件
(1) artifacts.jar / artifacts.xml
-
作用:记录所有二进制文件(Bundles、Features)的存储位置和校验信息。
-
内容示例:
<artifacts><artifact classifier='osgi.bundle' id='org.example.plugin' version='1.0.0'><properties size='2'><property name='download.size' value='12345'/><property name='download.md5' value='xxxxx'/></properties><mappings><rule output='plugins/org.example.plugin_1.0.0.jar'/></mappings></artifact>
</artifacts>
(2) content.jar / content.xml
-
作用:描述 Bundles/Features 的元数据(依赖、版本、版权等)。
-
内容示例:
<units><unit id='org.example.plugin' version='1.0.0'><requires><required namespace='osgi.bundle' name='org.eclipse.core.runtime' range='[3.10.0,4.0.0)'/></requires><artifacts><artifact classifier='osgi.bundle' id='org.example.plugin' version='1.0.0'/></artifacts></unit>
</units>
4. P2 仓库的生成方式
(1) 使用 Tycho 插件生成
通过 tycho-p2-extras-plugin(如你的配置):
<plugin><groupId>org.eclipse.tycho.extras</groupId><artifactId>tycho-p2-extras-plugin</artifactId><version>0.26.0</version><executions><execution><phase>prepare-package</phase><goals><goal>publish-features-and-bundles</goal></goals></execution></executions><configuration><compress>false</compress>  <!-- 是否压缩元数据 --></configuration>
</plugin>
(2) 使用 Eclipse PDE 工具
-
在 Eclipse IDE 中右键项目 → Export → Deployable Features → 选择 P2 仓库目录。
(3) 命令行生成
通过 eclipse-ant 工具:
<target name="build-p2-repo"><p2.publish.featuresAndBundlesrepository="file:/path/to/repository"compress="true"source="/path/to/build-result"/>
</target>
5. P2 仓库的使用场景
(1) 分发 Eclipse 插件
-
开发者将插件打包为 P2 仓库,用户通过 Eclipse → Help → Install New Software 输入仓库 URL 安装。
(2) RCP 应用更新
-
应用内集成 P2 客户端,定期检查仓库中的更新版本。
(3) 持续集成(CI)
-
在 CI 流程中自动生成 P2 仓库,供测试或生产环境部署。