自由学习记录(85)
用Unity Shader入门有向距离场 SDF_哔哩哔哩_bilibili
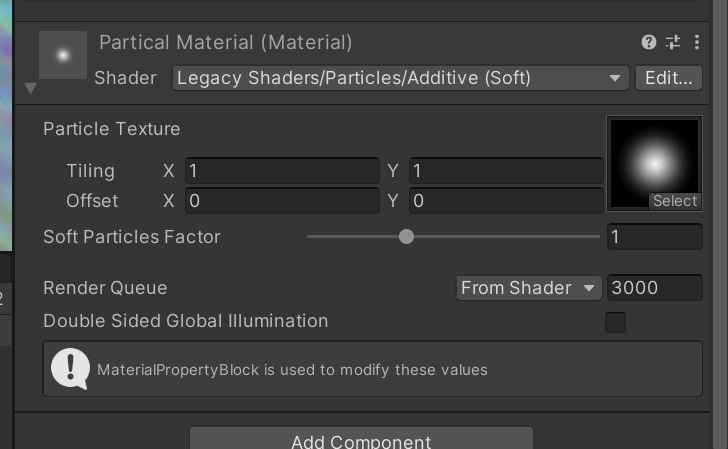
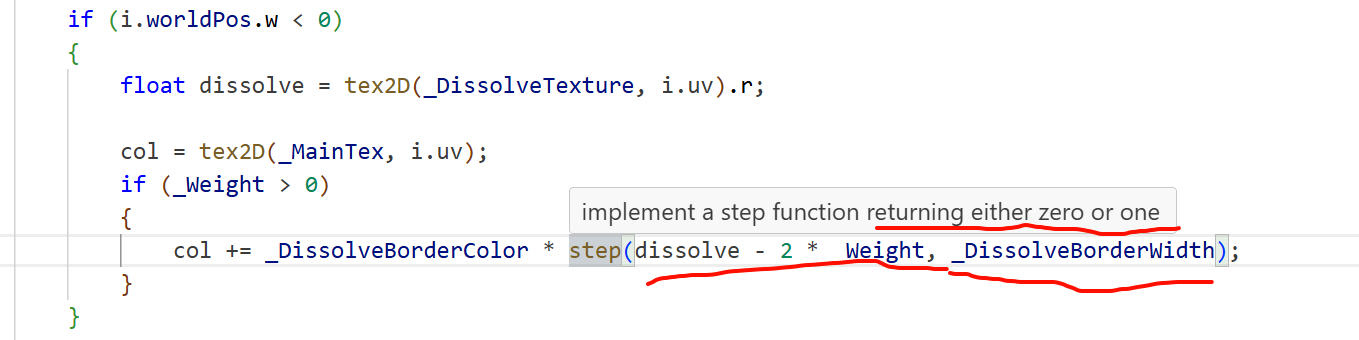
这里不可以修改成别的shader,这里的shader对于显示痕迹很重要
Keywords: <none>
-- Hardware tier variant: Tier 1
-- Vertex shader for "d3d11":
// Stats: 9 math, 2 temp registers
Uses vertex data channel "Vertex"
Uses vertex data channel "Color"
Uses vertex data channel "TexCoord0"Constant Buffer "$Globals" (80 bytes) on slot 0 {Vector4 _MainTex_ST at 48
}
Constant Buffer "UnityPerDraw" (176 bytes) on slot 1 {Matrix4x4 unity_ObjectToWorld at 0
}
Constant Buffer "UnityPerFrame" (368 bytes) on slot 2 {Matrix4x4 unity_MatrixVP at 272
}
$Globals 提供材质用的 _MainTex_ST→处理 UV;UnityPerDraw 提供 unity_ObjectToWorld→把点从物体到世界;UnityPerFrame 提供 unity_MatrixVP→把世界到裁剪。
编译器在报告本 Pass 的 VS 实际用了哪些顶点通道。这些通道再按 HLSL 语义绑定到你在源码里写的输入结构体上。
-
Uses vertex data channel "Vertex"→ 绑定到POSITION(顶点位置) -
… "Color"→ 绑定到COLOR(顶点色) -
… "TexCoord0"→ 绑定到TEXCOORD0(UV0)
struct appdata {float4 vertex : POSITION;float4 color  : COLOR;float2 uv     : TEXCOORD0;
};
“通道”对应 Unity 的 Mesh 顶点属性枚举(Position/Color/UV0…);TexCoord0 就是 Mesh.uv,对应 HLSL 的 TEXCOORD0
Unity 怎么把源码“变成”你看到的反汇编
Unity 有一条编译流水线,把你的 HLSL 源码为目标图形 API生成二进制/汇编,并把结果展示出来:Unity Documentation+2Unity Documentation+2
-
预处理 & 变体展开:处理
multi_compile/shader_feature、包含文件与宏(Unity 现在用自家的 Caching Shader Preprocessor)。Unity Documentation -
UnityShaderCompiler 并行编译:为每个平台/后端生成目标代码。D3D11 传统上走 FXC(Unity 近年也加入 DXC 选项);非 D3D 后端(Vulkan/Metal/OpenGL)则通过 Unity 的转换链(如 HLSLcc/GLSL/或 SPIR-V→MSL/GLSL)得到相应着色器。Unity DocumentationUnity Discussions
-
展示目标端程序:比如你贴的
vs_4_0 / ps_4_0就是 D3D11 顶点/像素着色器反汇编;此时所有vert/frag名称都已被内联/优化成目标端指令与寄存器,所以你看不到源码里的函数名,只能看到常量缓冲/输入输出语义/采样指令等低层信息。Unity Discussions
这就是为什么文件上说“不是有效 shader 文件”:它已经是目标端的编译/反汇编文本,不能直接拖回工程当 .shader 使用。
这份 “Additive (Soft)” 具体发生了什么
-
无关键词变体:VS 只做常规
Object→Clip变换并传Color/UV;PS 采样_MainTex乘顶点色,按Blend One OneMinusSrcColor叠加。 -
SOFTPARTICLES_ON变体:VS 额外输出屏幕坐标与视距供 FS 用;FS 采样_CameraDepthTexture,用_ZBufferParams线性化,与粒子自身深度做差,乘_InvFade得到淡出系数(软粒子)。这要求开启相机/管线的深度纹理。
用途是查看每个平台/关键字变体最终生成了什么指令、用了哪些常量缓冲/顶点通道/采样器,方便做分析与定位问题;Unity 官方界面上也会特别写明“not a valid shader file… for debugging purposes only”。
VS/PS 指令条数、资源绑定(cbuffer/texture/sampler)、varyings(例如软粒子会多输出屏幕坐标与视距),用于判断为何多了额外计算。
帧调试器/抓帧工具定位 drawcall:用 Unity Frame Debugger / RenderDoc 逐步查看具体 draw 调用了哪个变体、输入输出和状态。
不能对它做什么
-
不能直接改这份反汇编来“热修”:这不是可回导的 ShaderLab/HLSL,修改它不会回写到项目。要改效果,必须改源(你的 .shader / Shader Graph 生成的 HLSL),再让 Unity 重新编译。
想“能调试/单步”怎么办?
-
启用调试符号(D3D11):在 HLSL 里加
#pragma enable_d3d11_debug_symbols
这样抓帧时(RenderDoc/PIX/VS 图形调试器)能看到源级信息、常量名、甚至逐行步进(取决于后端/工具能力)。Unity 文档明确支持这一点;默认是为了减小体积而剥离的。
Unity 用 UnityShaderCompiler 把 HLSL 编成目标后端代码(D3D 走 FXC/DXC;其他平台经由转换链到 GLSL/Metal/SPIR-V)。“Compiled code”窗口展示的就是这些目标端程序(例如 vs_4_0/ps_4_0)。
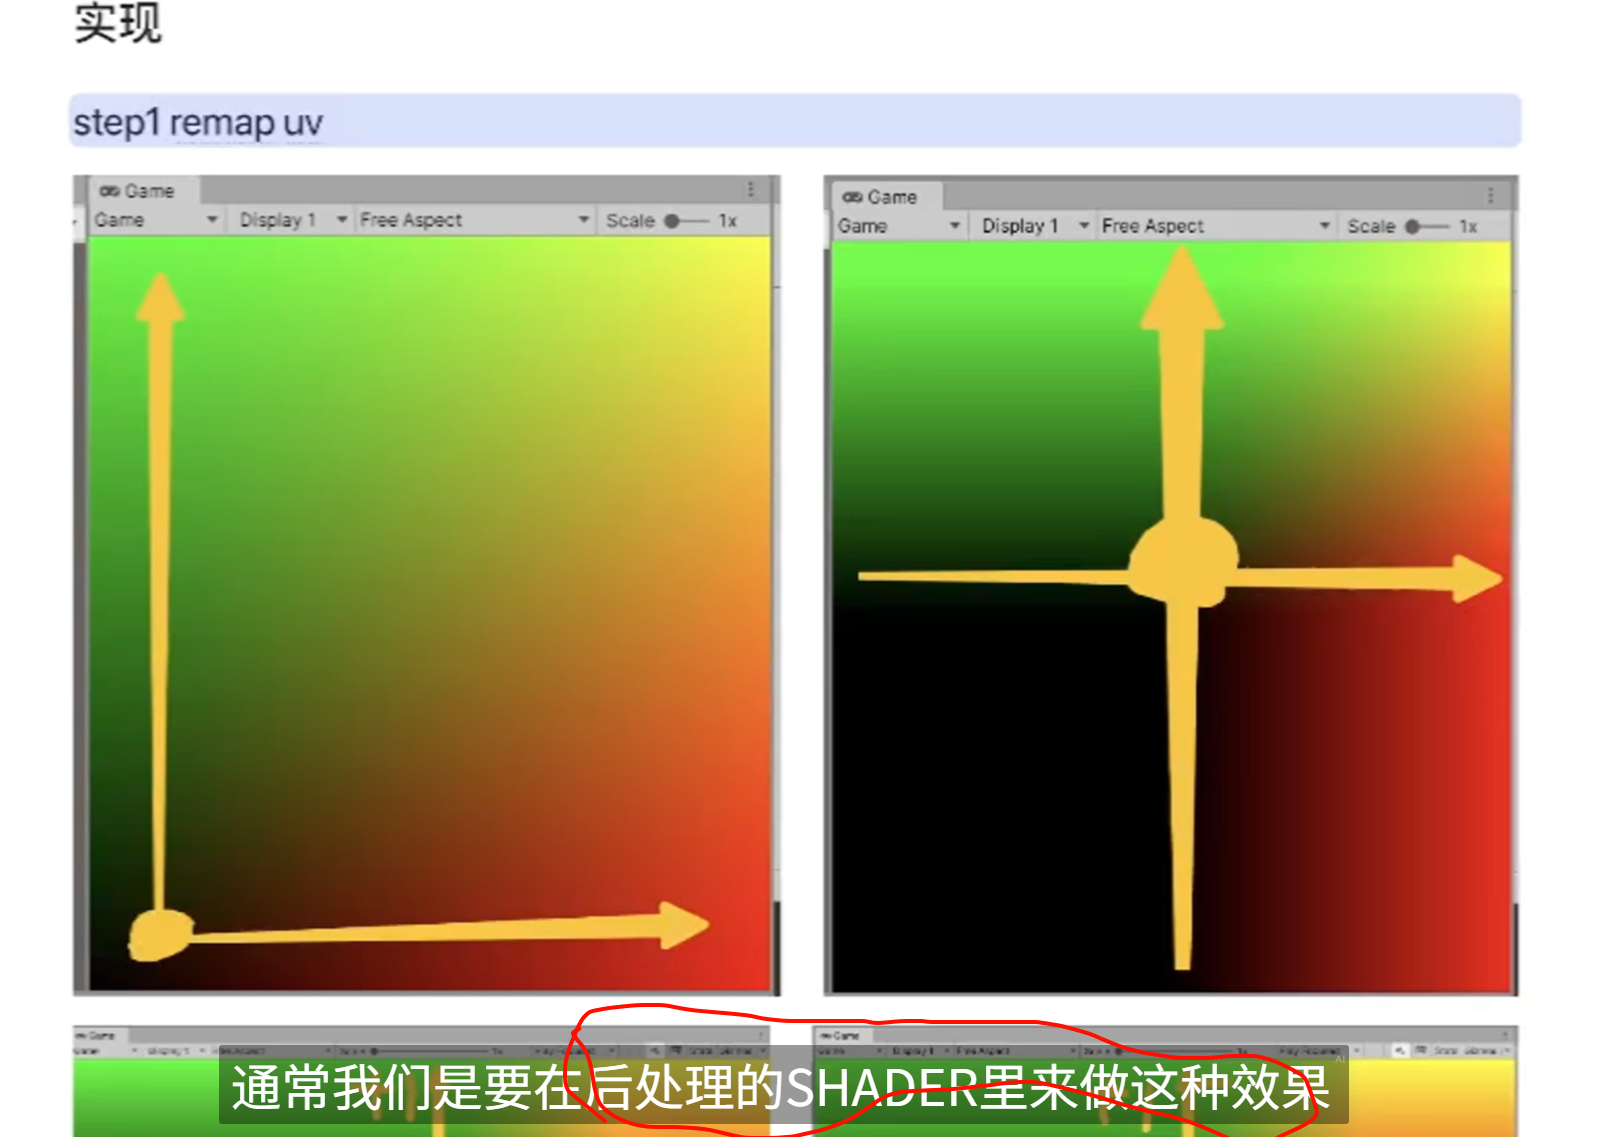
render camera是可以把走的痕迹变成一张图
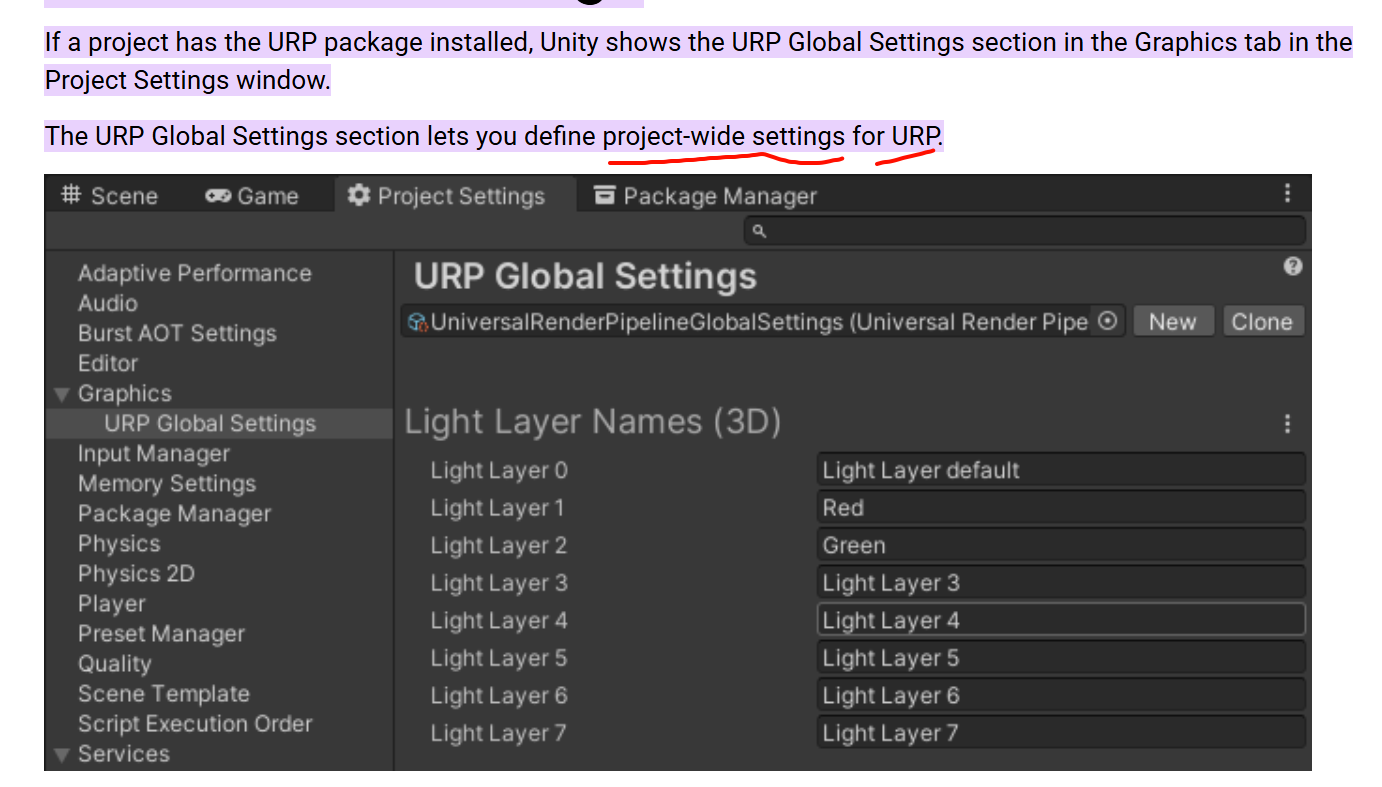
https://docs.unity3d.com/Packages/com.unity.render-pipelines.universal@12.0/manual/urp-global-settings.html
Light Layer Names (3D)
Use this section to define the names of Light Layers. Light Layers only work with 3D Renderers.
When enabled, Unity assumes that the Player does not create new Volume Profiles at runtime. With this assumption, Unity only keeps the shader variants that the existing Volume Profiles use, and strips all the other variants. Unity keeps shader variants used in Volume Profiles even if the Scenes in the project do not use the Profiles.
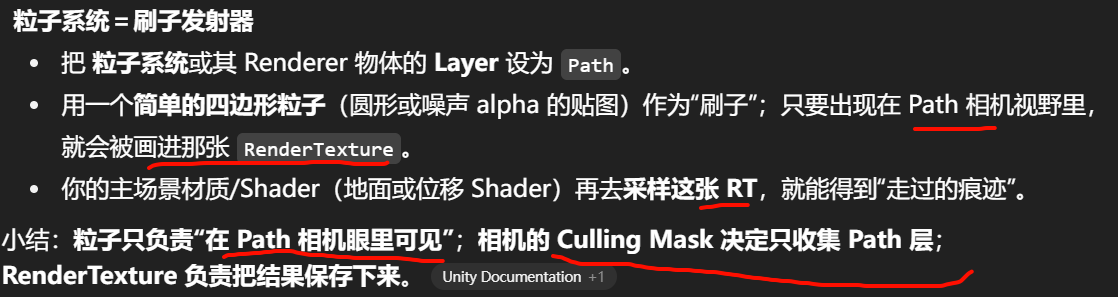
创建一台专用的“Footprint 相机”
-
Camera.targetTexture = 你的RT,让它把画面直接渲染进这张纹理。Unity Documentation -
设置成正交、俯视地面;Clear 只在开局清一次(之后不清屏以“累积”痕迹),Culling Mask 只渲染“Footprint”层。
把“刷子”作为可见物体画给这台相机
-
每次落脚时,在该相机可见层里生成一个小四边形/Decal Mesh(贴一张圆形/噪声的刷子图)。
-
相机只渲染这些刷子 → 输出到 RT → RT 内容不断累积(你也可以让材质使用 Additive/Max 等混合来“写入/加深”脚印)。
不另开相机,直接“往 RT 上画”(更轻量)
-
Graphics.Blit:用一支“刷子材质”把图样 Blit 到目标 RT(可在像素着色器里根据传入的中心/半径计算刷子覆盖的 UV,进行叠加/最大化等)。Blit 会以 RT 为目标,用指定着色器绘制一张全屏四边形,非常适合做这种贴花/涂抹。docs.unity.cnUnity Documentation -
CommandBuffer:更底层地SetRenderTarget → DrawMesh/Blit,可精准控制注入时机或一次性批量绘制多个脚印。Unity Documentation -
URP 下可用 Renderer Feature + ScriptableRenderPass 在管线指定阶段对一张 RT 做 Draw/Blit,然后在后续 Pass 里读这张 RT。Unity Documentation+1
小提示:Blit 读写同一 RT 不安全,通常要 Ping-Pong(
prevRT -> Blit(刷子) -> currRT,再交换)。docs.unity.cn
public int cullingMask;
Description
This is used to render parts of the Scene selectively.
For example if a GameObject's layer is set to 2, and the second bit of the camera's cullingMask is set to zero, the GameObject will be invisible to the camera. See Layers for more information.
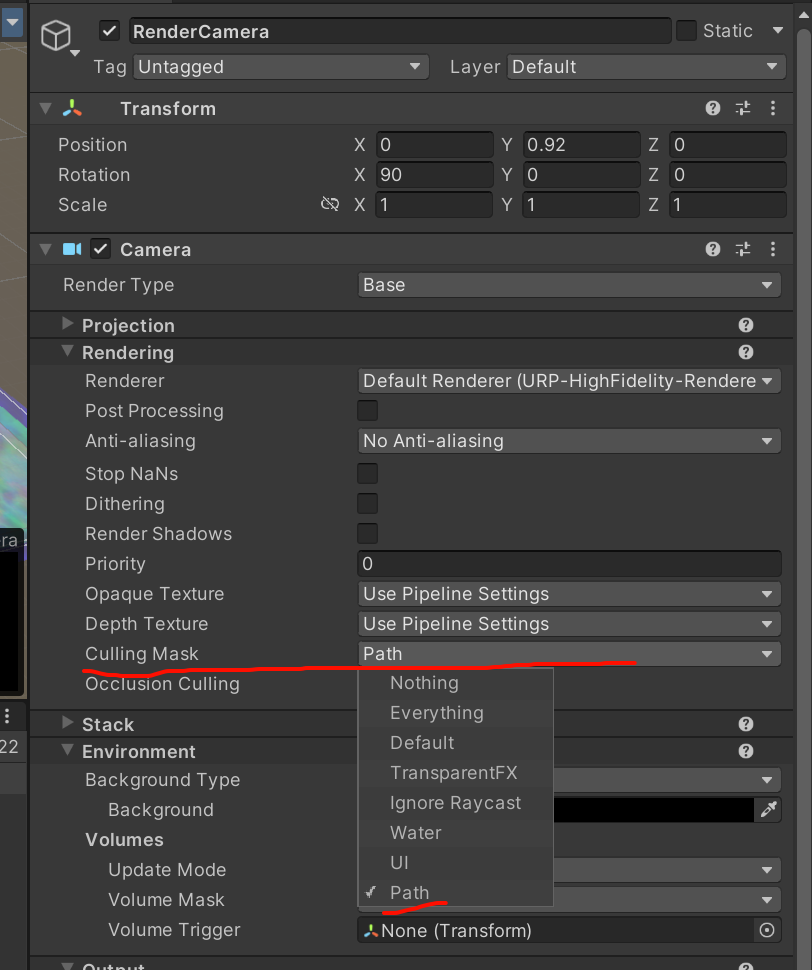
主相机layermask里关闭了对path的写入
那现在关注的重点就是粒子系统的显示,为什么粒子系统没有正常的什么都显示
关注点是,粒子系统是如何做到一张图在同一平面的叠加的
粒子系统我以为是会发射粒子的,但是这里却只是像画笔一样的瞬时
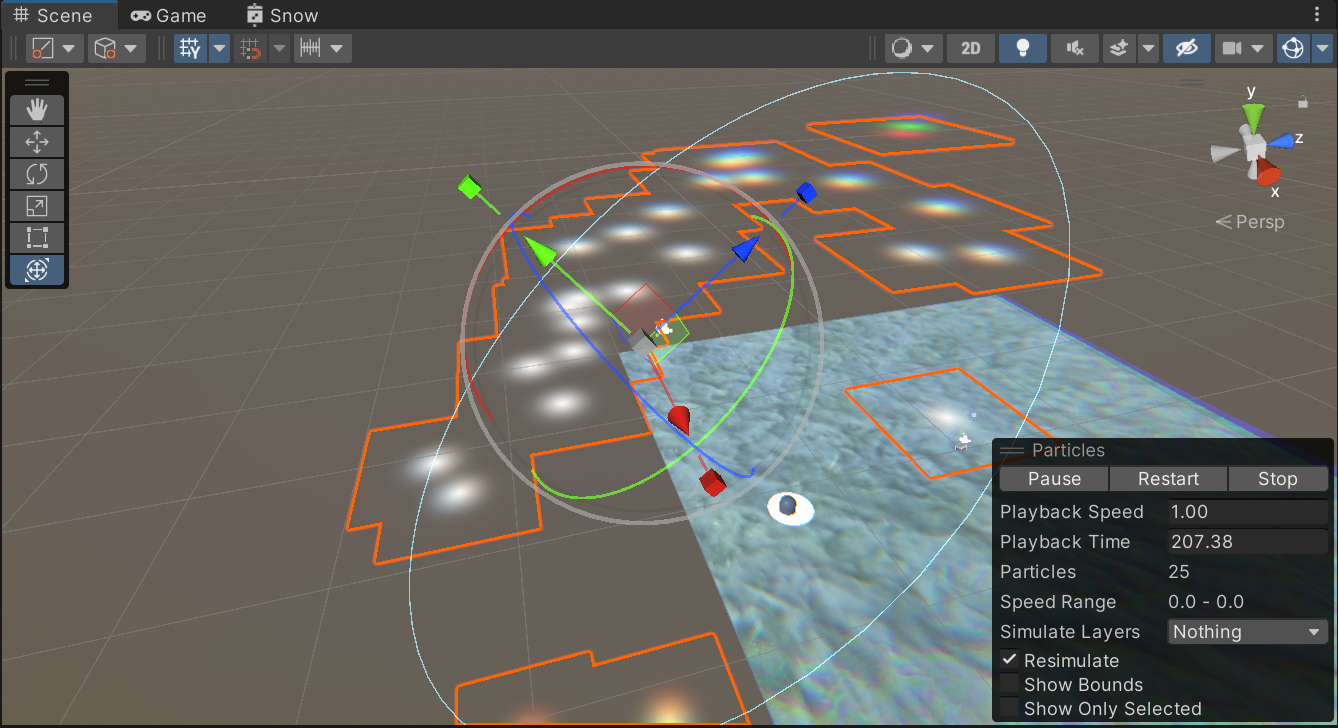
朝上的方向是设置出来的,,但是没有放射出来
没有从中心点放射出来
shape有规定分布的形状
是如何省去粒子的中间发散出来的,变成范围内随机点生成例子图片
Emission 模块:
-
Rate over Time:每秒发射多少粒子。 Unity Documentation+1
-
Rate over Distance:物体每移动一定距离发射多少粒子。 Unity Documentation
-
Bursts:在指定时间点一次性发射 N 个(设置 Time 和 Count),适合“打一梭子”或脚步印这类效果。 Unity Documentation
Main 模块 → Max Particles:系统内粒子同时存在的最大数量上限(达到上限会阻止继续生成)。
Main 模块 → Start Lifetime:设定每个新粒子的寿命(可设常量、随机区间、曲线)。这是生成时写入到粒子上的初始寿命。 Unity Documentation+1
系统播放时长(容易混淆)
Main 模块 → Duration/Looping 控制“系统播放多久/是否循环”,与单个粒子的 Start Lifetime 是两层概念。 Unity Documentation
为什么在移动的时候,粒子的数量会飙升?
生成粒子的速度不是恒定
开了 Emission → Rate over Distance(或脚本把它>0 了)。
这个模式会按物体移动的距离来额外发射粒子:移动越快,每秒走的距离越大 → 单位时间内发射的粒子越多,所以你一动起来,粒子数看起来就“飙升”。官方文档写得很直白:“发射器只有在移动时才会按距离发射”。Unity Documentation+1
Rate over Time + Rate over Distance 会一起生效
两者不是二选一;你可以同时用——时间常量流+移动时的额外粒子,所以一移动就更密。Unity 手册和经验贴都把这两种“可以一起用”的场景列出来(比如常驻火花+冲刺轨迹)。Unity DocumentationMediumUnity Discussions
寿命越长,瞬时“在世”的粒子越多
同样的每秒发射量 × 更长的 Start Lifetime = 同时在场的粒子更多(直到 Max Particles 上限)。手册里有 Start Lifetime 与 Max Particles 的说明。Unity Documentation
Start Lifetime / Max Particles:
-
寿命太长会让数量累积,适度降低或提高 Max Particles 的上限控制峰值。
PR 支持的常见格式:MP4/MOV(H.264/HEVC)、MXF(XAVC、AVC-Intra、XDCAM、JPEG2000 等)、AVI、ProRes/ProRes RAW、DNxHD/DNxHR、R3D、BRAW/ARRIRAW 等,以及常见音频 AAC/MP3/WAV/AIFF 等。完整清单见官方“Supported file formats”。
不支持mkv
等等,,首先现在要录视频,,视频的格式需要MP4
视频是obs录的,可以带上麦克风,麦克风可以不用管,,麦克风可以截取系统内的声音
检查一下obs的视频是不是有黑边,
obs录视频的比例默认不是按照电脑屏幕
控制采集的视频在画布中始终上下隔同样宽度,居中
pr和obs都没问题了,现在就是开始搞效果整理了
---还有字幕的设置,,
带“视频缩略图”的模板(.mogrt)才能在面板里滑动预览;没有内置视频缩略图的模板只能显示静态封面,所以你会看到有的能预览、有的不能。Premiere 文档写得很清楚:在 My Templates 里可以“对包含视频缩略图的模板进行悬停预览(hover-scrub)”
一个一个录,分着说效果?怎么说效果?一个视频说一个效果?确认下来是,,全部录好再挨个注释
先有再说,达到效果就可以,不要拖
-
GS 可以改变传给像素着色器(PS/frag)的结构:
顶点着色器(VS)的输出结构 → 作为 GS 的输入;你在 GS 里可以新增/计算额外的插值量(用TEXCOORDn、COLORn等语义),然后把它们写进 GS 的输出结构。PS 的输入结构必须与 GS 的输出结构逐语义匹配,这样 PS 就能“收到更多字段”。这是 HLSL 的阶段间接口规则。 Microsoft Learn+1Unity Documentation -
GS 可以放大/改变图元,并为每个新顶点填这些新增字段(比如给三角形加“面法线”“边索引”等再传给 PS)。GS 能输出可变数量的顶点/图元。 Microsoft LearnNVIDIA Developer
GS 不能直接“扩展 appdata(网格输入)”:
appdata 是 VS 的输入,对应网格顶点缓冲里实际存在的通道(POSITION/NORMAL/UV…)。GS 拿不到网格里新增的原始属性,它只能看到 VS 输出给它的内容。如果要用某个网格属性,必须先在 VS 输出结构里带上,再在 GS 接收。 Unity Documentation
-
签名要对齐:
-
VS 输出语义 ⟷ GS 输入语义 必须一致;
-
GS 输出语义 ⟷ PS 输入语义 必须一致。
自定义传参通常用TEXCOORD0..15/COLOR0..1这些语义。 Microsoft LearnUnity Answers
-
-
插值数量有限:各平台/着色器模型对“可用插值寄存器个数”有限制(例如 SM3.0 约 10 个、Metal/ES3.0 约 16 个;每个通常是
float4)。别无限加字段,超了会编译报 “too many interpolators”。 Unity Documentation
启用 GS 的编译与平台支持:Unity 里用 GS 需 #pragma geometry(编译目标自动提升到 4.0);很多移动/Metal 平台不支持 GS,要注意目标平台差异。 Unity Documentation+1
appdata.normal : NORMAL 在 Unity 里是对象空间(Object/Model space)的法线。通常你要把它变换到世界或视空间再参与光照。Unity 官方示例与 URP 文档都说明:从顶点输入拿到 object-space normal,再用提供的函数把它转换到世界空间。
-
Built-in 管线(
UnityCG.cginc)float3 nWS = UnityObjectToWorldNormal(v.normal); // 纠正非均匀缩放这个辅助函数专门把对象空间法线正确地变到世界空间。Unity Documentation
-
URP/HDRP(SRP)
#include "Packages/com.unity.render-pipelines.universal/ShaderLibrary/Core.hlsl" float3 nWS = TransformObjectToWorldNormal(IN.normal);文档示例同样说明:输入是对象空间,调用该函数得到世界空间法线。Unity Documentation
大多数“屏幕后处理”确实用 ZTest Always + ZWrite Off。原因是它们用全屏三角形/四边形把颜色做一次合成,不需要靠深度测试决定哪些片元能画;比如 URP 自带的后期总线 UberPost.shader 就是 ZTest Always ZWrite Off Cull Off,Unity 的 Graphics.Blit 官方示例也这么写。
什么时候不是 Always?
想用深度/模板测试来“剪裁”后期
只对有几何的地方生效、或基于 Stencil 做选择
在后处理里用到原场景的深度/模板,需要显式把原深度作为本次渲染的 depth target 绑定。否则你改了 ZTest 也起不到预期作用。
xxxx
“深度图”,通常就是相机把当前帧的深度缓冲复制/输出成一张纹理。
它从哪儿来?
-
Built-in 渲染管线
给相机开深度纹理输出(脚本或某些效果会自动打开):
// 只要相机需要,就会生成 _CameraDepthTexture
cam.depthTextureMode |= DepthTextureMode.Depth; // 或 DepthNormals
Unity - Manual: Cameras and depth textures
A Camera can generate a depth, depth+normals, or motion vector texture.
This is a minimalistic G-buffer texture that can be used for post-processing effects or to implement custom lighting models (e.g. light pre-pass).
Pixel values in the depth texture range between 0 and 1, with a non-linear distribution
Depth Textures are supported on most modern hardware and graphics APIs. Special requirements are listed below:
- Direct3D 11+ (Windows), OpenGL 3+ (Mac/Linux), OpenGL ES 3.0+ (iOS), Metal (iOS) and consoles like PS4/Xbox One all support depth textures.
- OpenGL ES 2.0 (Android) requires GL_OES_depth_texture extension to be present.
- WebGL
requires WEBGL_depth_texture extension.
- DepthTextureMode.Depth: a depth texture.
- DepthTextureMode.DepthNormals: depth and view space normals packed into one texture.*
- DepthTextureMode.MotionVectors: per-pixel screen space motion of each screen texel for the current frame. Packed into a RG16 texture.
by extension, if a shader does not support shadow casting (i.e. there’s no shadow caster pass in the shader or any of the fallbacks), then objects using that shader will not show up in the depth texture.
- Make your shader fallback to some other shader that has a shadow casting pass, or
- If you’re using surface shaders
, adding anaddshadowdirective will make them generate a shadow pass too.
Note that only “opaque” objects (that which have their materials and shaders setup to use render queue <= 2500) are rendered into the depth texture.
URP(通用渲染管线)
在 Universal Renderer 里启用 Depth Texture,并选择在哪个阶段复制或预写:
-
After Opaques(默认):在渲染完不透明后复制深度;
-
After Transparents:连同透明物体后的深度一起复制;
-
Force Prepass:先做一遍 Depth Prepass 生成深度。
这样管线会产生可采样的相机深度纹理供_CameraDepthTexture或图形节点(Scene Depth)使用。
HDRP在管线里维护深度缓冲并构建深度金字塔(Depth Pyramid),很多屏幕空间效果(SSAO/SSR 等)都用它;自定义 Pass 也能在指定注入点读/写深度。
_CameraDepthTexture 通常就是在某个阶段把 GPU 的 Z buffer 复制成一张纹理(或者先预写再复制)。在前向渲染时常需额外一次深度预写;在延迟渲染里,深度本来就有,复制即可。
什么时候“没有深度图”?
-
没启用(Built-in 没设
DepthTextureMode;URP 渲染器里没开 Depth Texture)。Unity User ManualUnity Documentation -
抓取阶段不对(比如你需要透明后的深度却只在 After Opaques 复制)。Unity Documentation
-
编辑器场景相机/某些平台下默认不产出,需要手动开启或在管线里启用。Unity Discussions
-
软粒子、SSAO、景深、边缘检测等后期都要相机深度纹理;没开就会警告或失效。Unity DocumentationUnity Discussions
-
采样后通常需按
_ZBufferParams把非线性深度线性化再计算。Unity User Manual
生成 _CameraDepthTexture 的方式就是:再渲染一遍场景,但只调用各材质里 ShadowCaster(或等价的“深度”)类型的 Pass 来把“深度”写进纹理;没有 ShadowCaster 的物体在这一步就被跳过,所以它们不会出现在深度图里。官方手册直接写了这点:Depth 纹理是“用与阴影投射相同的 Pass(ShadowCaster)渲染出来的”,因此不支持投影(没有 ShadowCaster/fallback) 的 Shader,不会出现在深度纹理中;而且**只有不透明队列(≤2500)**会被写入。
前向渲染里,Unity 通常用一次“替换着色器/额外渲染”把所有不透明物体按它们的 ShadowCaster Pass 重画一遍,得到相机深度纹理;
延迟渲染里,深度可直接来自 GBuffer 的深度/深度缓冲,但结论一样——没有提供正确深度写入路径的 Shader 仍然不会贡献深度。
bit=位深(bit depth),说的是每个通道用了多少位来存数,决定了能表示的离散级数和精度(2^n 个等级),不是“单位/量纲”。
32-bit(8 bit/通道)纹理:整张贴图有 4 个 8-bit 通道(RGBA8)。在 DepthNormals 里:
-
R、G 存视空间法线(用立体投影压到 2 通道);
-
B、A 存深度的 16-bit 值(把 16 位拆成两个 8 位通道打包)。解码可用
DecodeDepthNormal,得到 0..1 的深度和视空间法线。
每个通道只有 2^8 = 256 个离散取值(0–255),所以 RGBA8 的单通道精度就是 1/255 的量化步长;三通道颜色合起来最多 256³ ≈ 1677 万 种组合。
DepthNormals 里的深度是 16-bit(2^16 = 65536 个离散层级),再“拆成 B/A 两个 8-bit”存进去;解码后得到 0..1 深度用于计算。
叫“预写”(depth pre-pass/预深度)是因为它在正式着色前,先把“深度”写进深度缓冲
Documentation – Arm Developer
// extra pass that renders to depth buffer onlyPass {ZWrite OnColorMask 0}After adding this pass, the frame debugger shows that the objects are rendered twice. The first time they are rendered there are no changes in the color buffer.
if you have a set of objects with computationally expensive shaders and the camera can rotate around them freely, some objects that were at the back can move to the front. In this case, if there is a static rendering order set for these objects, some might be drawn last, even if they are occluded. This can also happen if an object can cover parts of itself.
之所以“预写”,核心就是**“提前写 Z”**,目的有两类:
-
功能需求:某些效果需要尽早拿到深度图(例如 SSAO、软粒子、体积雾等),这时会启用或强制 Prepass 来生成深度纹理。Unity Forum+1
-
性能需求:在几何特别密/难以排序(如植被)时,预写能显著减少被遮挡像素的着色成本。Interplay of Light
但它不是“总是更快”——多渲染一遍会增加带宽/CPU 开销,移动平台尤其要谨慎(ARM 明确建议避免滥用 depth prepass)。是否启用要看你的场景与瓶颈。Arm Developer
补充:在 URP 中你能明确选择深度纹理的产生时机:
-
After Opaques:不透明渲染后复制深度;
-
After Transparents:连同透明后的深度一起复制;
-
Force Prepass:先做预写再得到深度纹理。Unity Documentation+1
这就是它被称作“预写/预通道(pre-pass)”的原因:先写 Z,后着色/再用。
xxxxx
“把法线三维压成二维”并不一定丢信息——单位法线只有 2 个自由度。Unity 的 DepthNormals 用立体投影(stereographic projection)把视空间法线编码进 R/G 两通道,是可逆映射(除去投影极点),真正的误差主要来自量化位深(默认每通道 8-bit)
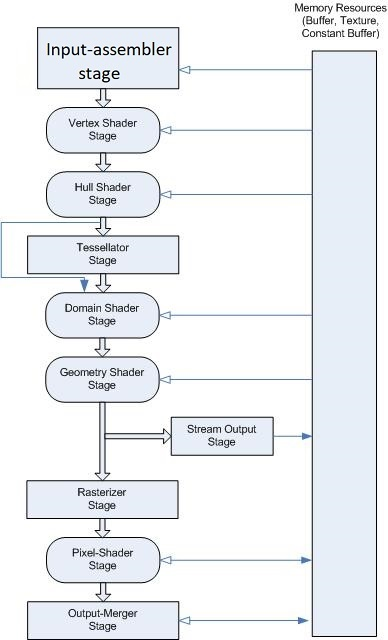
This pipeline hasn’t fundamentally changed for D3D12 (aside from the addition of mesh shaders) and is very similar in GL/Vulkan, albeit with different terminology.
In all cases the actual depth buffer operations are specified to happen at the very end of this logical pipeline after the pixel/fragment shader has run.
D3D calls this stage the Output-Merger or OM for short, and it’s the logical stage where writes/blending to render target occurs and also where depth/stencil operations logically occur.
While it might seem weird that depth operations are the end if you’re looking at things from a modern viewpoint, if you apply a historical context it really makes sense:
- The main purpose of depth/stencil operations is to control whether anything gets written to the render targets, so it makes sense that it would be in the same logical stage where write/blend operations occur
- The pixel shader can do certain operations, such as discard/alpha test, that also affect depth operations
- The earliest GPUs with hardware depth buffers performed depth operations at the end, since it was originally a visibility algorithm and not so much an optimization