WPF之TextBox控件详解
文章目录
- 1. TextBox概述
- 2. 基本属性与功能
- 3. 输入控制详解
- 3.1 MaxLength
- 3.2 AcceptsReturn
- 3.3 AcceptsTab
- 3.4 CharacterCasing
- 3.5 IsUndoEnabled
- 3.6 自定义输入限制
- 4. 文本选择与操作
- 4.1 选择属性
- 4.2 选择方法
- 4.3 文本操作
- 4.4 选择事件
- 4.5 实现自定义文本处理功能
- 5. 滚动支持
- 5.1 滚动条可见性
- 5.2 禁用水平滚动
- 5.3 编程控制滚动位置
- 5.4 滚动事件
- 5.5 自动滚动示例
- 6. 数据验证
- 6.1 基本验证方法
- 6.2 使用IDataErrorInfo接口
- 6.3 使用ValidationRule
- 6.4 错误样式和错误模板
- 6.5 实时验证示例
- 7. 撤销/重做支持
- 7.1 启用/禁用撤销功能
- 7.2 撤销和重做方法
- 7.3 自定义撤销重做按钮
- 7.4 撤销单元
- 7.5 清除撤销/重做历史
- 7.6 高级撤销/重做示例
- 8. 文本绑定与更新
- 8.1 基本绑定
- 8.2 绑定模式
- 8.3 更新触发器
- 8.4 字符串格式化
- 8.5 值转换器
- 8.6 FallbackValue 和 TargetNullValue
- 8.7 绑定到集合项
- 8.8 绑定命令
- 8.9 实时搜索示例
- 8.10 表单数据绑定示例
- 9. 特殊文本框:PasswordBox与RichTextBox
- 9.1 PasswordBox
- 9.1.1 基本属性
- 9.1.2 事件处理
- 9.1.3 PasswordBox与数据绑定问题
- 9.1.4 安全最佳实践
- 9.2 RichTextBox
- 9.2.1 基本用法
- 9.2.2 内容操作
- 9.2.3 格式化文本
- 9.2.4 插入图片和其他对象
- 9.2.5 文件保存与加载
- 9.2.6 创建简单的文本编辑器
- 10. 样式与模板定制
- 10.1 基本样式设置
- 10.2 使用Style对象
- 10.3 使用触发器
- 10.4 样式继承
- 10.5 隐式样式
- 10.6 控件模板定制
- 10.7 自定义附加属性
- 10.8 自定义控件
- 10.9 使用第三方控件库
- 10.10 动态样式效果
- 11. 常见应用场景
- 11.1 登录表单
- 11.2 搜索框
- 11.3 富文本编辑器
- 11.4 数值输入控件
- 11.5 自动完成文本框
- 11.6 配置文本编辑器
- 12. 总结与最佳实践
可以根据Github拉取示例程序运行
GitHub程序演示地址(点击直达)
也可以在本文资源中下载
1. TextBox概述
TextBox控件是WPF中用于文本输入和编辑的基本控件,它继承自TextBoxBase类,提供了文本编辑的核心功能。它可以用于单行文本输入(如表单字段)、多行文本编辑(如注释或描述)等场景。
TextBox的类层次结构如下:
2. 基本属性与功能
TextBox控件的主要属性包括:
Text:获取或设置文本框中的文本内容FontFamily、FontSize、FontWeight等:控制文本显示的字体属性TextAlignment:控制文本的对齐方式TextWrapping:控制文本的换行行为IsReadOnly:设置文本框是否为只读状态
下面是一个基本的TextBox控件示例:
<TextBox x:Name="txtBasic" Width="200" Height="30" Text="基本文本框" FontSize="14"TextAlignment="Center" />
C#代码中操作TextBox:
// 获取文本框内容
string content = txtBasic.Text;// 设置文本框内容
txtBasic.Text = "新的文本内容";// 设置字体
txtBasic.FontFamily = new FontFamily("Arial");
txtBasic.FontSize = 16;
txtBasic.FontWeight = FontWeights.Bold;// 设置只读状态
txtBasic.IsReadOnly = true;
3. 输入控制详解
TextBox提供了多种属性来控制用户输入:
3.1 MaxLength
MaxLength属性用于限制用户可以输入的最大字符数。默认值为0,表示没有限制。
// 限制最多输入50个字符
txtInput.MaxLength = 50;
3.2 AcceptsReturn
AcceptsReturn属性决定当用户按下回车键时,是否在文本中插入换行符。对于多行文本框,通常设置为true。
<TextBox AcceptsReturn="True" TextWrapping="Wrap"Height="100" Width="200" />
3.3 AcceptsTab
AcceptsTab属性决定当用户按下Tab键时,是否在文本中插入制表符。默认情况下,Tab键用于在控件间移动焦点。
<TextBox AcceptsTab="True" AcceptsReturn="True"TextWrapping="Wrap"Height="100" Width="200" />
3.4 CharacterCasing
CharacterCasing属性控制输入的字符自动转换为大写、小写或保持原样。
// 自动将用户输入的字符转换为大写
txtUpperCase.CharacterCasing = CharacterCasing.Upper;// 自动将用户输入的字符转换为小写
txtLowerCase.CharacterCasing = CharacterCasing.Lower;// 保持用户输入的原始大小写(默认值)
txtNormal.CharacterCasing = CharacterCasing.Normal;
3.5 IsUndoEnabled
IsUndoEnabled属性控制是否启用撤销/重做功能。默认为true。
// 禁用撤销/重做功能
txtNoUndo.IsUndoEnabled = false;
3.6 自定义输入限制
除了使用内置属性外,我们还可以通过处理TextBox的PreviewTextInput和PreviewKeyDown事件来实现自定义的输入限制,例如只允许输入数字:
private void NumericTextBox_PreviewTextInput(object sender, TextCompositionEventArgs e)
{// 使用正则表达式判断输入是否为数字Regex regex = new Regex("[^0-9]+");e.Handled = regex.IsMatch(e.Text);
}private void NumericTextBox_PreviewKeyDown(object sender, KeyEventArgs e)
{// 允许空格键和特殊控制键if (e.Key == Key.Space){e.Handled = true;}
}
以下是一个完整的示例,实现了一个只接受数字输入的TextBox:
<TextBox x:Name="txtNumeric"PreviewTextInput="NumericTextBox_PreviewTextInput"PreviewKeyDown="NumericTextBox_PreviewKeyDown"Width="200" />
using System.Text.RegularExpressions;
using System.Windows;
using System.Windows.Input;namespace WpfSample
{public partial class MainWindow : Window{public MainWindow(){InitializeComponent();}private void NumericTextBox_PreviewTextInput(object sender, TextCompositionEventArgs e){// 使用正则表达式判断输入是否为数字Regex regex = new Regex("[^0-9]+");e.Handled = regex.IsMatch(e.Text);}private void NumericTextBox_PreviewKeyDown(object sender, KeyEventArgs e){// 禁止输入空格if (e.Key == Key.Space){e.Handled = true;}}}
}
4. 文本选择与操作
TextBox提供了丰富的文本选择和操作功能,可以通过属性和方法来实现:
4.1 选择属性
SelectionStart:获取或设置选定内容的起始位置SelectionLength:获取或设置选定内容的长度SelectedText:获取或设置选定的文本CaretIndex:获取或设置插入符号(光标)位置
// 选择从位置5开始的10个字符
txtEditor.SelectionStart = 5;
txtEditor.SelectionLength = 10;// 获取选中的文本
string selectedText = txtEditor.SelectedText;// 替换选中的文本
txtEditor.SelectedText = "新文本";// 设置光标位置
txtEditor.CaretIndex = 15;
4.2 选择方法
TextBox提供了几个用于文本选择的便捷方法:
Select(int start, int length):选择指定范围的文本SelectAll():选择所有文本Clear():清除所有文本
// 选择从位置0开始的5个字符
txtEditor.Select(0, 5);// 选择所有文本
txtEditor.SelectAll();// 清除所有文本
txtEditor.Clear();
4.3 文本操作
以下是一些常见的文本操作示例:
// 在当前光标位置插入文本
int caretIndex = txtEditor.CaretIndex;
txtEditor.Text = txtEditor.Text.Insert(caretIndex, "插入的文本");
txtEditor.CaretIndex = caretIndex + "插入的文本".Length;// 删除选中的文本
txtEditor.SelectedText = string.Empty;// 复制选中的文本到剪贴板
if (!string.IsNullOrEmpty(txtEditor.SelectedText))
{Clipboard.SetText(txtEditor.SelectedText);
}// 将剪贴板内容粘贴到光标位置
if (Clipboard.ContainsText())
{txtEditor.SelectedText = Clipboard.GetText();
}
4.4 选择事件
TextBox提供了与选择相关的事件:
SelectionChanged:当选择的内容改变时触发
private void TextBox_SelectionChanged(object sender, RoutedEventArgs e)
{TextBox textBox = sender as TextBox;// 显示当前选择的信息statusInfo.Text = $"选择起始位置: {textBox.SelectionStart}, 选择长度: {textBox.SelectionLength}";
}
4.5 实现自定义文本处理功能
下面是一个示例,实现了一个简单的文本统计功能:
<StackPanel><TextBox x:Name="txtContent" AcceptsReturn="True" TextWrapping="Wrap"Height="200" Width="400"SelectionChanged="TextBox_SelectionChanged"/><TextBlock x:Name="txtStats" Margin="0,10,0,0"Text="文本统计信息将显示在这里"/>
</StackPanel>
private void TextBox_SelectionChanged(object sender, RoutedEventArgs e)
{TextBox textBox = sender as TextBox;// 计算文本统计信息int charCount = textBox.Text.Length;int lineCount = textBox.Text.Split(new[] { Environment.NewLine }, StringSplitOptions.None).Length;int wordCount = textBox.Text.Split(new[] { ' ', '\t', '\r', '\n' }, StringSplitOptions.RemoveEmptyEntries).Length;// 计算选中部分的统计信息int selectedCharCount = textBox.SelectedText.Length;int selectedLineCount = textBox.SelectedText.Split(new[] { Environment.NewLine }, StringSplitOptions.None).Length;int selectedWordCount = textBox.SelectedText.Split(new[] { ' ', '\t', '\r', '\n' }, StringSplitOptions.RemoveEmptyEntries).Length;// 更新统计信息显示txtStats.Text = $"字符数: {charCount}, 行数: {lineCount}, 单词数: {wordCount}\n" +$"选中内容 - 字符数: {selectedCharCount}, 行数: {selectedLineCount}, 单词数: {selectedWordCount}";
}
5. 滚动支持
对于多行文本,TextBox内置了滚动支持功能,可以通过以下属性控制滚动行为:
5.1 滚动条可见性
HorizontalScrollBarVisibility:控制水平滚动条的显示VerticalScrollBarVisibility:控制垂直滚动条的显示
这两个属性接受以下值:
ScrollBarVisibility.Auto:根据内容自动显示或隐藏滚动条ScrollBarVisibility.Visible:始终显示滚动条ScrollBarVisibility.Hidden:隐藏滚动条,但内容仍可滚动ScrollBarVisibility.Disabled:禁用滚动功能
<TextBox AcceptsReturn="True"TextWrapping="Wrap"Height="200"Width="300"VerticalScrollBarVisibility="Auto"HorizontalScrollBarVisibility="Auto"/>
5.2 禁用水平滚动
通常,对于多行文本框,我们希望文本能够自动换行而不是水平滚动。可以通过设置TextWrapping和HorizontalScrollBarVisibility来实现:
<TextBox AcceptsReturn="True"TextWrapping="Wrap"Height="200"Width="300"VerticalScrollBarVisibility="Auto"HorizontalScrollBarVisibility="Disabled"/>
5.3 编程控制滚动位置
TextBox继承自TextBoxBase,它提供了一些方法来控制滚动位置:
ScrollToHome():滚动到文档开始ScrollToEnd():滚动到文档结尾ScrollToLine(int lineIndex):滚动到指定行ScrollToHorizontalOffset(double offset):滚动到指定的水平偏移ScrollToVerticalOffset(double offset):滚动到指定的垂直偏移
// 滚动到文档结尾
txtLog.ScrollToEnd();// 滚动到文档开始
txtLog.ScrollToHome();// 滚动到第10行
txtLog.ScrollToLine(9); // 行索引从0开始// 滚动到指定的垂直偏移
txtLog.ScrollToVerticalOffset(100);
5.4 滚动事件
可以通过处理滚动相关的事件来响应用户的滚动操作:
private void TextBox_ScrollChanged(object sender, ScrollChangedEventArgs e)
{// 获取当前滚动位置double verticalOffset = e.VerticalOffset;double horizontalOffset = e.HorizontalOffset;// 获取内容的总高度和宽度double extentHeight = e.ExtentHeight;double extentWidth = e.ExtentWidth;// 判断是否已滚动到底部bool atBottom = (verticalOffset + e.ViewportHeight) >= extentHeight;// 更新状态信息statusInfo.Text = $"垂直滚动位置: {verticalOffset}, 是否到底部: {atBottom}";
}
5.5 自动滚动示例
以下是一个模拟日志查看器的示例,实现新内容添加时自动滚动到底部:
<StackPanel><TextBox x:Name="txtLog"IsReadOnly="True"AcceptsReturn="True"TextWrapping="Wrap"Height="300"Width="400"VerticalScrollBarVisibility="Auto"ScrollChanged="TextBox_ScrollChanged"/><Button Content="添加日志条目" Click="AddLogEntry_Click" Margin="0,10,0,0"/>
</StackPanel>
private bool autoScroll = true;private void TextBox_ScrollChanged(object sender, ScrollChangedEventArgs e)
{// 检测用户是否手动滚动if (e.ExtentHeightChange == 0){// 用户手动滚动// 判断是否滚动到底部autoScroll = (e.VerticalOffset + e.ViewportHeight) >= e.ExtentHeight;}else if (autoScroll){// 如果设置了自动滚动,内容变化时滚动到底部((TextBox)sender).ScrollToEnd();}
}private void AddLogEntry_Click(object sender, RoutedEventArgs e)
{// 添加一条日志条目string timestamp = DateTime.Now.ToString("yyyy-MM-dd HH:mm:ss.fff");string logEntry = $"[{timestamp}] 日志条目 #{++logCounter}\n";txtLog.AppendText(logEntry);// 如果启用了自动滚动,滚动到底部if (autoScroll){txtLog.ScrollToEnd();}
}private int logCounter = 0;
6. 数据验证
TextBox控件支持多种数据验证方式,可以确保用户输入的内容符合应用程序的要求。
6.1 基本验证方法
最简单的验证方法是在TextBox的Text属性变化时进行验证:
private void TextBox_TextChanged(object sender, TextChangedEventArgs e)
{TextBox textBox = sender as TextBox;string text = textBox.Text;// 进行验证bool isValid = !string.IsNullOrEmpty(text) && text.Length >= 3;// 根据验证结果更新界面if (!isValid){textBox.Background = new SolidColorBrush(Colors.LightPink);validationMessage.Text = "内容长度不能少于3个字符";}else{textBox.Background = new SolidColorBrush(Colors.White);validationMessage.Text = "";}
}
6.2 使用IDataErrorInfo接口
更结构化的方法是在数据模型中实现IDataErrorInfo接口,并将TextBox绑定到该数据模型:
public class UserViewModel : IDataErrorInfo
{private string _username;public string Username{get { return _username; }set { _username = value; }}// IDataErrorInfo接口实现public string Error{get { return null; }}public string this[string columnName]{get{string result = null;if (columnName == "Username"){if (string.IsNullOrEmpty(Username)){result = "用户名不能为空";}else if (Username.Length < 3){result = "用户名长度不能少于3个字符";}}return result;}}
}
在XAML中绑定:
<TextBox x:Name="txtUsername"Text="{Binding Username, ValidatesOnDataErrors=True, UpdateSourceTrigger=PropertyChanged}"Width="200"/>
6.3 使用ValidationRule
WPF还提供了ValidationRule类,可以为绑定定义验证规则:
public class UsernameValidationRule : ValidationRule
{public override ValidationResult Validate(object value, CultureInfo cultureInfo){string username = value as string;if (string.IsNullOrEmpty(username)){return new ValidationResult(false, "用户名不能为空");}if (username.Length < 3){return new ValidationResult(false, "用户名长度不能少于3个字符");}return ValidationResult.ValidResult;}
}
在XAML中使用:
<TextBox Width="200"><TextBox.Text><Binding Path="Username" UpdateSourceTrigger="PropertyChanged"><Binding.ValidationRules><local:UsernameValidationRule ValidatesOnTargetUpdated="True"/></Binding.ValidationRules></Binding></TextBox.Text>
</TextBox>
6.4 错误样式和错误模板
可以自定义验证错误的显示方式,通过设置Validation.ErrorTemplate:
<TextBox Width="200"><TextBox.Text><Binding Path="Username" UpdateSourceTrigger="PropertyChanged"><Binding.ValidationRules><local:UsernameValidationRule ValidatesOnTargetUpdated="True"/></Binding.ValidationRules></Binding></TextBox.Text><TextBox.Style><Style TargetType="TextBox"><Style.Triggers><Trigger Property="Validation.HasError" Value="True"><Setter Property="ToolTip"Value="{Binding RelativeSource={RelativeSource Self},Path=(Validation.Errors)[0].ErrorContent}"/><Setter Property="Background" Value="Pink"/></Trigger></Style.Triggers></Style></TextBox.Style>
</TextBox>
自定义错误模板:
<TextBox Width="200"><TextBox.Text><Binding Path="Username" UpdateSourceTrigger="PropertyChanged"><Binding.ValidationRules><local:UsernameValidationRule ValidatesOnTargetUpdated="True"/></Binding.ValidationRules></Binding></TextBox.Text><Validation.ErrorTemplate><ControlTemplate><StackPanel><AdornedElementPlaceholder/><TextBlock Text="{Binding ErrorContent}" Foreground="Red"/></StackPanel></ControlTemplate></Validation.ErrorTemplate>
</TextBox>
6.5 实时验证示例
下面是一个综合示例,实现了一个带实时验证的表单:
<StackPanel Margin="10"><TextBlock Text="用户名:" Margin="0,0,0,5"/><TextBox x:Name="txtUsername" Width="250" HorizontalAlignment="Left"Text="{Binding Username, UpdateSourceTrigger=PropertyChanged, ValidatesOnDataErrors=True}"/><TextBlock Text="邮箱:" Margin="0,10,0,5"/><TextBox x:Name="txtEmail" Width="250" HorizontalAlignment="Left"Text="{Binding Email, UpdateSourceTrigger=PropertyChanged, ValidatesOnDataErrors=True}"/><TextBlock Text="密码:" Margin="0,10,0,5"/><PasswordBox x:Name="txtPassword" Width="250" HorizontalAlignment="Left"PasswordChanged="PasswordBox_PasswordChanged"/><Button Content="提交" Margin="0,20,0,0" Width="100" HorizontalAlignment="Left"IsEnabled="{Binding IsFormValid}"/>
</StackPanel>
public class FormViewModel : INotifyPropertyChanged, IDataErrorInfo
{private string _username;public string Username{get { return _username; }set { _username = value;OnPropertyChanged(nameof(Username));ValidateForm();}}private string _email;public string Email{get { return _email; }set { _email = value; OnPropertyChanged(nameof(Email));ValidateForm();}}private string _password;public string Password{get { return _password; }set { _password = value; OnPropertyChanged(nameof(Password));ValidateForm();}}private bool _isFormValid;public bool IsFormValid{get { return _isFormValid; }set { _isFormValid = value; OnPropertyChanged(nameof(IsFormValid));}}private void ValidateForm(){// 检查所有字段的有效性bool usernameValid = !string.IsNullOrEmpty(Username) && Username.Length >= 3;bool emailValid = !string.IsNullOrEmpty(Email) && Email.Contains("@") && Email.Contains(".");bool passwordValid = !string.IsNullOrEmpty(Password) && Password.Length >= 6;IsFormValid = usernameValid && emailValid && passwordValid;}public string Error => null;public string this[string columnName]{get{switch (columnName){case nameof(Username):if (string.IsNullOrEmpty(Username))return "用户名不能为空";if (Username.Length < 3)return "用户名长度不能少于3个字符";break;case nameof(Email):if (string.IsNullOrEmpty(Email))return "邮箱不能为空";if (!Email.Contains("@") || !Email.Contains("."))return "邮箱格式不正确";break;case nameof(Password):if (string.IsNullOrEmpty(Password))return "密码不能为空";if (Password.Length < 6)return "密码长度不能少于6个字符";break;}return null;}}public event PropertyChangedEventHandler PropertyChanged;protected virtual void OnPropertyChanged(string propertyName){PropertyChanged?.Invoke(this, new PropertyChangedEventArgs(propertyName));}
}
7. 撤销/重做支持
TextBox控件内置了撤销(Undo)和重做(Redo)功能,让用户可以方便地回退和重复编辑操作。
7.1 启用/禁用撤销功能
通过IsUndoEnabled属性可以控制是否启用撤销功能:
// 禁用撤销功能
txtEditor.IsUndoEnabled = false;// 启用撤销功能
txtEditor.IsUndoEnabled = true;
7.2 撤销和重做方法
TextBox提供了以下方法来执行撤销和重做操作:
Undo():撤销最近的编辑操作Redo():重做最近撤销的操作CanUndo:获取一个值,指示是否可以撤销当前操作CanRedo:获取一个值,指示是否可以重做先前撤销的操作
// 检查是否可以撤销
if (txtEditor.CanUndo)
{// 撤销操作txtEditor.Undo();
}// 检查是否可以重做
if (txtEditor.CanRedo)
{// 重做操作txtEditor.Redo();
}
7.3 自定义撤销重做按钮
以下是一个示例,展示如何添加自定义的撤销和重做按钮:
<StackPanel><TextBox x:Name="txtEditor"AcceptsReturn="True"TextWrapping="Wrap"Height="200"Width="400"TextChanged="TextBox_TextChanged"/><StackPanel Orientation="Horizontal" Margin="0,10,0,0"><Button x:Name="btnUndo" Content="撤销" Width="80" Click="Undo_Click" IsEnabled="False" Margin="0,0,10,0"/><Button x:Name="btnRedo" Content="重做" Width="80" Click="Redo_Click" IsEnabled="False"/></StackPanel>
</StackPanel>
private void TextBox_TextChanged(object sender, TextChangedEventArgs e)
{// 更新撤销和重做按钮的状态UpdateUndoRedoButtons();
}private void Undo_Click(object sender, RoutedEventArgs e)
{if (txtEditor.CanUndo){txtEditor.Undo();UpdateUndoRedoButtons();}
}private void Redo_Click(object sender, RoutedEventArgs e)
{if (txtEditor.CanRedo){txtEditor.Redo();UpdateUndoRedoButtons();}
}private void UpdateUndoRedoButtons()
{btnUndo.IsEnabled = txtEditor.CanUndo;btnRedo.IsEnabled = txtEditor.CanRedo;
}
7.4 撤销单元
TextBox控件将操作分组为撤销单元(Undo Units)。一个撤销单元可能包含多个相关的编辑操作,如一个完整的单词输入或删除。
要手动创建新的撤销单元,可以使用UndoAction方法:
// 在开始新的编辑操作前调用此方法以创建新的撤销单元
txtEditor.UndoAction = UndoAction.Create;
这在实现自定义编辑功能时很有用,例如,当执行查找替换操作时,可以将整个操作作为一个撤销单元。
7.5 清除撤销/重做历史
如果需要清除所有撤销和重做历史记录,可以使用:
// 清除撤销/重做历史
txtEditor.IsUndoEnabled = false;
txtEditor.IsUndoEnabled = true;
7.6 高级撤销/重做示例
下面是一个更完整的示例,实现了一个简单的文本编辑器,包括撤销/重做功能和状态显示:
<Grid><Grid.RowDefinitions><RowDefinition Height="Auto"/><RowDefinition Height="*"/></Grid.RowDefinitions><ToolBar Grid.Row="0"><Button x:Name="btnUndo" Content="撤销" Click="Undo_Click" IsEnabled="False"><Button.ToolTip><ToolTip x:Name="undoTooltip" Content="撤销"/></Button.ToolTip></Button><Button x:Name="btnRedo" Content="重做" Click="Redo_Click" IsEnabled="False"><Button.ToolTip><ToolTip x:Name="redoTooltip" Content="重做"/></Button.ToolTip></Button><Separator/><Button Content="新建撤销单元" Click="NewUndoUnit_Click"/></ToolBar><TextBox x:Name="txtEditor"Grid.Row="1"AcceptsReturn="True"TextWrapping="Wrap"VerticalScrollBarVisibility="Auto"TextChanged="TextBox_TextChanged"/><StatusBar Grid.Row="2"><TextBlock x:Name="txtStatus" Text="就绪"/></StatusBar>
</Grid>
private Stack<string> _undoDescriptions = new Stack<string>();
private Stack<string> _redoDescriptions = new Stack<string>();
private string _lastText = string.Empty;private void TextBox_TextChanged(object sender, TextChangedEventArgs e)
{// 记录变更描述if (txtEditor.CanUndo && _lastText != txtEditor.Text){// 简单的变更描述逻辑string currentText = txtEditor.Text;if (currentText.Length > _lastText.Length){_undoDescriptions.Push("添加文本");}else{_undoDescriptions.Push("删除文本");}_lastText = currentText;}// 更新撤销和重做按钮的状态和描述UpdateUndoRedoUI();
}private void Undo_Click(object sender, RoutedEventArgs e)
{if (txtEditor.CanUndo){if (_undoDescriptions.Count > 0){string description = _undoDescriptions.Pop();_redoDescriptions.Push(description);}txtEditor.Undo();_lastText = txtEditor.Text;UpdateUndoRedoUI();}
}private void Redo_Click(object sender, RoutedEventArgs e)
{if (txtEditor.CanRedo){if (_redoDescriptions.Count > 0){string description = _redoDescriptions.Pop();_undoDescriptions.Push(description);}txtEditor.Redo();_lastText = txtEditor.Text;UpdateUndoRedoUI();}
}private void NewUndoUnit_Click(object sender, RoutedEventArgs e)
{// 创建新的撤销单元txtEditor.UndoAction = UndoAction.Create;txtStatus.Text = "已创建新的撤销单元";
}private void UpdateUndoRedoUI()
{btnUndo.IsEnabled = txtEditor.CanUndo;btnRedo.IsEnabled = txtEditor.CanRedo;// 更新撤销按钮的提示if (txtEditor.CanUndo && _undoDescriptions.Count > 0){undoTooltip.Content = $"撤销: {_undoDescriptions.Peek()}";}else{undoTooltip.Content = "撤销";}// 更新重做按钮的提示if (txtEditor.CanRedo && _redoDescriptions.Count > 0){redoTooltip.Content = $"重做: {_redoDescriptions.Peek()}";}else{redoTooltip.Content = "重做";}// 更新状态信息txtStatus.Text = txtEditor.CanUndo ? "可以撤销" + (_undoDescriptions.Count > 0 ? $": {_undoDescriptions.Peek()}" : "") :"不可撤销";
}
8. 文本绑定与更新
WPF的数据绑定是其最强大的特性之一,TextBox控件可以与各种数据源绑定,实现数据的双向同步。
8.1 基本绑定
最简单的绑定是将TextBox的Text属性绑定到数据源:
<TextBox Text="{Binding Name}" Width="200"/>
这里的Name是绑定上下文中的一个属性。
8.2 绑定模式
绑定有不同的模式,控制数据如何在源和目标之间流动:
OneWay:数据从源到目标(TextBox只读)TwoWay:数据双向流动(默认)OneTime:数据只在应用程序启动或数据上下文更改时从源到目标OneWayToSource:数据从目标到源
<!-- 只读文本框,显示数据但不允许编辑更新源 -->
<TextBox Text="{Binding Name, Mode=OneWay}" IsReadOnly="True" Width="200"/><!-- 双向绑定,允许用户编辑并更新源 -->
<TextBox Text="{Binding Name, Mode=TwoWay}" Width="200"/><!-- 一次性绑定,只在初始化时从源获取数据 -->
<TextBox Text="{Binding Name, Mode=OneTime}" Width="200"/><!-- 从TextBox到源的单向绑定(少见) -->
<TextBox Text="{Binding Name, Mode=OneWayToSource}" Width="200"/>
8.3 更新触发器
对于TextBox,可以通过UpdateSourceTrigger属性控制何时将用户输入的值更新到源:
PropertyChanged:属性更改时更新源(实时)LostFocus:失去焦点时更新源(默认)Explicit:仅在调用BindingExpression.UpdateSource()时更新源
<!-- 实时更新,用户每次输入都会更新源 -->
<TextBox Text="{Binding Name, UpdateSourceTrigger=PropertyChanged}" Width="200"/><!-- 默认行为,失去焦点时才更新源 -->
<TextBox Text="{Binding Name, UpdateSourceTrigger=LostFocus}" Width="200"/><!-- 显式更新,需要代码中调用UpdateSource() -->
<TextBox x:Name="txtExplicit" Text="{Binding Name, UpdateSourceTrigger=Explicit}" Width="200"/>
<Button Content="更新" Click="UpdateButton_Click"/>
private void UpdateButton_Click(object sender, RoutedEventArgs e)
{// 显式更新绑定源BindingExpression binding = txtExplicit.GetBindingExpression(TextBox.TextProperty);binding.UpdateSource();
}
8.4 字符串格式化
可以使用StringFormat属性对显示的文本进行格式化:
<!-- 显示带货币符号的金额 -->
<TextBox Text="{Binding Price, StringFormat=C}" Width="200"/><!-- 自定义格式 -->
<TextBox Text="{Binding Date, StringFormat=日期: {0:yyyy-MM-dd}}" Width="200"/>
8.5 值转换器
如果需要在绑定的源和目标之间进行数据转换,可以使用值转换器:
public class BoolToYesNoConverter : IValueConverter
{public object Convert(object value, Type targetType, object parameter, CultureInfo culture){if (value is bool boolValue){return boolValue ? "是" : "否";}return "未知";}public object ConvertBack(object value, Type targetType, object parameter, CultureInfo culture){if (value is string stringValue){return stringValue == "是";}return false;}
}
在XAML中使用转换器:
<Window.Resources><local:BoolToYesNoConverter x:Key="boolToYesNoConverter"/>
</Window.Resources><TextBox Text="{Binding IsActive, Converter={StaticResource boolToYesNoConverter}}" Width="200"/>
8.6 FallbackValue 和 TargetNullValue
处理空值或绑定失败的情况:
<!-- 当绑定源为null时显示"未设置" -->
<TextBox Text="{Binding Name, TargetNullValue='未设置'}" Width="200"/><!-- 当绑定失败时显示"绑定错误" -->
<TextBox Text="{Binding Name, FallbackValue='绑定错误'}" Width="200"/>
8.7 绑定到集合项
可以将TextBox绑定到集合中的项:
<!-- 绑定到当前选定的项目的Name属性 -->
<TextBox Text="{Binding SelectedItem.Name, ElementName=listView}" Width="200"/>
8.8 绑定命令
TextBox本身不直接支持Command属性,但可以通过InputBindings添加命令支持:
<TextBox x:Name="txtCommand" Width="200"><TextBox.InputBindings><KeyBinding Key="Enter" Command="{Binding SubmitCommand}" CommandParameter="{Binding Text, ElementName=txtCommand}"/></TextBox.InputBindings>
</TextBox>
8.9 实时搜索示例
以下是一个使用绑定实现实时搜索功能的示例:
<StackPanel><TextBox x:Name="txtSearch" Text="{Binding SearchTerm, UpdateSourceTrigger=PropertyChanged}" Width="200" Margin="0,0,0,10"Padding="5"FontSize="14"VerticalContentAlignment="Center"/><ListBox x:Name="resultsList"ItemsSource="{Binding FilteredItems}"Height="300"Width="200"/>
</StackPanel>
public class SearchViewModel : INotifyPropertyChanged
{private ObservableCollection<string> _allItems;private ObservableCollection<string> _filteredItems;private string _searchTerm;public SearchViewModel(){// 初始化数据_allItems = new ObservableCollection<string>{"苹果", "香蕉", "橙子", "草莓", "葡萄", "西瓜", "菠萝", "芒果", "樱桃", "蓝莓"};_filteredItems = new ObservableCollection<string>(_allItems);}public ObservableCollection<string> FilteredItems{get { return _filteredItems; }set { _filteredItems = value; OnPropertyChanged(nameof(FilteredItems));}}public string SearchTerm{get { return _searchTerm; }set { _searchTerm = value; OnPropertyChanged(nameof(SearchTerm));// 根据搜索词过滤项目FilterItems();}}private void FilterItems(){if (string.IsNullOrEmpty(SearchTerm)){// 如果搜索词为空,显示所有项目FilteredItems = new ObservableCollection<string>(_allItems);}else{// 根据搜索词过滤项目var filtered = _allItems.Where(i => i.Contains(SearchTerm, StringComparison.OrdinalIgnoreCase));FilteredItems = new ObservableCollection<string>(filtered);}}public event PropertyChangedEventHandler PropertyChanged;protected virtual void OnPropertyChanged(string propertyName){PropertyChanged?.Invoke(this, new PropertyChangedEventArgs(propertyName));}
}
8.10 表单数据绑定示例
下面是一个使用数据绑定的表单示例:
<Grid Margin="20"><Grid.RowDefinitions><RowDefinition Height="Auto"/><RowDefinition Height="Auto"/><RowDefinition Height="Auto"/><RowDefinition Height="Auto"/><RowDefinition Height="Auto"/></Grid.RowDefinitions><Grid.ColumnDefinitions><ColumnDefinition Width="Auto"/><ColumnDefinition Width="*"/></Grid.ColumnDefinitions><!-- 姓名 --><TextBlock Grid.Row="0" Grid.Column="0" Text="姓名:" Margin="0,0,0,5"/><TextBox Grid.Row="0" Grid.Column="1" Text="{Binding Name, UpdateSourceTrigger=PropertyChanged}"Margin="0,0,0,10" Height="30"/><!-- 电子邮件 --><TextBlock Grid.Row="1" Grid.Column="0" Text="电子邮件:" Margin="0,0,0,5"/><TextBox Grid.Row="1" Grid.Column="1" Text="{Binding Email, UpdateSourceTrigger=PropertyChanged, ValidatesOnDataErrors=True}"Margin="0,0,0,10" Height="30"/><!-- 年龄 --><TextBlock Grid.Row="2" Grid.Column="0" Text="年龄:" Margin="0,0,0,5"/><TextBox Grid.Row="2" Grid.Column="1" Text="{Binding Age, UpdateSourceTrigger=PropertyChanged, ValidatesOnDataErrors=True}"Margin="0,0,0,10" Height="30"/><!-- 备注 --><TextBlock Grid.Row="3" Grid.Column="0" Text="备注:" Margin="0,0,0,5"/><TextBox Grid.Row="3" Grid.Column="1" Text="{Binding Remarks, UpdateSourceTrigger=PropertyChanged}"AcceptsReturn="True"TextWrapping="Wrap"Height="100"Margin="0,0,0,10"/><!-- 提交按钮 --><Button Grid.Row="4" Grid.Column="1" Content="提交"Command="{Binding SubmitCommand}"Width="100"Height="30"HorizontalAlignment="Right"/>
</Grid>
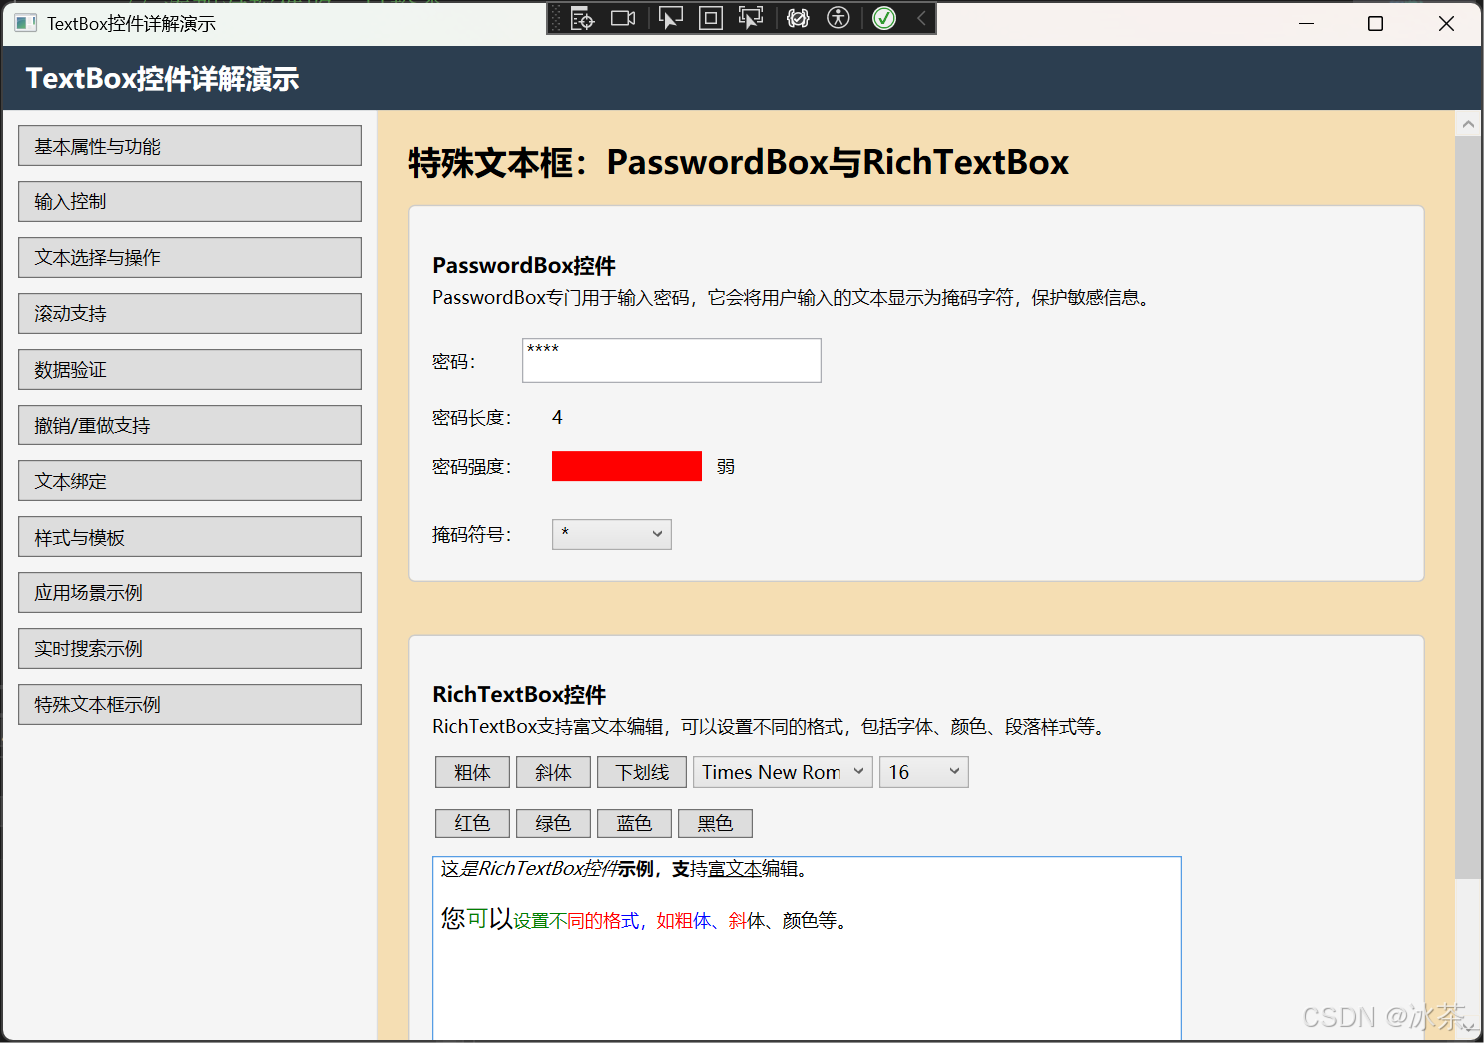
9. 特殊文本框:PasswordBox与RichTextBox
除了标准的TextBox控件,WPF还提供了两种特殊的文本输入控件:PasswordBox和RichTextBox。它们都继承自不同的基类,各自拥有独特的功能和特性。
9.1 PasswordBox
PasswordBox专门用于输入密码,它会将用户输入的文本显示为掩码字符,保护敏感信息。
9.1.1 基本属性
Password:获取或设置密码文本PasswordChar:设置掩码字符(默认为●)MaxLength:设置可输入的最大字符数SecurePassword:以SecureString形式获取密码(更安全)
<PasswordBox x:Name="pwdBox"Password="初始密码"PasswordChar="*"MaxLength="20"Width="200"Height="30"/>
// 获取密码
string password = pwdBox.Password;// 设置密码
pwdBox.Password = "新密码";// 修改掩码字符
pwdBox.PasswordChar = '#';// 获取安全密码
System.Security.SecureString securePassword = pwdBox.SecurePassword;
9.1.2 事件处理
PasswordBox提供了PasswordChanged事件,在密码内容变化时触发:
private void PasswordBox_PasswordChanged(object sender, RoutedEventArgs e)
{PasswordBox passwordBox = sender as PasswordBox;// 显示密码长度passwordLength.Text = $"密码长度:{passwordBox.Password.Length}";// 评估密码强度PasswordStrength strength = EvaluatePasswordStrength(passwordBox.Password);UpdatePasswordStrengthIndicator(strength);
}private enum PasswordStrength { Weak, Medium, Strong }private PasswordStrength EvaluatePasswordStrength(string password)
{if (string.IsNullOrEmpty(password) || password.Length < 6)return PasswordStrength.Weak;bool hasUpperCase = password.Any(char.IsUpper);bool hasLowerCase = password.Any(char.IsLower);bool hasDigit = password.Any(char.IsDigit);bool hasSpecialChar = password.Any(c => !char.IsLetterOrDigit(c));if (password.Length >= 8 && hasUpperCase && hasLowerCase && hasDigit && hasSpecialChar)return PasswordStrength.Strong;return PasswordStrength.Medium;
}private void UpdatePasswordStrengthIndicator(PasswordStrength strength)
{switch (strength){case PasswordStrength.Weak:strengthIndicator.Fill = new SolidColorBrush(Colors.Red);strengthText.Text = "弱";break;case PasswordStrength.Medium:strengthIndicator.Fill = new SolidColorBrush(Colors.Yellow);strengthText.Text = "中";break;case PasswordStrength.Strong:strengthIndicator.Fill = new SolidColorBrush(Colors.Green);strengthText.Text = "强";break;}
}
9.1.3 PasswordBox与数据绑定问题
出于安全考虑,PasswordBox的Password属性没有设计为依赖属性,这意味着无法直接使用数据绑定。要实现数据绑定,可以采用以下方法:
- 使用附加属性:
public static class PasswordBoxHelper
{public static readonly DependencyProperty BoundPasswordProperty =DependencyProperty.RegisterAttached("BoundPassword",typeof(string),typeof(PasswordBoxHelper),new FrameworkPropertyMetadata(string.Empty, OnBoundPasswordChanged));public static string GetBoundPassword(DependencyObject d){return (string)d.GetValue(BoundPasswordProperty);}public static void SetBoundPassword(DependencyObject d, string value){d.SetValue(BoundPasswordProperty, value);}private static void OnBoundPasswordChanged(DependencyObject d, DependencyPropertyChangedEventArgs e){PasswordBox passwordBox = d as PasswordBox;if (passwordBox != null){passwordBox.Password = (string)e.NewValue;}}public static readonly DependencyProperty IsUpdatingProperty =DependencyProperty.RegisterAttached("IsUpdating",typeof(bool),typeof(PasswordBoxHelper));public static bool GetIsUpdating(DependencyObject d){return (bool)d.GetValue(IsUpdatingProperty);}public static void SetIsUpdating(DependencyObject d, bool value){d.SetValue(IsUpdatingProperty, value);}public static readonly DependencyProperty BindPassword =DependencyProperty.RegisterAttached("BindPassword",typeof(bool),typeof(PasswordBoxHelper),new PropertyMetadata(false, OnBindPasswordChanged));public static bool GetBindPassword(DependencyObject d){return (bool)d.GetValue(BindPassword);}public static void SetBindPassword(DependencyObject d, bool value){d.SetValue(BindPassword, value);}private static void OnBindPasswordChanged(DependencyObject d, DependencyPropertyChangedEventArgs e){PasswordBox passwordBox = d as PasswordBox;if (passwordBox == null)return;if ((bool)e.NewValue){passwordBox.PasswordChanged += PasswordChanged;}else{passwordBox.PasswordChanged -= PasswordChanged;}}private static void PasswordChanged(object sender, RoutedEventArgs e){PasswordBox passwordBox = sender as PasswordBox;if (passwordBox == null)return;SetIsUpdating(passwordBox, true);SetBoundPassword(passwordBox, passwordBox.Password);SetIsUpdating(passwordBox, false);}
}
在XAML中使用:
<PasswordBox local:PasswordBoxHelper.BindPassword="True"local:PasswordBoxHelper.BoundPassword="{Binding Password, Mode=TwoWay, UpdateSourceTrigger=PropertyChanged}"Width="200"/>
- 使用行为(Behavior):
public class PasswordBoxBehavior : Behavior<PasswordBox>
{public static readonly DependencyProperty PasswordProperty =DependencyProperty.Register("Password", typeof(string), typeof(PasswordBoxBehavior),new FrameworkPropertyMetadata(string.Empty, FrameworkPropertyMetadataOptions.BindsTwoWayByDefault,OnPasswordPropertyChanged));private bool _isUpdating;public string Password{get { return (string)GetValue(PasswordProperty); }set { SetValue(PasswordProperty, value); }}protected override void OnAttached(){base.OnAttached();AssociatedObject.PasswordChanged += OnPasswordBoxPasswordChanged;}protected override void OnDetaching(){AssociatedObject.PasswordChanged -= OnPasswordBoxPasswordChanged;base.OnDetaching();}private static void OnPasswordPropertyChanged(DependencyObject d, DependencyPropertyChangedEventArgs e){PasswordBoxBehavior behavior = d as PasswordBoxBehavior;if (behavior._isUpdating)return;if (behavior.AssociatedObject != null){behavior.AssociatedObject.Password = e.NewValue as string;}}private void OnPasswordBoxPasswordChanged(object sender, RoutedEventArgs e){_isUpdating = true;Password = AssociatedObject.Password;_isUpdating = false;}
}
在XAML中使用(需要引入Behaviors命名空间):
<PasswordBox Width="200"><i:Interaction.Behaviors><local:PasswordBoxBehavior Password="{Binding Password, Mode=TwoWay}"/></i:Interaction.Behaviors>
</PasswordBox>
9.1.4 安全最佳实践
处理密码时,应注意以下安全最佳实践:
- 使用
SecurePassword而不是Password属性,避免明文密码在内存中停留过长时间 - 避免将密码保存在字符串变量中
- 密码验证后,及时清除内存中的密码信息
- 使用合适的哈希算法和加盐技术存储密码
// 推荐的密码处理方式
private void Login_Click(object sender, RoutedEventArgs e)
{using (SecureString securePassword = pwdBox.SecurePassword){// 使用安全的方式验证密码bool isAuthenticated = AuthenticateUser(txtUsername.Text, securePassword);if (isAuthenticated){// 登录成功处理}else{// 登录失败处理}}// 清除密码框pwdBox.Clear();
}
9.2 RichTextBox
RichTextBox是一个强大的富文本编辑控件,它支持多种文本格式、样式、颜色、嵌入对象等高级功能。它继承自TextBoxBase类,但内部使用FlowDocument来存储和管理内容。
9.2.1 基本用法
创建一个基本的RichTextBox控件:
<RichTextBox x:Name="richTextBox"Width="400"Height="300"VerticalScrollBarVisibility="Auto"><RichTextBox.Document><FlowDocument><Paragraph><Run Text="这是一个RichTextBox示例"/></Paragraph></FlowDocument></RichTextBox.Document>
</RichTextBox>
9.2.2 内容操作
RichTextBox的内容存储在FlowDocument中,它由各种文档元素(如Paragraph、Table、List等)组成。以下是一些常见的内容操作:
// 获取文档内容
FlowDocument document = richTextBox.Document;// 获取纯文本内容
TextRange textRange = new TextRange(document.ContentStart, document.ContentEnd);
string plainText = textRange.Text;// 设置文本内容
richTextBox.Document.Blocks.Clear();
richTextBox.Document.Blocks.Add(new Paragraph(new Run("新的文本内容")));// 追加文本
Paragraph lastParagraph = richTextBox.Document.Blocks.LastBlock as Paragraph;
if (lastParagraph != null)
{lastParagraph.Inlines.Add(new Run("追加的文本"));
}
else
{richTextBox.Document.Blocks.Add(new Paragraph(new Run("追加的文本")));
}
9.2.3 格式化文本
RichTextBox支持丰富的文本格式化功能:
// 创建格式化文本
Paragraph paragraph = new Paragraph();// 粗体文本
paragraph.Inlines.Add(new Bold(new Run("粗体文本")));
paragraph.Inlines.Add(new Run(" "));// 斜体文本
paragraph.Inlines.Add(new Italic(new Run("斜体文本")));
paragraph.Inlines.Add(new Run(" "));// 下划线文本
paragraph.Inlines.Add(new Underline(new Run("下划线文本")));
paragraph.Inlines.Add(new Run(" "));// 颜色文本
Run coloredText = new Run("彩色文本");
coloredText.Foreground = new SolidColorBrush(Colors.Red);
paragraph.Inlines.Add(coloredText);// 字体设置
Run fontText = new Run("不同字体文本");
fontText.FontFamily = new FontFamily("Arial");
fontText.FontSize = 16;
paragraph.Inlines.Add(new LineBreak());
paragraph.Inlines.Add(fontText);// 添加到文档
richTextBox.Document.Blocks.Add(paragraph);
9.2.4 插入图片和其他对象
RichTextBox还可以插入图片和其他嵌入对象:
// 插入图片
BitmapImage bitmap = new BitmapImage(new Uri("pack://application:,,,/Images/sample.png"));
Image image = new Image();
image.Source = bitmap;
image.Width = 100;
image.Height = 100;// 创建包含图片的Inline元素
InlineUIContainer container = new InlineUIContainer(image);// 添加到文档
Paragraph imageParagraph = new Paragraph();
imageParagraph.Inlines.Add(container);
richTextBox.Document.Blocks.Add(imageParagraph);
9.2.5 文件保存与加载
RichTextBox的内容可以保存为RTF、XAML或纯文本格式:
// 保存为RTF
private void SaveAsRtf(RichTextBox richTextBox, string filePath)
{TextRange range = new TextRange(richTextBox.Document.ContentStart, richTextBox.Document.ContentEnd);using (FileStream fileStream = new FileStream(filePath, FileMode.Create)){range.Save(fileStream, DataFormats.Rtf);}
}// 加载RTF文件
private void LoadRtfFile(RichTextBox richTextBox, string filePath)
{TextRange range = new TextRange(richTextBox.Document.ContentStart, richTextBox.Document.ContentEnd);using (FileStream fileStream = new FileStream(filePath, FileMode.Open)){range.Load(fileStream, DataFormats.Rtf);}
}// 保存为XAML
private void SaveAsXaml(RichTextBox richTextBox, string filePath)
{TextRange range = new TextRange(richTextBox.Document.ContentStart, richTextBox.Document.ContentEnd);using (FileStream fileStream = new FileStream(filePath, FileMode.Create)){range.Save(fileStream, DataFormats.Xaml);}
}// 加载XAML文件
private void LoadXamlFile(RichTextBox richTextBox, string filePath)
{TextRange range = new TextRange(richTextBox.Document.ContentStart, richTextBox.Document.ContentEnd);using (FileStream fileStream = new FileStream(filePath, FileMode.Open)){range.Load(fileStream, DataFormats.Xaml);}
}// 保存为纯文本
private void SaveAsText(RichTextBox richTextBox, string filePath)
{TextRange range = new TextRange(richTextBox.Document.ContentStart, richTextBox.Document.ContentEnd);using (StreamWriter writer = new StreamWriter(filePath)){writer.Write(range.Text);}
}
9.2.6 创建简单的文本编辑器
以下是一个简单的富文本编辑器实现:
<Grid><Grid.RowDefinitions><RowDefinition Height="Auto"/><RowDefinition Height="*"/></Grid.RowDefinitions><ToolBar Grid.Row="0"><Button Content="粗体" Click="Bold_Click"/><Button Content="斜体" Click="Italic_Click"/><Button Content="下划线" Click="Underline_Click"/><Separator/><ComboBox x:Name="cmbFontSize" SelectedIndex="2" SelectionChanged="FontSize_Changed"><ComboBoxItem Content="10"/><ComboBoxItem Content="12"/><ComboBoxItem Content="14"/><ComboBoxItem Content="16"/><ComboBoxItem Content="18"/><ComboBoxItem Content="20"/></ComboBox></ToolBar><RichTextBox x:Name="editor" Grid.Row="1" Margin="10"/>
</Grid>
public partial class RichTextEditorWindow : Window
{public RichTextEditorWindow(){InitializeComponent();// 初始化字体列表foreach (FontFamily fontFamily in Fonts.SystemFontFamilies){cmbFontSize.Items.Add(fontFamily);}cmbFontSize.SelectedItem = editor.FontFamily;}private void Editor_SelectionChanged(object sender, RoutedEventArgs e){// 更新工具栏状态UpdateToolbarState();}private void UpdateToolbarState(){// 获取当前选择的文本范围TextRange selection = new TextRange(editor.Selection.Start, editor.Selection.End);// 更新加粗按钮状态object fontWeight = selection.GetPropertyValue(TextElement.FontWeightProperty);btnBold.IsChecked = (fontWeight != DependencyProperty.UnsetValue && (FontWeight)fontWeight == FontWeights.Bold);// 更新斜体按钮状态object fontStyle = selection.GetPropertyValue(TextElement.FontStyleProperty);btnItalic.IsChecked = (fontStyle != DependencyProperty.UnsetValue && (FontStyle)fontStyle == FontStyles.Italic);// 更新下划线按钮状态object textDecorations = selection.GetPropertyValue(Inline.TextDecorationsProperty);btnUnderline.IsChecked = (textDecorations != DependencyProperty.UnsetValue && ((TextDecorationCollection)textDecorations).Equals(TextDecorations.Underline));// 更新对齐方式按钮object textAlignment = selection.GetPropertyValue(Block.TextAlignmentProperty);if (textAlignment != DependencyProperty.UnsetValue){TextAlignment alignment = (TextAlignment)textAlignment;btnAlignLeft.IsChecked = (alignment == TextAlignment.Left);btnAlignCenter.IsChecked = (alignment == TextAlignment.Center);btnAlignRight.IsChecked = (alignment == TextAlignment.Right);btnAlignJustify.IsChecked = (alignment == TextAlignment.Justify);}// 更新字体和字号object fontFamily = selection.GetPropertyValue(TextElement.FontFamilyProperty);if (fontFamily != DependencyProperty.UnsetValue){cmbFontSize.SelectedItem = fontFamily;}object fontSize = selection.GetPropertyValue(TextElement.FontSizeProperty);if (fontSize != DependencyProperty.UnsetValue){string fontSizeStr = ((double)fontSize).ToString();foreach (ComboBoxItem item in cmbFontSize.Items){if (item.Content.ToString() == fontSizeStr){cmbFontSize.SelectedItem = item;break;}}}}private void FontSize_Changed(object sender, SelectionChangedEventArgs e){if (cmbFontSize.SelectedItem != null && editor.Selection.Start != editor.Selection.End){double fontSize = double.Parse((cmbFontSize.SelectedItem as ComboBoxItem).Content.ToString());editor.Selection.ApplyPropertyValue(TextElement.FontSizeProperty, fontSize);}}private void Bold_Click(object sender, RoutedEventArgs e){editor.Selection.ApplyPropertyValue(TextElement.FontWeightProperty, editor.Selection.GetPropertyValue(TextElement.FontWeightProperty).Equals(FontWeights.Bold) ? FontWeights.Normal : FontWeights.Bold);}private void Italic_Click(object sender, RoutedEventArgs e){editor.Selection.ApplyPropertyValue(TextElement.FontStyleProperty, editor.Selection.GetPropertyValue(TextElement.FontStyleProperty).Equals(FontStyles.Italic) ? FontStyles.Normal : FontStyles.Italic);}private void Underline_Click(object sender, RoutedEventArgs e){TextDecorationCollection decorations = editor.Selection.GetPropertyValue(Inline.TextDecorationsProperty) as TextDecorationCollection;if (decorations != null && decorations.Equals(TextDecorations.Underline)){editor.Selection.ApplyPropertyValue(Inline.TextDecorationsProperty, null);}else{editor.Selection.ApplyPropertyValue(Inline.TextDecorationsProperty, TextDecorations.Underline);}}
}
10. 样式与模板定制
WPF的强大之处在于其样式和模板系统,可以完全自定义控件的外观而不改变其功能。TextBox控件同样可以进行丰富的样式和模板定制。
10.1 基本样式设置
最简单的样式设置是通过直接设置TextBox的属性:
<TextBox Width="200" Height="30"Background="LightYellow"Foreground="Navy"FontFamily="Consolas"FontSize="14"Padding="5,3"BorderBrush="Orange"BorderThickness="1"TextAlignment="Center"/>
10.2 使用Style对象
更系统的方法是创建Style对象:
<Window.Resources><Style x:Key="CustomTextBoxStyle" TargetType="TextBox"><Setter Property="Background" Value="LightYellow"/><Setter Property="Foreground" Value="Navy"/><Setter Property="FontFamily" Value="Consolas"/><Setter Property="FontSize" Value="14"/><Setter Property="Padding" Value="5,3"/><Setter Property="BorderBrush" Value="Orange"/><Setter Property="BorderThickness" Value="1"/><Setter Property="TextAlignment" Value="Center"/><Setter Property="Height" Value="30"/></Style>
</Window.Resources><TextBox Style="{StaticResource CustomTextBoxStyle}" Width="200"/>
10.3 使用触发器
样式可以包含触发器,根据条件改变控件的外观:
<Style x:Key="ValidationTextBoxStyle" TargetType="TextBox"><Setter Property="Background" Value="White"/><Setter Property="BorderBrush" Value="Gray"/><Setter Property="BorderThickness" Value="1"/><Style.Triggers><!-- 获得焦点时改变边框 --><Trigger Property="IsFocused" Value="True"><Setter Property="BorderBrush" Value="#3498db"/><Setter Property="BorderThickness" Value="2"/></Trigger><!-- 只读状态下改变背景色 --><Trigger Property="IsReadOnly" Value="True"><Setter Property="Background" Value="LightGray"/></Trigger><!-- 当文本为空时显示灰色背景 --><Trigger Property="Text" Value=""><Setter Property="Background" Value="#FFEEEEEE"/></Trigger><!-- 当文本长度超过10时显示警告颜色 --><DataTrigger Binding="{Binding RelativeSource={RelativeSource Self}, Path=Text.Length}" Value="10"><Setter Property="Foreground" Value="Red"/><Setter Property="ToolTip" Value="文本长度已达到10个字符"/></DataTrigger></Style.Triggers>
</Style>
10.4 样式继承
可以通过BasedOn属性继承现有样式:
<Style x:Key="BaseTextBoxStyle" TargetType="TextBox"><Setter Property="FontFamily" Value="Segoe UI"/><Setter Property="FontSize" Value="12"/><Setter Property="Padding" Value="5,3"/>
</Style><Style x:Key="SpecialTextBoxStyle" TargetType="TextBox" BasedOn="{StaticResource BaseTextBoxStyle}"><Setter Property="Background" Value="LightBlue"/><Setter Property="Foreground" Value="DarkBlue"/>
</Style>
10.5 隐式样式
可以创建针对所有TextBox的隐式样式,无需显式引用:
<Style TargetType="TextBox"><Setter Property="Padding" Value="5,3"/><Setter Property="Margin" Value="0,0,0,5"/><Setter Property="VerticalContentAlignment" Value="Center"/>
</Style>
10.6 控件模板定制
要完全控制TextBox的外观,可以自定义其控件模板:
<Style x:Key="ModernTextBoxStyle" TargetType="TextBox"><Setter Property="Background" Value="#F5F5F5"/><Setter Property="Foreground" Value="#333333"/><Setter Property="BorderThickness" Value="0,0,0,1"/><Setter Property="BorderBrush" Value="#CCCCCC"/><Setter Property="Padding" Value="5,8"/><Setter Property="FontSize" Value="13"/><Setter Property="Template"><Setter.Value><ControlTemplate TargetType="TextBox"><Grid><!-- 背景和边框 --><Border x:Name="border" Background="{TemplateBinding Background}"BorderBrush="{TemplateBinding BorderBrush}"BorderThickness="{TemplateBinding BorderThickness}"><Grid><!-- 水印文本 --><TextBlock x:Name="PART_Watermark"Text="请输入内容..."Foreground="#AAAAAA"Visibility="Collapsed"Margin="{TemplateBinding Padding}"VerticalAlignment="{TemplateBinding VerticalContentAlignment}"/><!-- 实际的文本编辑区域 --><ScrollViewer x:Name="PART_ContentHost"/></Grid></Border></Grid><ControlTemplate.Triggers><!-- 显示水印 --><MultiTrigger><MultiTrigger.Conditions><Condition Property="Text" Value=""/><Condition Property="IsFocused" Value="False"/></MultiTrigger.Conditions><Setter TargetName="PART_Watermark" Property="Visibility" Value="Visible"/></MultiTrigger><!-- 获取焦点时的样式 --><Trigger Property="IsFocused" Value="True"><Trigger.EnterActions><BeginStoryboard><Storyboard><ColorAnimation Storyboard.TargetName="border"Storyboard.TargetProperty="(Border.BorderBrush).(SolidColorBrush.Color)"To="#3498db"Duration="0:0:0.2"/><ThicknessAnimation Storyboard.TargetName="border"Storyboard.TargetProperty="BorderThickness"To="0,0,0,2"Duration="0:0:0.2"/></Storyboard></BeginStoryboard></Trigger.EnterActions><Trigger.ExitActions><BeginStoryboard><Storyboard><ColorAnimation Storyboard.TargetName="border"Storyboard.TargetProperty="(Border.BorderBrush).(SolidColorBrush.Color)"To="#CCCCCC"Duration="0:0:0.2"/><ThicknessAnimation Storyboard.TargetName="border"Storyboard.TargetProperty="BorderThickness"To="0,0,0,1"Duration="0:0:0.2"/></Storyboard></BeginStoryboard></Trigger.ExitActions></Trigger></ControlTemplate.Triggers></ControlTemplate></Setter.Value></Setter>
</Style>
10.7 自定义附加属性
可以创建附加属性来扩展TextBox的功能:
public static class TextBoxExtensions
{// 定义水印文本附加属性public static readonly DependencyProperty WatermarkProperty =DependencyProperty.RegisterAttached("Watermark",typeof(string),typeof(TextBoxExtensions),new FrameworkPropertyMetadata(string.Empty, FrameworkPropertyMetadataOptions.AffectsRender));// Getterpublic static string GetWatermark(DependencyObject obj){return (string)obj.GetValue(WatermarkProperty);}// Setterpublic static void SetWatermark(DependencyObject obj, string value){obj.SetValue(WatermarkProperty, value);}// 定义是否显示清除按钮的附加属性public static readonly DependencyProperty HasClearButtonProperty =DependencyProperty.RegisterAttached("HasClearButton",typeof(bool),typeof(TextBoxExtensions),new FrameworkPropertyMetadata(false, OnHasClearButtonChanged));// Getterpublic static bool GetHasClearButton(DependencyObject obj){return (bool)obj.GetValue(HasClearButtonProperty);}// Setterpublic static void SetHasClearButton(DependencyObject obj, bool value){obj.SetValue(HasClearButtonProperty, value);}// 当HasClearButton属性改变时处理private static void OnHasClearButtonChanged(DependencyObject d, DependencyPropertyChangedEventArgs e){if (d is TextBox textBox){if ((bool)e.NewValue){// 添加清除按钮textBox.Loaded += TextBox_Loaded;}else{// 移除清除按钮textBox.Loaded -= TextBox_Loaded;}}}private static void TextBox_Loaded(object sender, RoutedEventArgs e){if (sender is TextBox textBox){// 为TextBox创建一个父容器var parent = textBox.Parent;if (parent is Grid || parent is Canvas || parent is Panel){var container = parent;var index = -1;if (parent is Grid){index = Grid.GetColumn(textBox);}// 创建清除按钮var button = new Button{Content = "X",Width = 16,Height = 16,Padding = new Thickness(0),Margin = new Thickness(0),VerticalAlignment = VerticalAlignment.Center,HorizontalAlignment = HorizontalAlignment.Right,Background = Brushes.Transparent,BorderThickness = new Thickness(0),Visibility = string.IsNullOrEmpty(textBox.Text) ? Visibility.Collapsed : Visibility.Visible};// 处理按钮点击事件button.Click += (s, args) =>{textBox.Clear();textBox.Focus();};// 处理文本变化事件textBox.TextChanged += (s, args) =>{button.Visibility = string.IsNullOrEmpty(textBox.Text) ? Visibility.Collapsed : Visibility.Visible;};// 将按钮添加到父容器并定位if (parent is Grid grid){grid.Children.Add(button);Grid.SetRow(button, Grid.GetRow(textBox));Grid.SetColumn(button, Grid.GetColumn(textBox));}else if (parent is Canvas canvas){canvas.Children.Add(button);Canvas.SetLeft(button, Canvas.GetLeft(textBox) + textBox.ActualWidth - button.Width - 5);Canvas.SetTop(button, Canvas.GetTop(textBox) + (textBox.ActualHeight - button.Height) / 2);}else if (parent is Panel panel){panel.Children.Add(button);}}}}
}
在XAML中使用附加属性:
<TextBox local:TextBoxExtensions.Watermark="请输入搜索内容"local:TextBoxExtensions.HasClearButton="True"Width="200"/>
10.8 自定义控件
创建自定义的TextBox派生控件,可以添加新功能:
public class WatermarkTextBox : TextBox
{static WatermarkTextBox(){DefaultStyleKeyProperty.OverrideMetadata(typeof(WatermarkTextBox), new FrameworkPropertyMetadata(typeof(WatermarkTextBox)));}public static readonly DependencyProperty WatermarkProperty =DependencyProperty.Register("Watermark", typeof(string), typeof(WatermarkTextBox),new PropertyMetadata(string.Empty));public string Watermark{get { return (string)GetValue(WatermarkProperty); }set { SetValue(WatermarkProperty, value); }}public static readonly DependencyProperty WatermarkColorProperty =DependencyProperty.Register("WatermarkColor", typeof(Brush), typeof(WatermarkTextBox),new PropertyMetadata(Brushes.Gray));public Brush WatermarkColor{get { return (Brush)GetValue(WatermarkColorProperty); }set { SetValue(WatermarkColorProperty, value); }}
}
创建对应的控件模板:
<Style TargetType="{x:Type local:WatermarkTextBox}"><Setter Property="Template"><Setter.Value><ControlTemplate TargetType="{x:Type local:WatermarkTextBox}"><Border Background="{TemplateBinding Background}"BorderBrush="{TemplateBinding BorderBrush}"BorderThickness="{TemplateBinding BorderThickness}"><Grid><TextBlock x:Name="WatermarkText"Text="{TemplateBinding Watermark}"Foreground="{TemplateBinding WatermarkColor}"Visibility="Collapsed"Padding="{TemplateBinding Padding}"VerticalAlignment="{TemplateBinding VerticalContentAlignment}"/><ScrollViewer x:Name="PART_ContentHost"/></Grid></Border><ControlTemplate.Triggers><MultiTrigger><MultiTrigger.Conditions><Condition Property="Text" Value=""/><Condition Property="IsFocused" Value="False"/></MultiTrigger.Conditions><Setter TargetName="WatermarkText" Property="Visibility" Value="Visible"/></MultiTrigger></ControlTemplate.Triggers></ControlTemplate></Setter.Value></Setter>
</Style>
10.9 使用第三方控件库
许多第三方控件库提供了增强的TextBox控件,例如:
- MahApps.Metro - MetroTextBox
- MaterialDesignInXAML - MaterialDesignTextBox
- ModernWPF - 现代风格TextBox
- DevExpress - TextEdit
- Telerik - RadTextBox
- Syncfusion - SfTextBoxExt
10.10 动态样式效果
以下是一个动态效果的TextBox样式示例:
<Style x:Key="AnimatedTextBoxStyle" TargetType="TextBox"><Setter Property="BorderThickness" Value="0,0,0,1"/><Setter Property="BorderBrush" Value="#CCCCCC"/><Setter Property="Background" Value="Transparent"/><Setter Property="Padding" Value="5,3"/><Setter Property="Template"><Setter.Value><ControlTemplate TargetType="TextBox"><Grid><Border x:Name="border" Background="{TemplateBinding Background}"BorderBrush="{TemplateBinding BorderBrush}"BorderThickness="{TemplateBinding BorderThickness}"><ScrollViewer x:Name="PART_ContentHost"/></Border></Grid><ControlTemplate.Triggers><Trigger Property="IsFocused" Value="True"><Trigger.EnterActions><BeginStoryboard><Storyboard><ColorAnimation Storyboard.TargetName="border"Storyboard.TargetProperty="(Border.BorderBrush).(SolidColorBrush.Color)"To="#3498db"Duration="0:0:0.2"/><ThicknessAnimation Storyboard.TargetName="border"Storyboard.TargetProperty="BorderThickness"To="0,0,0,2"Duration="0:0:0.2"/></Storyboard></BeginStoryboard></Trigger.EnterActions><Trigger.ExitActions><BeginStoryboard><Storyboard><ColorAnimation Storyboard.TargetName="border"Storyboard.TargetProperty="(Border.BorderBrush).(SolidColorBrush.Color)"To="#CCCCCC"Duration="0:0:0.2"/><ThicknessAnimation Storyboard.TargetName="border"Storyboard.TargetProperty="BorderThickness"To="0,0,0,1"Duration="0:0:0.2"/></Storyboard></BeginStoryboard></Trigger.ExitActions></Trigger></ControlTemplate.Triggers></ControlTemplate></Setter.Value></Setter>
</Style>
11. 常见应用场景
TextBox控件在各种应用场景中都有广泛的应用。以下是一些常见的应用场景及其实现方式。
11.1 登录表单
登录表单是最常见的应用场景之一,通常包含用户名TextBox和密码PasswordBox:
<StackPanel Width="300" Margin="20"><TextBlock Text="用户登录" FontSize="18" FontWeight="Bold" Margin="0,0,0,20"/><TextBlock Text="用户名:" Margin="0,0,0,5"/><TextBox x:Name="txtUsername" Margin="0,0,0,15"/><TextBlock Text="密码:" Margin="0,0,0,5"/><PasswordBox x:Name="txtPassword" Margin="0,0,0,20"/><Button Content="登录" Click="Login_Click" HorizontalAlignment="Right" Padding="15,5"/>
</StackPanel>
private void Login_Click(object sender, RoutedEventArgs e)
{string username = txtUsername.Text;string password = txtPassword.Password;// 验证输入if (string.IsNullOrEmpty(username)){MessageBox.Show("请输入用户名");txtUsername.Focus();return;}if (string.IsNullOrEmpty(password)){MessageBox.Show("请输入密码");txtPassword.Focus();return;}// 进行登录验证bool isValid = AuthenticateUser(username, password);if (isValid){// 登录成功处理}else{// 登录失败处理}
}private bool AuthenticateUser(string username, string password)
{// 实际应用中,这里应该与服务器进行身份验证// 这里仅作为示例return username == "admin" && password == "password";
}
11.2 搜索框
带有清除按钮和水印的搜索框:
<Grid><TextBox x:Name="txtSearch" Width="300" Height="30"Padding="5,0,25,0"VerticalContentAlignment="Center"TextChanged="SearchTextBox_TextChanged"/><TextBlock x:Name="watermark"Text="输入关键词搜索..."IsHitTestVisible="False"Foreground="Gray"Margin="8,0,0,0"VerticalAlignment="Center"/><Button x:Name="btnClear"Content="✕"Width="20"Height="20"HorizontalAlignment="Right"Margin="0,0,5,0"Background="Transparent"BorderThickness="0"Visibility="Collapsed"Click="ClearButton_Click"/>
</Grid>
private void SearchTextBox_TextChanged(object sender, TextChangedEventArgs e)
{// 更新水印可见性watermark.Visibility = string.IsNullOrEmpty(txtSearch.Text) ? Visibility.Visible : Visibility.Collapsed;// 更新清除按钮可见性btnClear.Visibility = string.IsNullOrEmpty(txtSearch.Text) ? Visibility.Collapsed : Visibility.Visible;// 执行搜索PerformSearch(txtSearch.Text);
}private void ClearButton_Click(object sender, RoutedEventArgs e)
{txtSearch.Clear();txtSearch.Focus();
}private void PerformSearch(string searchTerm)
{if (string.IsNullOrEmpty(searchTerm)){// 如果搜索词为空,显示所有项目}else{// 根据搜索词过滤项目}
}
11.3 富文本编辑器
用RichTextBox实现一个简单的编辑器:
<Grid><Grid.RowDefinitions><RowDefinition Height="Auto"/><RowDefinition Height="*"/></Grid.RowDefinitions><ToolBar Grid.Row="0"><Button Content="粗体" Click="Bold_Click"/><Button Content="斜体" Click="Italic_Click"/><Button Content="下划线" Click="Underline_Click"/><Separator/><ComboBox x:Name="cmbFontSize" SelectedIndex="2" SelectionChanged="FontSize_Changed"><ComboBoxItem Content="10"/><ComboBoxItem Content="12"/><ComboBoxItem Content="14"/><ComboBoxItem Content="16"/><ComboBoxItem Content="18"/><ComboBoxItem Content="20"/></ComboBox></ToolBar><RichTextBox x:Name="editor" Grid.Row="1" SelectionChanged="Editor_SelectionChanged"VerticalScrollBarVisibility="Auto"AcceptsTab="True"SpellCheck.IsEnabled="True"/>
</Grid>
public partial class RichTextEditorWindow : Window
{public RichTextEditorWindow(){InitializeComponent();// 初始化字体列表foreach (FontFamily fontFamily in Fonts.SystemFontFamilies){cmbFontSize.Items.Add(fontFamily);}cmbFontSize.SelectedItem = editor.FontFamily;}private void Editor_SelectionChanged(object sender, RoutedEventArgs e){// 更新工具栏状态UpdateToolbarState();}private void UpdateToolbarState(){// 获取当前选择的文本范围TextRange selection = new TextRange(editor.Selection.Start, editor.Selection.End);// 更新加粗按钮状态object fontWeight = selection.GetPropertyValue(TextElement.FontWeightProperty);btnBold.IsChecked = (fontWeight != DependencyProperty.UnsetValue && (FontWeight)fontWeight == FontWeights.Bold);// 更新斜体按钮状态object fontStyle = selection.GetPropertyValue(TextElement.FontStyleProperty);btnItalic.IsChecked = (fontStyle != DependencyProperty.UnsetValue && (FontStyle)fontStyle == FontStyles.Italic);// 更新下划线按钮状态object textDecorations = selection.GetPropertyValue(Inline.TextDecorationsProperty);btnUnderline.IsChecked = (textDecorations != DependencyProperty.UnsetValue && ((TextDecorationCollection)textDecorations).Equals(TextDecorations.Underline));// 更新对齐方式按钮object textAlignment = selection.GetPropertyValue(Block.TextAlignmentProperty);if (textAlignment != DependencyProperty.UnsetValue){TextAlignment alignment = (TextAlignment)textAlignment;btnAlignLeft.IsChecked = (alignment == TextAlignment.Left);btnAlignCenter.IsChecked = (alignment == TextAlignment.Center);btnAlignRight.IsChecked = (alignment == TextAlignment.Right);btnAlignJustify.IsChecked = (alignment == TextAlignment.Justify);}// 更新字体和字号object fontFamily = selection.GetPropertyValue(TextElement.FontFamilyProperty);if (fontFamily != DependencyProperty.UnsetValue){cmbFontSize.SelectedItem = fontFamily;}object fontSize = selection.GetPropertyValue(TextElement.FontSizeProperty);if (fontSize != DependencyProperty.UnsetValue){string fontSizeStr = ((double)fontSize).ToString();foreach (ComboBoxItem item in cmbFontSize.Items){if (item.Content.ToString() == fontSizeStr){cmbFontSize.SelectedItem = item;break;}}}}private void FontSize_Changed(object sender, SelectionChangedEventArgs e){if (cmbFontSize.SelectedItem != null && editor.Selection.Start != editor.Selection.End){ComboBoxItem selectedItem = (ComboBoxItem)cmbFontSize.SelectedItem;editor.Selection.ApplyPropertyValue(TextElement.FontSizeProperty, double.Parse(selectedItem.Content.ToString()));}}private void Bold_Click(object sender, RoutedEventArgs e){if (btnBold.IsChecked == true){editor.Selection.ApplyPropertyValue(TextElement.FontWeightProperty, FontWeights.Bold);}else{editor.Selection.ApplyPropertyValue(TextElement.FontWeightProperty, FontWeights.Normal);}editor.Focus();}private void Italic_Click(object sender, RoutedEventArgs e){if (btnItalic.IsChecked == true){editor.Selection.ApplyPropertyValue(TextElement.FontStyleProperty, FontStyles.Italic);}else{editor.Selection.ApplyPropertyValue(TextElement.FontStyleProperty, FontStyles.Normal);}editor.Focus();}private void Underline_Click(object sender, RoutedEventArgs e){if (btnUnderline.IsChecked == true){editor.Selection.ApplyPropertyValue(Inline.TextDecorationsProperty, TextDecorations.Underline);}else{TextDecorationCollection emptyDecorations = new TextDecorationCollection();editor.Selection.ApplyPropertyValue(Inline.TextDecorationsProperty, emptyDecorations);}editor.Focus();}
}
11.4 数值输入控件
限制只能输入数字的TextBox:
<TextBox x:Name="numericTextBox"PreviewTextInput="NumericTextBox_PreviewTextInput"PreviewKeyDown="NumericTextBox_PreviewKeyDown"TextChanged="NumericTextBox_TextChanged"Width="100"/>
private void NumericTextBox_PreviewTextInput(object sender, TextCompositionEventArgs e)
{// 检查输入是否为数字或小数点Regex regex = new Regex("[^0-9.]+");e.Handled = regex.IsMatch(e.Text);
}private void NumericTextBox_PreviewKeyDown(object sender, KeyEventArgs e)
{// 禁止输入空格if (e.Key == Key.Space){e.Handled = true;}
}private void NumericTextBox_TextChanged(object sender, TextChangedEventArgs e)
{TextBox textBox = sender as TextBox;// 验证文本是否为有效的数字格式if (!string.IsNullOrEmpty(textBox.Text)){double value;if (!double.TryParse(textBox.Text, out value)){// 如果不是有效的数字,恢复为上一个有效值textBox.Text = _lastValidValue;textBox.CaretIndex = textBox.Text.Length;}else{_lastValidValue = textBox.Text;}}else{_lastValidValue = string.Empty;}
}private string _lastValidValue = string.Empty;
11.5 自动完成文本框
实现带有自动完成功能的TextBox:
<Grid><TextBox x:Name="txtAutoComplete"Width="200"Height="30"TextChanged="AutoComplete_TextChanged"KeyDown="AutoComplete_KeyDown"/><Popup x:Name="autoCompletePopup"PlacementTarget="{Binding ElementName=txtAutoComplete}"Placement="Bottom"Width="{Binding ElementName=txtAutoComplete, Path=ActualWidth}"IsOpen="False"StaysOpen="False"><ListBox x:Name="suggestionsList"MaxHeight="200"SelectionChanged="SuggestionsList_SelectionChanged"/></Popup>
</Grid>
// 示例数据源
private List<string> _dataSource = new List<string>
{"苹果", "香蕉", "橙子", "草莓", "葡萄", "西瓜", "菠萝", "芒果", "樱桃", "蓝莓","柠檬", "石榴", "猕猴桃", "荔枝", "龙眼"
};private void AutoComplete_TextChanged(object sender, TextChangedEventArgs e)
{string input = txtAutoComplete.Text.Trim();if (string.IsNullOrEmpty(input)){autoCompletePopup.IsOpen = false;return;}// 根据输入文本筛选匹配项var suggestions = _dataSource.Where(i => i.Contains(input, StringComparison.OrdinalIgnoreCase)).ToList();if (suggestions.Count > 0){// 更新建议列表suggestionsList.ItemsSource = suggestions;autoCompletePopup.IsOpen = true;}else{autoCompletePopup.IsOpen = false;}
}private void AutoComplete_KeyDown(object sender, KeyEventArgs e)
{if (!autoCompletePopup.IsOpen)return;// 用上下键导航建议列表if (e.Key == Key.Down){if (suggestionsList.SelectedIndex < suggestionsList.Items.Count - 1){suggestionsList.SelectedIndex++;}e.Handled = true;}else if (e.Key == Key.Up){if (suggestionsList.SelectedIndex > 0){suggestionsList.SelectedIndex--;}e.Handled = true;}else if (e.Key == Key.Enter){// 选择当前选中的建议项if (suggestionsList.SelectedItem != null){txtAutoComplete.Text = suggestionsList.SelectedItem.ToString();txtAutoComplete.CaretIndex = txtAutoComplete.Text.Length;autoCompletePopup.IsOpen = false;e.Handled = true;}}else if (e.Key == Key.Escape){// 关闭建议列表autoCompletePopup.IsOpen = false;e.Handled = true;}
}private void SuggestionsList_SelectionChanged(object sender, SelectionChangedEventArgs e)
{if (suggestionsList.SelectedItem != null){txtAutoComplete.Text = suggestionsList.SelectedItem.ToString();txtAutoComplete.CaretIndex = txtAutoComplete.Text.Length;autoCompletePopup.IsOpen = false;}
}
11.6 配置文本编辑器
自定义配置文件编辑器:
<Grid><Grid.RowDefinitions><RowDefinition Height="*"/><RowDefinition Height="Auto"/></Grid.RowDefinitions><ToolBar Grid.Row="0"><Button Content="粗体" Click="Bold_Click"/><Button Content="斜体" Click="Italic_Click"/><Button Content="下划线" Click="Underline_Click"/><Separator/><ComboBox x:Name="cmbFontSize" SelectedIndex="2" SelectionChanged="FontSize_Changed"><ComboBoxItem Content="10"/><ComboBoxItem Content="12"/><ComboBoxItem Content="14"/><ComboBoxItem Content="16"/><ComboBoxItem Content="18"/><ComboBoxItem Content="20"/></ComboBox></ToolBar><RichTextBox x:Name="editor" Grid.Row="1" SelectionChanged="Editor_SelectionChanged"VerticalScrollBarVisibility="Auto"AcceptsTab="True"SpellCheck.IsEnabled="True"/>
</Grid>
public partial class RichTextEditorWindow : Window
{public RichTextEditorWindow(){InitializeComponent();// 初始化字体列表foreach (FontFamily fontFamily in Fonts.SystemFontFamilies){cmbFontSize.Items.Add(fontFamily);}cmbFontSize.SelectedItem = editor.FontFamily;}private void Editor_SelectionChanged(object sender, RoutedEventArgs e){// 更新工具栏状态UpdateToolbarState();}private void UpdateToolbarState(){// 获取当前选择的文本范围TextRange selection = new TextRange(editor.Selection.Start, editor.Selection.End);// 更新加粗按钮状态object fontWeight = selection.GetPropertyValue(TextElement.FontWeightProperty);btnBold.IsChecked = (fontWeight != DependencyProperty.UnsetValue && (FontWeight)fontWeight == FontWeights.Bold);// 更新斜体按钮状态object fontStyle = selection.GetPropertyValue(TextElement.FontStyleProperty);btnItalic.IsChecked = (fontStyle != DependencyProperty.UnsetValue && (FontStyle)fontStyle == FontStyles.Italic);// 更新下划线按钮状态object textDecorations = selection.GetPropertyValue(Inline.TextDecorationsProperty);btnUnderline.IsChecked = (textDecorations != DependencyProperty.UnsetValue && ((TextDecorationCollection)textDecorations).Equals(TextDecorations.Underline));// 更新对齐方式按钮object textAlignment = selection.GetPropertyValue(Block.TextAlignmentProperty);if (textAlignment != DependencyProperty.UnsetValue){TextAlignment alignment = (TextAlignment)textAlignment;btnAlignLeft.IsChecked = (alignment == TextAlignment.Left);btnAlignCenter.IsChecked = (alignment == TextAlignment.Center);btnAlignRight.IsChecked = (alignment == TextAlignment.Right);btnAlignJustify.IsChecked = (alignment == TextAlignment.Justify);}// 更新字体和字号object fontFamily = selection.GetPropertyValue(TextElement.FontFamilyProperty);if (fontFamily != DependencyProperty.UnsetValue){cmbFontSize.SelectedItem = fontFamily;}object fontSize = selection.GetPropertyValue(TextElement.FontSizeProperty);if (fontSize != DependencyProperty.UnsetValue){string fontSizeStr = ((double)fontSize).ToString();foreach (ComboBoxItem item in cmbFontSize.Items){if (item.Content.ToString() == fontSizeStr){cmbFontSize.SelectedItem = item;break;}}}}private void FontSize_Changed(object sender, SelectionChangedEventArgs e){if (cmbFontSize.SelectedItem != null && editor.Selection.Start != editor.Selection.End){ComboBoxItem selectedItem = (ComboBoxItem)cmbFontSize.SelectedItem;editor.Selection.ApplyPropertyValue(TextElement.FontSizeProperty, double.Parse(selectedItem.Content.ToString()));}}private void Bold_Click(object sender, RoutedEventArgs e){if (btnBold.IsChecked == true){editor.Selection.ApplyPropertyValue(TextElement.FontWeightProperty, FontWeights.Bold);}else{editor.Selection.ApplyPropertyValue(TextElement.FontWeightProperty, FontWeights.Normal);}editor.Focus();}private void Italic_Click(object sender, RoutedEventArgs e){if (btnItalic.IsChecked == true){editor.Selection.ApplyPropertyValue(TextElement.FontStyleProperty, FontStyles.Italic);}else{editor.Selection.ApplyPropertyValue(TextElement.FontStyleProperty, FontStyles.Normal);}editor.Focus();}private void Underline_Click(object sender, RoutedEventArgs e){if (btnUnderline.IsChecked == true){editor.Selection.ApplyPropertyValue(Inline.TextDecorationsProperty, TextDecorations.Underline);}else{TextDecorationCollection emptyDecorations = new TextDecorationCollection();editor.Selection.ApplyPropertyValue(Inline.TextDecorationsProperty, emptyDecorations);}editor.Focus();}
}
12. 总结与最佳实践
TextBox控件是WPF中常用的文本输入控件,提供了丰富的功能和灵活的定制选项。在使用TextBox时,应该注意以下几点:
- 根据实际需求选择合适的文本框类型(单行或多行)
- 合理设置文本框的属性,如MaxLength、AcceptsReturn、AcceptsTab等
- 注意文本框的样式和模板定制,以提高用户体验
- 在数据验证和撤销/重做功能方面,应该谨慎处理,以确保数据安全和用户操作的便利性
通过本文的介绍和示例,开发者可以充分利用TextBox控件构建优秀的用户界面,并根据实际需求进行灵活的定制和扩展。