tauri2项目使用tauri-plugin-updater配置更新程序流程
插件地址:https://github.com/tauri-apps/plugins-workspace/tree/v2/plugins/updater
tauri2官方文档地址:Updater | Tauri
Tauri 的 Updater 插件 是一个用于 应用程序自动更新 的官方插件,它允许 Tauri 应用在发布新版本时自动检测、下载并安装更新,从而提升用户体验并简化开发者的维护流程。
项目配置
在src-tauri/Cargo.toml中添加插件
# you can add the dependencies on the `[dependencies]` section if you do not target mobile
[target."cfg(not(any(target_os = \"android\", target_os = \"ios\")))".dependencies]
tauri-plugin-updater = "2.0.0"
# alternatively with Git:
tauri-plugin-updater = { git = "https://github.com/tauri-apps/plugins-workspace", branch = "v2" }
您可以使用首选的JavaScript包管理器安装JavaScript Guest绑定:
pnpm add @tauri-apps/plugin-updater
# or
npm add @tauri-apps/plugin-updater
# or
yarn add @tauri-apps/plugin-updater# alternatively with Git:
pnpm add https://github.com/tauri-apps/tauri-plugin-updater#v2
# or
npm add https://github.com/tauri-apps/tauri-plugin-updater#v2
# or
yarn add https://github.com/tauri-apps/tauri-plugin-updater#v2
首先,您需要在Tauri注册核心插件:
src-tauri/src/lib.rs
fn main() {tauri::Builder::default().setup(|app| {#[cfg(desktop)]app.handle().plugin(tauri_plugin_updater::Builder::new().build())?;Ok(())}).run(tauri::generate_context!()).expect("error while running tauri application");
}
之后,所有插件的API都可以通过JavaScript客户机绑定获得:
import { check } from '@tauri-apps/plugin-updater'
import { relaunch } from '@tauri-apps/plugin-process'
const update = await check()
if (update) {await update.downloadAndInstall()await relaunch()
}
升级文件配置
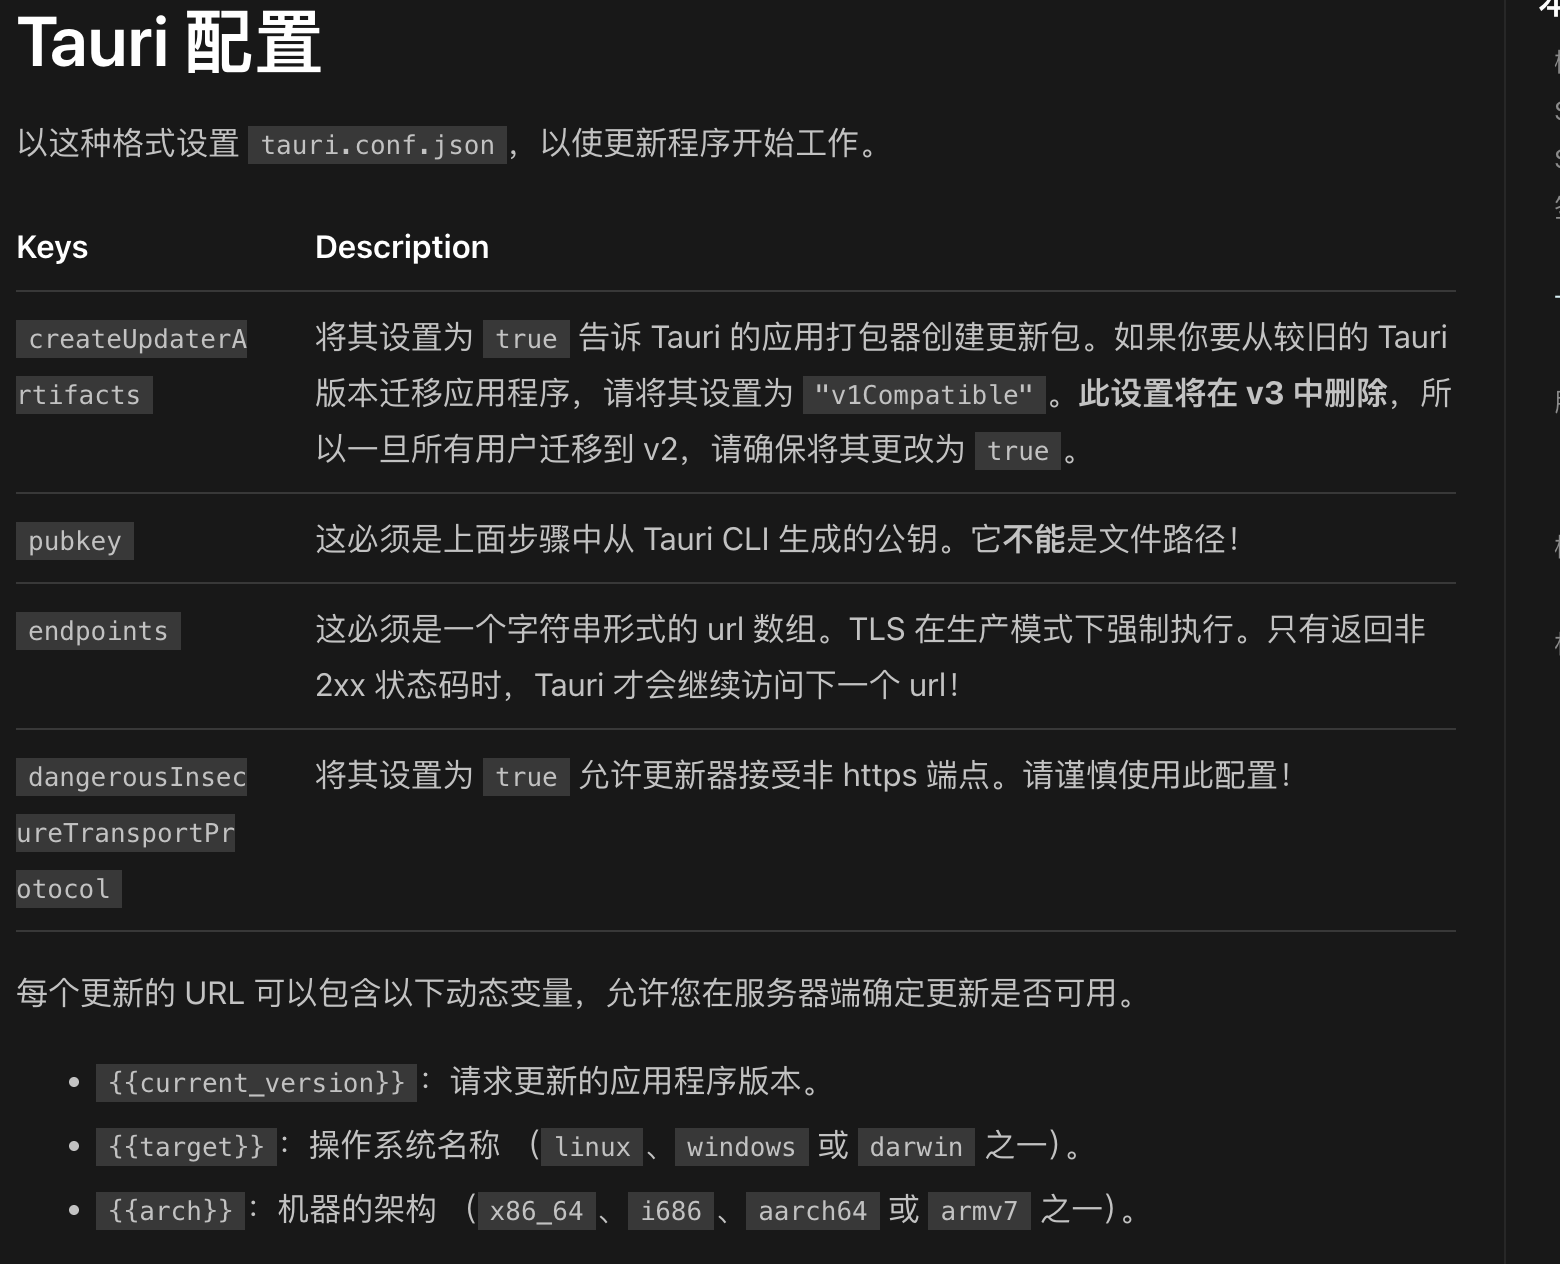
需要先给项目生成公私密钥,Tauri的更新程序需要签名来验证更新是否来自可信来源。这不能被禁用。要签署您的更新,您需要两个密钥:
公钥,将在tauri.conf.json中设置,以便在安装前验证工件。只要您的私钥是安全的,就可以安全地上传和共享此公钥。
私钥,用于对安装程序文件进行签名。切勿与任何人共享此密钥。此外,如果您丢失了此密钥,您将无法向已安装应用程序的用户发布新的更新。把这把钥匙放在安全的地方很重要!
为了生成密钥,Tauri CLI提供了signer generate命令。您可以运行此命令在主文件夹中创建密钥:
pnpm tauri signer generate -w ~/.tauri/myapp.key生成的文件如下:pakeplus.key pakeplus.key.pub

在构建更新工件时,您需要在环境变量中拥有上面生成的私钥。.env文件不起作用!
之后,您可以像往常一样运行Tauri构建,Tauri将生成更新包及其签名。生成的文件取决于下面配置的createUpdaterArtifacts配置值。
然后开启createUpdaterArtifacts为true:
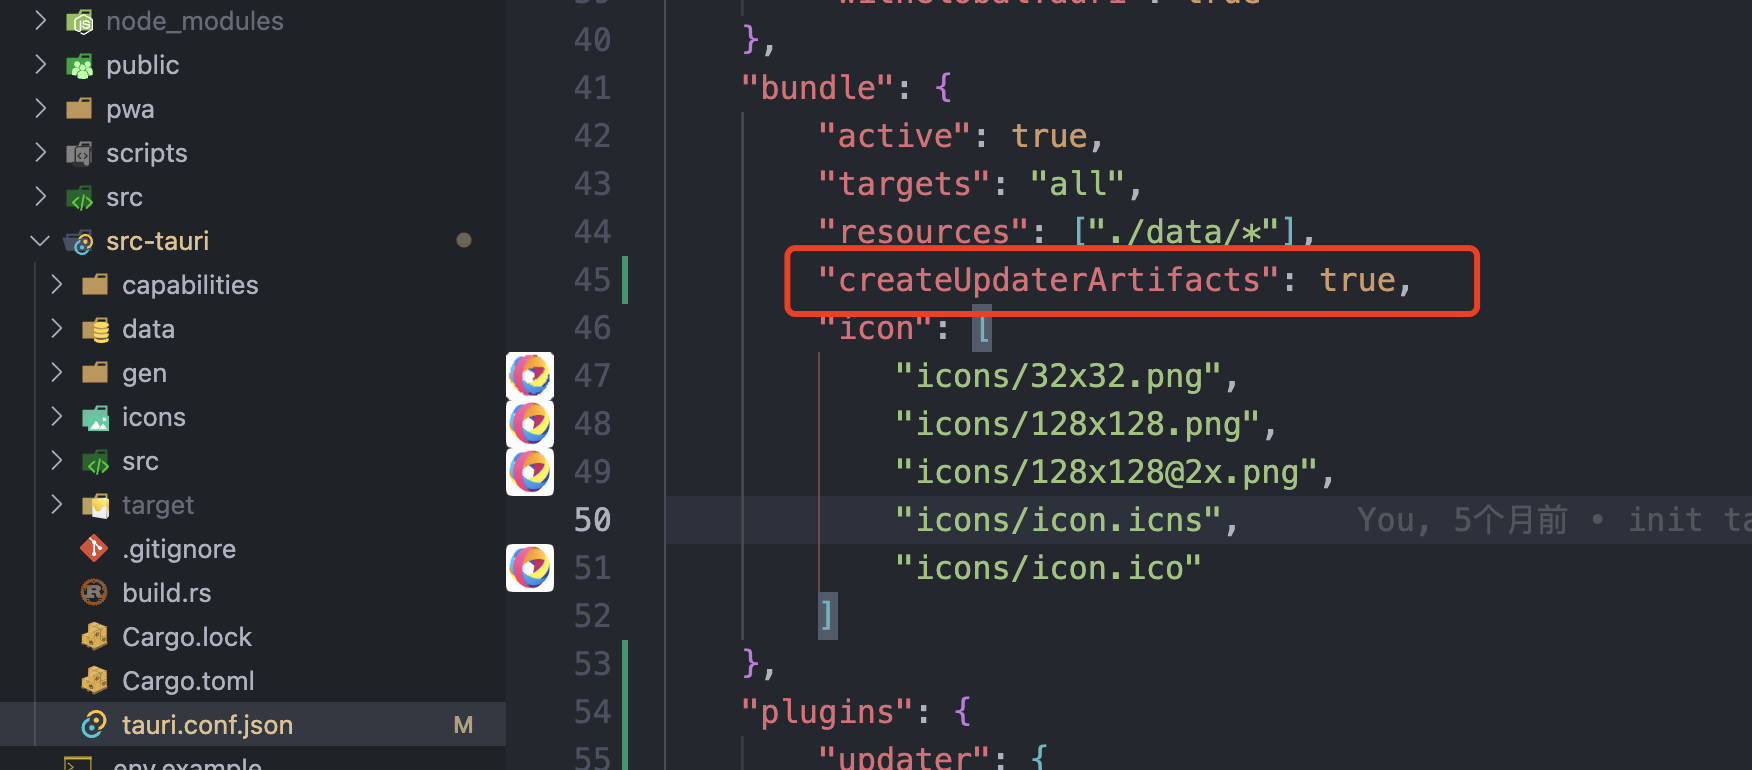
升级配置
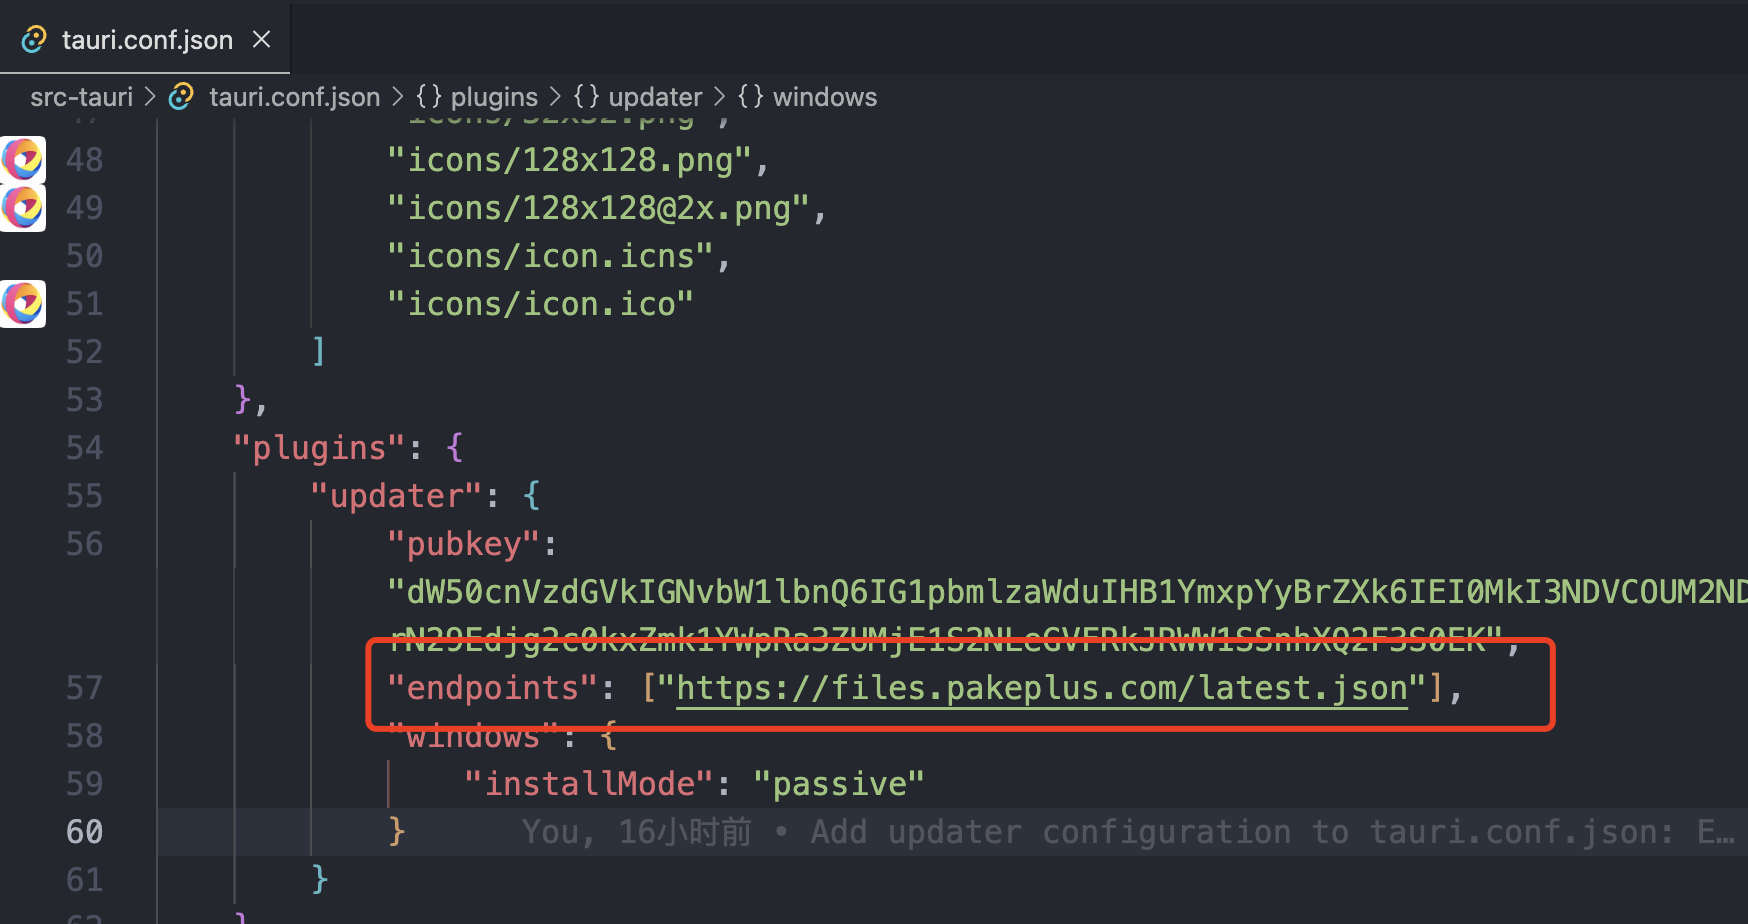
{"bundle": {"createUpdaterArtifacts": true},"plugins": {"updater": {"pubkey": "CONTENT FROM PUBLICKEY.PEM","endpoints": ["https://releases.myapp.com/{{target}}/{{arch}}/{{current_version}}",// or a static github json file"https://github.com/user/repo/releases/latest/download/latest.json"]}}
}
静态 JSON 文件
使用静态文件时,只需要返回一个包含所需信息的 JSON。这个文件会在后面自动生成,暂时先不用看。这里贴上官方的json文件作为参考
{"version": "v1.0.0","notes": "Test version","pub_date": "2020-06-22T19:25:57Z","platforms": {"darwin-x86_64": {"signature": "Content of app.tar.gz.sig","url": "https://github.com/username/reponame/releases/download/v1.0.0/app-x86_64.app.tar.gz"},"darwin-aarch64": {"signature": "Content of app.tar.gz.sig","url": "https://github.com/username/reponame/releases/download/v1.0.0/app-aarch64.app.tar.gz"},"linux-x86_64": {"signature": "Content of app.AppImage.tar.gz.sig","url": "https://github.com/username/reponame/releases/download/v1.0.0/app-amd64.AppImage.tar.gz"},"windows-x86_64": {"signature": "Content of app.msi.sig","url": "https://github.com/username/reponame/releases/download/v1.0.0/app-x64.msi.zip"}}
}
使用GitHu自动化
使用Tauri 官方提供的GitHub Actions,可以自动发布带有assets的release和自动生成updater.json文件。而且也能利用GitHub 构建其他平台的二进制程序。属于是省心又省力。
有两种思路白嫖静态json服务,而且都能与GitHub Actions完美结合,做到不用动手也能免费的自动化更新。使用Github Release
首先需要将第三步生成的私钥和密码配置到GitHub action secret中
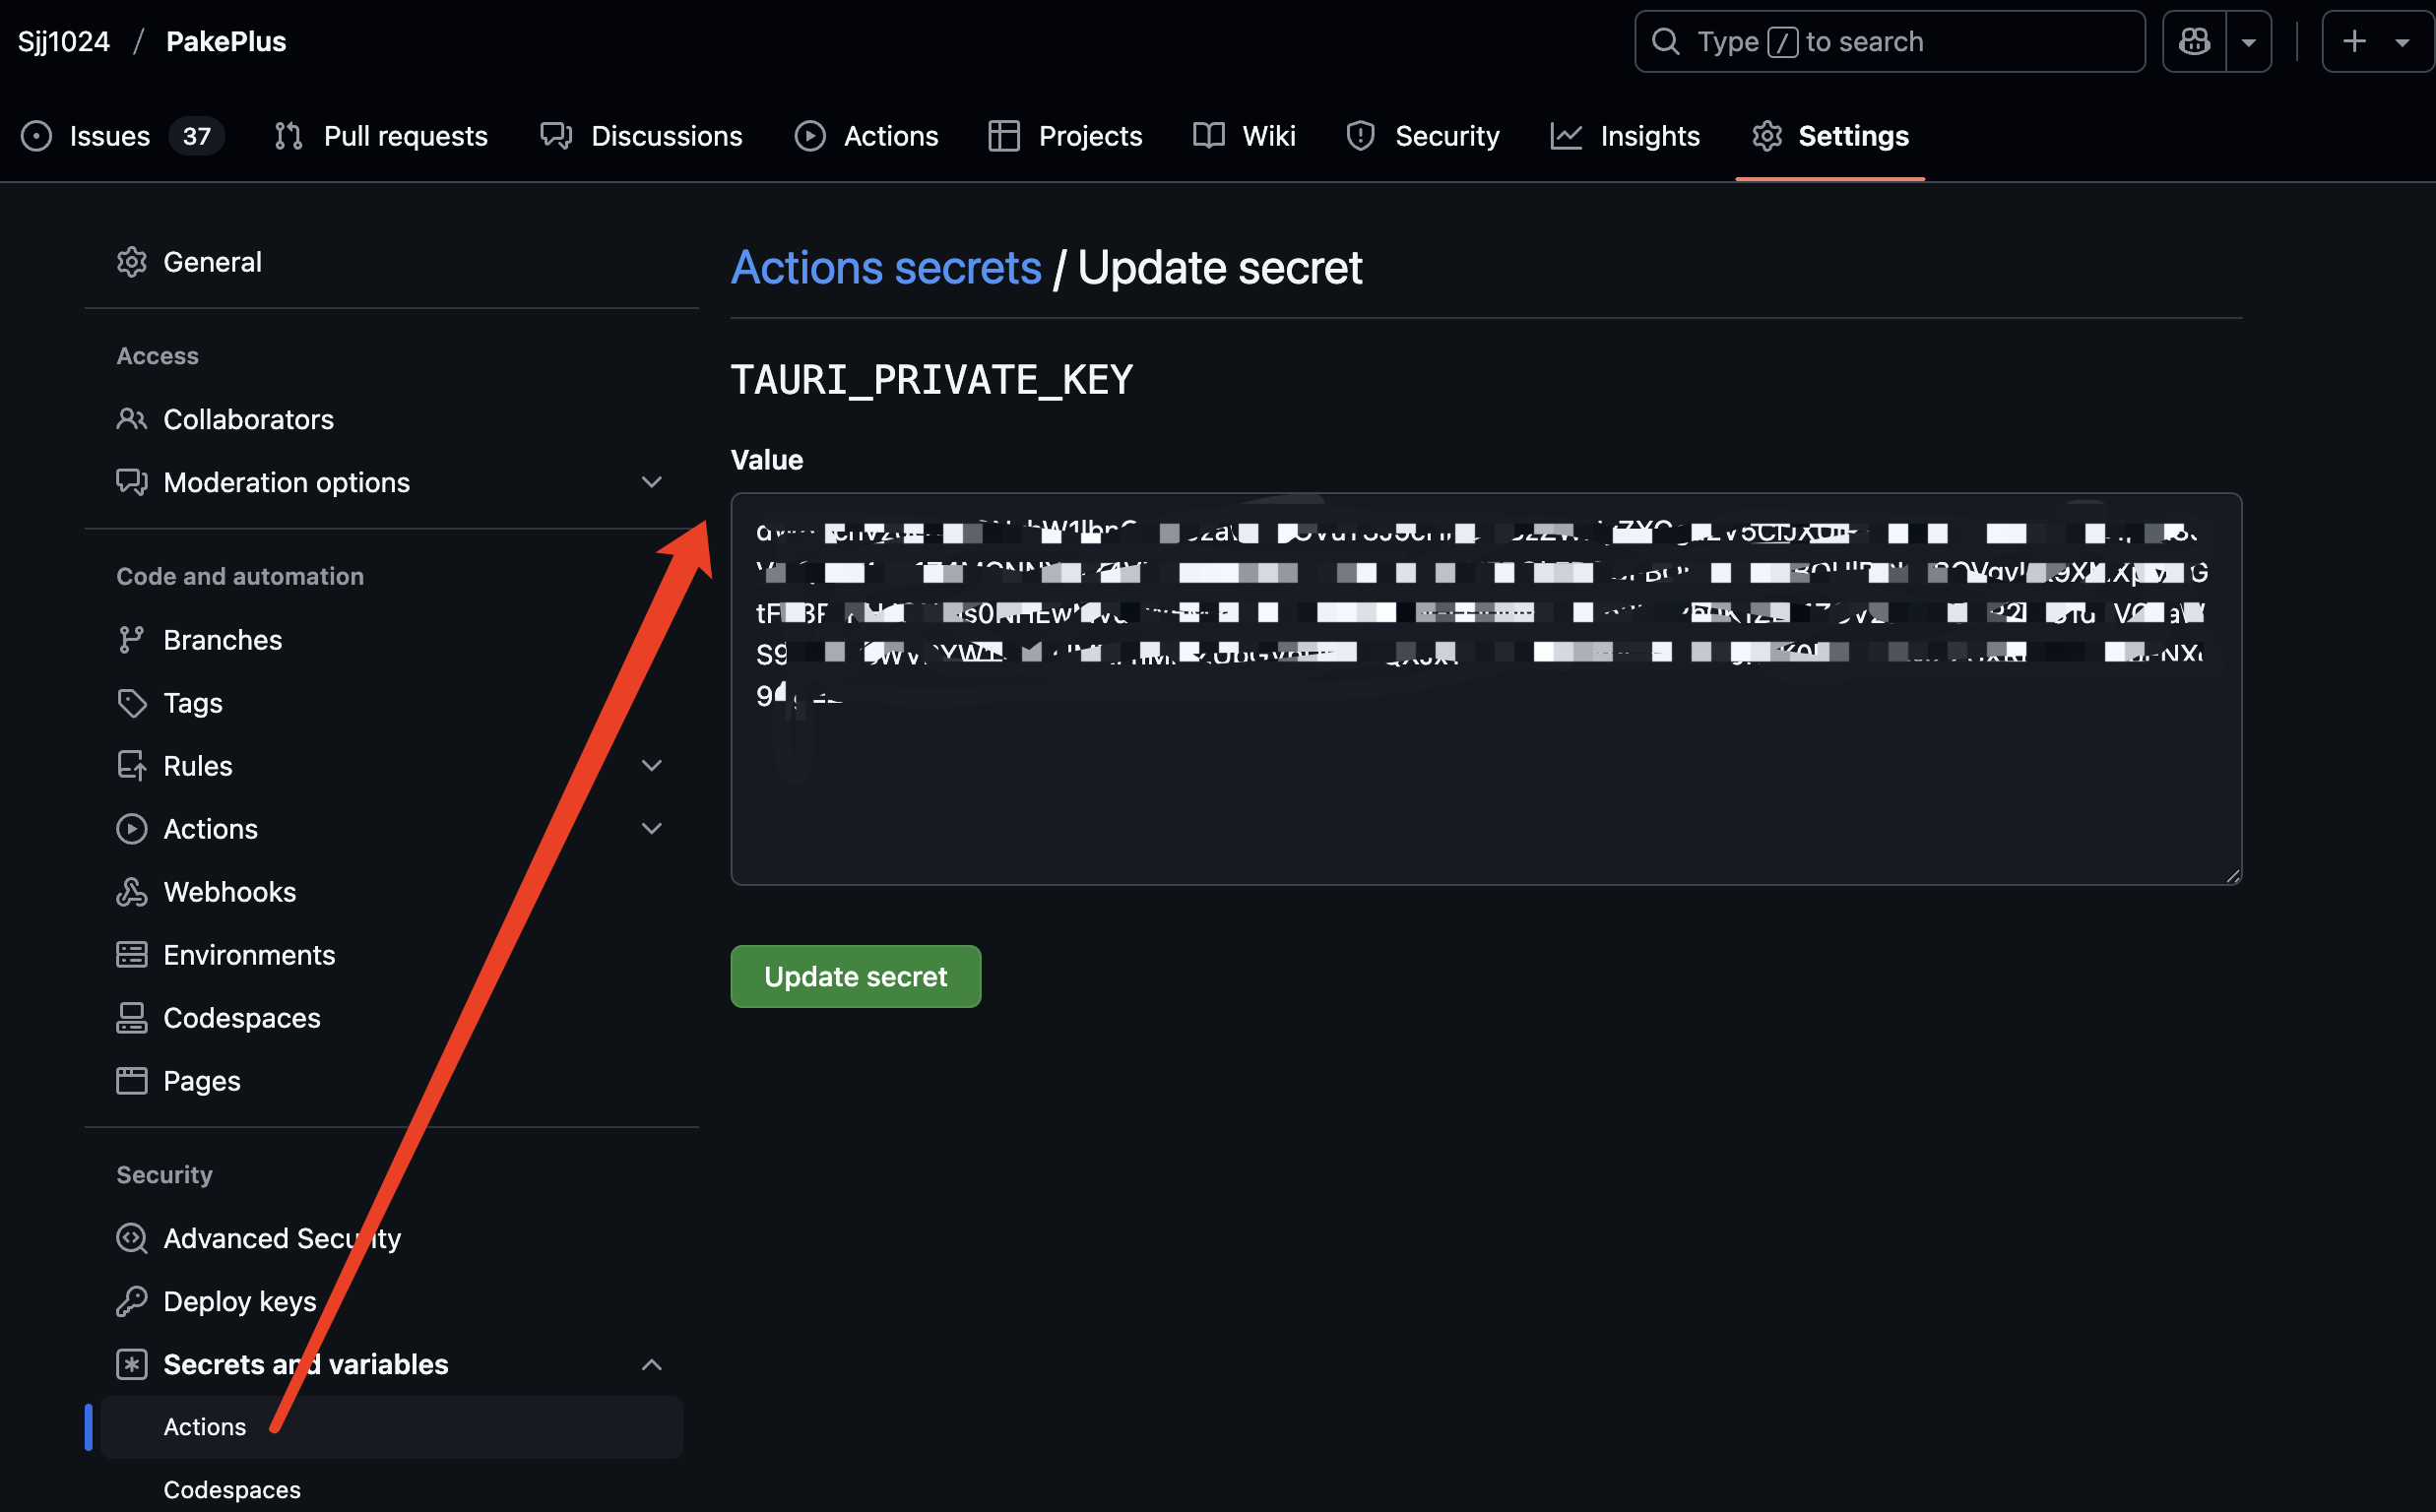

然后在工作流文件中添加:
- uses: tauri-apps/tauri-action@v0if: ${{ matrix.enabled }}env:GITHUB_TOKEN: ${{ secrets.GITHUB_TOKEN }}TAURI_SIGNING_PRIVATE_KEY: ${{ secrets.TAURI_PRIVATE_KEY }}TAURI_SIGNING_PRIVATE_KEY_PASSWORD: ${{ secrets.TAURI_KEY_PASSWORD }}with:tagName: 'PakePlus-v__VERSION__'releaseName: 'PakePlus v__VERSION__'然后触发工作流之后,就会生成一个latest.json文件:
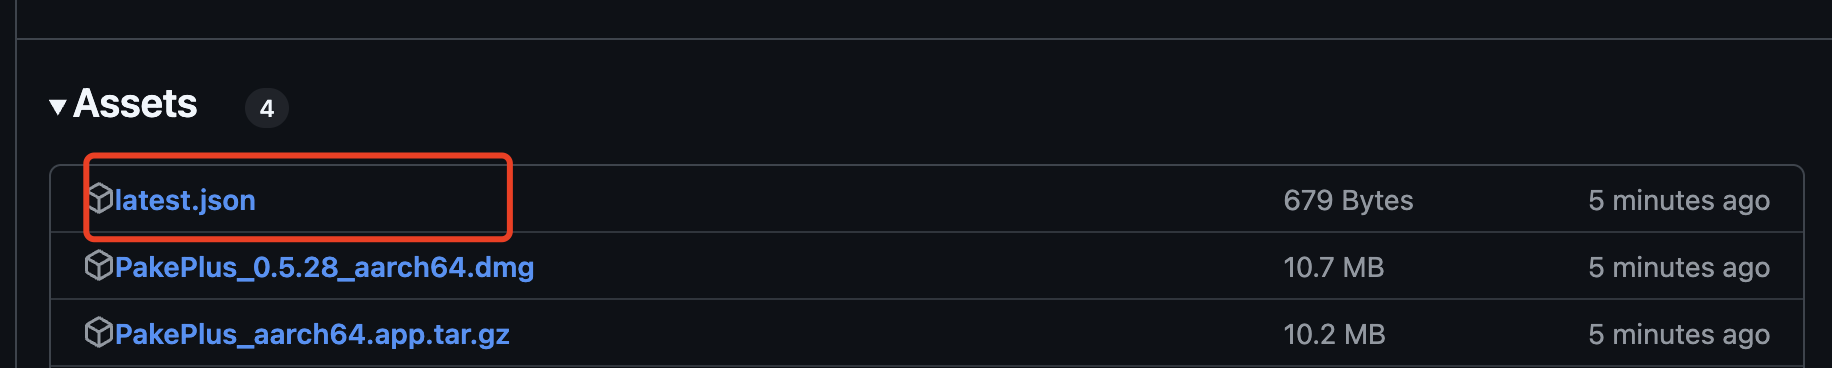
然后右键复制latest.json的链接填到tauri.conf.json中就能实现自动更新了。其实这个链接是带有版本号的,后面更新也不能写死,而且还是github服务器比较慢。所以可以优化成一个固定连接,可以看后面的优化。
优化更新
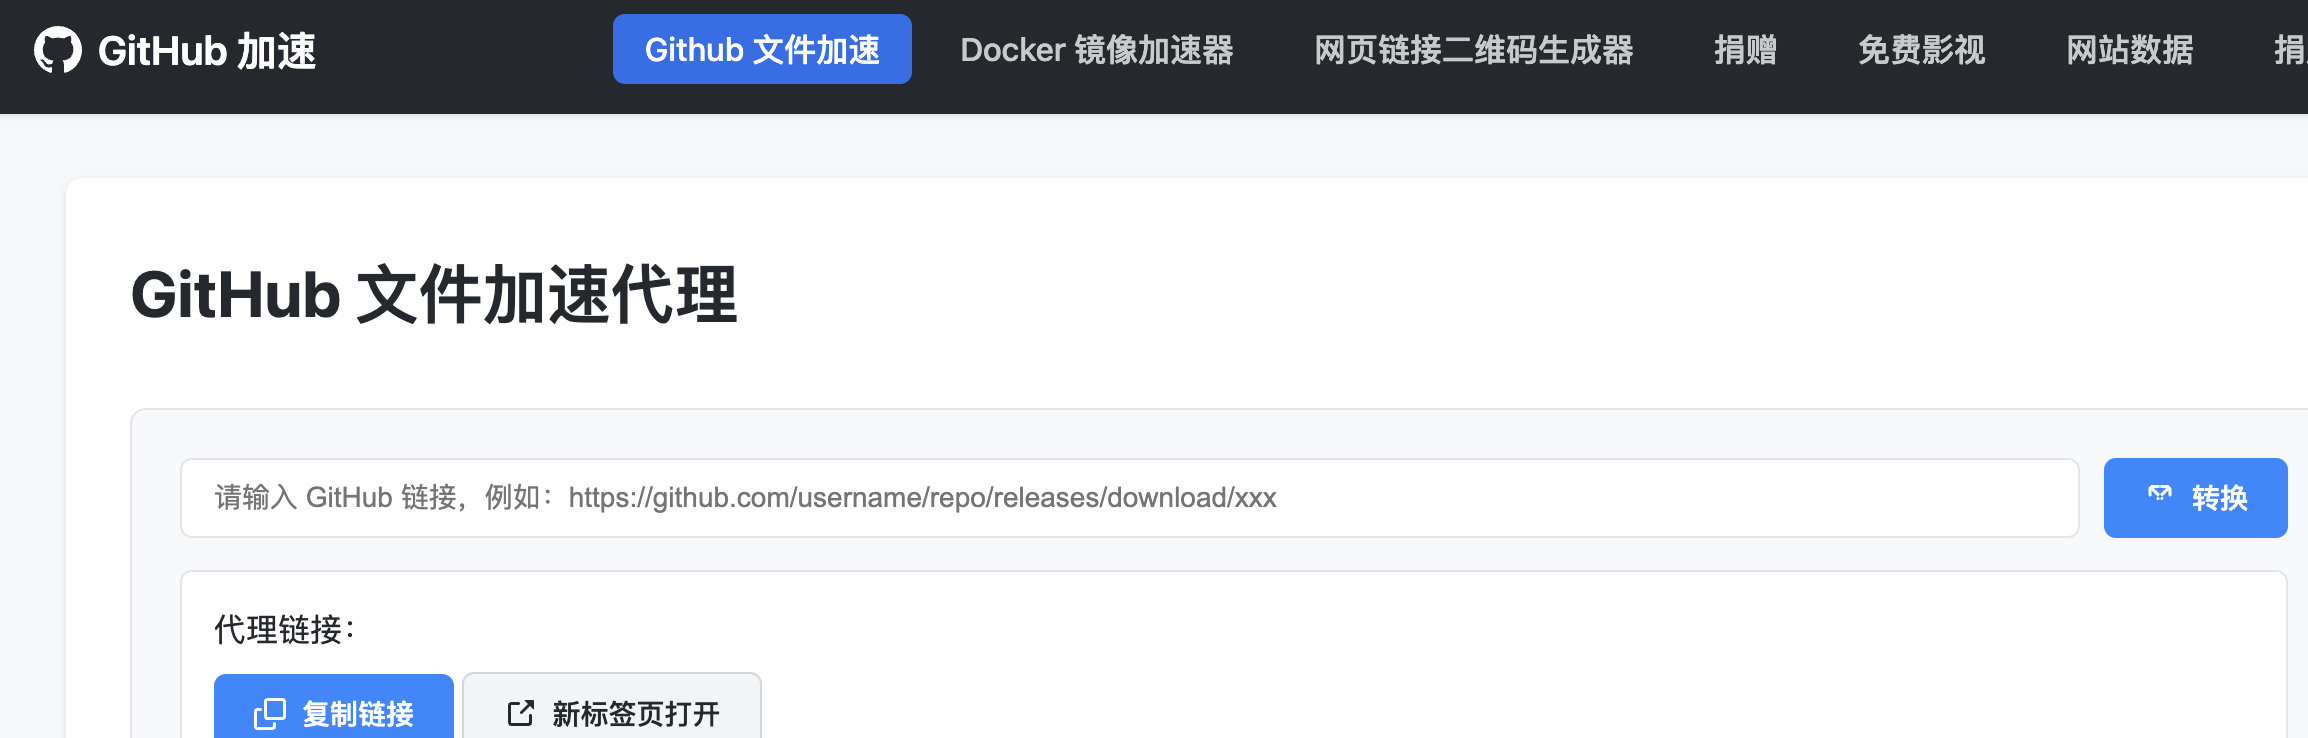
将latest.json文件的链接更新为固定连接,这样就不用替换更新链接,方式有很多中,最简单的就是使用github资源加速。并且自动获取最新版本的链接,比如下面的这种加速网站:GitHub 文件加速代理 - 快速访问 GitHub 文件
然后将你的latest.json替换一下链接就可以了。
或者使用后端或者使用cf的文件存储桶都是非常nice的选择。
效果演示
将得到的json文件填写到配置文件中
然后在前端页面中调用更新检查接口:
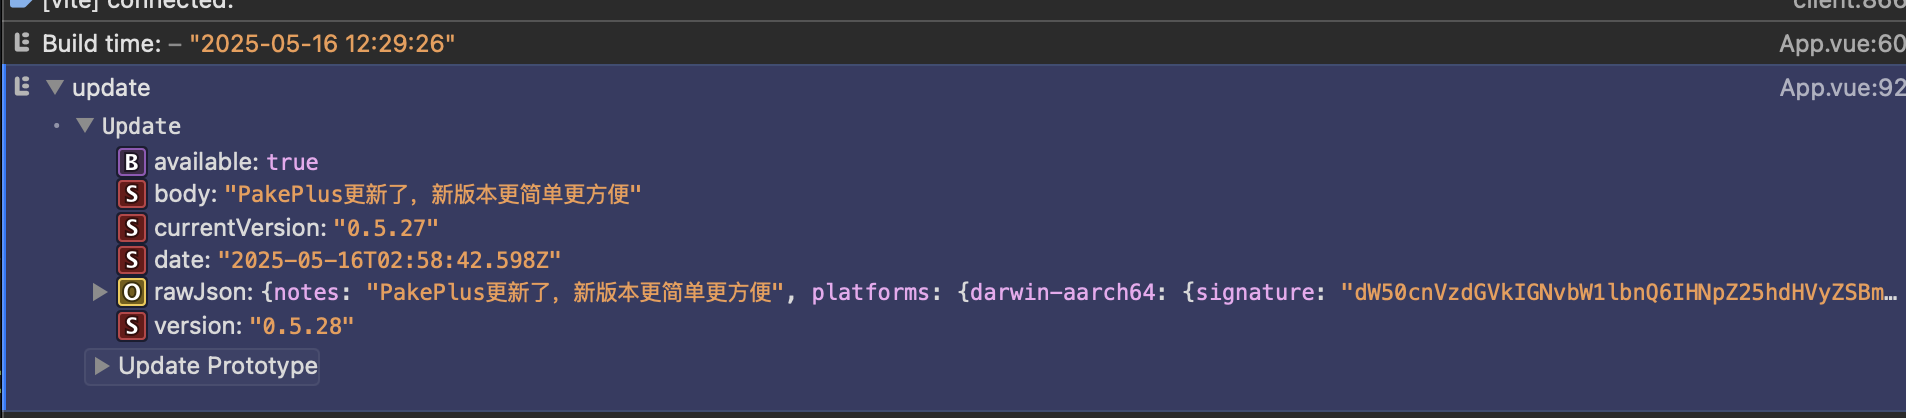
import { check } from '@tauri-apps/plugin-updater';const update = await check();
console.log('update', update);
就可以得到更新内容,然后根据你的逻辑更新即可