CocosCreator 之 ScrollView拓展:上拉、下拉及List的拓展
版本: 3.8.5
语言:TypeScript
环境: Mac
您好,我是鹤九日!
回顾
前段时间,我曾分享过一篇文章:
Cocos Creator 之 ScrollView组件的拓展分享List、ListItem
分享的内容是:Cocos论坛大佬KL针对于ScrollView的拓展优化,以此希望对学习中的小伙伴有些帮助。
KL编写的拓展组件List和ListItem主要包含:分帧渲染,循环列表,虚拟列表,列表Item单选、多选、添加删除等。
Cocos论坛:KL 虚拟列表(ScrollView) 拓展
GitHub仓库:cocoscreator-list
大佬编写的拓展组件很大程度上已经解决了ScrollView性能卡顿的问题,但某些情况下,依然需要我们对列表做特殊的操作,比如:上拉和下拉加载!
本篇文章的主题便是这个,为了方便大家从技术层面了解上拉、下拉的功能原理,文章从两方面讲解:
一、ScrollView实现上拉、下拉各种方法
二、拓展KL分享的List组件
注:本文的示例以垂直列表为主, 感谢KL对开源所做的付出!
ScrollView实现: 回调事件
无论是上拉加载,还是下拉加载,实质上是:ScrollView的滚动视图到达了指定区域的边界而触发的一些逻辑操作。
针对于滚动视图是否到达区域边界,ScrollView提供的主要回调事件有:
| 回调类型 | 描述 |
|---|---|
| SCROLL_TO_TOP | 滚动视图滚动到顶部边界事件 |
| SCROLL_TO_BOTTOM | 滚动视图滚动到底部边界事件 |
| SCROLL_TO_LEFT | 滚动视图滚动到左边界事件 |
| SCROLL_TO_RIGHT | 滚动视图滚动到右边界事件 |
注:更多ScrollView的回调事件类型,可通过
ScrollView.EventType进行查看
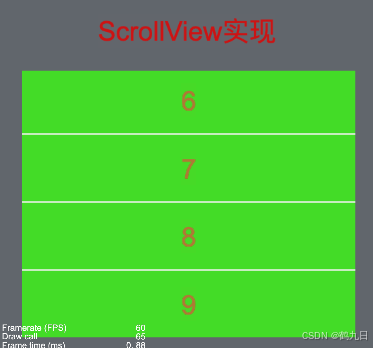
以垂直列表为例,我们只需做到监听 SCROLL_TO_TOP 和 SCROLL_TO_BOTTOM 即可。
如下是简单的代码示例:
注:示例仅编写了下载加载,上拉的操作与之类似,不再重复
@property(Node)
tmpItem: Node = null!;             // item节点,用于克隆
@property(ScrollView)
scroll: ScrollView = null!;private _valueList = [1,2,3,4,5,6];
private _isBottomLoad: boolean = false;    // 是否下拉加载中protected start(): void {// 初始化scrollViewfor (let i = 0; i < this._valueList.length; i++) {this.createItem(this._valueList[i])}
}protected onEnable(): void {this.scroll.node.on("scroll-to-bottom", this.scrollToBottom, this);
}private createItem(value:number) {let node = instantiate(this.tmpItem);if (!node) return;node.getComponentInChildren(Label)!.string = value.toString();node.parent = this.scroll.content;node.active = true;
}// 下拉逻辑操作
private showBottomLoad() {if (this._isBottomLoad) return;this._isBottomLoad = true;console.log("----------->>>加载中...")this.scheduleOnce(()=> {this._loadType = kLoadType.START;// 模拟插入3个新的数据for (let i = 0; i < 3; i++) {let newValue = this._valueList.length + 1;this._valueList.push(newValue);this.createItem(newValue);}console.log("----------->>>加载结束");this.scroll.scrollToBottom();this._isBottomLoad = false;}, 2);
}// 滚动视图滚动到底部边界回调事件
private scrollToBottom() {this.showBottomLoad();
}
注:
showBottomLoad()用于处理下拉加载逻辑,后面的示例就不再粘贴详细代码了。
代码的实现总体是比较简单的,主要逻辑:
一、先初始化6个Item,添加到ScrollView的content中。
二、当收到滚动视图到底部边界的回调事件后,添加一个布尔类型开关,防止重复执行。
三、以延时定时器,模拟客户端获取服务器数据成功后,执行添加Item的操作,并重置状态。
ScrollView偏移量
事件的回调,在某些情况下并不能完美的解决上拉、下拉的需求;究其原因:滑动较小,没有触发回调。
倘若需要更精准些,可以考虑使用ScrollView的偏移量,主要接口:
// 获取滚动视图相对于视图窗口左上角原点的位置, 及获取当前偏移量
getScrollOffset(): math.Vec2;
// 获取滚动视图最大可以滚动的偏移量
getMaxScrollOffset(): math.Vec2;
这里要使用到的滚动事件:SCROLLING, 简单的示例:
注: 模拟效果的实现,建议屏蔽掉
scrollToBottom()的回调事件,其他逻辑一样。
protected onEnable(): void {this.scroll.node.on("scrolling", this.scrolling, this);
}private scrolling() {let curOffset = this.scroll.getScrollOffset();let maxOffset = this.scroll.getMaxScrollOffset();if (curOffset.y <= 0) {console.log("滚动到顶部了...");} else if (curOffset.y >= maxOffset.y) {console.log("滚动到底部了....");this.showBottomLoad();}
}
注:一定要添加开关判定,滚动时发出的事件不仅多,而且回弹的时候也会有!!!
触点的移动距离
通过触点的移动距离也是可以模拟上拉、下拉的。
适用它的情况多是item不足以撑满全屏,但要执行对应的上拉、下拉操作。
注:Item无法撑满全屏,是无法滚动,也就没有了所谓的当前偏移量,以及回调事件!
这里我们需要借助Node的触摸回调事件,主要有:
| 回调类型 | 说明 |
|---|---|
| TOUCH_START | 手指开始触摸事件 |
| TOUCH_MOVE | 当手指在屏幕上移动时 |
| TOUCH_END | 手指结束触摸事件 |
| TOUCH_CANCEL | 当手指在目标节点区域外离开屏幕时 |
原理也比较简单:
一、当手指触摸开始的时候,记录下开始的位置
二、触摸移动的时候,检测是否到设定的临界点,如果是,则表示触发了上滑或下滑的操作
三、触摸结束、取消,则重置数据状态
private _valueList = [1,2,3];                // 将数据设置为不足以铺满全屏
private _startTouchPos: Vec2 = new Vec2();   // 存储初始触摸点的坐标
protected onEnable(): void {this.scroll.node.on(Node.EventType.TOUCH_START, this.onTouchStart, this);this.scroll.node.on(Node.EventType.TOUCH_MOVE, this.onTouchMove, this);this.scroll.node.on(Node.EventType.TOUCH_CANCEL, this.onTouchEnd, this);this.scroll.node.on(Node.EventType.TOUCH_END, this.onTouchEnd, this);
}// 通过触摸回调,检测移动的距离判定是否上滑、下滑
private onTouchStart(event: EventTouch) {this._startTouchPos.set(event.getUILocation());
}private onTouchMove(event: EventTouch) {// 获取当前触摸点的坐标const currentTouchPos = event.getUILocation();// 计算触摸点的垂直移动距离const deltaY = currentTouchPos.y - this._startTouchPos.y;// 如果垂直移动距离达到指定阈值,触发上滑操作if (deltaY <= -50) {// 表示上拉了let t: any = this;let curOffset = this.scroll.getScrollOffset();if (curOffset.y <= 0) {// 执行上拉操作}} else if (deltaY >= 50) {let curOffset = this.scroll.getScrollOffset();let maxOffset = this.scroll.getMaxScrollOffset()if (curOffset.y <= maxOffset.y) {// 执行下拉操作this.showBottomLoad();}}
}private onTouchEnd(event: EventTouch) {// 重置下触摸点位置this._startTouchPos.set(Vec2.ZERO);
}
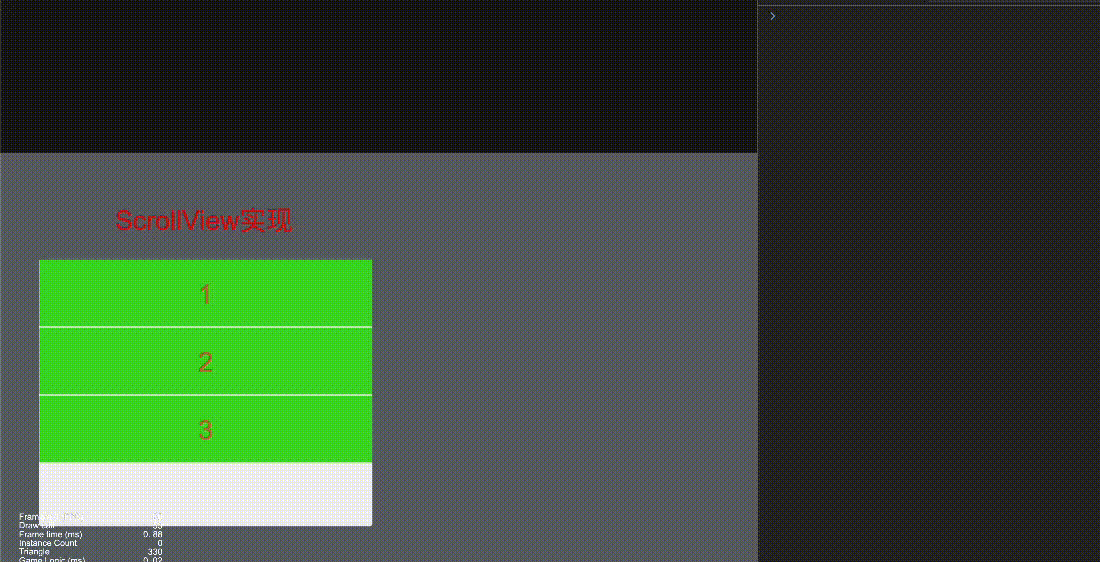
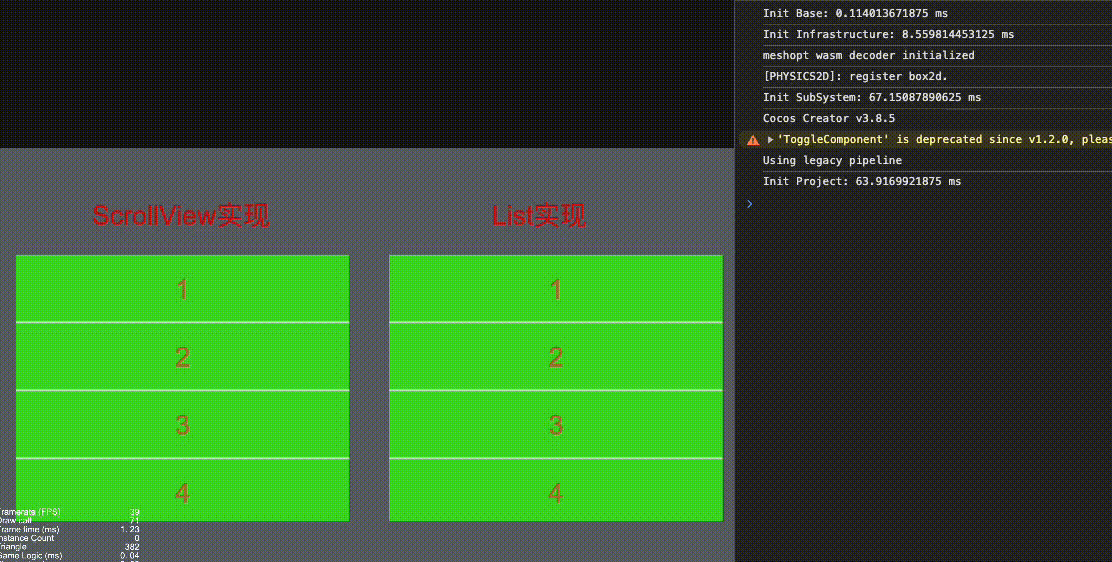
效果图如下:
List的延伸
KL分享的组件很强大,如果理解了上面ScrollView的基本使用,则拓展起来就省事很多。
鉴于上篇已经讲解了List和ListItem组件的使用,基础的逻辑代码:
@property(List)
list: List = null!;protected start(): void {this.list.numItems = this._valueList.length;
}
public onRenderItem(node: Node, idx: number) {const value = this._valueList[idx];if (!value) return;node.getComponentInChildren(Label)!.string = value.toString();
}
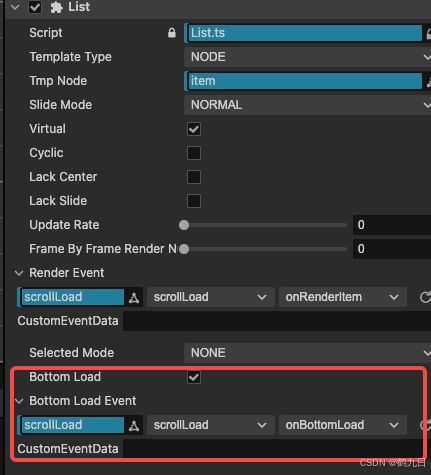
在List组件中,拓展下拉加载逻辑,同ScrollView很像,主要有:
一、增加布尔类型的开关,用于是否支持下拉逻辑
二、添加下拉加载的回调事件,用于我们做额外逻辑的补充
// 是否下拉加载
@property({type: CCBoolean,tooltip: DEV && '是否下拉加载',visible() { return true; }
})
public bottomLoad: boolean = false;private _isBottomLoading: boolean = false;
public set isBottomLoading(value: boolean) {this._isBottomLoading = value;
}
public get isBottomLoading(): boolean {return this._isBottomLoading;
}// 下拉触发事件(循环列表不支持下拉加载)
@property({type: EventHandler,tooltip: DEV && '下拉触发的事件',visible() { return !this.cyclic && this.bottomLoad; }
})
public bottomLoadEvent: EventHandler = new EventHandler();//注册事件
_registerEvent() {let t: any = this;t.node.on(ScrollView.EventType.SCROLL_TO_BOTTOM, t._onScrollToBottom, t);
}
//卸载事件
_unregisterEvent() {t.node.off(ScrollView.EventType.SCROLL_TO_BOTTOM, t._onScrollToBottom, t);
}// 滚动到底部边界
_onScrollToBottom() {// 是否开启下拉加载if (!this.bottomLoad) return;// 是否正在下拉加载中if (this._isBottomLoading) return;this._isBottomLoading = true;// 设置下拉状态if (this.bottomLoadEvent) {EventHandler.emitEvents([this.bottomLoadEvent], {});}
}
在编译器中,便会看到额外增加的属性:
在代码中编写如下逻辑:
// 下拉回调
public onBottomLoad() {this.scheduleOnce(()=> {// 模拟插入3个新的数据for (let i = 0; i < 3; i++) {let newValue = this._valueList.length + 1;this._valueList.push(newValue);}// 刷新this.list.numItems = this._valueList.length;// 重置下开关this.list.isBottomLoading = false;}, 2);
}
关于其他,不再拓展了,实现类似,与ScrollView实现类似
延伸:文字状态显示
这里继续以List延伸,下拉加载的过程中,可能需要显示:加载开始、进行中、结束的文字状态。实现这种的效果,主要做的事情:
一、在ScrollView的节点下,添加状态节点:
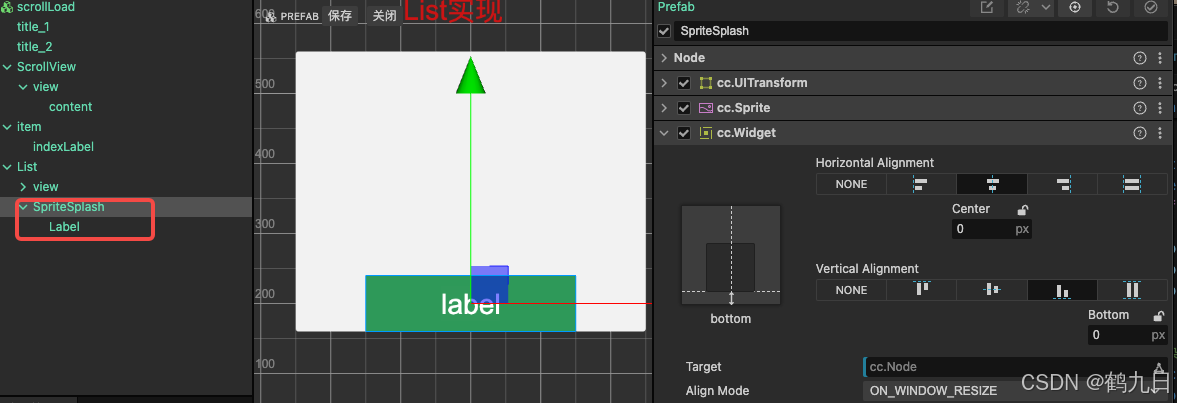
注: 文字节点居中对齐ScrollView的正下方即可。
二、List组件添加状态枚举、属性节点和显示逻辑等
// 下拉/上拉 加载类型
export enum kLoadType {NONE = 0,START,       // 开始PROCESS,     // 进行中END,         // 下拉结束
}// 下拉状态类型(用于控制不同文本的显示)
private _bottomLoadType: kLoadType = kLoadType.NONE;
public set bottomLoadType(val: kLoadType) {this._bottomLoadType = val;this.showBottomLoadUI();
}// 下拉加载显示
private showBottomLoadUI() {// 是否开启加载if (!this.bottomLoad) return;if (!this._isBottomLoading) return;const tipLabel = this.bottomLoadNode.getComponentInChildren(Label);if (this._bottomLoadType == kLoadType.START) {// 加载开始if (this.bottomLoadNode) {this.bottomLoadNode.active = true;tipLabel.string = "加载开始";}} else if (this._bottomLoadType == kLoadType.PROCESS) {if (this.bottomLoadNode) {this.bottomLoadNode.active = true;tipLabel.string = "加载进行中";}} else if (this._bottomLoadType == kLoadType.END) {// 加载结束if (this.bottomLoadNode) {tipLabel.string = "加载结束";this.bottomLoadNode.active = true;// 此处可使用tween做透明度消失动画this.scheduleOnce(() => {this._isBottomLoading = false;this._bottomLoadType = kLoadType.NONE;this.bottomLoadNode.active = false;}, 0.5);}} else {if (this.bottomLoadNode) {this.bottomLoadNode.active = false;}}
}
三、在属性检查器中挂载上节点:
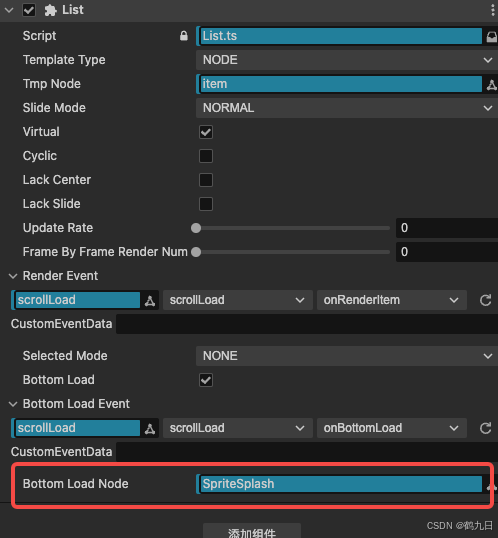
四、下拉回调事件中,便不再通过开关来控制了,而是类型状态值
注:为了模拟数据的交互,示例使用的是延时定时器
// 下拉回调
public onBottomLoad() {// 修改状态显示为:进行中this.list.bottomLoadType = kLoadType.PROCESS;// 使用延时定时器,模拟数据的请求、获取this.scheduleOnce(()=> {// 修改状态显示为:结束this.list.bottomLoadType = kLoadType.END;// 模拟插入3个新的数据for (let i = 0; i < 3; i++) {let newValue = this._valueList.length + 1;this._valueList.push(newValue);}// 刷新this.list.numItems = this._valueList.length;this.list.scrollTo(this._valueList.length);}, 2);
}
注:状态类型的改变,在List组件的showBottomLoadUI中,便可改变开关的状态等,这样开关状态便无需使用
public了
效果图如下:
最后
文章到这里就结束了,ScrollView的下拉逻辑使用了各种不同的方法,期待能够给您带来一些用处!
如果觉得文章不错,期待您的点赞和收藏,感谢!
我是鹤九日,祝您生活愉快!