血缘元数据采集开放标准:OpenLineage Guides 在 Airflow 中使用 OpenLineage Proxy

OpenLineage 是一个用于元数据和血缘采集的开放标准,专为在作业运行时动态采集数据而设计。它通过统一的命名策略定义了由作业(Job)、运行实例(Run)和数据集(Dataset) 组成的通用模型,并通过可扩展的Facets机制对这些实体进行元数据增强。
该项目是 LF AI & Data 基金会的毕业级项目,处于活跃开发阶段,欢迎社区贡献。
在 Airflow 中使用 OpenLineage Proxy
本教程介绍如何将 OpenLineage Proxy 与 Airflow 结合使用。OpenLineage 提供多种集成方案,可在使用 Airflow 集成 时让 Airflow 发出 OpenLineage 事件。本教程将使用 Docker Compose 运行本地 Airflow 实例,并学习如何启用和配置 OpenLineage 以发出数据血缘事件。教程将使用两个后端来查看数据血缘:1)Proxy,2)Marquez。
目录
- 使用 Docker Compose 搭建本地 Airflow 环境
- 配置 Marquez
- 启动所有服务
- 访问 Airflow UI
- 运行示例 DAG
使用 Docker Compose 搭建本地 Airflow 环境
Airflow 提供一种便捷方式,通过 Docker Compose 搭建并运行完整环境。因此,在开始本教程前,需先安装以下组件。
前提条件
- Docker 20.10.0+
- Docker Desktop
- Docker Compose
- Java 11
若使用 macOS Monterey(macOS 12),需通过禁用 AirPlay 接收器释放 5000 端口。若需访问 Marquez Web UI,还需确保 3000 端口空闲。
参考以下指南使用 Docker Compose 搭建并运行 Airflow。
首先,创建一个新目录,用于存放所有工作文件。
mkdir ~/airflow-ol &&
cd ~/airflow-ol
然后,下载我们将要运行的 Docker Compose 文件。
curl -LfO 'https://airflow.apache.org/docs/apache-airflow/2.3.3/docker-compose.yaml'
这将允许向 Docker 容器传递新的环境变量 OPENLINEAGE_URL,OpenLineage 需要该变量才能工作。
接着,创建以下目录,这些目录将被挂载并由启动 Airflow 的 Docker Compose 使用。
mkdir dags &&
mkdir logs &&
mkdir plugins
同时,创建 .env 文件,其中包含 Airflow 用于安装所需额外 Python 包的环境变量。本教程将安装 openlineage-airflow 包。
echo "_PIP_ADDITIONAL_REQUIREMENTS=openlineage-airflow" > .env
还需告知 OpenLineage 将血缘数据发送至何处。
echo "OPENLINEAGE_URL=http://host.docker.internal:4433" >> .env
将后端设置为 host.docker.internal 的原因是我们将在主机而非 Airflow 的 Docker 环境中运行 OpenLineage Proxy。代理将在 4433 端口监听血缘数据。
将 OpenLineage Proxy 配置为接收端
OpenLineage Proxy 是一个简单工具,可轻松搭建并运行以接收 OpenLineage 数据。代理本身不执行任何操作,仅显示接收到的数据。可选地,它还可通过 HTTP 将数据转发至任何兼容的 OpenLineage 后端。
从 git 下载代理代码并构建:
cd ~ &&
git clone https://github.com/OpenLineage/OpenLineage.git &&
cd OpenLineage/proxy/backend &&
./gradlew build
现在,复制 proxy.dev.yml 并按以下内容编辑,保存为 proxy.yml。
# Licensed under the Apache License, Version 2.0 (the "License");
# you may not use this file except in compliance with the License.
# You may obtain a copy of the License at
#
#     http://www.apache.org/licenses/LICENSE-2.0
#
# Unless required by applicable law or agreed to in writing, software
# distributed under the License is distributed on an "AS IS" BASIS,
# WITHOUT WARRANTIES OR CONDITIONS OF ANY KIND, either express or implied.
# See the License for the specific language governing permissions and
# limitations under the License.server:applicationConnectors:- type: httpport: ${OPENLINEAGE_PROXY_PORT:-4433}adminConnectors:- type: httpport: ${OPENLINEAGE_PROXY_ADMIN_PORT:-4434}logging:level: ${LOG_LEVEL:-INFO}appenders:- type: consoleproxy:source: openLineageProxyBackendstreams:- type: Console- type: Httpurl: http://localhost:5000/api/v1/lineage
配置 Marquez
最后一步是配置 Marquez 后端。使用 Marquez 的快速开始文档搭建 Marquez 环境。
cd ~ &&
git clone https://github.com/MarquezProject/marquez.git
在 marquez/docker-compose.dev.yml 中,更改 pghero 的端口,以释放 8080 端口供 Airflow 使用:
version: "3.7"
services:api:build: .seed_marquez:build: .pghero:image: ankane/pgherocontainer_name: pgheroports:- "8888:8888"environment:DATABASE_URL: postgres://postgres:password@db:5432
启动所有服务
启动 Marquez
启动 Docker Desktop,然后:
cd ~/marquez &&
./docker/up.sh
启动 OpenLineage proxy
cd ~/OpenLineage/proxy/backend &&
./gradlew runShadow
启动 Airflow
cd ~/airflow-ol
docker-compose up
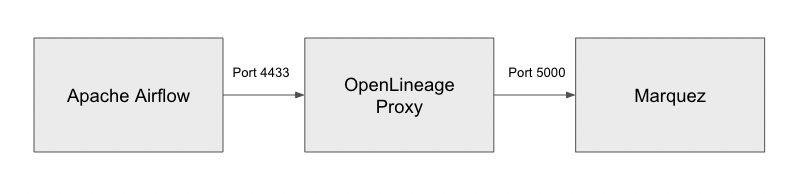
此时,Apache Airflow 应已运行,并能够将血缘数据发送至 OpenLineage Proxy,而 OpenLineage Proxy 将数据转发至 Marquez。因此,我们既可以检查数据负载,也可以以图形形式查看血缘数据。
访问 Airflow UI
所有服务启动后,现在可通过浏览器访问 Airflow UI,地址为 http://localhost:8080。
初始登录 ID 和密码为 airflow/airflow。
运行示例 DAG
登录 Airflow UI 后,会看到启动时已预填充的多个示例 DAG。我们可以运行其中一些,以查看它们生成的 OpenLineage 事件。
运行 Bash Operator
在 DAGs 页面,找到 example_bash_operator。

点击右侧的 ► 按钮,将弹出提示框。选择 Trigger DAG 手动触发并运行 DAG。
将看到 DAG 运行并最终完成。
检查 OpenLineage 事件
一切完成后,应在 OpenLineage proxy 的控制台中看到多条 JSON 数据负载输出。
INFO  [2022-08-16 21:39:41,411] io.openlineage.proxy.api.models.ConsoleLineageStream: {"eventTime" : "2022-08-16T21:39:40.854926Z","eventType" : "START","inputs" : [ ],"job" : {"facets" : { },"name" : "example_bash_operator.runme_2","namespace" : "default"},"outputs" : [ ],"producer" : "https://github.com/OpenLineage/OpenLineage/tree/0.12.0/integration/airflow","run" : {"facets" : {"airflow_runArgs" : {"_producer" : "https://github.com/OpenLineage/OpenLineage/tree/0.12.0/integration/airflow","_schemaURL" : "https://raw.githubusercontent.com/OpenLineage/OpenLineage/main/spec/OpenLineage.json#/definitions/BaseFacet","externalTrigger" : true},"airflow_version" : {"_producer" : "https://github.com/OpenLineage/OpenLineage/tree/0.12.0/integration/airflow","_schemaURL" : "https://raw.githubusercontent.com/OpenLineage/OpenLineage/main/spec/OpenLineage.json#/definitions/BaseFacet","airflowVersion" : "2.3.3","openlineageAirflowVersion" : "0.12.0","operator" : "airflow.operators.bash.BashOperator","taskInfo" : "{'_BaseOperator__init_kwargs': {'task_id': 'runme_2', 'params': <***.models.param.ParamsDict object at 0xffff7467b610>, 'bash_command': 'echo \"example_bash_operator__runme_2__20220816\" && sleep 1'}, '_BaseOperator__from_mapped': False, 'task_id': 'runme_2', 'task_group': <weakproxy at 0xffff74676ef0 to TaskGroup at 0xffff7467ba50>, 'owner': '***', 'email': None, 'email_on_retry': True, 'email_on_failure': True, 'execution_timeout': None, 'on_execute_callback': None, 'on_failure_callback': None, 'on_success_callback': None, 'on_retry_callback': None, '_pre_execute_hook': None, '_post_execute_hook': None, 'executor_config': {}, 'run_as_user': None, 'retries': 0, 'queue': 'default', 'pool': 'default_pool', 'pool_slots': 1, 'sla': None, 'trigger_rule': <TriggerRule.ALL_SUCCESS: 'all_success'>, 'depends_on_past': False, 'ignore_first_depends_on_past': True, 'wait_for_downstream': False, 'retry_delay': datetime.timedelta(seconds=300), 'retry_exponential_backoff': False, 'max_retry_delay': None, 'params': <***.models.param.ParamsDict object at 0xffff7467b4d0>, 'priority_weight': 1, 'weight_rule': <WeightRule.DOWNSTREAM: 'downstream'>, 'resources': None, 'max_active_tis_per_dag': None, 'do_xcom_push': True, 'doc_md': None, 'doc_json': None, 'doc_yaml': None, 'doc_rst': None, 'doc': None, 'upstream_task_ids': set(), 'downstream_task_ids': {'run_after_loop'}, 'start_date': DateTime(2021, 1, 1, 0, 0, 0, tzinfo=Timezone('UTC')), 'end_date': None, '_dag': <DAG: example_bash_operator>, '_log': <Logger ***.task.operators (INFO)>, 'inlets': [], 'outlets': [], '_inlets': [], '_outlets': [], '_BaseOperator__instantiated': True, 'bash_command': 'echo \"example_bash_operator__runme_2__20220816\" && sleep 1', 'env': None, 'output_encoding': 'utf-8', 'skip_exit_code': 99, 'cwd': None, 'append_env': False}"},"nominalTime" : {"_producer" : "https://github.com/OpenLineage/OpenLineage/tree/0.12.0/integration/airflow","_schemaURL" : "https://raw.githubusercontent.com/OpenLineage/OpenLineage/main/spec/OpenLineage.json#/definitions/NominalTimeRunFacet","nominalStartTime" : "2022-08-16T21:39:38.005668Z"},"parentRun" : {"_producer" : "https://github.com/OpenLineage/OpenLineage/tree/0.12.0/integration/airflow","_schemaURL" : "https://raw.githubusercontent.com/OpenLineage/OpenLineage/main/spec/OpenLineage.json#/definitions/ParentRunFacet","job" : {"name" : "example_bash_operator","namespace" : "default"},"run" : {"runId" : "39ad10d1-72d9-3fe9-b2a4-860c651b98b7"}}},"runId" : "313b4e71-9cde-4c83-b641-dd6773bf114b"}
}
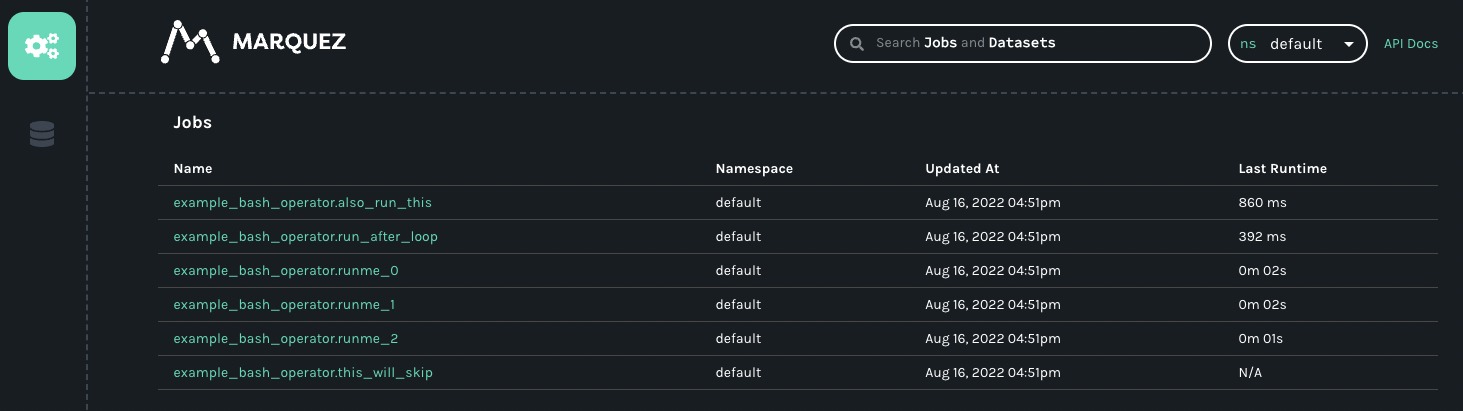
检查 Marquez
还可打开浏览器访问 http://localhost:3000 进入 Marquez UI,查看来自 Airflow 的 OpenLineage 事件。
运行其他 DAG
由于教程篇幅限制,此处不再运行其他示例 DAG,但你可以尝试运行它们,观察各 DAG 如何发出 OpenLineage 事件。请尝试运行其他示例,如 example_python_operator,它也会发出 OpenLineage 事件。
通常,当 DAG 运行涉及某些被使用或创建的 dataset 时,数据血缘会更加完整和有用。运行这些 DAG 后,你将能看到不同 DAG 和任务如何连接同一数据集,最终形成如下所示的数据血缘图:
以下是目前已具备提取器、能够提取并发出 OpenLineage 事件的 Airflow 算子:
- PostgresOperator
- MySqlOperator
- BigQueryOperator
- SnowflakeOperator
- GreatExpectationsOperator
- PythonOperator
更多可在 Airflow 中运行的 OpenLineage 示例 DAG,请参阅 Apache 示例。
故障排查
- 若未在 proxy 或 Marquez 中看到任何数据,请检查 Airflow 的任务日志,查看是否出现以下消息:
[2022-08-16, 21:23:19 UTC] {factory.py:122} ERROR - Did not find openlineage.yml and OPENLINEAGE_URL is not set。若出现,说明环境变量OPENLINEAGE_URL未正确设置,导致 OpenLineage 无法发出任何事件。请确保在通过 docker compose 设置 Airflow 时正确设置了环境变量。 - 有时 Marquez 可能无响应,无法通过 API 端口 5000 接收数据。若发现收到 Marquez 的 500 响应码,或 Marquez UI 卡死,只需停止并重启 Marquez 即可。
结论
本简短教程介绍了如何搭建并运行一个简单的 Apache Airflow 环境,使其在 DAG 运行期间能够发出 OpenLineage 事件。我们还通过 OpenLineage proxy 与 Marquez 的组合,监控并接收了血缘事件。希望本教程有助于理解如何将 Airflow 与 OpenLineage 结合,以及如何轻松使用 proxy 和 Marquez 监控其数据和最终结果。
风险提示与免责声明
本文内容基于公开信息研究整理,不构成任何形式的投资建议。历史表现不应作为未来收益保证,市场存在不可预见的波动风险。投资者需结合自身财务状况及风险承受能力独立决策,并自行承担交易结果。作者及发布方不对任何依据本文操作导致的损失承担法律责任。市场有风险,投资须谨慎。