Nginx 配置详解与虚拟主机实战指南
本文基于 Nginx 实际部署经验,系统梳理了 Nginx 的核心配置结构、虚拟主机配置方式(基于域名、IP、端口),并附带了访问控制与状态统计模块的使用方法,适合初学者和运维人员快速上手。
目录
前言
一、Nginx 配置文件结构概览
1. 全局配置(main 块)
2. I/O 事件配置(events 块)
二、HTTP 配置模块详解(http 块)
三、Server 块:Web 服务监听配置
修改配置文件
编辑基于授权的访问控制
基于客户端的访问控制
修改nginx配置文件
基于IP 的 Nginx 虚拟主机
修改配置文件
基于端口的 Nginx 虚拟主机
nginx升级
四、Nginx 虚拟主机配置实战
1. 基于域名的虚拟主机
步骤一:配置本地解析(测试用)
步骤二:准备网页目录
步骤三:修改 nginx.conf
步骤四:重启并访问
2. 基于 IP 的虚拟主机
3. 基于端口的虚拟主机
五、Nginx 访问控制与状态统计
1. 启用状态统计模块(stub_status)
2. 基于用户认证的访问控制
3. 基于 IP 的访问控制
六、总结与建议
前言
Nginx 早已不只是“反向代理”的代名词,更是高并发架构的守门人。面对日嚣的访问压力与多元业务需求,唯有吃透其三大虚拟主机模式、四层访问控制及状态统计机制,方能在有限资源内榨干每一分性能。本文以实战为导向,从升级平滑热替、域名-IP-端口三维隔离,到鉴权、IP 白名单与 stub_status 监控,逐行拆解配置细节,带你把单台服务器玩出集群级灵活度;更结合真实报错与日志分析,给出可复制、可落地的调优模板,助你在分钟级完成站点扩容与安全防护,让 Nginx 真正成为业务增长的“加速引擎”。
一、Nginx 配置文件结构概览
Nginx 的主配置文件通常位于:
/usr/local/nginx/conf/nginx.conf配置文件主要分为以下几个模块:
1. 全局配置(main 块)
#user  nobody;                 # 运行用户,默认 nobody
worker_processes  4;           # 工作进程数,建议设置为 CPU 核心数
#error_log  logs/error.log;    # 错误日志路径
#pid        logs/nginx.pid;    # PID 文件路径
2. I/O 事件配置(events 块)
events {use epoll;                  # 使用 epoll 模型,提升高并发性能worker_connections 4096;    # 每个进程最大连接数
}
提示:如需支持更高并发,可执行
ulimit -n 65535提高系统文件句柄限制。
二、HTTP 配置模块详解(http 块)
http 块是配置 Web 服务的核心区域,包含日志格式、文件类型、连接保持、gzip 压缩等设置。
http {include       mime.types;default_type  application/octet-stream;sendfile        on;keepalive_timeout  65;#gzip  on;
}
三、Server 块:Web 服务监听配置
每个 server 块代表一个虚拟主机,可监听不同域名、IP 或端口。
server {listen       80;server_name  www.kgc.com;charset utf-8;location / {root   html;index  index.html index.php;}error_page   500 502 503 504  /50x.html;location = /50x.html {root   html;}
}
修改配置文件
修改 nginx.conf 配置文件,指定访问位置并添加 stub_status 配置
cd /usr/local/nginx/conf
cp nginx.conf nginx.conf.bak
vim /usr/local/nginx/conf/nginx.conf
......
http {
......server {listen 80;server_name www.benet.com;charset utf-8;location / {root html;index index.html index.php;}##添加 stub_status 配置##location /status { 					#访问位置为/statusstub_status on; 				#打开状态统计功能access_log off; 				#关闭此位置的日志记录}}
}
图片
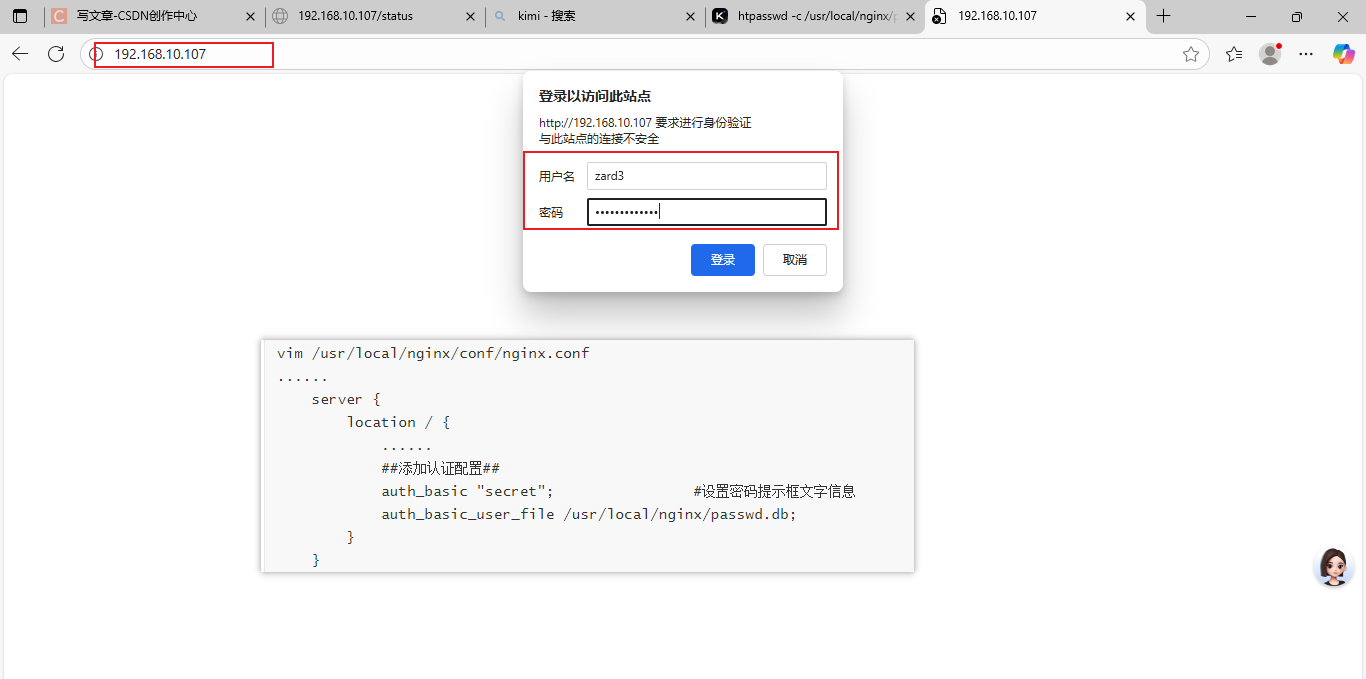
 基于授权的访问控制
生成用户密码认证文件
yum install -y httpd-tools
htpasswd -c /usr/local/nginx/passwd.db zhangsan
chown nginx /usr/local/nginx/passwd.db
chmod 400 /usr/local/nginx/passwd.db
修改主配置文件相对应目录,添加认证配置
vim /usr/local/nginx/conf/nginx.conf
......server {location / {......##添加认证配置##auth_basic "secret";				#设置密码提示框文字信息auth_basic_user_file /usr/local/nginx/passwd.db;}}
网络连接
基于客户端的访问控制
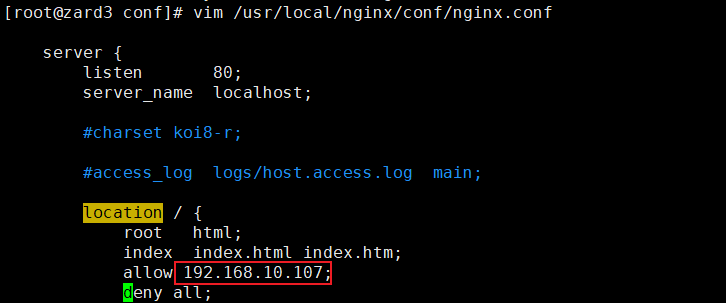
本机地址为192.168.10.90

但是我将allow换成192.168.10.90时
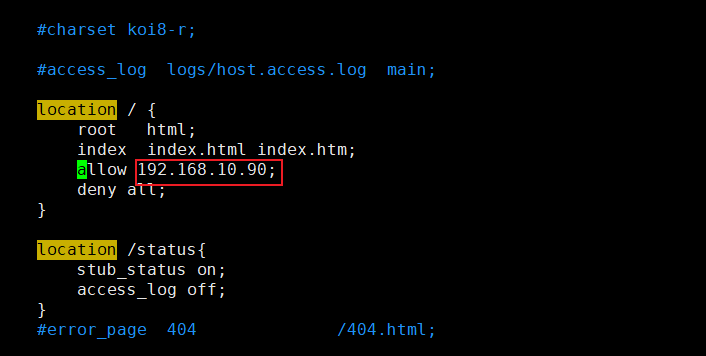
然后就被允许了
修改nginx配置文件
为虚拟主机准备网页
[root@zard3 conf]# mkdir -p /usr/local/nginx/html/zard3
[root@zard3 conf]# mkdir -p /usr/local/nginx/html/yjs
[root@zard3 conf]# echo "<h1>www.yjs.com</h1>" >/usr/local/nginx/html/yjs/index.html
[root@zard3 conf]# echo "<h1>www.zard3.com</h1>" >/usr/local/nginx/html/zard3/index.html
修改配置文件
#user  nobody;
worker_processes  1;#error_log  logs/error.log;
#error_log  logs/error.log  notice;
#error_log  logs/error.log  info;#pid        logs/nginx.pid;events {worker_connections  1024;
}http {include       mime.types;default_type  application/octet-stream;#log_format  main  '$remote_addr - $remote_user [$time_local] "$request" '#                  '$status $body_bytes_sent "$http_referer" '#                  '"$http_user_agent" "$http_x_forwarded_for"';#access_log  logs/access.log  main;sendfile        on;#tcp_nopush     on;#keepalive_timeout  0;keepalive_timeout  65;#gzip  on;server {listen       80;server_name  www.yjs.com;charset utf-8;access_log  logs/www.yjs.access.log;location / {root   /usr/local/nginx/html/yjs;index  index.html index.htm;}#error_page  404              /404.html;# redirect server error pages to the static page /50x.html#error_page   500 502 503 504  /50x.html;location = /50x.html {root   html;}# proxy the PHP scripts to Apache listening on 127.0.0.1:80##location ~ \.php$ {#    proxy_pass   http://127.0.0.1;#}# pass the PHP scripts to FastCGI server listening on 127.0.0.1:9000##location ~ \.php$ {#    root           html;#    fastcgi_pass   127.0.0.1:9000;#    fastcgi_index  index.php;#    fastcgi_param  SCRIPT_FILENAME  /scripts$fastcgi_script_name;#    include        fastcgi_params;#}# deny access to .htaccess files, if Apache's document root# concurs with nginx's one##location ~ /\.ht {#    deny  all;#}}server {listen       80;server_name  www.zard3.com;charset utf-8;access_log  logs/www.zard3.access.log;location / {root   /usr/local/nginx/html/zard3;index  index.html index.htm;}#error_page  404              /404.html;# redirect server error pages to the static page /50x.html#error_page   500 502 503 504  /50x.html;location = /50x.html {root   html;}}# another virtual host using mix of IP-, name-, and port-based configuration##server {#    listen       8000;#    listen       somename:8080;#    server_name  somename  alias  another.alias;#    location / {#        root   html;#        index  index.html index.htm;#    }#}# HTTPS server##server {#    listen       443 ssl;#    server_name  localhost;#    ssl_certificate      cert.pem;#    ssl_certificate_key  cert.key;#    ssl_session_cache    shared:SSL:1m;#    ssl_session_timeout  5m;#    ssl_ciphers  HIGH:!aNULL:!MD5;#    ssl_prefer_server_ciphers  on;#    location / {#        root   html;#        index  index.html index.htm;#    }#}}
基于IP 的 Nginx 虚拟主机
添加网卡,修改IP
[root@zard3 ~]# cd /etc/sysconfig/network-scripts/
[root@zard3 network-scripts]# vim ifcfg-ens36
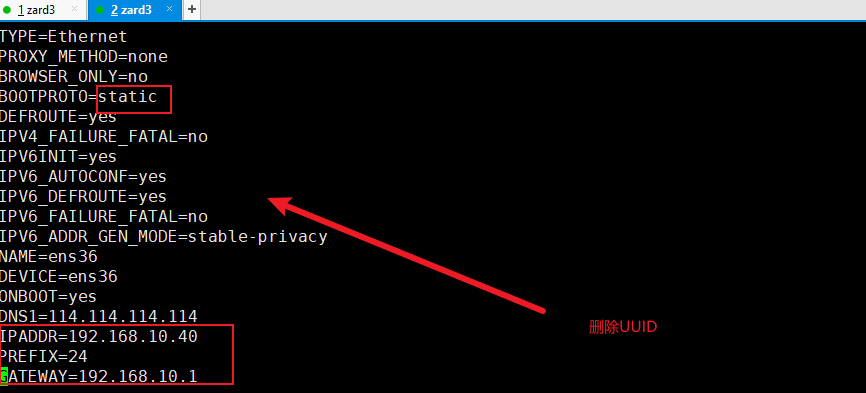
修改配置文件
vim /usr/local/nginx/conf/nginx.conf
......
http {
......server {listen 192.168.10.21:80;					#设置监听地址192.168.10.21server_name www.YJS.com;charset utf-8;access_log logs/www.YJS.access.log; location / {root /var/www/html/kgc;index index.html index.php;}error_page 500 502 503 504 /50x.html;location = 50x.html{root html;}1}```#### 6.5.2 配置server 2server {listen 192.168.10.40:80;					#设置监听地址192.168.10.40server_name www.benet.com;charset utf-8;access_log logs/www.benet.access.log; location / {root /var/www/html/benet;index index.html index.php;}error_page 500 502 503 504 /50x.html;location = 50x.html{root html;}}	}systemctl restart nginx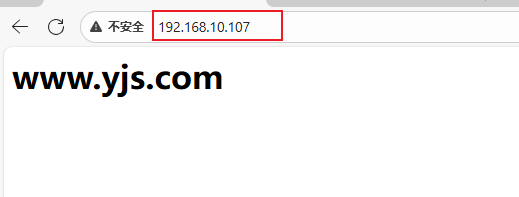

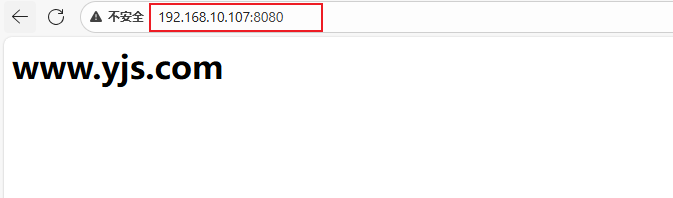
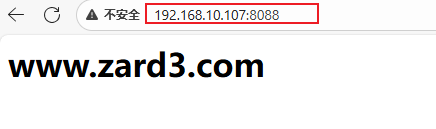
基于端口的 Nginx 虚拟主机
修改配置文件
[root@zard3 ~]# cat /usr/local/nginx/conf/nginx.conf#user  nobody;
worker_processes  1;#error_log  logs/error.log;
#error_log  logs/error.log  notice;
#error_log  logs/error.log  info;#pid        logs/nginx.pid;events {worker_connections  1024;
}http {include       mime.types;default_type  application/octet-stream;#log_format  main  '$remote_addr - $remote_user [$time_local] "$request" '#                  '$status $body_bytes_sent "$http_referer" '#                  '"$http_user_agent" "$http_x_forwarded_for"';#access_log  logs/access.log  main;sendfile        on;#tcp_nopush     on;#keepalive_timeout  0;keepalive_timeout  65;#gzip  on;server {listen 192.168.10.107:8080;server_name  www.yjs.com;charset utf-8;access_log  logs/www.yjs.access.log;location / {root   /usr/local/nginx/html/yjs;index  index.html index.htm;}#error_page  404              /404.html;# redirect server error pages to the static page /50x.html#error_page   500 502 503 504  /50x.html;location = /50x.html {root   html;}# proxy the PHP scripts to Apache listening on 127.0.0.1:80##location ~ \.php$ {#    proxy_pass   http://127.0.0.1;#}# pass the PHP scripts to FastCGI server listening on 127.0.0.1:9000##location ~ \.php$ {#    root           html;#    fastcgi_pass   127.0.0.1:9000;#    fastcgi_index  index.php;#    fastcgi_param  SCRIPT_FILENAME  /scripts$fastcgi_script_name;#    include        fastcgi_params;#}# deny access to .htaccess files, if Apache's document root# concurs with nginx's one##location ~ /\.ht {#    deny  all;#}}server {listen 192.168.10.107:8088;server_name  www.zard3.com;charset utf-8;access_log  logs/www.zard3.access.log;location / {root   /usr/local/nginx/html/zard3;index  index.html index.htm;}#error_page  404              /404.html;# redirect server error pages to the static page /50x.html#error_page   500 502 503 504  /50x.html;location = /50x.html {root   html;}}# another virtual host using mix of IP-, name-, and port-based configuration##server {#    listen       8000;#    listen       somename:8080;#    server_name  somename  alias  another.alias;#    location / {#        root   html;#        index  index.html index.htm;#    }#}# HTTPS server##server {#    listen       443 ssl;#    server_name  localhost;#    ssl_certificate      cert.pem;#    ssl_certificate_key  cert.key;#    ssl_session_cache    shared:SSL:1m;#    ssl_session_timeout  5m;#    ssl_ciphers  HIGH:!aNULL:!MD5;#    ssl_prefer_server_ciphers  on;#    location / {#        root   html;#        index  index.html index.htm;#    }#}}
使用192.168.10.90和它相连
nginx升级
之前的版本
[root@zard3 nginx-1.22.0]# nginx -V
nginx version: nginx/1.20.2
built by gcc 4.8.5 20150623 (Red Hat 4.8.5-44) (GCC)
built with OpenSSL 1.0.2k-fips  26 Jan 2017
TLS SNI support enabled
configure arguments: --prefix=/usr/local/nginx --user=nginx --group=nginx --with-http_stub_status_module --with-http_ssl_module
解压
[root@zard3 opt]# tar zxvf nginx-1.22.0.tar.gz -C /opt/
[root@zard3 opt]# cd nginx-1.xx.xx
./configure \
--prefix=/usr/local/nginx \
--user=nginx \
--group=nginx \
--with-http_stub_status_module \
--with-http_ssl_module
重启并查看版本
[root@zard3 nginx-1.22.0]# make
[root@zard3 nginx-1.22.0]# mv /usr/local/nginx/sbin/nginx /usr/local/nginx/sbin/nginx_old
[root@zard3 nginx-1.22.0]# ll /usr/local/nginx/sbin/
[root@zard3 opt]# systemctl restart nginx
[root@zard3 opt]# nginx -V
nginx version: nginx/1.22.0
built by gcc 4.8.5 20150623 (Red Hat 4.8.5-44) (GCC)
built with OpenSSL 1.0.2k-fips  26 Jan 2017
TLS SNI support enabled
configure arguments: --prefix=/usr/local/nginx --user=nginx --group=nginx --with-http_stub_status_module --with-http_ssl_module
四、Nginx 虚拟主机配置实战
Nginx 支持三种虚拟主机方式:
表格
| 类型 | 说明 | 使用场景 |
|---|---|---|
| 基于域名 | 多个域名指向同一 IP | 最常用,适合 Web 建站 |
| 基于 IP | 每个站点绑定不同 IP | 多网卡或 IP 资源充足时 |
| 基于端口 | 同一 IP,不同端口 | 内部测试、临时服务 |
1. 基于域名的虚拟主机
步骤一:配置本地解析(测试用)
echo "192.168.10.21 www.yjs.com www.benet.com" >> /etc/hosts步骤二:准备网页目录
bash
mkdir -p /var/www/html/yjs
mkdir -p /var/www/html/benet
echo "<h1>www.yjs.com</h1>" > /var/www/html/yjs/index.html
echo "<h1>www.benet.com</h1>" > /var/www/html/benet/index.html
步骤三:修改 nginx.conf
nginx
server {listen 80;server_name www.yjs.com;root /var/www/html/yjs;index index.html;access_log logs/www.yjs.access.log;
}server {listen 80;server_name www.benet.com;root /var/www/html/benet;index index.html;access_log logs/www.benet.access.log;
}
步骤四:重启并访问
systemctl restart nginx浏览器访问:
-
http://www.yjs.com
-
http://www.benet.com
2. 基于 IP 的虚拟主机
为网卡添加虚拟 IP:
ifconfig ens33:0 192.168.10.40 netmask 255.255.255.0配置两个 server,分别监听不同 IP:
server {listen 192.168.10.21:80;server_name www.yjs.com;root /var/www/html/yjs;
}server {listen 192.168.10.40:80;server_name www.benet.com;root /var/www/html/benet;
}
3. 基于端口的虚拟主机
server {listen 192.168.10.21:8080;root /var/www/html/yjs;
}server {listen 192.168.10.21:8888;root /var/www/html/benet;
}
访问方式:
-
http://192.168.10.21:8080
-
http://192.168.10.21:8888
五、Nginx 访问控制与状态统计
1. 启用状态统计模块(stub_status)
确认已安装 http_stub_status_module:
bash
nginx -V 2>&1 | grep stub_status配置示例:
nginx
location /status {stub_status on;access_log off;
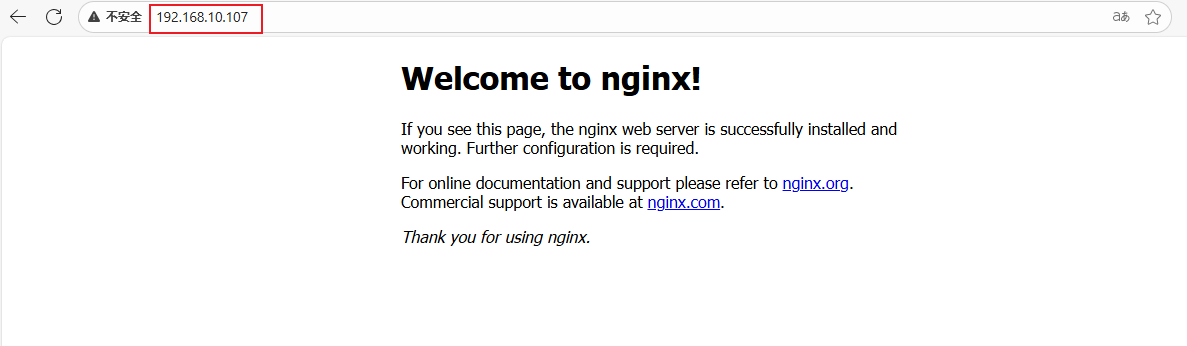
}访问:http://your_ip/status
输出说明:
Active connections: 当前活跃连接数
server accepts handled requests:已接受的连接、已处理的连接、已处理的请求数
2. 基于用户认证的访问控制
生成密码文件:
yum install -y httpd-tools
htpasswd -c /usr/local/nginx/passwd.db zhangsan
chown nginx /usr/local/nginx/passwd.db
chmod 400 /usr/local/nginx/passwd.db
配置认证:
location / {auth_basic "secret";auth_basic_user_file /usr/local/nginx/passwd.db;
}
3. 基于 IP 的访问控制
location / {allow 192.168.10.20;deny all;
}
六、总结与建议
| 功能模块 | 关键配置项 | 建议 |
|---|---|---|
| 虚拟主机 | server_name、listen、root | 域名方式最常用,推荐优先使用 |
| 访问控制 | allow/deny、auth_basic | 内部系统建议加认证或 IP 白名单 |
| 性能优化 | worker_processes、use epoll | 根据 CPU 核数调整进程数 |
| 日志与监控 | access_log、stub_status | 建议开启日志与状态统计模块 |