1Panel 部署 OpenResty + Redis 实现 IP 动态封禁教程
前言
最近给博客更换了一个域名,观察OpenResty 日志发现一直有境外的 IP 扫描服务器目录文件,同时也有一些别有用心的家伙恶意请求,为此决定给代理层加一个 IP 封禁,根据我的需求给 DeepSeek 提出问题:我用 1 panel 部署的 openresty 和 redis,请给我一个小白级别的操作教程实现这一步骤,一定要足够仔细,我只需要实现动态封禁,不需要推送监控。下面是我根据 AI 的建议完成的一个动态封禁,特此分享。
前提:服务器使用1Panel 部署了OpenResty 和 Redis!本方案适合中小流量网站防御CC攻击和目录扫描,如需防护DDOS或高频攻击,建议结合云厂商WAF使用。
实现思路
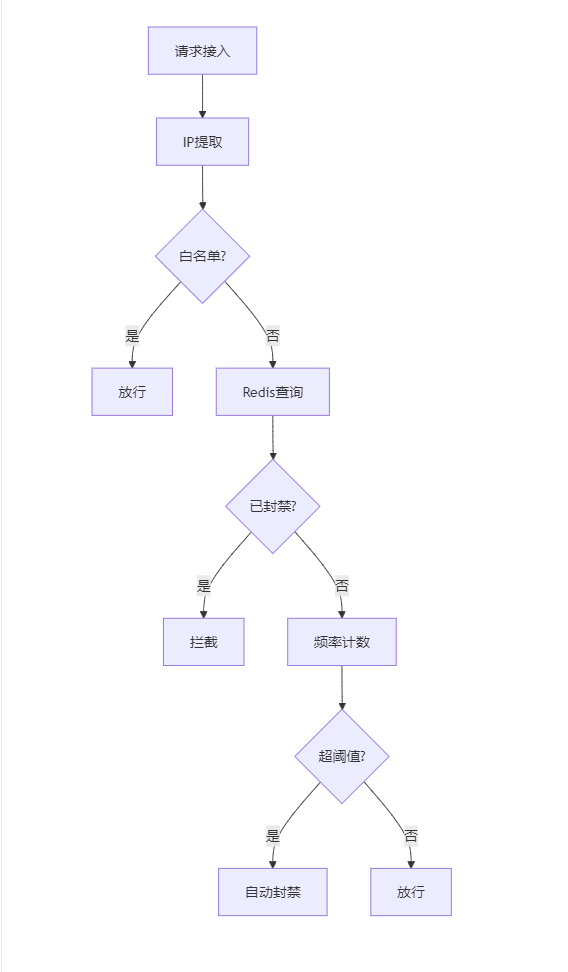
整体实现参考企业级防护,如图所示。
实现步骤
📂文件结构准备
/usr/local/openresty/nginx/conf
├── nginx.conf                 # 主配置文件
├── conf.d/
│   └── default.conf           # 原有的服务器配置
└── lua/                       # 新增 Lua 目录├── access_handler.lua     # 封禁逻辑├── real_ip.lua            # IP 提取工具└── util.lua               # 工具函数
🛠 第一步:创建 Lua 工具脚本
- 创建 /usr/local/openresty/nginx/conf/lua/real_ip.lua
-- real_ip.lua
local _M = {}function _M.get_client_ip()-- 1. 检查 X-Real-IP 头local real_ip = ngx.var.http_x_real_ipif real_ip and real_ip ~= "" thenreturn real_ipend-- 2. 检查 X-Forwarded-For 头local forwarded_for = ngx.var.http_x_forwarded_forif forwarded_for and forwarded_for ~= "" then-- 取第一个非代理IPlocal ips = {}for ip in string.gmatch(forwarded_for, "[^,%s]+") dotable.insert(ips, ip)endif #ips > 0 then-- 跳过已知内网地址for _, ip in ipairs(ips) doif not string.find(ip, "^(10%.|192%.168|172%.(1[6-9]|2[0-9]|3[0-1])%.)") thenreturn ipendendreturn ips[1]endend-- 3. 使用直接连接IPreturn ngx.var.remote_addr
endreturn _M- 创建 /usr/local/openresty/nginx/conf/lua/util.lua
-- util.lua
local redis = require "resty.redis"local _M = {VERSION = "1.1.0",KEY_PREFIX = "BAN:",CONN_POOL_SIZE = 300,CONN_POOL_TIMEOUT = 30000,
}-- 配置初始化函数
function _M.init_config()_M.REDIS_HOST = os.getenv("REDIS_HOST") or "172.18.0.2"_M.REDIS_PORT = tonumber(os.getenv("REDIS_PORT")) or 6379local env_pwd = os.getenv("REDIS_PASSWORD")_M.REDIS_PASSWORD = env_pwd ~= "nil" and env_pwd or nil
end-- 安全释放Redis连接
function _M.safe_release_redis(red)if not red then return endlocal ok, err = red:set_keepalive(_M.CONN_POOL_TIMEOUT, _M.CONN_POOL_SIZE)if not ok thenngx.log(ngx.WARN, "连接池错误: ", err)red:close()end
end-- 增强的Redis连接 (带缓存策略)
local redis_conn_cache = ngx.shared.redis_conn or {count=0}
_M.connect_redis = function()-- 缓存检查if redis_conn_cache.conn thenlocal status = redis_conn_cache.conn:ping()if status thenreturn redis_conn_cache.connendend-- 创建新连接local red = redis:new()red:set_timeouts(1500, 5000, 4000)-- 连接重试逻辑for i = 1, 3 dolocal ok = red:connect(_M.REDIS_HOST, _M.REDIS_PORT)if ok then-- 认证处理if _M.REDIS_PASSWORD thenlocal auth_ok = red:auth(_M.REDIS_PASSWORD)if not auth_ok thenred:close()return nil, "Redis认证失败"endend-- 选择DBred:select(3)-- 更新缓存redis_conn_cache.conn = redreturn redendngx.sleep(0.1) -- 短时等待后重试endreturn nil, "Redis连接失败"
end-- 关键函数
_M.ban_key = function(ip)return _M.KEY_PREFIX.."ip:"..(ip and ip:gsub("[^%d.:]", "") or "invalid")
end_M.count_key = function(ip)return "RATE:"..(ip and ip:gsub("[^%d.:]", "") or "invalid")
end-- 错误页面模板保持不变
_M.error_page_html = [[<!DOCTYPE html><html lang="zh-CN"><head><meta charset="UTF-8"><title>访问受限</title><style>body { font-family: -apple-system, BlinkMacSystemFont, "Segoe UI", Roboto, sans-serif; background-color: #f9f9f9; margin: 0; padding: 40px; text-align: center; }.container { max-width: 700px; margin: 0 auto; }.alert-box { background: #fff; border: 1px solid #ff5252; border-radius: 10px; padding: 30px; box-shadow: 0 4px 20px rgba(0,0,0,0.08); margin-top: 40px; }h1 { color: #ff4444; font-size: 24px; margin-bottom: 20px; }.ip-addr { font-family: monospace; background: #f3f3f3; padding: 5px 15px; border-radius: 6px; display: inline-block; margin: 10px 0; }.info { margin-top: 25px; font-size: 14px; color: #777; }</style></head><body><div class="container"><div class="alert-box"><h1>访问权限受限</h1><p>安全系统已禁止当前访问请求</p><div class="ip-addr">IP: %s</div><p class="reason">原因: %s</p></div><div class="info">请求ID: %s · 时间: %s · 防火墙版本 v%0.1f</div></div></body></html>
]]-- 初始化配置
_M.init_config()return _M- 创建核心封禁脚本
/usr/local/openresty/nginx/conf/lua/access_handler.lua
-- access_handler.lua
local _M = { version = "1.2.1" }function _M.main()-- 动态加载依赖(确保在函数内部require)local real_ip = require("real_ip")local util = require("util")-- 获取客户端IPlocal client_ip = real_ip.get_client_ip()if not client_ip thenngx.log(ngx.ERR, "无法获取客户端IP")return ngx.exit(500)end-- 白名单检查if ngx.var.whitelist == "1" thenngx.log(ngx.DEBUG, "白名单IP跳过检查: ", client_ip)returnend-- 连接Redis (延迟到函数内部)local red, red_err = util.connect_redis()if not red then ngx.log(ngx.ERR, "Redis连接失败: ", red_err)return ngx.exit(500)endlocal REQUEST_ID = ngx.var.request_id or "N/A"local CURRENT_TIME = ngx.localtime() or os.date("%Y-%m-%d %H:%M:%S")local FIREWALL_VERSION = 1.0-- 1. 检查是否已被封禁local ban_key = util.ban_key(client_ip)local is_banned = red:get(ban_key)if is_banned == "1" thenngx.log(ngx.WARN, "访问被阻止: ", client_ip, " 在黑名单中")ngx.header["Content-Type"] = "text/html"ngx.status = 403ngx.say(string.format(util.error_page_html, client_ip, "黑名单IP",REQUEST_ID,CURRENT_TIME,FIREWALL_VERSION))util.safe_release_redis(red)return ngx.exit(403)end-- 2. 请求计数local count_key = util.count_key(client_ip)local exists = red:exists(count_key)local current_count = 1if exists == 0 thenlocal ok = red:set(count_key, 1, "EX", 60) -- 60秒过期if not ok thenngx.log(ngx.ERR, "计数器创建失败")util.safe_release_redis(red)return ngx.exit(500)endelsecurrent_count = red:incr(count_key)end-- 3. 封禁检查 (阈值50)if current_count >= 50 thenred:setex(ban_key, 1800, "1") -- 封禁30分钟red:del(count_key)ngx.log(ngx.WARN, "IP封禁成功: ", client_ip, " | 请求数: ", current_count)ngx.header["Content-Type"] = "text/html"ngx.status = 403ngx.say(string.format(util.error_page_html, client_ip, "高频请求",REQUEST_ID,CURRENT_TIME,FIREWALL_VERSION))util.safe_release_redis(red)return ngx.exit(403)end-- 4. 正常释放连接util.safe_release_redis(red)ngx.log(ngx.DEBUG, "IP: ", client_ip, " | 当前计数: ", current_count)
endreturn _M
🔧 第二步:修改 Nginx 主配置
- 在最顶层加载 Redis 的环境变量
# 其他配置events {worker_connections  1024;
}# 环境变量
env REDIS_HOST;
env REDIS_PORT;
env REDIS_PASSWORD; # 注意:环境变量需要在OpenResty的环境变量中配置!!!http {# http块代码}
- 在 http {} 块内添加以下配置:
# nginx.conf (更新geo区块)
http {lua_package_path '/usr/local/openresty/nginx/conf/lua/?.lua;;';lua_shared_dict ip_ratelimit 10m;# 如果Redis配置的是ip不需要,用于DNS解析resolver 8.8.8.8 1.1.1.1 valid=30s;init_worker_by_lua_block {require("resty.core")}# 连接池全局设置lua_socket_pool_size 100;lua_socket_keepalive_timeout 60s;# TCP/Socket优化reset_timedout_connection on;proxy_read_timeout 30s;lua_socket_log_errors on;lua_socket_buffer_size 16k;lua_socket_connect_timeout 1500ms;lua_socket_send_timeout 5000ms;lua_check_client_abort on;# IP封禁排除列表geo $ratelimit_excluded {default 0;# 127.0.0.1 1;# 192.168.0.0/16 1;}# 恶意爬虫拦截map $http_user_agent $ban_bots {default 0;~*(SEMRush|AhrefsBot|MJ12bot|DotBot) 1;}# ... 其他原有配置 ...
}
✏️ 第三步:修改 HTTPS Server 配置
在 server {} 块添加如下代码:
server {listen       80;server_name  你的域名;# 重定向所有HTTP请求到HTTPSreturn 301 https://$server_name$request_uri;
}server {listen       443 ssl http2;server_name  你的域名;# IP封禁模块 1=启用 0=禁用set $rate_limit_enabled 1;access_by_lua_block {if ngx.var.rate_limit_enabled == "0" then return endif ngx.var.ratelimit_excluded == "1" then return endif ngx.var.ban_bots == "1" then ngx.log(ngx.WARN, "恶意爬虫拦截: "..ngx.var.http_user_agent)ngx.exit(403)end-- 清除模块缓存package.loaded["access_handler"] = nil-- 安全加载并执行main函数local ok, handler = pcall(require, "access_handler")if not ok or not handler.main thenngx.log(ngx.ERR, "防火墙模块加载失败: ", handler or "未知错误")returnend-- 在安全上下文中执行访问控制handler.main()}# 其他正常配置
}
实现效果&&验证
-
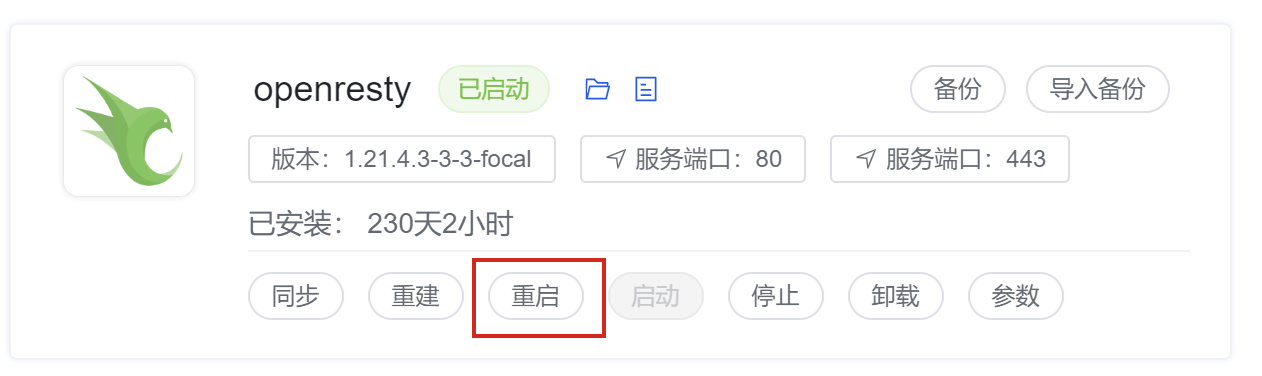
重启OpenResty
-
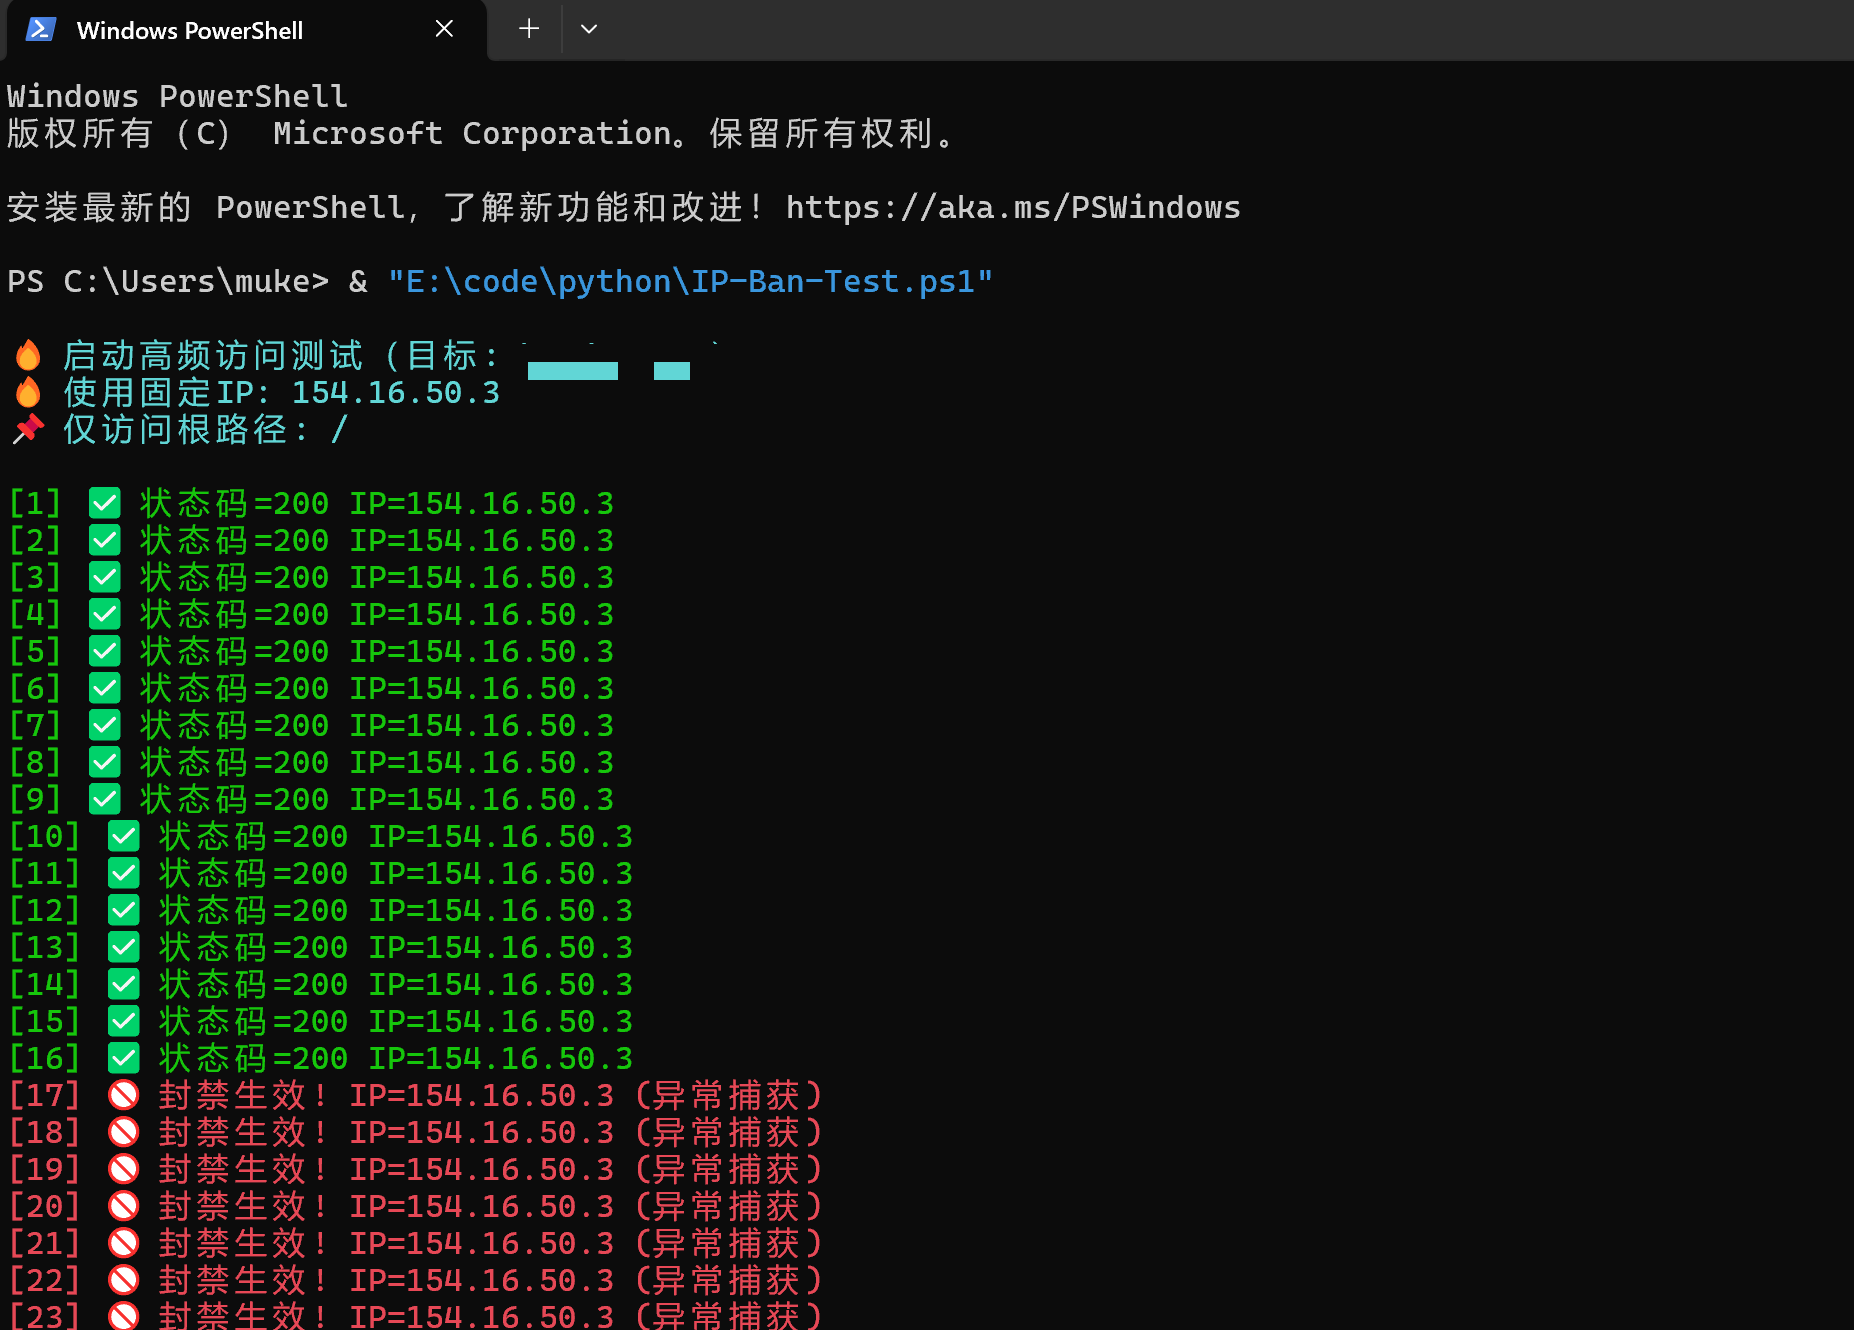
测试封禁功能(使用 PowerShell)
# 测试参数配置
$targetDomain = "域名" # 替换为你的域名
$testCount = 200 # 总请求数
$delayMs = 10 # 毫秒级间隔(模拟高频访问)
$timeoutSec = 2 # 单请求超时时间# 使用单一境外IP
$fixedTestIP = "154.16." + (Get-Random -Min 1 -Max 255) + "." + (Get-Random -Min 1 -Max 255)# 结果统计
$global:stats = @{Total = 0Success = 0Banned = 0Errors = 0Timeouts = 0
}# 初始化SSL设置(忽略证书错误)
[System.Net.ServicePointManager]::SecurityProtocol = [System.Net.SecurityProtocolType]::Tls12 -bor[System.Net.SecurityProtocolType]::Tls11 -bor[System.Net.SecurityProtocolType]::Tls
[System.Net.ServicePointManager]::ServerCertificateValidationCallback = { $true }function Test-Request {param ([int]$RequestId)# 只访问根路径$url = "https://$targetDomain/"# 请求头设置$headers = @{"X-Forwarded-For" = $fixedTestIP"User-Agent" = "Mozilla/5.0 (Windows NT 10.0; Win64; x64) AppleWebKit/537.36 (KHTML, like Gecko) Chrome/91.0.4472.124 Safari/537.36""Accept-Language" = "en-US,en;q=0.9"}# 创建HTTP请求对象$request = [System.Net.WebRequest]::Create($url)$request.Method = "GET"$request.Timeout = $timeoutSec * 1000$request.Headers.Add("X-Forwarded-For", $fixedTestIP)$request.UserAgent = $headers["User-Agent"]try {$response = $request.GetResponse()$statusCode = [int]$response.StatusCodeif ($statusCode -eq 403) {$global:stats.Banned++Write-Host "[$RequestId] 🚫 封禁生效! IP=$fixedTestIP" -ForegroundColor Red} else {$global:stats.Success++Write-Host "[$RequestId] ✅ 状态码=$statusCode IP=$fixedTestIP" -ForegroundColor Green}$response.Close()}catch [System.Net.WebException] {if ($_.Exception.Response) {$statusCode = [int]$_.Exception.Response.StatusCodeif ($statusCode -eq 403) {$global:stats.Banned++Write-Host "[$RequestId] 🚫 封禁生效! IP=$fixedTestIP (异常捕获)" -ForegroundColor Red} else {$global:stats.Errors++Write-Host "[$RequestId]⚠️ 错误: $($_.Exception.Message) (状态码=$statusCode)" -ForegroundColor Yellow}}else {$global:stats.Timeouts++Write-Host "[$RequestId] ⌛ 超时: $($_.Exception.Message)" -ForegroundColor Magenta}}catch {$global:stats.Errors++Write-Host "[$RequestId] ❌ 未知错误: $_" -ForegroundColor DarkRed}finally {$global:stats.Total++}
}# 开始测试
Write-Host "`n🔥 启动高频访问测试(目标: $targetDomain)" -ForegroundColor Cyan
Write-Host "🔥 使用固定IP: $fixedTestIP" -ForegroundColor Cyan
Write-Host "📌 仅访问根路径: /`n" -ForegroundColor Cyanfor ($i = 1; $i -le $testCount; $i++) {Test-Request -RequestId $iStart-Sleep -Milliseconds $delayMs
}# 结果统计
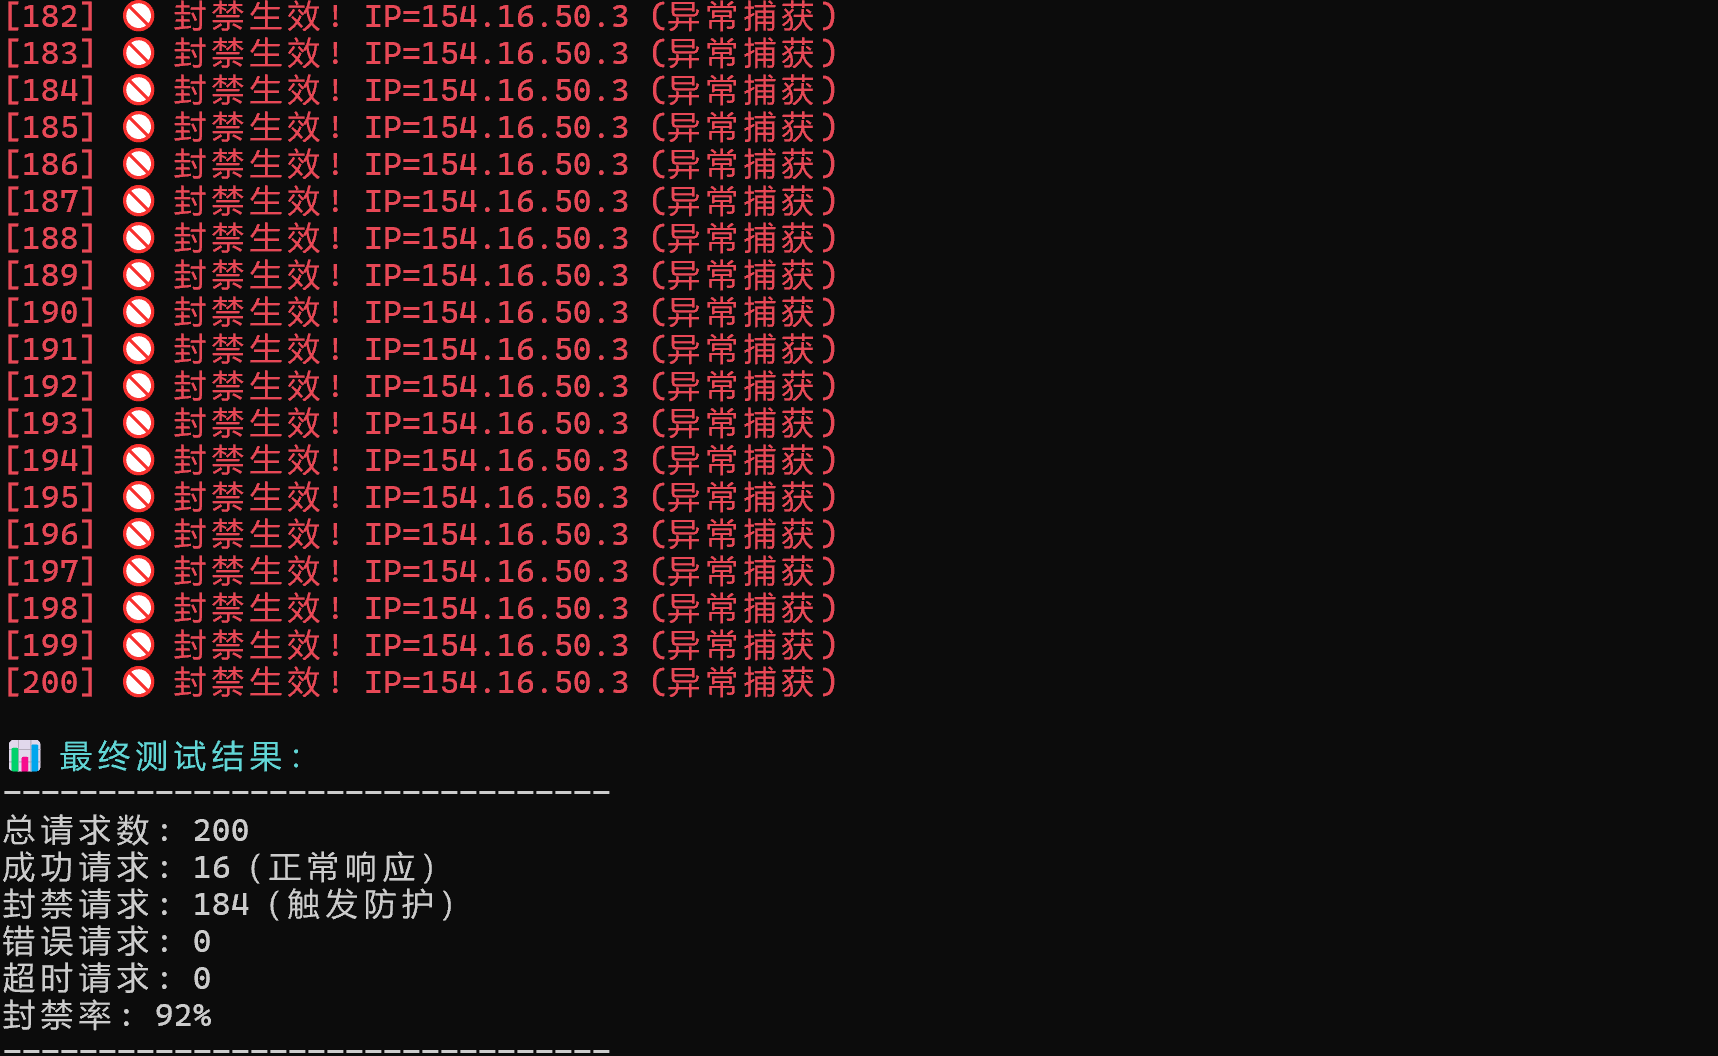
Write-Host "`n📊 最终测试结果:" -ForegroundColor Cyan
Write-Host "--------------------------------"
Write-Host "总请求数: $($global:stats.Total)"
Write-Host "成功请求: $($global:stats.Success)(正常响应)"
Write-Host "封禁请求: $($global:stats.Banned)(触发防护)"
Write-Host "错误请求: $($global:stats.Errors)"
Write-Host "超时请求: $($global:stats.Timeouts)"
Write-Host "封禁率: $([math]::Round($global:stats.Banned/$global:stats.Total*100, 2))%"
Write-Host "--------------------------------"# 安全重置
[System.Net.ServicePointManager]::ServerCertificateValidationCallback = $null
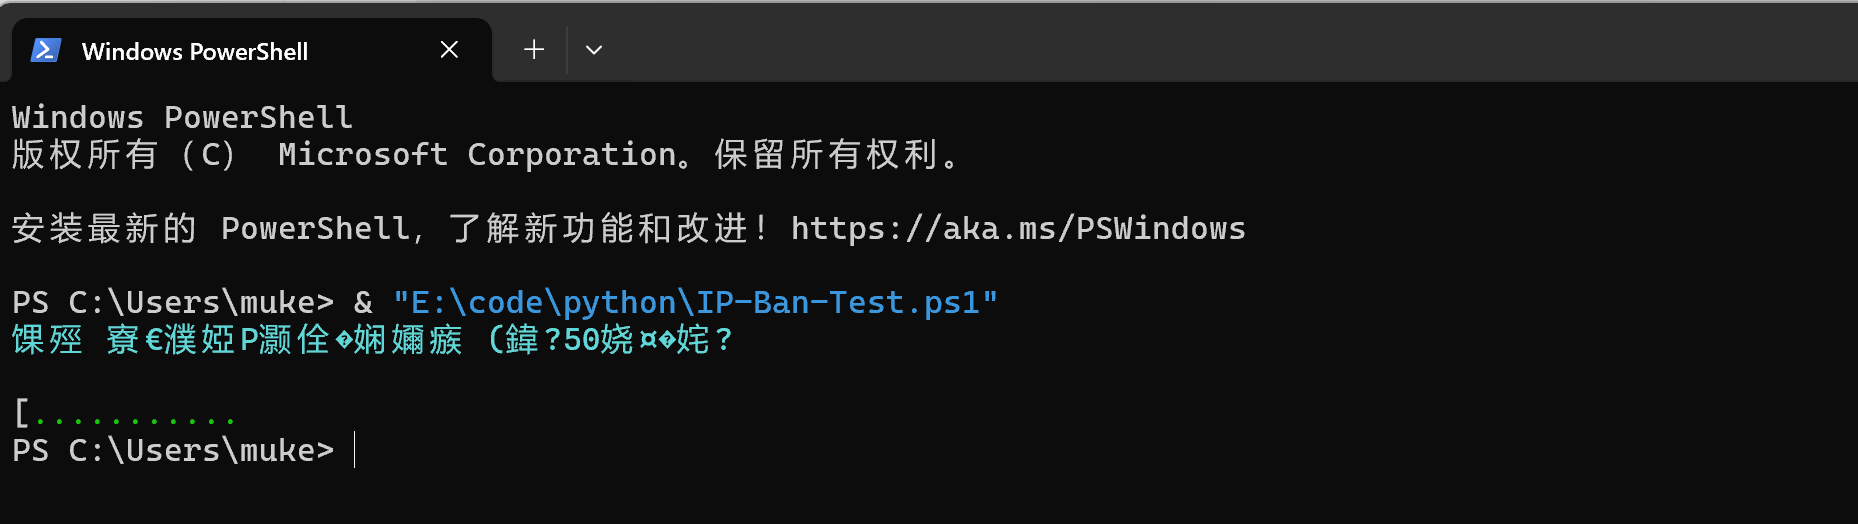
Tip:上述脚本保存为 ps 1 文件后在 PowerShell 执行如下命令
& "E:\code\python\IP-Ban-Test.ps1"
(1)如果执行报错如下图,需要临时修改执行策略。

Set-ExecutionPolicy -ExecutionPolicy RemoteSigned -Scope CurrentUser
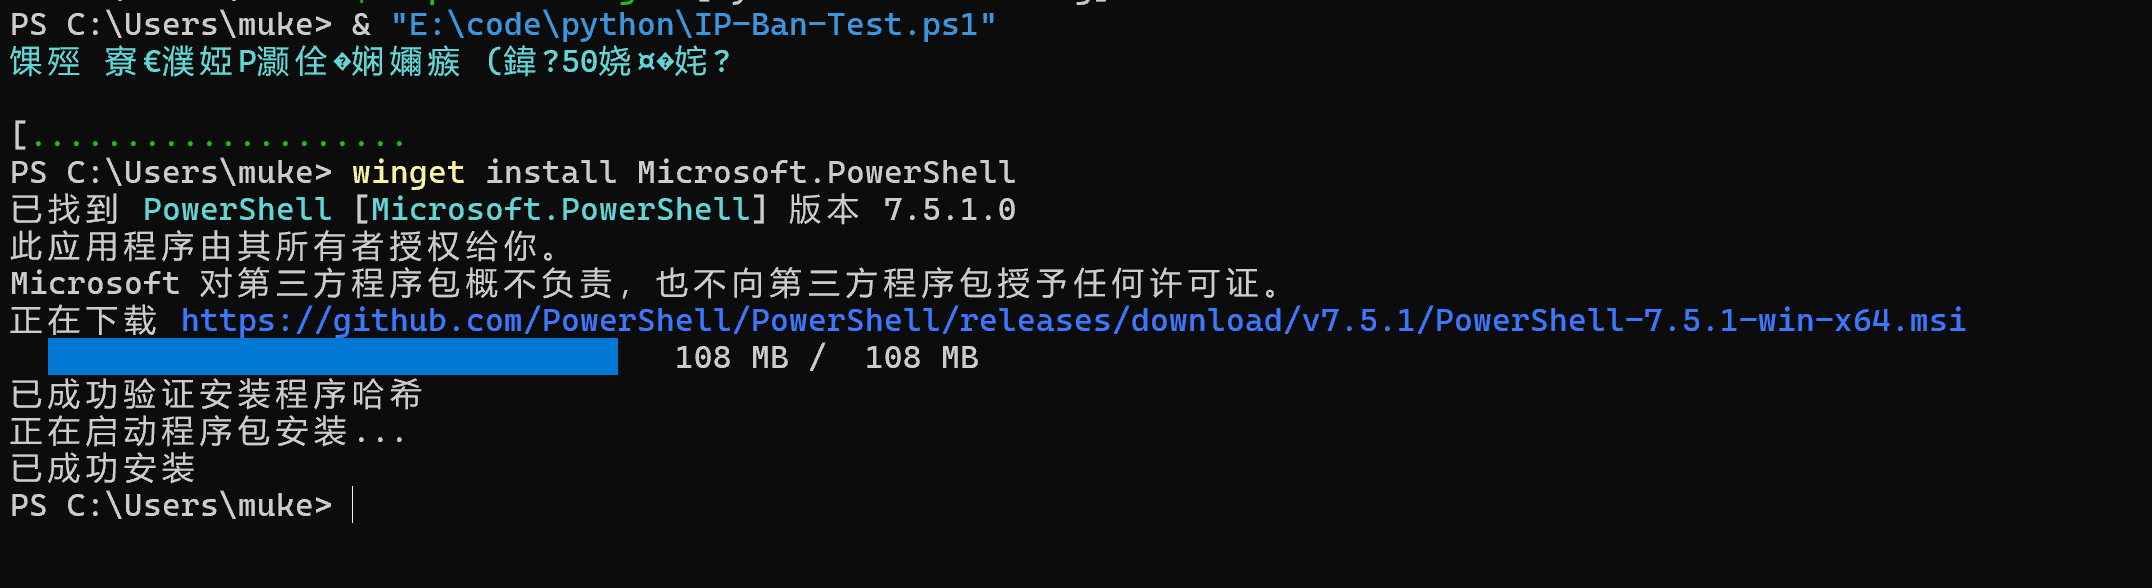
(2)如果执行中文显示乱码
-- 在当前控制台执行如下命令升级版本
winget install Microsoft.PowerShell
(3)如果更新后执行还是乱码,需要检查脚本文件自身的编码:
1. 用 VSCode 打开脚本
2. 右下角点击当前编码(如GB2312)
3. 选择"通过编码保存" > UTF-8 with BOM
- 测试脚本运行效果,可以看到我们频繁请求后便会触发拦截,后续请求都会返回 403,当前默认封禁时间为半小时,具体可以自行修改。
锦上添花
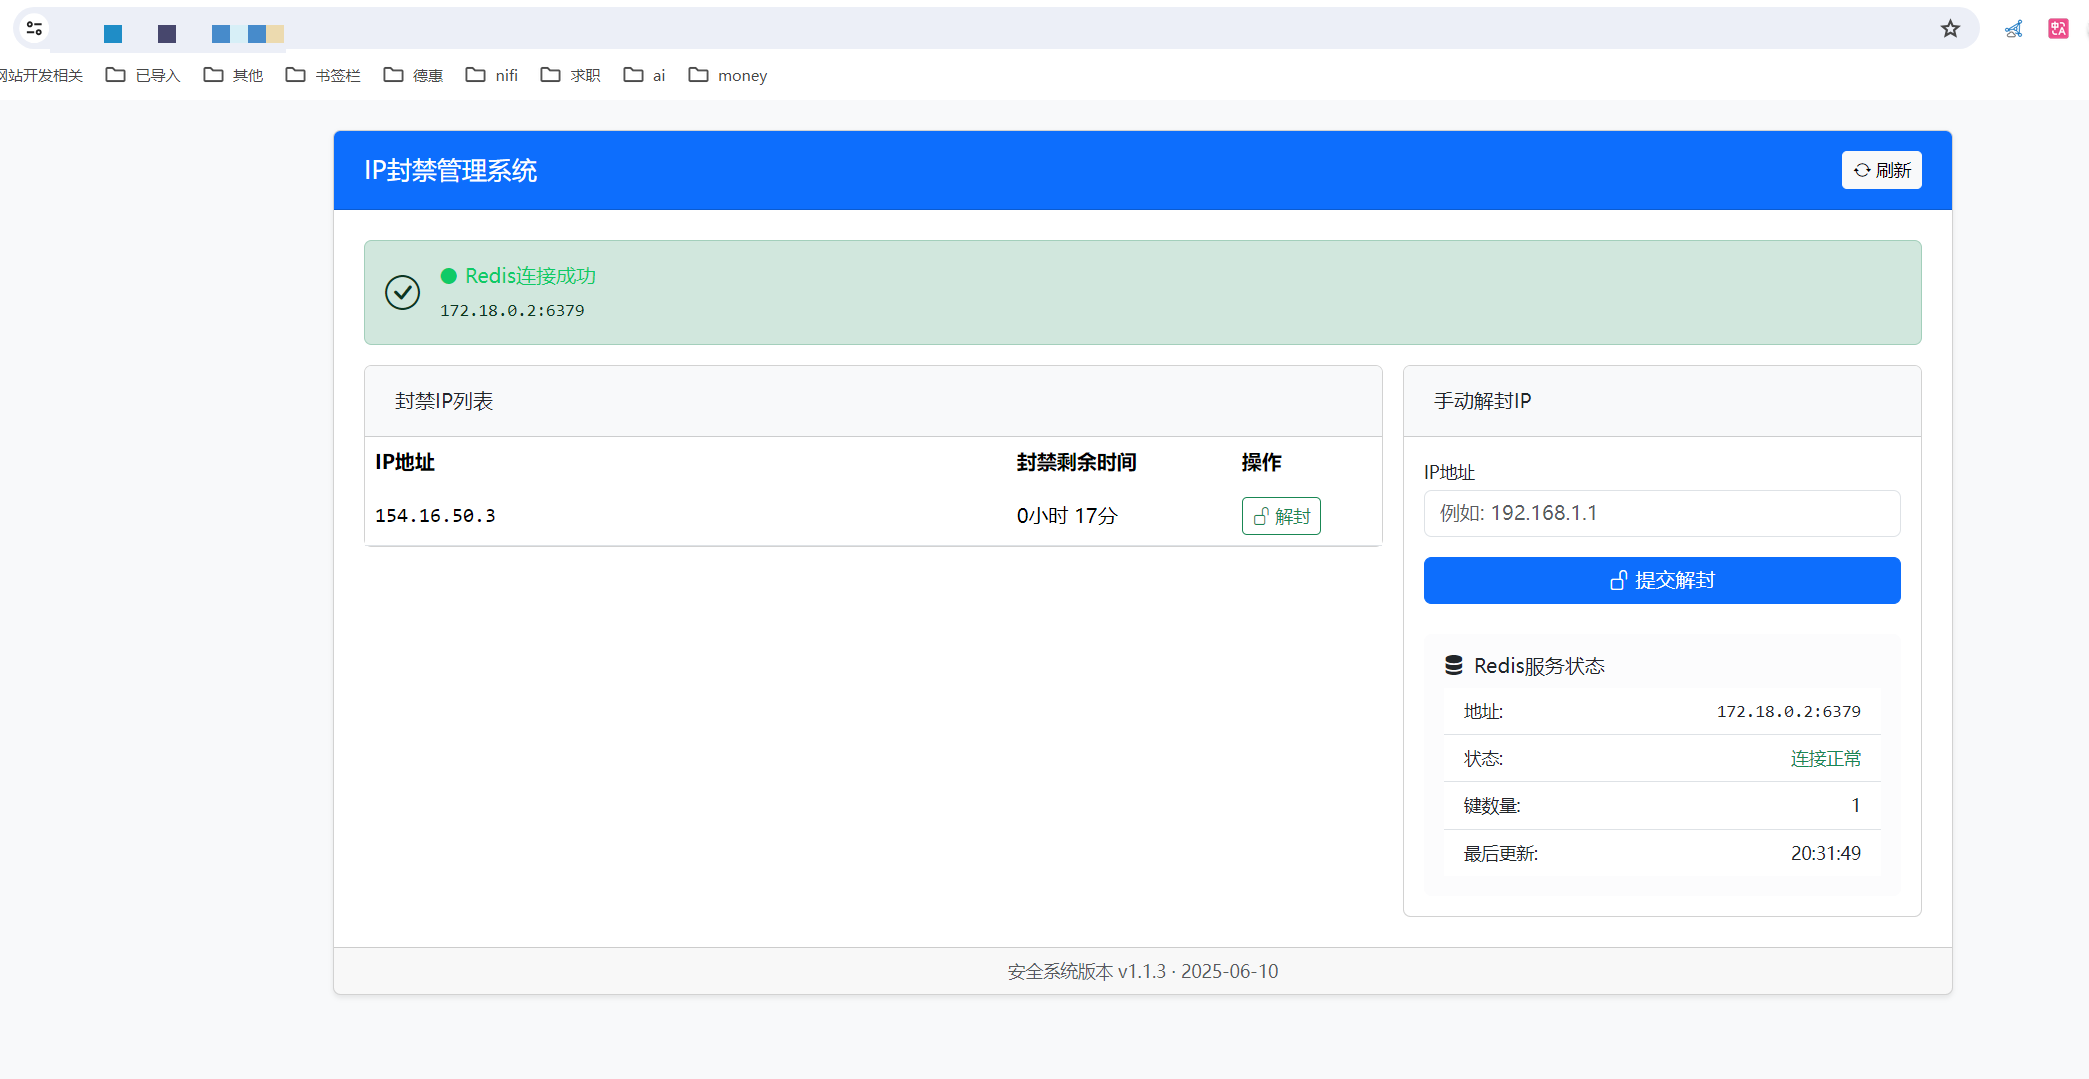
当前我们已经实现了用 Lua 脚本 + Redis 实现动态 IP 封禁,但我们不能直观的看到哪些 IP 被封禁,所以希望有一个可视化的页面展示封禁的情况。当前我能想到的有两种方案,一种是在自己的管理后台里面加一个页面,后端服务连接 Reids 查询数据并提供接口,但这样就需要开发代码,而且这个页面使用频率不会很高,成本比较大。另一种就是借助 Nginx,也就是这里的OpenResty 实现一个简单的封禁管理后台界面,下面我提供的就是这种方法,代码经过验证,可以直接复制使用。
# 自行在server下面加一个location即可# 封禁管理端点
location /admin/ip-ban {# IP访问控制 - 只允许内网访问allow 127.0.0.1;allow 172.18.0.0/16;deny all;# 安全设置set $rate_limit_enabled "0";set $ratelimit_excluded "1";# Basic认证,这里自行百度或者AI一下,需要配置并初始化用户密码的auth_basic "Admin Access Required";auth_basic_user_file /etc/nginx/auth/secure-admin.htpasswd;# 安全头add_header X-Content-Type-Options "nosniff";add_header Strict-Transport-Security "max-age=31536000; includeSubDomains";add_header Cache-Control "no-store, no-cache";# Lua处理核心content_by_lua_block {ngx.header.content_type = 'text/html; charset=utf-8'local util = require("util")ngx.say([[<!DOCTYPE html><html lang="zh-CN"><head><meta charset="utf-8"><meta name="viewport" content="width=device-width, initial-scale=1"><title>IP封禁系统管理</title><link href="https://cdn.jsdelivr.net/npm/bootstrap@5.3/dist/css/bootstrap.min.css" rel="stylesheet"><link rel="stylesheet" href="https://cdn.jsdelivr.net/npm/bootstrap-icons@1.10/font/bootstrap-icons.css"><style>body { background: #f8f9fa; }.card-header { padding: 1rem 1.5rem; }.conn-status::before{ content: "⬤"; margin-right: 6px; }.conn-up { color: #0fca66; }.conn-down { color: #dc3545; }.monospace { font-family: 'SFMono-Regular', Consolas, monospace; }tbody tr { vertical-align: middle; }</style></head><body><div class="container py-4"><div class="card shadow-sm overflow-hidden"><div class="card-header bg-primary text-white d-flex justify-content-between align-items-center"><h1 class="h5 mb-0">IP封禁管理系统</h1><button id="refreshBtn" class="btn btn-sm btn-light"><i class="bi bi-arrow-repeat"></i> 刷新</button></div><div class="card-body p-0">]])-- 连接Redis,带重试机制local red, conn_err = util.connect_redis(2)-- 错误处理区if not red thenngx.log(ngx.ERR, "Redis连接失败: ", conn_err or "未知错误")ngx.say([[<div class="alert alert-danger m-4"><div class="d-flex align-items-center"><i class="bi bi-exclamation-triangle fs-3 me-3"></i><div><h4 class="alert-heading">Redis服务连接失败</h4><p class="mb-0">错误信息: <code>]]..(conn_err or "未知错误")..[[</code></p><div class="mt-2"><p class="small mb-1">连接目标: <span class="monospace">]])ngx.say(util.REDIS_HOST, ":", util.REDIS_PORT, [[</span></p><div class="conn-status conn-down">连接状态: <strong>失败</strong></div></div></div></div></div></div></div></div><script>document.getElementById('refreshBtn').addEventListener('click', function() {window.location.reload();});</script></body></html>]])returnendngx.say([[<div class="m-4"><div class="alert alert-success"><div class="d-flex align-items-center"><i class="bi bi-check-circle fs-3 me-3"></i><div><div class="conn-status conn-up">Redis连接成功</div><div class="small mt-1"><span class="monospace">]]..util.REDIS_HOST..":"..util.REDIS_PORT..[[</span></div></div></div></div>]])-- 处理解封操作local unban_ip = ngx.unescape_uri(ngx.var.arg_ip or "") or ""if unban_ip and #unban_ip > 0 thenunban_ip = unban_ip:gsub("%s+", "") -- 清理空格local result, del_err = red:del(util.ban_key(unban_ip))if not result thenngx.say([[<div class="alert alert-danger d-flex align-items-center"><i class="bi bi-x-circle me-2"></i><span>解封失败:<code>]]..unban_ip..[[</code> - 错误: <em>]]..(del_err or "未知错误")..[[</em></span></div>]])elsengx.say([[<div class="alert alert-success d-flex align-items-center"><i class="bi bi-check-circle me-2"></i><span>已解封IP:<code>]]..unban_ip..[[</code> (操作状态: ]]..result..[[)</span></div>]])endendngx.say([[<div class="d-lg-flex"><div class="col-lg-8 pe-lg-3"><div class="card mb-4"><div class="card-header bg-light d-flex justify-content-between align-items-center"><span>封禁IP列表</span><span class="badge bg-primary"></span></div>]])-- 获取并显示封禁列表local keys, keys_err = red:keys(util.KEY_PREFIX.."ip:*")if keys_err thenngx.say([[<div class="card-body"><div class="alert alert-warning"><i class="bi bi-exclamation-circle me-1"></i>查询失败: ]]..keys_err..[[</div></div>]])elseif #keys > 0 thenngx.say([[<div class="table-responsive"><table class="table table-hover align-middle mb-0"><thead><tr><th class="border-0">IP地址</th><th class="border-0" width="180">封禁剩余时间</th><th class="border-0" width="120">操作</th></tr></thead><tbody>]])for _, key in ipairs(keys) dolocal ip = key:match("ip:(.+)$") or "N/A"local ttl = red:ttl(key) or -1local ttlText = (ttl < 0) and "永久" or (math.floor(ttl/3600) .. "小时 " .. math.floor((ttl%3600)/60).."分")ngx.say([[<tr><td><span class="monospace">]]..ip..[[</span></td><td class="text-nowrap">]]..ttlText..[[</td><td><form method="GET" class="d-inline"><input type="hidden" name="ip" value="]]..ip..[["><button type="submit" class="btn btn-outline-success btn-sm"><i class="bi bi-unlock"></i> 解封</button></form></td></tr>]])endngx.say([[</tbody></table></div>]])elsengx.say([[<div class="card-body"><div class="text-center py-4 text-muted"><i class="bi bi-check2-circle fs-1"></i><p class="mt-3 mb-0">当前没有封禁记录</p></div></div>]])endendngx.say([[</div></div><div class="col-lg-4"><div class="card"><div class="card-header bg-light">手动解封IP</div><div class="card-body"><form method="GET" class="mb-4"><div class="mb-3"><label class="form-label small mb-1">IP地址</label><input type="text" name="ip" class="form-control" placeholder="例如: 192.168.1.1" requiredvalue="]]..(unban_ip ~= "" and unban_ip or "")..[["></div><button type="submit" class="btn btn-primary w-100"><i class="bi bi-unlock"></i> 提交解封</button></form><div class="card border-0 bg-light-subtle"><div class="card-body p-3"><h6 class="d-flex align-items-center mb-2"><i class="bi bi-server me-2"></i>Redis服务状态</h6><ul class="list-group list-group-flush small"><li class="list-group-item d-flex justify-content-between"><span>地址:</span><span class="monospace">]]..util.REDIS_HOST..":"..util.REDIS_PORT..[[</span></li><li class="list-group-item d-flex justify-content-between"><span>状态:</span><span class="text-success">连接正常</span></li><li class="list-group-item d-flex justify-content-between"><span>键数量:</span><span>]]..#(keys or {})..[[</span></li><li class="list-group-item d-flex justify-content-between"><span>最后更新:</span><span class="text-nowrap">]]..os.date("%H:%M:%S")..[[</span></li></ul></div></div></div></div></div></div> <!-- /flex -->]])-- 关闭连接local keepalive_ok, keepalive_err = red:set_keepalive(10000, 100)if not keepalive_ok thenngx.log(ngx.WARN, "连接池错误: ", keepalive_err)red:close()endngx.say([[</div> <!-- m-4 --></div> <!-- /card-body --><div class="card-footer py-2 small text-center text-muted">安全系统版本 v1.1.3 · ]]..os.date("%Y-%m-%d")..[[</div></div> <!-- /card --></div> <!-- /container --><script>document.getElementById('refreshBtn').addEventListener('click', function() {window.location.reload();});</script></body></html>]])}
}
效果展示:
总结
本文介绍的开源防护方案为中小型站点提供了企业级安全能力,以不到 200 行核心代码实现了商业 WAF 的基础防护功能。其突出优势在于:
- 高效轻量:单节点可处理 2000+RPS 的检测请求
- 成本极低:仅依赖开源组件,硬件要求低
- 灵活可扩展:Lua 脚本便于二次开发
- 快速部署:1 Panel 环境 10 分钟完成部署
这正是:「轻量防护巧布防,Lua 一脚本;开源之力护全站,恶意 IP 无处藏」!
原文参见作者个人主页:专业bug开发的小站,欢迎来踩!!!