Linux ClearOS yum无法使用解决备忘
前述
一个长期未使用的系统ClearOS Linux系统,属于CentOS家族,该系统用于网络设备。现在继续使用时,发现通过yum命令无法更新或下载软件。在这里记录一下解决该问题的过程。
问题
SSL证书问题
问题描述
问题现象如下所示,执行yum命令后,提示SSL证书问题
[root@pc ~]# yum
Loaded plugins: clearcenter-marketplace, fastestmirror
ClearCenter Marketplace: fetching repositories...
ClearCenter Marketplace: <urlopen error [SSL: CERTIFICATE_VERIFY_FAILED] certificate verify failed (_ssl.c:618)>
在执行yum命令时,如果启用并配置了插件模块,则yum会在运行时加载配置的这些插件,该错误提示就是来自其中的一个插件的网络行为。错误信息字面意思就是当访问某个HTTPS的URL时,SSL证书校验失败,具体的错误可以通过抓包查看得到具体原因。
下图为通过wireshark工具抓包的结果

由抓包结果可知,当客户端(192.168.200.134)与服务器(cos7-ws1.clearsdn.com)进行TLS握手交互时,服务器返回的证书经过客户端检测为证书过期(Certificate Expired)错误,终止网络连接。所以导致上文中提到的错误信息:“urlopen error [SSL: CERTIFICATE_VERIFY_FAILED] certificate verify failed”,即证书校验失败。
将wireshark抓包得到的证书数据另存出来(如另存为ssl.crt文件),可以得到证书错误信息正是过期错误。
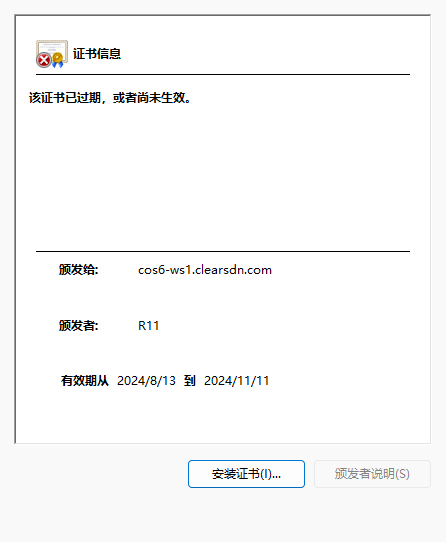
现在知道问题原因位服务器的证书过期,并且客户端校验了该证书,导致与服务器连接中断。
解决方案一
禁用客户端对证书的校验。
通过查询得到,yum插件主要使用python开发,默认插件的存放路径为“/usr/lib/yum-plugins”。找到导致问题的插件文件,禁用其对SSL证书的校验,python中禁用SSL证书检测,简单就是加入如下2行(本案中,插件文件路径为/usr/lib/yum-plugins/clearcenter-marketplace.py)。
import ssl
ssl._create_default_https_context = ssl._create_unverified_context
再次执行yum命令,不再提示“certificate verify failed”错误信息。如果服务器正常,则可以正常访问、请求服务器的数据了。
解决方案二
通过修改yum工具的配置文件,禁用插件功能。yum默认配置文件为/etc/yum.conf,打开该文件,修改其中的plugins=0。再次执行yum命令将不再加载插件,也不会有证书校验失败问题。并且yum命令启动的速度更快,因为省去了插件的加载执行时间。
[main]
http_caching=packages
cachedir=/var/cache/yum/$basearch/$releasever
keepcache=0
debuglevel=2
logfile=/var/log/yum.log
exactarch=1
obsoletes=1
gpgcheck=1
plugins=0
installonly_limit=5#
# 其它配置
#
但禁用插件功能,在ClearOS中运行yum命令时,可能存在未知的问题,目前暂未发现不好的影响。
yum更新源(repo)问题
问题描述
解决上述问题后,执行命令 yum update,出现如下错误信息
https://mirror2-amsterdam.clearos.com/clearos/7/os/x86_64/repodata/repomd.xml: [Errno 14] curl#7 - "Failed connect to mirror2-amsterdam.clearos.com :443; Connection refused"
Trying other mirror.
https://mirror2-frankfurt.clearos.com/clearos/7/os/x86_64/repodata/repomd.xml: [Errno 14] curl#7 - "Failed connect to mirror2-frankfurt.clearos.com :443; Connection refused"
Trying other mirror.
clearos | 3.7 kB 00:00:00
http://download1.clearsdn.com/centos/7.8.2003/os/x86_64/repodata/repomd.xml: [Errno 14] curl#7 - "Failed connect to download1.clearsdn.com:80; Conn ection refused"
Trying other mirror.
很明显,这里的repo服务器都拒绝了访问,复制URL到浏览器查看,也是无法访问,如下图所示

最后结论就是ClearOS关闭了其repo服务,不知为何?证书也不更新了,缺钱? 可能吧。
解决方案
既然ClearOS原有的repo源无法访问,那就只能换掉了。网上搜索看看ClearOS有没有提供新的repo源地址,没有结果。然后下载最新的ClearOS ISO安装镜像,看看里面是否提供了新的repo源地址,也是旧的repo,没有用。最后在github上找到centos7的repo源centos-7-repo。
首先备份原始的旧的repo源(虽然它们已经废了,但保持删除前备份的习惯)
[root@PC ~]# ll /etc/yum.repos.d/
total 40
-rw-r--r-- 1 root root 936 Jun 23 2020 centos-sclo-scl-rh-unverified.repo
-rw-r--r-- 1 root root 960 Jun 23 2020 centos-sclo-scl-unverified.repo
-rw-r--r-- 1 root root 2299 Aug 31 2020 centos-unverified.repo
-rw-r--r-- 1 root root 2260 Jun 23 2020 centos-unverified.repo.rpmnew
-rw-r--r-- 1 root root 2586 May 29 16:34 clearos-centos.repo
-rw-r--r-- 1 root root 438 Jun 16 2020 clearos-centos-sclo-scl-rh.repo
-rw-r--r-- 1 root root 501 May 29 16:34 clearos-epel.repo
-rw-r--r--. 1 root root 433 Oct 26 2018 clearos-fast-updates.repo
-rw-r--r--. 1 root root 2352 May 29 16:34 clearos.repo
-rw-r--r-- 1 root root 910 Jun 23 2020 epel-unverified.repo[root@PC ~]# mkdir /etc/yum.repos.d-back
[root@PC ~]# mv /etc/yum.repos.d/* /etc/yum.repos.d-back/
将centos-7-repo中的.repo文件复制到/etc/yum.repos.d中
[root@PC~]# ll /etc/yum.repos.d
total 52
-rw-r--r-- 1 root root 1260 May 30 14:47 CentOS-Base.repo
-rw-r--r-- 1 root root 1308 May 30 14:47 CentOS-CR.repo
-rw-r--r-- 1 root root 644 May 30 14:47 CentOS-Debuginfo.repo
-rw-r--r-- 1 root root 312 May 30 14:47 CentOS-fasttrack.repo
-rw-r--r-- 1 root root 628 May 30 14:47 CentOS-Media.repo
-rw-r--r-- 1 root root 1326 May 30 14:47 CentOS-Sources.repo
-rw-r--r-- 1 root root 8514 May 30 14:47 CentOS-Vault.repo
-rw-r--r-- 1 root root 614 May 30 14:47 CentOS-x86_64-kernel.repo
-rw-r--r-- 1 root root 1357 May 30 14:47 epel.repo
-rw-r--r-- 1 root root 1456 May 30 14:47 epel-testing.repo
-rw-r--r-- 1 root root 743 May 30 14:47 README.md
清理yum缓存
[root@PC~]# yum clean all
更新yum
[root@PC~]# yum update


更新完成后,就可以愉快的使用了yum了!