【JavaWeb】Maven、Servlet、cookie/session
目录
- 5. Maven
- 6. Servlet
- 6.1 Servlet 简介
- 6.2 HelloServlet
- 6.3 Servlet原理
- 6.4 Mapping( **<font style="color:rgb(44, 44, 54);">映射 ** )问题
- 6.5 ServletContext
- 6.6 HttpServletResponse
- <font style="color:rgb(232, 62, 140);background-color:rgb(246, 246, 246);">常见应用
- 6.7 HttpServletRequest
- 7. cookie/session
- 7.1 会话
- 7.2 保存会话的两种技术
- 7.3 Cookie
- 7.4 Session (重点)
5. Maven
Maven是一个强大的项目管理和理解工具,主要用于Java项目的构建、依赖管理和文档生成。以下是Maven的简明概述:
- 核心概念:POM(Project Object Model),它是一个XML文件,包含了项目的配置信息,如依赖、构建目标等。
- 依赖管理:自动处理项目依赖的库,通过中央仓库或自定义仓库下载所需的JAR包,并解决版本冲突。
- 构建生命周期:定义了构建过程的标准阶段,包括验证、编译、测试、打包、集成测试、验证、部署等。
- 插件支持:提供了多种插件来扩展其功能,比如编译代码、创建Javadoc以及运行单元测试等。
- 多模块项目:支持复杂项目的分模块构建,方便大型项目的维护和管理。
Maven通过提供统一的构建系统、**约定优于配置 **的原则以及强大的依赖管理能力,极大地简化了Java项目的开发流程。
- Maven项目的标准结构:
myproject/
├── src/
│   ├── main/
│   │   ├── java/         ← Java 源代码
│   │   └── resources/    ← 资源文件(如 .properties, XML 等)
│   └── test/
└── pom.xml
6. Servlet
6.1 Servlet 简介
- Servlet就是sun公司开发动态web的一门技术。
- Sun在这些API中提供一个接口叫做:
Servlet,如果你想开发一个Servlet程序,只需要完成两个小步骤:- 编写一个类,实现
Servlet接口; - 把开发好的Java类部署到web服务器中。
把实现了Servlet接口Java程序叫做Servlet
- 编写一个类,实现
6.2 HelloServlet
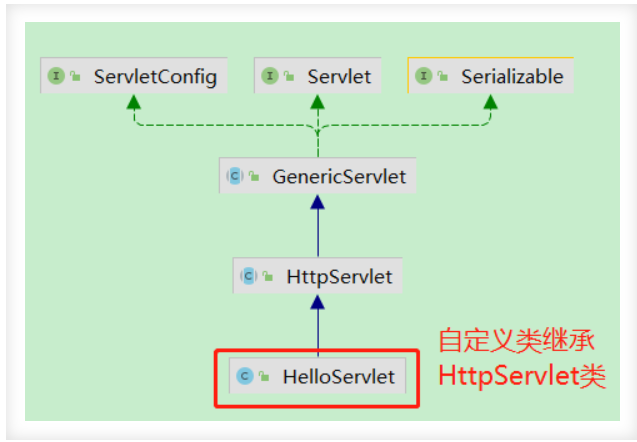
Serlvet接口Sun公司有两个默认的实现类: HttpServlet, GenericServlet,如图所示, HttpServlet 继承自 GenericServlet ,我们手写一个servlet就需要继承自 HttpServlet 。
- 构建一个普通的Maven项目,删掉里面的src目录,在这个项目里面建立Moudel;
这个空的工程就是Maven主工程;
- 关于Maven父子工程的理解:
父工程中会有:
<modules><module>servlet-01</module>
</modules>
子项目中会有:
<parent><groupId>org.example</groupId><artifactId>javaweb-servlet</artifactId><version>1.0-SNAPSHOT</version>
</parent>
父项目中的jar包依赖,子项目可以直接使用,反过来则不可以,这就是 继承 。
- Maven环境优化
- 编写一个Servlet程序
- 编写一个普通的类
HelloServlet - 我们实现Servlet接口,这里我们直接继承
HttpServlet类
- 编写一个普通的类
public class HelloServlet extends HttpServlet {@Overrideprotected void doGet(HttpServletRequest req, HttpServletResponse resp) throws ServletException, IOException {System.out.println("hello servlet");PrintWriter writer = resp.getWriter();writer.println("Hello Servlet");}@Overrideprotected void doPost(HttpServletRequest req, HttpServletResponse resp) throws ServletException, IOException {this.doGet(req,resp);}
}
- 编写Servlet的映射
为什么需要映射 :我们写的是Java程序,但是要通过浏览器访问,而浏览器需要连接web服务器,所以我们需要在web服务中注册我们写的Servlet,还需给他一个浏览器能够访问的路径。
<!--注册servlet-->
<servlet><servlet-name>helloservlet</servlet-name><servlet-class>com.sunyiwenlong.servlet.HelloServlet</servlet-class>
</servlet>
<!--servlet请求路径-->
<servlet-mapping><servlet-name>helloservlet</servlet-name><url-pattern>/hello</url-pattern>
</servlet-mapping>
- 配置tomcat
注意:配置项目发布路径就可以了 - 启动测试
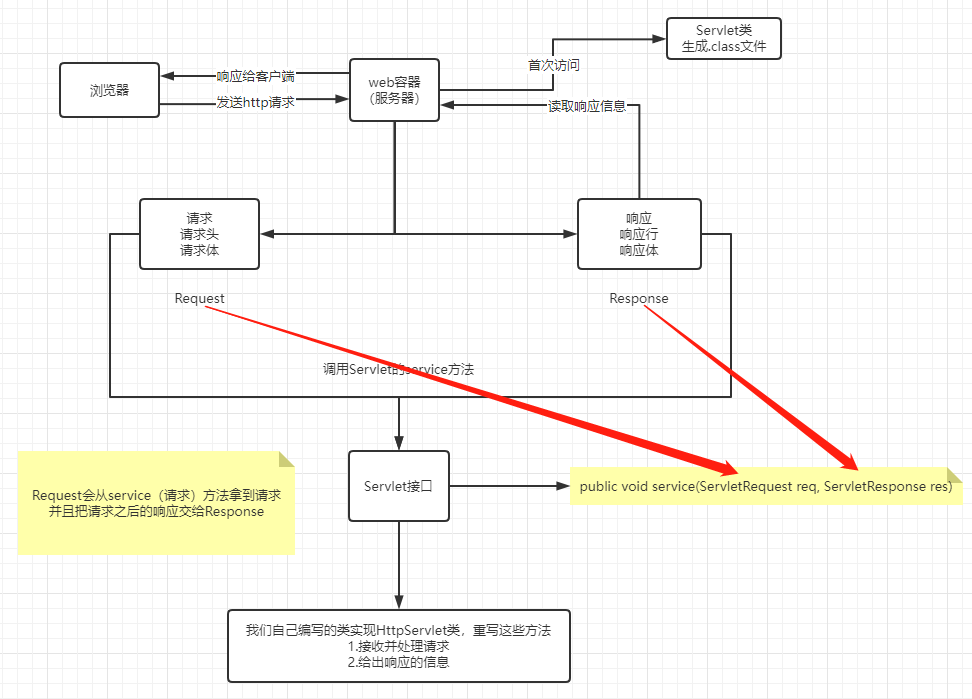
6.3 Servlet原理
6.4 Mapping( **映射 ** )问题
<project><modelVersion>4.0.0</modelVersion><groupId>com.example</groupId><artifactId>my-web-app</artifactId><version>1.0-SNAPSHOT</version><packaging>war</packaging><dependencies><!-- Servlet API --><dependency><groupId>javax.servlet</groupId><artifactId>javax.servlet-api</artifactId><version>4.0.1</version><scope>provided</scope></dependency><!-- JSP API --><dependency><groupId>javax.servlet.jsp</groupId><artifactId>jsp-api</artifactId><version>2.3.3</version><scope>provided</scope></dependency><!-- Spring MVC 示例 --><dependency><groupId>org.springframework</groupId><artifactId>spring-webmvc</artifactId><version>5.3.20</version></dependency>
</dependencies><build><finalName>mywebapp</finalName><plugins><!-- 编译插件 --><plugin><groupId>org.apache.maven.plugins</groupId><artifactId>maven-compiler-plugin</artifactId><version>3.8.1</version><configuration><source>1.8</source><target>1.8</target></configuration></plugin><!-- WAR 插件 --><plugin><groupId>org.apache.maven.plugins</groupId><artifactId>maven-war-plugin</artifactId><version>3.2.3</version><configuration><failOnMissingWebXml>false</failOnMissingWebXml></configuration></plugin></plugins>
</build></project>- 一个Servlet可以指定一个映射路径
"/hello"
@WebServlet("/hello")
public class HelloServlet extends HttpServlet {protected void doGet(HttpServletRequest req, HttpServletResponse resp) {// 处理逻辑}
}
- 一个Servlet可以指定多个映射路径
{"/hello", "/hi", "/greeting"}
@WebServlet({"/hello", "/hi", "/greeting"})
public class HelloServlet extends HttpServlet {protected void doGet(HttpServletRequest req, HttpServletResponse resp) {// 多个路径都能访问到这个 Servlet}
}
- 一个Servlet可以指定通用映射路径
"/user/*"
@WebServlet("/user/*")
public class UserServlet extends HttpServlet {protected void doGet(HttpServletRequest req, HttpServletResponse resp) {// 所有以 /user/ 开头的请求都会进入该 Servlet}
}
- 指定一些后缀或者前缀等等…
@WebServlet("*.do")
public class ActionServlet extends HttpServlet {protected void doGet(HttpServletRequest req, HttpServletResponse resp) {// 所有以 .do 结尾的请求都进入此 Servlet}
}
@WebServlet("/api/*")
public class ApiServlet extends HttpServlet {protected void doGet(HttpServletRequest req, HttpServletResponse resp) {// 所有 /api/ 开头的请求进入此 Servlet}
}
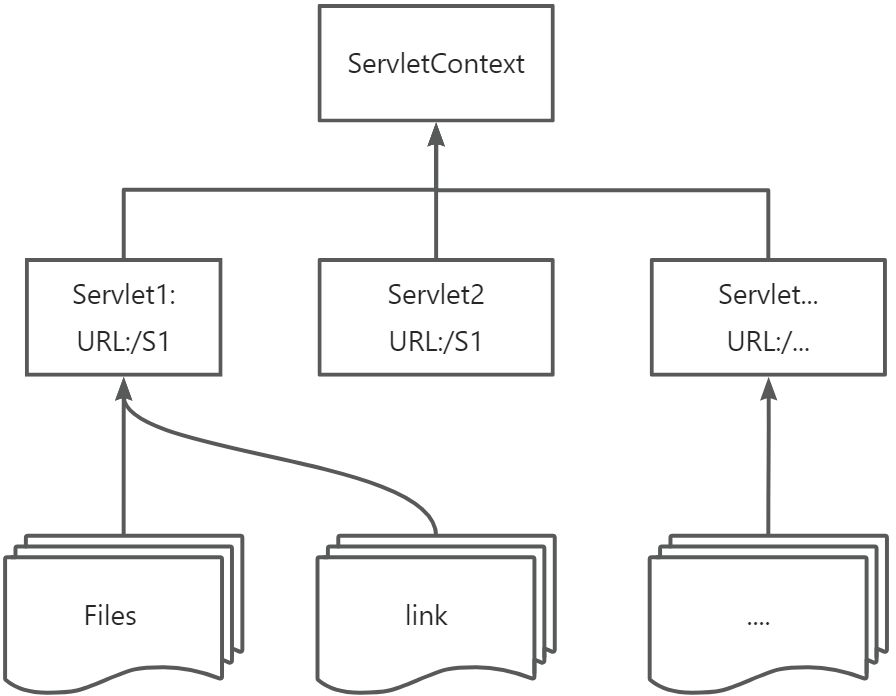
6.5 ServletContext
ServletContext 是 Java Web 开发中一个非常核心的接口,属于 Servlet API 的一部分。每个 Web 应用在服务器启动时都会创建一个唯一的 ServletContext 实例。
Q:可以自己手动 new 一个 ServletContext 对象?
A:不能直接 new 创建 ServletContext
Q:why?
A:ServletContext 是 由 Web 容器(如 Tomcat、Jetty)在启动 Web 应用时自动创建的,它是整个 Web 应用的运行环境对象。
Q:那我们怎么获取它?
A:在 Servlet 、Listener、JSP中获取;
web容器在启动的时候,它会为每个web程序都创建一个对应的 ServletContext 对象,它代表了当前的web应用。
- 共享数据:在这个Servlet中保存的数据,可以在另一个Servlet中拿到
1. 在 Servlet 中获取 `ServletContext`,将一个数据保存在了`ServletContext`中
public class HelloServlet extends HttpServlet {@Overrideprotected void doGet(HttpServletRequest req, HttpServletResponse resp) throws ServletException, IOException {// this.getInitParameter(); 获取初始化参数(web.xml文件中的初始化参数)// this.getServletConfig(); 获取servlet的配置(web.xml文件中的配置)// this.getServletContext(); 获取servlet上下文ServletContext context = this.getServletContext();String username = "张三";context.setAttribute("username",username);// 将一个数据保存在了ServletContext中}
}
// 在 Listener 中获取getServletContext
public class MyListener implements HttpSessionListener {public void sessionCreated(HttpSessionEvent se) {ServletContext context = se.getSession().getServletContext();}
}
2. 将保存在context的数据响应出来。
public class GetServlet extends HttpServlet {@Overrideprotected void doGet(HttpServletRequest req, HttpServletResponse resp) throws ServletException, IOException {ServletContext context = this.getServletContext();String username = (String) context.getAttribute("username");resp.setContentType("text/html");resp.setCharacterEncoding("utf-8");resp.getWriter().println("名字"+username);}@Overrideprotected void doPost(HttpServletRequest req, HttpServletResponse resp) throws ServletException, IOException {this.doGet(req,resp);}
}
3. 配置URL地址映射
<!-- // web.xml文件 -->
<?xml version="1.0" encoding="UTF-8"?>
<web-app version="2.4"xmlns="http://java.sun.com/xml/ns/j2ee"xmlns:xsi="http://www.w3.org/2001/XMLSchema-instance"xsi:schemaLocation="http://java.sun.com/xml/ns/j2ee http://java.sun.com/xml/ns/j2ee/web-app_2_4.xsd"><servlet><servlet-name>helloservlet1</servlet-name><servlet-class>com.sunyiwenlong.servlet.HelloServlet</servlet-class></servlet><servlet-mapping><servlet-name>helloservlet1</servlet-name><url-pattern>/hello</url-pattern></servlet-mapping><servlet><servlet-name>getservlet</servlet-name><servlet-class>com.sunyiwenlong.servlet.GetServlet</servlet-class></servlet><servlet-mapping><servlet-name>getservlet</servlet-name><url-pattern>/getc</url-pattern></servlet-mapping>
</web-app>
1. <font style="color:rgba(0, 0, 0, 0.85);">也可以通过注解配置地址映射 :: Servlet 3.0+ 规范
-
获取初始化参数
-
配置web应用中的基本参数
<!-- web.xml文件 -->
<!--配置一些web应用一些初始化参数-->
<context-param><param-name>url</param-name><param-value>jdbc:mysql://localhost:3306/mybatis</param-value>
</context-param>
- 实现
ServletDemo03的Post和Get的逻辑
public class ServletDemo03 extends HttpServlet {@Overrideprotected void doGet(HttpServletRequest req, HttpServletResponse resp) throws ServletException, IOException {String url = this.getInitParameter("url");resp.getWriter().println(url);}@Overrideprotected void doPost(HttpServletRequest req, HttpServletResponse resp) throws ServletException, IOException {this.doGet(req, resp);}
}
-
请求转发
-
配置相关URL映射的地址
// web.xml文件
// 请求sd4
<servlet><servlet-name>gp</servlet-name><servlet-class>com.sunyiwenlong.servlet.ServletDemo03</servlet-class>
</servlet>
<servlet-mapping><servlet-name>gp</servlet-name><url-pattern>/gp</url-pattern>
</servlet-mapping><servlet><servlet-name>sd4</servlet-name><servlet-class>com.sunyiwenlong.servlet.ServletDemo04</servlet-class>
</servlet>
<servlet-mapping><servlet-name>sd4</servlet-name><url-pattern>/sd4</url-pattern>
</servlet-mapping>
/sd4请求 找到ServletDemo04,ServletDemo04逻辑块中进行请求 转发到/gp,到/gp的页面,/gp找到ServletDemo03。
// 请求/sd4找到ServletDemo04,ServletDemo04进行请求转发到/gp,到/gp的页面
// (浏览器路径是sd4的路径,页面拿到的是/gp的数据)
public class ServletDemo04 extends HttpServlet {@Overrideprotected void doGet(HttpServletRequest req, HttpServletResponse resp) throws ServletException, IOException {ServletContext context = this.getServletContext();System.out.println("进入了demo04");// RequestDispatcher requestDispatcher = context.getRequestDispatcher("/gp");// 转发的路径// requestDispatcher.forward(req,resp);// 调用forward请求转发context.getRequestDispatcher("/gp").forward(req,resp);}@Overrideprotected void doPost(HttpServletRequest req, HttpServletResponse resp) throws ServletException, IOException {this.doGet(req, resp);}
}
- 读取资源文件
Properties
- 在
src/main/java目录下新建properties - 在
src/main/resources目录下新建properties - 最后都被打包到了同一个路径下:
target/classes,我们俗称这个路径为classpath。
- 实现一个文件流,读取
properties
public class ServletDemo05 extends HttpServlet {@Overrideprotected void doGet(HttpServletRequest req, HttpServletResponse resp) throws ServletException, IOException {InputStream stream = this.getServletContext().getResourceAsStream("/WEB-INF/CLASSES/db.properties");Properties properties = new Properties();properties.load(stream);String username = properties.getProperty("username");String password = properties.getProperty("password");resp.getWriter().println(username+":"+password);}@Overrideprotected void doPost(HttpServletRequest req, HttpServletResponse resp) throws ServletException, IOException {this.doGet(req, resp);}
}
- 用例图解析:
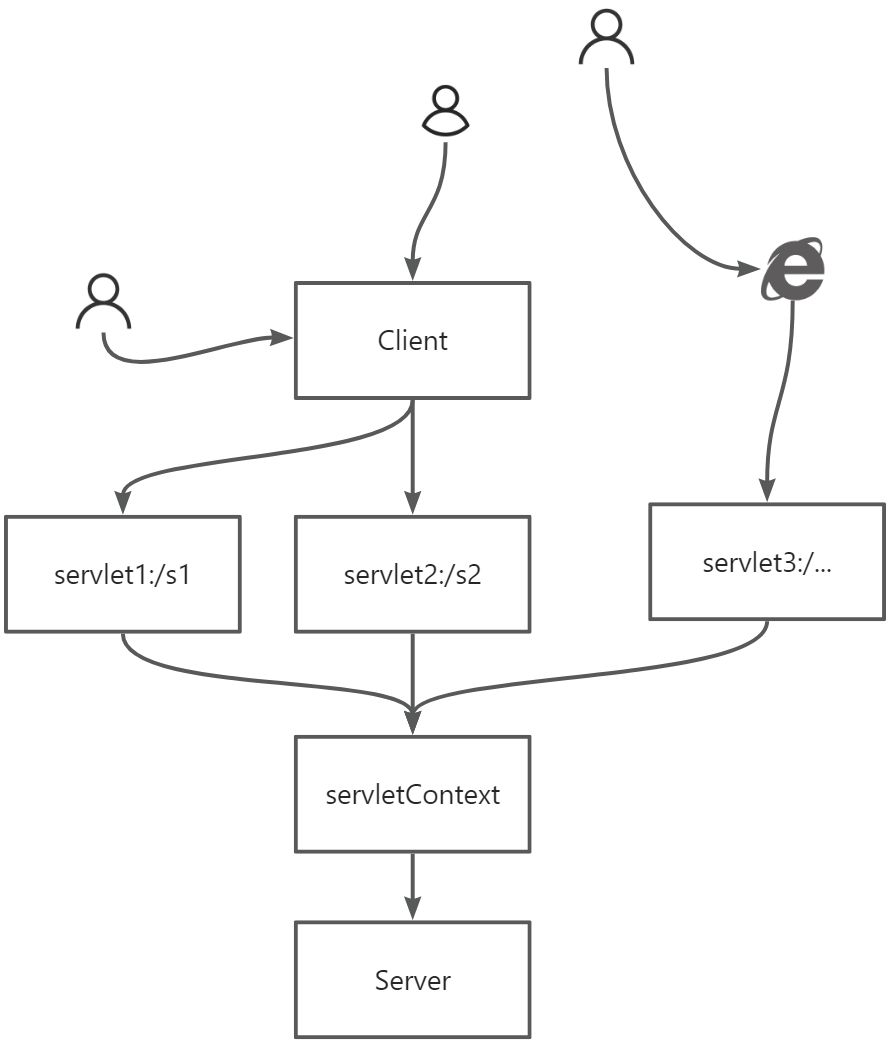
在一个Web应用中,客户端通过请求与服务器上的多个Servlet交互,ServletContext在其中扮演的角色是提供一个全局的数据共享空间。
重点理解:
ServletContext是所有Servlet都能访问的全局上下文,用于在应用范围内共享数据;而HttpSession则是针对单个用户的会话管理,用于保存用户相关的临时数据。
6.6 HttpServletResponse
web服务器接收到客户端的http请求,针对这个请求,分别创建一个代表请求的 HttpServletRequest 对象,代表响应的一个 HttpServletResponse ;
- 如果要获取客户端请求过来的参数:找
HttpServletRequest - 如果要给客户端响应一些信息:找
HttpServletResponse
- 负责向浏览器发送数据的方法
public ServletOutputStream getOutputStream() throws IOException;
public PrintWriter getWriter() throws IOException;
- 响应的状态码
public static final int SC_CONTINUE = 100;
/*** Status code (200) indicating the request succeeded normally.*/
public static final int SC_OK = 200;/*** Status code (302) indicating that the resource has temporarily* moved to another location, but that future references should* still use the original URI to access the resource.** This definition is being retained for backwards compatibility.* SC_FOUND is now the preferred definition.*/
public static final int SC_MOVED_TEMPORARILY = 302;/*** Status code (302) indicating that the resource reside* temporarily under a different URI. Since the redirection might* be altered on occasion, the client should continue to use the* Request-URI for future requests.(HTTP/1.1) To represent the* status code (302), it is recommended to use this variable.*/
public static final int SC_FOUND = 302;/*** Status code (304) indicating that a conditional GET operation* found that the resource was available and not modified.*/
public static final int SC_NOT_MODIFIED = 304;/*** Status code (404) indicating that the requested resource is not* available.*/
public static final int SC_NOT_FOUND = 404;/*** Status code (500) indicating an error inside the HTTP server* which prevented it from fulfilling the request.*/
public static final int SC_INTERNAL_SERVER_ERROR = 500;/*** Status code (502) indicating that the HTTP server received an* invalid response from a server it consulted when acting as a* proxy or gateway.*/
public static final int SC_BAD_GATEWAY = 502;// ...
常见应用
- 向浏览器输出消息的
- 下载文件 实现方式
public class FileServlet extends HttpServlet {@Overrideprotected void doGet(HttpServletRequest req, HttpServletResponse resp) throws ServletException, IOException {// 1.要获取下载文件的路径 :\转义字符String realPath = "E:\\dev\\StudyProjects\\javaweb-servlet\\response\\src\\main\\resources\\大乔.jpg";// 2.下载的文件名是啥?String filename = realPath.substring(realPath.lastIndexOf("\\") + 1);// 3.设置想办法让浏览器能够支持下载我们需要的东西resp.setHeader("Content-disposition","attachment;filename="+ URLEncoder.encode(filename,"utf-8"));// 4.获取下载文件的输入流FileInputStream in = new FileInputStream(realPath);// 5.创建缓冲区int len = 0;byte[] buffer = new byte[1024]; // 每次读取的长度// 6.获取OutputStream对象ServletOutputStream out = resp.getOutputStream();// 7.将FileOutputStream流写入到bufer缓冲区while ((len = in.read(buffer))>0){// 每次读取的长度大于0的情况下,就写出去out.write(buffer,0,len);// 写出字节,从0写到len}// 8.使用OutputStream将缓冲区中的数据输出到客户端!in.close();out.close();}@Overrideprotected void doPost(HttpServletRequest req, HttpServletResponse resp) throws ServletException, IOException {this.doGet(req, resp);}
}
- 验证码功能 实现方式
public class ImageServlet extends HttpServlet {@Overrideprotected void doGet(HttpServletRequest req, HttpServletResponse resp) throws ServletException, IOException {// 让浏览器3秒刷新一次resp.setHeader("refresh", "3");// 在内存中创建一个图片BufferedImage image = new BufferedImage(80, 20, BufferedImage.TYPE_INT_RGB);// 宽、高、颜色// 得到图片Graphics2D g = (Graphics2D) image.getGraphics();// 得到一只2D的笔// 设置图片的背景颜色g.setColor(Color.white);g.fillRect(0, 0, 80, 20);// 填充颜色// 换个背景颜色g.setColor(Color.BLUE);// 设置字体样式:粗体,20g.setFont(new Font(null,Font.BOLD,20));// 画一个字符串(给图片写数据)g.drawString(makeNum(),0,20);// 告诉浏览器,这个请求用图片的方式打开resp.setContentType("image/jpeg");// 网站存在缓存,不让浏览器缓存resp.setDateHeader("expires",-1);resp.setHeader("Cache-Control","no-cache");resp.setHeader("Pragma","no-cache");// 把图片写给浏览器boolean write = ImageIO.write(image, "jpg",resp.getOutputStream());}// 生成随机数private String makeNum() {Random random = new Random();String num = random.nextInt(9999999) + "";// 随机数,最大七位,[0,9999999)StringBuffer sb = new StringBuffer();for (int i = 0; i < 7 - num.length(); i++) {// 不足七位,则添加0sb.append("0");}num = sb.toString()+num;// 不足七位,在随机数前面添加0return num;}@Overrideprotected void doPost(HttpServletRequest req, HttpServletResponse resp) throws ServletException, IOException {this.doGet(req, resp);}
}
- 实现 请求重定向
public class RedirectServlet extends HttpServlet {@Overrideprotected void doGet(HttpServletRequest req, HttpServletResponse resp) throws ServletException, IOException {/*resp.setHeader("Location","/response_war/image");resp.setStatus(HttpServletResponse.SC_NOT_MODIFIED);*/resp.sendRedirect("/response_war/image");// 重定向相当于上面两行代码}@Overrideprotected void doPost(HttpServletRequest req, HttpServletResponse resp) throws ServletException, IOException {this.doGet(req, resp);}
}
6.7 HttpServletRequest
HttpServletRequest 代表客户端的请求,用户通过 Http 协议访问服务器,HTTP请求中的所有信息会被封装到 HttpServletRequest ,通过这个 HttpServletRequest 的方法,获得客户端的所有信息。
- 获取前端传递的参数
getParameter(String name)| 获取指定名称的请求参数值(GET 或 POST 表单)
String username = request.getParameter("username");
String password = request.getParameter("password");
getParameterValues(String name)| 用于获取多个值的参数(如多选框)
String[] hobbies = request.getParameterValues("hobby");
if (hobbies != null) {for (String hobby : hobbies) {System.out.println("兴趣爱好:" + hobby);}
}
getParameterMap()| 返回所有参数的 Map 形式,键为参数名,值为字符串数组(适合处理复杂表单)
Map<String, String[]> parameterMap = request.getParameterMap();
for (Map.Entry<String, String[]> entry : parameterMap.entrySet()) { //使用foreach语句循环使用System.out.println(entry.getKey() + " = " + Arrays.toString(entry.getValue()));
}
getInputStream()/getReader()| 适用于接收 JSON、XML 等原始请求体内容(常用于前后端分离项目)
StringBuilder jsonBody = new StringBuilder();
BufferedReader reader = request.getReader();
String line;while ((line = reader.readLine()) != null) {jsonBody.append(line);
}System.out.println("接收到的JSON:" + jsonBody.toString());
注意:你需要使用 JSON 解析库(如 Jackson、Gson)来解析这个字符串。
- 获取路径参数(RESTful 风格) :
request.getPathInfo()
@WebServlet("/user/*")
public class UserServlet extends HttpServlet {protected void doGet(HttpServletRequest request, HttpServletResponse response) {String pathInfo = request.getPathInfo(); // 如:/user/123 → 返回 "/123"if (pathInfo != null && pathInfo.length() > 1) {String userId = pathInfo.substring(1); // 去掉开头斜杠System.out.println("用户ID:" + userId);}}
}
- 完整代码如下:
protected void doPost(HttpServletRequest request, HttpServletResponse response)throws ServletException, IOException {// 获取普通参数String username = request.getParameter("username");String password = request.getParameter("password");// 获取多选参数String[] hobbies = request.getParameterValues("hobby");// 获取所有参数(Map)Map<String, String[]> parameterMap = request.getParameterMap();// 输出参数System.out.println("用户名:" + username);System.out.println("密码:" + password);if (hobbies != null) {for (String hobby : hobbies) {System.out.println("兴趣:" + hobby);}}// 处理 JSON 数据(如果需要)if ("application/json".equals(request.getContentType())) {BufferedReader reader = request.getReader();StringBuilder json = new StringBuilder();String line;while ((line = reader.readLine()) != null) {json.append(line);}System.out.println("JSON 内容:" + json);}
}
- 请求 转发
前端:
<%@ page contentType="text/html;charset=UTF-8" language="java" %><html><head><title>首页</title></head><body><form action="${pageContext.request.contextPath}/login" method="post">用户名:<input type="text" name="username"><br>密码:<input type="password" name="password"><br>爱好:<input type="checkbox" name="hobbys" value="代码"> 代码<input type="checkbox" name="hobbys" value="唱歌"> 唱歌<input type="checkbox" name="hobbys" value="女孩"> 女孩<input type="checkbox" name="hobbys" value="电影"> 电影<br><input type="submit" name="提交"></form></body></html>
后端:
public class LoginServlet extends HttpServlet {@Overrideprotected void doGet(HttpServletRequest req, HttpServletResponse resp) throws ServletException, IOException {this.doPost(req, resp);}@Overrideprotected void doPost(HttpServletRequest req, HttpServletResponse resp) throws ServletException, IOException {// 处理请求中文乱码(后期可以使用过滤器来解决)req.setCharacterEncoding("utf-8");resp.setCharacterEncoding("utf-8");String username = req.getParameter("username");	 // 用户String password = req.getParameter("password");	 // 密码String[] hobbys = req.getParameterValues("hobbys"); // 爱好System.out.println(username);System.out.println(password);System.out.println(Arrays.toString(hobbys));// 这里的 / 代表当前的web应用,所以不需要再加上/request_war这个上下文路径了,否则会出现404错误 转发req.getRequestDispatcher("/success.jsp").forward(req,resp);}
}
web.xml
<servlet><servlet-name>login</servlet-name><servlet-class>com.sunyiwenlong.request.LoginServlet</servlet-class>
</servlet><servlet-mapping><servlet-name>login</servlet-name><url-pattern>/login</url-pattern>
</servlet-mapping>
这个 web.xml 配置定义了一个名为 login 的Servlet及其URL映射,对应的Java代码实现了基本的登录处理逻辑,包括获取请求参数和返回响应
面试题:请你聊聊 重定向 和 转发 的区别?
相同点:页面都会实现跳转
不同点:
请求转发的时候,URL地址栏不会产生变化。
- 适合服务器内部跳转 。
- 状态码:
307(临时重定向)RequestDispatcher.forward()
protected void doGet(HttpServletRequest request, HttpServletResponse response) throws ServletException, IOException {// 设置属性request.setAttribute("message", "这是转发时携带的消息");// 获取 RequestDispatcher 并转发RequestDispatcher dispatcher = request.getRequestDispatcher("/target.jsp");dispatcher.forward(request, response);
}
重定向时候,URL地址栏会发生变化。
- 跳转到外部网站。
- 状态码:302 ,301(永久重定向)
HttpServletResponse.sendRedirect()
protected void doGet(HttpServletRequest request, HttpServletResponse response) throws IOException {// 重定向到另一个路径response.sendRedirect("http://example.com");  // 也可以是相对路径:"/myapp/target.jsp"
}
7. cookie/session
7.1 会话
无状态的会话:用户打开一个浏览器,点击了很多超链接,访问多个web资源,关闭浏览器,这个过程可以称之为会话。
有状态的会话:一个用户打开一个浏览器,访问某些资源(网站),下次再来访问该资源(网站),我们会知道这个用户曾经来过,称之为有状态会话;
一个网站,怎么证明你来过?
- 服务端给客户端一个信件,客户端下次访问服务端带上信件就可以了;cookie(客户端)
- 服务器登记你来过了,下次你来的时候我来匹配你;session(服务端)
7.2 保存会话的两种技术
cookie:客户端技术,(响应、请求)
session:服务端技术,利用这个技术,可以保存用户的会话信息?我们可以把信息或者数据放在Session中。
用户登录↓
服务器创建 Session 并保存用户信息↓
服务器生成 JSESSIONID 并写入 Cookie↓
客户端保存 Cookie↓
后续请求携带 Cookie 到服务器↓
服务器根据 JSESSIONID 找到对应的 Session↓
继续处理用户逻辑
7.3 Cookie
- 从请求中拿到cookie
- 服务器响应给客户端cookie
Cookie[] cookies = req.getCookies();// 获得cookie
cookie.getName();// 获得cookie中的key
cookie.getValue();// 获得cookie中的value
new Cookie("lastLoginTime",System.currentTimeMills()+"");// 新建一个cookie
cookie.setMaxAge(24*60*60);// 设置cookie的有效期,单位:秒
resp.addCookie(cookie);// 响应给客户端一个cookie
Q: cookie:一般会保存在本地的用户目录下appdata,一个网站cookie是否存在上限!聊聊细节问题
- 一个Cookie只能保存一个信息;
- 一个web站点可以给浏览器发送多个cookie,最多存放20个cookie;
- Cookie大小有限制4kb
- 300个cookie浏览器上限
删除cookie
- 不设置有效期,关闭浏览器,自动失效
- 设置有效期时间为 0
编码解码,怎么解决中文乱码问题
URLEncoder.encode("张三","UTF-8")
URLDecoder.decode("张三","UTF-8")
保存上一次登录时间** 实现方式 **
// 保存用户上一次访问的时间
public class CookieDemo01 extends HttpServlet {@Overrideprotected void doGet(HttpServletRequest req, HttpServletResponse resp) throws ServletException, IOException {// 服务器告诉你,你来的时间,把这个时间封装成一个信息,你下次带来,我就知道你上次来的时间// 解决中文乱码req.setCharacterEncoding("utf-8");resp.setCharacterEncoding("utf-8");PrintWriter out = resp.getWriter();// Cookie,服务器端从客户端获取cookieCookie[] cookies = req.getCookies();// 数组,说明cookie可以有多个// 判断cookie是否if (cookies != null) {out.write("你上一次登录的时间是:");for (int i = 0; i < cookies.length; i++) {// 获取cookie的名字if (cookies[i].getName().equals("lastLoginTime")) {// 获取cookie的值long l = Long.parseLong(cookies[i].getValue());Date date = new Date(l);out.write(date.toLocaleString());}}} else {out.write("你是第一次登录!");}Cookie cookie = new Cookie("lastLoginTime", System.currentTimeMillis() + "");cookie.setMaxAge(24*60*60);// 设置cookie的有效期为一天,单位是:秒resp.addCookie(cookie);}@Overrideprotected void doPost(HttpServletRequest req, HttpServletResponse resp) throws ServletException, IOException {this.doGet(req, resp);}
}
7.4 Session (重点)
什么是Session:
- 服务器会给每一个用户(浏览器)创建一个Seesion对象。
- 一个session独占一个浏览器,只要浏览器没有关闭,这个session就存在。
- 用户登录之后,整个网站它都可以访问。(保存用户的信息;也可以保存购物车的信息)
Session和cookie的区别
- Cookie是把用户的数据写给用户的浏览器,浏览器保存(可以保存多个)保存在
客户端; - Session把用户的数据写到用户独占
Session中,服务器端保存(保存重要的信息,减少服务器资源的浪费) - Session对象由服务(
sevice)创建;
使用场景
- 保存一个登录用户的信息;
- 购物车信息;
- 在整个网站中经常会使用的数据,我们将它保存在 Session 中;
会话自动过期
<!--设置session默认的失效时间-->
<session-config><!--15分钟后session自动失效,以分钟为单位--><session-timeout>15</session-timeout>
</session-config>
Session的使用
public class SessionDemo01 extends HttpServlet {@Overrideprotected void doGet(HttpServletRequest req, HttpServletResponse resp) throws ServletException, IOException {// 解决中文乱码req.setCharacterEncoding("UTF-8");resp.setCharacterEncoding("UTF-8");resp.setContentType("text/html;charset=utf-8");// 得到SessionHttpSession session = req.getSession();// 给session中存东西session.setAttribute("name", "张三");// 获取session的idString sessionId = session.getId();// 判断session是不是新创建if (session.isNew()) {resp.getWriter().write("session创建成功,ID:" + sessionId);} else {resp.getWriter().write("session已经存在了,ID:" + sessionId);}// session创建的时候做了什么事情/*Cookie cookie = new Cookie("JSESSIONID", sessionId);resp.addCookie(cookie);*///------------------// 从session中获取数据String name = (String) session.getAttribute("name");//------------------// 从session中删除指定name的数据session.removeAttribute("name");// 手动注销sessionsession.invalidate();}@Overrideprotected void doPost(HttpServletRequest req, HttpServletResponse resp) throws ServletException, IOException {this.doGet(req, resp);}
}