Cisco Packer Tracer 中 VLAN 与三层交换机
一、实验目的
1)掌握 VLAN 的基本配置方法, 理解 VLAN 的功能和作用;
2)掌握三层交换机的基本配置方法。
3)理解三层网络的路由转发
二、实验环境
1)运行 Windows 2008 Server/XP/7 /10操作系统的 PC 一台。
2) PacketTracer。
三、实验内容
1) 学习使用命令行配置 VLAN, 观察报文的转发,理解 VLAN 的作用。
2) 学习三层交换机的基本配置方法。
3) 理解三层网络的路由转发
四、实验步骤
1. 配置网络拓扑
按下图配置网络拓扑。 交换机选择 2960。 Switch0 和 Switch1 的接口 Gig1/1 互连。
(注:只有g口有路由功能,要接在g口)
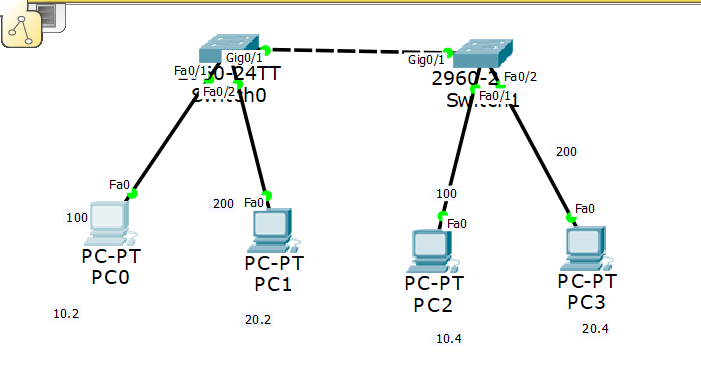
| 设备 | 连接接口 | IP 地址 |
| PC0 | Switch0 Fa0/1 | 192.168.10.2/24 |
| PC1 | Switch0 Fa0/2 | 192.168.20.2/24 |
| PC2 | Switch1 Fa0/1 | 192.168.10.4/24 |
| PC3 | Switch1 Fa0/2 | 192.168.20.4/24 |
2. 配置交换机 VLAN
在特权模式下输“configure terminal”或者“conf t”就可以进入全局配置模式。全局配置模式也称为“config”模式,使用“?”命令可查看改模式下的所有命令。
Switch>enable  #进入特权模式
Switch#confi
Switch#configure ter
Switch#configure terminal #进入全局配置模式(1)在交换机 Switch0 中创建 VLAN, VLAN 号为 100, VLAN 名为 v1。
Switch(config)#vlan 100
Switch(config-vlan)#name v1
(2)在交换机 Switch0 中创建 VLAN, VLAN 号为 200, VLAN 名为 v2。
Switch(config)#vlan 200
Switch(config-vlan)#name v2
Switch(config-vlan)#exit(3)将 Switch0 的接口 Fa0/1 配置为vlan 100。
Switch(config)#interface FastEthernet0/1
Switch(config-if)#switchport access vlan 100
(4)将 Switch0 的接口 Fa0/2 配置为vlan 200。
(5)在交换机 Switch1 中同样创建 VLAN v1 和 v2, 并将接口 Fa0/1 和 Fa0/2 分别配置为访问 v1 和 v2。
Switch(config)#vlan 100
Switch(config-vlan)#name v1
Switch(config-vlan)#exit
Switch(config)#vlan 200
Switch(config-vlan)#name v2
Switch(config-vlan)#exit
Switch(config)#int F0/1
Switch(config-if)#swit acce vlan 100
Switch(config-if)#int F0/2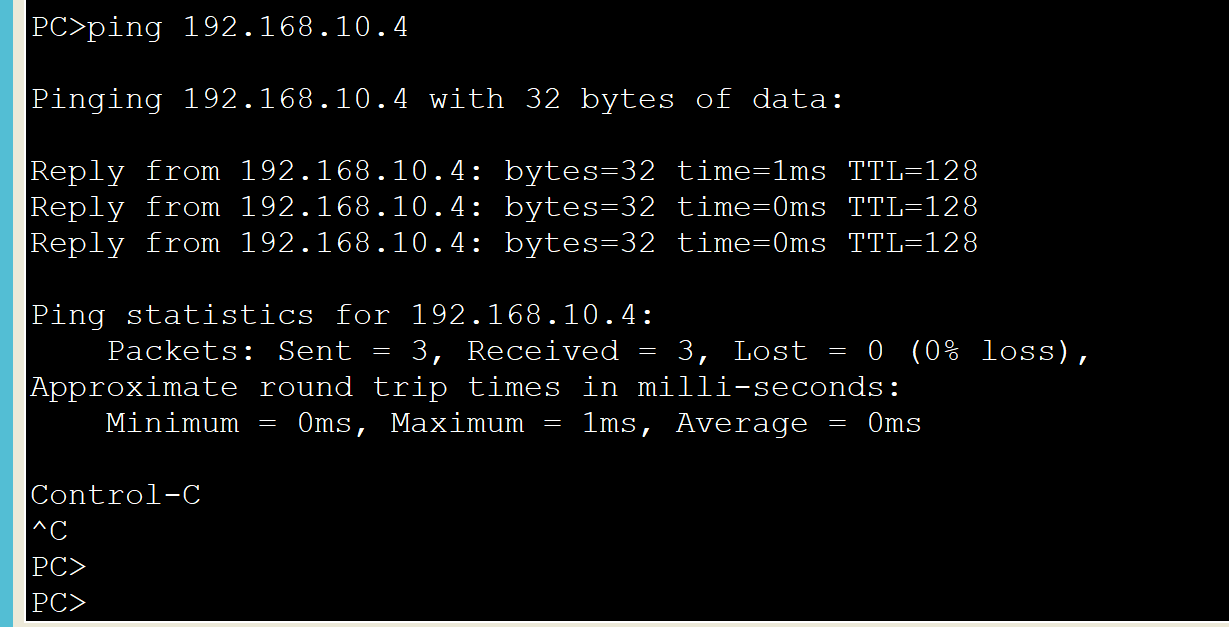
Switch(config-if)#swit acce vlan 200(6) 测试各 PC 之间是否互通。
(7) 将 Switch0 和 Switch1 的接口 Gig1/1 配置为 trunk 模式。
(注:只有g口有路由功能,要接在g口)
Switch(config)#interface GigabitEthernet1/1
Switch(config-if)#switchport mode trunk
Switch#conf t
Enter configuration commands, one per line.  End with CNTL/Z.
Switch(config)#
Switch(config)#int g0/1
Switch(config-if)#swit mode trunk(8)测试各 PC 之间是否互通。
3. 分析交换机转发报文过程
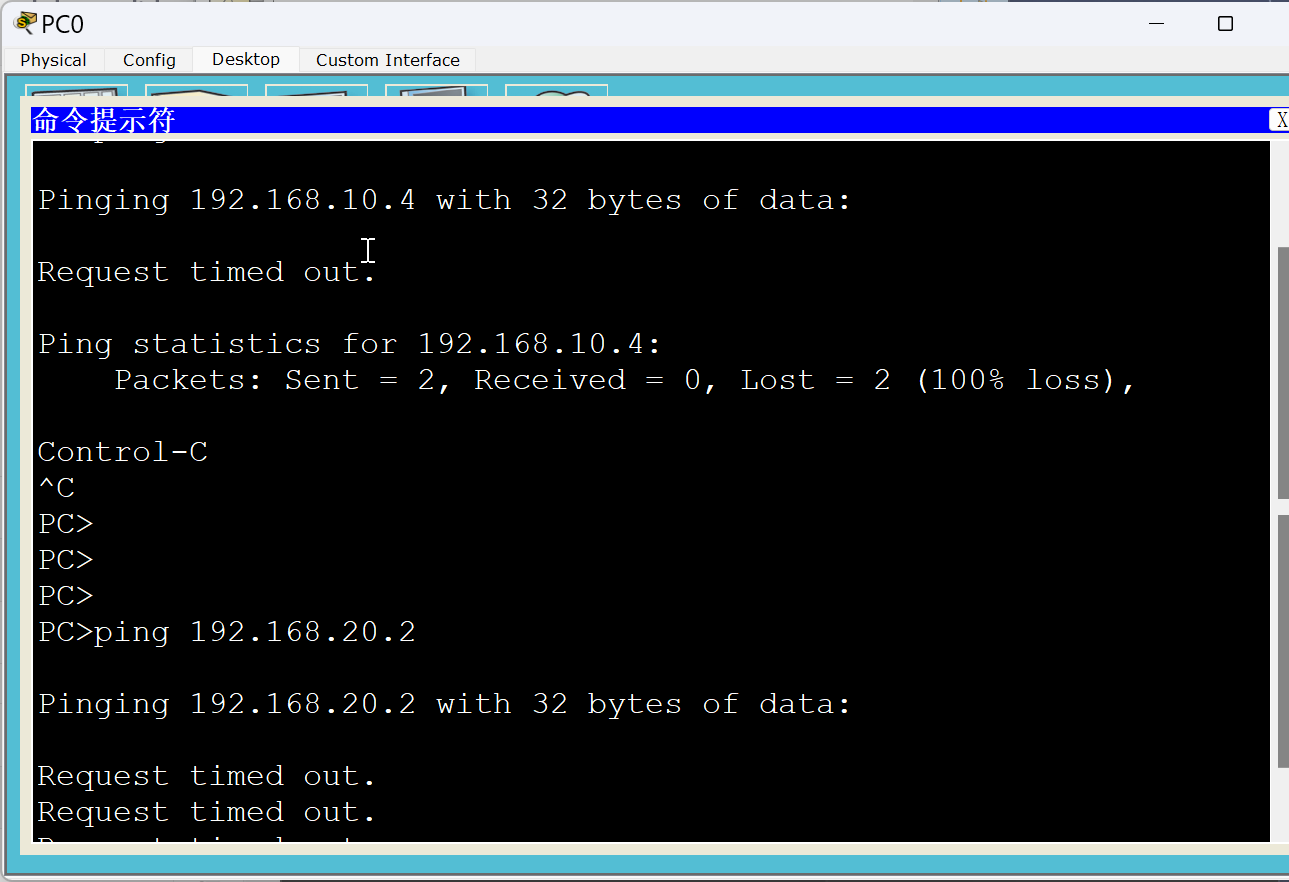
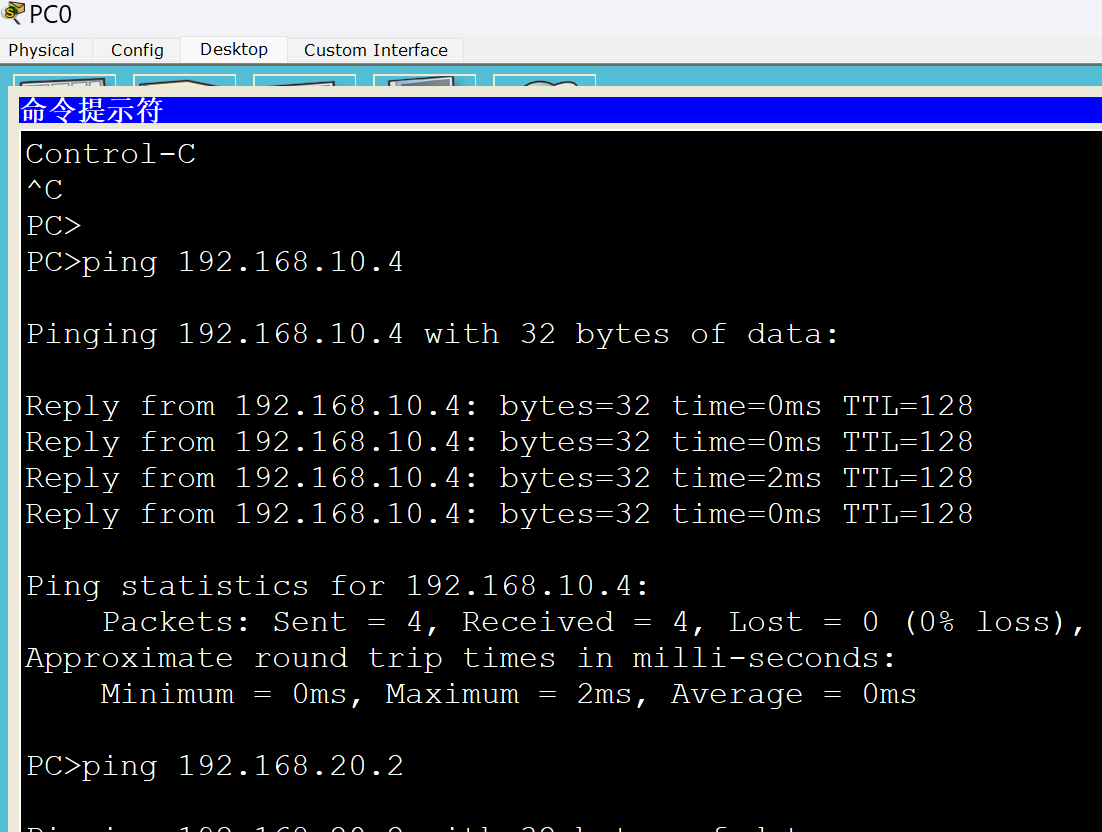
清空 PC0 和 PC1 的 ARP 缓存(arp –d)。 切换到模拟方式下, 在 PC0 中 ping –n 1 211.1.1.255。观察分组转发结果。 在 PC1 中 ping –n 1 211.1.1.255。 在实验报告中分析 ARP 请求广播的范围以及 ICMP 分组转发结果(为什么会是这样的结果? )。
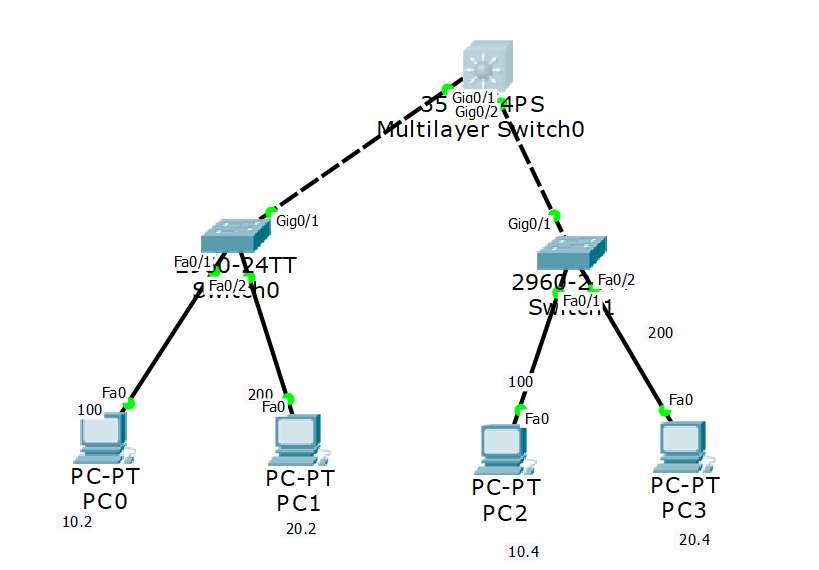
4. 配置三层交换机
如图所示, 在前面的网络拓扑中添加多层交换机 3560。并将 3560 交换机的接口f0/1,f0/2 分别与 Switch0 和 Switch1 的接口相连接。
(注:只有g口有路由功能,要接在g口)
(1)在 3560 交换机中创建 VLAN 100 和 200(名为 v1 和 v2)。
Switch(config)#vlan 100
Switch(config-vlan)#name v1
Switch(config-vlan)#vlan 200
Switch(config-vlan)#name v2(2) 3560 交换机的接口 f0/1, f0/2 配置为 trunk 模式:
Switch#conf tSwitch(config)#vlan 10Switch(config-vlan)#vlan 20Switch(config-vlan)#eSwitch(config)#int g0/1Switch(config-if)#no shutdown #用于激活网络接口Switch(config-if)#eSwitch(config)#int G0/2Switch(config-if)#no shutdownSwitch(config-if)#e(3) 启动 3560 交换机 IP 路由功能。
Switch(config)#ip routing
(4)分别为 3560 交换机的 VLAN v1 和 v2 的虚拟接口配置 IP 地址。
Switch#conf t
Enter configuration commands, one per line.  End with CNTL/Z.
Switch(config)#int vlan 10
Switch(config-if)#
%LINK-5-CHANGED: Interface Vlan10, changed state to up
ip address 192.168.10.1 255.255.255.0
Switch(config-if)#no shutdown
Switch(config-if)#e
Switch(config)#int vlan 20
Switch(config-if)#
%LINK-5-CHANGED: Interface Vlan20, changed state to up
ip address 192.168.20.1 255.255.255.0
Switch(config-if)#no shutdown
Switch(config-if)#e
Switch(config)#
Switch(config)#int vlan 10
Switch(config-if)#ip address 192.168.10.1 255.255.255.0
Switch(config-if)#no shutdown
Switch(config-if)#e
Switch(config)#int vlan 20
Switch(config-if)#ip address 192.168.20.1 255.255.255.0
Switch(config-if)#no shutdown
Switch(config-if)#e
(5)配置 PC0~3 的默认网关(应配置为多少? 不配置会如何? )。
5. 分析三层交换机转发过程
(1) 测试各主机间的连通性。 并在模拟方式下观察三层交换机转发报文的过程。
应该是都可以ping通
五、相关知识
现在广泛应用于局域网环境中的被称为“三层交换机”的设备在逻辑上就是一个路由器和支持 VLAN 的二层交换机的集成体。三层交换机可以很方便地直接将多个 VLAN 在 IP 层(第三层)进行互连。三层交换机通常不具有广域网接口,主要用于在局域网环境中互连同构的以太网,并起到隔离广播域的作用。由于三层交换机所处理的都是封装在以太网帧中的IP 数据报,可以对处理算法进行很多特殊的优化并尽量用硬件来实现,因此比传统路由器转发分组的速度要快。
思科交换机路由器通过命令行接口(Command Line Interface, CLI) 进行配置操作的基本方法如下:
1. 查看用户配置模式下的基本命令。
当进入交换机的“命令行”界面时,按一下键盘上的“Enter”键就进入了交换机的用户配置模式。在该模式下可以查看交换机的软、硬件版本信息,并进行简单的测试。它的提示符为“>”,在该模式下可用的命令比较少,使用“?”命令可显示该模式下的所有命令。
Switch> ?
Exec commands:
<1-99> Session number to resume
connect Open a terminal connection
disconnect Disconnect an existing network connection
enable Turn on privileged commands
exit Exit from the EXEC
logout Exit from the EXEC
ping Send echo messages
resume Resume an active network connection
show Show running system information
telnet Open a telnet connection
terminal Set terminal line parameters
traceroute Trace route to destination
2. 查看特权模式下的基本命令。
特权模式下可对交换机的配置文件进行管理,查看交换机的配置信息,进行网络的测试和调试等。在用户配置模式下键入“enable”命令进入特权模式。特权模式的提示符为“#”。使用“?”命令可查看该模式下的所有命令。
Switch>
Switch>enable
Switch#?
Exec commands:
<1-99> Session number to resume
clear Reset functions
clock Manage the system clock
configure Enter configuration mode
connect Open a terminal connection
copy Copy from one file to another
debug Debugging functions (see also 'undebug')
delete Delete a file
dir List files on a filesystem
disable Turn off privileged commands
disconnect Disconnect an existing network connection
enable Turn on privileged commands
erase Erase a filesystem
exit Exit from the EXEC
logout Exit from the EXEC
more Display the contents of a file
no Disable debugging informations
ping Send echo messages
reload Halt and perform a cold restart
resume Resume an active network connection
setup Run the SETUP command facility
show Show running system information
telnet Open a telnet connection
terminal Set terminal line parameters
traceroute Trace route to destination
undebug Disable debugging functions (see also 'debug')
vlan Configure VLAN parameters
write Write running configuration to memory, network, or terminal
3. 查看全局配置模式下基本命令。
全局配置模式下可以配置交换机的全局性参数。在特权模式下输“configureterminal”或者“conf t”就可以进入全局配置模式。全局配置模式也称为“config”模式,使用“?”命令可查看改模式下的所有命令。
Switch# conf t
Enter configuration commands, one per line. End with CNTL/Z.
Switch(config)#?
Configure commands:
banner Define a login banner
boot Boot Commands
cdp Global CDP configuration subcommands
clock Configure time-of-day clock
do To run exec commands in config mode
enable Modify enable password parameters
end Exit from configure mode
exit Exit from configure mode
hostname Set system's network name
interface Select an interface to configure
ip Global IP configuration subcommands
line Configure a terminal line
mac-address-table Configure the MAC address table
no Negate a command or set its defaults
port-channel EtherChannel configuration
service Modify use of network based services
spanning-tree Spanning Tree Subsystem
username Establish User Name Authentication
vlan Vlan commands
vtp Configure global VTP state
4. 查看端口配置模式下的命令。
端口配置模式下可以对交换机的端口进行参数配置。一般交换机都拥有很多窗口,还可
以添加不同的模块。默认情况下,交换机的所有端口都为以太网接口类型。进入端口配置模
式,可以使用“interface Ethernet 0/1”命令。其中, interface 为进入端口命令; ethernet 表示
以太网; 0/1 表示端口编号。使用“?”可查看该模式下的所有命令。
Switch(config)#interface fastEthernet 0/1
Switch(config-if)#?
cdp Global CDP configuration subcommands
channel-group Etherchannel/port bundling configuration
channel-protocol Select the channel protocol (LACP, PAgP)
description Interface specific description
duplex Configure duplex operation.
exit Exit from interface configuration mode
mac-address Manually set interface MAC address
no Negate a command or set its defaults
shutdown Shutdown the selected interface
spanning-tree Spanning Tree Subsystem
speed Configure speed operation.
switchport Set switching mode characteristics
Switch(config-if)#
5. 模式之间的切换。
交换机各模式之间的切换可通过“exit”和“end”命令完成。
| Switch>enable Switch#configure terminal Switch(config)#interface fastEthernet 0/5 Switch(config-if)#exit Switch(config)#end Switch# | !进入特权模式 !进入全局配置模式 !进入交换机 F 0/5 的接口配置模式 !退回到上一级操作模式 !直接退回到特权模式 |
6. 撤销某个命令。
no