为 MCP Server 提供 Auth 认证,及 Django 实现示例
目录
- 背景
- 调试工具
- MCP 的 OAuth 流程
- 为 MCP 直接实现一个授权服务
- 使用 Django OAuth Toolkit 对 MCP 服务鉴权
- 安装服务和基础配置
- 处理配置文件
- 增加视图处理
- 路由配置
- 修改 MCP Server
背景
通过网络提供 MCP 服务,出于一些考虑,往往需要对服务进行鉴权。
- 数据隐私与安全: 保护敏感数据不被泄露或滥用,避免隐私侵犯和法律风险。
- 防御恶意攻击: 阻止 DoS 攻击、数据篡改和资源滥用,维护服务完整性。
- 服务可靠与计费: 确保服务稳定运行,实现资源有效管理和合理计费。
- 满足合规要求: 遵循行业法规和标准,避免巨额罚款并维护企业声誉。
除了在链接上携带 token 的方式提供鉴权,目前 MCP 支持通过 OAuth 的方式对服务进行保护。
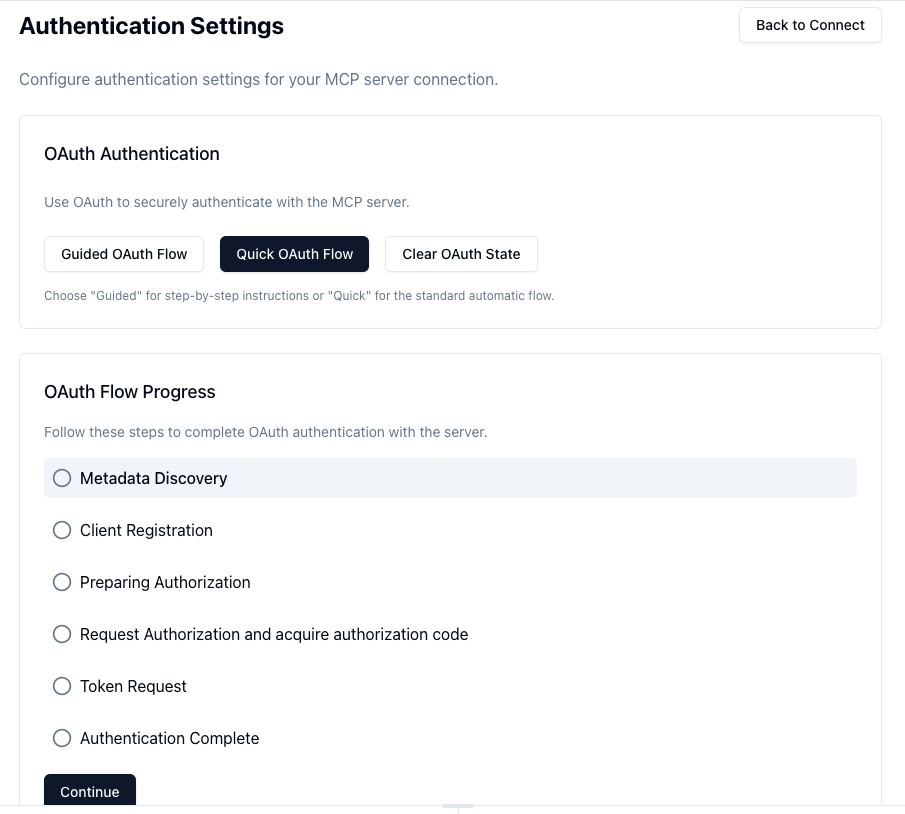
调试工具
OAuth 保护 MCP 服务,需要 MCP Client 支持,目前明确的 VSCode 和 Claude 是支持的,Trae 目前还不支持。
Anthropic 提供了 MCP Inspector 用于调试,使用时可以:
git clone https://github.com/modelcontextprotocol/inspector.git
cd inspector
npm i # 需要安装 node、npm,NodeJS 版本需要 22.7.5
npm run dev
服务默认会在 6274 端口运行,浏览器打开 http://127.0.0.1:6274 即可看到页面

在左侧填写服务器的类型、地址等信息,即可尝试连接,点击右侧的 Open Auth Settings 可以看到工具提供了整套的 Auth 调试检查。
MCP 的 OAuth 流程
MCP 的 OAuth 流程如图:
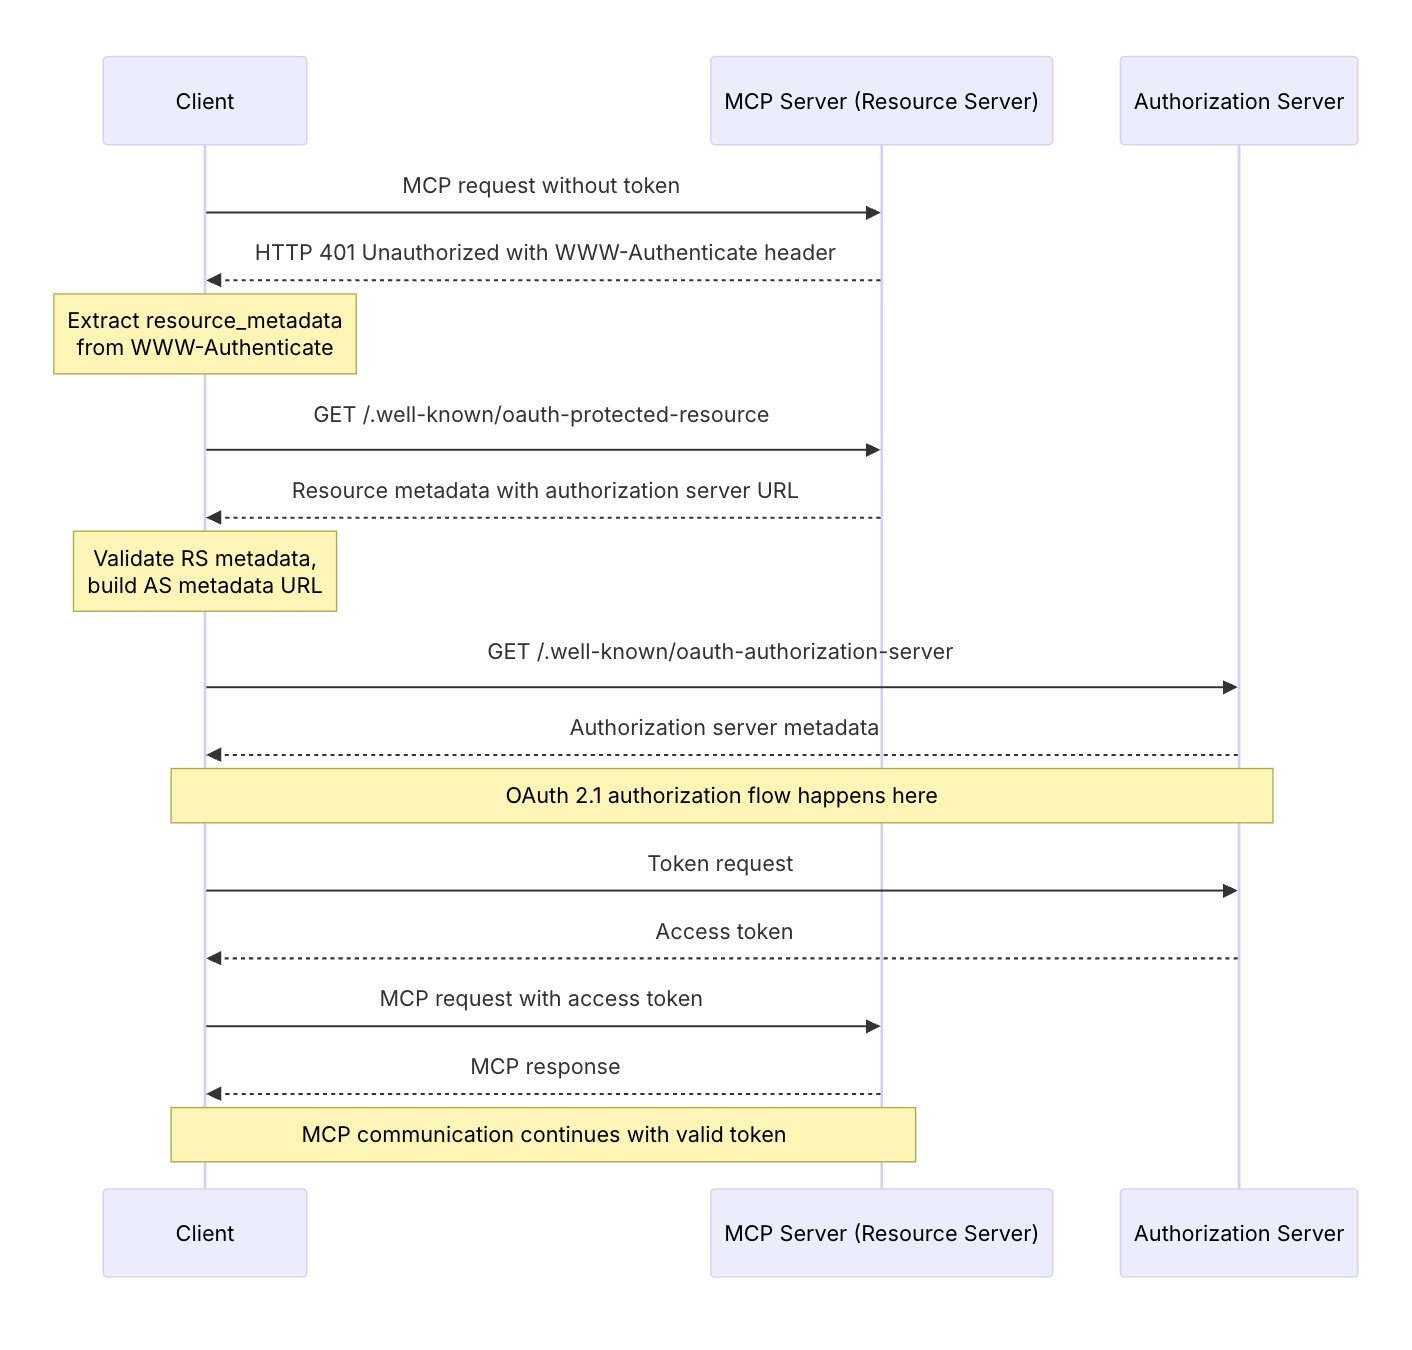
对于 OAuth 服务器的能力,MCP 提出了几个个要求:
- 支持应用注册(Client Registration)
- 支持 S256 的方式进行 code challenage
- 支持授权代码(authorization code)的授权方式(grant type)
为 MCP 直接实现一个授权服务
按照 官方文档 说明,需要为 MCP Server 配置一个 Auth 服务类,Auth 服务类的实现可以参考 provider.py 中 OAuthAuthorizationServerProvider 部分的代码。
实现后,需要制定 MCP Server 使用 Auth 服务:
mcp1 = FastMCP("weather",auth_server_provider=CustomOAuthProvider(), # 提供 OAuth 的服务器auth=AuthSettings(issuer_url="http://127.0.0.1:8833/o/", # 签发地址)
)
其中 CustomOAuthProvider 是 OAuthAuthorizationServerProvider 的子类。在实际运行中,这个 Auth 服务会:
- 在 MCP Server 的
.well-known/oauth-authorization-server路径下挂载相关服务能力 - 提供注册、认证、获取 token、刷新 token 等服务
- 在每次处理服务请求时,通过
load_access_token完成服务鉴权,如果鉴权成功,返回AccessToken对象;失败则返回None
官方提供了一个示例,基于 GitHub 的 OAuth 服务,写了一个简单的 SimpleGitHubOAuthProvider。
使用前需要在 GitHub 中添加一个 OAuth 应用,并把对应的 client_id 和 client_secret 作为 MCP_GITHUB_GITHUB_CLIENT_ID 和 MCP_GITHUB_GITHUB_CLIENT_SECRET 环境变量
使用 Django OAuth Toolkit 对 MCP 服务鉴权
我的服务使用了 Django 框架,并且把 MCP Server 集成到了原先的服务下,所以在原有的服务框架下添加了 OAuth 服务,并实现了对 MCP 服务的鉴权。
安装服务和基础配置
pip install django-oauth-toolkit django-cors-headers
cd 项目目录
python manage.py startapp auth # 应用名称可自定义
重要! 关于 OAuth 的基本流程和 django-oauth-toolkit 的基本配置,建议先参考 官方文档 做个了解,这里提到了新建一个 User 类、LOGIN_URL 配置等细节工作。
另外可以参考 之前的文章,看一下 MCP Server 和 Django 项目的集成方案。
在我的项目背景下,MCP Server 会处理 /star 下的请求。
处理配置文件
# settings.py
INSTALLED_APPS = {'django.contrib.admin',# ...'oauth2_provider','corsheaders',
}MIDDLEWARE = (# ...'corsheaders.middleware.CorsMiddleware', # 尽量放在前边# ...
)CORS_ORIGIN_ALLOW_ALL = True # 仅限示例
增加视图处理
# auth/views.py
import json
import time
import secrets
import base64
import osfrom django.http import JsonResponse
from django.views.decorators.csrf import csrf_exempt
from oauth2_provider.models import Application
from oauth2_provider.views import AuthorizationView# 获取 OAuth 服务器的能力
@csrf_exempt
def oauth_authorization_server(request):# 获取域名url = f'{request.scheme}://{request.get_host()}'auth_url = f'{url}/o/'# register_url = f'{url}/oauth_register/'return JsonResponse({"issuer": auth_url,"authorization_endpoint": f'{auth_url}authorize/',"token_endpoint": f'{auth_url}token/',"jwks_uri": f'{auth_url}jwks/',# "registration_endpoint": f'{auth_url}applications/register/',"registration_endpoint": f'{auth_url}register/',"response_types_supported": ["code", "token", "id_token"],"grant_types_supported": ["authorization_code", "client_credentials", "refresh_token"],"code_challenge_methods_supported": ["plain", "S256"],})def _get_name_from_list(data, field_names, fall_back=None):for n in field_names:if n in data:return data[n]return fall_back# 由于 django-oauth-toolkit 默认没有提供通过 post 进行 application 注册的服务,这里手搓一个
@csrf_exempt
def oauth_client_registration(request):if request.method == 'POST':data = json.loads(request.body.decode('utf-8'))# 必填字段验证try:name = _get_name_from_list(data, ['client_name', 'name'])redirect_uris = _get_name_from_list(data, ['redirect_uris', 'redirect_uri'], [])redirect_uris_str = ' '.join(redirect_uris)grant_types = _get_name_from_list(data, ['grant_types', 'grant_type'], [])if 'authorization_code' in grant_types: grant_type_p = 'authorization-code'grant_types = ['authorization_code','refresh_token']elif 'client_credentials' in grant_types: grant_type_p = 'client-credentials'grant_types = ['client_credentials', 'refresh_token']elif 'password' in grant_types: grant_type_p = 'password'grant_types = ['password','refresh_token']# response_types = _get_name_from_list(data, ['response_types', 'response_type'])# scope = _get_name_from_list(data, ['scope'])# 生成 client_id 和 client_secretclient_id = secrets.token_urlsafe(16)client_secret = base64.urlsafe_b64encode(os.urandom(32)).decode('utf-8').rstrip('=')user = request.user# 创建 OAuth 客户端client = Application.objects.create(name=name if name else 'default',client_id=client_id,client_secret=client_secret,redirect_uris=redirect_uris_str,client_type='confidential', #data['client_type'],  # 'public' 或 'confidential'authorization_grant_type=grant_type_p,  # 如 'authorization-code'# 可选字段skip_authorization=False, # data.get('skip_authorization', False),# scope=scope if scope else '',  # 如 'read write')# 构造响应数据(RFC 7591 格式)response_data = {'client_id': client_id,'client_secret': client_secret,'client_id_issued_at': int(time.time()),'client_secret_expires_at': 0,  # 永不过期'redirect_uris': redirect_uris,'grant_types': grant_types,'client_type': client.client_type,# 'scope': client.scope,}return JsonResponse(response_data, status=201)except json.JSONDecodeError:return JsonResponse({'error': 'Invalid JSON'}, status=400)except Exception as e:return JsonResponse({'error': str(e)}, status=500)# 默认的 authorize 没有把登录用户和生成的 application 进行绑定,这里做个调整
class CustomAuthorizationView(AuthorizationView):def get(self, request, *args, **kwargs):# 检查是否登录if request.user.is_authenticated:# 获取 client_idclient_id = request.GET.get('client_id')if client_id: Application.objects.filter(client_id=client_id).update(user_id=request.user.id)# 调用父类的 get 方法return super().get(request, *args, **kwargs)
路由配置
增加 auth 应用的路由配置
# 新建 auth/urls.py
from django.urls import path, re_path
from .views import oauth_client_registration, CustomAuthorizationView
from oauth2_provider.views import TokenView, RevokeTokenView, IntrospectTokenView#, AuthorizationViewurlpatterns = [path("authorize/", CustomAuthorizationView.as_view(), name="authorize"),path("token/", TokenView.as_view(), name="token"),path("revoke_token/", RevokeTokenView.as_view(), name="revoke-token"),path("introspect/", IntrospectTokenView.as_view(), name="introspect"),path("register/", oauth_client_registration, name="register")
]
增加项目路由配置
# 项目名称/urls.py
from auth.views import oauth_authorization_server # urlpatterns = [...,path('.well-known/oauth-authorization-server', oauth_authorization_server),path('o/', include('auth.urls'))
]
修改 MCP Server
最后记得在 MCP Server 中,设置一个 OAuthProvider,实现 load_access_token 函数,通过 Django oauth 的数据库,查询 acess token
# MCP 服务文件内
from mcp.server.fastmcp import FastMCP
from mcp.server.auth.settings import AuthSettingsfrom mcp.server.auth.provider import (OAuthAuthorizationServerProvider,AccessToken,
)from oauth2_provider.models import AccessToken as AccessTokenModel
from asgiref.sync import sync_to_asyncclass CustomOAuthProvider(OAuthAuthorizationServerProvider):OAUTH_SERVER_URL = "http://127.0.0.1:8833/o/"DB_FILE = "oauth_tokens.db"# 对比 access token 的函数async def load_access_token(self, token: str) -> AccessToken | None:# 记得使用异步方法来查询 Django 数据库at = await AccessTokenModel.objects.filter(token=token).afirst()ap = await sync_to_async(getattr)(at, 'application')if not at:return Nonereturn AccessToken(token=at.token,client_id=ap.client_id,scopes=at.scope.split(' '),)app = FastMCP("test mcp",auth_server_provider=CustomOAuthProvider(),auth=AuthSettings(issuer_url="http://127.0.0.1/o/", # 其实没什么用,但必须要是一个链接,通常应该指向 OAuth 服务器)
)