mysql数据库之备份
mysql数据库备份
- 一、备份
- 1、热备
- 2、备份库:
- 3、表
- 4、备份还原
- 二、备份的方式
- 1、完全备份(全备)
- 2、增量备份
- 3、差异备份
- 三、备份方案
- 四、备份恢复
- 五、rsync数据同步
- rsync+sersync文件实时同步
一、备份
备份工具可以帮助您保护数据免受意外的损失。
备份:冷备和热备。
物理的:硬件的
逻辑的:软件的。
1、热备
sql文件:文本文件,里面是sql语句。
2、备份库:
指明备份的数据库:
mysqldump --databases db1 db2 db3 > dump.sql
备份所有的数据库:
mysqldump --all-databases > dump.sql
备份databases库中的TENNIS库tennis.sql中:
mysqldump -uroot -p'Sanchuang123#' --databases TENNIS >/backup/tennis.sql
mysqldump:全备份的命名
3、表
mysqldump test t1 t3 t7 > dump sql
将TENNIS库中的 PLAYERS 表备份到tennis_players文件中。
mysqldump -uroot -p “Sanchuang123#” TENNIS PLAYERS > tennis_players.sql
[root@sc-mysql ~]# mysqldump -uroot -p'Sanchuang123#'  TENNIS  PLAYERS  >tennis_players.sql
mysqldump: [Warning] Using a password on the command line interfac
4、备份还原
将mysqldump -uroot -p’Sanchuang123#’ TENNIS PLAYERS >tennis_players.sql的备份进行还原。
[root@Sanchuang backup]# mysql -uroot -p'Sanchuang123#' <tennis.sql
[root@sc-mysql ~]# mysqldump -uroot -p'Sanchuang123#'  TENNIS  PLAYERS  >tennis_players.sql
mysqldump: [Warning] Using a password on the command line interface can be insecure.
二、备份的方式
1、完全备份(全备)
优点:备份了全部的内容
缺点:备份的耗时比较长
2、增量备份
增量备份的好处是每次备份的数据较少,耗时较短,占用的空间较小;坏处是数据恢复比较麻烦。
3、差异备份
差异备份也要先进行一次完全备份,但是和增量备份不同的是,每次差异备份都备份和原始的完全备份不同的数据。也就是说,差异备份每次的参照物都是原始的完全备份,而不是上一次的差异备份。
备份mysql的执行操作:先将二进制文件开启,在配置文件中开启。
三、备份方案
每天的下午11:20点做全备,刚好到了下午11点25分的时候,数据库被删除了,如何将数据恢复到11点25分的状态?
1、开启二进制日志
show variables like “log_bin”;
root@(none) 11:13  scmysql>show variables like "log_bin";
+---------------+-------+
| Variable_name | Value |
+---------------+-------+
| log_bin       | ON    |
+---------------+-------+
1 row in set (0.01 sec)
2、模拟产生数据
create database wangshuai;
root@(none) 11:18  scmysql>create database wangshuai;
Query OK, 1 row affected (0.00 sec)root@(none) 11:20  scmysql>use wangshuai
Database changedroot@wangshuai 11:20  scmysql>create table t1(id int primary key,name varchar(20) not null);
Query OK, 0 rows affected (0.11 sec)root@wangshuai 11:20  scmysql>insert into t1(id,name) values(1,'cali'),(2,'hepang'),(3,'zhangquanliang');
Query OK, 3 rows affected (0.01 sec)
Records: 3  Duplicates: 0  Warnings: 0
3、产生一个新的二进制日志,为了方便我们后面查找,特意新建一个新的二进制日志
flush logs
root@wangshuai 11:22  scmysql>flush logs;
Query OK, 0 rows affected (0.05 sec)root@wangshuai 11:23  scmysql>show master status;
+---------------------+----------+--------------+------------------+-------------------+
| File                | Position | Binlog_Do_DB | Binlog_Ignore_DB | Executed_Gtid_Set |
+---------------------+----------+--------------+------------------+-------------------+
| sc-mysql-bin.000003 |      154 |              |                  |                   |
+---------------------+----------+--------------+------------------+-------------------+
1 row in set (0.00 sec)
4、做全备
mkdir /backup
mysqldump -uroot -p’Sanchuang1234#’ --databases wangshuai >/backup/ws.sql
[root@sc-mysql backup]# mkdir /backup
[root@sc-mysql backup]# mysqldump -uroot -p'Sanchuang1234#' --databases wangshuai >/backup/ws.sql
mysqldump: [Warning] Using a password on the command line interface can be insecure.
[root@sc-mysql backup]# ls
all_db.sql  hunan_liangliang.sql  tennis_player.sql  ws.sql
5、模拟全备后产生一些新的数据
新增数据:
insert into t1(id,name)values(4,“cali2”),(5,‘hepang2’),(6,‘zhangquanliang2’);
更新数据:
update t1 set name = ‘fengdeyong’ where id = 4;
root@wangshuai 11:23  scmysql>insert into t1(id,name) values(4,'cali2'),(5,'hepang2'),(6,'zhangquanliang2');
Query OK, 3 rows affected (0.02 sec)
Records: 3  Duplicates: 0  Warnings: 0root@wangshuai 11:27  scmysql>update t1 set name = 'fengdeyong' where id = 4;
Query OK, 1 row affected (0.04 sec)
Rows matched: 1  Changed: 1  Warnings: 0
root@wangshuai 11:28  scmysql>show master status;
+---------------------+----------+--------------+------------------+-------------------+
| File                | Position | Binlog_Do_DB | Binlog_Ignore_DB | Executed_Gtid_Set |
+---------------------+----------+--------------+------------------+-------------------+
| sc-mysql-bin.000003 |      749 |              |                  |                   |
+---------------------+----------+--------------+------------------+-------------------+
1 row in set (0.01 sec)
6、模拟删除数据库wangshuai
drop database wangshuai;
root@wangshuai 11:28  scmysql>drop database wangshuai;
Query OK, 1 row affected (0.04 sec)
四、备份恢复
1、先恢复全备
mysql -uroot -p“Sanchuang1234#” < /backup/ws.sql
[root@sc-mysql backup]# mysql -uroot -p'Sanchuang1234#' < /backup/ws.sql
mysql: [Warning] Using a password on the command line interface can be insecure.
root@wangshuai 11:30  scmysql>select * from t1;
+----+----------------+
| id | name           |
+----+----------------+
|  1 | cali           |
|  2 | hepang         |
|  3 | zhangquanliang |
+----+----------------+
3 rows in set (0.00 sec)
2、再根据二进制日志去恢复数据
mysqlbinlog -vv sc-mysql-bin.000003 |egrep -i “drop database wangshuai” -C 100
[root@sc-mysql mysql]# mysqlbinlog -vv sc-mysql-bin.000003 |egrep -i "drop database wangshuai" -C 100
查找删除数据库和
220818 11:27:37 开始的时间
220818 11:29:36 drop database前的时间
mysqlbinlog --start-datetime “2022-08-18 11:27:37” --stop-datetime “2022-08-18 11:29:36” sc-mysql-bin.000003 |mysql -uroot -p’Sanchuang1234#’
mysqlbinlog --start-datetime "2022-08-18 11:27:37"  --stop-datetime "2022-08-18 11:29:36"  sc-mysql-bin.000003 |mysql -uroot -p'Sanchuang1234#'
root@sc-mysql mysql]# mysqlbinlog --start-datetime "2022-08-18 11:27:37"  --stop-datetime "2022-08-18 11:29:36"  sc-mysql-bin.000003 |mysql -uroot -p'Sanchuang1234#'
mysql: [Warning] Using a password on the command line interface can be insecure.
root@wangshuai 11:48  scmysql>select * from t1;
+----+-----------------+
| id | name            |
+----+-----------------+
|  1 | cali            |
|  2 | hepang          |
|  3 | zhangquanliang  |
|  4 | fengdeyong      |
|  5 | hepang2         |
|  6 | zhangquanliang2 |
+----+-----------------+
6 rows in set (0.00 sec)
五、rsync数据同步
rsync命令的使用,远程备份rsync
rsync是linux系统下的数据镜像备份工具。使用快速增量备份工具Remote Sync可以远程同步,支持本地复制,或者与其他SSH、rsync主机同步。已支持跨平台,可以在windows与linux间进行数据同步。
raid
镜像卷:raid1
2块,可以怀一块,两块磁盘里存放相同的数据。
1、编写备份脚本
1.每天晚上3:30开始备份sc123这个库
2.备份文件存放到/backup目录下,要求备份的文件名里包含当天的日期(精确到天)
3.保留最近15天的备份文件
4.本地备份完成后,将备份文件上传到另外一台linux服务器的/backup_mysql目录下
每天晚上2点30分钟备份所有的数据库,然后scp到备份服务器上。
需要先建立免密通道:
[root@zabbix-4-centos7 ~]# cat backup_db.sh
#!/bin/bash
ctime=$(date +%Y%m%d)
mkdir -p /backup
#备份sc123库 其中的/usr/local/mysql/bin/mysqldump是官方备份工具
/usr/local/mysql/bin/mysqldump -uyangst -p 'yang123#' sc123
>/backup/sc123_${ctime}.sql
#上传备份文件到远程的服务器
scp /backup/sc123_${ctime}.sql root@192,168.0.177:/backup
#只是保留最近15天的数据,本机上保留最近15天
find /backup -mtime +15 -type f -name “sc123”.sql" -exec rm -rf {} \;
#日志功能
now_time=$(date +%Y%m%d%H%M%S)
echo "${now_time} sc123_${ctime}.sql success" >>/var/log/backup_db.log
rsync全称remote synchronize,即远程同步。使用rsync进行数据同步时,第一次进行完全备份,以后则是增量备份,利用rsync算法(差分编码),只传输差异部分数据。
rsync+sersync文件实时同步
一、什么是Rsync?
Rsync(Remote Synchronize)是一款开源的、快速的、多功能的、可以实现全量及增量的本地或远程数据同步的优秀工具,并且支持多种操作系统平台运行。
二、Rsync + serync文件实时同步的流程:
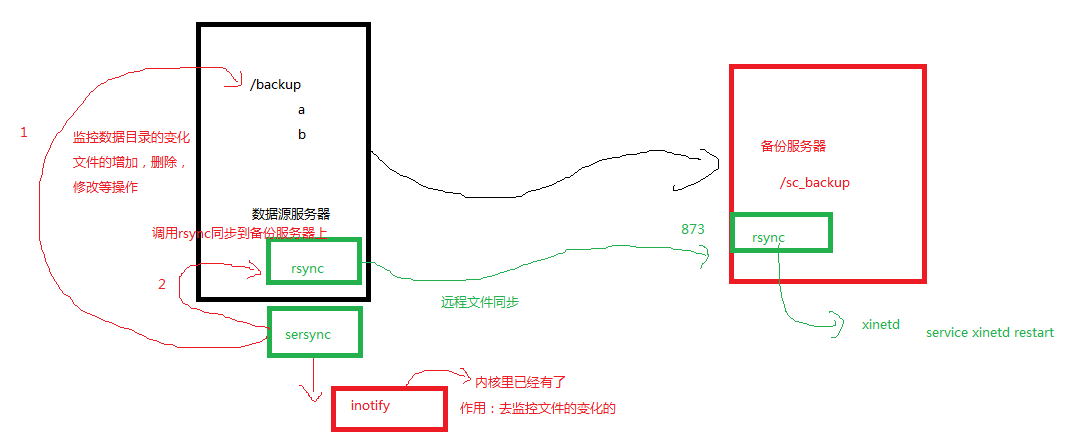
使用全量和二进制的方式来进行备份。
三、环境
备份服务器:192.168.2.152 操作系统:centos7.9
数据源服务器:192.168.2.132 操作系统:centos7.9
[root@sc-mysql2 backup]# cat /etc/centos-releaseCentOS Linux release 7.9.2009 (Core)
四、备份服务器操作
1、关闭selinx #永久关闭linux防火墙
[root@sc-mysql2 backup]# getenforce Permissive
[root@sc-mysql2 backup] vim  /etc/selinux/config
SELINUX=disabled   # 修改
[root@sc-mysql2 backup]setenforce 0     # 立即生效
[root@sc-mysql2 backup]# chmod +x /etc/rc.d/rc.local  给开启启动文件设置权限
2、关闭防火墙
service firewalld stop
yum install rsync xinetd -y
vi /etc/rc.d/rc.local  #设置为开机启动
/usr/bin/rsync --daemon --config=/etc/rsyncd.conf # 添加开机启动
3、安装rsync服务端软件
1、yum install rsync xinetd
[root@nginx-kafka01 ~]# yum install rsync xinetd
已加载插件:fastestmirror
Loading mirror speeds from cached hostfile
epel/x86_64/metalink
2、vi /etc/rc.d/rc.local #设置开机启动
3、/usr/bin/rsync --daemon --config=/etc/rsyncd.conf # 添加开机启动
4、systemctl start xinetd
4、创建rsyncd.conf配置文件
vi /etc/rc.d/rc.local
其中的rc.local:开启启动文件
uid = root
gid = root
use chroot = yes
max connections = 0
log file = /var/log/rsyncd.log
pid file = /var/run/rsyncd.pid
lock file = /var/run/rsync.lock
secrets file = /etc/rsync.pass
motd file = /etc/rsyncd.Motd
[back_data]path = /backupcomment = A directory in which data is storedignore errors = yesread only = nohosts allow =  192.168.2.132  数据源服务器机器的ip
5、创建用户认证文件
vi /etc/rsync.pass :配置文件,添加以下内容,添加允许传输用户和密码
sunline:sunline :格式,用户名:密码,可以设置多个,每行一个用户名:密码 sc:sc123456
6、设置文件权限
chmod 600 /etc/rsyncd.conf #设置文件所有者读取、写入权限
chmod 600 /etc/rsync.pass #设置文件所有者读取、写入权限
7、启动rsync和xinetd
[root@sc-mysql2 backup]# /usr/bin/rsync --daemon --config=/etc/rsyncd.conf    #设置开机启动
[root@sc-mysql2 backup]# ps aux|grep rsync
root      9455  0.0  0.0 114844   584 ?        Ss   16:13   0:00 /usr/bin/rsync --daemon --config=/etc/rsyncd.conf
root      9457  0.0  0.0 112824   988 pts/0    S+   16:13   0:00 grep --color=auto rsync[root@sc-mysql2 backup]# systemctl start xinetd
[root@sc-mysql2 backup]# ps aux|grep xinetd
root      9425  0.0  0.0  25044   584 ?        Ss   16:00   0:00 /usr/sbin/xinetd -stayalive -pidfile /var/run/xinetd.pid
root      9465  0.0  0.0 112824   988 pts/0    S+   16:14   0:00 grep --color=auto xinetd