#RabbitMQ# 消息队列入门
目录
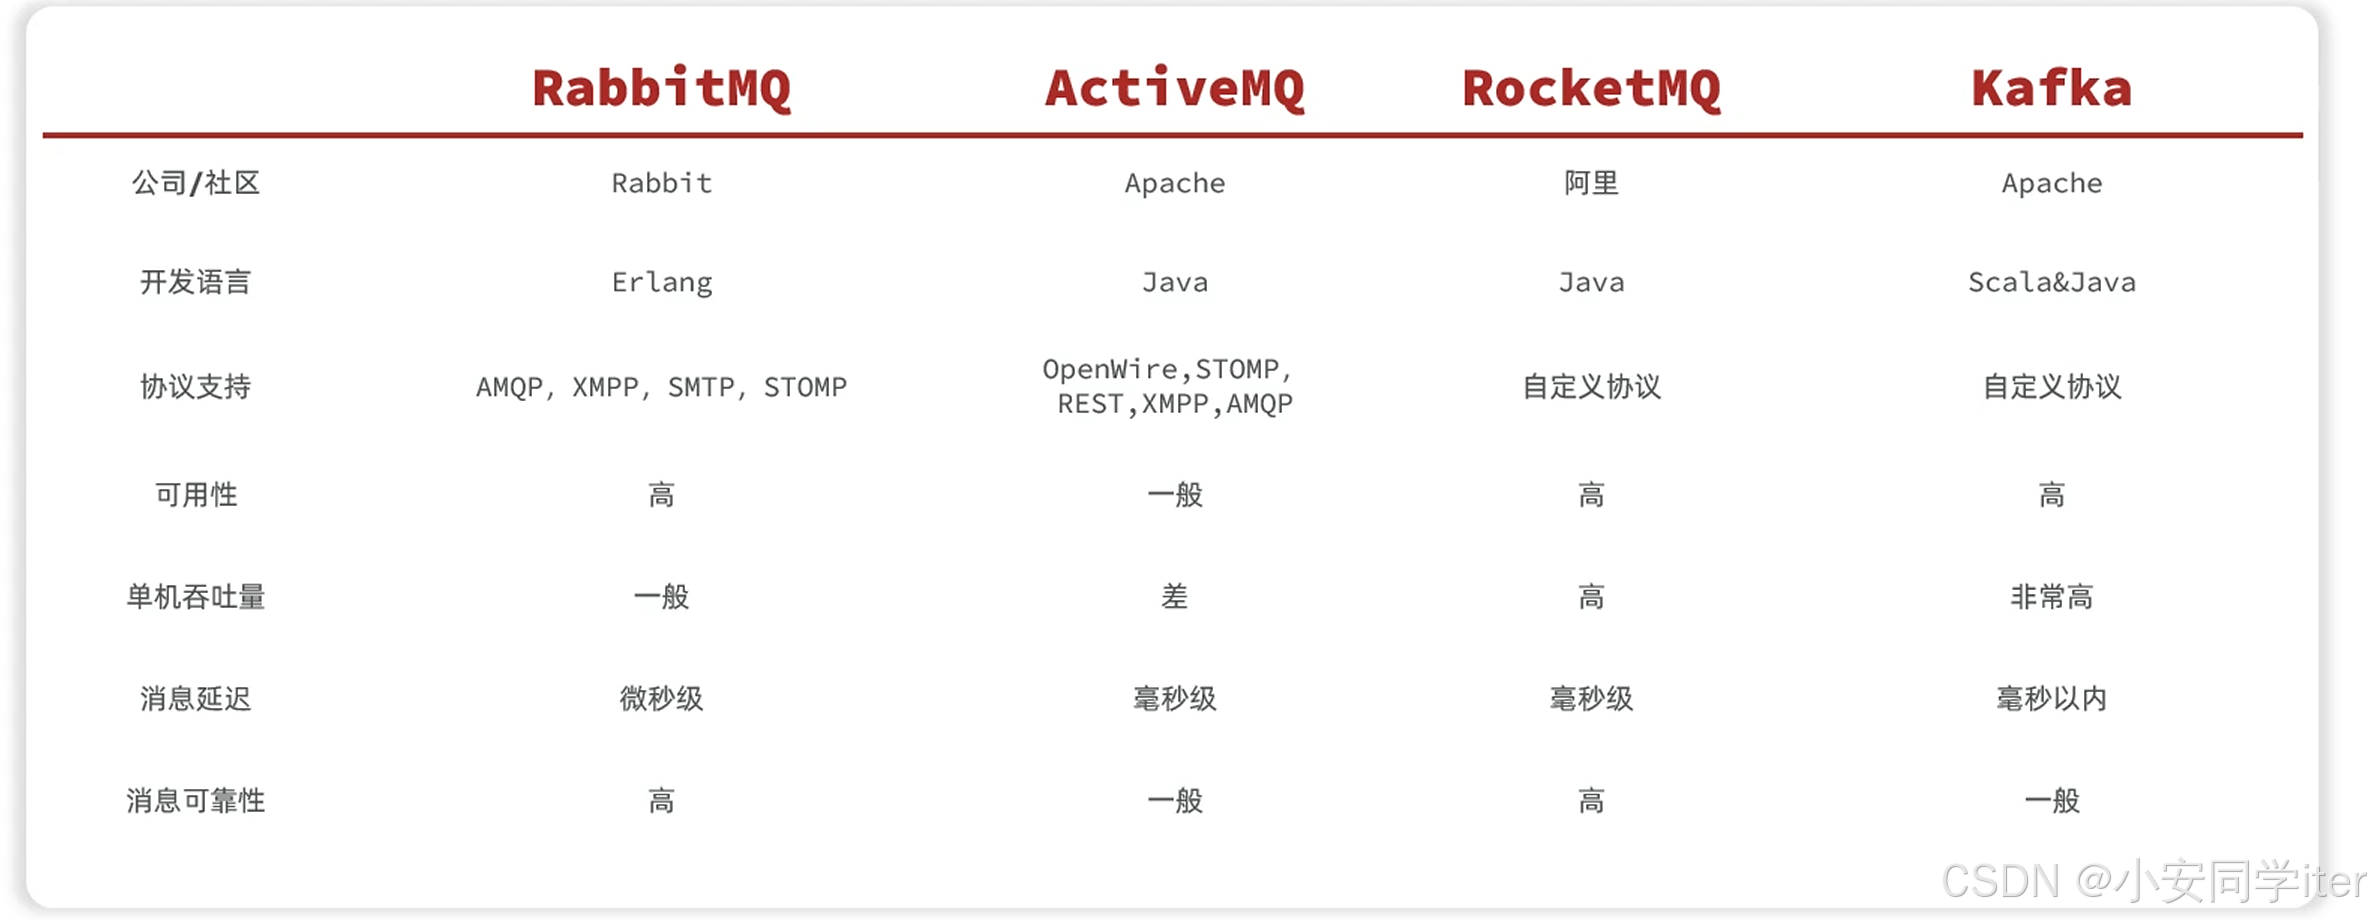
一 MQ技术选型
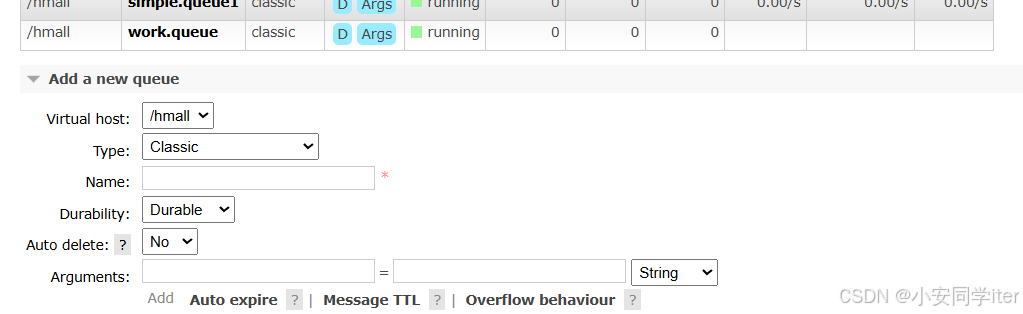
1 运行rabbitmq
2 基本介绍
3 快速入门
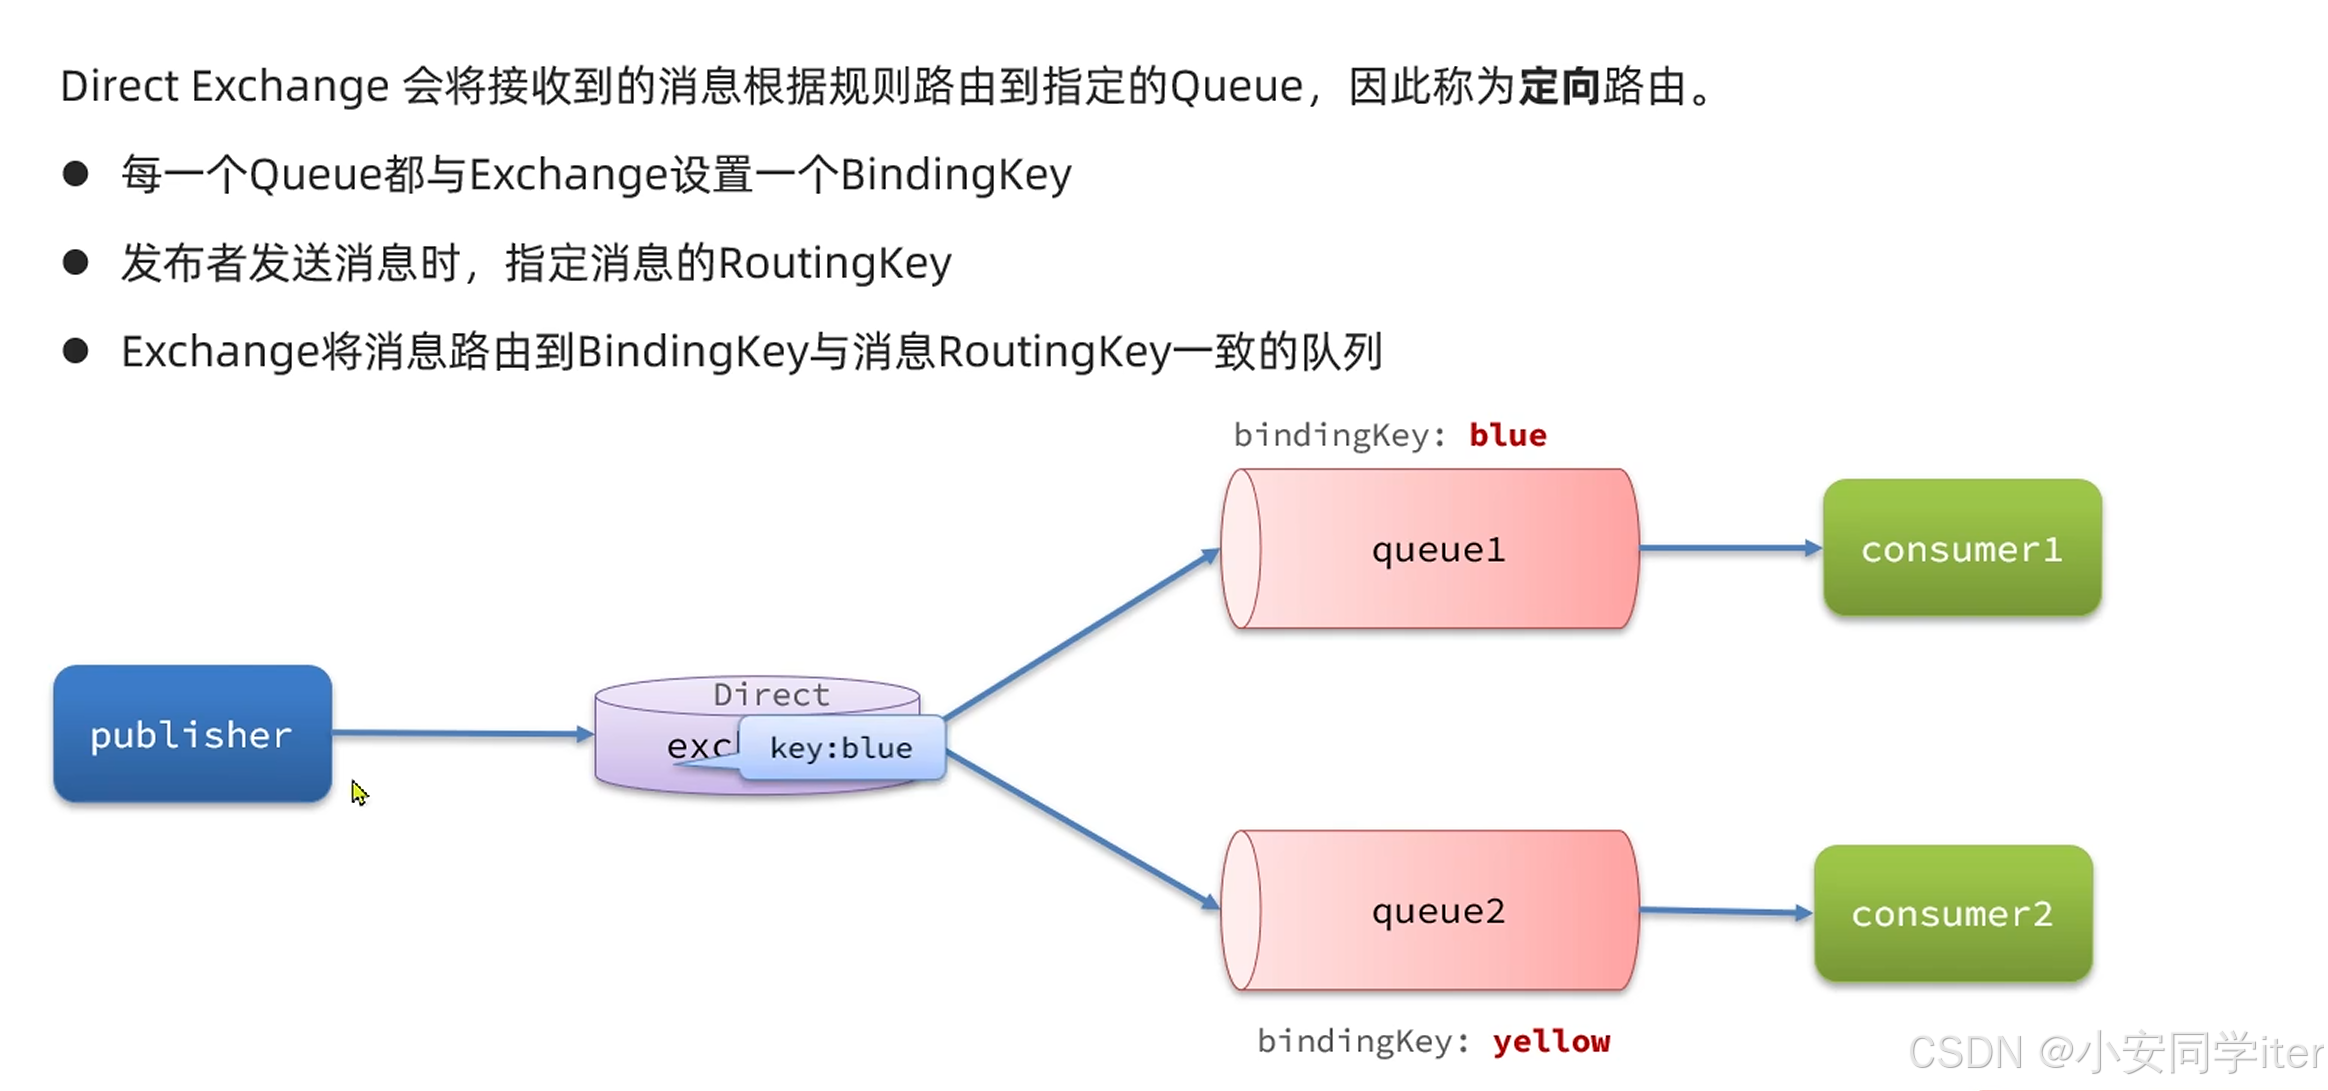
1 交换机负责路由消息给队列
2 数据隔离
二 Java客户端
1 快速入门
2 WorkQueue
3 FanOut交换机
4 Direct交换机
5 Topic交换机
*6 声明队列交换机
1 在配置类当中声明
2 使用注解的方式指定
7 消息转换器
*前景引入
| 维度 | 异步通讯 | 同步通讯 | RabbitMQ 的定位 |
|---|---|---|---|
| 交互方式 | 通过中间件间接通信,无阻塞等待 | 直接通信,需实时响应 | 作为异步通讯的核心载体,支持消息缓存与路由 |
| 耦合度 | 低(生产者和消费者解耦) | 高(调用方依赖被调用方可用性) | 通过队列解耦系统,提升容错性 |
| 适用场景 | 高并发、耗时任务、事件驱动架构 | 实时性要求高的简单交互 | 天然适合异步场景,也可通过 RPC 支持同步需求 |
| 性能与扩展性 | 高吞吐,支持水平扩展 | 受限于实时响应能力 | 通过集群、负载均衡优化异步性能 |
一 MQ技术选型
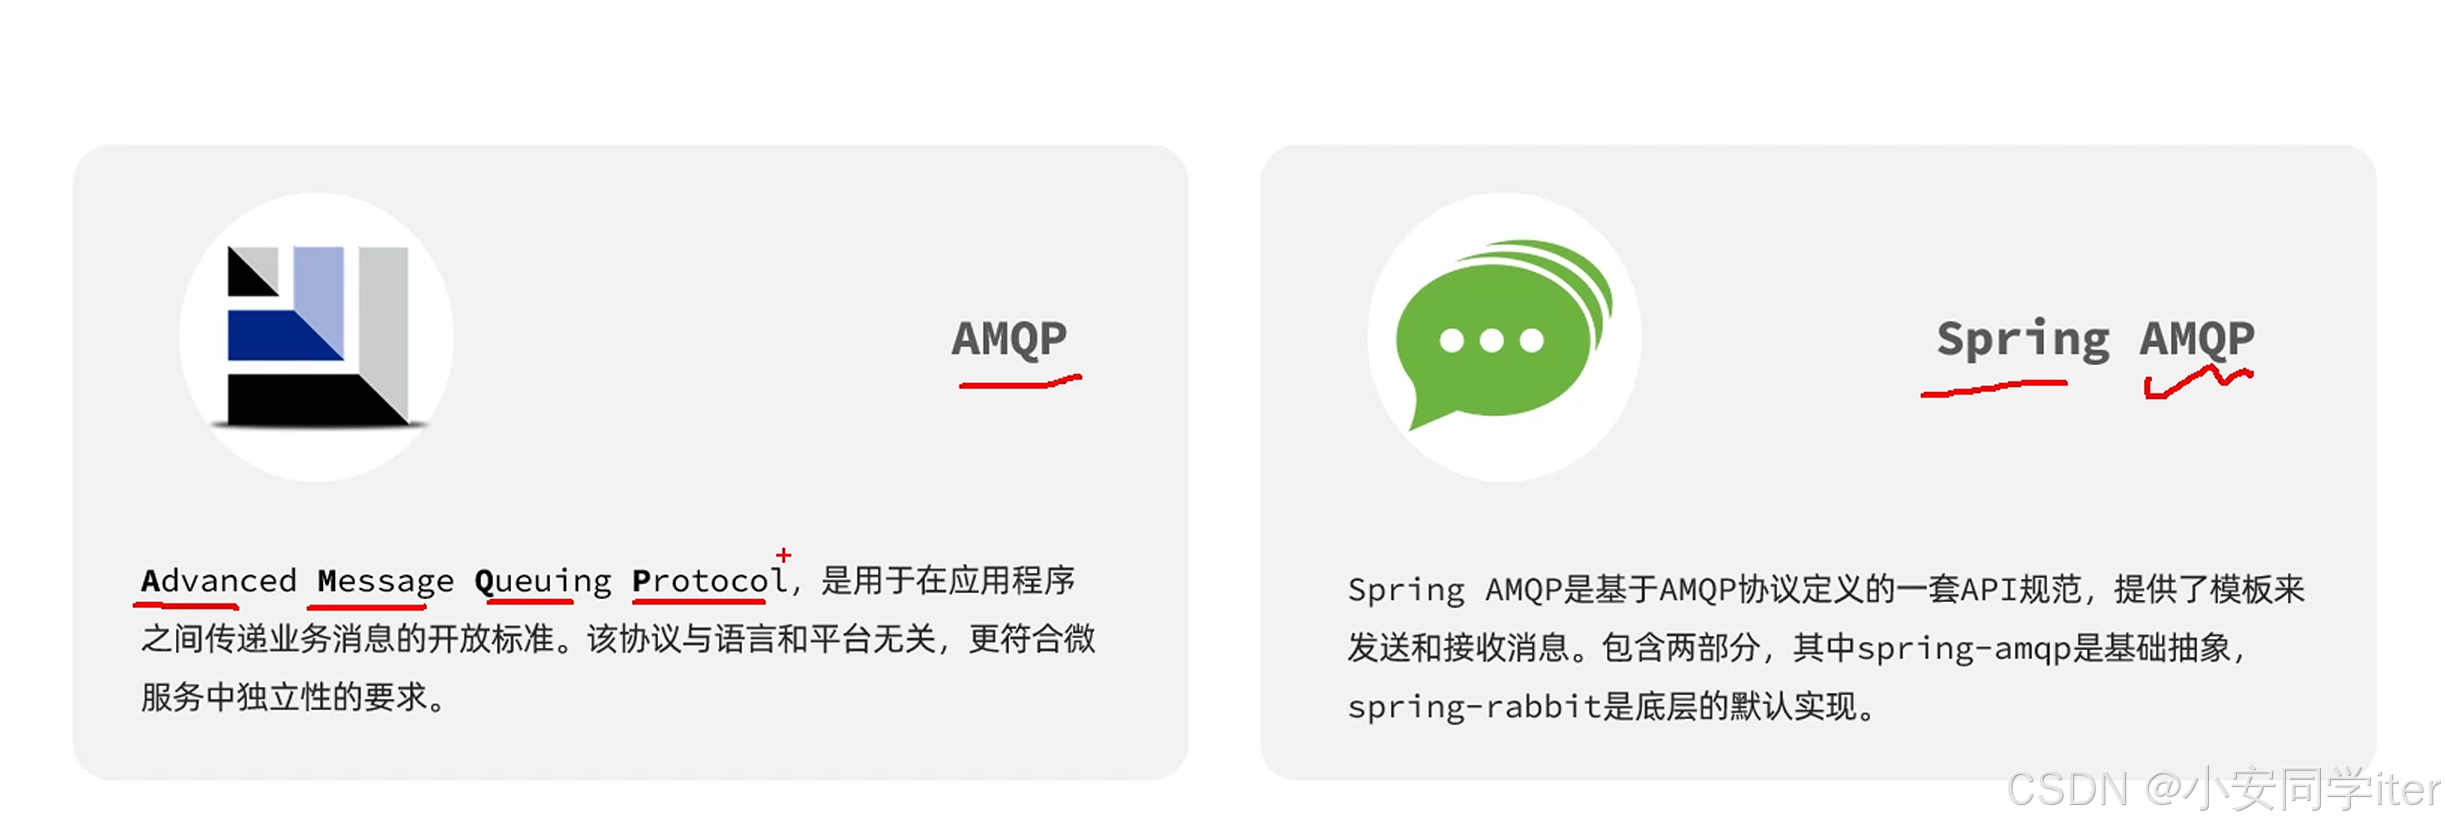
MQ(message Queue)消息队列,字面来看就是存放消息的队列。也就是异步调用中的Broke。
1 运行rabbitmq
在虚拟机上安装Docker_虚拟机安装docker-CSDN博客
拉取镜像
- docker pull rabbitmq:3-management

在容器当中运行
- docker run ...

借助端口访问
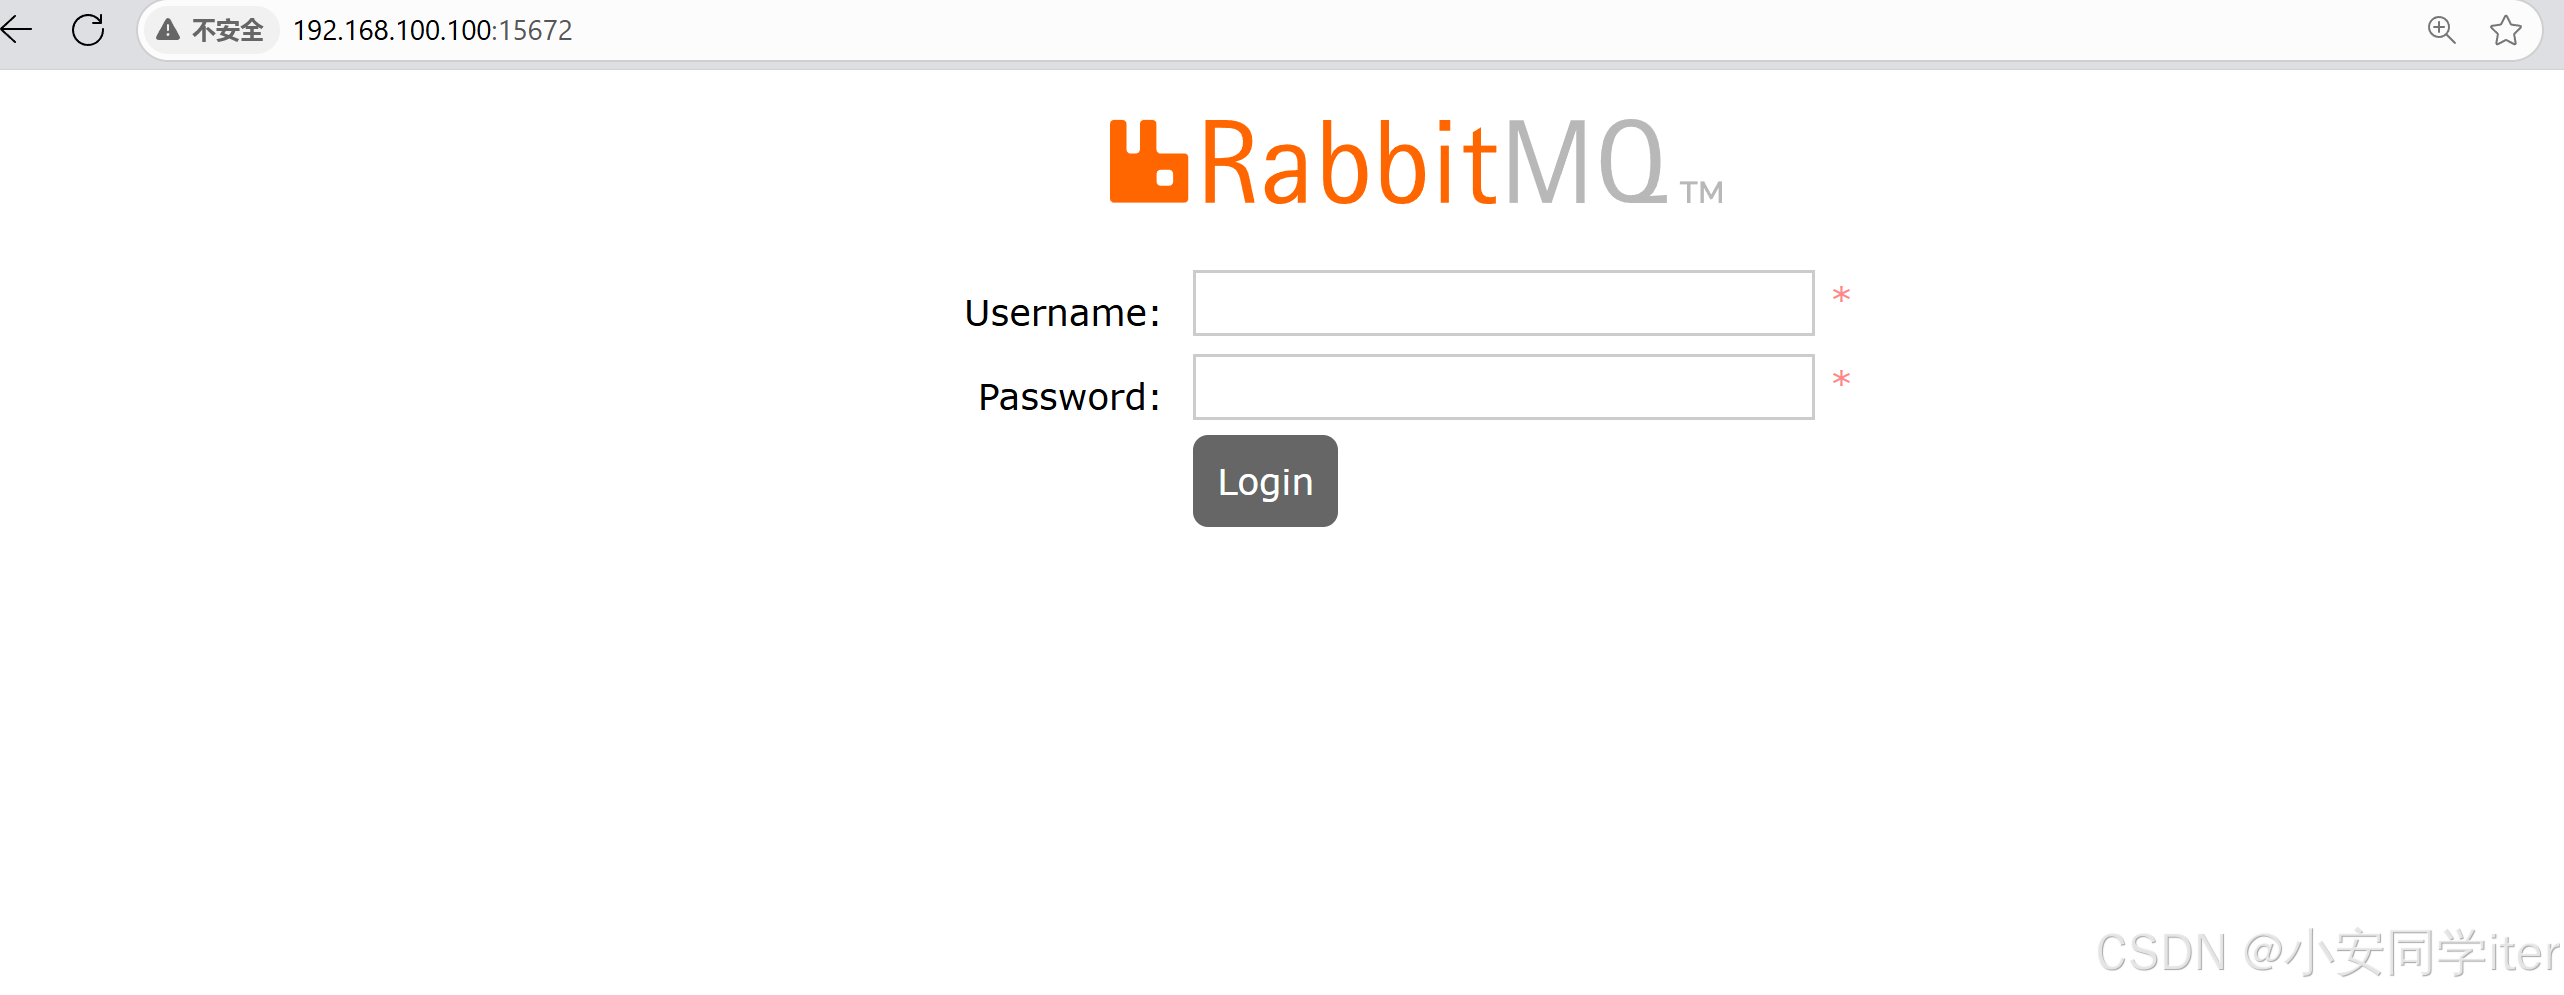
2 基本介绍
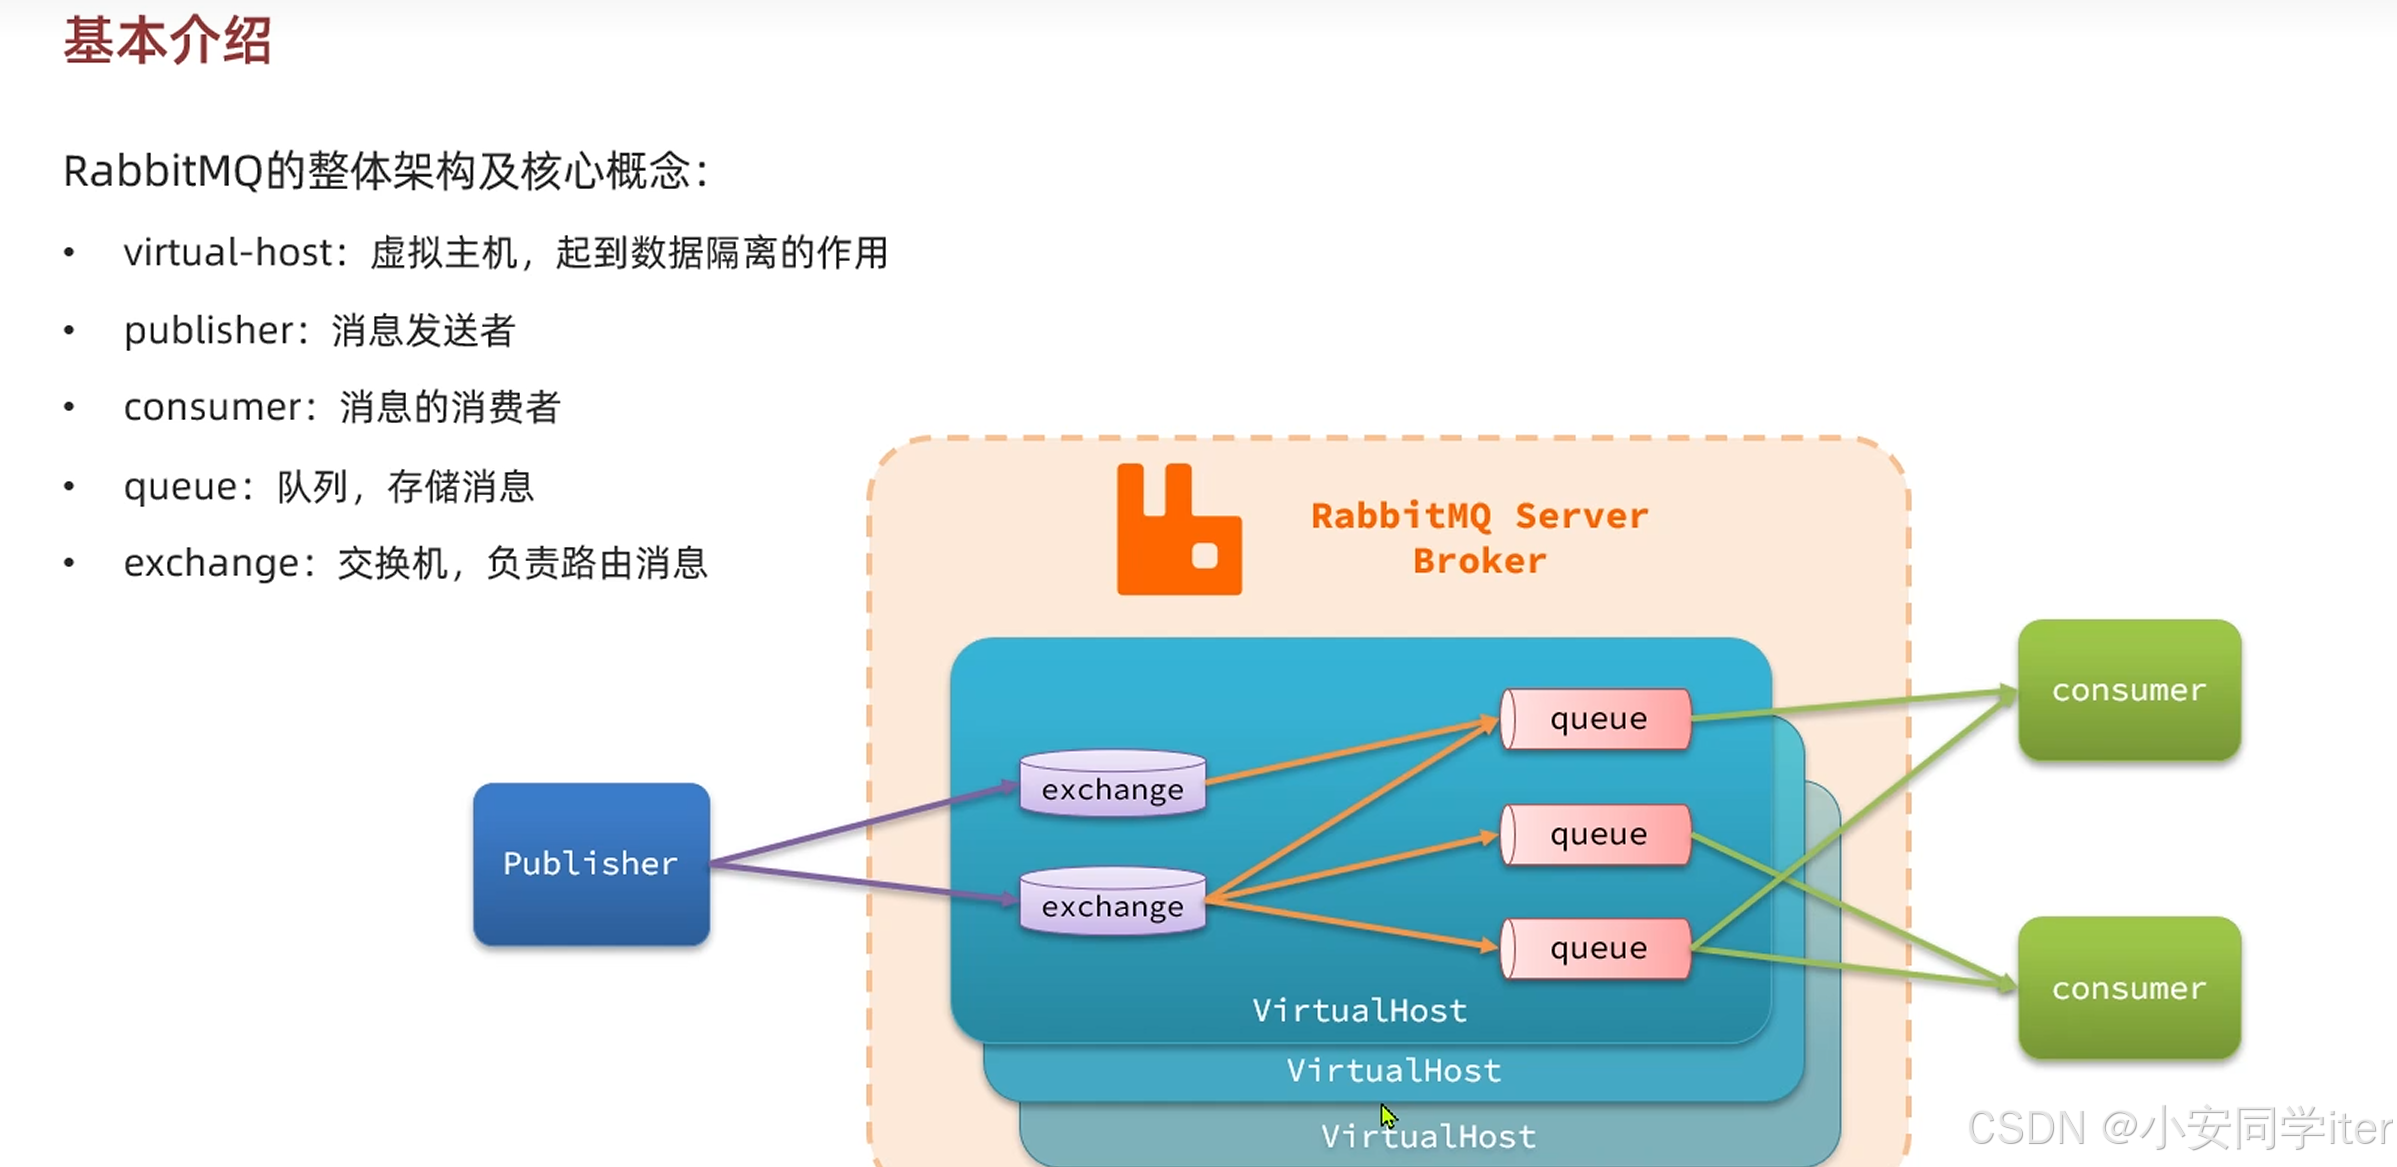
核心概念总结
| 角色 | 作用 | 类比 |
|---|---|---|
| Publisher | 发送消息的程序 | 寄信人 |
| Exchange | 按规则将消息分发到队列 | 邮局分拣员 |
| Queue | 存储消息的容器 | 邮箱 |
| Consumer | 从队列取消息并处理的程序 | 收信人 |
| Virtual Host | 隔离不同业务的消息环境(如测试、生产) | 邮局内的独立部门 |
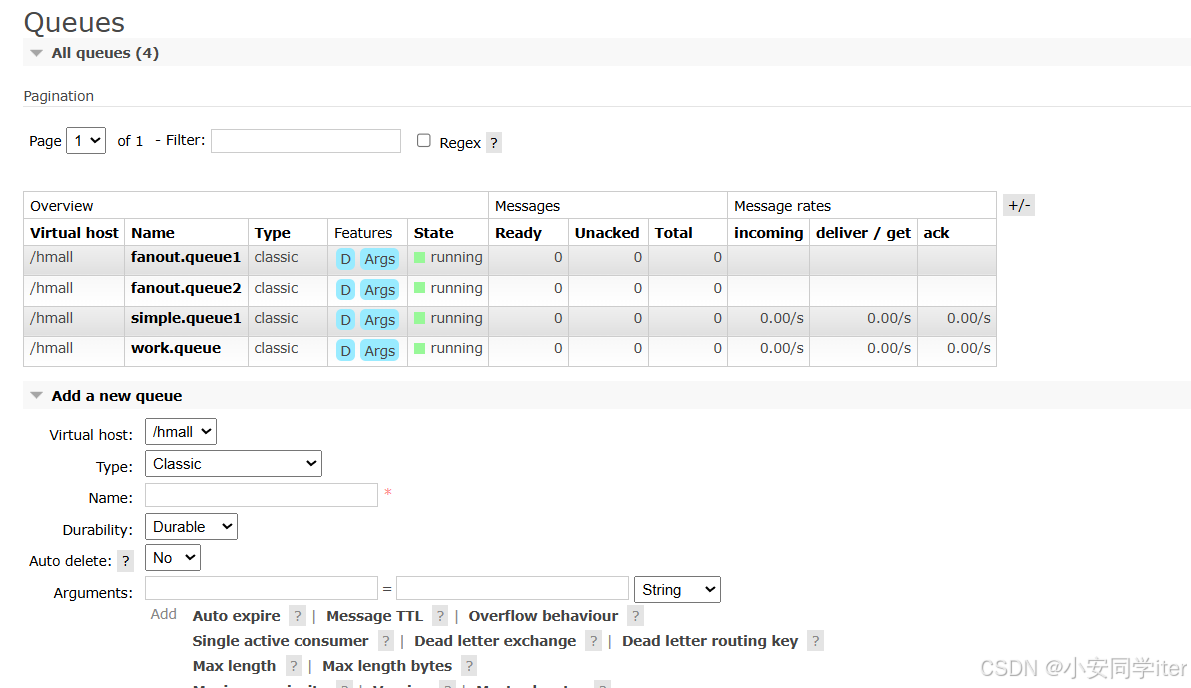
3 快速入门
1 交换机负责路由消息给队列

添加成功
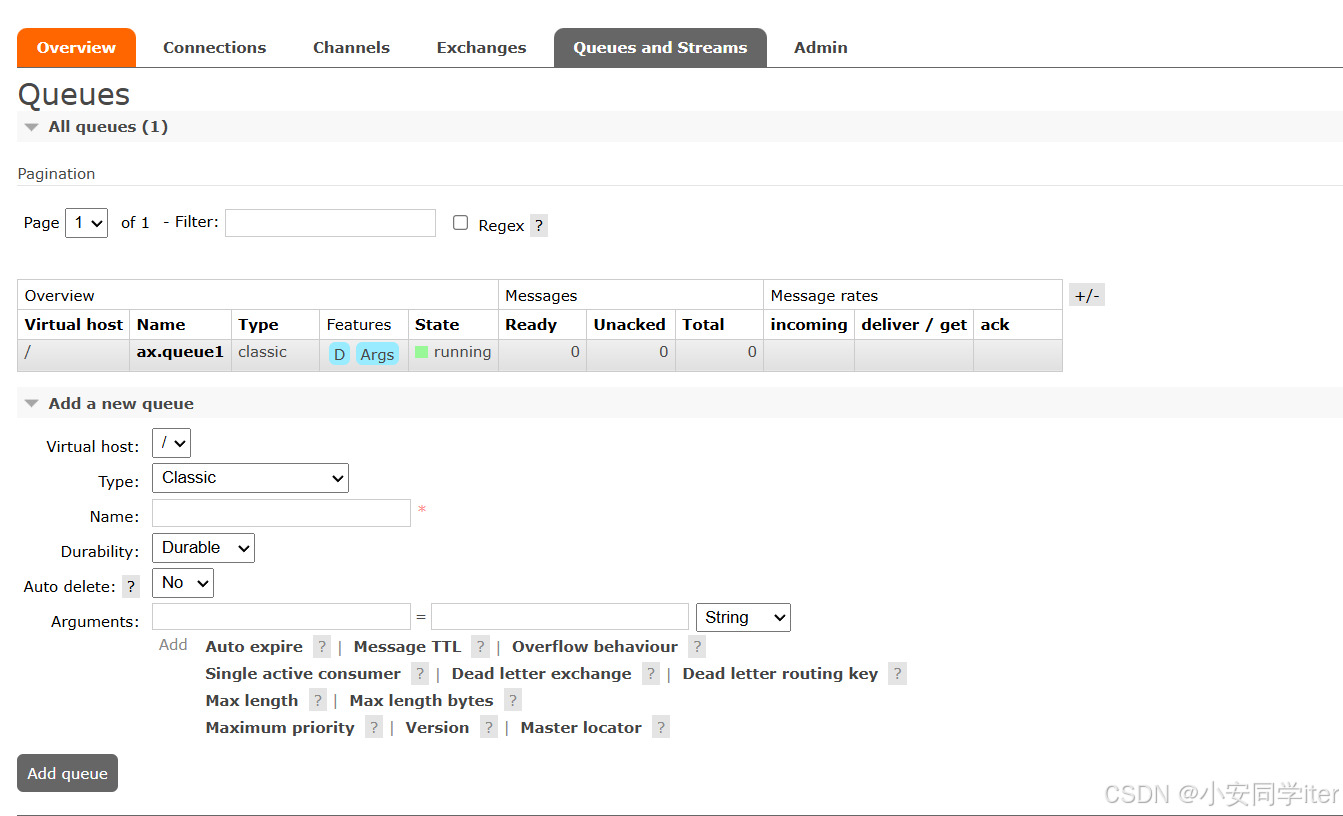
找到一台交换机
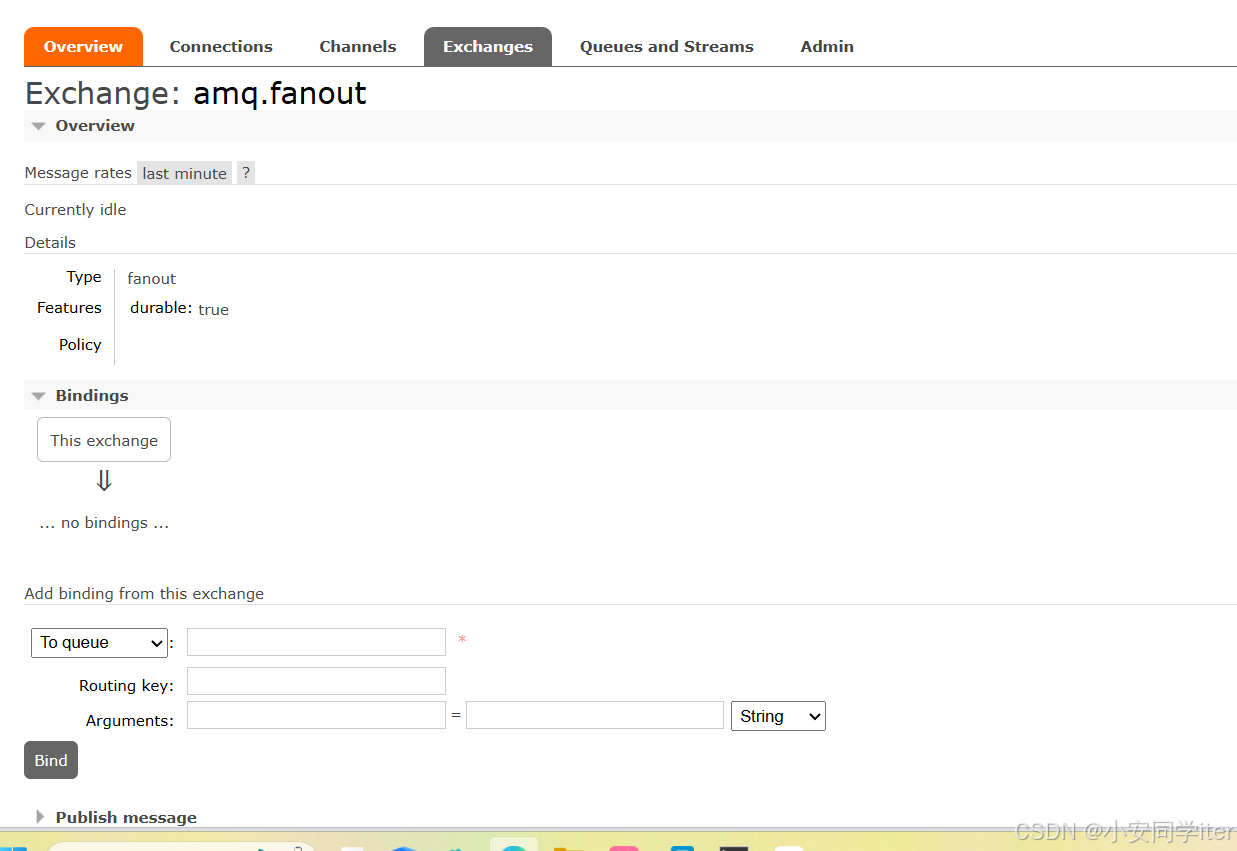
需要添加绑定队列从而实现路由给队列
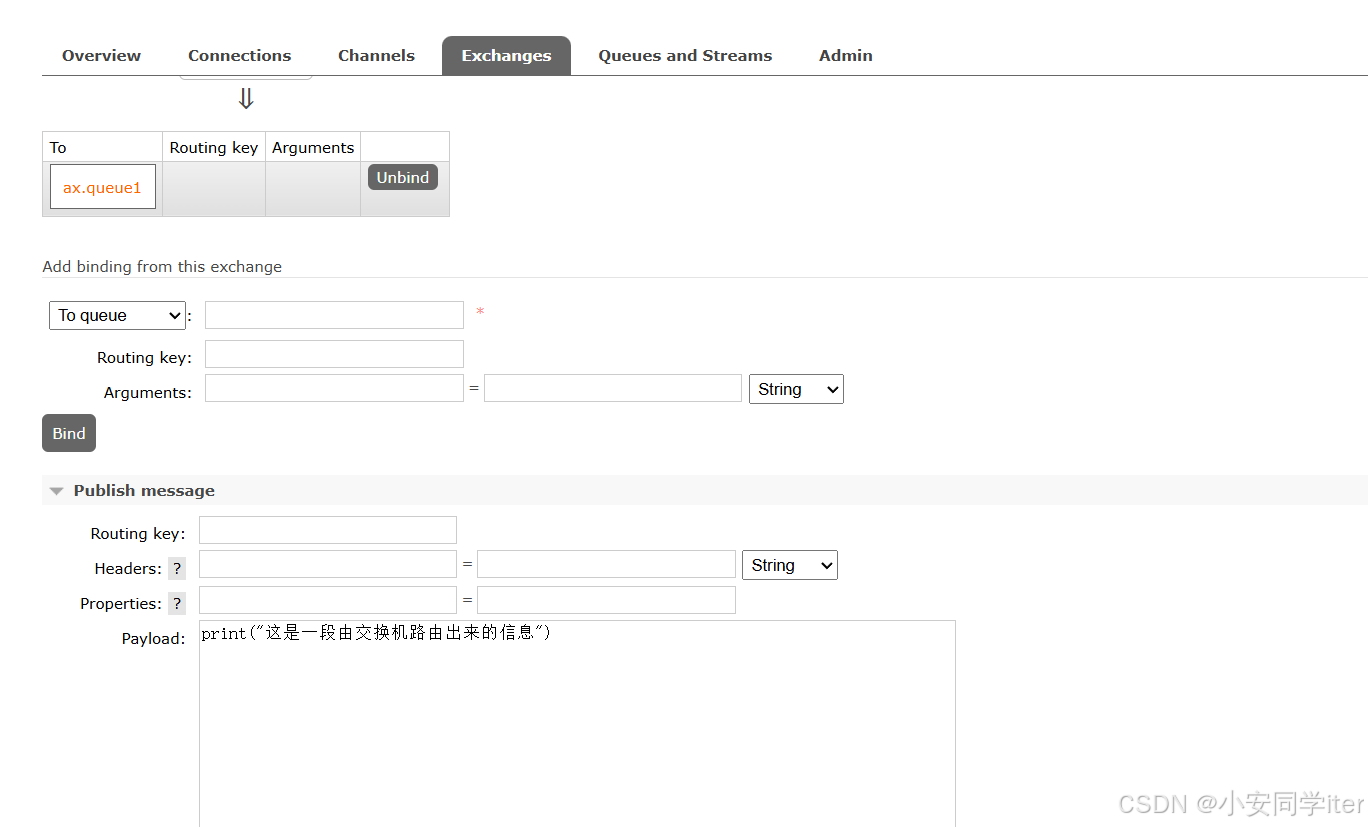
消息路由成功
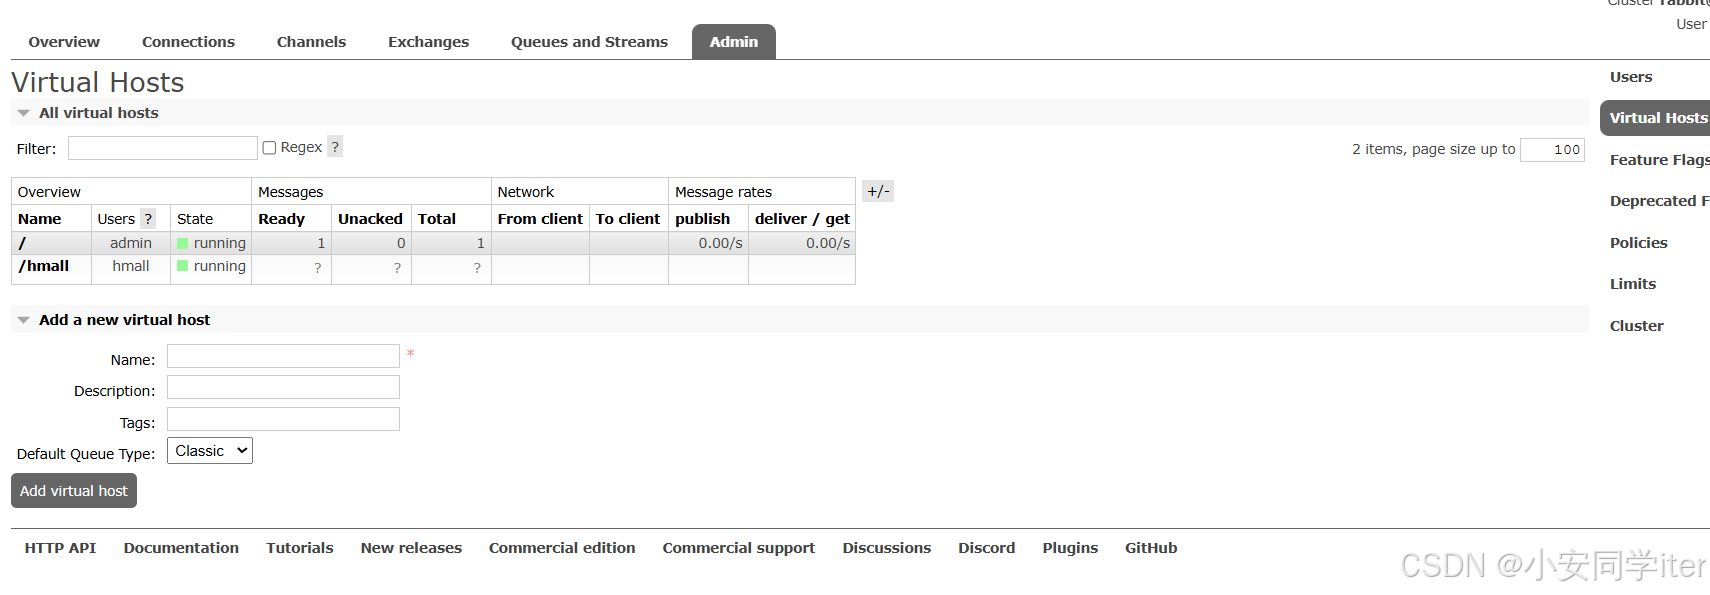
2 数据隔离
RabbitMQ 中的 虚拟主机(vhost) 可以用一个简单的比喻来理解:它就像一台大型服务器中的“独立房间”,每个房间都有自己的门禁系统、家具和规则,互不干扰。以下是它的核心作用:
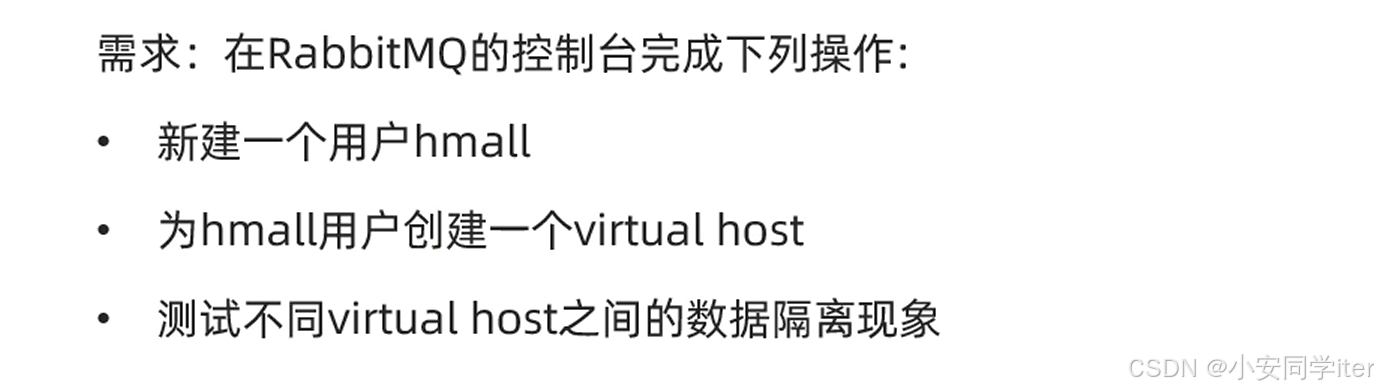
实现:
先添加一个用户
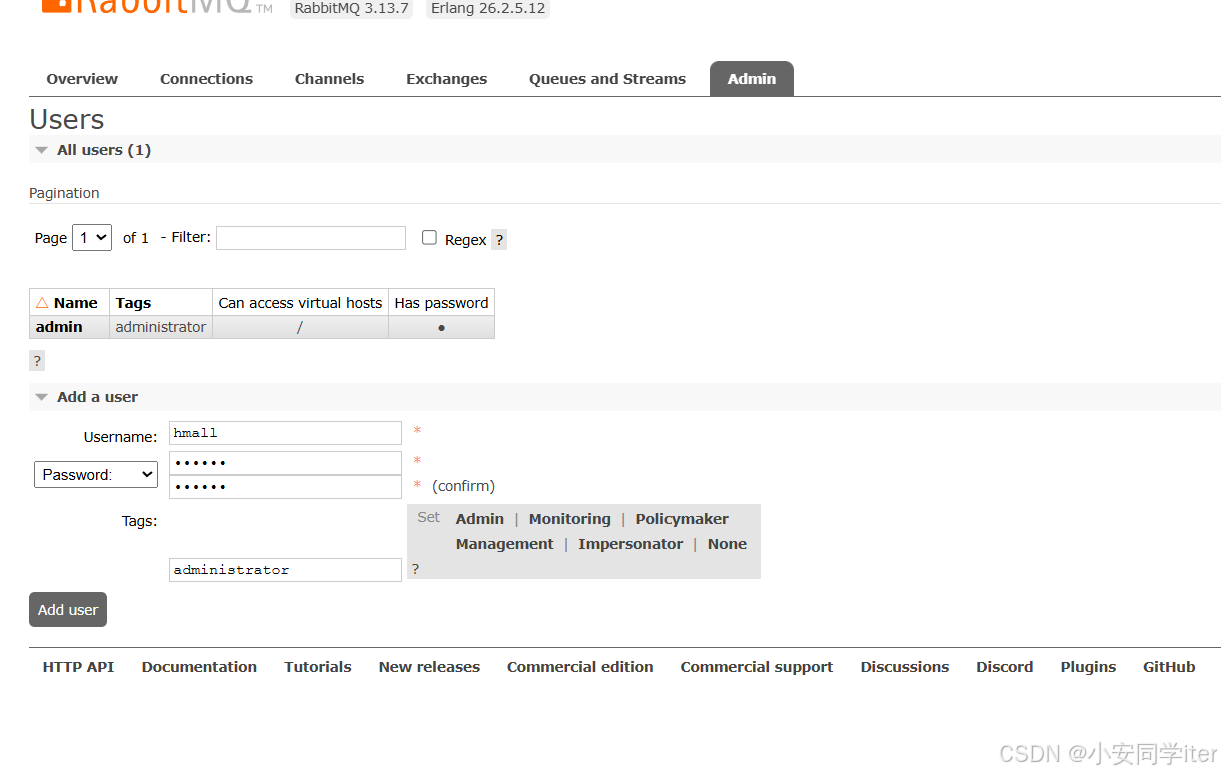
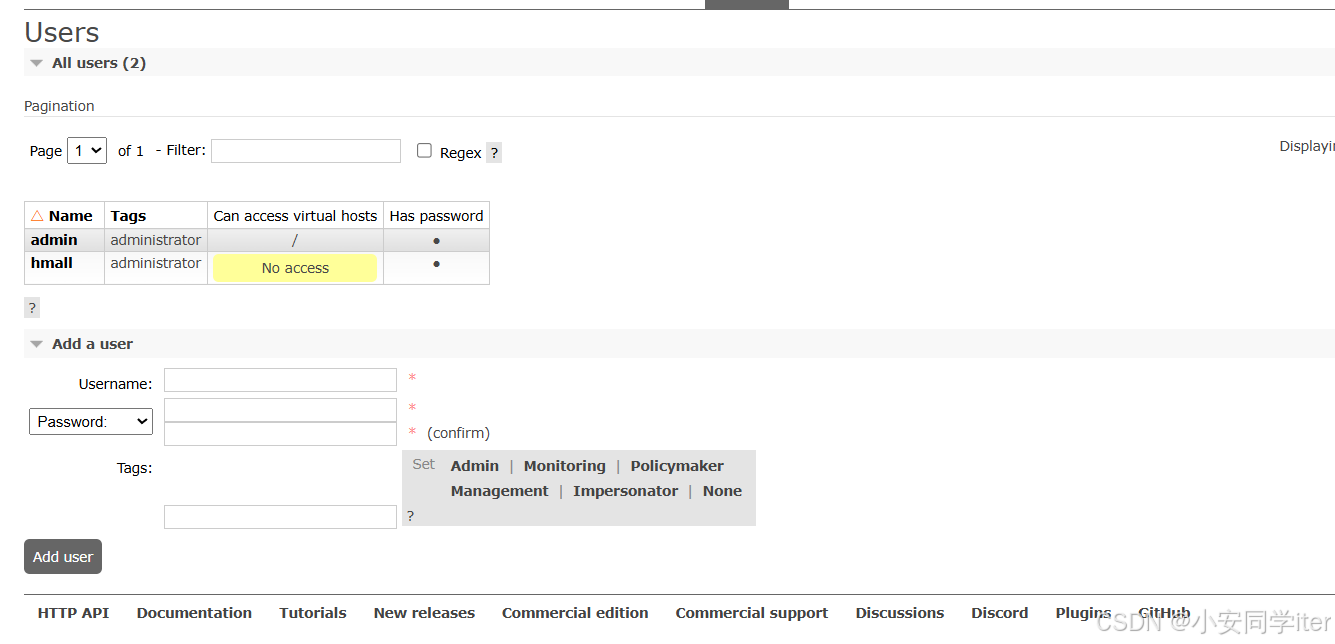
现在这个用户还没有虚拟主机,这里其是无法访问之前创建的队列,是与之前的虚拟主机隔离开的
现在退出原先的用户,以刚刚创建的用户信息登录,然后添加一个虚拟主机
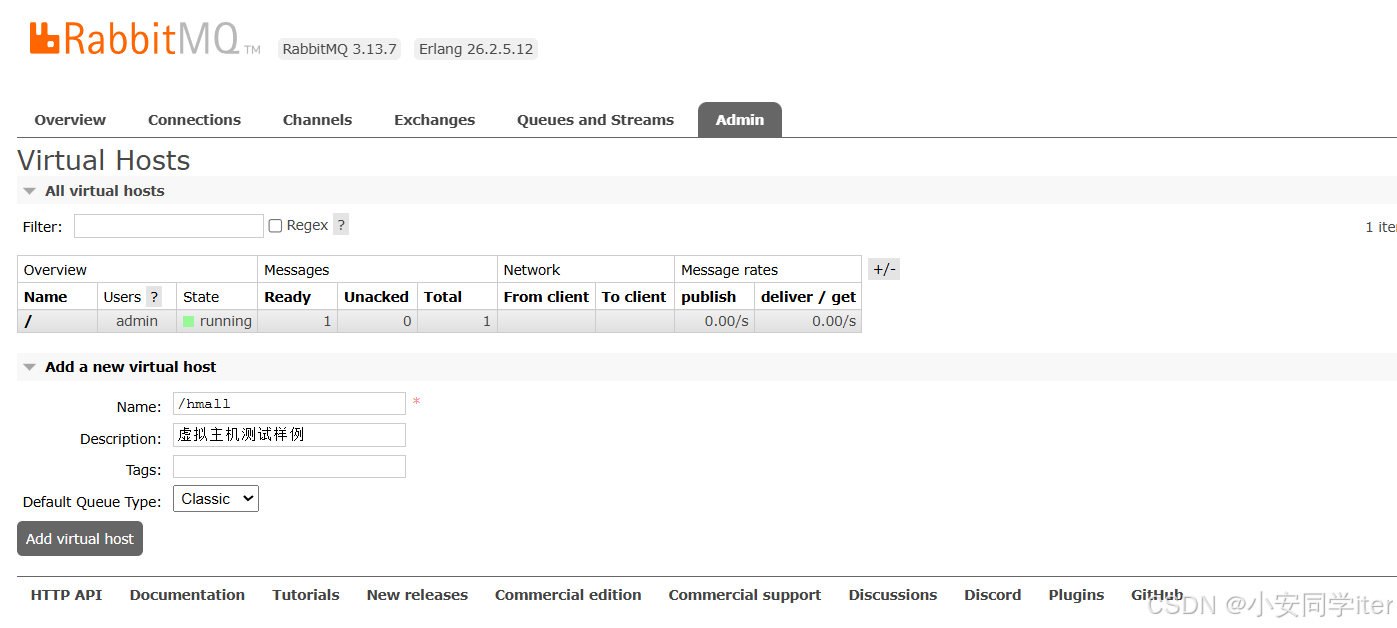
现在就可以在现在的用户之下的虚拟主机上创建新的队列
二 Java客户端
1 快速入门
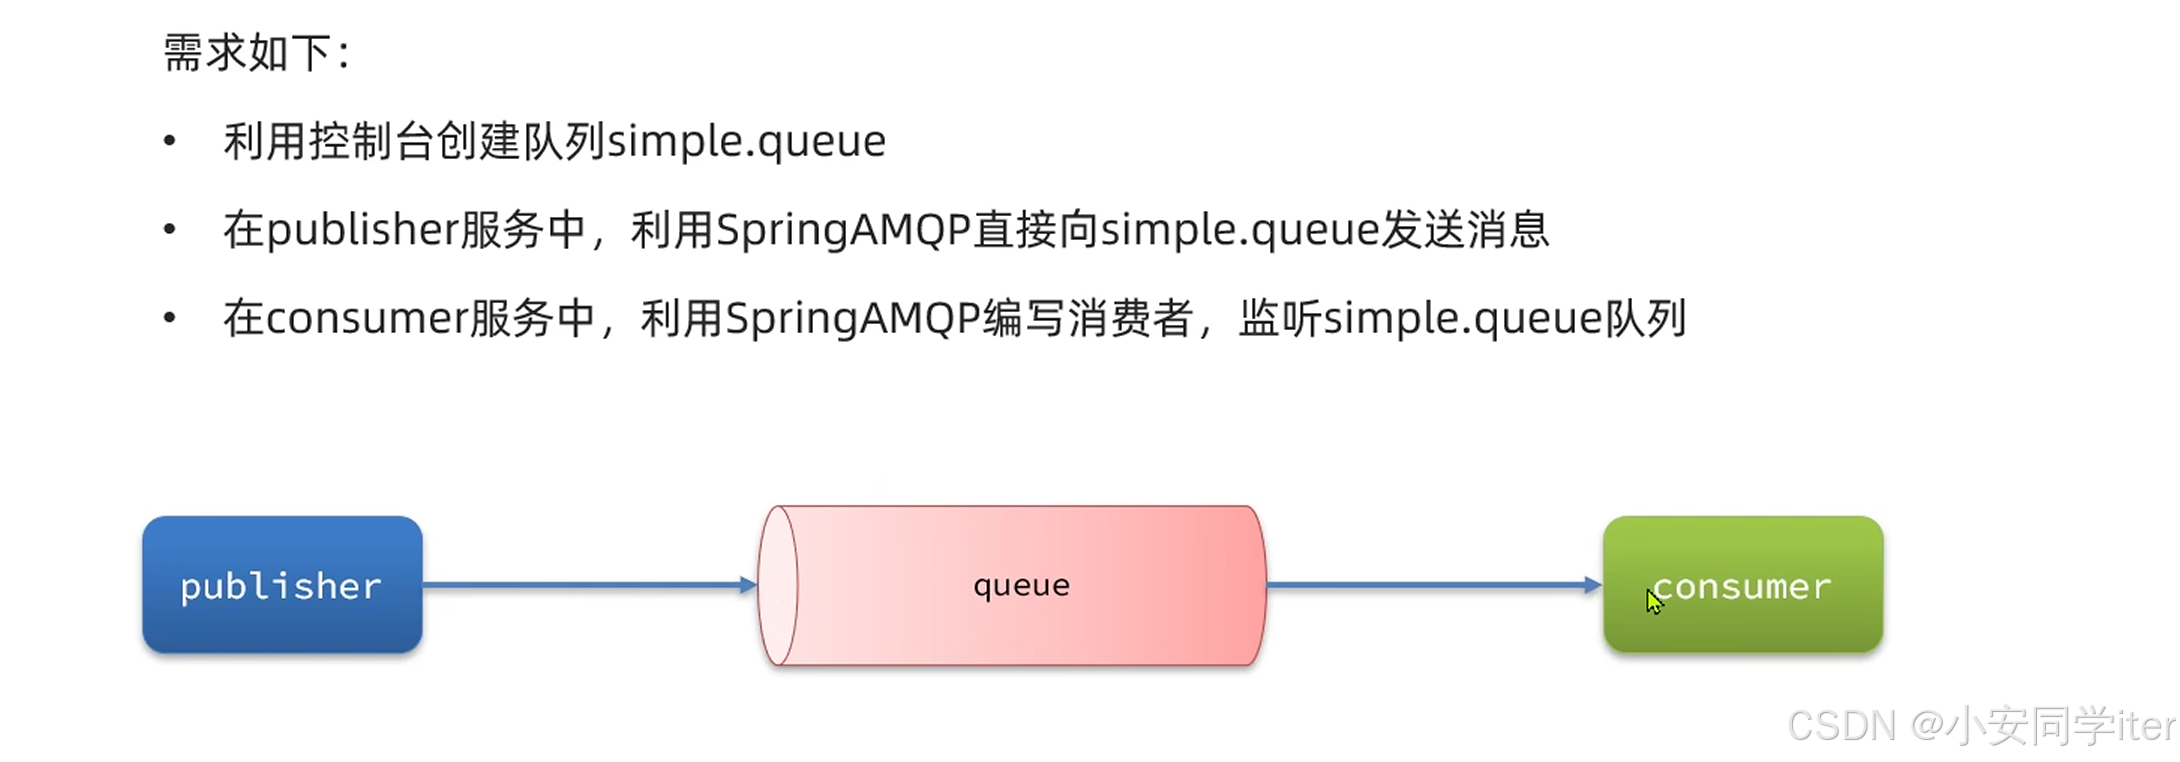
实现:
1 导入spring-amqp依赖
<dependency><groupId>org.springframework.boot</groupId><artifactId>spring-boot-starter-amqp</artifactId></dependency>2 添加队列

3 配置MQ地址
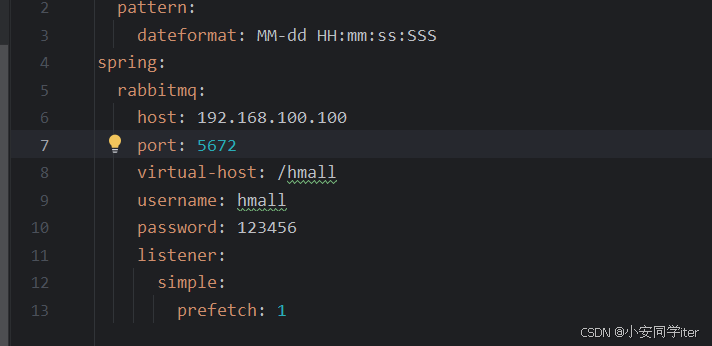
4 发送消息
@Autowiredprivate RabbitTemplate rabbitTemplate;@Testvoid testSendMessage2Queue() {String queueName = "simple.queue1";String msg = "hello, amqp!";rabbitTemplate.convertAndSend(queueName, msg);}5 队列
6 在消费者的相关方法中定义
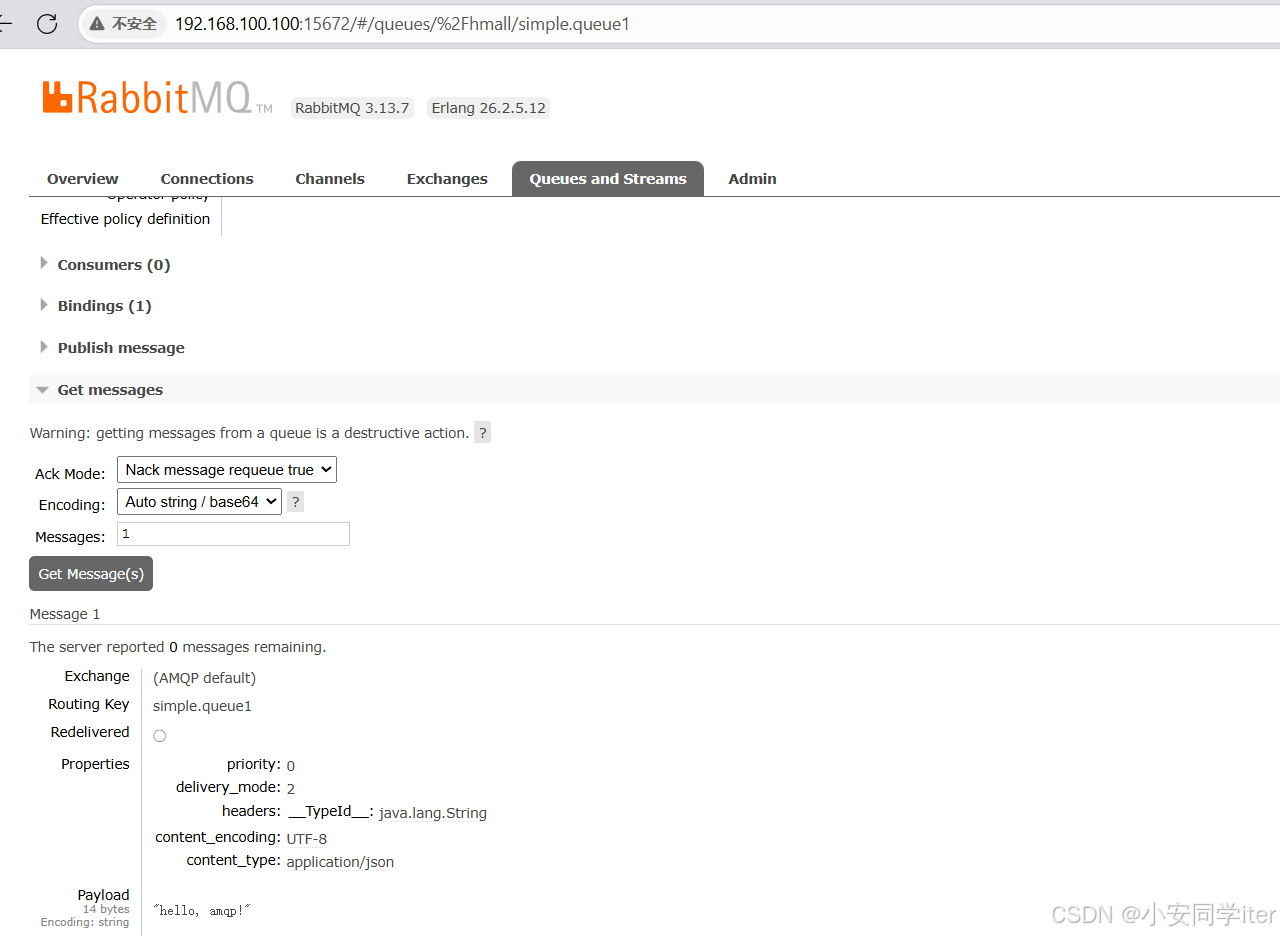
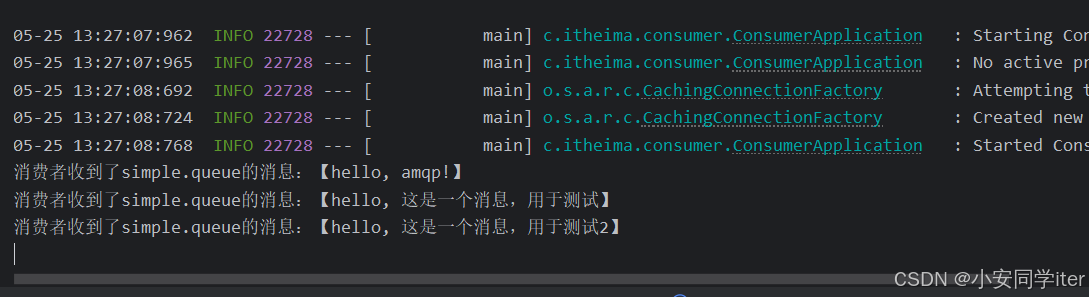
@RabbitListener(queues = "simple.queue1")public void listenSimpleQueue(String msg) {System.out.println("消费者收到了simple.queue的消息:【" + msg + "】");}7 然后将项目启动,再在测试类中发送消息,控制台会实时监控到发送的消息
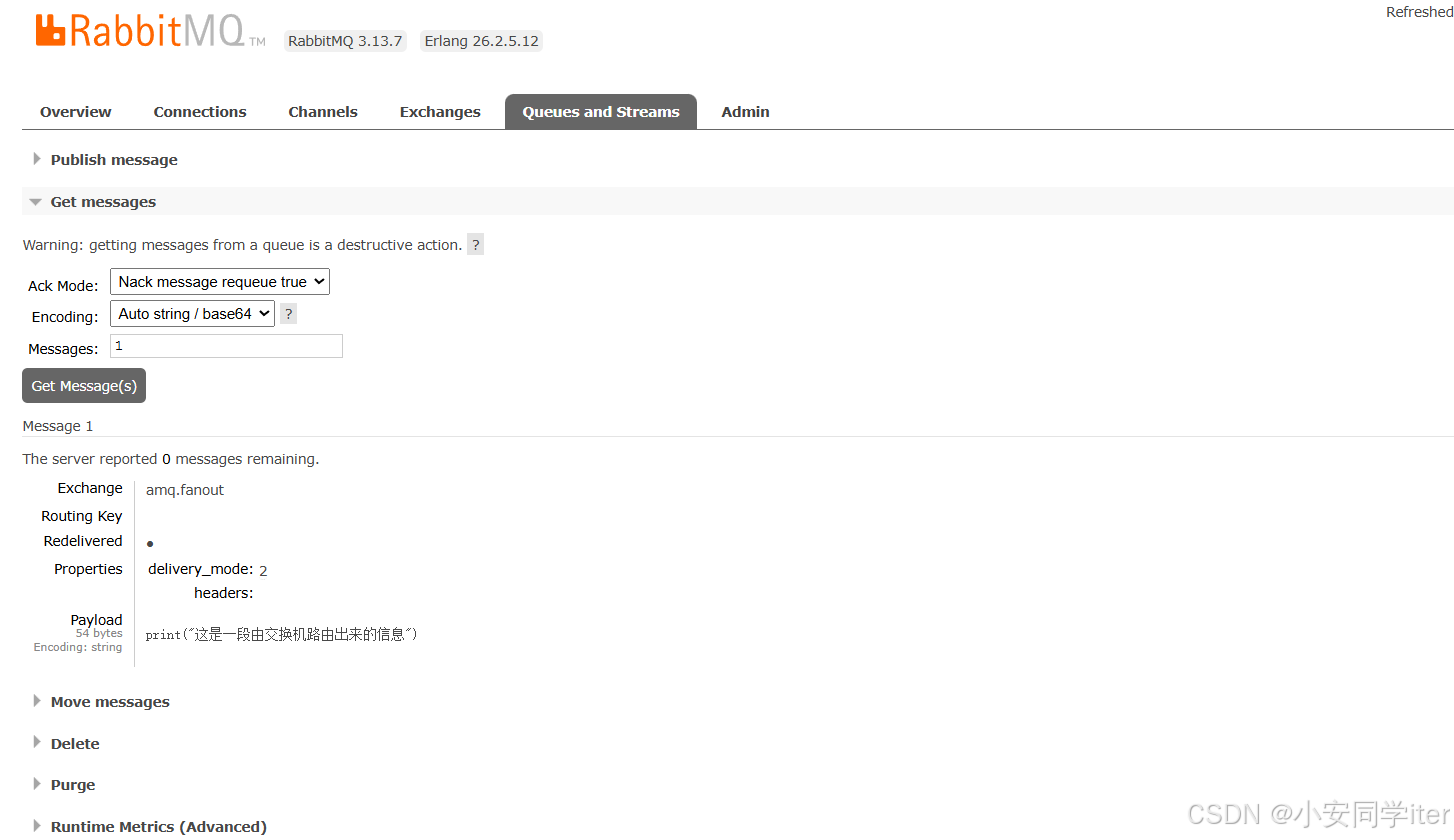
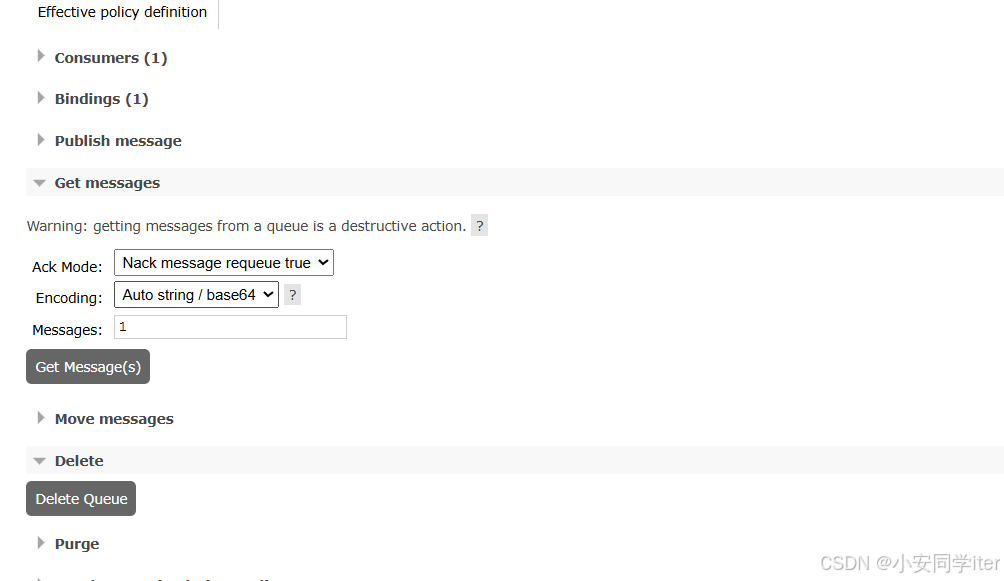
8 队列当中的消息拿出来在控制台里面就没有消息了
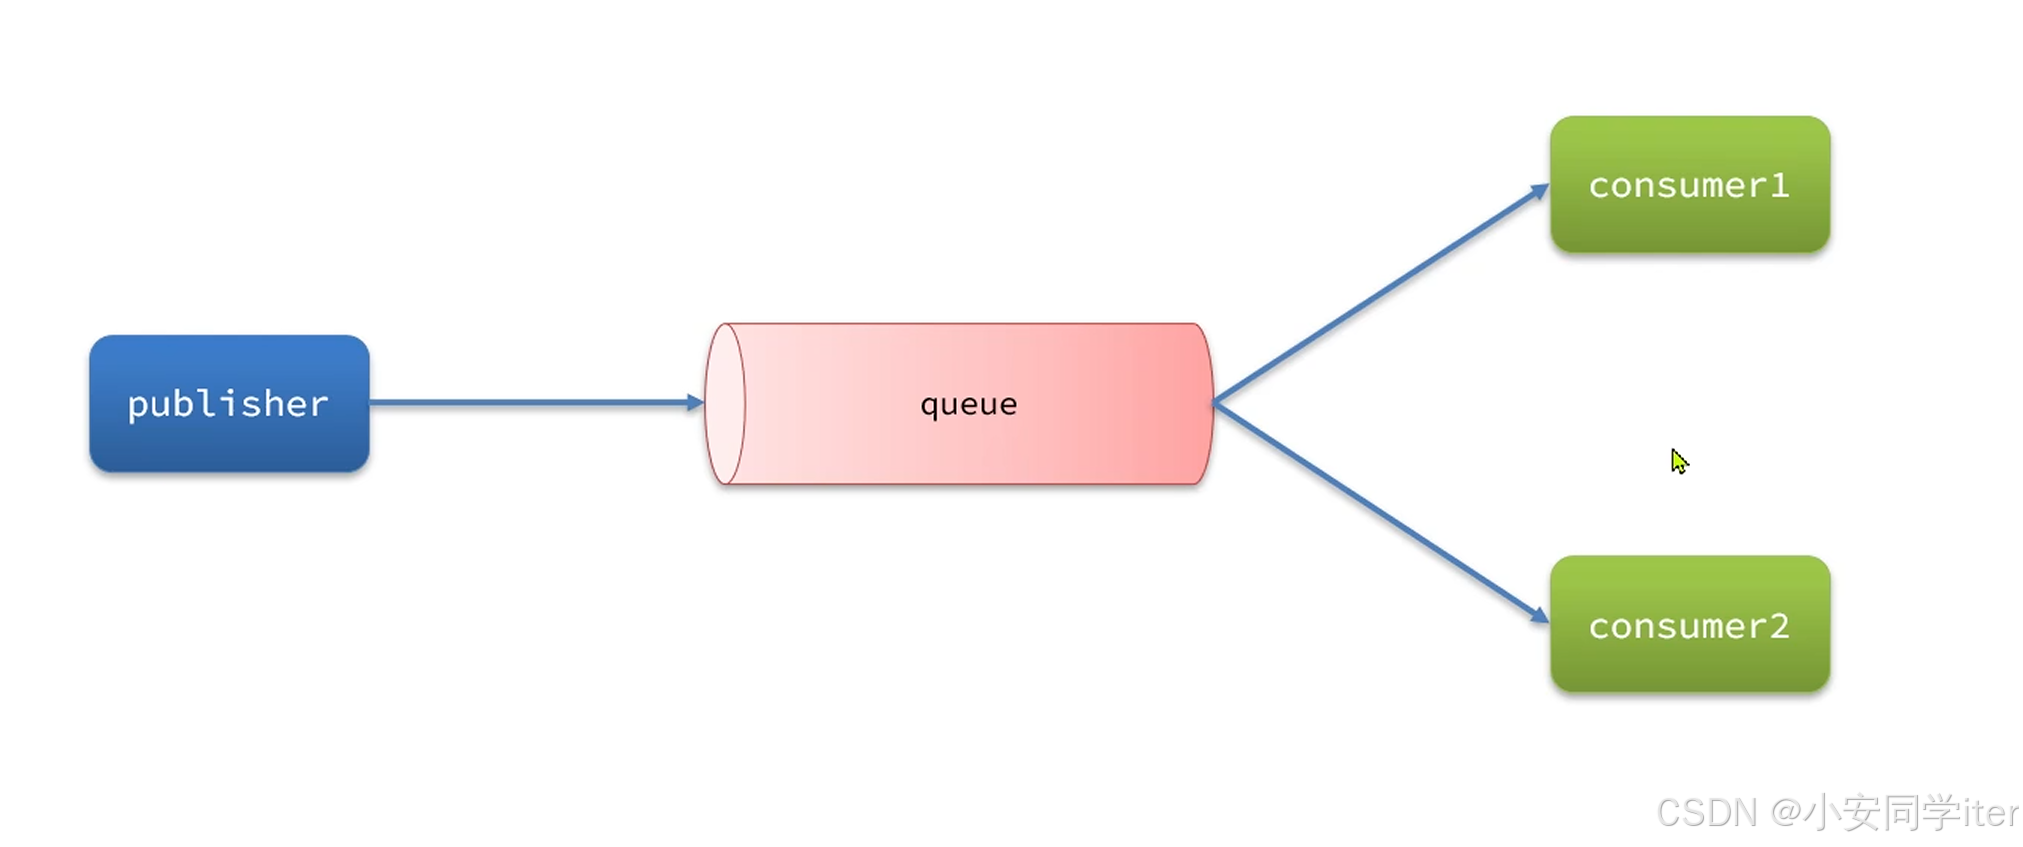
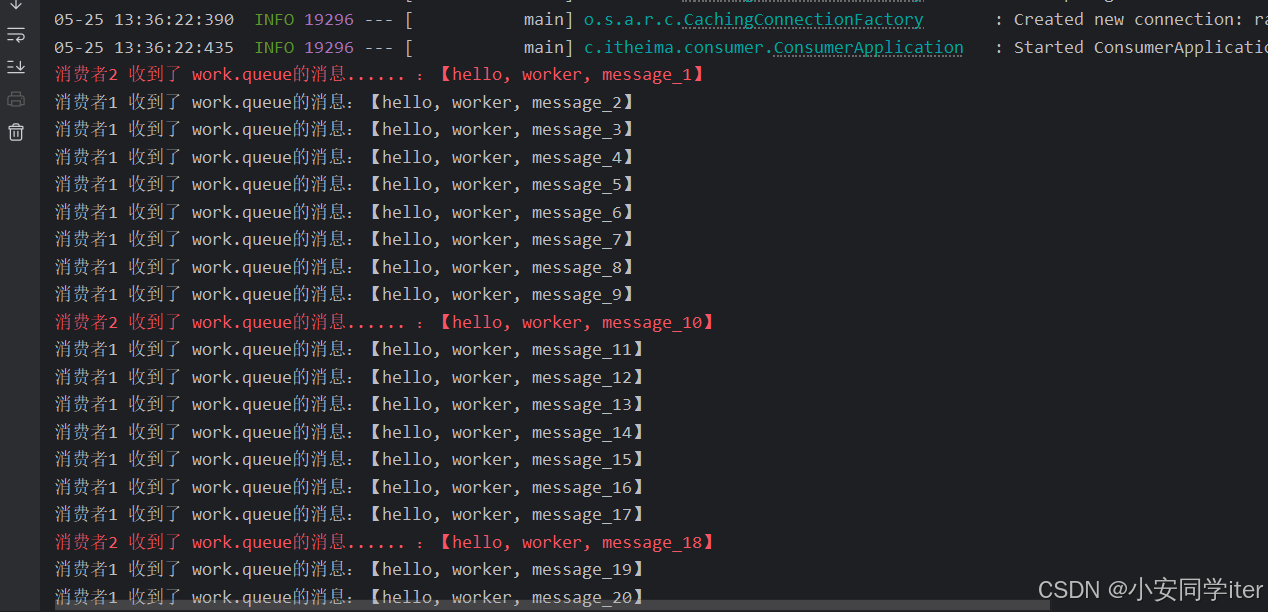
2 WorkQueue
任务模型:简单来说就是让多个消费者绑定到一个队列,共同消费队列当中的消息。
一个队列多个消费者,可以缓解消息堆积问题。
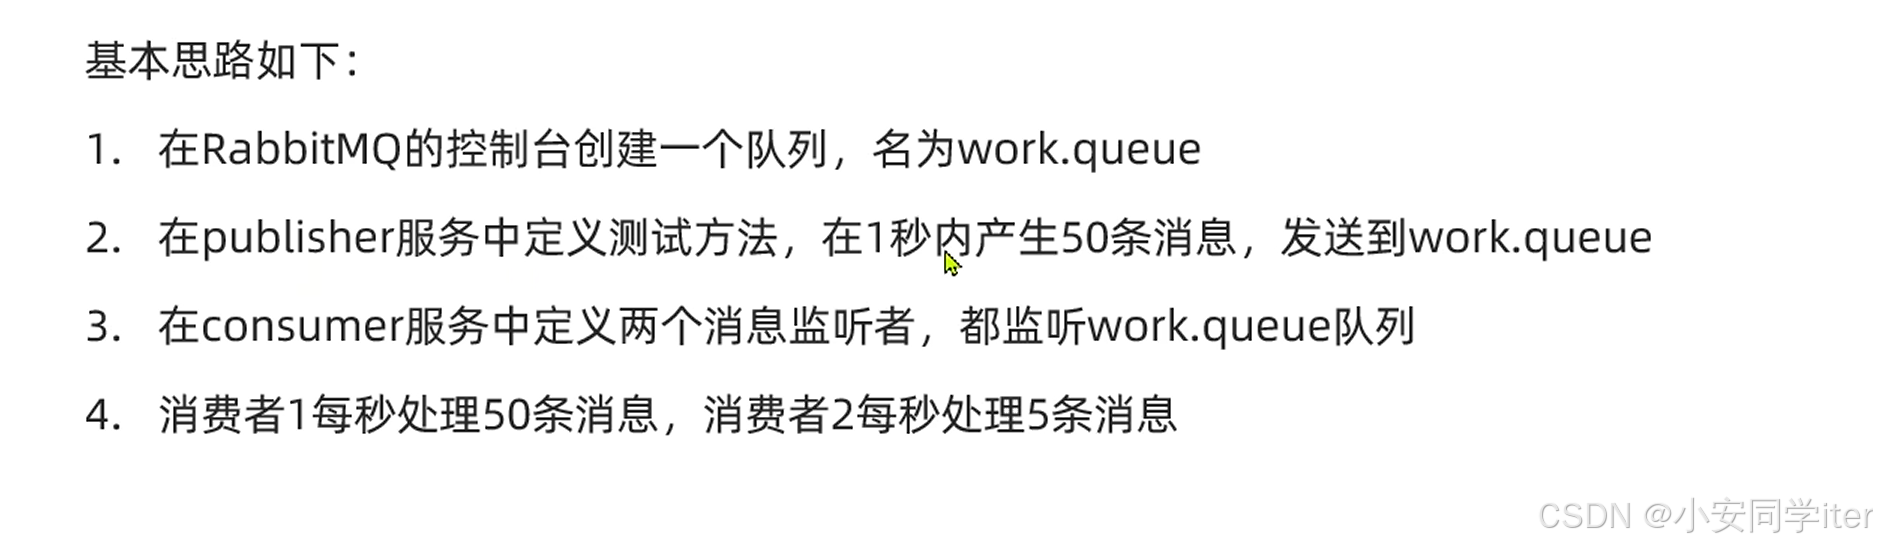
1 配置项
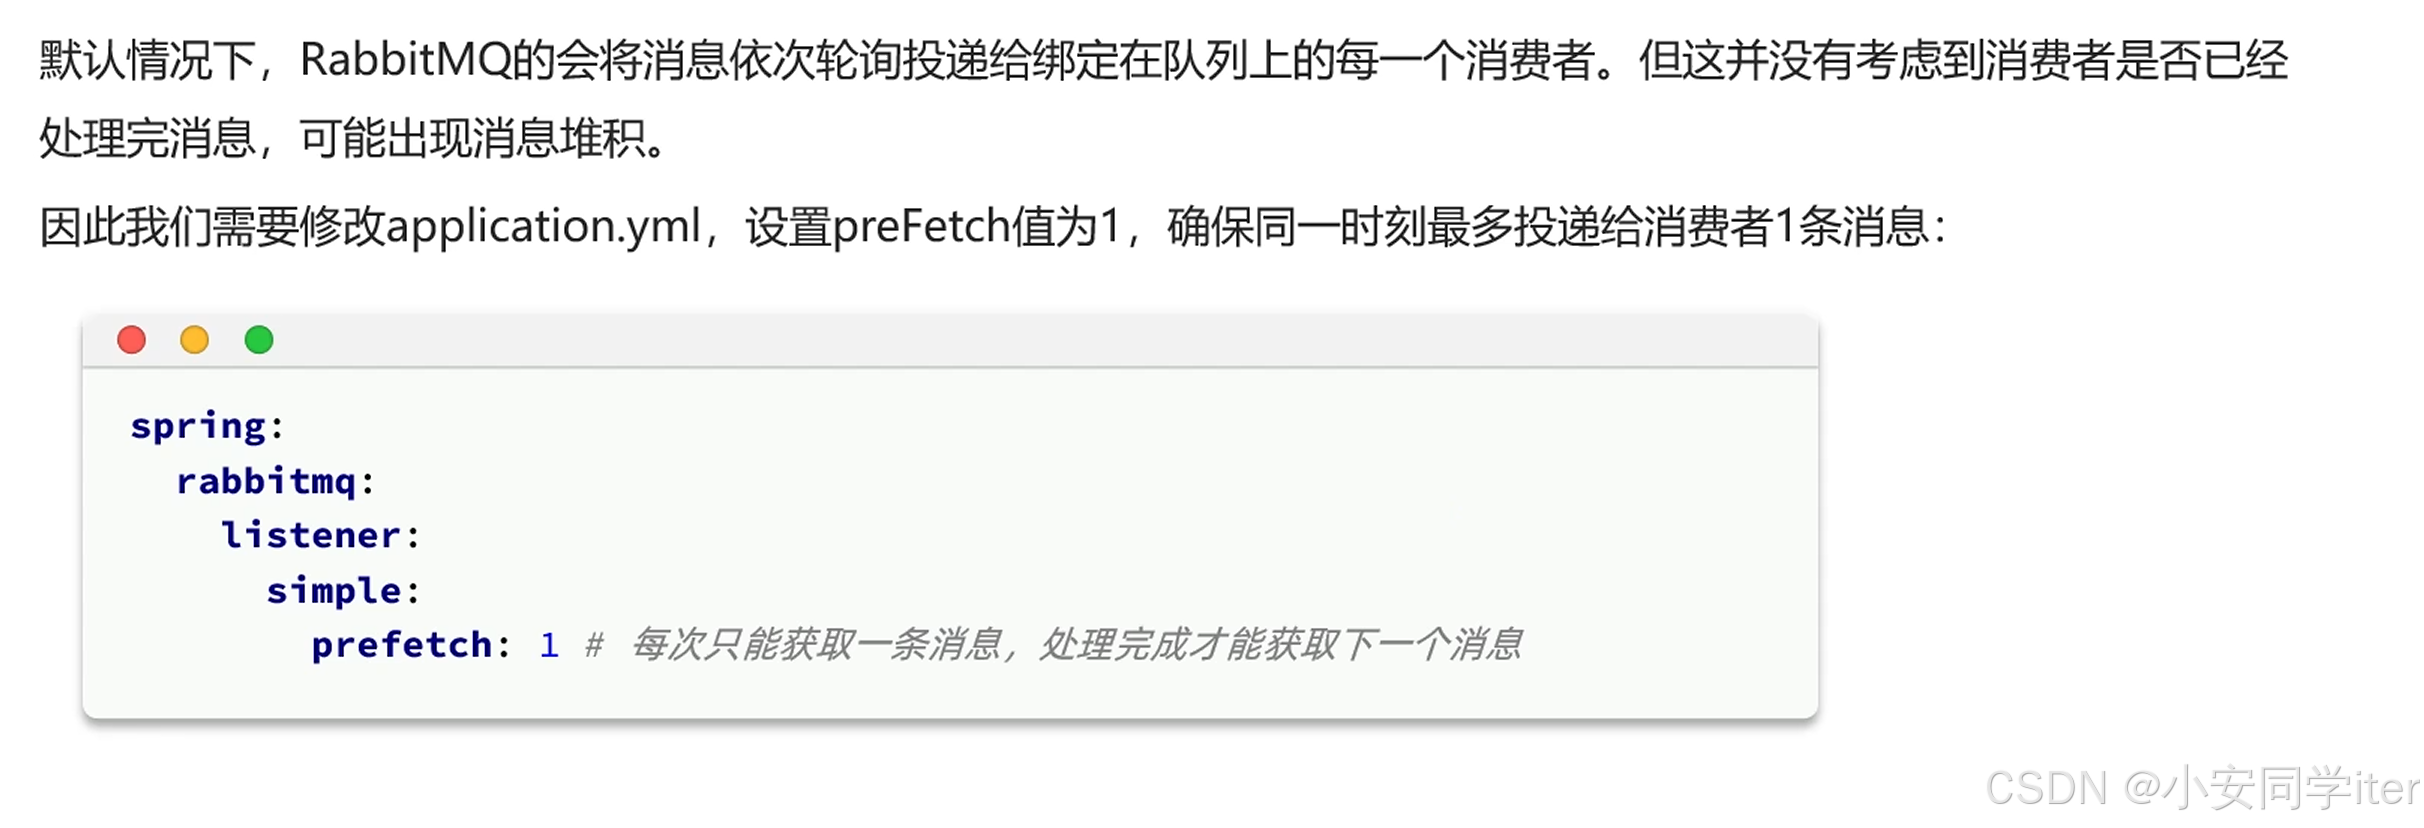
2 不写的话(默认一人一半,处理不完在队列里等待)
3 新增一个队列
4 两个消费者(消费能力不同,消费能力相同应该是轮询消费)
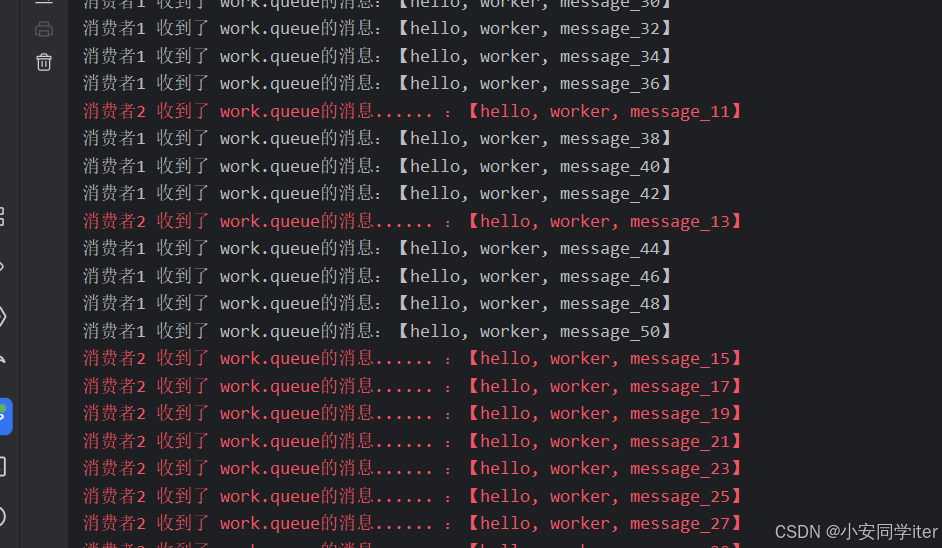
@RabbitListener(queues = "work.queue")public void listenWorkQueue1(String msg) throws InterruptedException {System.out.println("消费者1 收到了 work.queue的消息:【" + msg + "】");Thread.sleep(20);}@RabbitListener(queues = "work.queue")public void listenWorkQueue2(String msg) throws InterruptedException {System.err.println("消费者2 收到了 work.queue的消息...... :【" + msg + "】");Thread.sleep(200);}5 生产者
@Testvoid testWorkQueue() throws InterruptedException {String queueName = "work.queue";for (int i = 1; i <= 50; i++) {String msg = "hello, worker, message_" + i;rabbitTemplate.convertAndSend(queueName, msg);Thread.sleep(20);}}6 测试
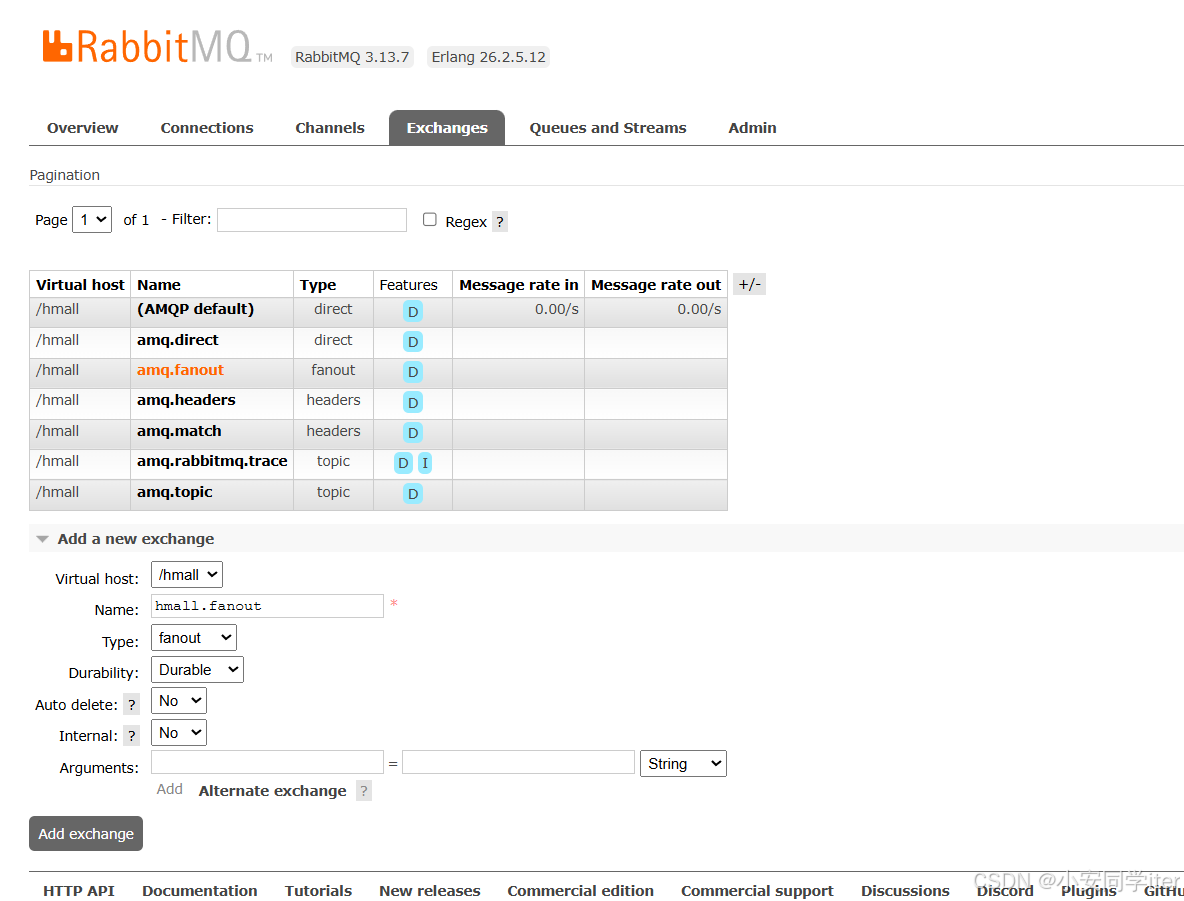
3 FanOut交换机
真正生产环境都会经过exchange来发送消息,而不是直接发送到队列,交换机的类型有以下三种
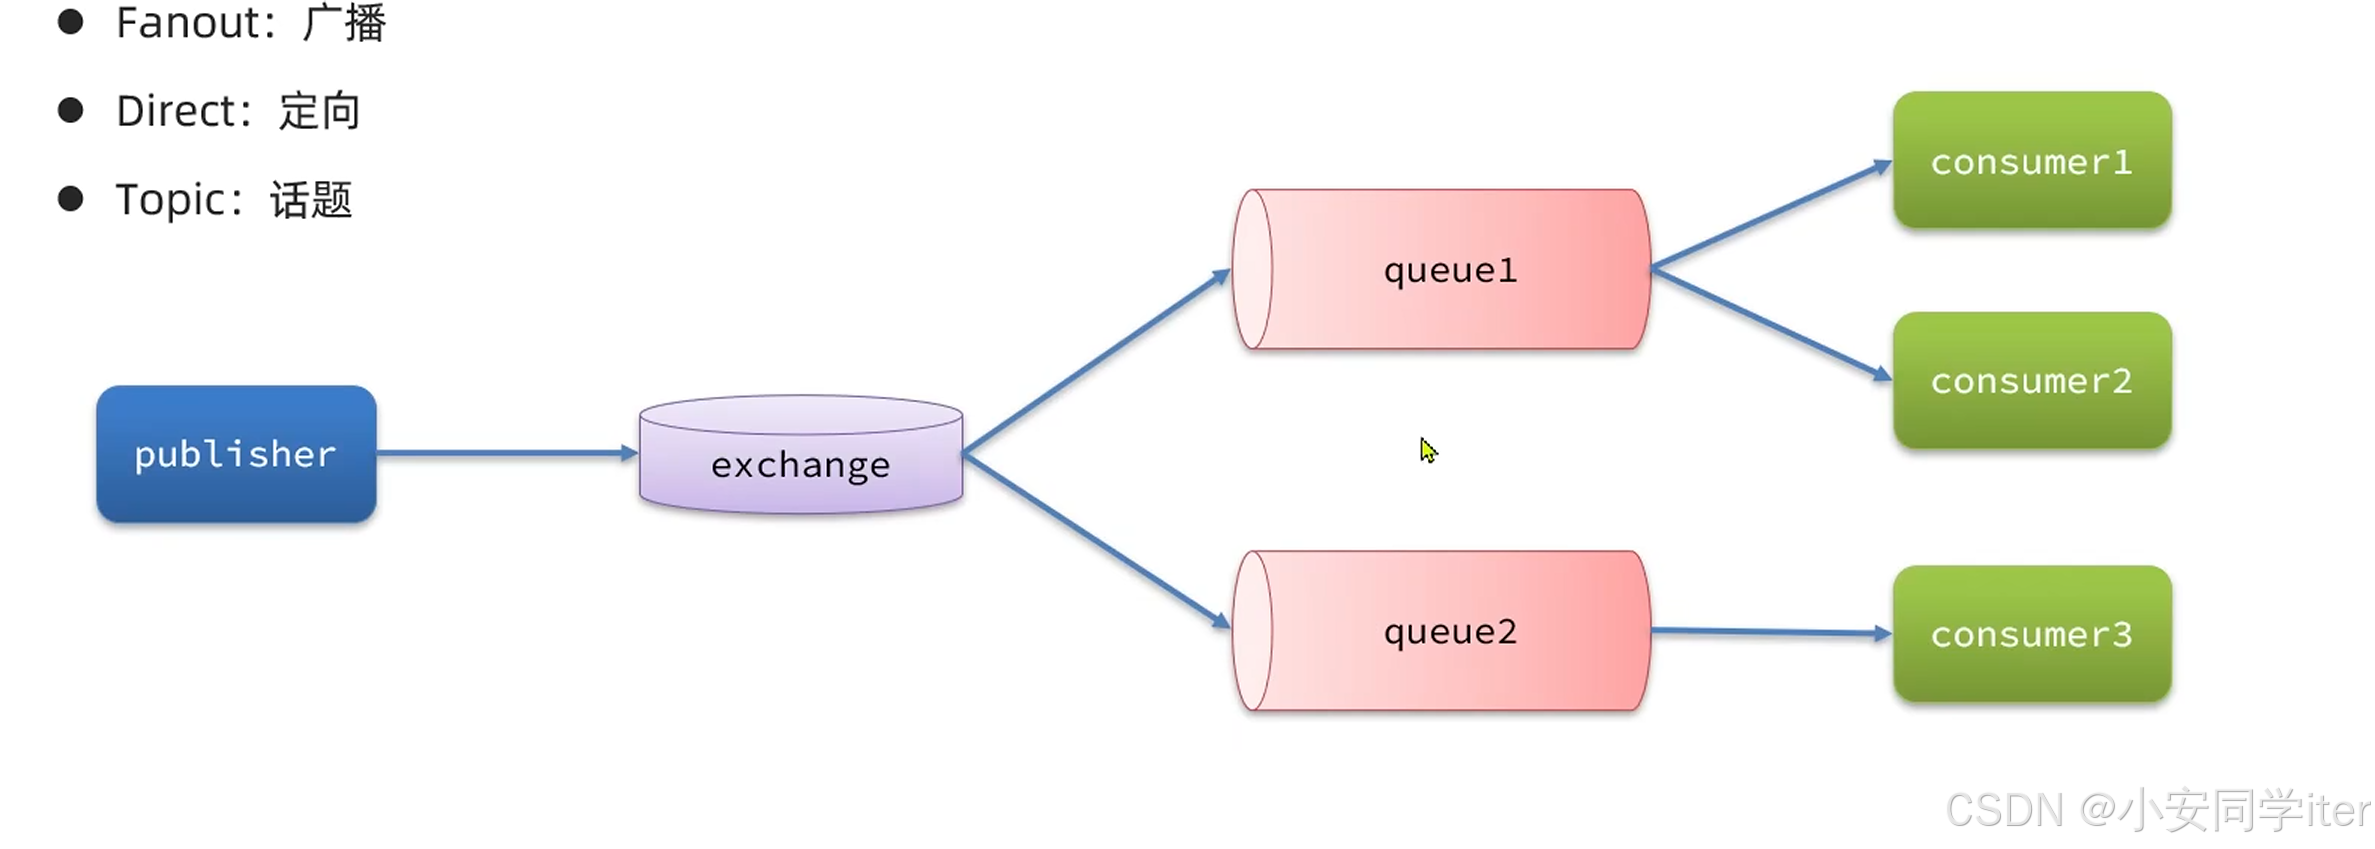
Fanout模式会将接受到的消息广播到跟其绑定的每一个队列,广播模式。
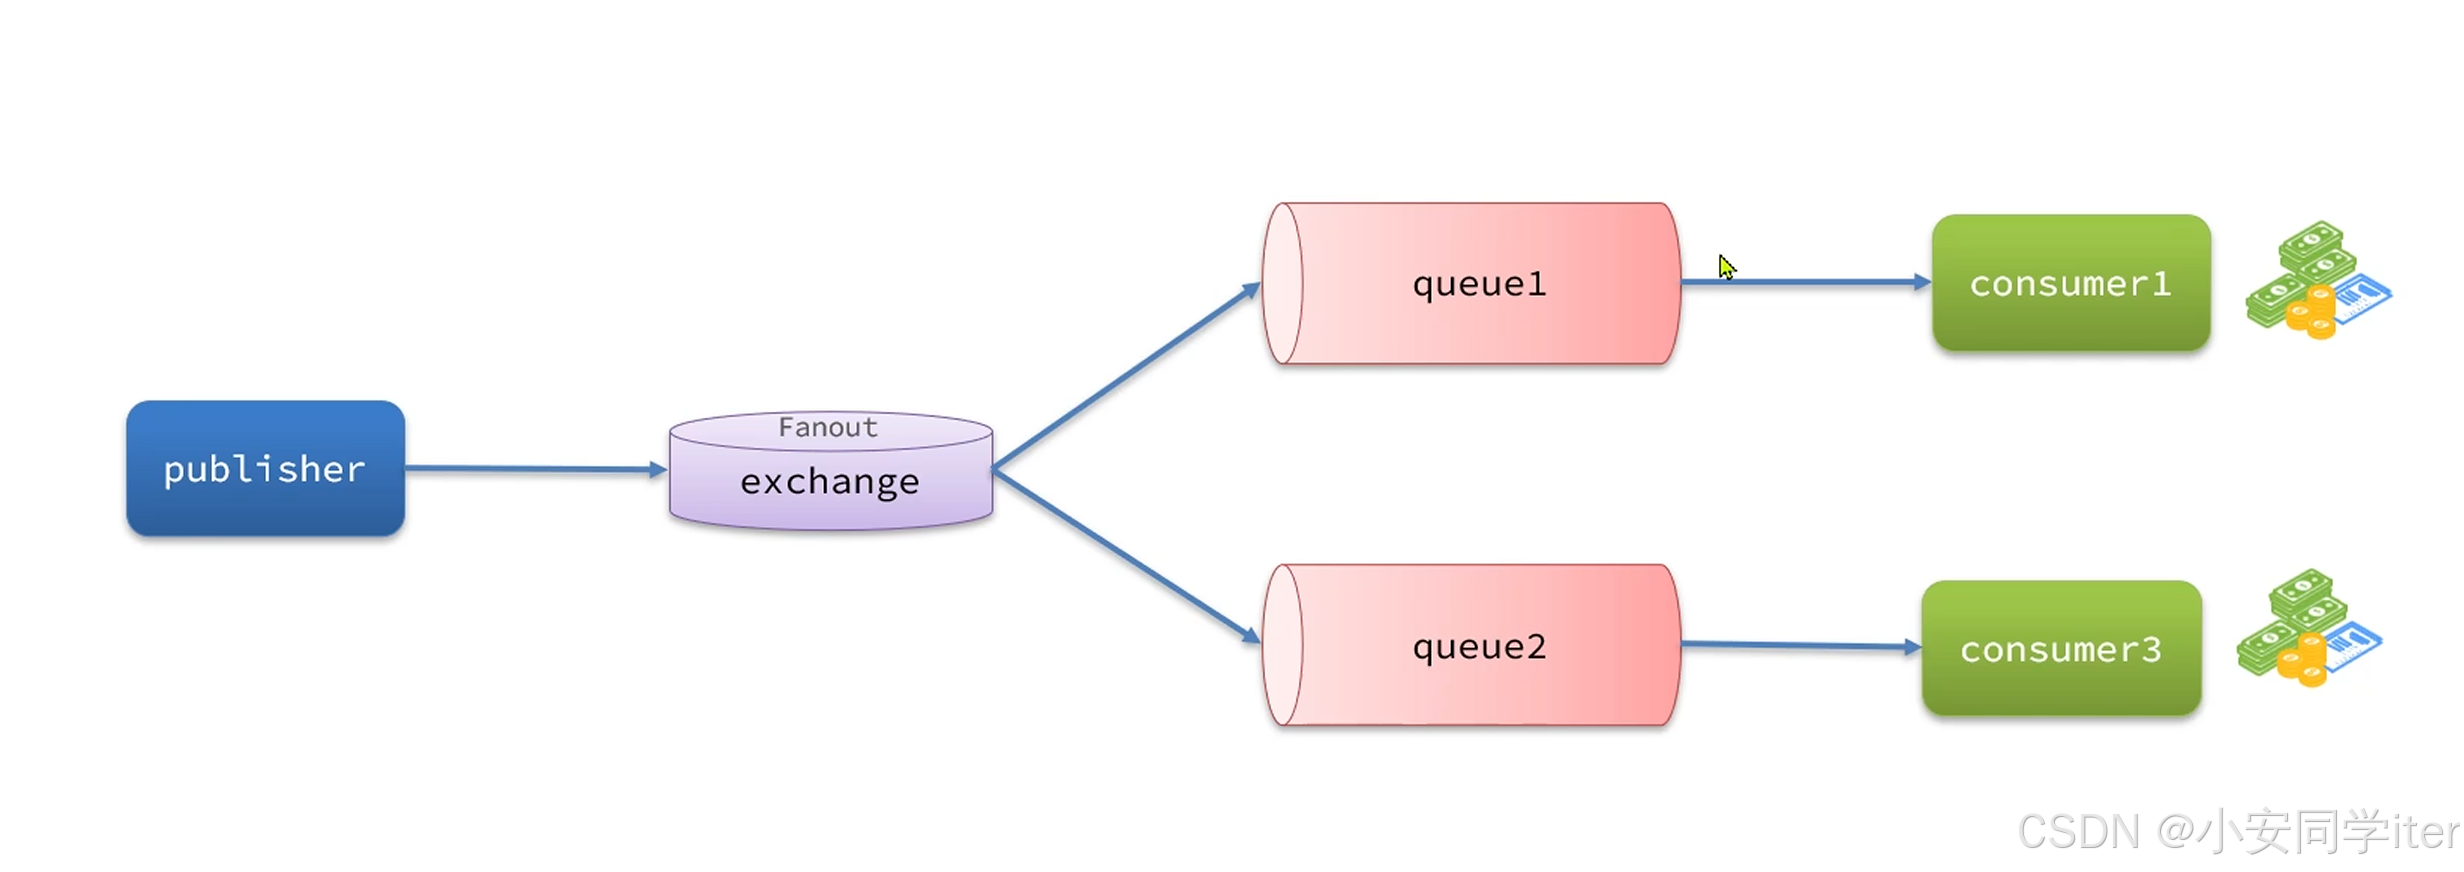
例子

1 先将队列声明好
2 再声明交换机同时与队列绑定

3 消费者
@RabbitListener(queues = "fanout.queue1")public void listenFanoutQueue1(String msg) throws InterruptedException {System.out.println("消费者1 收到了 fanout.queue1的消息:【" + msg + "】");}@RabbitListener(queues = "fanout.queue2")public void listenFanoutQueue2(String msg) throws InterruptedException {System.out.println("消费者2 收到了 fanout.queue2的消息:【" + msg + "】");}4 生产者
@Testvoid testSendFanout() {String exchangeName = "hmall.fanout";String msg = "hello, everyone!";rabbitTemplate.convertAndSend(exchangeName, null, msg);}测试结果:

为什么第二个参数是 null?
在你的代码中,第二个参数是 null,这是为了配合 Fanout 交换机 的特性。以下是关键点:
Fanout 交换机的特性
- Fanout 交换机(也称为广播交换机)会将消息 无条件广播到所有绑定到该交换机的队列,完全忽略路由键。
- 因此,在使用 Fanout 交换机时,路由键(
routingKey)可以设为null,因为交换机不会使用它来决定消息的路由规则。
4 Direct交换机
这种交换机可以实现与Fanout交换机相同的效果同时也可以实现定向的效果。
需求
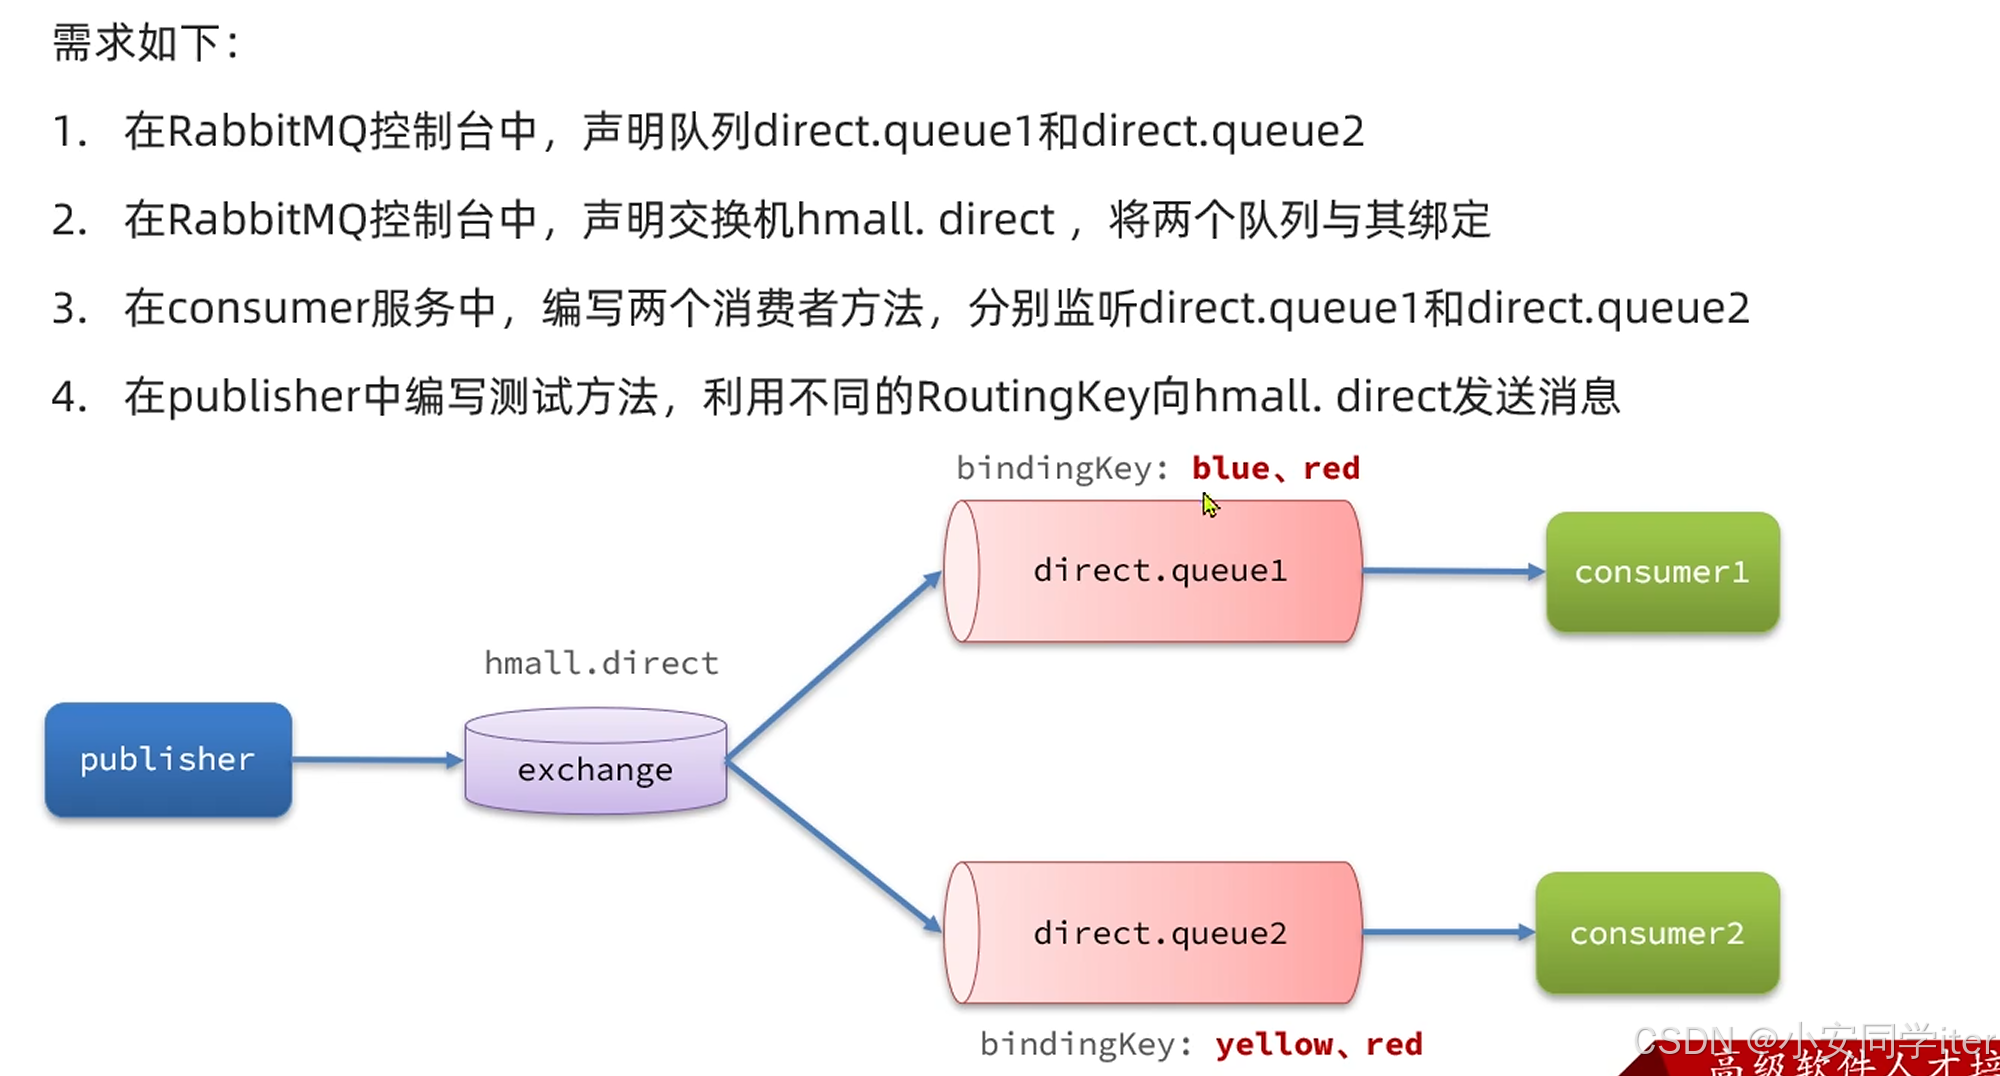
1 创建队列与交换机

(交换机需要给routingKey值)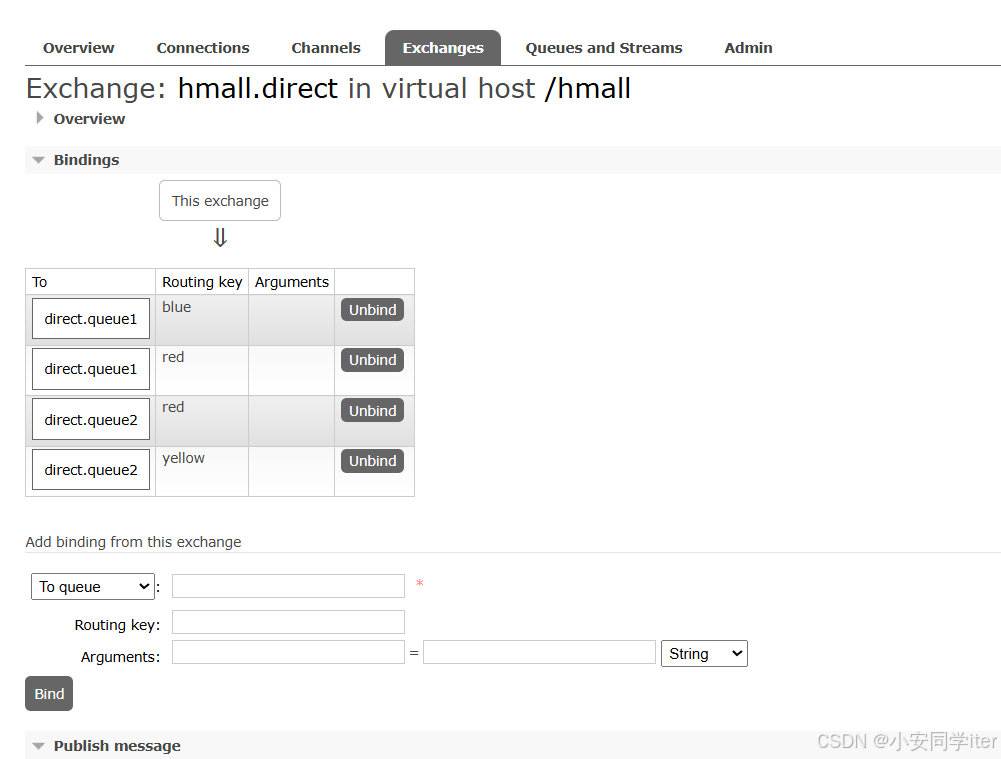
2 消费者
@RabbitListener(queues = "direct.queue1") // 直接监听名为 direct.queue1 的队列
public void listenDirectQueue1(String msg) {System.out.println("消费者1 收到了 direct.queue1的消息:【" + msg + "】");
}@RabbitListener(queues = "direct.queue2") // 直接监听名为 direct.queue2 的队列
public void listenDirectQueue2(String msg) {System.out.println("消费者2 收到了 direct.queue2的消息:【" + msg + "】");
}
3 生产者
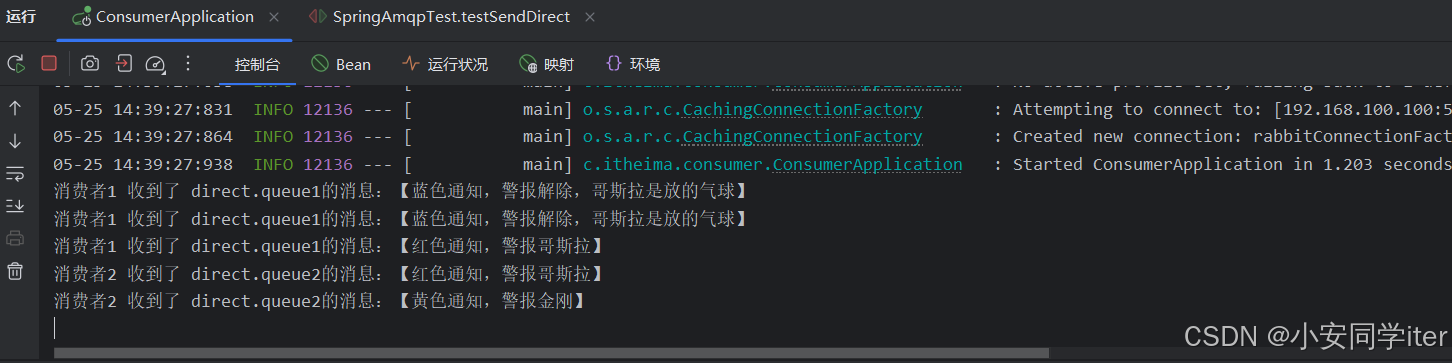
@Testvoid testSendDirect() {String exchangeName = "hmall.direct";String msg = "蓝色通知,警报解除,哥斯拉是放的气球";rabbitTemplate.convertAndSend(exchangeName, "blue", msg);}测试:
| 发送的路由键 | 接收队列 | 触发的消费者 |
|---|---|---|
red | direct.queue1, direct.queue2 | 消费者1 + 消费者2 |
blue | direct.queue1 | 消费者1 |
yellow | direct.queue2 | 消费者2 |
可以根据需求更改生产者的代码逻辑:
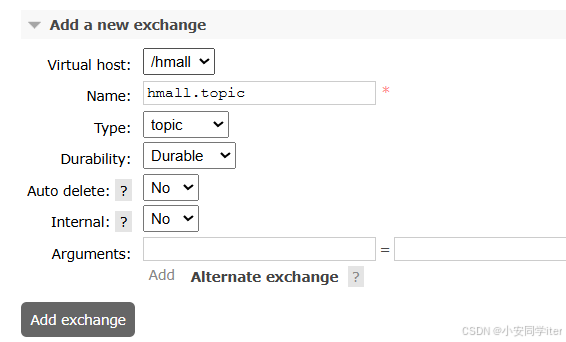
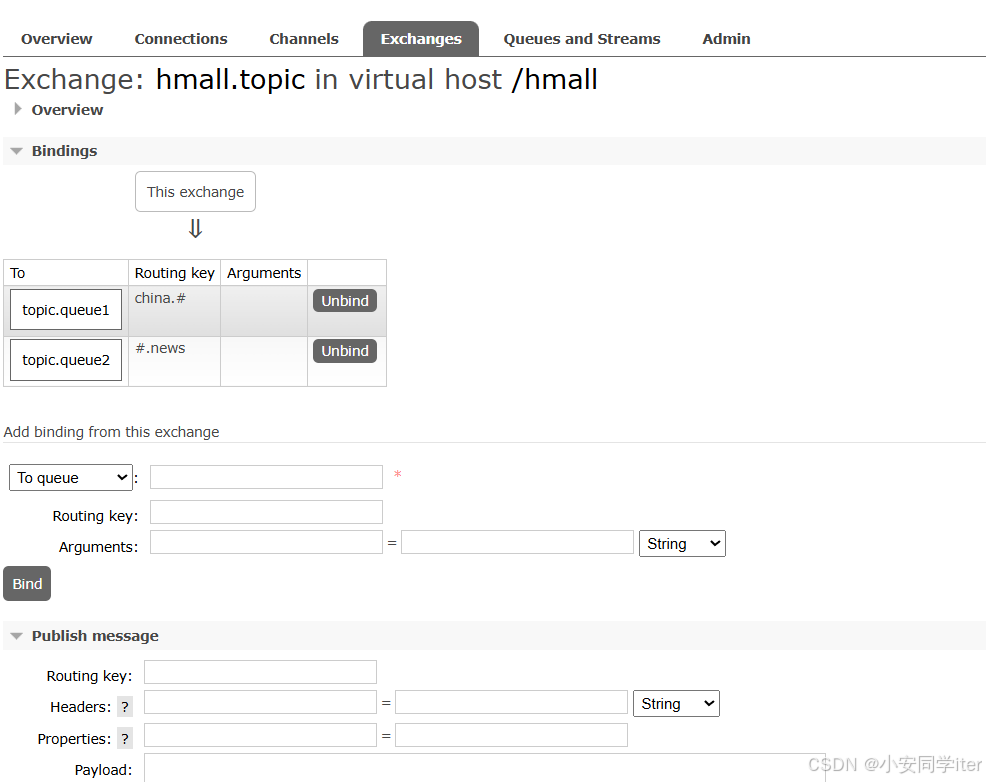
5 Topic交换机
Topic 交换机是 RabbitMQ 中基于模式匹配的路由机制,允许通过通配符(* 和 #)实现灵活的路由规则。
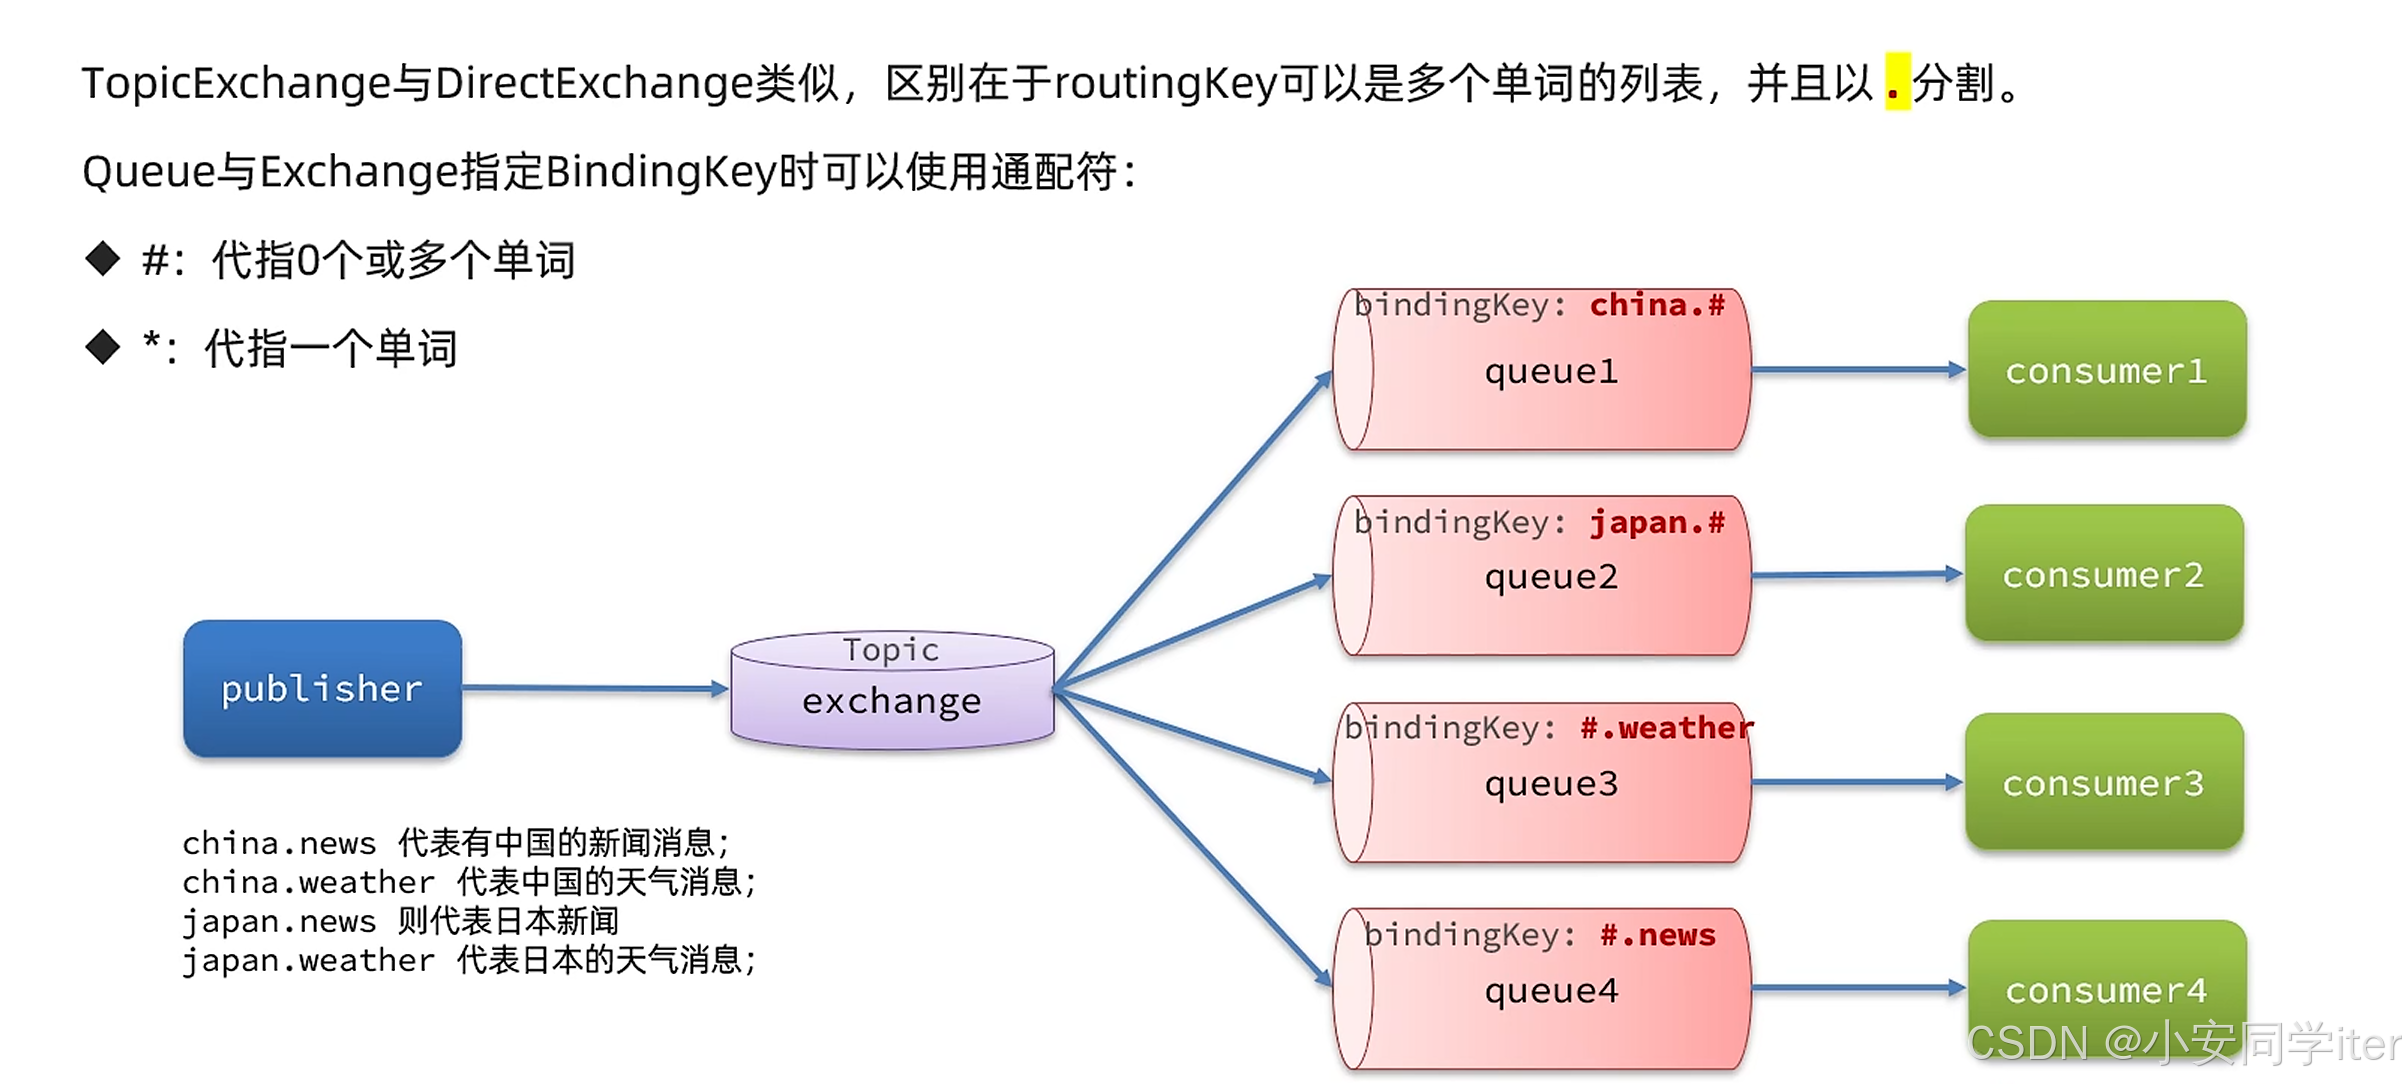
需求
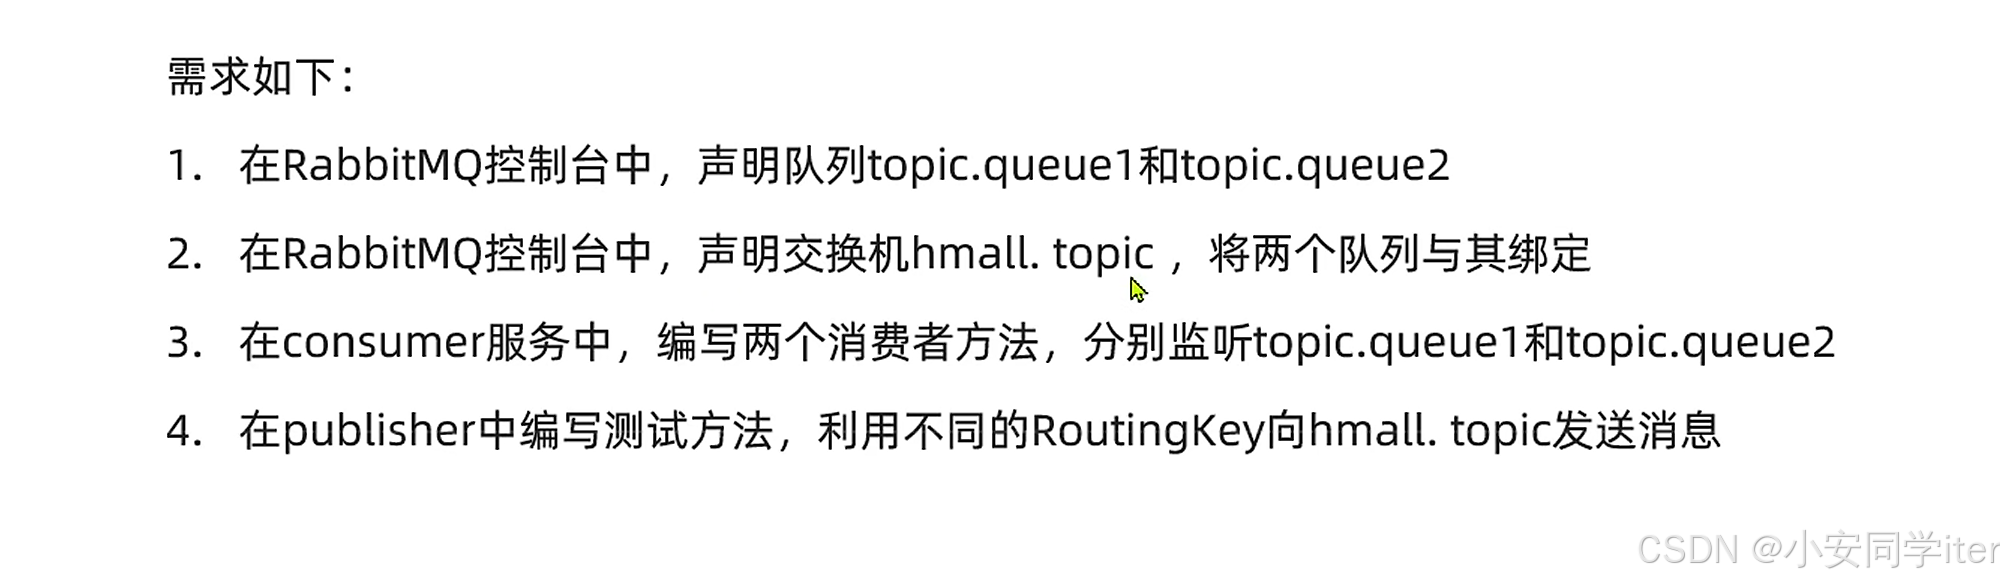
实现:
声明队列和交换机
消费者
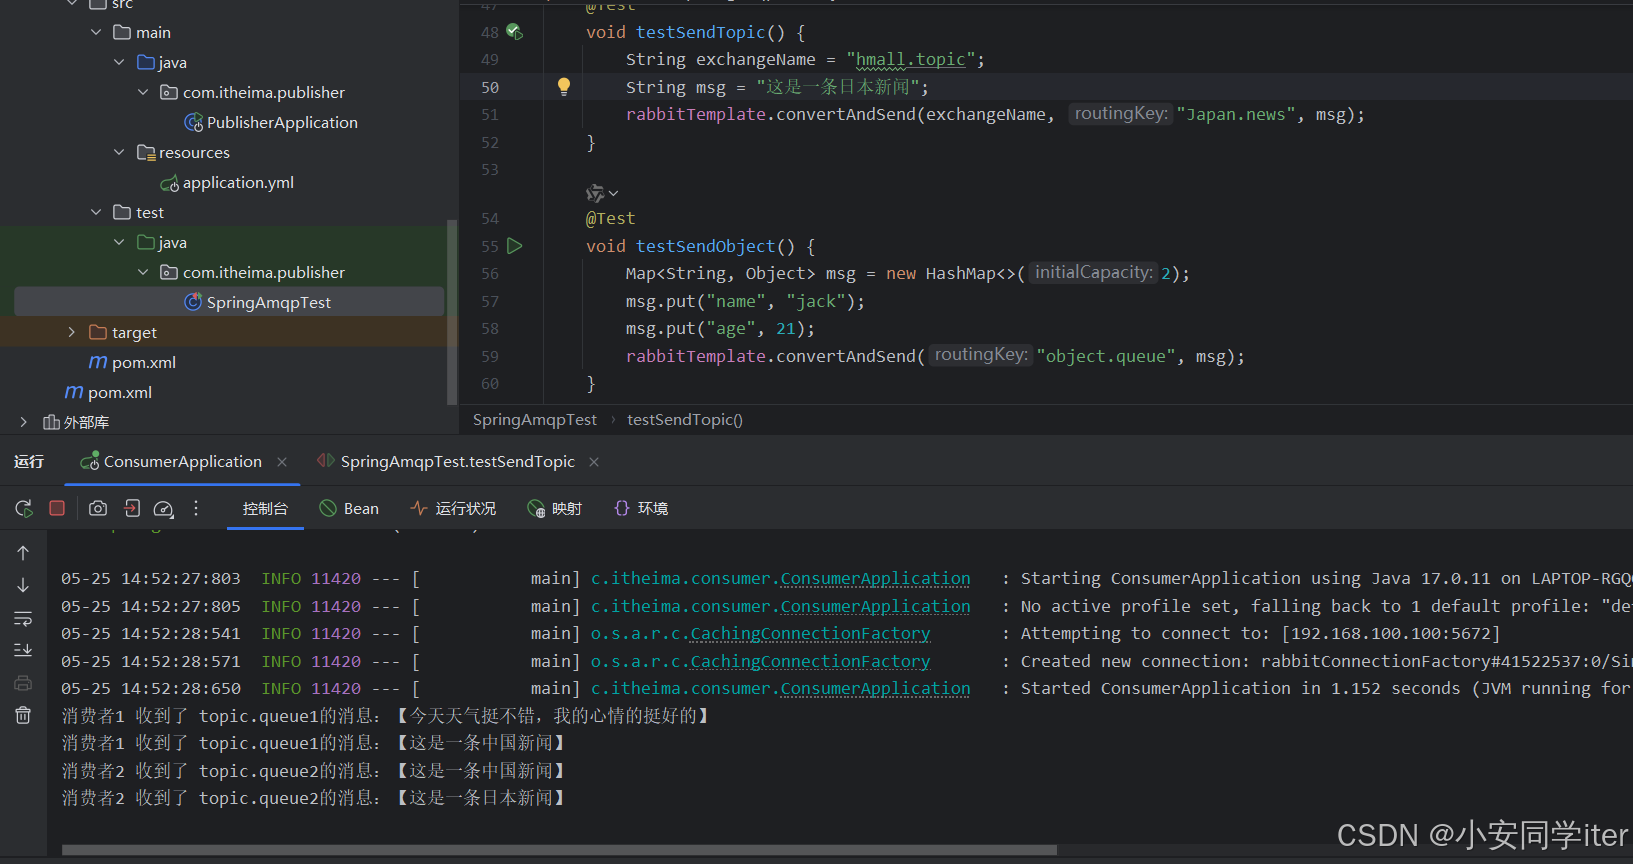
@RabbitListener(queues = "topic.queue1")public void listenTopicQueue1(String msg) throws InterruptedException {System.out.println("消费者1 收到了 topic.queue1的消息:【" + msg + "】");}@RabbitListener(queues = "topic.queue2")public void listenTopicQueue2(String msg) throws InterruptedException {System.out.println("消费者2 收到了 topic.queue2的消息:【" + msg + "】");}生产者
@Testvoid testSendTopic() {String exchangeName = "hmall.topic";String msg = "今天天气挺不错,我的心情的挺好的";rabbitTemplate.convertAndSend(exchangeName, "china.weather", msg);}测试:可以根据需求修改发送的RoutingKey
Direct交换机与Topic的差异
| 特性 | Direct 交换机 | Topic 交换机 |
|---|---|---|
| 路由键匹配方式 | 精确匹配(完全一致) | 模式匹配(支持通配符 * 和 #) |
| 灵活性 | 低(适合简单路由) | 高(适合复杂路由场景) |
| 典型场景 | 订单状态变更、任务分发 | 日志分类、多维度消息分发 |
*6 声明队列交换机
为了改善在控制台创建队列交换机的笨重,可以使用相关接口
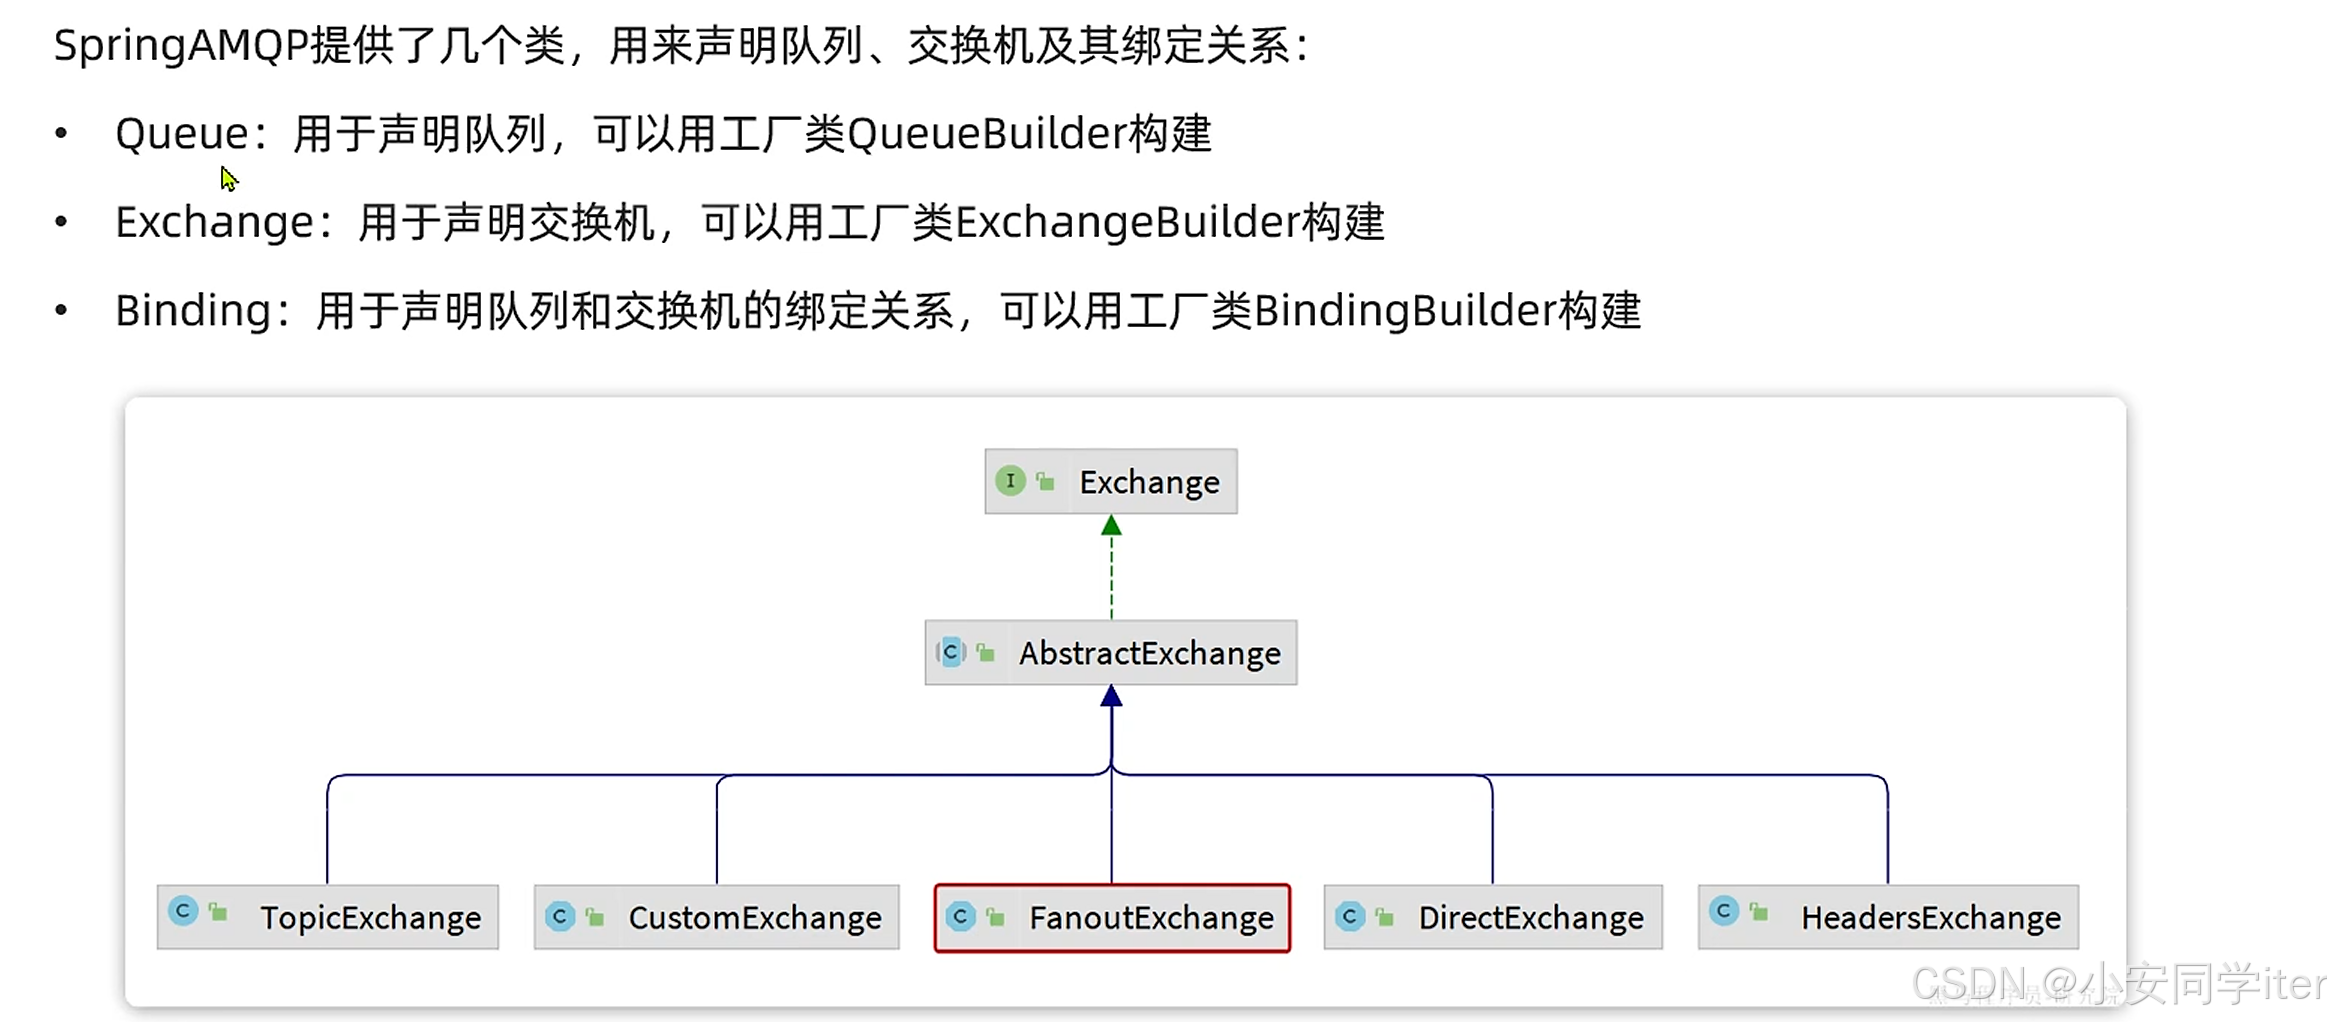
声明队列和交换机
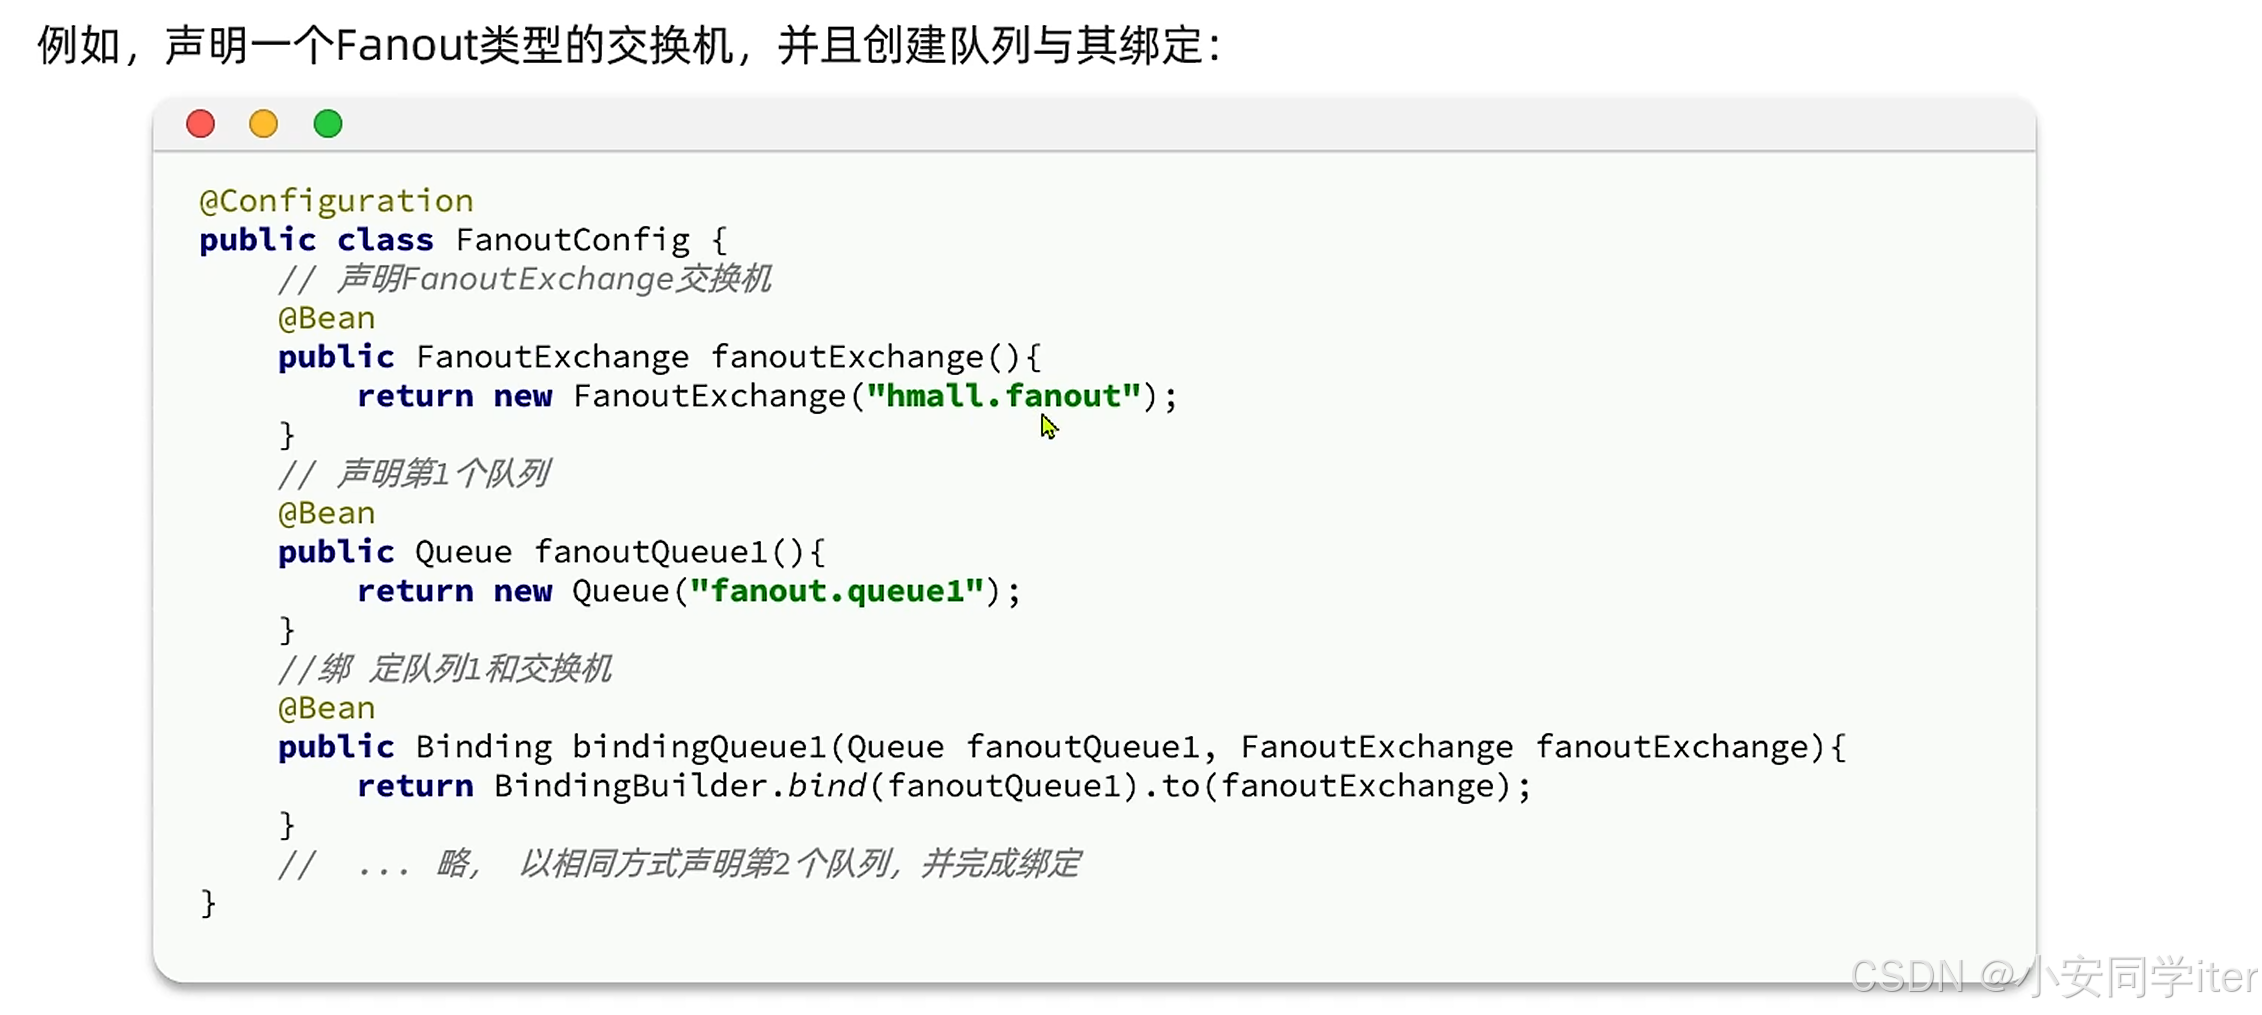
实现:
1 在配置类当中声明
Fanout的
package com.itheima.consumer.config;import org.springframework.amqp.core.Binding;
import org.springframework.amqp.core.BindingBuilder;
import org.springframework.amqp.core.FanoutExchange;
import org.springframework.amqp.core.Queue;
import org.springframework.context.annotation.Bean;
import org.springframework.context.annotation.Configuration;@Configuration
public class FanoutConfiguration {// fanoutExchange 定义交换机@Beanpublic FanoutExchange fanoutExchange(){// ExchangeBuilder.fanoutExchange("").build();return new FanoutExchange("hmall.fanout2");}//  queue 创建队列@Beanpublic Queue fanoutQueue3(){// QueueBuilder.durable("ff").build();//持久化return new Queue("fanout.queue3");}// 绑定队列和交换机@Beanpublic Binding fanoutBinding3(Queue fanoutQueue3, FanoutExchange fanoutExchange){return BindingBuilder.bind(fanoutQueue3).to(fanoutExchange);}// 创建队列@Beanpublic Queue fanoutQueue4(){return new Queue("fanout.queue4");}// 绑定队列和交换机@Beanpublic Binding fanoutBinding4(){return BindingBuilder.bind(fanoutQueue4()).to(fanoutExchange());}
}
Direct的
package com.itheima.consumer.config;import org.springframework.amqp.core.Binding;
import org.springframework.amqp.core.BindingBuilder;
import org.springframework.amqp.core.DirectExchange;
import org.springframework.amqp.core.Queue;
import org.springframework.context.annotation.Bean;// @Configuration
public class DirectConfiguration {//   定义交换机@Beanpublic DirectExchange directExchange() {return new DirectExchange("hmall.direct");}//   创建队列@Beanpublic Queue directQueue1() {return new Queue("direct.queue1");}// 队列与交换机进行绑定@Beanpublic Binding directQueue1BindingRed(Queue directQueue1, DirectExchange directExchange) {return BindingBuilder.bind(directQueue1).to(directExchange).with("red");}//  队列与交换机进行绑定@Beanpublic Binding directQueue1BindingBlue(Queue directQueue1, DirectExchange directExchange) {return BindingBuilder.bind(directQueue1).to(directExchange).with("blue");}//   创建队列@Beanpublic Queue directQueue2() {return new Queue("direct.queue2");}//  队列与交换机进行绑定@Beanpublic Binding directQueue2BindingRed(Queue directQueue2, DirectExchange directExchange) {return BindingBuilder.bind(directQueue2).to(directExchange).with("red");}//  队列与交换机进行绑定@Beanpublic Binding directQueue2BindingBlue(Queue directQueue2, DirectExchange directExchange) {return BindingBuilder.bind(directQueue2).to(directExchange).with("yellow");}}
2 使用注解的方式指定
@RabbitListener(bindings = @QueueBinding(value = @Queue(name = "direct.queue1", durable = "true"),exchange = @Exchange(name = "hmall.direct", type = ExchangeTypes.DIRECT),key = {"red", "blue"}))public void listenDirectQueue1(String msg) throws InterruptedException {System.out.println("消费者1 收到了 direct.queue1的消息:【" + msg + "】");}@RabbitListener(bindings = @QueueBinding(value = @Queue(name = "direct.queue2", durable = "true"),exchange = @Exchange(name = "hmall.direct", type = ExchangeTypes.DIRECT),key = {"red", "yellow"}))public void listenDirectQueue2(String msg) throws InterruptedException {System.out.println("消费者2 收到了 direct.queue2的消息:【" + msg + "】");}通过使用 @RabbitListener 的 bindings + @QueueBinding 注解的方式,不需要手动创建队列、交换机或绑定关系。
-
检查资源是否存在:
Spring 会通过RabbitAdmin组件向 RabbitMQ 服务器发起检查,确认队列、交换机是否已存在。 -
自动创建缺失的资源:
-
若队列
direct.queue1或direct.queue2不存在,会根据@Queue注解的配置(如name、durable)自动创建队列。 -
若交换机
hmall.direct不存在,会根据@Exchange注解的配置(如name、type)自动创建交换机。
-
-
自动绑定队列到交换机:
根据key指定的路由键,将队列与交换机绑定(如direct.queue1绑定red和blue路由键)。
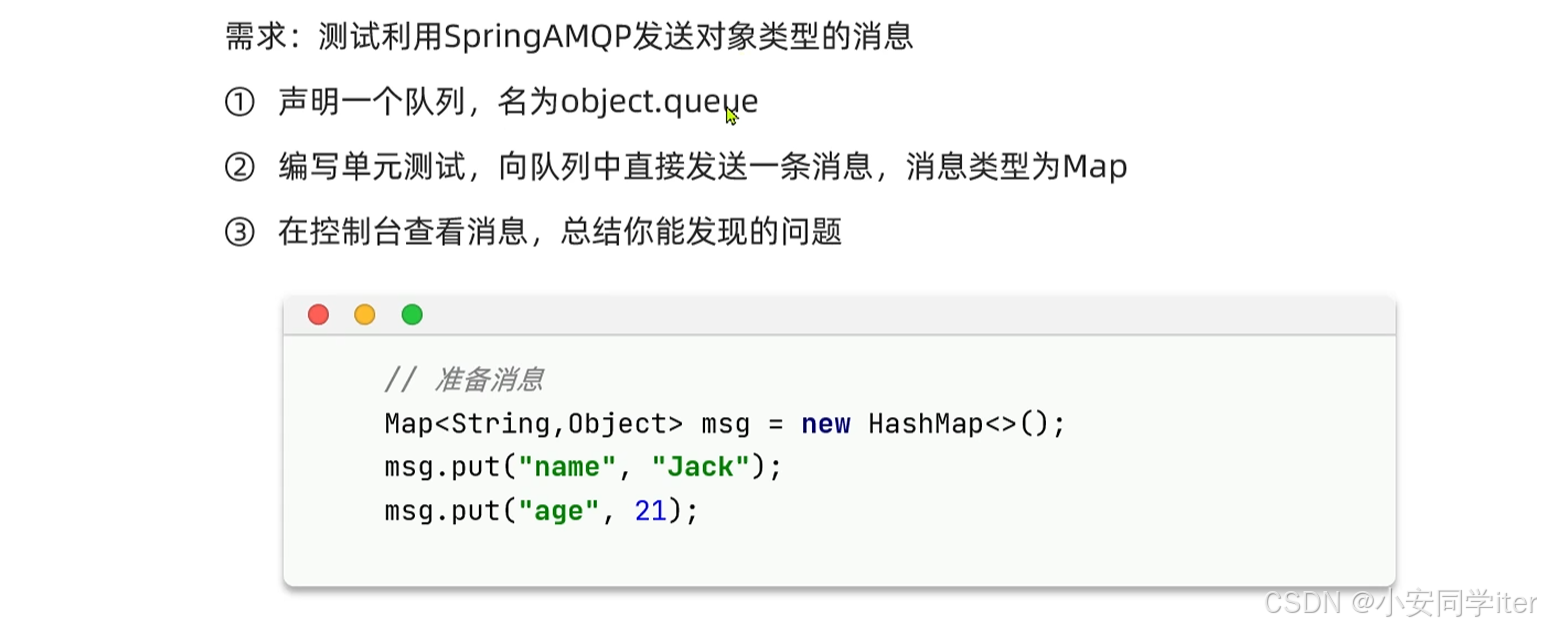
7 消息转换器