Qt与Hid设备通信
什么是HID?
HID(Human Interface Device)是直接与人交互的电子设备,通过标准化协议实现用户与计算机或其他设备的通信,典型代表包括键盘、鼠标、游戏手柄等。
为什么HID要与qt进行通信?
我这里的应用场景是数位板与我自己写的上位机进行通信,用户可以在上位机软件中手动设置数位板上按键代表的快捷键。
如何通信?
1. 引入 hidapi 库
hidapi库是一个第三方库需要下载。下载完编译之后把 hidapi.h,hidapi.dll,hidapi.lib放到项目根目录下。
hid设备初始化有以下几个步骤:
2. 初始化 hidapi
hid_init()3. 枚举和选择设备
void enumerateDevices() {struct hid_device_info *devs = hid_enumerate(0x0, 0x0); // 参数为VID和PID,0x0表示匹配所有struct hid_device_info *cur_dev = devs;while (cur_dev) {printf("Device Found\n  type: %04hx %04hx\n  path: %s\n  serial_number: %ls",cur_dev->vendor_id, cur_dev->product_id, cur_dev->path, cur_dev->serial_number);printf("\n");printf("  Manufacturer: %ls\n", cur_dev->manufacturer_string);printf("  Product: %ls\n", cur_dev->product_string);printf("  Release: %hx\n", cur_dev->release_number);printf("  Interface Number: %d\n\n", cur_dev->interface_number);cur_dev = cur_dev->next;}hid_free_enumeration(devs);
}
4. 打开设备
hid_device *handle;
handle = hid_open(0x1234, 0x5678, NULL); // 替换为设备的VID和PID
5. 设置非阻塞模式(可选)
int res = hid_set_nonblocking(handle, 1); // 参数为1表示非阻塞模式
if (res < 0) {// 处理设置失败的情况
}
6. 读取和写入数据
// 读取数据
unsigned char buf[256];
int res = hid_read(handle, buf, sizeof(buf));
if (res < 0) {// 处理读取错误
} else {// 处理读取到的数据
}// 写入数据
unsigned char data[] = {0x00, 0x01, 0x02}; // 示例数据
res = hid_write(handle, data, sizeof(data));
if (res < 0) {// 处理写入错误
}
7. 关闭设备和释放资源
hid_close(handle);
hid_exit();
示例代码整合
void MainWindow::HidInit()
{// 1. 初始化HIDAPIif (hid_init() != 0) {qDebug() << "[错误] HIDAPI初始化失败";return;}else{qDebug() << "[正确] HIDAPI初始化成功";}// 2. 枚举设备qDebug() << "[调试] 开始枚举HID设备...";hid_device_info *devs = hid_enumerate(0x0, 0x0);if (!devs) {qDebug() << "[错误] 无法枚举HID设备,可能没有HID设备连接";hid_exit();return;}hid_device_info *cur_dev = devs;char* devicePath = nullptr;bool deviceFound = false;int deviceCount = 0; // 用于统计发现的HID设备数量qDebug() << "[调试] 开始遍历HID设备列表...";while (cur_dev) {deviceCount++;// 打印所有HID设备信息,用于调试qDebug().nospace() << "[调试] 设备 #" << deviceCount<< ": VID=0x" << QString::number(cur_dev->vendor_id, 16).toUpper()<< ", PID=0x" << QString::number(cur_dev->product_id, 16).toUpper();// << ", 路径=" << QString::fromWCharArray(cur_dev->path);if (cur_dev->vendor_id == TARGET_VID && cur_dev->product_id == TARGET_PID) {devicePath = _strdup(cur_dev->path);deviceFound = true;qDebug() << "\n[信息] 找到目标设备:";qDebug() << "路径:" << devicePath;qDebug() << "制造商:" << (cur_dev->manufacturer_string ? QString::fromWCharArray(cur_dev->manufacturer_string) : "N/A");qDebug() << "产品名:" << (cur_dev->product_string ? QString::fromWCharArray(cur_dev->product_string) : "N/A");qDebug() << "接口号:" << cur_dev->interface_number;break;}cur_dev = cur_dev->next;}qDebug() << "[调试] 遍历完成,共发现" << deviceCount << "个HID设备";hid_free_enumeration(devs);if (!deviceFound) {qDebug() << "[错误] 未找到目标设备 (VID: 0x" << QString::number(TARGET_VID, 16).toUpper()<< ", PID: 0x" << QString::number(TARGET_PID, 16).toUpper() << ")";hid_exit();return;}// 3. 打开设备qDebug() << "[调试] 尝试打开目标设备...";hid_device* handle = hid_open_path(devicePath);if (!handle) {qDebug() << "[错误] 无法打开设备:" << QString::fromWCharArray(hid_error(nullptr));free(devicePath);hid_exit();return;}// 3. 打开设备handle = hid_open_path(devicePath);if (!handle) {qDebug() << "[错误] 无法打开设备:" << QString::fromWCharArray(hid_error(nullptr));free(devicePath);hid_exit();return;}// 设置非阻塞模式hid_set_nonblocking(handle, 1);qDebug() << "\n[信息] 设备已成功打开";// 4. 尝试通信const int REPORT_SIZE = 65; // 64字节数据 + 1字节报告IDunsigned char buf[REPORT_SIZE] = {0};// 尝试不同报告ID (0x00-0xFF)for (int report_id = 0x00; report_id <= 0xFF; report_id++) {// 4.1 尝试特性报告buf[0] = report_id;buf[1] = 0x01; // 示例命令qDebug() << "\n[调试] 尝试报告ID: 0x" << QString::number(report_id, 16).toUpper();int res = hid_send_feature_report(handle, buf, REPORT_SIZE);if (res > 0) {qDebug() << "[成功] 特性报告发送成功 (ID: 0x"<< QString::number(report_id, 16).toUpper() << ")";break;} else if (report_id == 0xFF) {qDebug() << "[警告] 所有特性报告尝试失败";}// 4.2 尝试输出报告res = hid_write(handle, buf, REPORT_SIZE);if (res > 0) {qDebug() << "[成功] 输出报告发送成功 (ID: 0x"<< QString::number(report_id, 16).toUpper() << ")";break;} else if (report_id == 0xFF) {qDebug() << "[警告] 所有输出报告尝试失败";}}// 5. 读取响应 (5秒超时)qDebug() << "\n[信息] 等待设备响应...";int timeout_ms = 5000;QElapsedTimer timer;timer.start();while (timer.elapsed() < timeout_ms) {int res = hid_read(handle, buf, REPORT_SIZE);if (res > 0) {qDebug() << "[成功] 收到" << res << "字节数据:";// 打印接收到的数据 (十六进制格式)QString hexData;for (int i = 0; i < res; i++) {hexData += "0x" + QString::number(buf[i], 16).toUpper().rightJustified(2, '0') + " ";if ((i+1) % 8 == 0) hexData += "\n";}qDebug() << hexData;break;} else if (res == 0) {QThread::msleep(100); // 避免CPU占用过高} else {qDebug() << "[错误] 读取失败:" << QString::fromWCharArray(hid_error(handle));break;}}if (timer.elapsed() >= timeout_ms) {qDebug() << "[警告] 读取超时,未收到响应";}// 6. 清理资源hid_close(handle);free(devicePath);hid_exit();qDebug() << "\n[信息] HID通信结束";
}
运行效果演示(我接入的是wacom数位板):

全是0xFF为未激活状态(初始状态)。
总结操作流程
- 确认设备功能与协议:明确设备是输入型(主动上报)还是命令型(需指令触发)。
- 发送测试指令:若无文档,通过简单指令试探设备响应模式。
- 解析数据结构:根据响应数据的变化规律,逆向推导字节含义(如坐标、状态、校验等)。
- 编写业务逻辑:基于解析结果,实现数据处理或控制功能(如鼠标模拟、设备配置等)。
解析报告数据
如何解析
用以下结构来存储报告:
struct TabletData {quint8 reportId;        // 报告IDquint16 x;              // X坐标(0-最大值)quint16 y;              // Y坐标(0-最大值)quint16 pressure;       // 压力值(0-最大值)QList<int> buttons;     // 按下的按钮列表(按钮编号从1开始)
};
创建一个TabletData 类型的函数:
该函数对报告进行解析,第0字节是报告ID,第1字节是按钮位置........
TabletData HidManager::parseTabletData(const QByteArray& data) {TabletData result;if (data.isEmpty()) return result;result.reportId = data[0];switch (result.reportId) {case 0x11: // 按钮报告(假设按钮在字节1-2)for (int byteIdx = 1; byteIdx < 3; byteIdx++) {if (byteIdx >= data.size()) break;unsigned char byte = data[byteIdx];for (int bitIdx = 0; bitIdx < 8; bitIdx++) {if ((byte & (1 << bitIdx)) != 0) { // 1表示按下result.buttons.append((byteIdx - 1) * 8 + bitIdx + 1);}}}break;case 0x10: // **关键修改**:坐标/压力报告ID改为0x10// 解析坐标和压力(假设坐标在字节1-4,压力在字节5-6)if (data.size() >= 5) {// 小端序解析:低字节在前,高字节在后result.x = static_cast<quint16>(data[1]) | (static_cast<quint16>(data[2]) << 8);result.y = static_cast<quint16>(data[3]) | (static_cast<quint16>(data[4]) << 8);}if (data.size() >= 7) {result.pressure = static_cast<quint16>(data[5]) | (static_cast<quint16>(data[6]) << 8);}result.buttons.clear(); // 坐标报告不含按钮,清空列表break;default:qWarning() << "未知报告ID:" << QString::number(result.reportId, 16);break;}return result;
}
写一个打印输出函数
void HidManager::handleHidData(const QByteArray& data)
{// 数据为空或与上次完全相同则直接返回static QByteArray lastDataFrame;if (data.isEmpty() || data == lastDataFrame) return;lastDataFrame = data;// 解析数据到结构体TabletData currentData = parseTabletData(data);// 打印原始数据和解析结果(调试用)if (debugMode) { // 可添加调试开关QString hexData;for (int i = 0; i < data.size(); i++) {hexData += "0x" + QString::number((unsigned char)data[i], 16).toUpper().rightJustified(2, '0') + " ";if ((i+1) % 8 == 0) hexData += "\n";}qDebug() << "收到新数据:" << hexData;qDebug() << "解析后数据:"<< "报告ID:" << QString::number(currentData.reportId, 16)<< "坐标: (" << currentData.x << ", " << currentData.y << ")"<< "压力:" << currentData.pressure<< "按钮:" << currentData.buttons;}// 静态变量存储上次数据,用于检测变化static TabletData lastData;// 检查关键数据是否变化(按钮、坐标、压力)bool isButtonChanged = (currentData.buttons != lastData.buttons);bool isPositionChanged = (currentData.x != lastData.x || currentData.y != lastData.y);bool isPressureChanged = (currentData.pressure != lastData.pressure);// 根据变化类型发送不同信号if (isButtonChanged) {emit buttonStateChanged(currentData.buttons);}if (isPositionChanged || isPressureChanged) {emit tabletMoved(currentData.x, currentData.y, currentData.pressure);}// 更新上次数据缓存lastData = currentData;
}
打印输出:
拿wacom数位板举例。以下是连接wacom数位板之后,数位笔滑动之后wacom数位板发送过来的报告:
解析内容
报告第一个字节为报告ID,用来区分用户进行的是什么操作。
当报告ID为0X10时代表坐标移动
当报告ID为0X11时代表按键按下
例:
按下第一个按键,此时报告ID为0x11,表示按键事件发生。此时第2个字节发生了变化,也就是第一个字节被按下了:

当用数位笔在数位板上滑动之后收到如下报告:
报告ID为0x10,表示坐标发生变化。坐标在字节1-4,压力在字节5-6:

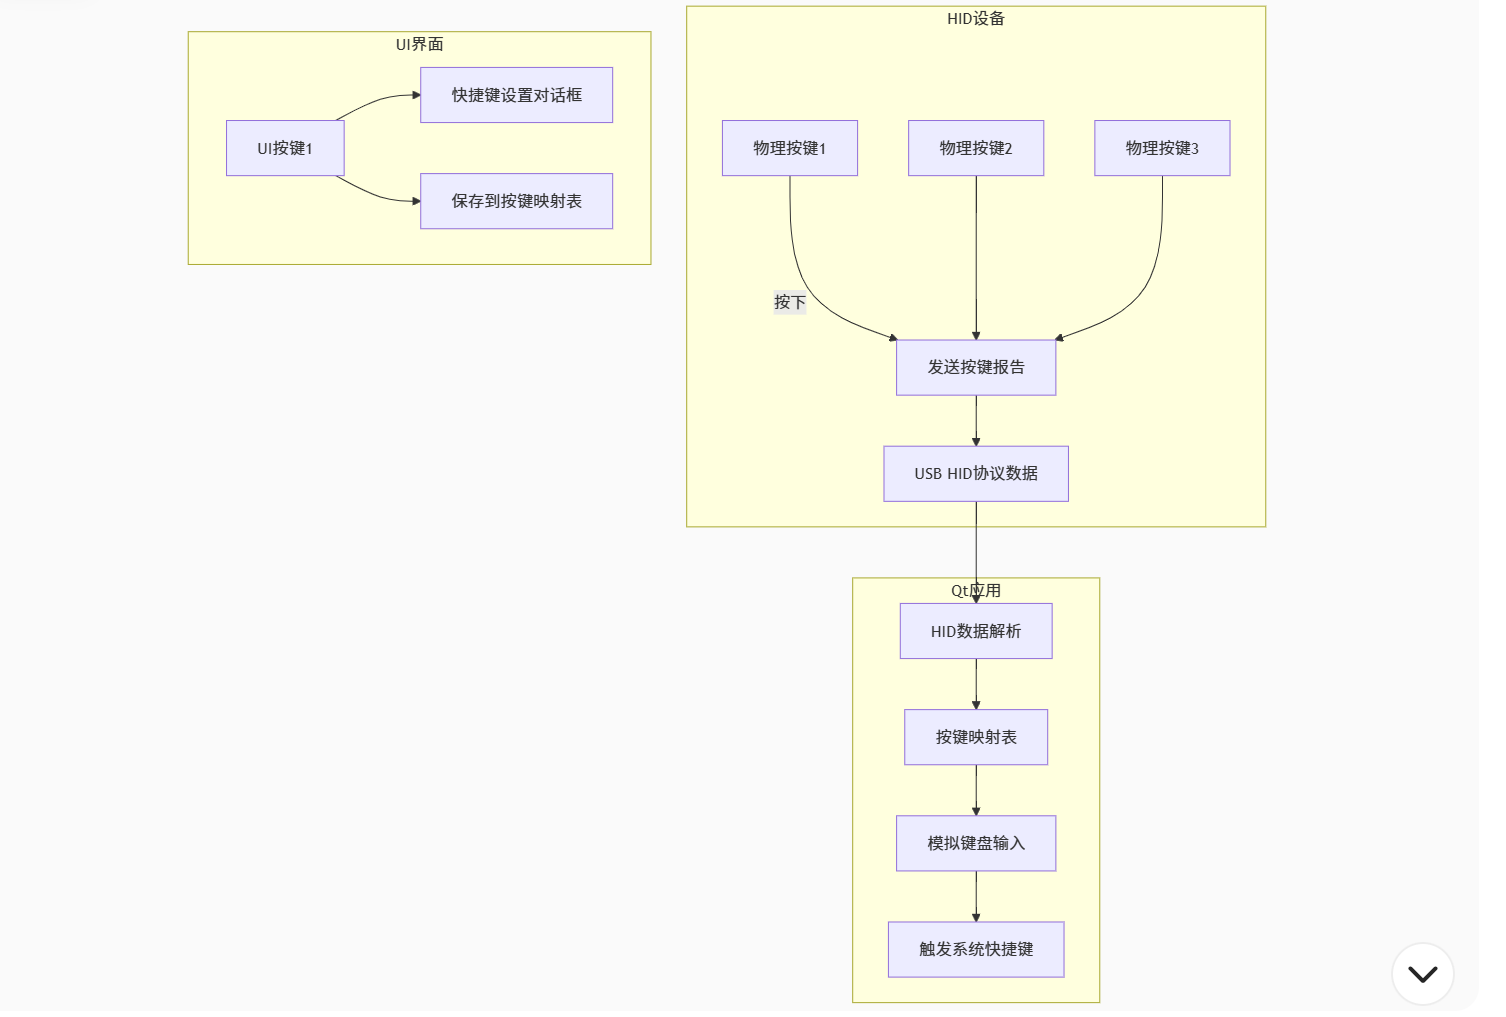
HID设备按键与Qt界面UI按键的快捷键绑定实现
流程图