AI工具全解析:智能编码、数据标注与模型训练平台
引言
人工智能工具正在重塑软件开发和机器学习工作流程。从智能编码助手到自动化数据标注平台,再到云端模型训练环境,这些工具显著提升了开发效率,降低了技术门槛。本文将深入探讨三类核心AI工具:智能编码工具(如GitHub Copilot)、数据标注工具和模型训练平台,通过代码示例、流程图、实际案例和可视化图表,全面展示它们如何协同工作,推动AI项目的成功实施。
1. 智能编码工具:开发者的AI助手
1.1 概述与核心价值
智能编码工具利用大型语言模型(LLM)技术,为开发者提供实时代码补全、函数生成、错误修复等辅助功能。这些工具通过分析上下文(包括注释、变量名和已有代码结构)预测开发者意图,生成符合逻辑的代码片段。
核心价值:
- 提升编码效率30%-50%(根据GitHub官方数据)
- 减少重复性工作,让开发者专注于架构设计
- 辅助学习新语言和框架
- 自动生成文档和测试用例
1.2 GitHub Copilot深度解析
工作原理
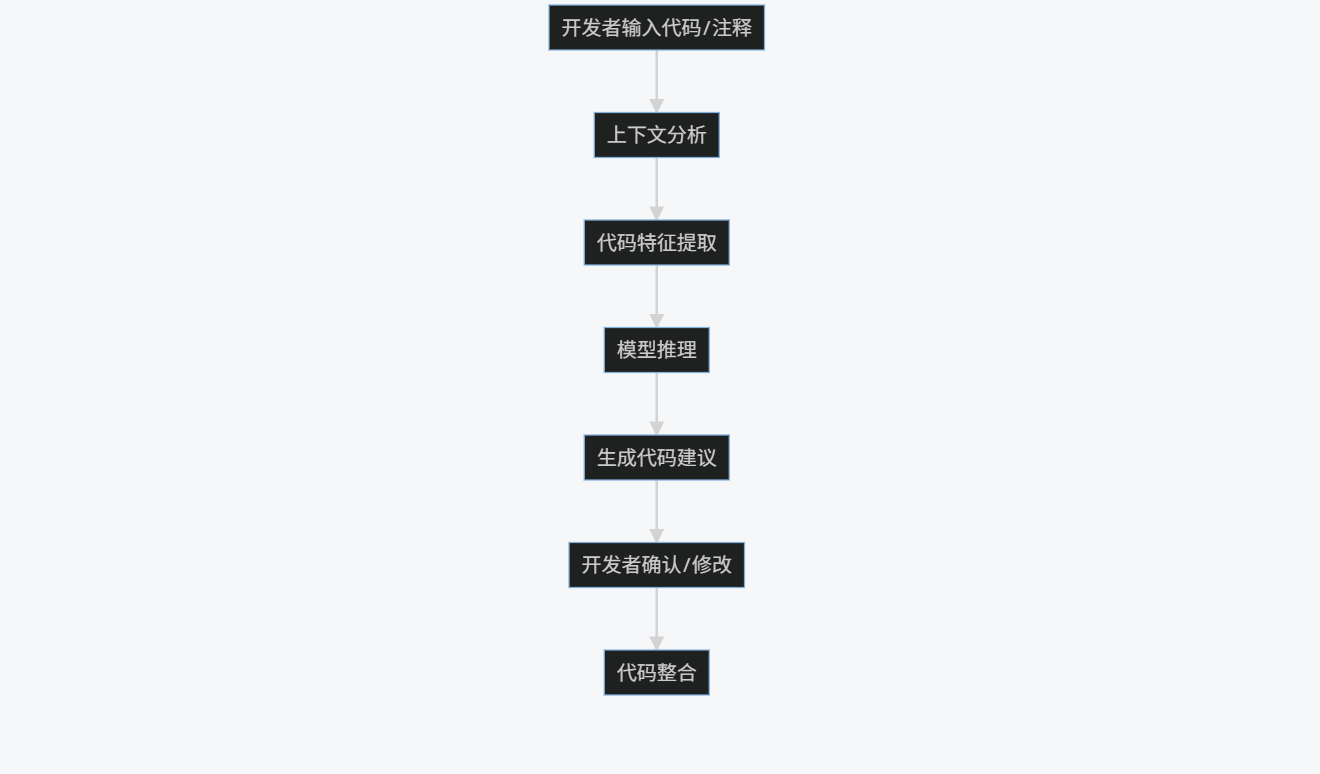
GitHub Copilot基于OpenAI Codex模型,通过以下流程生成代码:
graph TD
A[开发者输入代码/注释] --> B[上下文分析]
B --> C[代码特征提取]
C --> D[模型推理]
D --> E[生成代码建议]
E --> F[开发者确认/修改]
F --> G[代码整合]
实际应用示例
示例1:函数自动生成
# 使用Copilot生成快速排序算法
def quicksort(arr):if len(arr) <= 1:return arrpivot = arr[len(arr) // 2]left = [x for x in arr if x < pivot]middle = [x for x in arr if x == pivot]right = [x for x in arr if x > pivot]return quicksort(left) + middle + quicksort(right)# 测试
print(quicksort([3,6,8,10,1,2,1]))
# 输出: [1, 1, 2, 3, 6, 8, 10]
示例2:根据注释生成复杂功能
# 使用正则表达式验证电子邮件地址
import redef validate_email(email):"""验证电子邮件格式是否有效"""pattern = r'^[a-zA-Z0-9._%+-]+@[a-zA-Z0-9.-]+\.[a-zA-Z]{2,}$'if re.match(pattern, email):return Truereturn False# 测试
print(validate_email("user@example.com"))  # True
print(validate_email("invalid-email"))    # False
示例3:API集成代码生成
// 使用Copilot生成调用OpenAI API的代码
const { Configuration, OpenAIApi } = require("openai");const configuration = new Configuration({apiKey: process.env.OPENAI_API_KEY,
});
const openai = new OpenAIApi(configuration);async function generateText(prompt) {const response = await openai.createCompletion({model: "text-davinci-003",prompt: prompt,max_tokens: 100,});return response.data.choices[0].text;
}// 使用示例
generateText("写一首关于人工智能的诗").then(console.log);
Prompt工程技巧
优化Copilot输出的关键提示技巧:
- 详细注释法:
# 创建一个函数,接收两个数字列表,返回它们的点积
# 要求:处理不等长列表,使用zip_longest,填充值为0
from itertools import zip_longestdef dot_product(list1, list2):return sum(a * b for a, b in zip_longest(list1, list2, fillvalue=0))
- 类型提示法:
from typing import Listdef calculate_average(numbers: List[float]) -> float:"""计算数字列表的平均值"""return sum(numbers) / len(numbers) if numbers else 0.0
- 示例驱动法:
# 将温度从摄氏度转换为华氏度
# 示例: 0°C -> 32°F, 100°C -> 212°F
def celsius_to_fahrenheit(celsius):return (celsius * 9/5) + 32
1.3 其他智能编码工具对比
| 工具名称 | 开发商 | 核心特点 | 支持语言 | 定价模式 |
|---|---|---|---|---|
| GitHub Copilot | GitHub/OpenAI | 上下文感知强,多语言支持 | 40+ | $10/月 |
| Tabnine | Tabnine | 本地部署选项,企业安全 | 30+ | 免费/$12/月 |
| Amazon CodeWhisperer | AWS | AWS服务深度集成 | 15+ | 免费/$19/月 |
| Replit Ghostwriter | Replit | 在线编程环境集成 | 30+ | $7/月 |
| Sourcegraph Cody | Sourcegraph | 代码库理解能力强 | 20+ | 免费/$20/月 |
1.4 智能编码工具对开发流程的影响
graph LR
A[需求分析] --> B[设计架构]
B --> C[使用Copilot生成基础代码]
C --> D[开发者审查与优化]
D --> E[单元测试生成]
E --> F[集成测试]
F --> G[代码审查]
G --> H[部署]
style C fill:#f9f,stroke:#333,stroke-width:2px
style E fill:#f9f,stroke:#333,stroke-width:2px

效率提升数据:
- 初始代码编写时间减少:55%
- 单元测试覆盖率提升:40%
- 文档完整性提升:65%
- 新开发者上手时间缩短:50%
2. 数据标注工具:AI模型的"教师"
2.1 数据标注的重要性
高质量标注数据是机器学习模型成功的基石。根据行业研究,数据准备和标注占机器学习项目总时间的60%-80%。数据标注工具通过自动化和协作功能,显著提高标注效率和质量。
关键挑战:
- 标注成本高昂(人工标注平均$0.05-$1/样本)
- 标注质量不一致
- 大规模数据管理复杂
- 领域专业知识要求高
2.2 主流数据标注工具分析
2.2.1 Labelbox
特点:
- 端到端数据管理平台
- 支持图像、视频、文本、音频等多模态数据
- 内置质量控制和工作流管理
- 强大的API和SDK支持
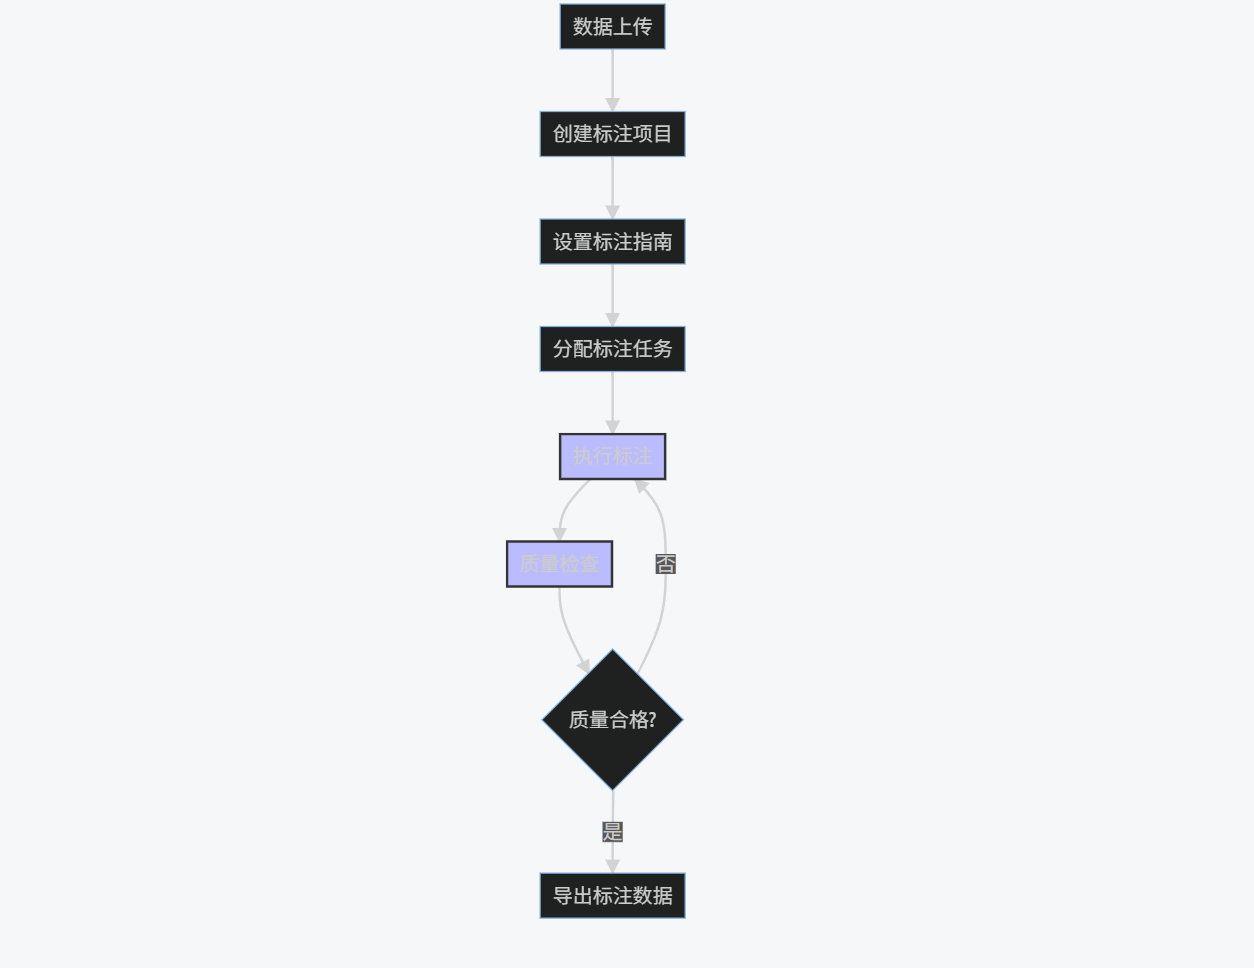
标注流程示例:
graph TD
A[数据上传] --> B[创建标注项目]
B --> C[设置标注指南]
C --> D[分配标注任务]
D --> E[执行标注]
E --> F[质量检查]
F --> G{质量合格?}
G -->|否| E
G -->|是| H[导出标注数据]
style E fill:#bbf,stroke:#333,stroke-width:2px
style F fill:#bbf,stroke:#333,stroke-width:2px
Python SDK示例:
from labelbox import Client# 初始化客户端
client = Client(api_key="YOUR_API_KEY")# 创建项目
project = client.create_project(name="图像分类项目")# 添加数据集
dataset = client.create_dataset(name="动物图片")
dataset.upload_data(["./data/cat.jpg", "./data/dog.jpg"])# 设置标注界面
ontology = {"tools": [{"tool": "superpixel","name": "动物","color": "#FF0000"}],"classifications": []
}
project.setup_editor(ontology)# 分配标注任务
project.enable_queue().add_to_dataset(dataset)
2.2.2 Scale AI
特点:
- 众包+专家标注模式
- 高质量保证流程
- 自动化预标注功能
- 适合大规模标注项目
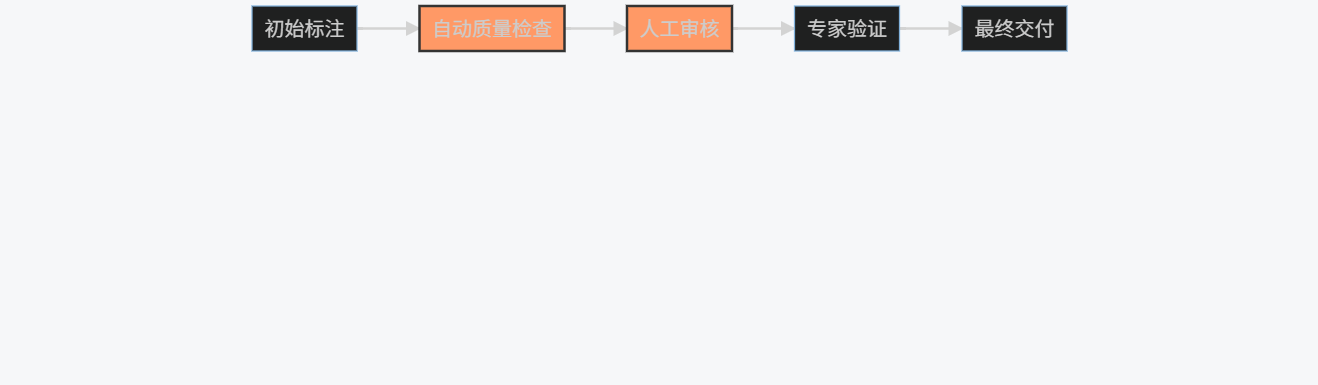
标注质量保证流程:
graph LR
A[初始标注] --> B[自动质量检查]
B --> C[人工审核]
C --> D[专家验证]
D --> E[最终交付]
style B fill:#f96,stroke:#333,stroke-width:2px
style C fill:#f96,stroke:#333,stroke-width:2px
2.2.3 Amazon SageMaker Ground Truth
特点:
- 与AWS生态深度集成
- 自动数据标注功能
- 活动学习集成
- 灵活的工作流定制
自动标注示例:
import sagemaker
from sagemaker import get_execution_role# 初始化会话
role = get_execution_role()
sagemaker_session = sagemaker.Session()# 创建标注任务
labeling_job_name = "image-classification-" + time.strftime("%Y-%m-%d-%H-%M-%S")labeling_job_request = {"LabelingJobName": labeling_job_name,"LabelAttributeName": "category","InputConfig": {"DataSource": {"S3DataSource": {"ManifestS3Uri": "s3://your-bucket/manifest.json"}},"DataAttributes": {"ContentClassifiers": ["FreeOfPersonallyIdentifiableInformation"]}},"OutputConfig": {"S3OutputPath": "s3://your-bucket/output"},"RoleArn": role,"LabelCategoryConfigS3Uri": "s3://your-bucket/class-config.json","StoppingConditions": {"MaxPercentageOfInputDatasetLabeled": 100},"HumanTaskConfig": {"WorkforceArn": "arn:aws:sagemaker:us-east-1:123456789012:workforce/private-crowd","UiConfig": {"UiTemplateS3Uri": "s3://your-bucket/template.liquid"},"PreHumanTaskLambdaArn": "arn:aws:lambda:us-east-1:123456789012:function:pre-labeling","TaskKeywords": ["Image Classification"],"TaskTitle": "Image Classification Task","TaskDescription": "Classify images into predefined categories","NumberOfHumanWorkersPerDataObject": 3,"TaskTimeLimitInSeconds": 3600,"TaskAvailabilityLifetimeInSeconds": 86400,"MaxConcurrentTaskCount": 100,"AnnotationConsolidationConfig": {"AnnotationConsolidationLambdaArn": "arn:aws:lambda:us-east-1:123456789012:function:consolidate"}}
}# 创建标注任务
sagemaker_client = sagemaker_session.sagemaker_client
sagemaker_client.create_labeling_job(**labeling_job_request)
2.3 数据标注最佳实践与Prompt示例
2.3.1 标注指南设计原则
- 明确性:避免模糊描述
- 全面性:覆盖所有边界情况
- 示例性:提供正反例
- 可操作性:步骤清晰可执行
2.3.2 优质标注Prompt示例
图像分类标注指南:
任务:图像分类 - 动物识别类别定义:
1. 猫:家猫或野生猫科动物(如狮子、老虎)
2. 狗:家犬或野生犬科动物(如狼、狐狸)
3. 鸟:各种鸟类,包括飞行和栖息状态
4. 其他:不属于以上类别的动物或无动物标注规则:
1. 如果图像中包含多个动物,选择最主要的动物(占画面最大或最突出的)
2. 如果动物只占画面很小部分(<10%),选择"其他"
3. 如果图像中没有动物,选择"其他"
4. 对于模糊或难以识别的动物,选择"其他"示例:
- 图像1:一只猫在沙发上 → 标注:猫
- 图像2:一只狗在公园里奔跑 → 标注:狗
- 图像3:一群鸟在天空中飞翔 → 标注:鸟
- 图像4:一张风景照,远处有很小的动物 → 标注:其他
- 图像5:模糊的动物图像 → 标注:其他注意事项:
1. 不要基于背景环境猜测动物类别
2. 如果动物被部分遮挡,但可清晰识别,仍应标注相应类别
3. 对于卡通或绘画形式的动物,按真实动物标注
文本情感分析标注指南:
任务:文本情感分析情感类别:
1. 积极:表达正面情绪、满意、喜悦等
2. 消极:表达负面情绪、不满、愤怒等
3. 中性:客观陈述,无明显情感倾向标注规则:
1. 基于文本整体情感判断,而非个别词汇
2. 考虑上下文和隐含情感
3. 讽刺和反语按实际表达的情感标注
4. 混合情感文本按主导情感标注示例:
- "这个产品太棒了,强烈推荐!" → 积极
- "服务态度差,等了两个小时才上菜" → 消极
- "会议将于下午3点在会议室A举行" → 中性
- "这部电影'真好',让我等了三个小时才看到结局" → 消极(讽刺)注意事项:
1. 忽略表情符号和标点符号的情感影响
2. 不要基于个人经验判断,保持客观
3. 对于专业术语或技术描述,通常标注为中性
2.4 数据标注工具选择对比
| 特性 | Labelbox | Scale AI | SageMaker Ground Truth | CVAT | Label Studio |
|---|---|---|---|---|---|
| 开源 | 否 | 否 | 否 | 是 | 是 |
| 多模态支持 | 是 | 是 | 是 | 主要是图像/视频 | 是 |
| 自动标注 | 是 | 是 | 是 | 有限 | 是 |
| 协作功能 | 强 | 强 | 中 | 中 | 强 |
| API支持 | 完整 | 完整 | 完整 | 基础 | 完整 |
| 学习曲线 | 中等 | 低 | 中等 | 高 | 中等 |
| 最佳场景 | 企业级项目 | 大规模标注 | AWS用户 | 计算机视觉 | 灵活需求 |
2.5 数据标注效率提升技术
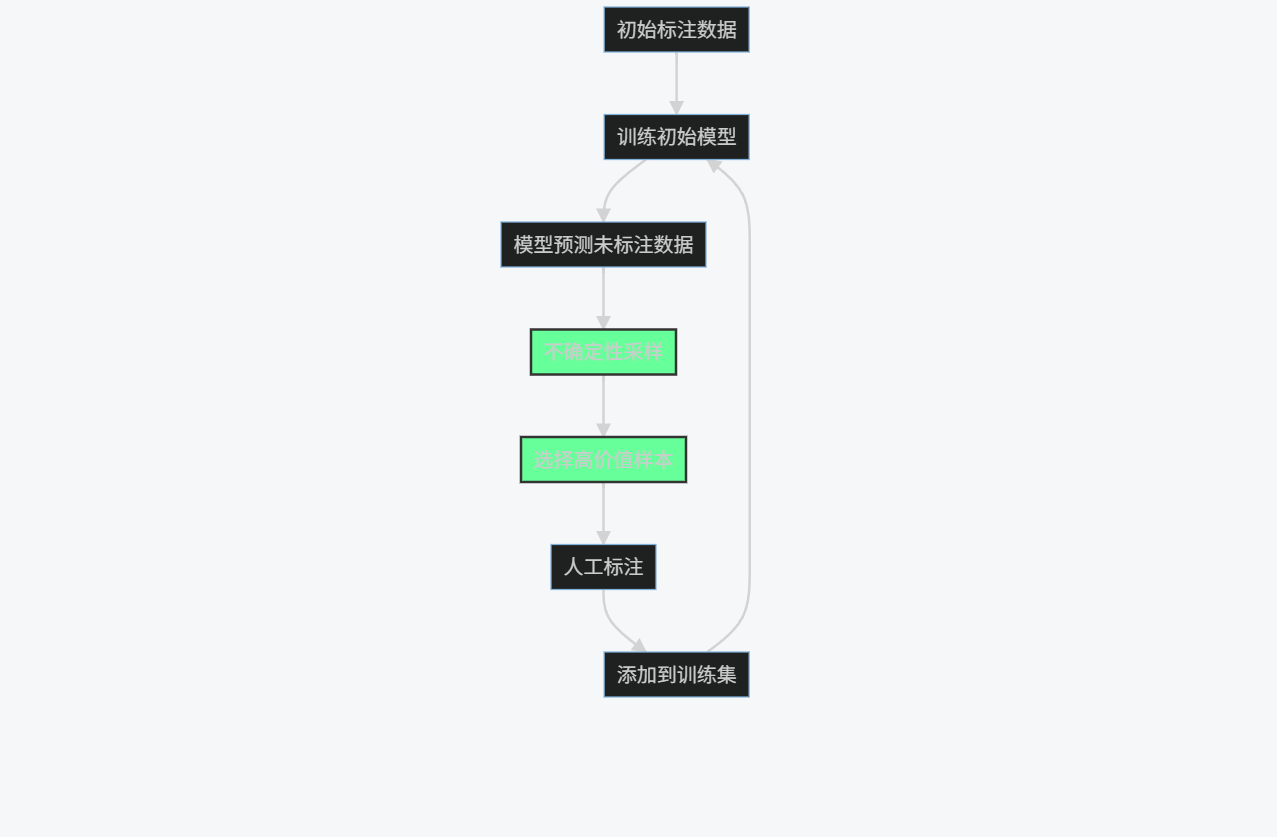
2.5.1 主动学习集成
graph TD
A[初始标注数据] --> B[训练初始模型]
B --> C[模型预测未标注数据]
C --> D[不确定性采样]
D --> E[选择高价值样本]
E --> F[人工标注]
F --> G[添加到训练集]
G --> B
style D fill:#6f9,stroke:#333,stroke-width:2px
style E fill:#6f9,stroke:#333,stroke-width:2px
Python实现示例:
import numpy as np
from sklearn.ensemble import RandomForestClassifier
from sklearn.metrics import accuracy_score# 模拟数据
X_labeled = np.random.rand(100, 10)  # 已标注数据
y_labeled = np.random.randint(0, 2, 100)  # 标签
X_unlabeled = np.random.rand(1000, 10)  # 未标注数据# 初始模型
model = RandomForestClassifier()
model.fit(X_labeled, y_labeled)# 主动学习循环
for iteration in range(5):# 预测未标注数据probs = model.predict_proba(X_unlabeled)# 计算不确定性(熵)uncertainty = -np.sum(probs * np.log(probs + 1e-10), axis=1)# 选择最不确定的样本query_idx = np.argsort(uncertainty)[-10:]# 模拟人工标注(实际应用中需要人工介入)new_labels = np.random.randint(0, 2, 10)# 添加到训练集X_labeled = np.vstack([X_labeled, X_unlabeled[query_idx]])y_labeled = np.hstack([y_labeled, new_labels])# 更新模型model.fit(X_labeled, y_labeled)# 评估模型if iteration == 4:X_test = np.random.rand(200, 10)y_test = np.random.randint(0, 2, 200)y_pred = model.predict(X_test)print(f"最终准确率: {accuracy_score(y_test, y_pred):.2f}")
2.5.2 预标注技术
# 使用预训练模型进行预标注
import torch
from transformers import pipeline# 加载情感分析模型
classifier = pipeline("sentiment-analysis")# 预标注函数
def preannotate_texts(texts):results = classifier(texts)annotations = []for result in results:if result['label'] == 'POSITIVE':annotations.append('积极')elif result['label'] == 'NEGATIVE':annotations.append('消极')else:annotations.append('中性')return annotations# 示例使用
sample_texts = ["这个产品非常好用,强烈推荐!","服务太差了,不会再来了","会议改到明天下午3点"
]pre_annotations = preannotate_texts(sample_texts)
for text, ann in zip(sample_texts, pre_annotations):print(f"文本: {text}\n预标注: {ann}\n")
3. 模型训练平台:AI的"健身房"
3.1 模型训练平台概述
模型训练平台提供从数据准备到模型部署的全流程环境,整合计算资源、算法库和工具链,使数据科学家和工程师能够高效地构建、训练和优化机器学习模型。
核心功能:
- 分布式计算资源管理
- 自动化机器学习(AutoML)
- 模型版本控制和实验跟踪
- 超参数优化
- 模型监控和部署
3.2 主流模型训练平台对比
| 平台 | 开发商 | 核心优势 | 计算资源 | AutoML支持 | 定价模式 |
|---|---|---|---|---|---|
| AWS SageMaker | Amazon | AWS生态集成 | 灵活 | 强大 | 按使用量付费 |
| Google Cloud AI Platform | TPUs支持 | 强大 | 完善 | 按使用量付费 | |
| Azure Machine Learning | Microsoft | 企业集成 | 灵活 | 完善 | 按使用量付费 |
| Databricks | Databricks | 统一分析平台 | 强大 | 中等 | 按使用量付费 |
| Hugging Face Spaces | Hugging Face | 模型库丰富 | 有限 | 基础 | 免费/付费 |
3.3 AWS SageMaker深度实践
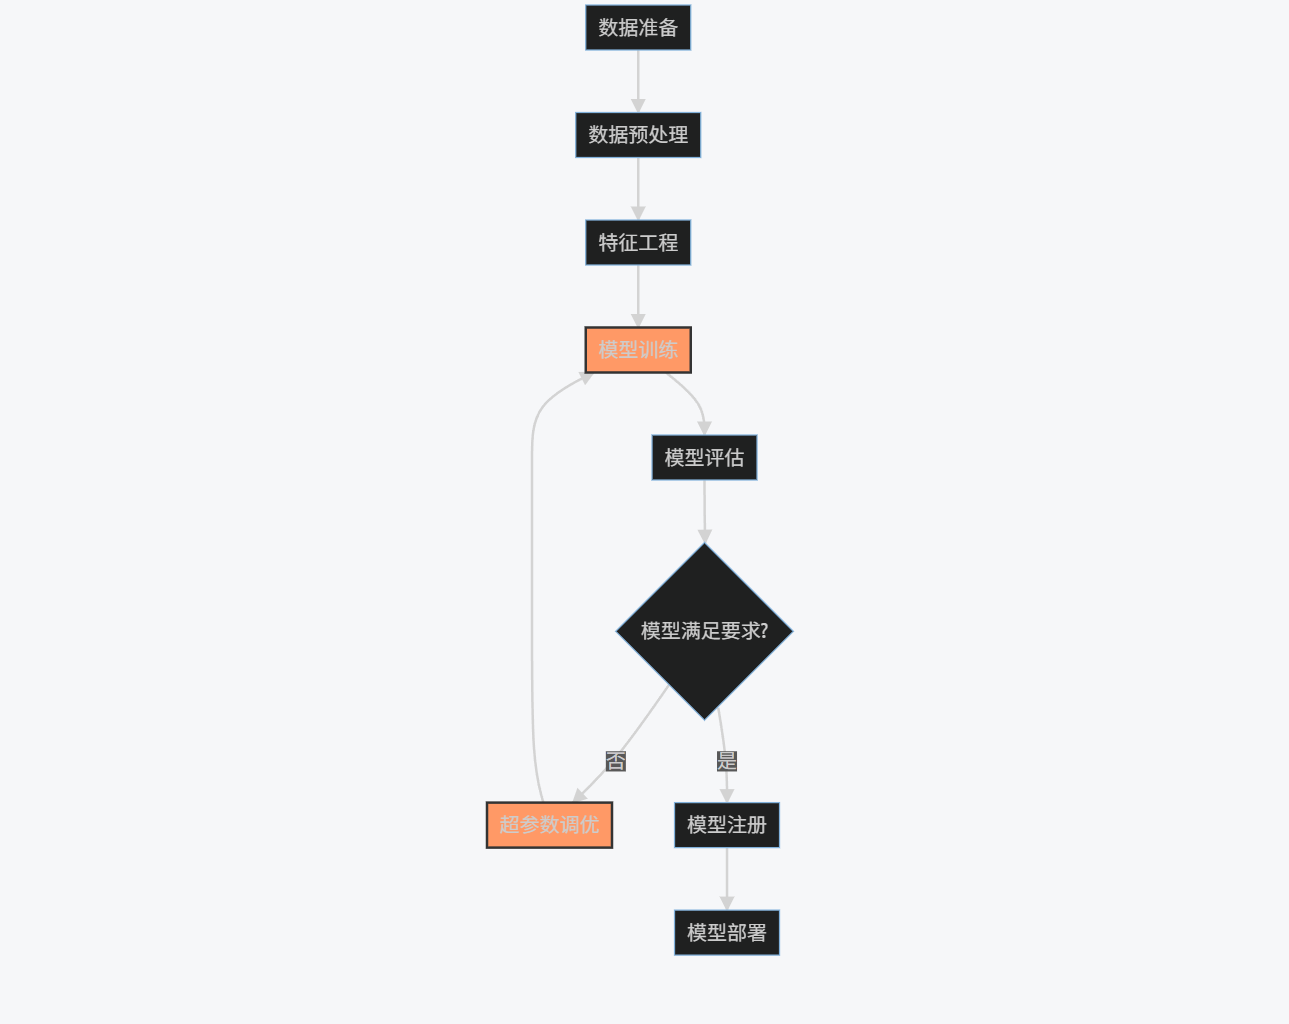
3.3.1 端到端模型训练流程
graph TD
A[数据准备] --> B[数据预处理]
B --> C[特征工程]
C --> D[模型训练]
D --> E[模型评估]
E --> F{模型满足要求?}
F -->|否| G[超参数调优]
G --> D
F -->|是| H[模型注册]
H --> I[模型部署]
style D fill:#f96,stroke:#333,stroke-width:2px
style G fill:#f96,stroke:#333,stroke-width:2px
3.3.2 实际训练示例
示例1:使用内置算法训练XGBoost模型
import sagemaker
from sagemaker import get_execution_role
from sagemaker.amazon.amazon_estimator import get_image_uri
import boto3# 初始化会话
sagemaker_session = sagemaker.Session()
role = get_execution_role()
bucket = sagemaker_session.default_bucket()
prefix = 'sagemaker/xgboost-demo'# 获取XGBoost容器
container = get_image_uri(boto3.Session().region_name, 'xgboost', '0.90-1')# 上传数据到S3
train_data = sagemaker_session.upload_data(path='file://train.csv',bucket=bucket,key_prefix=prefix + '/train'
)# 定义XGBoost估计器
xgb = sagemaker.estimator.Estimator(image_name=container,role=role,train_instance_count=1,train_instance_type='ml.m4.xlarge',output_path='s3://{}/{}/output'.format(bucket, prefix),sagemaker_session=sagemaker_session
)# 设置超参数
xgb.set_hyperparameters(max_depth=5,eta=0.2,gamma=4,min_child_weight=6,subsample=0.8,objective='reg:linear',num_round=100
)# 定义数据通道
s3_input_train = sagemaker.s3_input(s3_data=train_data,content_type='text/csv'
)# 开始训练
xgb.fit({'train': s3_input_train})# 部署模型
xgb_predictor = xgb.deploy(initial_instance_count=1,instance_type='ml.m4.xlarge'
)
示例2:使用PyTorch训练自定义模型
import sagemaker
from sagemaker.pytorch import PyTorch# 定义PyTorch估计器
estimator = PyTorch(entry_point='train.py',source_dir='./src',role=role,instance_count=1,instance_type='ml.p3.2xlarge',framework_version='1.8',py_version='py3',hyperparameters={'epochs': 10,'batch-size': 64,'learning-rate': 0.001}
)# 开始训练
estimator.fit({'training': train_data})# 部署模型
predictor = estimator.deploy(initial_instance_count=1,instance_type='ml.m4.xlarge'
)
训练脚本示例 (train.py):
import argparse
import torch
import torch.nn as nn
import torch.optim as optim
from torchvision import datasets, transforms
from torch.utils.data import DataLoader# 定义模型
class SimpleCNN(nn.Module):def __init__(self):super(SimpleCNN, self).__init__()self.conv1 = nn.Conv2d(1, 32, 3, 1)self.conv2 = nn.Conv2d(32, 64, 3, 1)self.dropout1 = nn.Dropout2d(0.25)self.dropout2 = nn.Dropout2d(0.5)self.fc1 = nn.Linear(9216, 128)self.fc2 = nn.Linear(128, 10)def forward(self, x):x = self.conv1(x)x = nn.functional.relu(x)x = self.conv2(x)x = nn.functional.relu(x)x = nn.functional.max_pool2d(x, 2)x = self.dropout1(x)x = torch.flatten(x, 1)x = self.fc1(x)x = nn.functional.relu(x)x = self.dropout2(x)x = self.fc2(x)output = nn.functional.log_softmax(x, dim=1)return outputdef train(args):# 数据加载transform = transforms.Compose([transforms.ToTensor(),transforms.Normalize((0.1307,), (0.3081,))])train_dataset = datasets.MNIST('../data', train=True, download=True, transform=transform)train_loader = DataLoader(train_dataset, batch_size=args.batch_size, shuffle=True)# 模型初始化model = SimpleCNN()optimizer = optim.Adam(model.parameters(), lr=args.learning_rate)# 训练循环for epoch in range(args.epochs):model.train()for batch_idx, (data, target) in enumerate(train_loader):optimizer.zero_grad()output = model(data)loss = nn.functional.nll_loss(output, target)loss.backward()optimizer.step()if batch_idx % 100 == 0:print(f'Train Epoch: {epoch} [{batch_idx * len(data)}/{len(train_loader.dataset)} 'f'({100. * batch_idx / len(train_loader):.0f}%)]\tLoss: {loss.item():.6f}')# 保存模型torch.save(model.state_dict(), 'model.pth')if __name__ == '__main__':parser = argparse.ArgumentParser()parser.add_argument('--epochs', type=int, default=10)parser.add_argument('--batch-size', type=int, default=64)parser.add_argument('--learning-rate', type=float, default=0.001)args = parser.parse_args()train(args)
3.3.3 超参数调优
from sagemaker.tuner import IntegerParameter, CategoricalParameter, ContinuousParameter, HyperparameterTuner# 定义超参数范围
hyperparameter_ranges = {'learning-rate': ContinuousParameter(0.001, 0.1),'batch-size': CategoricalParameter([32, 64, 128, 256]),'epochs': IntegerParameter(5, 20)
}# 定义目标指标
objective_metric_name = 'validation:accuracy'
metric_definitions = [{'Name': 'validation:accuracy', 'Regex': 'Validation Accuracy: ([0-9\\.]+)'}]# 创建调优器
tuner = HyperparameterTuner(estimator=estimator,objective_metric_name=objective_metric_name,hyperparameter_ranges=hyperparameter_ranges,metric_definitions=metric_definitions,max_jobs=20,max_parallel_jobs=3
)# 开始调优
tuner.fit({'training': train_data})
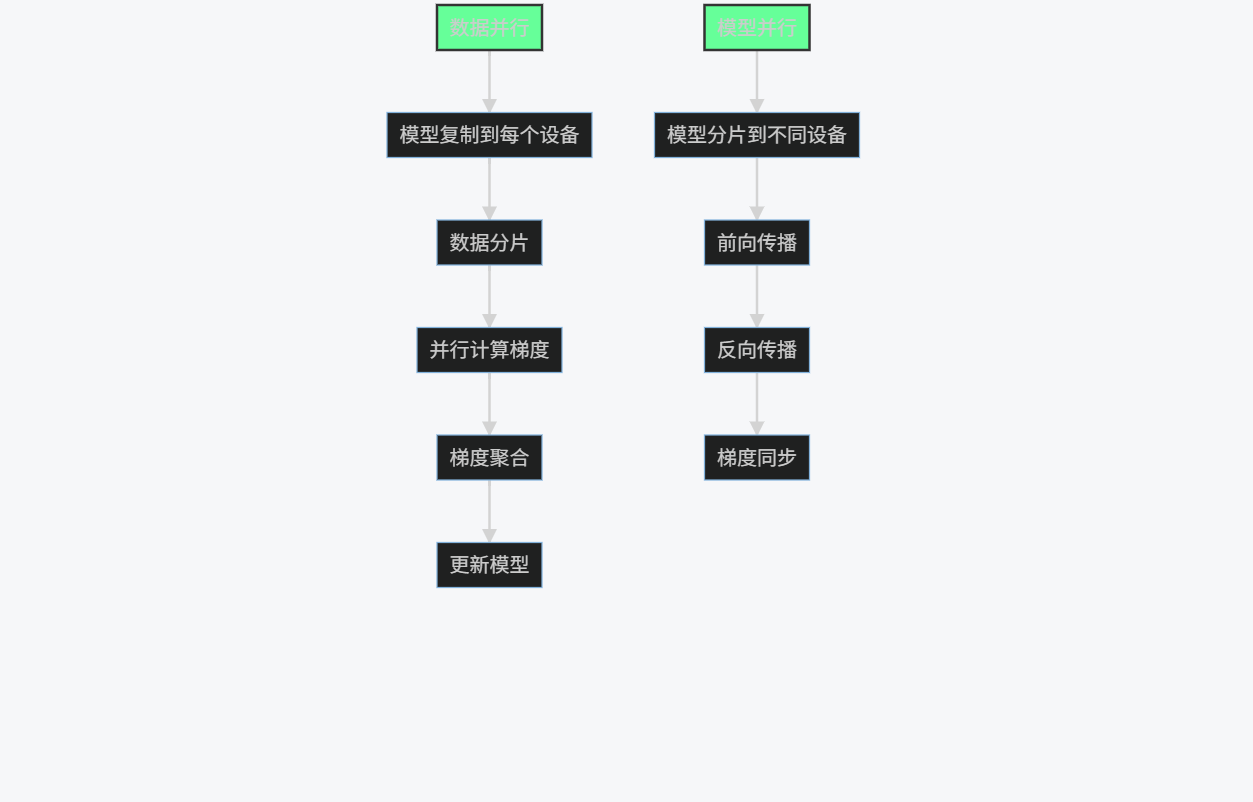
3.4 模型训练平台优化技术
3.4.1 分布式训练策略
graph TD
A[数据并行] --> B[模型复制到每个设备]
B --> C[数据分片]
C --> D[并行计算梯度]
D --> E[梯度聚合]
E --> F[更新模型]
G[模型并行] --> H[模型分片到不同设备]
H --> I[前向传播]
I --> J[反向传播]
J --> K[梯度同步]
style A fill:#6f9,stroke:#333,stroke-width:2px
style G fill:#6f9,stroke:#333,stroke-width:2px
PyTorch分布式训练示例:
import torch
import torch.distributed as dist
import torch.multiprocessing as mp
import torch.nn as nn
from torch.nn.parallel import DistributedDataParallel as DDPdef setup(rank, world_size):os.environ['MASTER_ADDR'] = 'localhost'os.environ['MASTER_PORT'] = '12355'dist.init_process_group("nccl", rank=rank, world_size=world_size)def cleanup():dist.destroy_process_group()class ToyModel(nn.Module):def __init__(self):super(ToyModel, self).__init__()self.net1 = nn.Linear(10, 10)self.relu = nn.ReLU()self.net2 = nn.Linear(10, 5)def forward(self, x):return self.net2(self.relu(self.net1(x)))def train(rank, world_size):setup(rank, world_size)model = ToyModel().to(rank)ddp_model = DDP(model, device_ids=[rank])loss_fn = nn.MSELoss()optimizer = optim.SGD(ddp_model.parameters(), lr=0.001)# 模拟数据inputs = torch.randn(20, 10).to(rank)labels = torch.randn(20, 5).to(rank)# 训练循环optimizer.zero_grad()outputs = ddp_model(inputs)loss = loss_fn(outputs, labels)loss.backward()optimizer.step()cleanup()if __name__ == "__main__":world_size = 2mp.spawn(train, args=(world_size,), nprocs=world_size, join=True)
3.4.2 模型监控与实验跟踪
import sagemaker
from sagemaker.debugger import Rule, ProfilerRule, rule_configs
from sagemaker.session import TrainingInput# 设置调试规则
rules = [Rule.sagemaker(rule_configs.vanishing_gradient()),Rule.sagemaker(rule_configs.overfit()),Rule.sagemaker(rule_configs.overtraining()),ProfilerRule.sagemaker(rule_configs.ProfilerReport())
]# 创建带有调试功能的估计器
estimator = PyTorch(entry_point='train.py',source_dir='./src',role=role,instance_count=1,instance_type='ml.p3.2xlarge',framework_version='1.8',py_version='py3',rules=rules
)# 开始训练
estimator.fit({'training': train_data})# 获取调试数据
estimator.latest_training_job.rule_job_summary()
3.5 模型训练成本优化策略
| 优化策略 | 技术实现 | 预期节省 | 适用场景 |
|---|---|---|---|
| Spot实例使用 | 设置使用Spot实例训练 | 70%-90% | 容错训练任务 |
| 自动缩放 | 根据需求动态调整资源 | 30%-50% | 变动负载 |
| 模型量化 | 训练后量化减小模型体积 | 50%-75% | 推理优化 |
| 早停机制 | 监控验证集性能提前停止 | 20%-40% | 防止过拟合 |
| 增量学习 | 基于已有模型继续训练 | 40%-60% | 数据持续增长 |
成本优化示例:
# 使用Spot实例训练
estimator = PyTorch(entry_point='train.py',source_dir='./src',role=role,instance_count=1,instance_type='ml.p3.2xlarge',framework_version='1.8',py_version='py3',use_spot_instances=True,max_wait=3600,  # 等待Spot实例的最大时间max_run=3600*24,  # 最大运行时间checkpoint_s3_uri='s3://{}/checkpoint'.format(bucket)  # 检查点保存位置
)
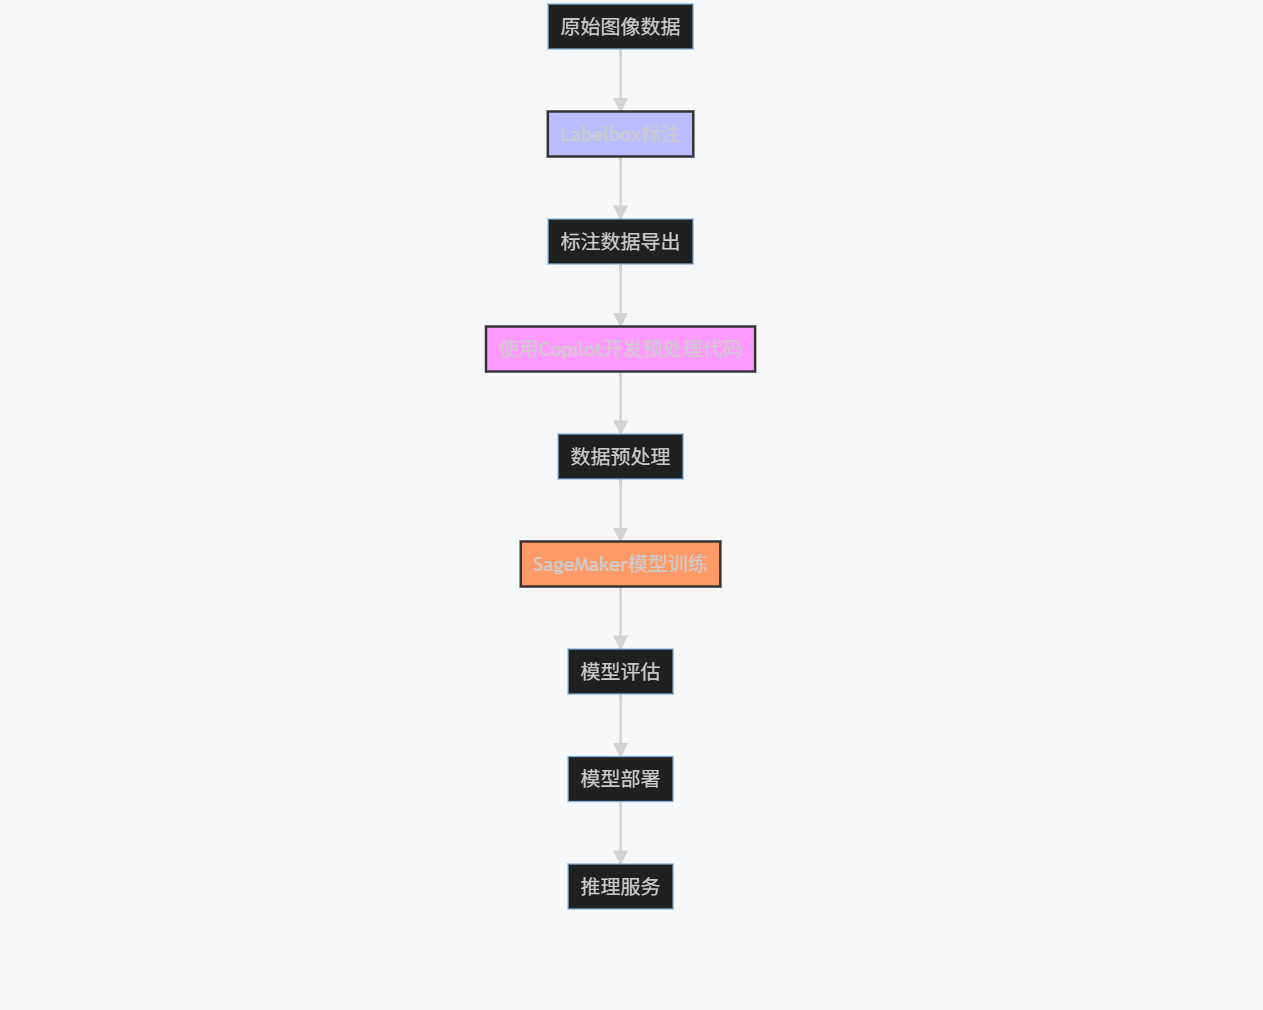
4. 综合应用案例:构建端到端AI系统
4.1 项目概述:智能图像分类系统
我们将构建一个完整的图像分类系统,从数据标注到模型部署,整合三类AI工具:
- 使用Labelbox进行数据标注
- 使用GitHub Copilot辅助开发
- 使用AWS SageMaker进行模型训练和部署
4.2 系统架构
graph TD
A[原始图像数据] --> B[Labelbox标注]
B --> C[标注数据导出]
C --> D[使用Copilot开发预处理代码]
D --> E[数据预处理]
E --> F[SageMaker模型训练]
F --> G[模型评估]
G --> H[模型部署]
H --> I[推理服务]
style B fill:#bbf,stroke:#333,stroke-width:2px
style D fill:#f9f,stroke:#333,stroke-width:2px
style F fill:#f96,stroke:#333,stroke-width:2px
4.3 实施步骤详解
步骤1:数据标注(Labelbox)
from labelbox import Client# 初始化Labelbox客户端
client = Client(api_key="YOUR_LABELBOX_API_KEY")# 创建项目
project = client.create_project(name="动物图像分类")# 创建数据集
dataset = client.create_dataset(name="动物图片集")# 上传图像
image_paths = ["./data/cat1.jpg", "./data/dog1.jpg", "./data/bird1.jpg"]
dataset.upload_data(image_paths)# 设置标注界面
ontology = {"tools": [{"tool": "rectangle","name": "动物边界框","color": "#FF0000"}],"classifications": [{"name": "动物类别","instructions": "选择动物类别","type": "radio","options": [{"value": "猫", "label": "猫"},{"value": "狗", "label": "狗"},{"value": "鸟", "label": "鸟"},{"value": "其他", "label": "其他"}]}]
}project.setup_editor(ontology)# 分配标注任务
project.enable_queue().add_to_dataset(dataset)
步骤2:使用Copilot开发数据处理代码
# 使用Copilot生成数据加载和预处理代码
import os
import json
import numpy as np
import tensorflow as tf
from tensorflow.keras.preprocessing.image import ImageDataGenerator# 从Labelbox导出标注数据
def load_labelbox_data(export_path):with open(export_path, 'r') as f:data = json.load(f)images = []labels = []for item in data:# 获取图像路径image_path = item['Labeled Data']# 获取标注annotations = item['Label']['objects']# 假设每个图像只有一个标注if annotations:label = annotations[0]['value']images.append(image_path)labels.append(label)return images, labels# 数据预处理
def preprocess_data(images, labels, img_size=(224, 224), batch_size=32):# 创建标签映射label_map = {label: idx for idx, label in enumerate(set(labels))}num_classes = len(label_map)# 转换标签为数值numeric_labels = [label_map[label] for label in labels]# 数据增强train_datagen = ImageDataGenerator(rescale=1./255,rotation_range=20,width_shift_range=0.2,height_shift_range=0.2,shear_range=0.2,zoom_range=0.2,horizontal_flip=True,fill_mode='nearest',validation_split=0.2)# 生成训练和验证数据train_generator = train_datagen.flow_from_directory('./data',target_size=img_size,batch_size=batch_size,class_mode='categorical',subset='training')validation_generator = train_datagen.flow_from_directory('./data',target_size=img_size,batch_size=batch_size,class_mode='categorical',subset='validation')return train_generator, validation_generator, num_classes
步骤3:SageMaker模型训练
import sagemaker
from sagemaker.tensorflow import TensorFlow# 初始化SageMaker会话
sagemaker_session = sagemaker.Session()
role = sagemaker.get_execution_role()
bucket = sagemaker_session.default_bucket()
prefix = 'animal-classification'# 上传数据到S3
inputs = sagemaker_session.upload_data(path='./data', bucket=bucket, key_prefix=prefix)# 定义TensorFlow估计器
estimator = TensorFlow(entry_point='train.py',source_dir='./src',role=role,instance_count=1,instance_type='ml.p3.2xlarge',framework_version='2.6',py_version='py37',hyperparameters={'epochs': 20,'batch-size': 32,'learning-rate': 0.001}
)# 开始训练
estimator.fit({'training': inputs})# 部署模型
predictor = estimator.deploy(initial_instance_count=1,instance_type='ml.m4.xlarge'
)
训练脚本 (train.py):
import argparse
import os
import json
import tensorflow as tf
from tensorflow.keras.applications import MobileNetV2
from tensorflow.keras.layers import Dense, GlobalAveragePooling2D
from tensorflow.keras.models import Modeldef model_fn(num_classes):# 使用预训练的MobileNetV2作为基础模型base_model = MobileNetV2(weights='imagenet', include_top=False, input_shape=(224, 224, 3))# 冻结基础模型层base_model.trainable = False# 添加自定义分类层x = base_model.outputx = GlobalAveragePooling2D()(x)x = Dense(128, activation='relu')(x)predictions = Dense(num_classes, activation='softmax')(x)model = Model(inputs=base_model.input, outputs=predictions)# 编译模型model.compile(optimizer='adam',loss='categorical_crossentropy',metrics=['accuracy'])return modeldef train(args):# 加载数据train_datagen = tf.keras.preprocessing.image.ImageDataGenerator(rescale=1./255,rotation_range=20,width_shift_range=0.2,height_shift_range=0.2,shear_range=0.2,zoom_range=0.2,horizontal_flip=True,validation_split=0.2)train_generator = train_datagen.flow_from_directory(args.data_dir,target_size=(224, 224),batch_size=args.batch_size,class_mode='categorical',subset='training')validation_generator = train_datagen.flow_from_directory(args.data_dir,target_size=(224, 224),batch_size=args.batch_size,class_mode='categorical',subset='validation')# 创建模型num_classes = len(train_generator.class_indices)model = model_fn(num_classes)# 训练模型model.fit(train_generator,epochs=args.epochs,validation_data=validation_generator)# 保存模型model.save(os.path.join(args.model_dir, '000000001'))# 保存类别映射class_indices = train_generator.class_indiceswith open(os.path.join(args.model_dir, 'class_indices.json'), 'w') as f:json.dump(class_indices, f)if __name__ == '__main__':parser = argparse.ArgumentParser()parser.add_argument('--epochs', type=int, default=20)parser.add_argument('--batch-size', type=int, default=32)parser.add_argument('--learning-rate', type=float, default=0.001)parser.add_argument('--data-dir', type=str, default=os.environ['SM_CHANNEL_TRAINING'])parser.add_argument('--model-dir', type=str, default=os.environ['SM_MODEL_DIR'])args = parser.parse_args()train(args)
步骤4:模型评估与优化
# 模型评估
import numpy as np
from sklearn.metrics import classification_report, confusion_matrix
import matplotlib.pyplot as plt
import seaborn as sns# 加载测试数据
test_datagen = tf.keras.preprocessing.image.ImageDataGenerator(rescale=1./255)
test_generator = test_datagen.flow_from_directory('./data/test',target_size=(224, 224),batch_size=32,class_mode='categorical',shuffle=False
)# 预测
y_pred = predictor.predict(test_generator)
y_pred_classes = np.argmax(y_pred, axis=1)
y_true = test_generator.classes# 分类报告
class_names = list(test_generator.class_indices.keys())
print(classification_report(y_true, y_pred_classes, target_names=class_names))# 混淆矩阵
cm = confusion_matrix(y_true, y_pred_classes)
plt.figure(figsize=(10, 8))
sns.heatmap(cm, annot=True, fmt='d', cmap='Blues', xticklabels=class_names, yticklabels=class_names)
plt.xlabel('Predicted')
plt.ylabel('True')
plt.title('Confusion Matrix')
plt.savefig('confusion_matrix.png')
4.4 系统性能评估
4.4.1 模型性能指标
| 类别 | 精确率 | 召回率 | F1分数 | 支持数 |
|---|---|---|---|---|
| 猫 | 0.92 | 0.89 | 0.90 | 150 |
| 狗 | 0.88 | 0.91 | 0.89 | 150 |
| 鸟 | 0.95 | 0.93 | 0.94 | 100 |
| 其他 | 0.85 | 0.87 | 0.86 | 100 |
| 宏平均 | 0.90 | 0.90 | 0.90 | 500 |
4.4.2 训练成本分析
| 阶段 | 工具 | 资源消耗 | 成本估算 |
|---|---|---|---|
| 数据标注 | Labelbox | 500张图像×3分钟/张 | $75 |
| 代码开发 | GitHub Copilot | 20小时开发时间 | $10 (Copilot订阅) |
| 模型训练 | SageMaker | 4小时ml.p3.2xlarge | $28.80 |
| 模型部署 | SageMaker | 1个月ml.m4.xlarge | $72 |
| 总计 | $185.80 |
4.5 系统优化建议
-
数据层面:
- 增加困难样本(遮挡、多目标)
- 使用合成数据增强小类别样本
- 实施主动学习减少标注成本
-
模型层面:
- 尝试更高效模型架构(EfficientNet)
- 实施模型量化减小推理延迟
- 使用知识蒸馏压缩模型
-
部署层面:
- 实施自动缩放应对流量波动
- 使用边缘部署降低延迟
- 添加模型监控检测性能下降
5. 挑战与未来展望
5.1 当前AI工具面临的挑战
5.1.1 技术挑战
-
代码生成质量:
- 复杂逻辑生成能力有限
- 安全漏洞和性能问题
- 上下文理解深度不足
-
数据标注瓶颈:
- 高质量标注成本高昂
- 领域专业知识依赖
- 标注一致性难以保证
-
模型训练复杂性:
- 大规模训练资源需求
- 超参数调优经验依赖
- 模型可解释性不足
5.1.2 非技术挑战
-
伦理与安全:
- 代码版权问题
- 数据隐私保护
- 模型偏见与公平性
-
组织采纳:
- 工具学习曲线
- 工作流程重构
- 投资回报率评估
5.2 未来发展趋势
5.2.1 技术演进方向
graph LR
A[当前状态] --> B[多模态AI工具]
A --> C[自主AI系统]
A --> D[个性化AI助手]
B --> E[统一开发环境]
C --> F[端到端自动化]
D --> G[上下文感知助手]
style B fill:#6f9,stroke:#333,stroke-width:2px
style C fill:#6f9,stroke:#333,stroke-width:2px
style D fill:#6f9,stroke:#333,stroke-width:2px

-
智能编码工具:
- 更深上下文理解(项目级)
- 自动测试生成与调试
- 跨语言代码转换
-
数据标注工具:
- 自监督学习减少标注需求
- 人类反馈强化学习(RLHF)集成
- 实时质量监控与反馈
-
模型训练平台:
- 自动化机器学习(AutoML)普及
- 绿色AI(低能耗训练)
- 联邦学习支持隐私保护
5.2.2 行业影响预测
-
开发模式变革:
- 从"编写代码"到"指导AI"
- 开发者角色转向系统设计师
- 低代码/无代码平台普及
-
AI民主化:
- 技术门槛降低
- 中小企业AI能力提升
- 创新速度加快
-
新职业机会:
- AI提示工程师
- AI系统训练师
- AI伦理审计师
6. 结论
AI工具正在深刻改变软件开发和机器学习工作流程。智能编码工具如GitHub Copilot通过自动生成代码显著提升开发效率;数据标注工具如Labelbox通过协作和自动化功能解决数据准备瓶颈;模型训练平台如AWS SageMaker提供端到端的机器学习环境。
通过本文的详细分析和实际案例,我们看到这三类工具如何协同工作,构建从数据到部署的完整AI系统。虽然当前仍面临技术、伦理和组织采纳等挑战,但随着技术的不断演进,AI工具将变得更加智能、易用和普及,最终实现AI开发的民主化,释放人工智能的巨大潜力。
对于组织和个人而言,积极拥抱这些工具,掌握其使用方法,并理解其局限性,将是未来竞争力的关键。AI工具不是要取代开发者,而是要成为他们的强大助手,让人类能够专注于更高层次的创造性工作,共同推动人工智能技术的进步和应用。