Spring启示录
1. Spring开发基础
1.1 OCP开闭原则
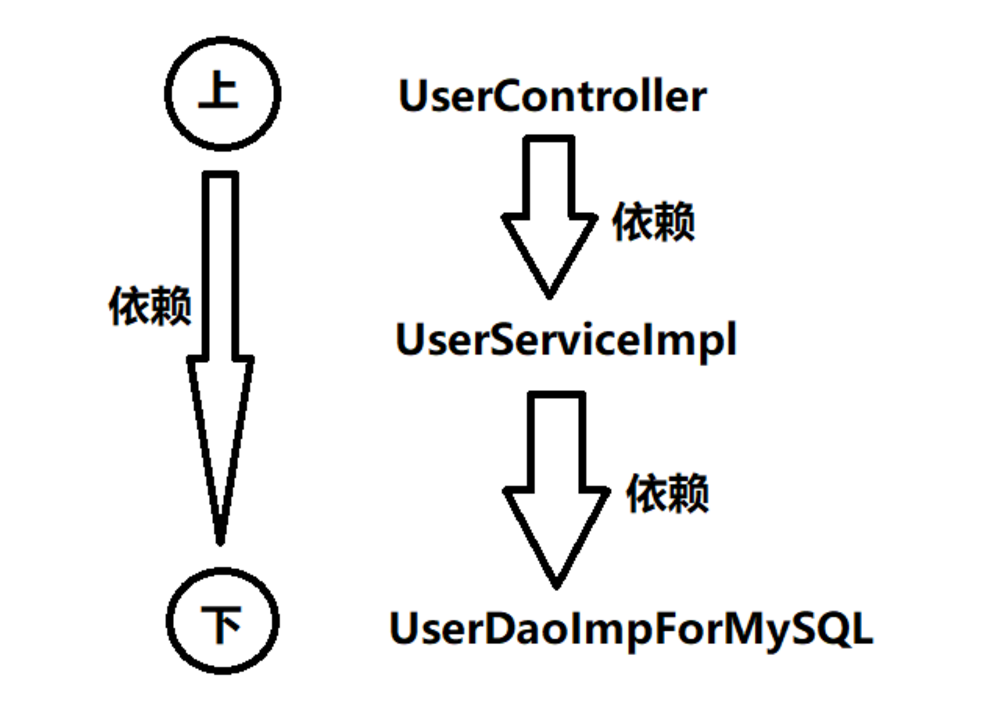
上层是依赖下层的。UserController依赖UserServiceImpl,而UserServiceImpl依赖UserDaoImplForMySQL,这样就会导致下面只要改动,上面必然会受牵连(跟着也会改),所谓牵一发而动全身。这样也就同时违背了另一个开发原则:依赖倒置原则。
1.2 依赖倒置原则DIP
倡导面向抽象编程,面向接口编程,不要面向具体编程,让上层不再依赖下层,下面改动了,上面的代码不会受到牵连。这样可以大大降低程序的耦合度,耦合度低了,扩展力就强了,同时代码复用性也会增强。
1.3 Spring的核心:IOC
将对象的创建权/管理权交出去了,不再使用硬编码的方式了。同时也把对象关系的管理权交出去了,也不再使用硬编码的方式了。像这种把对象的创建权交出去,把对象关系的管理权交出去,被称为控制反转IOC。
2. Spring概述
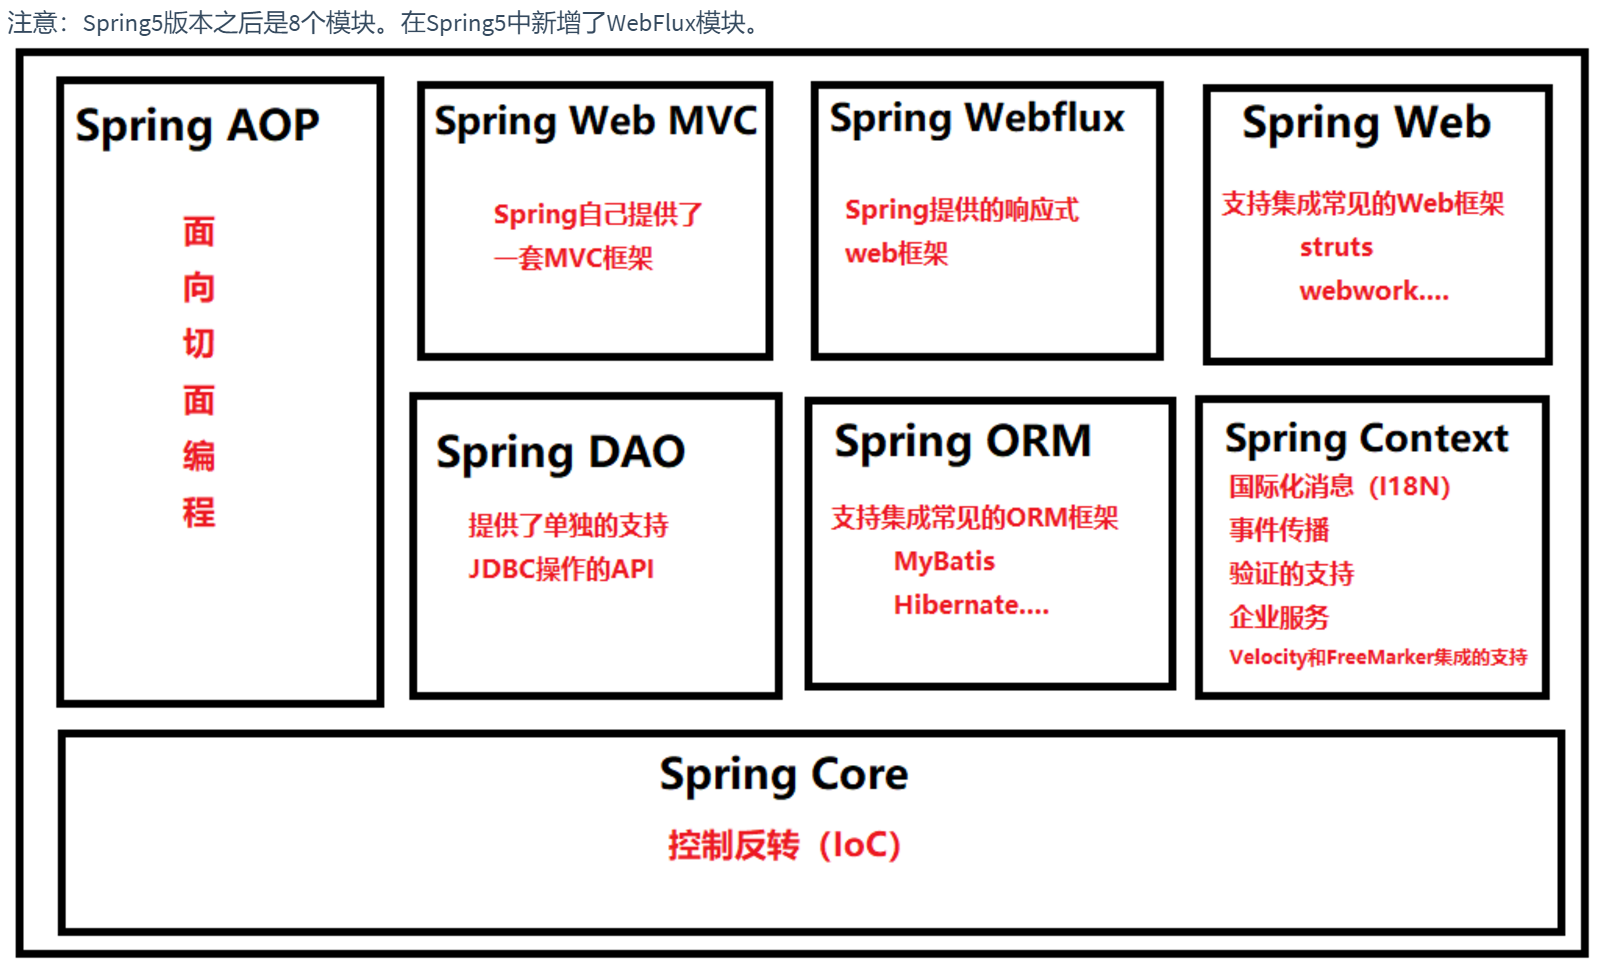
Spring包含并管理应用对象的配置和生命周期,在这个意义上它是一种容器,你可以配置你的每个bean如何被创建——基于一个可配置原型(prototype),bean可以创建一个单独的实例或者每次需要时都生成一个新的实例——以及它们是如何相互关联的。
当加入spring context的依赖之后,会关联引入其他依赖:
spring aop:面向切面编程
spring beans:IOC核心
spring core:spring的核心工具包
spring jcl:spring的日志包
spring expression:spring表达式
2.1 bean的配置
<?xml version="1.0" encoding="UTF-8"?>
<beans xmlns="http://www.springframework.org/schema/beans"xmlns:xsi="http://www.w3.org/2001/XMLSchema-instance"xsi:schemaLocation="http://www.springframework.org/schema/beans http://www.springframework.org/schema/beans/spring-beans.xsd"><bean id="vipBean" class="com.hnlg.bean.Vip"/></beans>
bean的id和class属性:
-
id属性:代表对象的唯一标识。可以看做一个人的身份证号。
-
class属性:用来指定要创建的java对象的类名,这个类名必须是全限定类名(带包名)。
// 测试代码
public class Spring6Test {@Testpublic void testFirst(){// 初始化Spring容器上下文(解析beans.xml文件,创建所有的bean对象)ApplicationContext applicationContext = new ClassPathXmlApplicationContext("beans.xml");// 根据id获取bean对象Object userBean = applicationContext.getBean("userBean");System.out.println(userBean);}
}
2.2 Spring底层程序思想
1. 在spring的配置文件中id是不能重名。
2. 底层通过反射机制调用无参数构造方法从而创建对象
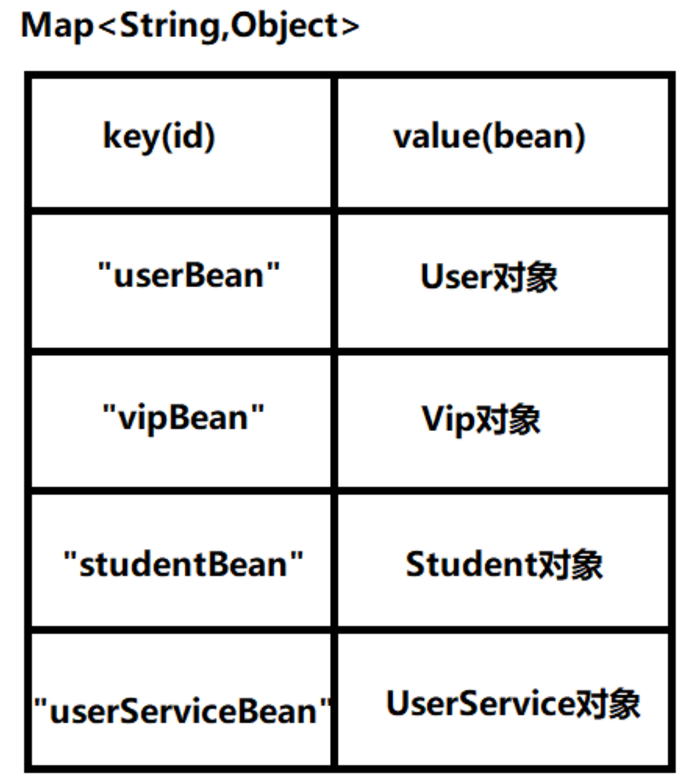
3. 创建好的对象存储到了Map数据结构
4. spring配置文件中配置的bean可以任意类,只要这个类不是抽象的,并且提供了无参数构造方法。
<!--配置java.util.Date Bean-->
<bean id="nowTime" class="java.util.Date"/>
5. getBean()方法返回的类型是Object,如果访问子类的特有属性和方法时,还需要向下转型 (除了强转,还可以使用代码)
/*不想强转的话,可以使用代码*/
Date nowTime1 = applicationContext.getBean("nowTime", Date.class);
6. 文件spring.xml放在D盘下
ApplicationContext applicationContext2 = new FileSystemXmlApplicationContext("d:/spring6.xml");
Vip vip = applicationContext2.getBean("vipBean2", Vip.class);
System.out.println(vip);
7. ApplicationContext的超级父接口BeanFactory
BeanFactory是Spring容器的超级接口。ApplicationContext是BeanFactory的子接口。
// 不是在调用getBean()方法的时候创建对象,执行以下代码时就会实例化对象
BeanFactory beanFactory = new ClassPathXmlApplicationContext("spring.xml");
Object vipBean = beanFactory.getBean("vipBean");
System.out.println(vipBean);
2.3 启用Log4j2日志框架
2.3.1 添加依赖 log4j
<!--log4j2日志框架-->
<dependency><groupId>org.apache.logging.log4j</groupId><artifactId>log4j-core</artifactId><version>2.20.0</version> <!-- 使用最新安全版本 -->
</dependency>
<dependency><groupId>org.apache.logging.log4j</groupId><artifactId>log4j-api</artifactId><version>2.20.0</version>
</dependency>
2.3.2 log4j2.xml配置文件
<?xml version="1.0" encoding="UTF-8"?><configuration><appenders><!--输出日志信息到控制台--><console name="spring6log" target="SYSTEM_OUT"><!--控制日志输出的格式--><PatternLayout pattern="%d{yyyy-MM-dd HH:mm:ss SSS} [%t] %-3level %logger{1024} - %msg%n"/></console></appenders><loggers><!--level指定日志级别,从低到高的优先级:(级别越高,输出信息越精简)ALL < TRACE < DEBUG < INFO < WARN < ERROR < FATAL < OFF--><root level="DEBUG"><appender-ref ref="spring6log"/></root></loggers>
</configuration>
2.3.3 使用日志框架
Logger logger = LoggerFactory.getLogger(FirstSpringTest.class);
logger.info("我是一条日志消息");
3. Spring对IOC的实现
3.1 IOC控制反转
-
控制反转是一种思想。
-
控制反转是为了降低程序耦合度,提高程序扩展力,达到OCP原则,达到DIP原则。
-
控制反转,反转的是什么?
-
将对象的创建权利交出去,交给第三方容器负责。
-
将对象和对象之间关系的维护权交出去,交给第三方容器负责。
-
-
控制反转这种思想如何实现呢?
-
DI(Dependency Injection):依赖注入
-
3.2 依赖注入
依赖注入实现了控制反转的思想。
Spring通过依赖注入的方式来完成Bean管理的。
Bean管理说的是:Bean对象的创建,以及Bean对象中属性的赋值(或者叫做Bean对象之间关系的维护)。
依赖注入:
-
依赖指的是对象和对象之间的关联关系。
-
注入指的是一种数据传递行为,通过注入行为来让对象和对象产生关系。
依赖注入常见的实现方式包括两种:
-
第一种:set注入
-
第二种:构造注入
3.2.1 Set注入
public class UserDao {private static final Logger logger = LoggerFactory.getLogger(UserDao.class);public void insert() {
//		System.out.println("数据库正在保存用户信息");logger.info("数据库正在保存用户信息");}
}public class UserService {private UserDao userDao;// Spring容器会调用这个set方法,给userDao赋值public void setUserDao(UserDao userDao) {this.userDao = userDao;}public void saveUser(){// 保存用户信息到数据库userDao.insert();}
}
<?xml version="1.0" encoding="UTF-8"?>
<beans xmlns="http://www.springframework.org/schema/beans"xmlns:xsi="http://www.w3.org/2001/XMLSchema-instance"xsi:schemaLocation="http://www.springframework.org/schema/beans http://www.springframework.org/schema/beans/spring-beans.xsd"><!--声明一个Bean,并将其交给Spring容器管理--><bean id="userDaoBean" class="com.hnlg.dao.UserDao"/><bean id="userServiceBean" class="com.hnlg.service.UserService"><!--想让Srping调用对应的set方法,需要配置property标签--><!--name属性怎么指定值:set方法的方法名,去掉set,然后把剩下的单词首字母变小写--><!--ref后面指定的是要注入的bean的id--><property name="userDao" ref="userDaoBean"/></bean>
</beans>1. 首先通过property标签获取到属性名:userDao
2. 通过属性名推断出set方法名:setUserDao
3. 通过反射机制调用setUserDao()方法给属性赋值
4. property标签的name是属性名。property标签的ref是要注入的bean对象的id。(通过ref属性来完成bean的装配,这是bean最简单的一种装配方式。装配指的是:创建系统组件之间关联的动作)
@Test
public void testSetDI() {ApplicationContext context = new ClassPathXmlApplicationContext("spring.xml");// 从容器中查找 ID/Name 为 "userServiceBean"的 Bean// 确认获取的对象是 UserService.class类型// 返回一个已经完成所有依赖注入的、可直接使用的 BeanUserService userService = context.getBean("userServiceBean", UserService.class);userService.saveUser();		// 输出 数据库正在保存用户信息
}
3.2.2 构造注入
public class UserDao {private static final Logger logger = LoggerFactory.getLogger(UserDao.class);public void insert() {logger.info("数据库正在保存用户信息");}
}public class VipDao {private static final Logger logger = LoggerFactory.getLogger(UserDao.class);public void insert() {logger.info("数据库正在保存Vip信息");}
}public class CustomerService {private UserDao userDao;private VipDao vipDao;public CustomerService(UserDao userDao, VipDao vipDao) {this.userDao = userDao;this.vipDao = vipDao;}public void setUserDao(UserDao userDao) {this.userDao = userDao;}public void setVipDao(VipDao vipDao) {this.vipDao = vipDao;}public void save() {userDao.insert();vipDao.insert();}
}
<bean id="userDaoBean" class="com.hnlg.dao.UserDao"/>
<bean id="vipDaoBean" class="com.hnlg.dao.VipDao"/><bean id="customerServiceBean" class="com.hnlg.service.CustomerService"><!--构造注入, ref用来指定注入的bean的id--><constructor-arg index="0" ref="userDaoBean"/><!--<constructor-arg index="1" ref="vipDaoBean"/>--><!--<constructor-arg name="vipDao" ref="vipDaoBean"/>--><!--<constructor-arg ref="vipDaoBean"/>-->
</bean>@Test
public void testConstructorDI() {ApplicationContext context = new ClassPathXmlApplicationContext("beans.xml");CustomerService customerService = context.getBean("customerServiceBean", CustomerService.class);System.out.println(customerService);customerService.save();
}3.3 Set注入
3.3.1 注入外部Bean和注入内部Bean
<bean id="orderDaoBean" class="com.hnlg.dao.OrderDao"/>
<bean id="orderServiceBean" class="com.hnlg.service.OrderService"><!--使用ref属性注入, 引入外部Bean--><property name="orderDao" ref="orderDaoBean"/>
</bean><bean id="orderServiceBean2" class="com.hnlg.service.OrderService"><property name="orderDao"><!--property标签中使用嵌套的bean标签,内部Bean--><bean class="com.hnlg.dao.OrderDao"/></property>
</bean>
3.3.2 注入简单类型
<!--注入简单类型-->
<bean id="userBean" class="com.hnlg.bean.User"><!--给简单数据类型赋值,需要使用value,而不是ref--><property name="username" value="张三"/><property name="password" value="123"/><property name="age" value="20"/>
</bean>
3.3.3 测试简单类型
<!--测试哪些类型是简单类型-->
<bean id="svt" class="com.hnlg.bean.SimpleValueType"><property name="age" value="20"/><property name="age2" value="20"/><property name="username" value="zhangsan"/><property name="season" value="Spring"/><property name="flag" value="false"/><property name="flag2" value="true"/><property name="c" value="男"/><property name="c2" value="女"/><property name="clazz" value="java.lang.String"/><!--字符串无法直接转为Data简单类型--><!--<property name="birth" value="1980-09-09"/>--><!--一般不会把Data当作简单类型-->
</bean>
@Test
public void testSimpleType() {ApplicationContext context = new ClassPathXmlApplicationContext("set-di.xml");/*User user = context.getBean("userBean", User.class);System.out.println(user);*/SimpleValueType simpleValueType = context.getBean("svt", SimpleValueType.class);System.out.println(simpleValueType);
}3.4 手写数据源
/*** ClassName: MyDataSource* Description:  数据源,所有的数据源都要实现java规范* 		数据源:凡是能提供Connection对象的,都是数据源*/
public class MyDataSource implements DataSource {private String driver;private String url;private String username;private String password;public void setDriver(String driver) {this.driver = driver;}public void setUrl(String url) {this.url = url;}public void setUsername(String username) {this.username = username;}public void setPassword(String password) {this.password = password;}@Overridepublic String toString() {return "MyDataSource{" +"driver='" + driver + '\'' +", url='" + url + '\'' +", username='" + username + '\'' +", password='" + password + '\'' +'}';}@Overridepublic Connection getConnection() throws SQLException {// 获取数据库连接对象的时候需要4个信息:driver url username passwordreturn null;}@Overridepublic Connection getConnection(String username, String password) throws SQLException {return null;}@Overridepublic PrintWriter getLogWriter() throws SQLException {return null;}@Overridepublic void setLogWriter(PrintWriter out) throws SQLException {}@Overridepublic void setLoginTimeout(int seconds) throws SQLException {}@Overridepublic int getLoginTimeout() throws SQLException {return 0;}@Overridepublic Logger getParentLogger() throws SQLFeatureNotSupportedException {return null;}@Overridepublic <T> T unwrap(Class<T> iface) throws SQLException {return null;}@Overridepublic boolean isWrapperFor(Class<?> iface) throws SQLException {return false;}
}
3.4.1 spring管理数据源
<!--让spring来管理我们的数据源-->
<bean id="myDataSource" class="com.hnlg.jdbc.MyDataSource"><property name="driver" value="com.mysql.cj.jdbc.Driver"/><property name="url" value="jdbc:mysql://localhost:3306/spring6"/><property name="username" value="root"/><property name="password" value="123456"/>
</bean>
@Test
public void testMyDataSource(){ApplicationContext applicationContext = new ClassPathXmlApplicationContext("set-di.xml");MyDataSource myDataSource = applicationContext.getBean("myDataSource", MyDataSource.class);System.out.println(myDataSource);// MyDataSource{driver='com.mysql.cj.jdbc.Driver', url='jdbc:mysql://localhost:3306/spring6', username='root', password='123456'}
}3.5 级联属性赋值
3.6 注入数组
public class Woman {private String name;public void setName(String name) {this.name = name;}@Overridepublic String toString() {return "Woman{" +"name='" + name + '\'' +'}';}
}public class QianDaYe {private String[] aiHaos;// 多个女性朋友private Woman[] womens;public void setWomens(Woman[] womens) {this.womens = womens;}public void setAiHaos(String[] aiHaos) {this.aiHaos = aiHaos;}@Overridepublic String toString() {return "QianDaYe{" +"aiHaos=" + Arrays.toString(aiHaos) +", womens=" + Arrays.toString(womens) +'}';}
}
<bean id="w1" class="com.hnlg.bean.Woman"><property name="name" value="小花"/>
</bean><bean id="w2" class="com.hnlg.bean.Woman"><property name="name" value="小亮"/>
</bean><bean id="w3" class="com.hnlg.bean.Woman"><property name="name" value="小明"/>
</bean><bean id="yuQian" class="com.hnlg.bean.QianDaYe"><!-- 这个数组属性当中的元素类型是String简单类型 --><property name="aiHaos"><array><value>抽烟</value><value>喝酒</value><value>烫头</value></array></property><!-- 这个数组当中的类型就不是简单类型了--><property name="womens"><array><ref bean="w1"/><ref bean="w2"/><ref bean="w3"/></array></property>
</bean>
@Test
public void testArray(){ApplicationContext applicationContext = new ClassPathXmlApplicationContext("spring-array.xml");QianDaYe yuQian = applicationContext.getBean("yuQian", QianDaYe.class);System.out.println(yuQian);// QianDaYe{aiHaos=[抽烟, 喝酒, 烫头], womens=[Woman{name='小花'}, Woman{name='小亮'}, Woman{name='小明'}]}
}3.7 注入集合
public class Person {// 注入List集合private List<String> names;// 注入Set集合private Set<String> addrs;// 注入Map集合// 多个电话private Map<Integer, String> phones;// 注入属性类对象// Properties本质上也是一个Map集合。// Properties的父类Hashtable,Hashtable实现了Map接口。// 虽然这个也是一个Map集合,但是和Map的注入方式有点像,但是不同。// Properties的key和value只能是String类型。private Properties properties;public void setProperties(Properties properties) {this.properties = properties;}public void setPhones(Map<Integer, String> phones) {this.phones = phones;}public void setNames(List<String> names) {this.names = names;}public void setAddrs(Set<String> addrs) {this.addrs = addrs;}@Overridepublic String toString() {return "Person{" +"names=" + names +", addrs=" + addrs +", phones=" + phones +", properties=" + properties +'}';}
}
<bean id="personBean" class="com.hnlg.bean.Person"><property name="properties"><!--注入Properties属性类对象--><props><prop key="driver">com.mysql.cj.jdbc.Driver</prop><prop key="url">jdbc:mysql://localhost:3306/spring6</prop><prop key="username">root</prop><prop key="password">1234</prop></props></property><property name="phones"><!--注入Map集合--><map><!--如果key和value不是简单类型就用这个配置。--><!--<entry key-ref="" value-ref=""/>--><!--如果是简单类型就是key和value--><entry key="1" value="110"/><entry key="2" value="120"/><entry key="3" value="119"/></map></property><property name="names"><!--list集合有序可重复--><list><value>张三</value><value>李四</value><value>王五</value><value>张三</value><value>张三</value><value>张三</value><value>张三</value></list></property><property name="addrs"><!--set集合无序不可重复--><set><value>北京大兴区</value><value>北京大兴区</value><value>北京海淀区</value><value>北京海淀区</value><value>北京大兴区</value></set></property>
</bean>@Test
public void testCollection(){ApplicationContext applicationContext = new ClassPathXmlApplicationContext("spring-collection.xml");Person personBean = applicationContext.getBean("personBean", Person.class);System.out.println(personBean);
}3.8 注入null和空字符串
<bean id="catBean" class="com.hnlg.bean.Cat"><!--删除此行不给属性注入,属性的默认值就是null--><!--<property name="name" value="tom"></property>--><!-- 这不是注入null,这只是注入了一个"null"字符串--><!--<property name="name" value="null"/>--><!--这种方式是手动注入null--><!--<property name="name"><null/></property>--><!--注入空字符串第一种方式--><!--<property name="name" value=""/>--><!--注入空字符串第二种方式--><property name="name"><value/></property><property name="age" value="3"/>
</bean>
3.9 注入的值含有特殊符号
XML中有5个特殊字符,分别是:<、>、'、"、&
<bean id="mathBean" class="com.hnlg.bean.MathBean"><!--第一种方案:使用实体符号代替特殊符号--><!--<property name="result" value="2 < 3" />--><!--第二种方案:使用<![CDATA[]]> xml中的语法--><property name="result"><!--只能使用value标签--><value><![CDATA[2 < 3]]></value></property></bean>3.10 p命名空间注入
使用p命名空间注入的前提条件包括两个:
-
第一:在XML头部信息中添加p命名空间的配置信息:xmlns:p="http://www.springframework.org/schema/p"
-
第二:p命名空间注入是基于setter方法的,所以需要对应的属性提供setter方法。
public class Dog {// 简单类型private String name;private int age;// 非简单类型private Date birth;// p命名空间注入底层还是set注入,只不过p命名空间注入可以让spring配置变的更加简单。public void setName(String name) {this.name = name;}public void setAge(int age) {this.age = age;}public void setBirth(Date birth) {this.birth = birth;}@Overridepublic String toString() {return "Dog{" +"name='" + name + '\'' +", age=" + age +", birth=" + birth +'}';}
}
<?xml version="1.0" encoding="UTF-8"?>
<beans xmlns="http://www.springframework.org/schema/beans"xmlns:xsi="http://www.w3.org/2001/XMLSchema-instance"xmlns:p="http://www.springframework.org/schema/p"xsi:schemaLocation="http://www.springframework.org/schema/beans http://www.springframework.org/schema/beans/spring-beans.xsd"><!--第一步:在spring的配置文件头部添加p命名空间。xmlns:p="http://www.springframework.org/schema/p"第二步:使用 p:属性名 = "属性值"--><bean id="dogBean" class="com.hnlg.bean.Dog" p:name="小花" p:age="3" p:birth-ref="birthBean"/><!--调用无参构造方法,获取当前系统时间。--><bean id="birthBean" class="java.util.Date"/></beans>3.11 c空间命名注入
public class People {private String name;private int age;private boolean sex;// c命名空间是简化构造注入的。// c命名空间注入办法是基于构造方法的。public People(String name, int age, boolean sex) {this.name = name;this.age = age;this.sex = sex;}@Overridepublic String toString() {return "People{" +"name='" + name + '\'' +", age=" + age +", sex=" + sex +'}';}
}
<?xml version="1.0" encoding="UTF-8"?>
<beans xmlns="http://www.springframework.org/schema/beans"xmlns:xsi="http://www.w3.org/2001/XMLSchema-instance"xmlns:c="http://www.springframework.org/schema/c"xsi:schemaLocation="http://www.springframework.org/schema/beans http://www.springframework.org/schema/beans/spring-beans.xsd"><!--第一步:在spring的配置文件头部添加: xmlns:c="http://www.springframework.org/schema/c"第二步:使用c:_0 下标方式c:name 参数名方式--><!--<bean id="peopleBean" class="com.hnlg.bean.People" c:_0="zhangsan" c:_1="30" c:_2="true"></bean>--><bean id="peopleBean" class="com.hnlg.bean.People" c:name="jack" c:age="30" c:sex="true"/></beans>3.12 util命名空间
使用util命名空间可以让配置复用。
使用util命名空间的前提是:在spring配置文件头部添加配置信息。
public class MyDataSource1 implements DataSource {// 连接数据库的信息/*private String driver;private String url;private String username;private String password;*/// Properties属性类对象,这是一个Map集合,key和value都是String类型。private Properties properties;public void setProperties(Properties properties) {this.properties = properties;}@Overridepublic String toString() {return "MyDataSource1{" +"properties=" + properties +'}';}@Overridepublic Connection getConnection() throws SQLException {return null;}@Overridepublic Connection getConnection(String username, String password) throws SQLException {return null;}@Overridepublic PrintWriter getLogWriter() throws SQLException {return null;}@Overridepublic void setLogWriter(PrintWriter out) throws SQLException {}@Overridepublic void setLoginTimeout(int seconds) throws SQLException {}@Overridepublic int getLoginTimeout() throws SQLException {return 0;}@Overridepublic Logger getParentLogger() throws SQLFeatureNotSupportedException {return null;}@Overridepublic <T> T unwrap(Class<T> iface) throws SQLException {return null;}@Overridepublic boolean isWrapperFor(Class<?> iface) throws SQLException {return false;}
}
<?xml version="1.0" encoding="UTF-8"?>
<beans xmlns="http://www.springframework.org/schema/beans"xmlns:xsi="http://www.w3.org/2001/XMLSchema-instance"xmlns:util="http://www.springframework.org/schema/util"xsi:schemaLocation="http://www.springframework.org/schema/beans http://www.springframework.org/schema/beans/spring-beans.xsdhttp://www.springframework.org/schema/util http://www.springframework.org/schema/util/spring-util.xsd"><!--引入util命名空间在spring的配置文件头部添加:xmlns:util="http://www.springframework.org/schema/util"http://www.springframework.org/schema/util http://www.springframework.org/schema/util/spring-util.xsd--><util:properties id="prop"><prop key="driver">com.mysql.cj.jdbc.Driver</prop><prop key="url">jdbc:mysql://localhost:3306/spring6</prop><prop key="username">root</prop><prop key="password">123</prop></util:properties><!--数据源1--><bean id="ds1" class="com.hnlg.jdbc.MyDataSource1"><property name="properties" ref="prop"/></bean><!--数据源1--><!--<bean id="ds1" class="com.hnlg.jdbc.MyDataSource1"><property name="properties"><props><prop key="driver">com.mysql.cj.jdbc.Driver</prop><prop key="url">jdbc:mysql://localhost:3306/spring6</prop><prop key="username">root</prop><prop key="password">1234</prop></props></property></bean>--></beans>3.13 基于XML的自动装配
Spring还可以完成自动化的注入,自动化注入又被称为自动装配。它可以根据名字进行自动装配,也可以根据类型进行自动装配。
<!--根据名字进行自动装配-->
<!--注意:自动装配也是基于set方式实现的。-->
<bean id="orderService" class="com.hnlg.service.OrderService" autowire="byName"/><!--id一般也叫作bean的名称。-->
<!--根据名字进行自动装配的时候,被注入的对象的bean的id不能随便写,怎么写?set方法的方法名去掉set,剩下单词首字母小写。-->
<bean id="orderDao" class="com.hnlg.dao.OrderDao"/>
<!--根据类型进行自动装配-->
<!--自动装配是基于set方法的-->
<!--根据类型进行自动装配的时候,在有效的配置文件当中,某种类型的实例只能有一个。-->
<bean class="com.hnlg.dao.VipDao"/><bean id="x" class="com.hnlg.dao.UserDao"/>
<!--<bean id="y" class="com.hnlg.dao.UserDao"></bean>-->
<bean id="cs" class="com.hnlg.service.CustomerService" autowire="byType"/>3.14 Spring引入外部属性配置文件
<?xml version="1.0" encoding="UTF-8"?>
<beans xmlns="http://www.springframework.org/schema/beans"xmlns:xsi="http://www.w3.org/2001/XMLSchema-instance"xmlns:context="http://www.springframework.org/schema/context"xsi:schemaLocation="http://www.springframework.org/schema/beans http://www.springframework.org/schema/beans/spring-beans.xsdhttp://www.springframework.org/schema/context http://www.springframework.org/schema/context/spring-context.xsd"><!--引入外部的properties文件第一步:引入context命名空间。第二步:使用标签context:property-placeholder的location属性来指定属性配置文件的路径。location默认从类的根路径下开始加载资源。--><context:property-placeholder location="jdbc.properties"/><!--配置数据源--><bean id="ds" class="com.hnlg.jdbc.MyDataSource"><!--怎么取值呢?第三步:${key}--><property name="driver" value="${jdbc.driverClass}"/><property name="url" value="${jdbc.url}"/><property name="username" value="${jdbc.username}"/><property name="password" value="${jdbc.password}"/></bean>
</beans>
4. Bean的作用域
<!--目前来说:scope属性有两个值第一个值:singleton 单例(默认情况下就是单例的。)第二个值:prototype 原型/多例 每调用一次getBean()方法则获取一个新的Bean对象。或每次注入的时候都是新对象。其实scope属性有多个值:例如:request session但是request session要求项目必须是一个web应用。当引入springmvc框架的时候,这两个值就可以使用了。request:一次请求当中一个beansession:一次会话中只有一个bean- application:一个应用对应一个Bean。仅限于在WEB应用中使用。- websocket:一个websocket生命周期对应一个Bean。仅限于在WEB应用中使用。
-->
<bean id="sb" class="com.hnlg.bean.SpringBean" scope="threadScope"/>
public class SpringBean {public SpringBean() {System.out.println("SpringBean的无参数构造方法执行了!");}
}4.1 singleton和prototype
@Test
public void testBeanScope(){/*** 1. Spring默认情况下是如何管理这个Bean的:* 	Spring 中的 Bean 就是被 Spring 容器接管了的 Java 对象,由 Spring 负责创建、组装和管理**      默认情况下Bean是单例的。(单例:singleton)*      单例模式就是确保一个类只有一个实例;**      在Spring上下文初始化(也就是第一行代码)的时候实例化。*      每一次调用getBean()方法的时候,都返回那个单例的对象。** 2. 当将bean的scope属性设置为prototype:*      bean是多例的。*      spring上下文初始化的时候,并不会初始化这些prototype的bean。*      每一次调用getBean()方法的时候,实例化该bean对象。*      prototype翻译为:原型。*/ApplicationContext applicationContext = new ClassPathXmlApplicationContext("spring-scope.xml");SpringBean sb = applicationContext.getBean("sb", SpringBean.class);System.out.println(sb);SpringBean sb2 = applicationContext.getBean("sb", SpringBean.class);System.out.println(sb2);SpringBean sb3 = applicationContext.getBean("sb", SpringBean.class);System.out.println(sb3);/*SpringBean的无参数构造方法执行了!com.hnlg.bean.SpringBean@6c40365ccom.hnlg.bean.SpringBean@6c40365ccom.hnlg.bean.SpringBean@6c40365c* */
}
4.2 自定义scope
<!--配置自定义的作用域-->
<bean class="org.springframework.beans.factory.config.CustomScopeConfigurer"><property name="scopes"><map><entry key="threadScope"><!--这个Scope接口的实现类使用的是Spring框架内置的。也可以自定义。--><bean class="org.springframework.context.support.SimpleThreadScope"/></entry></map></property>
</bean>
@Test
public void testThreadScope(){ApplicationContext applicationContext = new ClassPathXmlApplicationContext("spring-scope.xml");SpringBean sb = applicationContext.getBean("sb", SpringBean.class);System.out.println(sb);SpringBean sb1 = applicationContext.getBean("sb", SpringBean.class);System.out.println(sb1);// 启动一个新的线程new Thread(new Runnable() {@Overridepublic void run() {SpringBean sb2 = applicationContext.getBean("sb", SpringBean.class);System.out.println(sb2);SpringBean sb3 = applicationContext.getBean("sb", SpringBean.class);System.out.println(sb3);}}).start();/** SpringBean的无参数构造方法执行了!com.hnlg.bean.SpringBean@1ebd319fcom.hnlg.bean.SpringBean@1ebd319fSpringBean的无参数构造方法执行了!com.hnlg.bean.SpringBean@1b1dd763com.hnlg.bean.SpringBean@1b1dd763* */
}5. GOF之工厂模式
GoF23种设计模式可分为三大类:
创建型(5个):解决对象创建问题。
① 单例模式 ② 工厂方法模式 ③ 抽象工厂模式 ④建造者模式 ⑤ 原型模式
结构型(7个):一些类或对象组合在一起的经典结构。
① 代理模式 ② 装饰模式 ③ 适配器模式 ④ 组合模式 ⑤ 享元模式 ⑥ 外观模式 ⑦ 桥接模式
行为型(11个):解决类或对象之间的交互问题。
策略模式、模板方法模式、责任链模式、观察者模式、迭代子模式、命令模式、备忘录模式、状态模式、访问者模式、中介者模式、解释器模式
5.1 简单工厂模式
1. 简单工厂模式是工厂方法模式的一种特殊实现,又被称为:静态 工厂方法模式。
2. 简单工厂模式解决什么问题呢?
优点:客户端程序不需要关心对象的创建细节,需要哪个对象时,只需要向工厂索要即可,初步实现了责任的分离。
客户端只负责“消费”,工厂负责“生产”。生产和消费分离。
3. 简单工厂模式中:
① 抽象产品 ② 具体产品 ③ 工厂类
4. 简单工厂模式的缺点?
缺点一:假设现在需要扩展一个新的产品,WeaponFactory工厂类的代码是需要修改的,显然违背了OCP原则。
缺点二:工厂类的责任比较重大,不能出现任何问题,因为这个工厂类负责所有产品的生产,称为全能类,或者有人把它叫做上帝类。
这个工厂类一旦出问题,整个系统必然全部瘫痪。(不要把所有鸡蛋放到一个篮子里面哦。)
抽象产品
public abstract class Weapon {/*** 所有的武器都可以攻击。*/public abstract void attack();
}
具体产品
public class Dagger extends Weapon{@Overridepublic void attack() {System.out.println("砍丫的!!!");}
}public class Fighter extends Weapon{@Overridepublic void attack() {System.out.println("战斗机抛下小男孩!!!!");}
}public class Tank extends Weapon{@Overridepublic void attack() {System.out.println("坦克开炮!!!");}
}
工厂类(静态类)
public class WeaponFactory {/*** 静态方法。要获取什么产品?就看你传什么参数,传TANK获取坦克,传DAGGER获取匕首,传FIGHTER获取战斗机* 简单工厂模式中有一个静态方法,所以被称为:静态工厂方法模式。* @param weaponType* @return*/public static Weapon get(String weaponType){if ("TANK".equals(weaponType)) {return new Tank();} else if ("DAGGER".equals(weaponType)) {return new Dagger();} else if ("FIGHTER".equals(weaponType)) {return new Fighter();} else {throw new RuntimeException("不支持该武器的生产");}}}public class Test {public static void main(String[] args) {// 需要坦克// 对于我客户端来说,坦克的生产细节,我不需要关心,我只需要向工厂索要即可。// 简单工厂模式达到了什么呢?职责分离。客户端不需要关心产品的生产细节。// 客户端只负责消费。工厂类负责生产。一个负责生产,一个负责消费。生产者和消费者分离了。这就是简单工厂模式的作用。Weapon tank = WeaponFactory.get("TANK");tank.attack();// 需要匕首Weapon dagger = WeaponFactory.get("DAGGER");dagger.attack();// 需要战斗机Weapon fighter = WeaponFactory.get("FIGHTER");fighter.attack();}
}5.2 工厂方法模式
① 抽象工厂 ② 具体工厂 ③ 抽象产品 ④ 具体产品
相比于简单工厂模式,抽象产品和具体产品不变;
抽象工厂
abstract public class WeaponFactory {/*** 这个方法不是静态的。是实例方法。* @return*/public abstract Weapon get();
}
具体工厂
public class GunFactory extends WeaponFactory{@Overridepublic Weapon get() {return new Gun();}
}
public class Test {public static void main(String[] args) {WeaponFactory weaponFactory = new DaggerFactory();Weapon dagger = weaponFactory.get();dagger.attack();WeaponFactory weaponFactory1 = new GunFactory();Weapon gun = weaponFactory1.get();gun.attack();}
}6. Bean的实例化方法
Spring为Bean提供了多种实例化方式,通常包括4种方式。
-
第一种:通过构造方法实例化
-
第二种:通过简单工厂模式实例化
-
第三种:通过factory-bean实例化
-
第四种:通过FactoryBean接口实例化
6.1 构造方法实例化
<!--Spring提供的实例化方式,第一种:在spring配置文件中直接配置类全路径,Spring会自动调用该类的无参数构造方法来实例化Bean-->
<bean id="sb" class="com.hnlg.bean.SpringBean"/>
6.2 简单工厂模式实例化
public class StarFactory {// 工厂类中有一个静态方法。// 简单工厂模式又叫做:静态工厂方法模式。public static Star get(){// 这个Star对象最终实际上创建的时候还是我们负责new的对象。return new Star();}
}
<!--Spring提供的实例化方式,第二种:通过简单工厂模式。需要在Spring配置文件中告诉Spring框架,调用哪个类的哪个方法获取Bean-->
<!--factory-method 属性指定的是工厂类当中的静态方法。也就是告诉Spring框架,调用这个方法可以获取Bean。-->
<bean id="star" class="com.hnlg.bean.StarFactory" factory-method="get"/>6.3 factory-bean实例化
<!--Spring提供的实例化方式,第三种:通过工厂方法模式。通过 factory-bean属性 + factory-method属性来共同完成。-->
<!--告诉Spring框架,调用哪个对象的哪个方法来获取Bean。-->
<bean id="gunFactory" class="com.hnlg.bean.GunFactory"/><!--GunFactory实际上就是一个FactoryBean-->
<!--以下的配置很关键,factory-bean属性告诉Spring调用哪个对象。factory-method告诉Spring调用该对象的哪个方法。-->
<bean id="gun" factory-bean="gunFactory" factory-method="get"/>
6.4 FactoryBean实例化
<!--Spring提供的实例化方式,第四种:通过FactoryBean接口来实现。-->
<!--这种方式实际上就是第三种方式的简化。-->
<!--由于你编写的类实现了FactoryBean接口,所以这个类是一个特殊的类,不需要你再手动指定:factory-bean、factory-method-->
<!--通过一个特殊的Bean:工厂Bean。来返回一个普通的Bean Person对象。-->
<!--通过FactoryBean这个工厂Bean主要是想对普通Bean进行加工处理。-->
<bean id="person" class="com.hnlg.bean.PersonFactoryBean"/>
public class PersonFactoryBean implements FactoryBean<Person> {// PersonFactoryBean也是一个Bean。只不过这个Bean比较特殊。叫做工厂Bean。// 通过工厂Bean这个特殊的Bean可以获取一个普通的Bean。@Overridepublic Person getObject() throws Exception {// 最终这个Bean的创建还是程序员自己new的。return new Person();}@Overridepublic Class<?> getObjectType() {return null;}// 这个方法在接口中有默认实现。// 默认返回true,表示单例的。// 如果想多例,直接将这个方法修改为return false;即可。@Overridepublic boolean isSingleton() {return true;}
}6.5 BeanFactory和FactoryBean的区别
6.5.1 BeanFactory
Spring IoC容器的顶级对象,BeanFactory被翻译为“Bean工厂”
在Spring的IoC容器中,“Bean工厂”负责创建Bean对象。BeanFactory是工厂。
6.5.2 FactoryBean
FactoryBean:它是一个Bean,是一个能够辅助Spring实例化其它Bean对象的一个Bean。
在Spring中,Bean可以分为两类:
1. 第一类:普通Bean
2. 第二类:工厂Bean(记住:工厂Bean也是一种Bean,只不过这种Bean比较特殊,它可以辅助Spring实例化其它Bean对象。)
6.6 注入自定义Date
<!--这种方式只能获取系统当前时间,这种时间不能作为生日。-->
<bean id="nowTime" class="java.util.Date"/><bean id="student" class="com.hnlg.bean.Student"><!--把日期类型当做简单类型。--><!--<property name="birth" value="Mon Oct 10 14:30:26 CST 2022"/>--><!--把日期类型当做非简单类型。--><property name="birth" ref="nowTime"/>
</bean>
public class Student {// java.util.Date 在Spring当中被当做简单类型。 但是简单类型的话,注入的日期字符串格式有要求。// java.util.Date 在Spring当中也可以被当做非简单类型。private Date birth;public void setBirth(Date birth) {this.birth = birth;}@Overridepublic String toString() {return "Student{" +"birth=" + birth +'}';}
}public class DateFactoryBean implements FactoryBean<Date> {// DateFactoryBean这个工厂Bean协助Spring创建这个普通的Bean:Date。private String strDate;// 构造方法强制要求传入参数public DateFactoryBean(String strDate) {this.strDate = strDate;}// 实际返回的产品对象@Overridepublic Date getObject() throws Exception {/*将字符串解析为日期对象*/SimpleDateFormat sdf = new SimpleDateFormat("yyyy-MM-dd");/*输入 "2008-10-11" → 输出 Date对象(表示 2008年10月11日)*/Date date = sdf.parse(strDate);return date;}// 产品对象类型@Overridepublic Class<?> getObjectType() {return null;}
}<!--通过工厂Bean:DateFactoryBean 来返回普通Bean:java.util.Date -->
<bean id="date" class="com.hnlg.bean.DateFactoryBean"><constructor-arg index="0" value="2008-10-11"/>
</bean><bean id="studentBean" class="com.hnlg.bean.Student"><property name="birth" ref="date"/>
</bean>7. Bean的生命周期
/*** ClassName: User* Description: Bean的五步生命周期* 第一步:实例化Bean(调用无参数构造方法。)* 第二步:给Bean属性赋值(调用set方法。)* 第三步:初始化Bean(会调用Bean的init方法。注意:这个init方法需要自己写,自己配。)* 第四步:使用Bean* 第五步:销毁Bean(会调用Bean的destroy方法。注意:这个destroy方法需要自己写,自己配。)*/
5步中,第3步是初始化Bean,如果还想在初始化前和初始化后添加代码,可以加入“Bean后处理器”。
-
第一:只有正常关闭spring容器,bean的销毁方法才会被调用。
-
第二:ClassPathXmlApplicationContext类才有close()方法。
-
第三:配置文件中的init-method指定初始化方法。destroy-method指定销毁方法。
<!--配置Bean后处理器。-->
<!--注意:这个Bean后处理器将作用于整个配置文件中所有的bean。-->
<bean class="com.hnlg.bean.LogBeanPostProcessor"/><!--需要手动指定初始化方法,和销毁方法。-->
<bean id="user" class="com.hnlg.bean.User"init-method="initBean" destroy-method="destroyBean" scope="prototype"><property name="name" value="zhangsan"/>
</bean>
public class User implements BeanNameAware, BeanClassLoaderAware, BeanFactoryAware, InitializingBean, DisposableBean {private String name;public void setName(String name) {System.out.println("第二步:给对象的属性赋值。");this.name = name;}public User() {System.out.println("第一步:无参数构造方法执行。");}// 这个方法需要自己写,自己配。方法名随意。public void initBean(){System.out.println("第四步:初始化Bean。");}// 这个方法需要自己写,自己配。方法名随意。public void destroyBean(){System.out.println("第七步:销毁Bean。");}@Overridepublic void setBeanClassLoader(ClassLoader classLoader) {System.out.println("Bean这个类的加载器:" + classLoader);}@Overridepublic void setBeanFactory(BeanFactory beanFactory) throws BeansException {System.out.println("生产这个Bean的工厂对象是:" + beanFactory);}@Overridepublic void setBeanName(String name) {System.out.println("这个Bean的名字是:" + name);}@Overridepublic void destroy() throws Exception {System.out.println("DisposableBean's destroy方法执行");}@Overridepublic void afterPropertiesSet() throws Exception {System.out.println("InitializingBean's afterPropertiesSet执行。");}
}public class LogBeanPostProcessor implements BeanPostProcessor {@Overridepublic Object postProcessBeforeInitialization(Object bean, String beanName) throws BeansException {System.out.println("第三步:执行Bean后处理器的before方法。");return BeanPostProcessor.super.postProcessBeforeInitialization(bean, beanName);}// 方法有两个参数:// 第一个参数:刚创建的bean对象。// 第二个参数:bean的名字。@Overridepublic Object postProcessAfterInitialization(Object bean, String beanName) throws BeansException {System.out.println("第五步:执行Bean后处理器的after方法。");return BeanPostProcessor.super.postProcessAfterInitialization(bean, beanName);}
}
/*** Spring容器只对singleton的Bean进行完整的生命周期管理。* 如果是prototype作用域的Bean,Spring容器只负责将该Bean初始化完毕。等客户端程序一旦获取到该Bean之后,Spring容器就不再管理该对象的生命周期了。也就是不再执行DisposableBean destory和销毁Bean*/
@Test
public void testBeanLifecycleFive(){ApplicationContext applicationContext = new ClassPathXmlApplicationContext("spring.xml");User user = applicationContext.getBean("user", User.class);System.out.println("第六步:使用Bean:" + user);// 注意:必须手动关闭Spring容器,这样Spring容器才会销毁Bean.ClassPathXmlApplicationContext context = (ClassPathXmlApplicationContext) applicationContext;context.close();// 自动调用destoryBean()方法进行销毁Bean
}
new对象让spring管理
@Test
public void testRegisterBean(){// 自己new的对象Student student = new Student();System.out.println(student);// 将以上自己new的这个对象纳入Spring容器来管理。半路上交给Spring来管理。DefaultListableBeanFactory factory = new DefaultListableBeanFactory();factory.registerSingleton("studentBean", student);// 从spring容器中获取Object studentBean = factory.getBean("studentBean");System.out.println(studentBean);
}
8. Bean的循环依赖
A对象中有B属性。B对象中有A属性。这就是循环依赖。我依赖你,你也依赖我。
比如:丈夫类Husband,妻子类Wife。Husband中有Wife的引用。Wife中有Husband的引用。
public class Husband {private String name;private Wife wife;
}public class Wife {private String name;private Husband husband;
}
8.1 singleton下的set注入产生的循环依赖
public class Husband {private String name;private Wife wife;public void setName(String name) {this.name = name;}public void setWife(Wife wife) {this.wife = wife;}public String getName() {return name;}@Overridepublic String toString() {return "Husband{" +"name='" + name + '\'' +", wife=" + wife.getName() +'}';}
}
<!--singleton + setter模式下的循环依赖是没有任何问题的。-->
<!--singleton表示在整个Spring容器当中是单例的,独一无二的对象。-->
<!--在singleton + setter模式下,为什么循环依赖不会出现问题,Spring是如何应对的?主要的原因是,在这种模式下Spring对Bean的管理主要分为清晰的两个阶段:第一个阶段:在Spring容器加载的时候,实例化Bean,只要其中任意一个Bean实例化之后,马上进行 “曝光”【不等属性赋值就曝光】第二个阶段:Bean“曝光”之后,再进行属性的赋值(调用set方法。)。核心解决方案是:实例化对象和对象的属性赋值分为两个阶段来完成的。注意:只有在scope是singleton的情况下,Bean才会采取提前“曝光”的措施。
-->
<bean id="husbandBean" class="com.hnlg.bean.Husband" scope="singleton"><property name="name" value="张三"/><property name="wife" ref="wifeBean"/>
</bean><bean id="wifeBean" class="com.hnlg.bean.Wife" scope="singleton"><property name="name" value="小花"/><property name="husband" ref="husbandBean"/>
</bean><!--在prototype + setter模式下的循环依赖,存在问题,会出现异常!-->
<!--BeanCurrentlyInCreationException 当前的Bean正在处于创建中异常。。。-->
<!-- 注意:当两个bean的scope都是prototype的时候,才会出现异常。如果其中任意一个是singleton的,就不会出现异常。-->@Test
public void testCD(){ApplicationContext applicationContext = new ClassPathXmlApplicationContext("spring.xml");Husband husbandBean = applicationContext.getBean("husbandBean", Husband.class);System.out.println(husbandBean);Wife wifeBean = applicationContext.getBean("wifeBean", Wife.class);System.out.println(wifeBean);
}8.2 singleton下的构造注入产生的循环依赖
public class Husband {private String name;private Wife wife;public Husband(String name, Wife wife) {this.name = name;this.wife = wife;}public String getName() {return name;}@Overridepublic String toString() {return "Husband{" +"name='" + name + '\'' +", wife=" + wife.getName() +'}';}
}
<!--构造注入,这种循环依赖有没有问题?-->
<!--注意:基于构造注入的方式下产生的循环依赖也是无法解决的,所以编写代码时一定要注意。-->
<bean id="h" scope="singleton" class="com.hnlg.bean2.Husband"><constructor-arg index="0" value="张三"/><constructor-arg index="1" ref="w"/>
</bean><bean id="w" scope="singleton" class="com.hnlg.bean2.Wife"><constructor-arg index="0" value="小花"/><constructor-arg index="1" ref="h"/>
</bean>8.3 Spring解决循环依赖的机理
Spring为什么可以解决set + singleton模式下循环依赖?
根本的原因在于:这种方式可以做到将“实例化Bean”和“给Bean属性赋值”这两个动作分开去完成。实例化Bean的时候:调用无参数构造方法来完成。此时可以先不给属性赋值,可以提前将该Bean对象“曝光”给外界。给Bean属性赋值的时候:调用setter方法来完成。
Bean都是单例的,我们可以先把所有的单例Bean实例化出来,放到一个集合当中(可以称之为缓存),所有的单例Bean全部实例化完成之后,以后再慢慢的调用setter方法给属性赋值。这样就解决了循环依赖的问题。
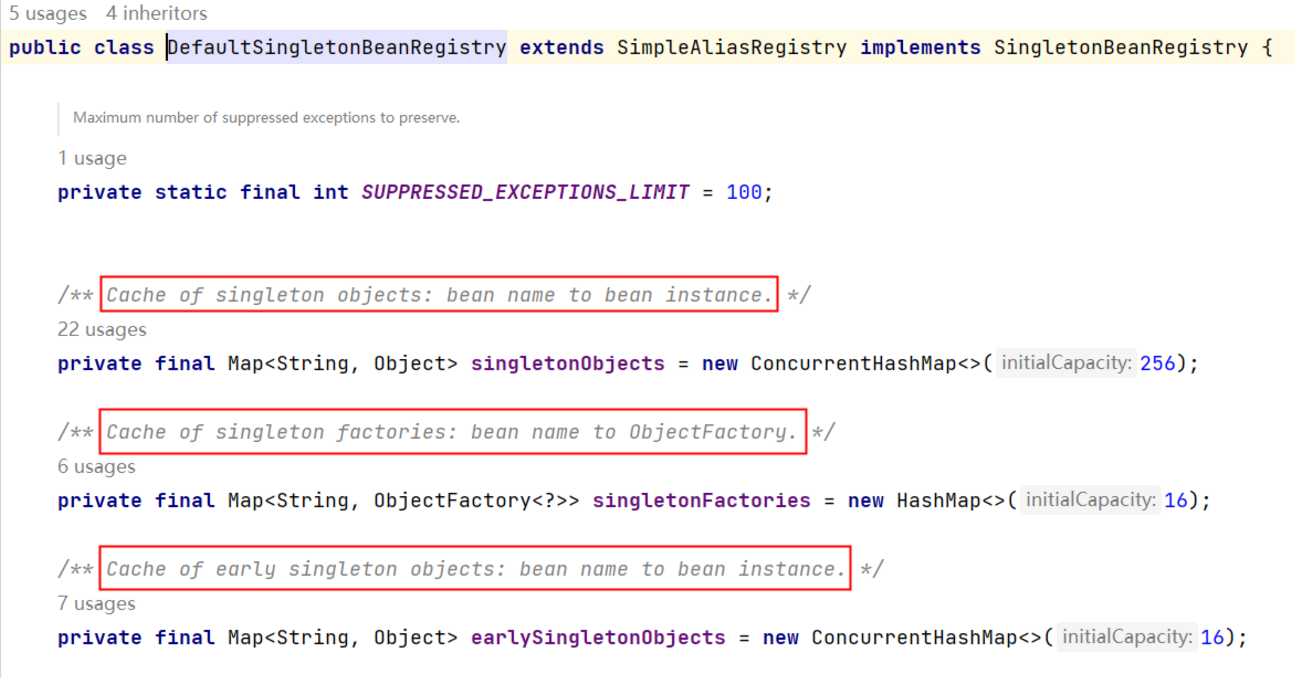
Cache of singleton objects: bean name to bean instance. 单例对象的缓存:key存储bean名称,value存储Bean对象【一级缓存】
Cache of early singleton objects: bean name to bean instance. 早期单例对象的缓存:key存储bean名称,value存储早期的Bean对象【二级缓存】
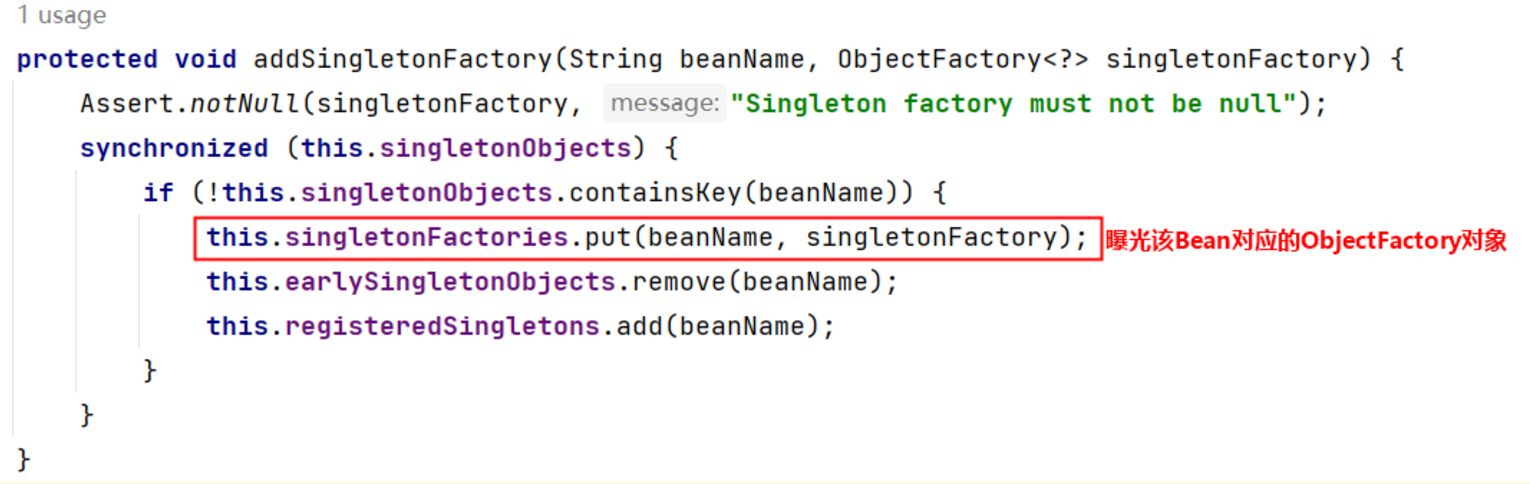
Cache of singleton factories: bean name to ObjectFactory. 单例工厂缓存:key存储bean名称,value存储该Bean对应的ObjectFactory对象【三级缓存】
这三个缓存其实本质上是三个Map集合。
在该类中有这样一个方法addSingletonFactory(),这个方法的作用是:将创建Bean对象的ObjectFactory对象提前曝光。
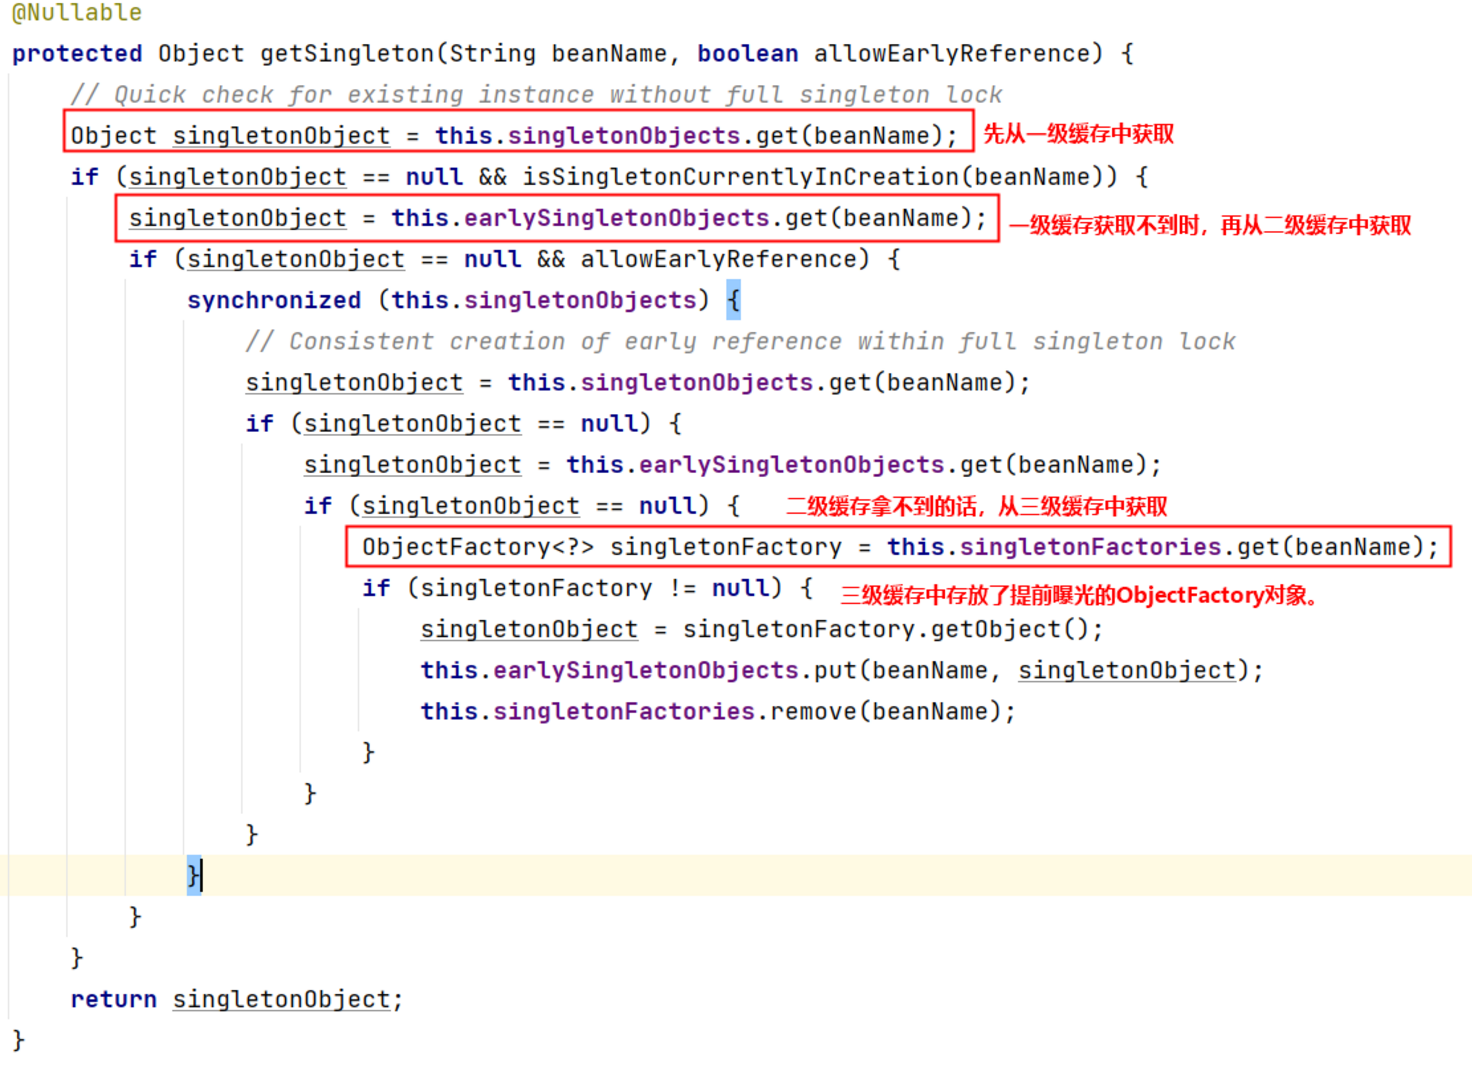
spring会先从一级缓存中获取Bean,如果获取不到,则从二级缓存中获取Bean,如果二级缓存还是获取不到,则从三级缓存中获取之前曝光的ObjectFactory对象,通过ObjectFactory对象获取Bean实例,这样就解决了循环依赖的问题。
9. 反射中已知属性名赋值
public class UserTest {public static void main(String[] args) throws Exception{// 已知类名String className = "com.powernode.reflect.User";// 已知属性名String propertyName = "age";// 通过反射机制给User对象的age属性赋值20岁Class<?> clazz = Class.forName(className);Object obj = clazz.newInstance(); // 创建对象// 根据属性名获取setter方法名String setMethodName = "set" + propertyName.toUpperCase().charAt(0) + propertyName.substring(1);// 获取MethodMethod setMethod = clazz.getDeclaredMethod(setMethodName, int.class);// 调用MethodsetMethod.invoke(obj, 20);System.out.println(obj);}
}
10. 手写Spring框架
手写Spring框架![]() https://blog.csdn.net/qq_47896523/article/details/151191468?sharetype=blogdetail&sharerId=151191468&sharerefer=PC&sharesource=qq_47896523&spm=1011.2480.3001.8118
https://blog.csdn.net/qq_47896523/article/details/151191468?sharetype=blogdetail&sharerId=151191468&sharerefer=PC&sharesource=qq_47896523&spm=1011.2480.3001.8118
11. Spring IOC注解式开发
11.1 注解的使用
@注解类型名(属性名=属性值, 属性名=属性值, 属性名=属性值......)
userBean为什么使用双引号括起来,因为value属性是String类型,字符串。
如果属性名是value,则在使用的时候可以省略属性名。
注解
// 标注注解的注解,叫做元注解。@Target注解用来修饰@Component可以出现的位置。
// @Target()
// 以下表示@Component注解可以出现在类上、属性上。
// @Target(value = {ElementType.TYPE, ElementType.FIELD})
// 以下表示@Component注解可以出现在类上
// @Target(value = {ElementType.TYPE})
// 使用某个注解的时候,如果注解的属性名是value的话,value可以省略。
// @Target({ElementType.TYPE})
// 使用某个注解的时候,如果注解的属性值是数组,并且数组中只有一个元素,大括号可以省略。
@Target(ElementType.TYPE)
// @Retention 也是一个元注解。用来标注@Component注解最终保留在class文件当中,并且可以被反射机制读取。
@Retention(RetentionPolicy.RUNTIME)
// SOURCE: 仅源代码阶段,给编译器看的提示 (如 @Override)
// CLASS: 编译到字节码阶段, 字节码处理工具
// RUNTIME: 运行时阶段, 运行时反射读取  (如 Spring 的 @Autowired)
public @interface Component {// 定义注解的属性// String是属性类型// value是属性名String value();// 其他的属性// 属性类型String// 属性名是name// String name();// 数组属性// 属性类型是:String[]// 属性名:names// String[] names();// int[] ages();// int age();
}
11.1.1 通过反射读取注解
//@Component(属性名 = 属性值, 属性名 = 属性值, 属性名 = 属性值....)
//@Component(value = "userBean")
// 如果属性名是value,value可以省略。
@Component("userBean")
public class User {// 编译器报错,不能出现在这里。// @Component(value = "test")//private String name;
}@Component("vipBean")
public class Vip {
}public class Order {
}
注解扫描 component-scan
public class ComponentScan {public static void main(String[] args) {Map<String,Object> beanMap = new HashMap<>();// 目前只知道一个包的名字,扫描这个包下所有的类,当这个类上有@Component注解的时候,实例化该对象,然后放到Map集合中。String packageName = "com.hnlg.bean";// 开始写扫描程序。// . 这个正则表达式代表任意字符。这里的"."必须是一个普通的"."字符。不能是正则表达式中的"."// 在正则表达式当中怎么表示一个普通的"."字符呢?使用 \. 正则表达式代表一个普通的 . 字符。String packagePath = packageName.replaceAll("\\.", "/");System.out.println(packagePath);// com是在类的根路径下的一个目录。URL url = ClassLoader.getSystemClassLoader().getResource(packagePath);String path = url.getPath();		// 获取到绝对路径System.out.println(path);// 获取一个绝对路径下的所有文件File file = new File(path);File[] files = file.listFiles();// stream(T[] array)是一个静态方法,它接收一个数组(这里是 files)并返回一个顺序流(Stream<T>)// 流(Stream)包含了数组中的所有元素Arrays.stream(files).forEach(f -> {try {// System.out.println(f.getName());// System.out.println(f.getName().split("\\.")[0]);String className = packageName + "." + f.getName().split("\\.")[0];// System.out.println(className);// 通过反射机制解析注解Class<?> aClass = Class.forName(className);// 判断类上是否有这个注解if (aClass.isAnnotationPresent(Component.class)) {// 获取注解Component annotation = aClass.getAnnotation(Component.class);String id = annotation.value();// 有这个注解的都要创建对象Object obj = aClass.newInstance();beanMap.put(id, obj);}} catch (Exception e) {e.printStackTrace();}});System.out.println(beanMap);/** com/hnlg/bean/D:/Java/10-spring/Spring/review-annotation/target/classes/com/hnlg/bean{vipBean=com.hnlg.bean.Vip@46ee7fe8, userBean=com.hnlg.bean.User@7506e922}* */}
}
11.2 声明Bean的注解
负责声明Bean的注解,常见的包括四个:
-
@Component
-
@Controller
-
@Service
-
@Repository
@Controller、@Service、@Repository这三个注解都是@Component注解的别名。也就是说:这四个注解的功能都一样。用哪个都可以。只是为了增强程序的可读性,建议:
-
控制器类上使用:Controller
-
service类上使用:Service
-
dao类上使用:Repository
都是只有一个value属性。value属性用来指定bean的id,也就是bean的名字。
11.3 Spring注解的使用
如何使用以上的注解呢?
-
第一步:加入aop的依赖
<dependency><groupId>org.springframework</groupId><artifactId>spring-context</artifactId><version>6.2.10</version>
</dependency>-
第二步:在配置文件中添加context命名空间
<?xml version="1.0" encoding="UTF-8"?>
<beans xmlns="http://www.springframework.org/schema/beans"xmlns:xsi="http://www.w3.org/2001/XMLSchema-instance"xmlns:context="http://www.springframework.org/schema/context"xsi:schemaLocation="http://www.springframework.org/schema/beans http://www.springframework.org/schema/beans/spring-beans.xsdhttp://www.springframework.org/schema/context http://www.springframework.org/schema/context/spring-context.xsd"></beans>-
第三步:在配置文件中指定扫描的包
<!--给Spring框架指定要扫描哪些包中的类-->
<context:component-scan base-package="com.hnlg.spring6.bean"/><!--多个包,使用逗号隔开。-->
<context:component-scan base-package="com.hnlg.spring6.bean,com.hnlg.spring6.dao"/><!--多个包,也可以指定这多个包共同的父包,但是这肯定要牺牲一部分效率。-->
<context:component-scan base-package="com.hnlg.spring6"/>-
第四步:在Bean类上使用注解
如果注解的属性名是value,那么value是可以省略的。
@Service // 如果你把整个value属性全部省略了,bean有没有默认的名称?有:类名首字母变小写就是bean的名字。
public class Order {
}/*
以上的这个注解@Service就相当于以下的这个配置信息:
<bean id="order" class="com.powernode.spring6.bean.Order"></bean>
*/@Component("userBean")
public class User {
}
11.4 选择性实例化Bean
@Component
public class A {public A() {System.out.println("A的无参数构造方法执行");}
}@Controller
class B {public B() {System.out.println("B的无参数构造方法执行");}
}@Service
class C {public C() {System.out.println("C的无参数构造方法执行");}
}@Repository
class D {public D() {System.out.println("D的无参数构造方法执行");}
}@Controller
class E {public E() {System.out.println("E的无参数构造方法执行");}
}
<?xml version="1.0" encoding="UTF-8"?>
<beans xmlns="http://www.springframework.org/schema/beans"xmlns:xsi="http://www.w3.org/2001/XMLSchema-instance"xmlns:context="http://www.springframework.org/schema/context"xsi:schemaLocation="http://www.springframework.org/schema/beans http://www.springframework.org/schema/beans/spring-beans.xsdhttp://www.springframework.org/schema/context http://www.springframework.org/schema/context/spring-context.xsd"><!--第一种解决方案:use-default-filters="false"如果这个属性是false,表示com.hnlg.spring6.bean2包下所有的带有声明Bean的注解全部失效。@Component @Controller @Service @Repository全部失效。--><context:component-scan base-package="com.hnlg.spring6.bean2" use-default-filters="false"><!--只有@Repository @Service 被包含进来,生效。--><context:include-filter type="annotation" expression="org.springframework.stereotype.Repository"/><context:include-filter type="annotation" expression="org.springframework.stereotype.Service"/></context:component-scan><!--第二种解决方案:use-default-filters="true"如果这个属性的值是true,表示com.hnlg.spring6.bean2下的所有的带有声明Bean的注解全部生效。use-default-filters="true" 默认值就是true,不用写。--><context:component-scan base-package="com.hnlg.spring6.bean2"><!--@Controller注解失效--><context:exclude-filter type="annotation" expression="org.springframework.stereotype.Controller"/></context:component-scan></beans>11.5 负责注入的注解
@Component @Controller @Service @Repository 这四个注解是用来声明Bean的,声明后这些Bean将被实例化。接下来看一下,如何给Bean的属性赋值。给Bean属性赋值需要用到这些注解:
-
@Value
-
@Autowired
-
@Qualifier
-
@Resource
11.5.1 @Value
当属性的类型是简单类型时,可以使用@Value注解进行注入。
@Component
public class Product {/*@Value("隔壁老王")private String name;@Value("30")private int age;*/private String name;private int age;public Product(@Value("隔壁老王3") String name, @Value("42") int age) {this.name = name;this.age = age;}// @Value注解也可以使用在方法上。/*@Value("隔壁老王2")public void setName(String name) {this.name = name;}@Value("33")public void setAge(int age) {this.age = age;}*/@Overridepublic String toString() {return "Product{" +"name='" + name + '\'' +", age=" + age +'}';}
}
@Component
public class MyDataSource implements DataSource {@Value(value = "com.mysql.cj.jdbc.Driver")private String driver;@Value("jdbc:mysql://localhost:3306/spring6")private String url;@Value("root")private String username;@Value("1234")private String password; // 使用@Value注解注入的话,可以用在属性上,并且可以不提供setter方法。
}@Test
public void testDIByAnnotation(){ApplicationContext applicationContext = new ClassPathXmlApplicationContext("spring-di-annotation.xml");MyDataSource myDataSource = applicationContext.getBean("myDataSource", MyDataSource.class);System.out.println(myDataSource);// MyDataSource{driver='com.mysql.cj.jdbc.Driver', url='jdbc:mysql://localhost:3306/spring6', username='root', password='1234'}Product product = applicationContext.getBean("product", Product.class);System.out.println(product);
}11.5.2 自动装配AutoWired
@Autowired注解可以用来注入非简单类型。被翻译为:自动连线的,或者自动装配。单独使用@Autowired注解,默认根据类型装配。【默认是byType】
该注解可以标注在哪里?
-
构造方法上
-
方法上
-
形参上
-
属性上
-
注解上
第二处:该注解有一个required属性,默认值是true,表示在注入的时候要求被注入的Bean必须是存在的,如果不存在则报错。如果required属性设置为false,表示注入的Bean存在或者不存在都没关系,存在的话就注入,不存在的话,也不报错。
public interface OrderDao {void insert();
}@Repository("orderDaoImplForMySQL")
public class OrderDaoImplForMySQL implements OrderDao {@Overridepublic void insert() {System.out.println("MySQL数据库正在保存订单信息...");}
}@Service
public class OrderService {// private OrderDao orderDao;// @Autowired注解使用的时候,不需要指定任何属性,直接使用这个注解即可。// 这个注解的作用是根据类型byType进行自动装配。// @Autowired//private OrderDao orderDao;// 如果想解决以上问题,只能根据名字进行装配。// @Autowired和@Qualifier联合使用,可以根据名字进行装配。//@Autowired//@Qualifier("orderDaoImplForOracle")//@Qualifier("orderDaoImplForMySQL")private OrderDao orderDao;/*@Autowiredpublic OrderService(OrderDao orderDao) {this.orderDao = orderDao;}*//*public OrderService(@Autowired OrderDao orderDao) {this.orderDao = orderDao;}*/public OrderService(OrderDao orderDao) {this.orderDao = orderDao;}// 如果一个类当中构造方法只有一个,并且构造方法上的参数和属性能够对应上。@Autowired注解可以省略。/* public OrderService() {}*//* @Autowiredpublic void setOrderDao(OrderDao orderDao) {this.orderDao = orderDao;}*/public void generate(){orderDao.insert();}
}-
@Autowired注解可以出现在:属性上、构造方法上、构造方法的参数上、setter方法上。
-
当带参数的构造方法只有一个,@Autowired注解可以省略。
-
@Autowired注解默认根据类型注入。如果要根据名称注入的话,需要配合@Qualifier注解一起使用。
<?xml version="1.0" encoding="UTF-8"?>
<beans xmlns="http://www.springframework.org/schema/beans"xmlns:xsi="http://www.w3.org/2001/XMLSchema-instance"xmlns:context="http://www.springframework.org/schema/context"xsi:schemaLocation="http://www.springframework.org/schema/beans http://www.springframework.org/schema/beans/spring-beans.xsdhttp://www.springframework.org/schema/context http://www.springframework.org/schema/context/spring-context.xsd"><context:component-scan base-package="org.hnlg"/></beans>
11.5.3 @Resource
@Resource注解也可以完成非简单类型注入。那它和@Autowired注解有什么区别?
-
@Resource注解是JDK扩展包中的,也就是说属于JDK的一部分。所以该注解是标准注解,更加具有通用性。(JSR-250标准中制定的注解类型。JSR是Java规范提案。)
-
@Autowired注解是Spring框架自己的。
-
@Resource注解默认根据名称装配byName,未指定name时,使用属性名作为name。通过name找不到的话会自动启动通过类型byType装配。
-
@Autowired注解默认根据类型装配byType,如果想根据名称装配,需要配合@Qualifier注解一起用。
-
@Resource注解用在属性上、setter方法上。
-
@Autowired注解用在属性上、setter方法上、构造方法上、构造方法参数上。
@Service
public class StudentService {
//	@Resource(name = "studentDaoImplForMySQL")@Resource// 不指定名字,以属性名作为名字注入private StudentDao studentDao;// 不能出现在构造方法上。/*@Resource(name = "studentDaoImplForMySQL")public StudentService(StudentDao studentDao) {this.studentDao = studentDao;}*/// 可以出现在set方法上/*@Resource(name = "studentDaoImplForMySQL")public void setStudentDao(StudentDao studentDao) {this.studentDao = studentDao;}*/public void deleteStudent(){studentDao.deleteById();}
}
@Resource注解:默认byName注入,没有指定name时把属性名当做name,根据name找不到时,才会byType注入。byType注入时,某种类型的Bean(实现同一接口)只能有一个。
11.6 全注解式开发
@Configuration // Java代码代替XML文件来配置Spring容器
@ComponentScan({"cn.hnlg.dao", "cn.hnlg.service"})
public class Spring6Config {
}