基于Taro4打造的一款最新版微信小程序、H5的多端开发简单模板
基于Taro4、Vue3、TypeScript、Webpack5打造的一款最新版微信小程序、H5的多端开发简单模板

特色
-
🛠️ Taro4, Vue 3, Webpack5, pnpm10
-
💪 TypeScript 全新类型系统支持
-
🍍 使用 Pinia 的状态管理
-
🎨 Tailwindcss4 - 目前最流行的原子化
CSS框架,用于快速UI开发 -
🔥 使用 新的
<script setup>语法 -
🚀 NutUI-Vue - 无需引入直接使用高质量组件,覆盖移动端主流场景
-
🌍 API 采用模块化导入方式 根据demo.js文件设置接口,以API_xxx_method的方式命名,在请求时无需导入 直接使用useRequest()函数返回参数以解构的方式获取,拿到即为写入的接口
准备
本项目搭建采用环境如下
vscode
v1.103.2
nodev22.14.0
tarov4.1.5
pnpmv10.11.0
步入正题
创建项目基本结构
-
打开vscode编辑器终端进行操作
-
安装taro脚手架
pnpm install -g @tarojs/cli -
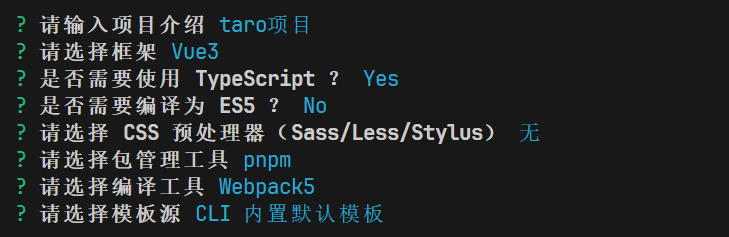
创建基础模版
taro init my-taro-project根据相应提示进行如下选择
-
进入创建的 my-taro-project终端目录下
为了可以同时并且实时的预览小程序和h5,更改下config/index.ts文件中的部分内容outputRoot: `dist/${process.env.TARO_ENV}` -
直接运行微信小程序自动安装依赖
pnpm dev:weapp -
打开微信开发者工具
如未安装点击下面链接下载安装即可👇
https://developers.weixin.qq.com/miniprogram/dev/devtools/download.html打开编译过后的微信小程序代码在:`dist》weapp`目录
项目结构介绍
https://docs.taro.zone/docs/folder
接入Pinia
安装
pnpm install pinia taro-plugin-pinia
修改配置
修改config/index.ts内容
plugins: ["taro-plugin-pinia",
],
compiler: {type: "webpack5",prebundle: {enable: false, // 开启后导致pinia丢失响应式},
},
引入使用
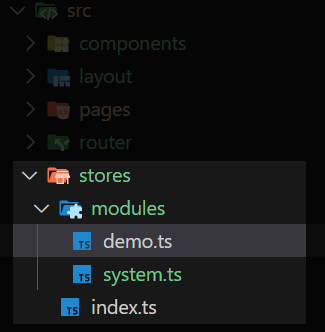
创建以下文件夹以及文件
写入以下代码
index.ts
import { createPinia } from "pinia";
import type { App } from "vue";export const piniaStore = createPinia();
export function setupStore(app: App) {app.use(piniaStore);
}
demo.ts
import { defineStore } from 'pinia'
import { piniaStore } from '@/stores'const useCounterStore = defineStore('counter', {state: () => {return { count: 0 }},actions: {increment() {this.count++},},
})export function useCounterOutsideStore() {return useCounterStore(piniaStore)
}
使用pinia
app.ts
import { createApp } from "vue";
import { setupStore } from "./stores"; // +
import "./app.css";const App = createApp({onShow(options) {console.log("App onShow.");},
});
setupStore(App); // +export default App;
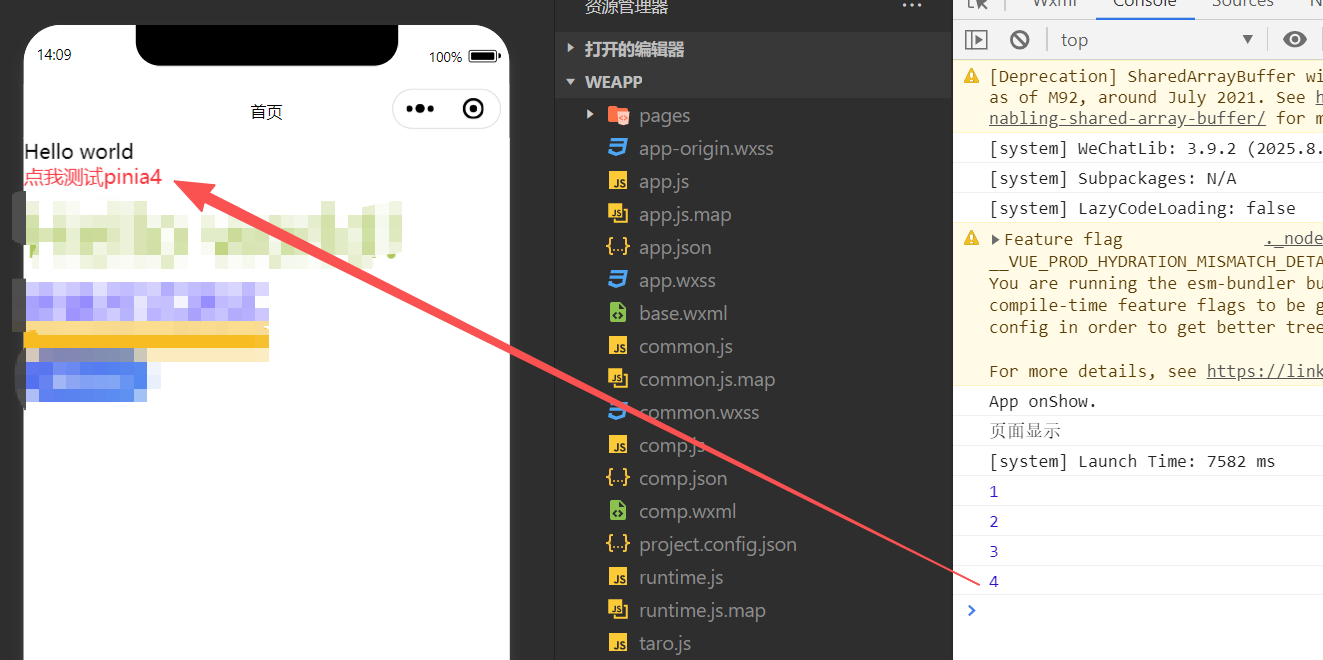
src/pages/index/index.ts
<template><view>{{ msg }}</view><view class="text-red-500" @tap="testPinia">点我测试pinia{{ count }}</view>
</template><script setup lang="ts">
import { ref, computed } from 'vue'
import './index.css'
import { useCounterOutsideStore } from '@/stores/modules/demo'const msg = ref('Hello world')
const count = computed(() => counterStore.count)
const counterStore = useCounterOutsideStore()
const testPinia = () => {counterStore.increment()console.log(counterStore.count)
}
</script>
运行结果
接入Tailwind
安装
pnpm install -D tailwindcss @tailwindcss/postcss postcss weapp-tailwindcss autoprefixer
https://github.com/sonofmagic/weapp-tailwindcss
创建写入
创建 postcss.config.js 并注册 tailwindcss
export default {plugins: {"@tailwindcss/postcss": {},autoprefixer: {},},
}
tailwind.config.ts
/** @type {import('tailwindcss').Config} */
module.exports = {// 这里给出了一份 taro 通用示例,具体要根据你自己项目的目录结构进行配置// 比如你使用 vue3 项目,你就需要把 vue 这个格式也包括进来// 不在 content glob 表达式中包括的文件,在里面编写 tailwindcss class,是不会生成对应的 css 工具类的content: ['./public/index.html', './src/**/*.{html,js,ts,jsx,tsx}'],// 其他配置项 ...corePlugins: {// 小程序不需要 preflight,因为这主要是给 h5 的,如果你要同时开发多端,你应该使用 process.env.TARO_ENV 环境变量来控制它preflight: false,},
}
package.json
"scripts": {
+ "postinstall": "weapp-tw patch"
}
添加这段脚本的用途是,每次安装包后,都会自动执行一遍 weapp-tw patch 这个脚本,给本地的 tailwindcss 打上小程序支持补丁。
config/index.js
mini: {webpackChain(chain) {chain.resolve.plugin("tsconfig-paths").use(TsconfigPathsPlugin);chain.merge({plugin: {install: {plugin: UnifiedWebpackPluginV5,args: [{// 这里可以传参数rem2rpx: true,tailwindcss: {v4: {cssEntries: [// 你 @import "weapp-tailwindcss"; 那个文件绝对路径path.resolve(__dirname, "../src/app.css"),],},},// https://github.com/sonofmagic/weapp-tailwindcss/issues/155injectAdditionalCssVarScope: true, // 解决nutui对tailwindcss的影响},],},},});}
},
src/app.css
@import "weapp-tailwindcss";
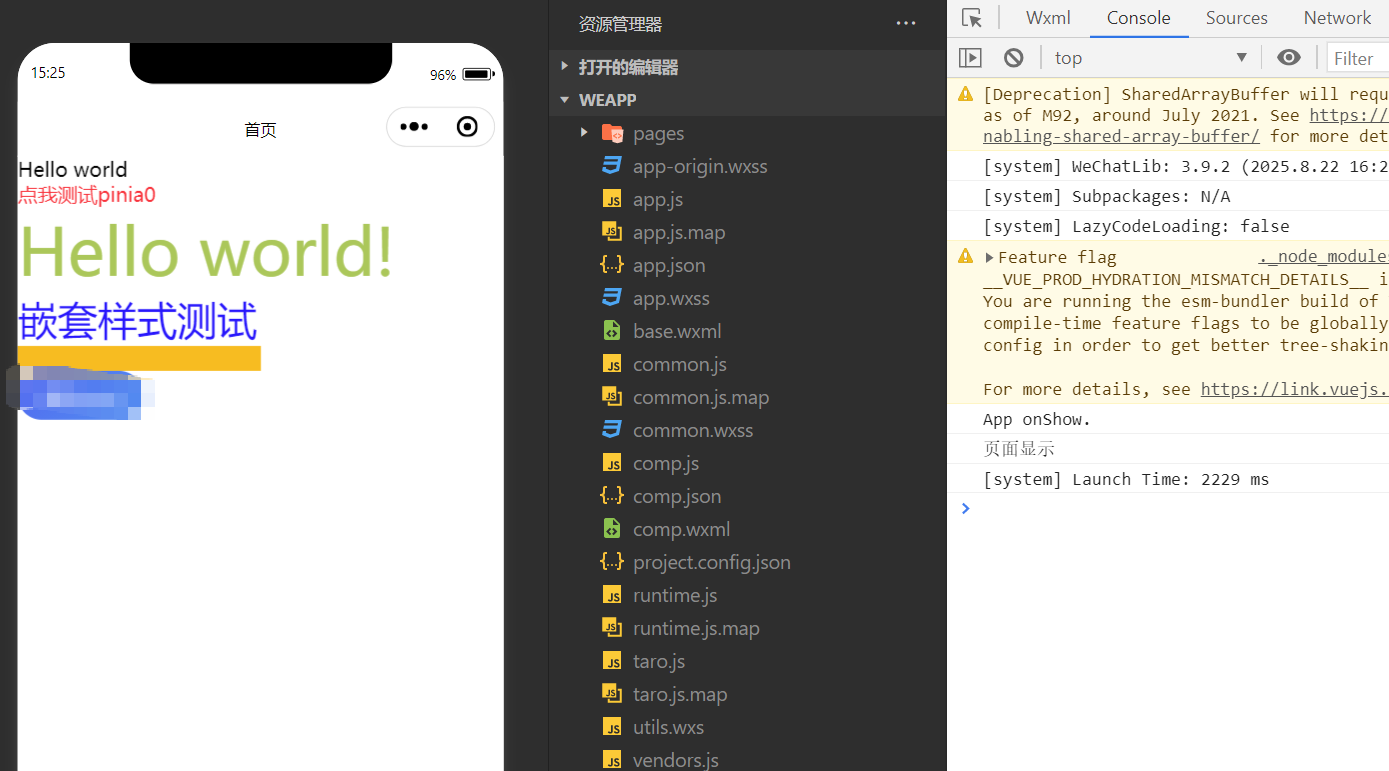
使用tailwind
src/pages/index/index.ts
<template><view>{{ msg }}</view><view class="text-red-500" @tap="testPinia">点我测试pinia{{ count }}</view><view className="text-[#acc855] text-[100px]">Hello world!</view><view class="outer"><view class="inner">嵌套样式测试</view><view class="w-[50%] h-5 bg-amber-400"></view></view>
</template><script setup lang="ts">
import { ref, computed } from 'vue'
import './index.css'
import { useCounterOutsideStore } from '@/stores/modules/demo'const msg = ref('Hello world')
const count = computed(() => counterStore.count)
const counterStore = useCounterOutsideStore()
const testPinia = () => {counterStore.increment()console.log(counterStore.count)
}
</script>
src/pages/index/index.css
.outer{.inner{color: blue;font-size: xx-large;}
}
在tailwind4版本中已经实现了 样式嵌套功能所以不用sass、less这些 也可以嵌套样式编写
运行结果
接入NutUI
安装
pnpm add @nutui/nutui-taro @nutui/icons-vue-taro @tarojs/plugin-html
@tarojs/plugin-html 使用 HTML 标签,nutui需要用到
自动按需引入nutui组件
pnpm add @nutui/auto-import-resolver unplugin-vue-components -D
写入使用
在config/index.js添加以下相应配置
import ComponentsPlugin from 'unplugin-vue-components/webpack'
import NutUIResolver from '@nutui/auto-import-resolver'config = {// 开启 HTML 插件plugins: ['@tarojs/plugin-html'],designWidth (input) {// 配置 NutUI 375 尺寸if (input?.file?.replace(/\\+/g, '/').indexOf('@nutui') > -1) {return 375}// 全局使用 Taro 默认的 750 尺寸return 750},deviceRatio: {640: 2.34 / 2,750: 1,828: 1.81 / 2,375: 2 / 1},// 小程序开发mini: {webpackChain(chain) {chain.plugin('unplugin-vue-components').use(ComponentsPlugin({resolvers: [NutUIResolver({taro: true})]}))},},// Taro-H5 开发h5: {webpackChain(chain) {chain.plugin('unplugin-vue-components').use(ComponentsPlugin({resolvers: [NutUIResolver({taro: true})]}))},}
}
src/app.ts
import { createApp } from "vue";
import { setupStore } from "./stores";
import "@nutui/nutui-taro/dist/style.css"; // +
import "./app.css";const App = createApp({onShow(options) {console.log("App onShow.");},
});
setupStore(App);export default App;
配置完成后,可以直接在模板中使用 NutUI 组件,unplugin-vue-components 插件会自动注册对应的组件,并按需引入组件样式。
使用NutUI
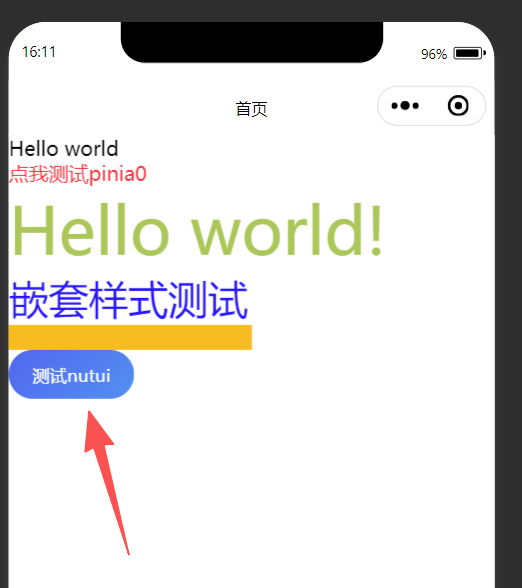
src/pages/index/index.ts
<template><view>{{ msg }}</view><view class="text-red-500" @tap="testPinia">点我测试pinia{{ count }}</view><view className="text-[#acc855] text-[100px]">Hello world!</view><view class="outer"><view class="inner">嵌套样式测试</view><view class="w-[50%] h-5 bg-amber-400"></view></view><nut-button type="info">测试nutui</nut-button>
</template><script setup lang="ts">
import { ref, computed } from 'vue'
import './index.css'
import { useCounterOutsideStore } from '@/stores/modules/demo'const msg = ref('Hello world')
const count = computed(() => counterStore.count)
const counterStore = useCounterOutsideStore()
const testPinia = () => {counterStore.increment()console.log(counterStore.count)
}
</script>
运行结果
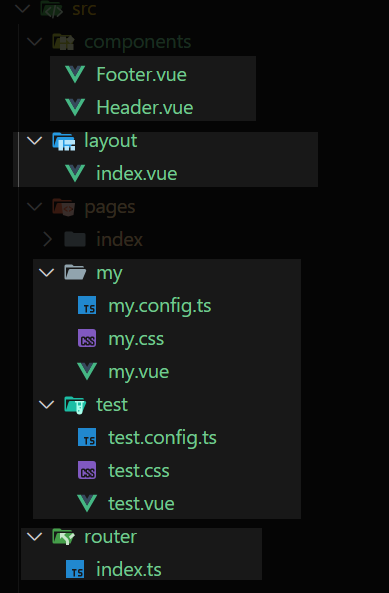
接入自定义Tabbar
创建所需的目录结构
写入代码
src/stores/modules/system.ts
import { defineStore } from "pinia";
import { piniaStore } from "@/stores";type SystemState = {tabbar: {active: string;};
};const useSystemStore = defineStore("system", {state: (): SystemState => {return { tabbar: { active: "home" } };},actions: {setActiveTab(tab: string) {if (tab === this.tabbar.active) return;this.tabbar.active = tab;},},
});export function useSystemOutsideStore() {return useSystemStore(piniaStore);
}
将nut-tabbar的切换状态存入store为了解决页面重复渲染tabbar引起的问题 https://github.com/jd-opensource/nutui/issues/2368
router/index.ts
import Taro from "@tarojs/taro";type Params = Record<string, string | number | boolean | undefined | null>;interface Router {push(url: string, params?: Params): void;replace(url: string, params?: Params): void;switchTab(url: string, params?: Params): void;reLaunch(url: string, params?: Params): void;
}function buildQuery(params: Params): string {return Object.keys(params).map((key) =>`${encodeURIComponent(key)}=${encodeURIComponent(params[key] ?? "")}`).join("&");
}/*** Taro 应用的路由工具类。** 提供页面跳转、重定向、切换 Tab、重启应用等方法,并支持可选的查询参数。** @property navigateTo - 跳转到指定页面,可携带查询参数。* @property redirectTo - 重定向到指定页面,可携带查询参数。* @property switchTab - 切换到指定 Tab 页面,可携带查询参数。* @property reLaunch - 重启应用到指定页面,可携带查询参数。** @example* router.navigateTo('/pages/home', { userId: 123 });*/
const router: Router = {push(url, params) {if (params) {const query = buildQuery(params);Taro.navigateTo({ url: `${url}?${query}` });} else {Taro.navigateTo({ url });}},replace(url, params) {if (params) {const query = buildQuery(params);Taro.redirectTo({ url: `${url}?${query}` });} else {Taro.redirectTo({ url });}},switchTab(url, params) {if (params) {const query = buildQuery(params);Taro.switchTab({ url: `${url}?${query}` });} else {Taro.switchTab({ url });}},reLaunch(url, params) {if (params) {const query = buildQuery(params);Taro.reLaunch({ url: `${url}?${query}` });} else {Taro.reLaunch({ url });}},
};export { router };
Footer.vue
<template><view class="footer"><nut-tabbarv-model="activeName"@tab-switch="tabSwitch":safe-area-inset-bottom="true"><nut-tabbar-itemv-for="item in list":key="item.name":name="item.name":tab-title="item.title":icon="item.icon"></nut-tabbar-item></nut-tabbar></view>
</template><script setup lang="ts">
import { Home, Category, My } from "@nutui/icons-vue-taro";
import { ref, h, computed } from "vue";
import { router } from "@/router";
import { useSystemOutsideStore } from "@/stores/modules/system";const useSystemStore = useSystemOutsideStore();
type TabItem = {name: string;path: string;title: string;icon: unknown;
};const list = ref<TabItem[]>([{ name: "home", path: "/pages/index/index", title: "首页", icon: h(Home) },{ name: "test", path: "/pages/test/test", title: "测试", icon: h(Category) },{ name: "my", path: "/pages/my/my", title: "我的", icon: h(My) },
]);const activeName = computed({get: () => useSystemStore.tabbar.active,set: (value) => useSystemStore.setActiveTab(value),
});const tabSwitch = (item: TabItem, index: number) => {const path = list.value.filter((tab) => tab.name === item.name)[0].path;console.log(path, index);router.switchTab(path);
};
</script>
Header.vue
<template><view class="header">header</view>
</template>
layout/index.vue
<template><nut-config-provider class="h-full" :theme-vars="themeVars"><view class="layout h-full flex flex-col"><view class="header" v-show="isShowHeader"><Header :title="title" /></view><view class="content flex-1"><slot /></view><view class="footer" v-show="isShowFooter"><Footer :activeName="footerActive" /></view></view></nut-config-provider>
</template><script setup lang="ts">
import Header from "@/components/Header.vue";
import Footer from "@/components/Footer.vue";
import { onMounted, ref } from "vue";type Props = {title: string;isShowHeader?: boolean;isShowFooter?: boolean;footerActive: string;
};
withDefaults(defineProps<Props>(), {title: "标题",isShowHeader: false,isShowFooter: true,footerActive: "home"
});// 修改nutui主题样式 https://nutui.jd.com/taro/vue/4x/#/zh-CN/component/configprovider
const themeVars = ref({primaryColor: "#008000",primaryColorEnd: "#008000",
});onMounted(() => {console.log("页面显示");
});
</script>
index/index.vue
<template><Layout title="首页" footerActive="home"><view>{{ msg }}</view><view class="text-red-500" @tap="testPinia">点我测试pinia{{ count }}</view><view className="text-[#acc855] text-[100px]">Hello world!</view><view class="outer"><view class="inner">嵌套样式测试</view><view class="w-[50%] h-5 bg-amber-400"></view></view><nut-button type="info">测试nutui</nut-button></Layout>
</template><script setup lang="ts">
import { ref, computed } from 'vue'
import './index.css'
import Layout from '@/layout/index.vue' // +
import { useCounterOutsideStore } from '@/stores/modules/demo'const msg = ref('Hello world')
const count = computed(() => counterStore.count)
const counterStore = useCounterOutsideStore()
const testPinia = () => {counterStore.increment()console.log(counterStore.count)
}
</script>
my/index.vue test/index.vue 和下面一样
<template><Layout title="我的" footerActive="my"><view class="my-page"><view class="my-header">我的</view><view class="my-content">欢迎来到我的页面</view></view></Layout>
</template><script setup lang="ts">
import "./my.css";
import Layout from "@/layout/index.vue";
</script>
src/app.config.ts
// https://docs.taro.zone/docs/app-config
export default defineAppConfig({pages: ['pages/index/index', 'pages/my/my','pages/test/test',],tabBar: {custom: true,list: [{ pagePath: 'pages/index/index', text: '首页' },{ pagePath: 'pages/test/test', text: '测试' },{ pagePath: 'pages/my/my', text: '我的' },]},window: {backgroundTextStyle: 'light',navigationBarBackgroundColor: '#fff',navigationBarTitleText: 'WeChat',navigationBarTextStyle: 'black'}
})
src/app.css
page{@apply h-full;
}
最终实现结果

项目地址
https://github.com/template-space/taro-template-vue
后续功能接入
🔳taro-axiosAPI 采用模块化导入方式
🔳上拉刷新、下拉加载
🔳子页面分包,跳转、拦截
🔳图片、视频、canvas、图表echarts
🔳地图
🔳…
敬请期待💥
到这里就结束了,后续还会更新 Taro、Vue 系列相关,还请持续关注!
感谢阅读,若有错误可以在下方评论区留言哦!!!

推荐文章👇
uniapp-vue3-vite 搭建小程序、H5 项目模板