Arduino Uno与4×4矩阵键盘联动完全指南
Arduino Uno与4×4矩阵键盘联动完全指南
资料已免费上传:一个基于Arduino IDE和FastLED库开发的WS2812 programmable LED灯环(灯带)控制项目
一、4×4矩阵键盘工作原理
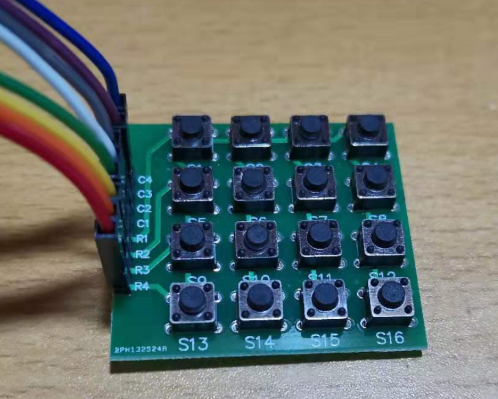
1.1 硬件结构
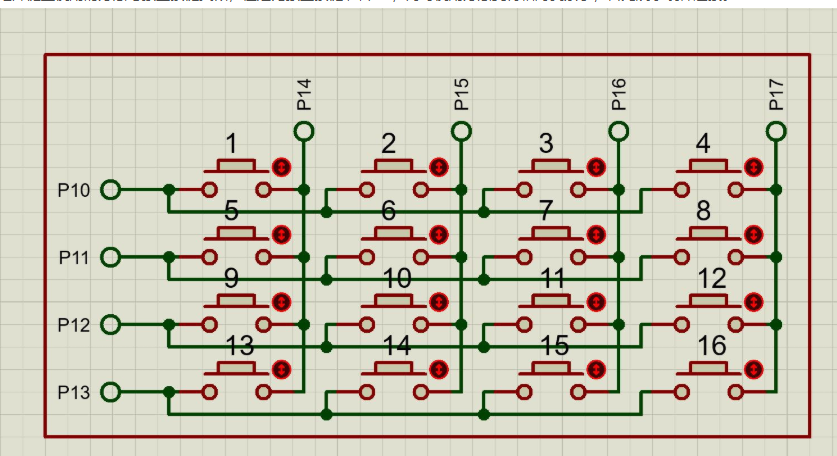
4×4矩阵键盘由16个按键组成,排列成4行×4列的矩阵结构:
列线: C1 C2 C3 C4
行线: R1 [1] [2] [3] [A]R2 [4] [5] [6] [B]R3 [7] [8] [9] [C]R4 [*] [0] [#] [D]
1.2 扫描原理
采用行扫描法或列扫描法来检测按键:
- 逐行设置低电平,检测列线状态
- 或逐列设置低电平,检测行线状态
二、硬件连接方式
2.1 引脚连接对照表
| 键盘引脚 | Arduino引脚 | 功能说明 |
|---|---|---|
| R1 (行1) | 2 | 行控制线 |
| R2 (行2) | 3 | 行控制线 |
| R3 (行3) | 4 | 行控制线 |
| R4 (行4) | 5 | 行控制线 |
| C1 (列1) | 6 | 列检测线 |
| C2 (列2) | 7 | 列检测线 |
| C3 (列3) | 8 | 列检测线 |
| C4 (列4) | 9 | 列检测线 |
2.2 电路连接示意图
键盘       Arduino Uno
行1 (R1) → 数字引脚2
行2 (R2) → 数字引脚3
行3 (R3) → 数字引脚4
行4 (R4) → 数字引脚5
列1 (C1) → 数字引脚6
列2 (C2) → 数字引脚7
列3 (C3) → 数字引脚8
列4 (C4) → 数字引脚9
三、基础扫描算法实现
3.1 不使用库的基本实现
const byte ROWS = 4;
const byte COLS = 4;// 定义行列引脚
byte rowPins[ROWS] = {2, 3, 4, 5};    // 行引脚
byte colPins[COLS] = {6, 7, 8, 9};    // 列引脚// 键盘映射
char keys[ROWS][COLS] = {{'1','2','3','A'},{'4','5','6','B'},{'7','8','9','C'},{'*','0','#','D'}
};void setup() {Serial.begin(9600);// 初始化行引脚为输出for (byte r = 0; r < ROWS; r++) {pinMode(rowPins[r], OUTPUT);digitalWrite(rowPins[r], HIGH);}// 初始化列引脚为输入上拉for (byte c = 0; c < COLS; c++) {pinMode(colPins[c], INPUT_PULLUP);}
}char readKey() {for (byte r = 0; r < ROWS; r++) {// 设置当前行为低电平digitalWrite(rowPins[r], LOW);// 检查每一列for (byte c = 0; c < COLS; c++) {if (digitalRead(colPins[c]) == LOW) {// 等待按键释放while(digitalRead(colPins[c]) == LOW);digitalWrite(rowPins[r], HIGH);return keys[r][c];}}// 恢复当前行为高电平digitalWrite(rowPins[r], HIGH);}return '\0'; // 没有按键按下
}void loop() {char key = readKey();if (key != '\0') {Serial.print("按键按下: ");Serial.println(key);}delay(100);
}
四、使用Keypad库的优化实现
Keypad 是一个库,原本是 Arduino Playground 中的一个版本,后由 Chris–A 在 GitHub 上创建了一个副本,并对代码进行了调整,使之与 Arduino IDE 的库管理器兼容。该库主要服务于Arduino平台,用于简化键盘矩阵的使用。
4.1 安装Keypad库
- Arduino IDE → 项目 → 加载库 → 管理库
- 搜索 “Keypad”
- 安装Mark Stanley和Alexander Brevig的Keypad库
4.2 使用Keypad库的完整代码
#include <Keypad.h>const byte ROWS = 4;
const byte COLS = 4;// 键盘布局
char hexaKeys[ROWS][COLS] = {{'1', '2', '3', 'A'},{'4', '5', '6', 'B'},{'7', '8', '9', 'C'},{'*', '0', '#', 'D'}
};// 引脚定义
byte rowPins[ROWS] = {2, 3, 4, 5};
byte colPins[COLS] = {6, 7, 8, 9};// 创建Keypad实例
Keypad customKeypad = Keypad(makeKeymap(hexaKeys), rowPins, colPins, ROWS, COLS
);void setup() {Serial.begin(9600);Serial.println("4×4键盘测试开始");
}void loop() {char key = customKeypad.getKey();if (key) {Serial.print("按键: ");Serial.println(key);// 根据按键执行不同操作handleKeyPress(key);}
}void handleKeyPress(char key) {switch(key) {case '1': Serial.println("执行功能1");break;case '2':Serial.println("执行功能2");break;case 'A':Serial.println("功能A激活");break;case '*':Serial.println("星号键按下");break;case '#':Serial.println("井号键按下");break;default:Serial.println("其他按键");}
}
五、高级功能实现
5.1 密码输入系统
#include <Keypad.h>const byte ROWS = 4;
const byte COLS = 4;char hexaKeys[ROWS][COLS] = {{'1','2','3','A'},{'4','5','6','B'},{'7','8','9','C'},{'*','0','#','D'}
};byte rowPins[ROWS] = {2, 3, 4, 5};
byte colPins[COLS] = {6, 7, 8, 9};Keypad keypad = Keypad(makeKeymap(hexaKeys), rowPins, colPins, ROWS, COLS);const String PASSWORD = "1234"; // 设置密码
String inputPassword = "";
unsigned long lastKeyTime = 0;
const long TIMEOUT = 10000; // 10秒超时void setup() {Serial.begin(9600);Serial.println("请输入4位密码: ");
}void loop() {char key = keypad.getKey();if (key) {handlePasswordInput(key);}// 检查超时if (millis() - lastKeyTime > TIMEOUT && inputPassword.length() > 0) {Serial.println("\n输入超时,请重新输入");inputPassword = "";}
}void handlePasswordInput(char key) {lastKeyTime = millis();if (key == '#') {// 确认键checkPassword();} else if (key == '*') {// 清除输入inputPassword = "";Serial.println("\n已清除,请重新输入: ");} else if (inputPassword.length() < 4) {// 输入密码inputPassword += key;Serial.print("*");}
}void checkPassword() {if (inputPassword == PASSWORD) {Serial.println("\n密码正确! access granted");// 执行解锁操作} else {Serial.println("\n密码错误! access denied");}inputPassword = "";Serial.println("请输入4位密码: ");
}
5.2 键盘控制LED示例
#include <Keypad.h>
#include <FastLED.h>#define LED_PIN     10
#define NUM_LEDS    16
CRGB leds[NUM_LEDS];const byte ROWS = 4;
const byte COLS = 4;char hexaKeys[ROWS][COLS] = {{'1','2','3','A'},{'4','5','6','B'},{'7','8','9','C'},{'R','G','B','O'}  // R:红色, G:绿色, B:蓝色, O:关闭
};byte rowPins[ROWS] = {2, 3, 4, 5};
byte colPins[COLS] = {6, 7, 8, 9};Keypad keypad = Keypad(makeKeymap(hexaKeys), rowPins, colPins, ROWS, COLS);void setup() {Serial.begin(9600);FastLED.addLeds<WS2812, LED_PIN, GRB>(leds, NUM_LEDS);FastLED.setBrightness(100);Serial.println("键盘LED控制器就绪");
}void loop() {char key = keypad.getKey();if (key) {Serial.print("控制命令: ");Serial.println(key);controlLEDs(key);}
}void controlLEDs(char command) {switch(command) {case 'R':fill_solid(leds, NUM_LEDS, CRGB::Red);break;case 'G':fill_solid(leds, NUM_LEDS, CRGB::Green);break;case 'B':fill_solid(leds, NUM_LEDS, CRGB::Blue);break;case 'O':fill_solid(leds, NUM_LEDS, CRGB::Black);break;case '1':leds[0] = CRGB::White;break;case '2':leds[1] = CRGB::Yellow;break;}FastLED.show();
}
六、故障排除与优化
6.1 常见问题解决
void debugKeyboard() {// 调试模式:显示所有引脚状态for (byte r = 0; r < ROWS; r++) {Serial.print("行");Serial.print(r);Serial.print(": ");Serial.println(digitalRead(rowPins[r]));}for (byte c = 0; c < COLS; c++) {Serial.print("列");Serial.print(c);Serial.print(": ");Serial.println(digitalRead(colPins[c]));}Serial.println("------------");delay(1000);
}
6.2 防抖优化
// 在readKey函数中添加防抖
if (digitalRead(colPins[c]) == LOW) {delay(50); // 防抖延迟if (digitalRead(colPins[c]) == LOW) {// 确认按键按下while(digitalRead(colPins[c]) == LOW); // 等待释放digitalWrite(rowPins[r], HIGH);return keys[r][c];}
}
七、应用场景扩展(含详细代码实现)
7.1 智能家居控制系统
7.1.1 智能门禁系统
#include <Keypad.h>
#include <Servo.h>
#include <LiquidCrystal_I2C.h>// 硬件设置
const byte ROWS = 4;
const byte COLS = 4;
char hexaKeys[ROWS][COLS] = {{'1','2','3','A'},{'4','5','6','B'},{'7','8','9','C'},{'*','0','#','D'}
};
byte rowPins[ROWS] = {2, 3, 4, 5};
byte colPins[COLS] = {6, 7, 8, 9};Keypad keypad = Keypad(makeKeymap(hexaKeys), rowPins, colPins, ROWS, COLS);
Servo doorLock;
LiquidCrystal_I2C lcd(0x27, 16, 2); // I2C地址 0x27,16×2显示屏// 系统变量
const String ADMIN_PASSWORD = "123456";
const String GUEST_PASSWORD = "0000";
String inputPassword = "";
bool systemArmed = true;
unsigned long lastActivity = 0;
const long INACTIVITY_TIMEOUT = 30000; // 30秒无操作关闭显示void setup() {Serial.begin(9600);doorLock.attach(10);doorLock.write(0); // 门锁关闭lcd.init();lcd.backlight();lcd.setCursor(0, 0);lcd.print("智能门禁系统");lcd.setCursor(0, 1);lcd.print("请输入密码:");pinMode(11, OUTPUT); // 绿色LED - 门开pinMode(12, OUTPUT); // 红色LED - 门关pinMode(13, OUTPUT); // 蜂鸣器digitalWrite(12, HIGH); // 初始状态门关
}void loop() {char key = keypad.getKey();if (key) {lastActivity = millis();handleKeyInput(key);}checkInactivity();
}void handleKeyInput(char key) {beep(100);if (key == '#') {checkPassword();} else if (key == '*') {clearInput();} else if (inputPassword.length() < 6) {inputPassword += key;updateDisplay();}
}void checkPassword() {lcd.clear();if (inputPassword == ADMIN_PASSWORD) {// 管理员权限lcd.print("管理员模式");doorLock.write(90); // 开门digitalWrite(11, HIGH);digitalWrite(12, LOW);beep(500);delay(3000);// 3秒后自动关门doorLock.write(0);digitalWrite(11, LOW);digitalWrite(12, HIGH);} else if (inputPassword == GUEST_PASSWORD) {// 访客权限lcd.print("欢迎访客");doorLock.write(90);digitalWrite(11, HIGH);digitalWrite(12, LOW);delay(5000); // 访客5秒通行时间doorLock.write(0);digitalWrite(11, LOW);digitalWrite(12, HIGH);} else {lcd.print("密码错误!");beep(1000);delay(2000);}clearInput();lcd.setCursor(0, 0);lcd.print("请输入密码:");
}void updateDisplay() {lcd.setCursor(0, 1);lcd.print("                "); // 清空行lcd.setCursor(0, 1);for (int i = 0; i < inputPassword.length(); i++) {lcd.print('*');}
}void clearInput() {inputPassword = "";updateDisplay();
}void beep(int duration) {digitalWrite(13, HIGH);delay(duration);digitalWrite(13, LOW);
}void checkInactivity() {if (millis() - lastActivity > INACTIVITY_TIMEOUT) {lcd.noBacklight();} else {lcd.backlight();}
}
7.1.2 灯光场景控制系统
#include <Keypad.h>
#include <FastLED.h>#define LED_PIN     11
#define NUM_LEDS    20
CRGB leds[NUM_LEDS];const byte ROWS = 4;
const byte COLS = 4;
char hexaKeys[ROWS][COLS] = {{'1','2','3','A'},  // 场景1,2,3,全部开{'4','5','6','B'},  // 场景4,5,6,全部关{'7','8','9','C'},  // 亮度+,亮度-,模式切换{'*','0','#','D'}   // 红色,绿色,蓝色,白色
};byte rowPins[ROWS] = {2, 3, 4, 5};
byte colPins[COLS] = {6, 7, 8, 9};
Keypad keypad = Keypad(makeKeymap(hexaKeys), rowPins, colPins, ROWS, COLS);int brightness = 100;
int currentMode = 0;
const int MODE_COUNT = 5;void setup() {Serial.begin(9600);FastLED.addLeds<WS2812B, LED_PIN, GRB>(leds, NUM_LEDS);FastLED.setBrightness(brightness);setScene(0); // 默认场景
}void loop() {char key = keypad.getKey();if (key) {handleLightControl(key);}// 动态效果更新updateLightEffects();FastLED.show();delay(30);
}void handleLightControl(char key) {switch(key) {case '1': setScene(1); break;case '2': setScene(2); break;case '3': setScene(3); break;case '4': setScene(4); break;case '5': setScene(5); break;case '6': setScene(6); break;case 'A': setAllOn(); break;case 'B': setAllOff(); break;case '7': adjustBrightness(+20); break;case '8': adjustBrightness(-20); break;case '9': cycleMode(); break;case '*': setColor(CRGB::Red); break;case '0': setColor(CRGB::Green); break;case '#': setColor(CRGB::Blue); break;case 'D': setColor(CRGB::White); break;}
}void setScene(int scene) {switch(scene) {case 1: // 温馨黄光fill_solid(leds, NUM_LEDS, CRGB(255, 180, 50));break;case 2: // 冷白光fill_solid(leds, NUM_LEDS, CRGB(255, 255, 200));break;case 3: // 浪漫粉紫fill_gradient_RGB(leds, NUM_LEDS, CRGB::Purple, CRGB::Pink);break;case 4: // 阅读模式fill_solid(leds, NUM_LEDS, CRGB(255, 220, 180));break;case 5: // 派对模式currentMode = 4; // 彩虹模式break;case 6: // 夜间模式fill_solid(leds, NUM_LEDS, CRGB(10, 10, 20));break;}FastLED.show();
}void setAllOn() {fill_solid(leds, NUM_LEDS, CRGB::White);FastLED.show();
}void setAllOff() {fill_solid(leds, NUM_LEDS, CRGB::Black);FastLED.show();
}void adjustBrightness(int delta) {brightness = constrain(brightness + delta, 10, 255);FastLED.setBrightness(brightness);FastLED.show();
}void cycleMode() {currentMode = (currentMode + 1) % MODE_COUNT;
}void setColor(CRGB color) {fill_solid(leds, NUM_LEDS, color);FastLED.show();
}void updateLightEffects() {static uint8_t hue = 0;switch(currentMode) {case 0: // 静态模式// 无动态效果break;case 1: // 呼吸灯效果{uint8_t breath = (exp(sin(millis()/2000.0*PI)) - 0.36787944)*108.0;FastLED.setBrightness(breath);}break;case 2: // 流水灯效果{static int position = 0;fadeToBlackBy(leds, NUM_LEDS, 50);leds[position] = CHSV(hue, 255, 255);position = (position + 1) % NUM_LEDS;}break;case 3: // 闪烁效果{uint8_t blink = (millis() / 500) % 2;if (blink) {fill_solid(leds, NUM_LEDS, CRGB::Black);}}break;case 4: // 彩虹效果fill_rainbow(leds, NUM_LEDS, hue, 7);hue++;break;}
}
7.2 工业控制系统
7.2.1 电机控制系统
#include <Keypad.h>
#include <LiquidCrystal_I2C.h>const byte ROWS = 4;
const byte COLS = 4;
char hexaKeys[ROWS][COLS] = {{'F','R','S','+'},  // 前进,后退,停止,加速{'1','2','3','-'},  // 速度1,2,3,减速{'4','5','6','M'},  // 模式选择{'H','L','A','E'}   // 高速,低速,自动,急停
};byte rowPins[ROWS] = {2, 3, 4, 5};
byte colPins[COLS] = {6, 7, 8, 9};
Keypad keypad = Keypad(makeKeymap(hexaKeys), rowPins, colPins, ROWS, COLS);
LiquidCrystal_I2C lcd(0x27, 16, 2);// 电机控制引脚
const int MOTOR_PWM = 10;
const int MOTOR_IN1 = 11;
const int MOTOR_IN2 = 12;// 系统变量
int motorSpeed = 0;
const int MAX_SPEED = 255;
const int MIN_SPEED = 0;
bool motorRunning = false;
String operationMode = "MANUAL"; // MANUAL or AUTOvoid setup() {Serial.begin(9600);lcd.init();lcd.backlight();pinMode(MOTOR_PWM, OUTPUT);pinMode(MOTOR_IN1, OUTPUT);pinMode(MOTOR_IN2, OUTPUT);updateDisplay();
}void loop() {char key = keypad.getKey();if (key) {handleMotorControl(key);}// 自动模式逻辑if (operationMode == "AUTO") {autoModeOperation();}
}void handleMotorControl(char key) {lcd.clear();switch(key) {case 'F': // 前进setMotorDirection(true);startMotor();lcd.print("前进");break;case 'R': // 后退setMotorDirection(false);startMotor();lcd.print("后退");break;case 'S': // 停止stopMotor();lcd.print("停止");break;case '+': // 加速motorSpeed = constrain(motorSpeed + 20, MIN_SPEED, MAX_SPEED);updateMotorSpeed();lcd.print("加速: " + String(motorSpeed));break;case '-': // 减速motorSpeed = constrain(motorSpeed - 20, MIN_SPEED, MAX_SPEED);updateMotorSpeed();lcd.print("减速: " + String(motorSpeed));break;case '1': setSpeed(85); break;  // 33%case '2': setSpeed(170); break; // 66%case '3': setSpeed(255); break; // 100%case 'H': setSpeed(MAX_SPEED); break;case 'L': setSpeed(MAX_SPEED/4); break;case 'M': toggleMode(); break;case 'A': operationMode = "AUTO"; lcd.print("自动模式"); break;case 'E': emergencyStop(); break;}delay(1000);updateDisplay();
}void setMotorDirection(bool forward) {digitalWrite(MOTOR_IN1, forward ? HIGH : LOW);digitalWrite(MOTOR_IN2, forward ? LOW : HIGH);
}void startMotor() {motorRunning = true;updateMotorSpeed();
}void stopMotor() {motorRunning = false;analogWrite(MOTOR_PWM, 0);
}void updateMotorSpeed() {if (motorRunning) {analogWrite(MOTOR_PWM, motorSpeed);}
}void setSpeed(int speed) {motorSpeed = speed;updateMotorSpeed();lcd.print("速度: " + String(motorSpeed));
}void toggleMode() {operationMode = (operationMode == "MANUAL") ? "AUTO" : "MANUAL";lcd.print("模式: " + operationMode);
}void emergencyStop() {stopMotor();motorSpeed = 0;lcd.print("紧急停止!");// 触发警报for(int i=0; i<5; i++) {tone(13, 1000, 200);delay(300);}
}void autoModeOperation() {// 简单的自动控制逻辑static unsigned long lastChange = 0;static bool direction = true;if (millis() - lastChange > 5000) { // 每5秒切换direction = !direction;setMotorDirection(direction);motorSpeed = random(100, 256);updateMotorSpeed();lastChange = millis();lcd.clear();lcd.print("自动运行:");lcd.setCursor(0, 1);lcd.print(direction ? "前进 " : "后退 ");lcd.print(motorSpeed);}
}void updateDisplay() {lcd.clear();lcd.setCursor(0, 0);lcd.print("电机控制:");lcd.setCursor(0, 1);lcd.print("S:");lcd.print(motorSpeed);lcd.print(" M:");lcd.print(operationMode);lcd.print(motorRunning ? " RUN" : " STOP");
}
7.3 教育项目系统
7.3.1 科学计算器
#include <Keypad.h>
#include <LiquidCrystal_I2C.h>const byte ROWS = 4;
const byte COLS = 4;
char hexaKeys[ROWS][COLS] = {{'7','8','9','/'},{'4','5','6','*'},{'1','2','3','-'},{'C','0','=','+'}
};byte rowPins[ROWS] = {2, 3, 4, 5};
byte colPins[COLS] = {6, 7, 8, 9};
Keypad keypad = Keypad(makeKeymap(hexaKeys), rowPins, colPins, ROWS, COLS);
LiquidCrystal_I2C lcd(0x27, 16, 2);// 计算器变量
String inputString = "";
String displayString = "";
double firstOperand = 0;
double secondOperand = 0;
char operation = ' ';
bool newInput = true;void setup() {Serial.begin(9600);lcd.init();lcd.backlight();lcd.print("科学计算器");delay(2000);lcd.clear();lcd.print("0");
}void loop() {char key = keypad.getKey();if (key) {handleCalculatorInput(key);}
}void handleCalculatorInput(char key) {if (isdigit(key) || key == '.') {// 数字输入if (newInput) {inputString = "";newInput = false;}if (key == '.' && inputString.indexOf('.') != -1) {return; // 防止多个小数点}inputString += key;updateDisplay(inputString);} else if (isOperator(key)) {// 运算符if (inputString != "") {firstOperand = inputString.toDouble();}operation = key;newInput = true;displayString = String(firstOperand) + " " + operation;updateDisplay(displayString);} else if (key == '=') {// 等于号if (inputString != "" && operation != ' ') {secondOperand = inputString.toDouble();double result = calculateResult();displayResult(result);firstOperand = result; // 连续计算inputString = "";newInput = true;}} else if (key == 'C') {// 清除clearCalculator();updateDisplay("0");}
}bool isOperator(char c) {return c == '+' || c == '-' || c == '*' || c == '/';
}double calculateResult() {switch(operation) {case '+': return firstOperand + secondOperand;case '-': return firstOperand - secondOperand;case '*': return firstOperand * secondOperand;case '/': if (secondOperand != 0) {return firstOperand / secondOperand;} else {return 0; // 除零错误}default: return 0;}
}void displayResult(double result) {lcd.clear();lcd.setCursor(0, 0);lcd.print(String(firstOperand) + " " + operation + " " + String(secondOperand));lcd.setCursor(0, 1);if (isinf(result) || isnan(result)) {lcd.print("错误");} else {// 格式化显示if (result == (long)result) {lcd.print("= " + String((long)result));} else {lcd.print("= " + String(result, 4));}}
}void clearCalculator() {inputString = "";firstOperand = 0;secondOperand = 0;operation = ' ';newInput = true;
}void updateDisplay(String text) {lcd.clear();lcd.setCursor(0, 0);// 显示历史if (operation != ' ') {lcd.print(String(firstOperand) + " " + operation);}lcd.setCursor(0, 1);if (text.length() > 16) {lcd.print(text.substring(text.length()-16));} else {lcd.print(text);}
}// 高级数学函数(扩展功能)
double advancedCalculate(double a, double b, char op) {switch(op) {case 'S': return sin(a);      // 正弦case 'C': return cos(a);      // 余弦case 'T': return tan(a);      // 正切case 'L': return log(a);      // 自然对数case 'G': return log10(a);    // 常用对数case 'R': return sqrt(a);     // 平方根case 'P': return pow(a, b);   // 幂运算default: return 0;}
}
7.3.2 音乐键盘合成器
#include <Keypad.h>
#include <toneAC.h>const byte ROWS = 4;
const byte COLS = 4;
char hexaKeys[ROWS][COLS] = {{'C','D','E','F'},  // 音符{'G','A','B','C'},  // 音符{'1','2','3','4'},  // 音阶选择{'V','T','R','S'}   // 音量,音色,节奏,停止
};byte rowPins[ROWS] = {2, 3, 4, 5};
byte colPins[COLS] = {6, 7, 8, 9};
Keypad keypad = Keypad(makeKeymap(hexaKeys), rowPins, colPins, ROWS, COLS);// 音乐参数
int currentScale = 4; // 中央C音阶
int volume = 10;
int waveform = 0; // 波形选择
bool isPlaying = false;
unsigned long lastNoteTime = 0;
const int NOTE_DURATION = 300;// 音符频率表 (C4到C5)
float noteFrequencies[] = {261.63, 293.66, 329.63, 349.23, // C, D, E, F392.00, 440.00, 493.88, 523.25  // G, A, B, C5
};void setup() {Serial.begin(9600);Serial.println("音乐键盘就绪");
}void loop() {char key = keypad.getKey();if (key) {handleMusicInput(key);}// 自动停止音符if (isPlaying && millis() - lastNoteTime > NOTE_DURATION) {noToneAC();isPlaying = false;}
}void handleMusicInput(char key) {switch(key) {case 'C': playNote(0); break;case 'D': playNote(1); break;case 'E': playNote(2); break;case 'F': playNote(3); break;case 'G': playNote(4); break;case 'A': playNote(5); break;case 'B': playNote(6); break;case 'C': playNote(7); break; // 高音Ccase '1': currentScale = 3; Serial.println("音阶3"); break;case '2': currentScale = 4; Serial.println("音阶4"); break;case '3': currentScale = 5; Serial.println("音阶5"); break;case '4': currentScale = 6; Serial.println("音阶6"); break;case 'V': adjustVolume(); break;case 'T': changeWaveform(); break;case 'R': playRhythm(); break;case 'S': stopPlayback(); break;}
}void playNote(int noteIndex) {float frequency = noteFrequencies[noteIndex] * pow(2, currentScale - 4);toneAC(frequency, volume);isPlaying = true;lastNoteTime = millis();Serial.print("播放: ");Serial.print(getNoteName(noteIndex));Serial.print(" 频率: ");Serial.print(frequency);Serial.print("Hz");Serial.println();
}String getNoteName(int index) {String notes[] = {"C", "D", "E", "F", "G", "A", "B", "C5"};return notes[index] + String(currentScale);
}void adjustVolume() {volume = (volume % 10) + 1;Serial.print("音量: ");Serial.println(volume);
}void changeWaveform() {waveform = (waveform + 1) % 3;String waveforms[] = {"正弦", "方波", "三角波"};Serial.print("音色: ");Serial.println(waveforms[waveform]);
}void playRhythm() {Serial.println("播放节奏模式");// 简单的节奏模式int rhythm[] = {0, 4, 7, 4, 2, 5, 7, 5}; // 音符序列int durations[] = {200, 200, 400, 200, 200, 200, 400, 200}; // 持续时间for (int i = 0; i < 8; i++) {playNote(rhythm[i]);delay(durations[i]);noToneAC();delay(50);}
}void stopPlayback() {noToneAC();isPlaying = false;Serial.println("播放停止");
}// 和弦功能
void playChord(int root, int chordType) {int chordNotes[3];switch(chordType) {case 0: // 大三和弦chordNotes[0] = root;chordNotes[1] = root + 4;chordNotes[2] = root + 7;break;case 1: // 小三和弦chordNotes[0] = root;chordNotes[1] = root + 3;chordNotes[2] = root + 7;break;}// 播放和弦(简化版)for (int i = 0; i < 3; i++) {if (chordNotes[i] < 8) { // 确保不超出范围playNote(chordNotes[i]);delay(100);}}
}
这些详细的代码实现展示了4×4矩阵键盘在各种应用场景中的强大功能,从简单的输入设备到复杂的控制系统,为Arduino项目提供了丰富的交互可能性。
通过4×4矩阵键盘与Arduino Uno的联动,可以创建各种交互式项目,从简单的输入设备到复杂的控制系统。