小杰机器视觉(six)——模板匹配
1.模板匹配
三种归一化算法,方便匹配阈值。
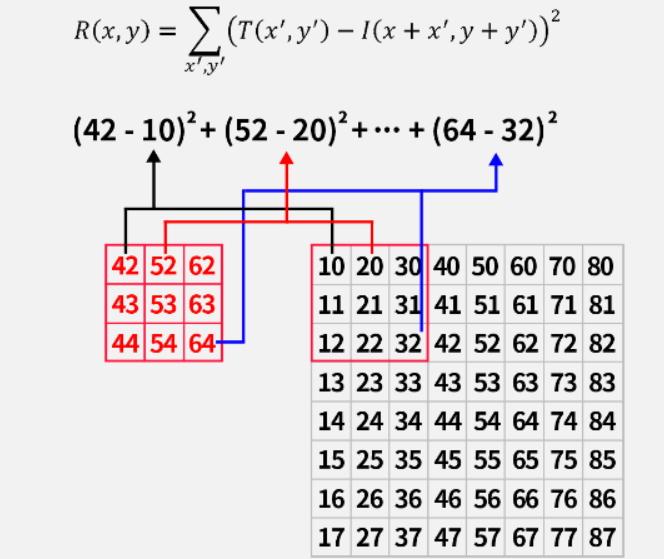
(1)平方差匹配 TM_SQDIFF
使用模板图与目标图对应的像素值使用平方差公式来计算,其结果越小(最小值为0),代表匹配程度越高。
注意:模板匹配都不要需要边缘填充,直接从原点开始计算。
![]()
代码
import cv2
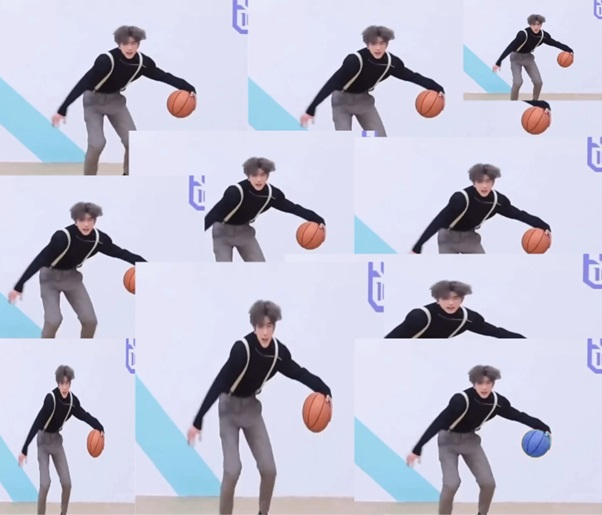
import numpy as npif __name__ == '__main__':# 1. 图片输入path = 'ctrl.jpg'image_np = cv2.imread(path)# 2. 灰度化(原图)image_np_gray = cv2.cvtColor(image_np, cv2.COLOR_BGR2GRAY)# 3. 模板输入path = 'basketball.jpg'template = cv2.imread(path)# 4. 灰度化(模板)template_gray = cv2.cvtColor(template, cv2.COLOR_BGR2GRAY)# 5. 模板匹配# 获得模板宽高h = template_gray.shape[0]w = template_gray.shape[1]print(h, w)# 模板匹配算法res = cv2.matchTemplate(image_np_gray,  # 原始图像template_gray,  # 模板cv2.TM_SQDIFF  # 平方差)print(res)# 找到最小值:完美篮球print(res.min())# 设定动态阈值threshold = res.min() * 20print(threshold)# 认为小于阈值的是匹配成功loc = np.where(res < threshold)print(loc)print(len(loc))# 6. 绘制轮廓for x, y in zip(loc[1], loc[0]):print('坐标:', (x, y))# 画框cv2.rectangle(img=image_np,pt1=(x, y),pt2=(x + w, y + h),color=(0, 0, 255),thickness=2)# 6. 图片输出cv2.imshow('image_np', image_np)cv2.waitKey(0)
平方差匹配的问题是无上限,不方便调参。
(2)归一化平凡差匹配 TM_SQDIFF_NORMED
与平方差匹配类似,只不过需要将结果的值统一到0到1,计算结果越小,代表匹配程度越高。
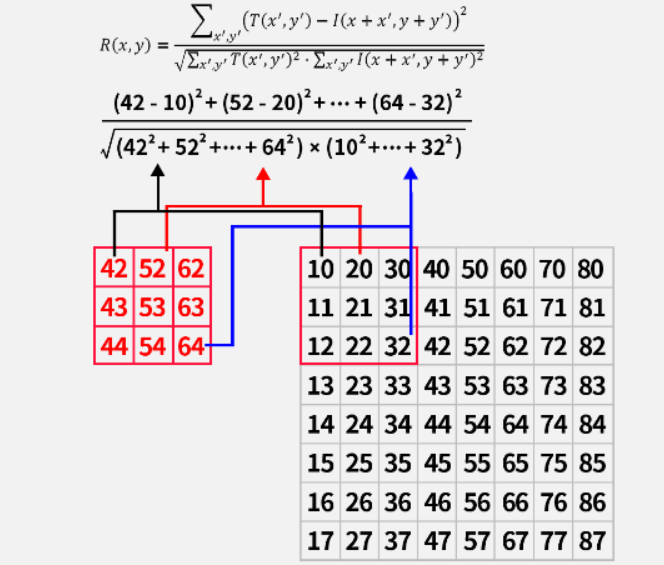
归一化可以上结果有明确的上下限,方便在整体中判断量化程度。
代码
import cv2
import numpy as npif __name__ == '__main__':# 1. 图片输入path = 'ctrl.jpg'image_np = cv2.imread(path)# 2. 灰度化(原图)image_np_gray = cv2.cvtColor(image_np, cv2.COLOR_BGR2GRAY)# 3. 模板输入path = 'basketball.jpg'template = cv2.imread(path)# 4. 灰度化(模板)template_gray = cv2.cvtColor(template, cv2.COLOR_BGR2GRAY)# 5. 模板匹配# 获得模板宽高h = template_gray.shape[0]w = template_gray.shape[1]print(h, w)# 模板匹配算法res = cv2.matchTemplate(image_np_gray,  # 原始图像template_gray,  # 模板cv2.TM_SQDIFF_NORMED  # 归一化平方差)print(res)# 找到最小值:完美篮球print(res.min())# 设定阈值threshold = 0.014# 认为小于阈值的是匹配成功loc = np.where(res < threshold)print(loc)print(len(loc))# 6. 绘制轮廓for x, y in zip(loc[1], loc[0]):print('坐标:', (x, y))# 画框cv2.rectangle(img=image_np,pt1=(x, y),pt2=(x + w, y + h),color=(0, 0, 255),thickness=2)# 6. 图片输出cv2.imshow('image_np', image_np)cv2.waitKey(0)
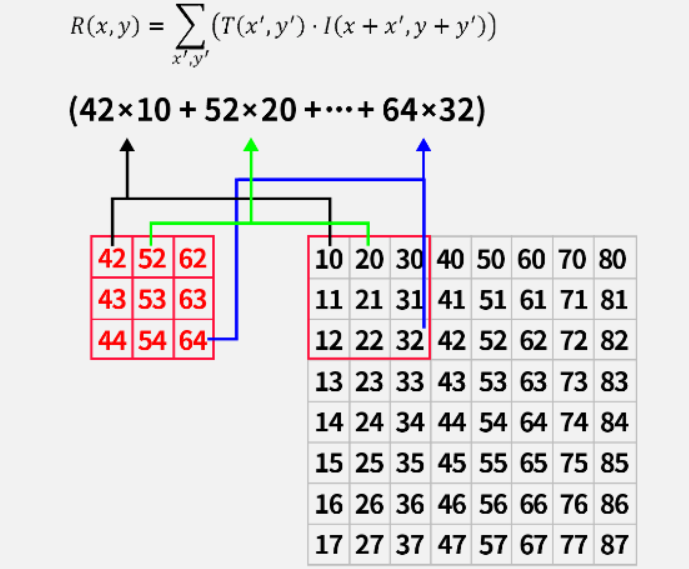
(3)相关匹配 TM_CCORR
使用对应像素的乘积进行匹配,乘积的结果越大,表示匹配程度越高。该方法对光照和颜色变化较为敏感,实际开发中很难匹配。
(4)归一化相关匹配 TM_CCORR_NORMED
同样进行归一化,结果处于0到1之间,值越大表示匹配程度越高。
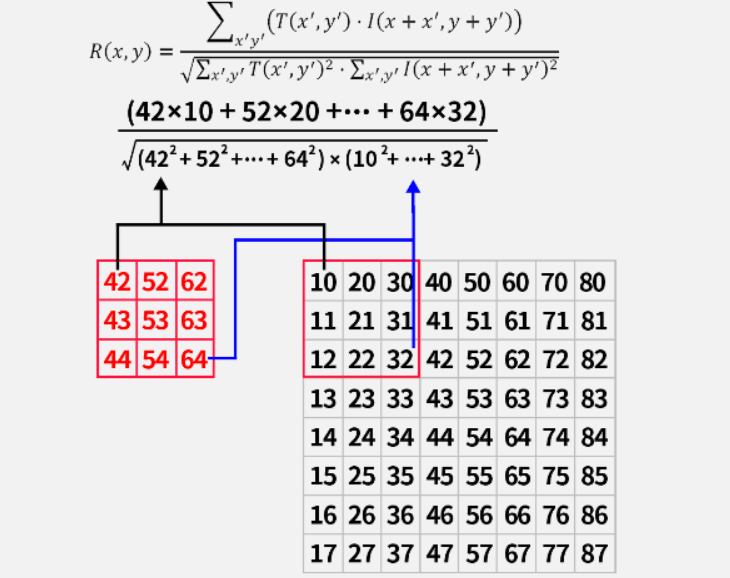
代码
import cv2
import numpy as npif __name__ == '__main__':# 1. 图片输入path = 'ctrl.jpg'image_np = cv2.imread(path)# 2. 灰度化(原图)image_np_gray = cv2.cvtColor(image_np, cv2.COLOR_BGR2GRAY)# 3. 模板输入path = 'basketball.jpg'template = cv2.imread(path)# 4. 灰度化(模板)template_gray = cv2.cvtColor(template, cv2.COLOR_BGR2GRAY)# 5. 模板匹配# 获得模板宽高h = template_gray.shape[0]w = template_gray.shape[1]print(h, w)# 模板匹配算法res = cv2.matchTemplate(image_np_gray,  # 原始图像template_gray,  # 模板cv2.TM_CCORR_NORMED  # 归一化相关匹配)print(res)# 找到最大值:完美篮球print(res.max())# 设定阈值threshold = 0.99# 认为小于阈值的是匹配成功loc = np.where(res > threshold)print(loc)print(len(loc))# 6. 绘制轮廓for x, y in zip(loc[1], loc[0]):print('坐标:', (x, y))# 画框cv2.rectangle(img=image_np,pt1=(x, y),pt2=(x + w, y + h),color=(0, 0, 255),thickness=2)# 6. 图片输出cv2.imshow('image_np', image_np)cv2.waitKey(0)
(5)相关系数匹配 TM_CCOEFF
需要先计算模板与目标图像的均值,然后每个像素与均值之间的差的乘积再求和表示匹配程度,数值越大表示匹配程度越高。需要注意的是,这种算法在像素完全相同的极端情况下会失效(例如模板是9个10像素,原图匹配区域也是9个10像素,结果为0)。
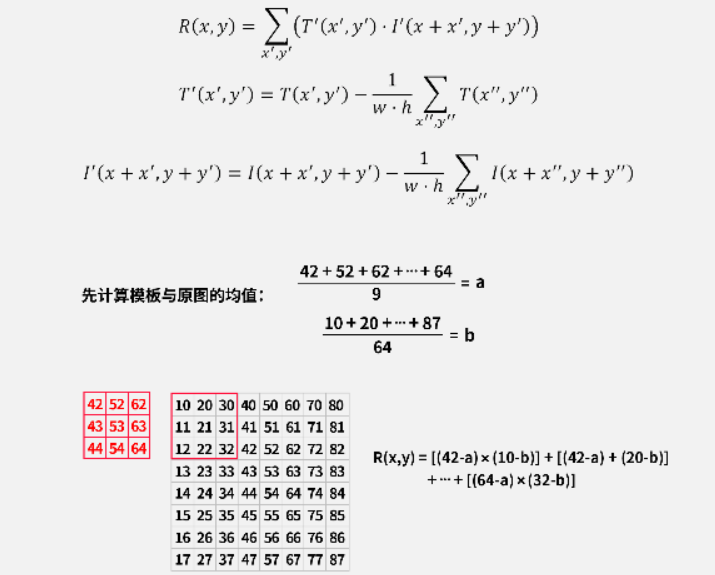
代码
import cv2
import numpy as npif __name__ == '__main__':# 1. 图片输入path = 'ctrl.jpg'image_np = cv2.imread(path)# 2. 灰度化(原图)image_np_gray = cv2.cvtColor(image_np, cv2.COLOR_BGR2GRAY)# 3. 模板输入path = 'basketball.jpg'template = cv2.imread(path)# 4. 灰度化(模板)template_gray = cv2.cvtColor(template, cv2.COLOR_BGR2GRAY)# 5. 模板匹配# 获得模板宽高h = template_gray.shape[0]w = template_gray.shape[1]print(h, w)# 模板匹配算法res = cv2.matchTemplate(image_np_gray,  # 原始图像template_gray,  # 模板cv2.TM_CCOEFF  # 相关系数)print(res)# 找到最大值:完美篮球print(res.max())# 设定动态阈值threshold = res.max() * 0.9# 认为小于阈值的是匹配成功loc = np.where(res > threshold)print(loc)print(len(loc))# 6. 绘制轮廓for x, y in zip(loc[1], loc[0]):print('坐标:', (x, y))# 画框cv2.rectangle(img=image_np,pt1=(x, y),pt2=(x + w, y + h),color=(0, 0, 255),thickness=2)# 6. 图片输出cv2.imshow('image_np', image_np)cv2.waitKey(0)
(6)归一化相关系数匹配 TM_CCOEFF_NORMED
把相关系数匹配归一化到0和1之间,值越大表示匹配程度越高。
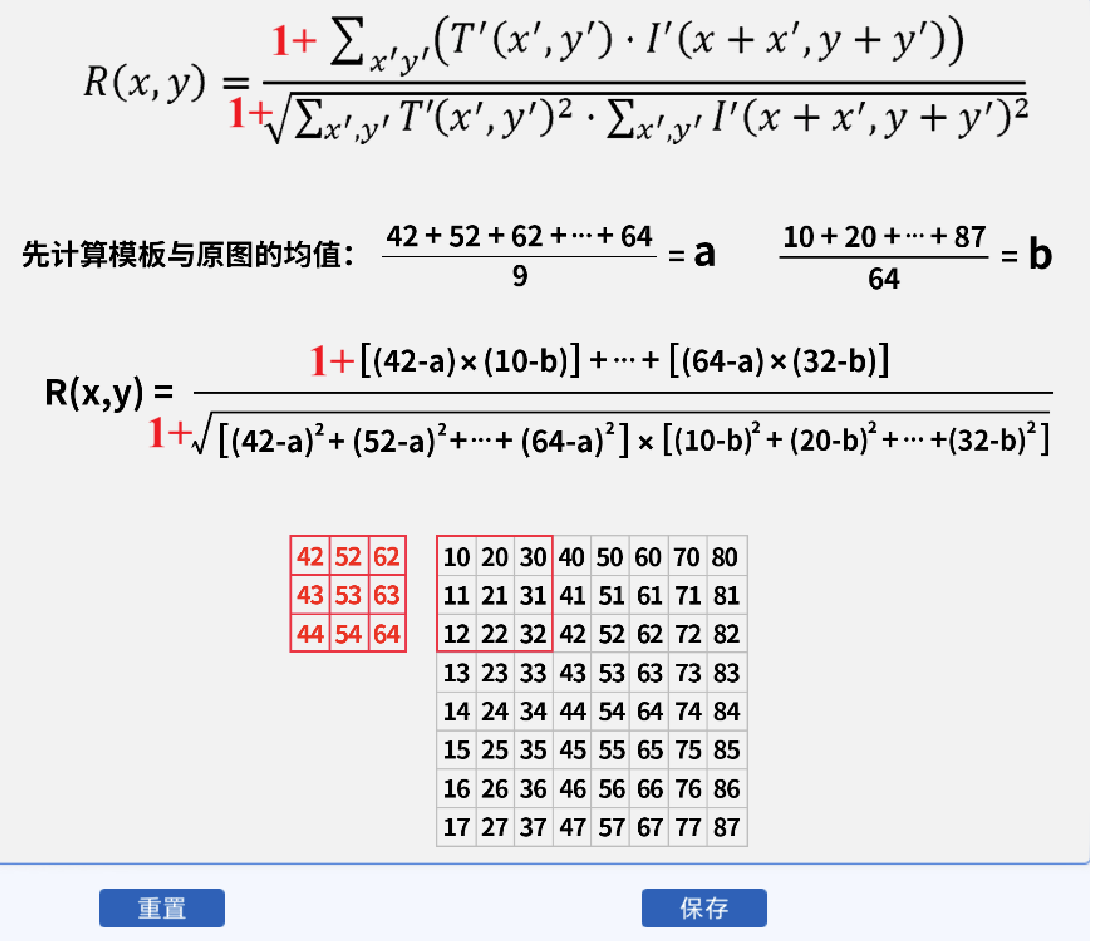
代码
import cv2
import numpy as npif __name__ == '__main__':# 1. 图片输入path = 'ctrl.jpg'image_np = cv2.imread(path)# 2. 灰度化(原图)image_np_gray = cv2.cvtColor(image_np, cv2.COLOR_BGR2GRAY)# 3. 模板输入path = 'basketball.jpg'template = cv2.imread(path)# 4. 灰度化(模板)template_gray = cv2.cvtColor(template, cv2.COLOR_BGR2GRAY)# 5. 模板匹配# 获得模板宽高h = template_gray.shape[0]w = template_gray.shape[1]print(h, w)# 模板匹配算法res = cv2.matchTemplate(image_np_gray,  # 原始图像template_gray,  # 模板cv2.TM_CCOEFF_NORMED  # 归一化相关系数)print(res)# 找到最大值:完美篮球print(res.max())# 设定阈值threshold = 0.9# 认为小于阈值的是匹配成功loc = np.where(res > threshold)print(loc)print(len(loc))# 6. 绘制轮廓for x, y in zip(loc[1], loc[0]):print('坐标:', (x, y))# 画框cv2.rectangle(img=image_np,pt1=(x, y),pt2=(x + w, y + h),color=(0, 0, 255),thickness=2)# 6. 图片输出cv2.imshow('image_np', image_np)cv2.waitKey(0)
