nVidia Tesla P40使用anaconda本地重编译pytorch3d成功加载ComfyUI-3D-Pack
背景
自己用的是nVidia Tesla P40,垃圾佬专属卡
使用下面的由YanWenKun提供的ComfyUI-3D-Pack预安装环境,但在本地编译pytorch3d这一步出错,后面有出错信息,如果有和我一样的卡一样的问题,参看此文的解决方法
老版本的ComfyUI-3D-Pack预集成包
https://github.com/YanWenKun/ComfyUI-Windows-Portable
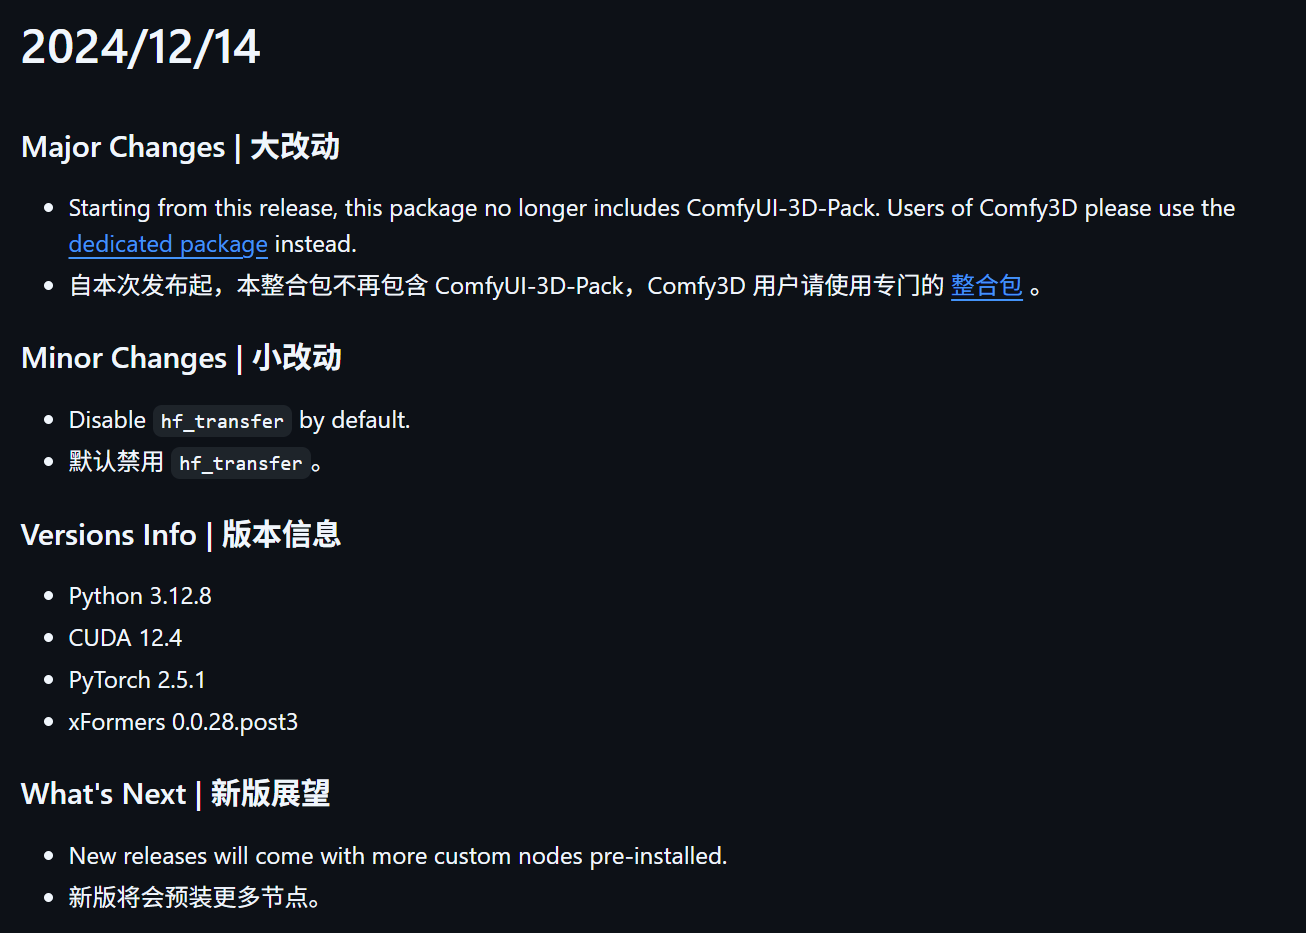
2024/12/14后切换到新仓库
https://github.com/YanWenKun/Comfy3D-WinPortable
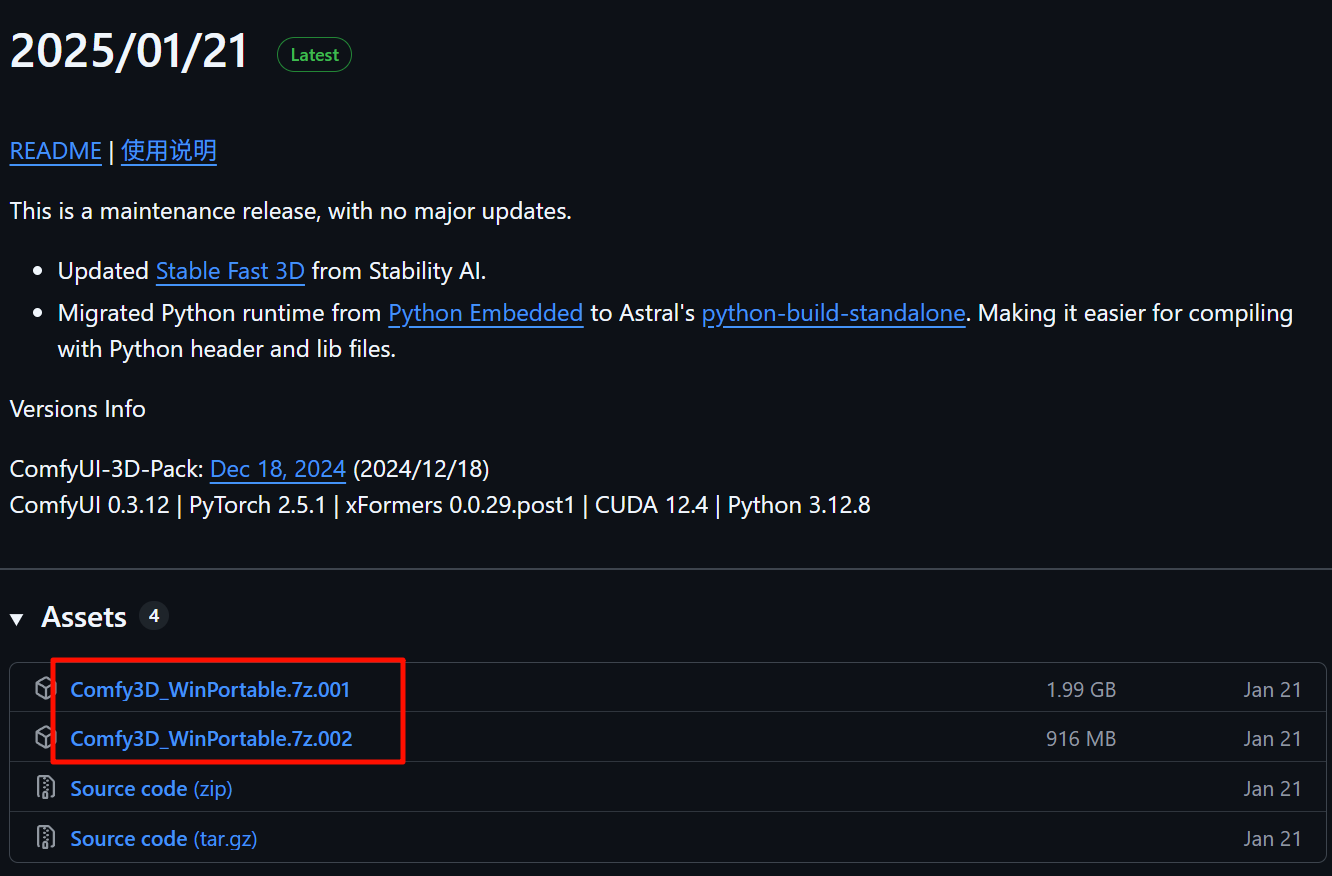
我使用的预集成包的版本是2025/1/21
https://github.com/YanWenKun/Comfy3D-WinPortable/releases
解压后目录结构如下:
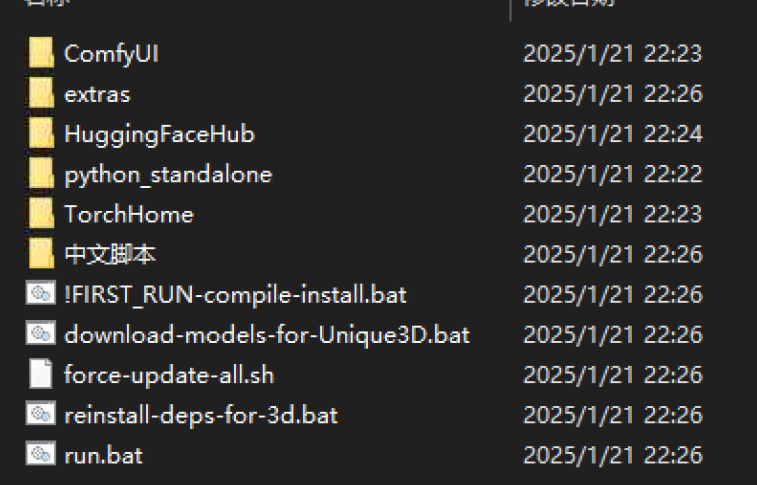
其中的python_standalone目录就是预安装完的库,包括独立的python环境
对于首次需要本地编译的TORCH_CUDA_ARCH_LIST的参数,
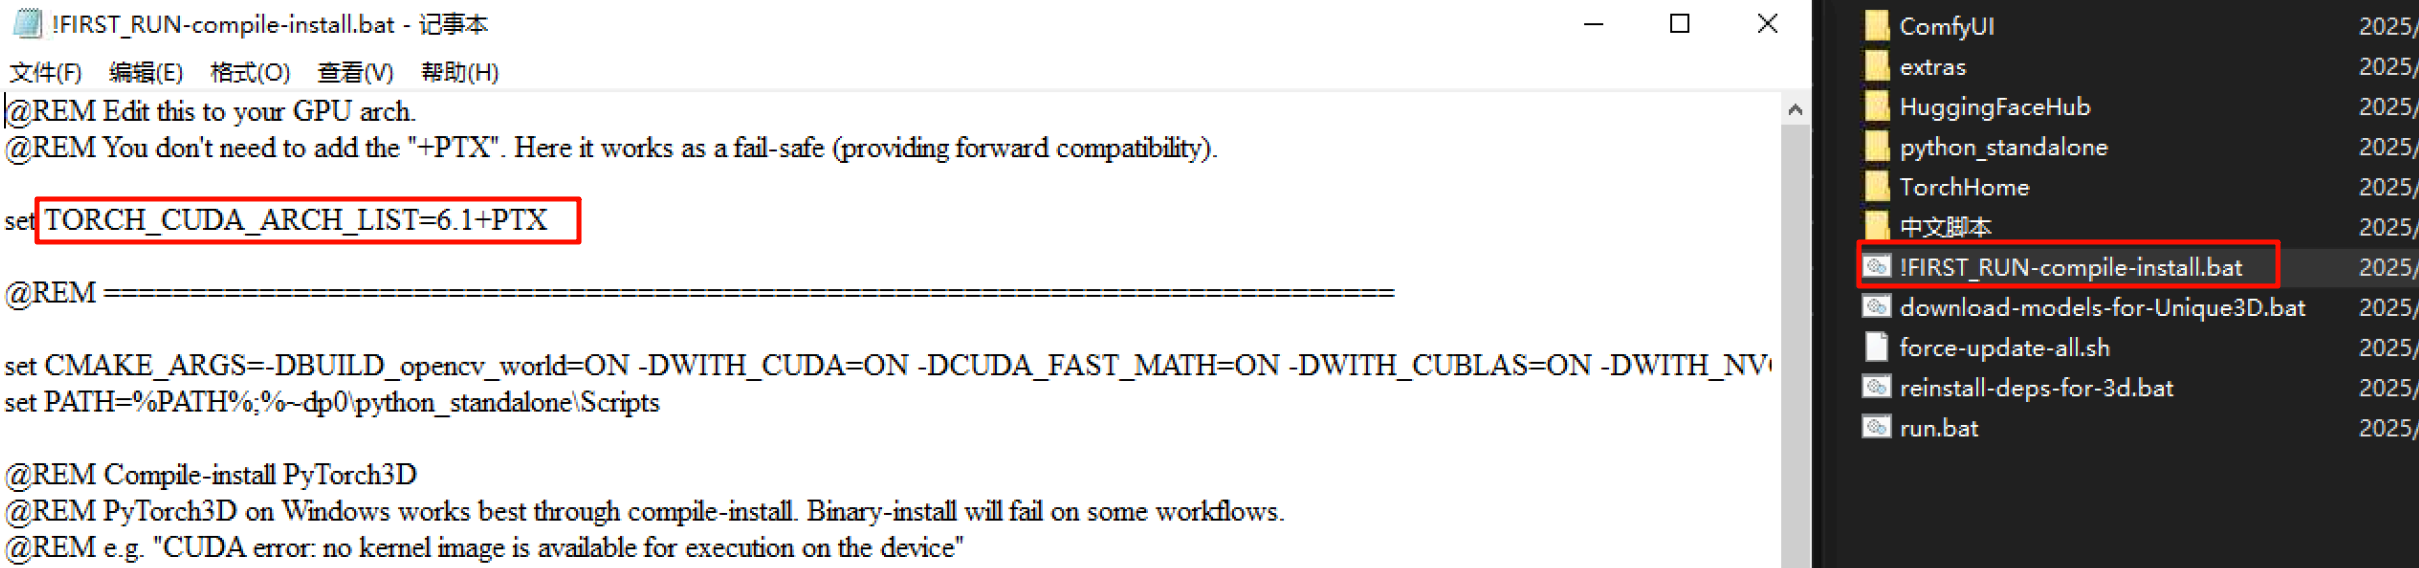
我的Tesla P40查显卡根据架构编号查资料需要设置为6.1,和bat文件内默认的设置相同
set TORCH_CUDA_ARCH_LIST=6.1
架构编号查看链接如下:
https://arnon.dk/matching-sm-architectures-arch-and-gencode-for-various-nvidia-cards/
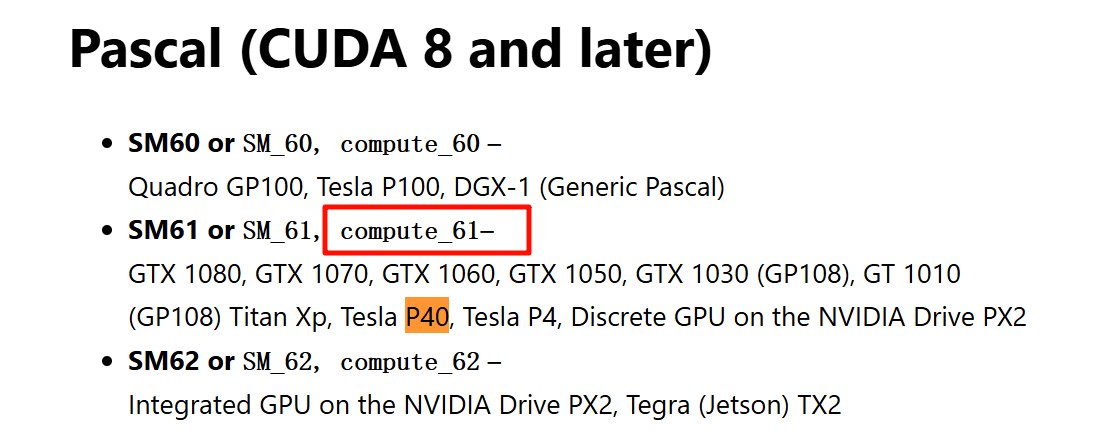
在我的3070上按下面B站UP主啦啦啦的小黄瓜详细的步骤是可以成功的,但是P40就一直在编译pytorch3d的部分失败
3070的根据架构编译参数是8.6
无奈只能自己用anaconda重新构建一个python环境,这样可以方便的用于不同python环境版本的环境切换
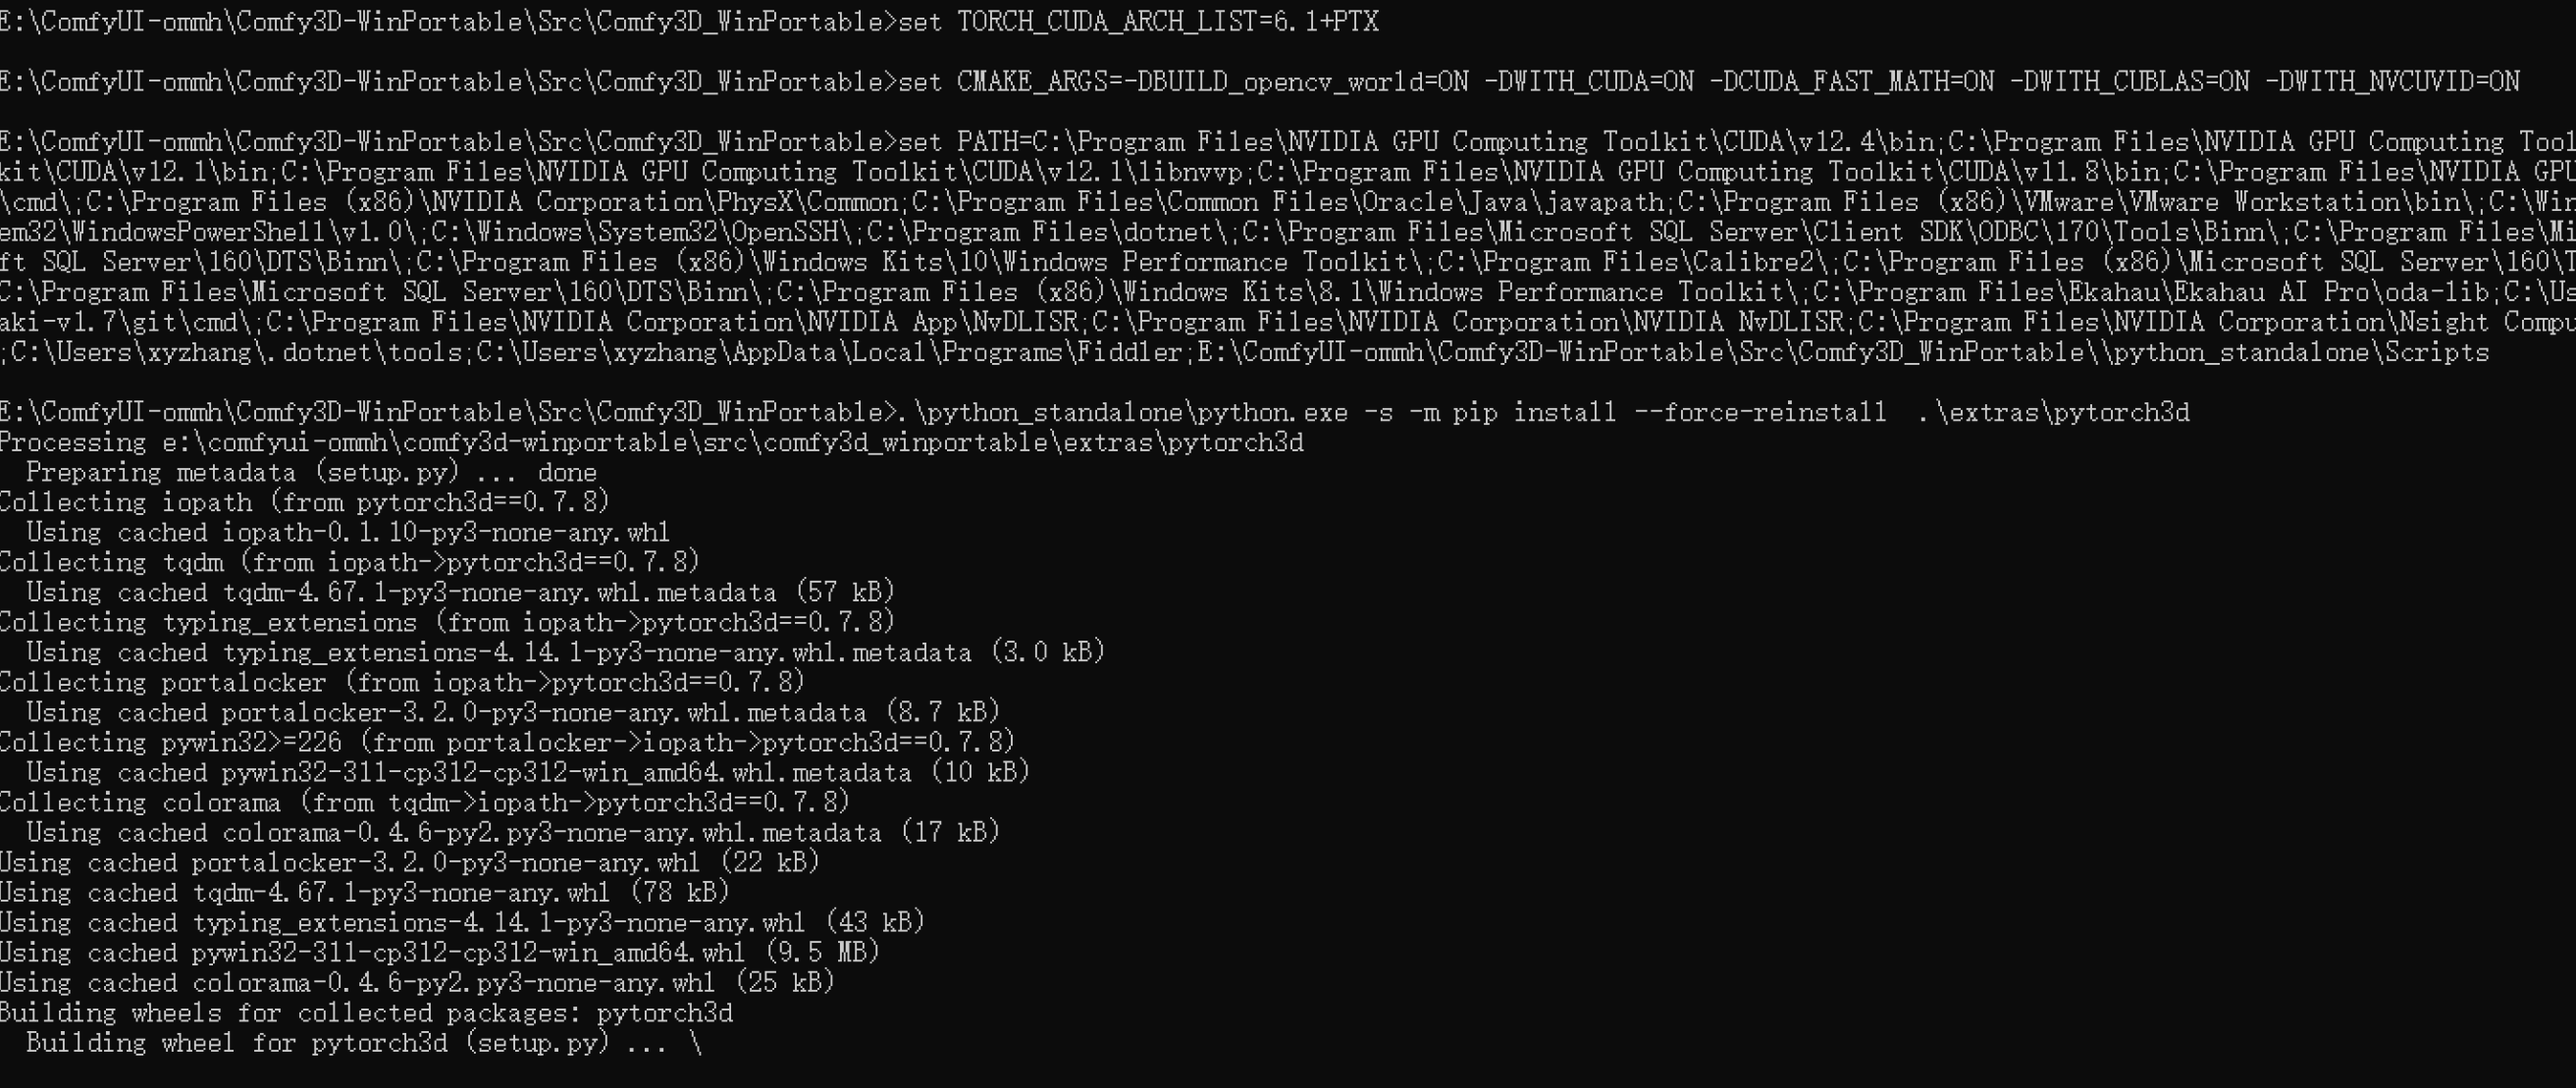
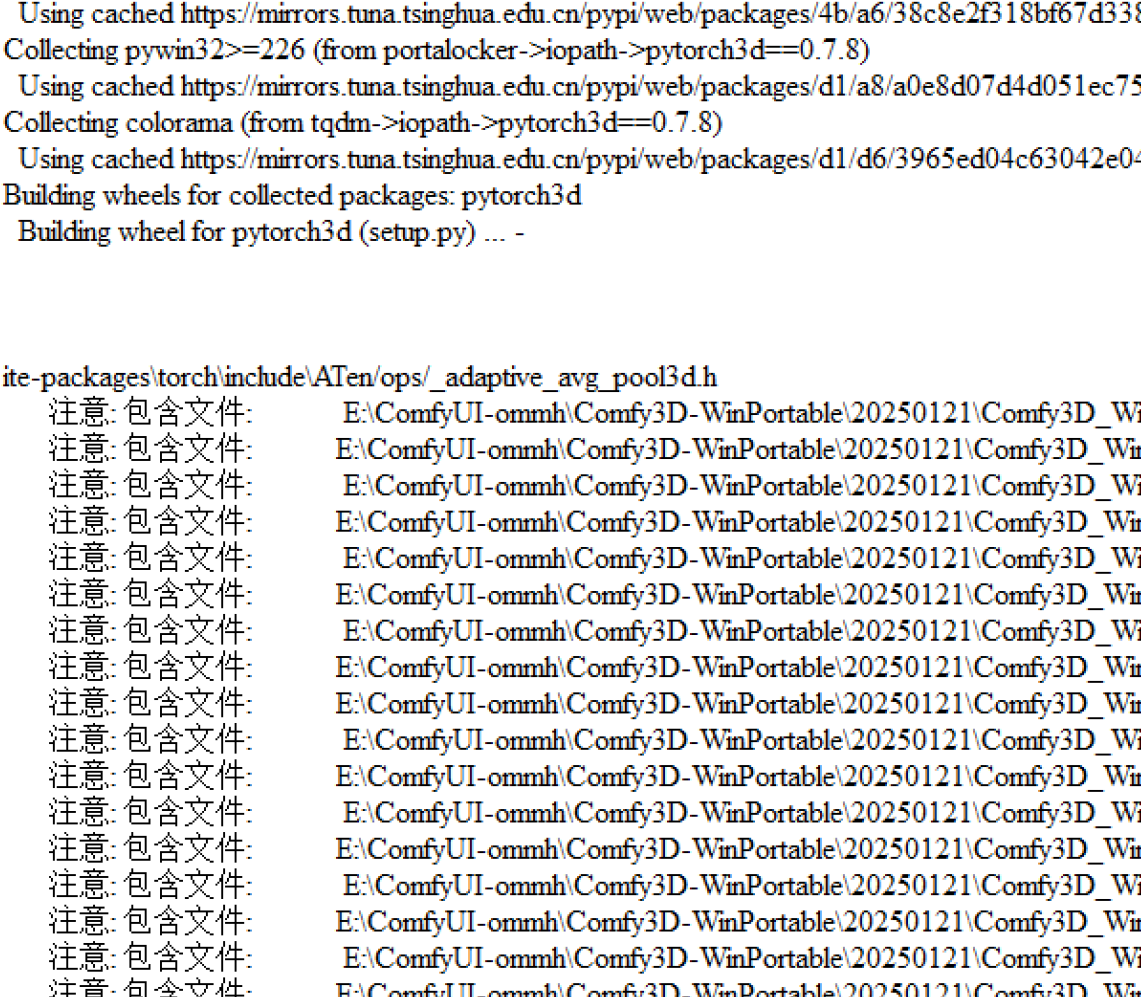
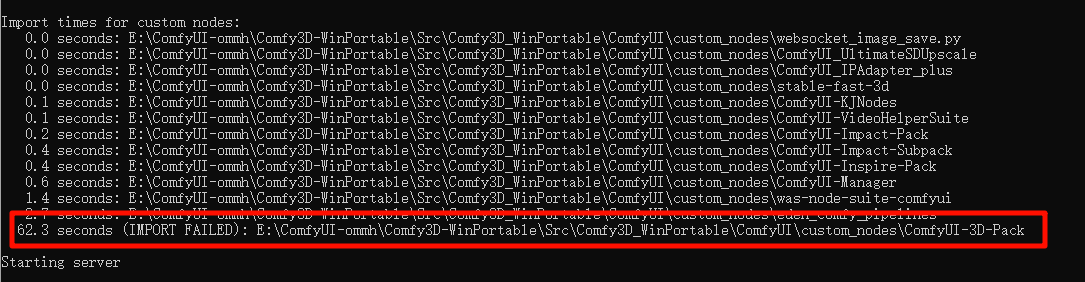
编译pytorch3d时的错误信息如下:
出错信息
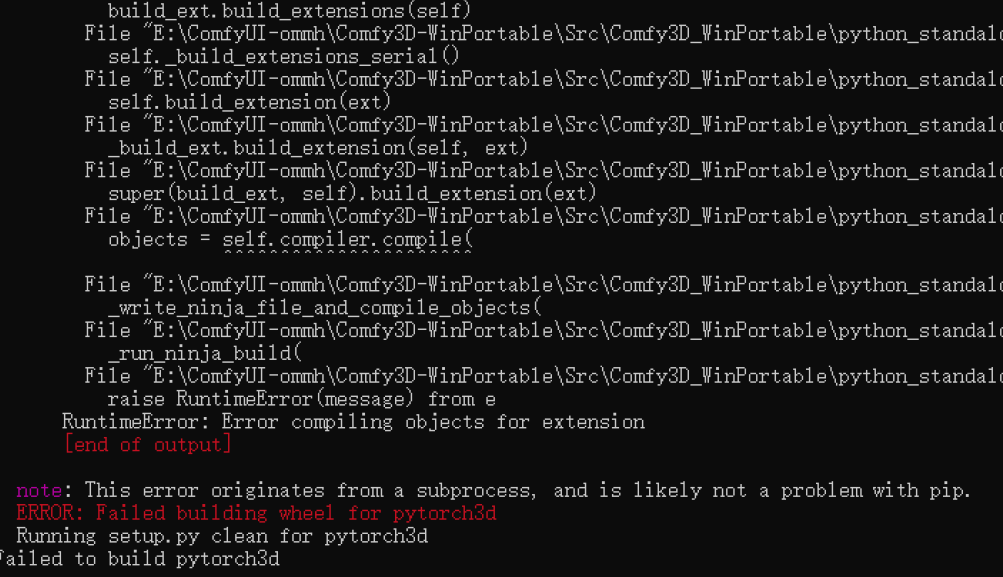
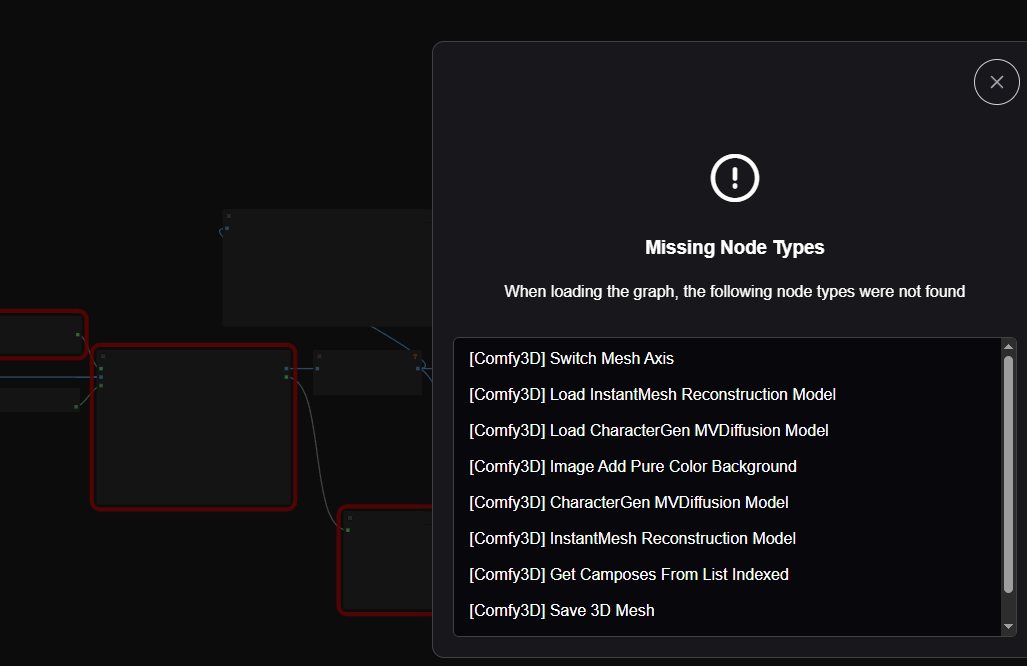
最终编译出错,导致comyui-3d-pack import failed,其他几个必须本地编译的库都可以正常
ComfyUI-3D-Pack节点加载失败
解决思路
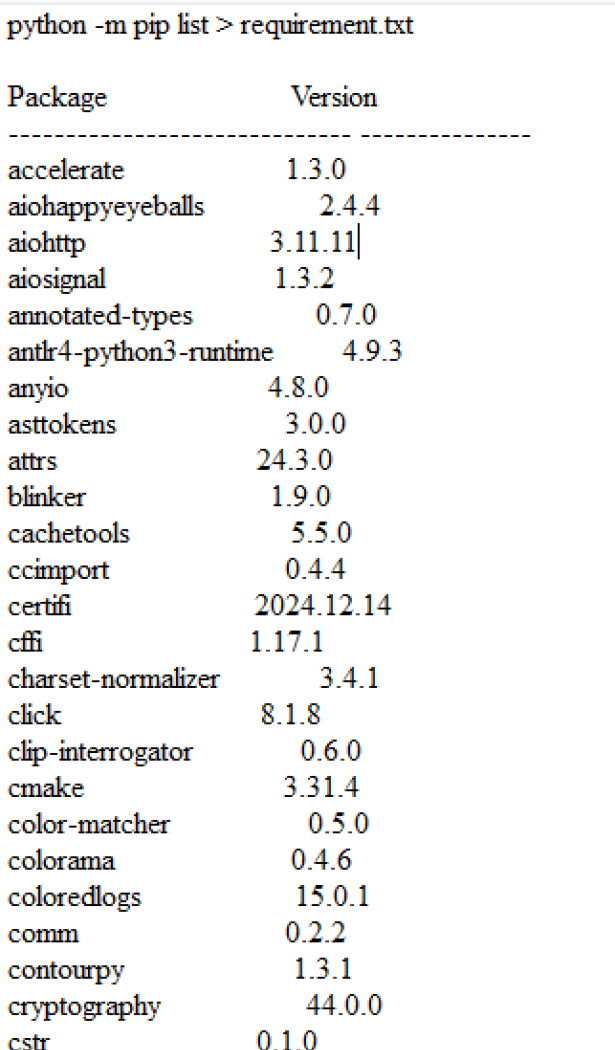
步骤1、获取预安装包的python_standalone里的python环境,确定所需要的每一个python库的版本
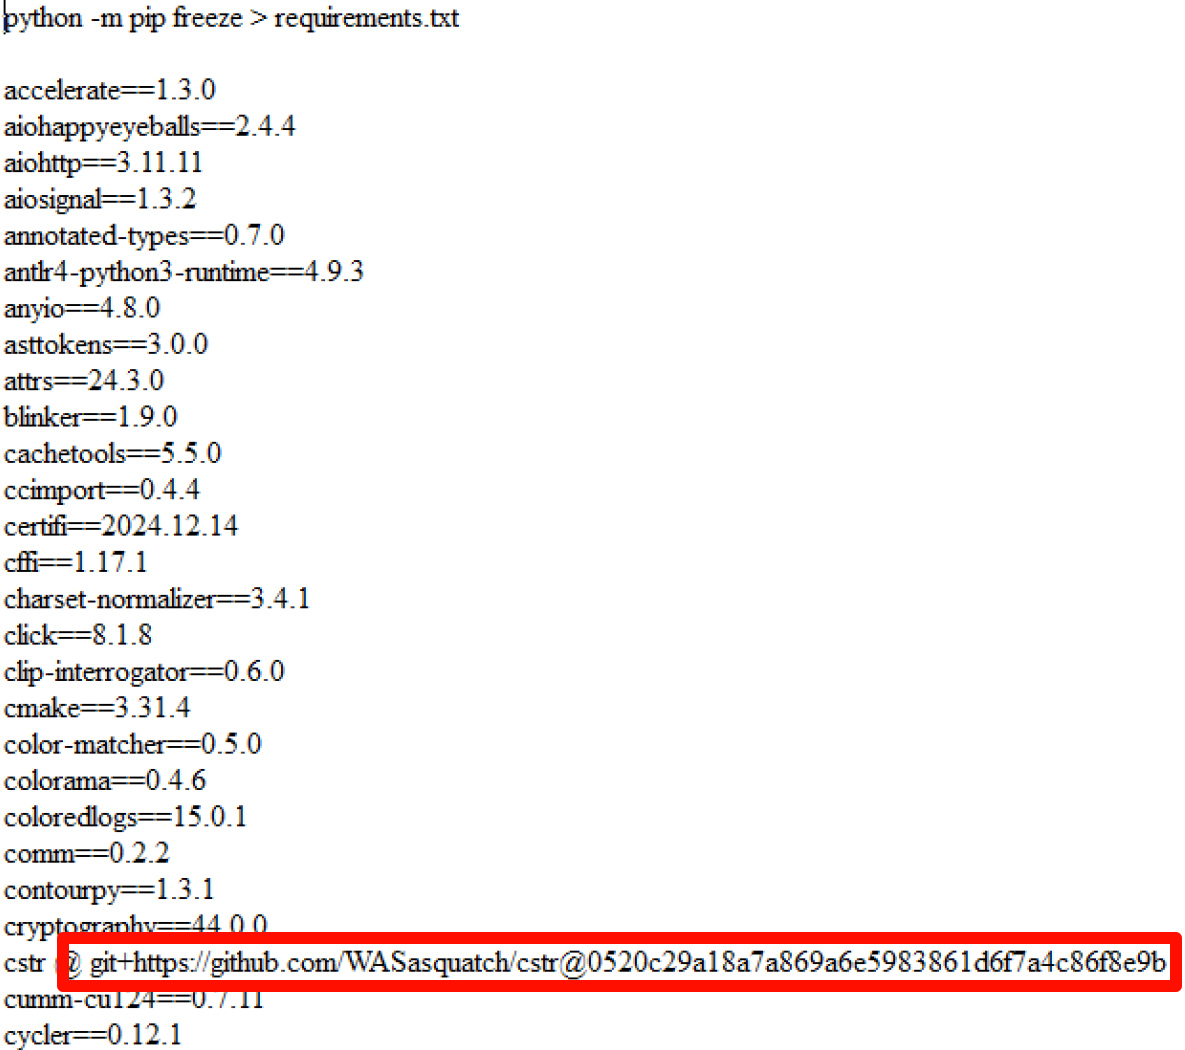
方法是在解压后的预安装环境中使用 python -m pip list > requirement.txt 导出只有版本号
使用 python -m pip freeze > requirement.txt 导出,还带有预安装环境构建时的安装方式
步骤2、使用anaconda构建一个完全相同的python环境
将所有的python库分成如下几种安装方式,按顺序在conda环境中进行安装:
- 直接pip install 库==版本号 方式安装的
- 需要添加cuda版本进行选择安装方式 安装命令最后需要加上相应的torch cuda链接的
- 使用预构建包 whl文件安装的
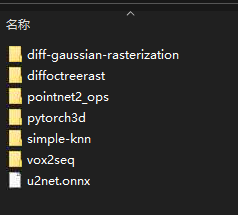
- 必须本机编译安装的(构造包里extra目录下的除 pytorch3d外的5个)
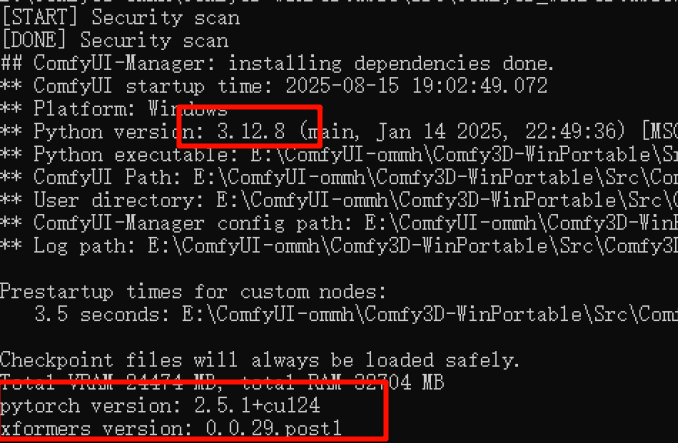
几个关键的版本号
- Python – 3.12.8
- Pytorch – 2.5.1
- Cuda – 12.4
- xformers – 0.0.29.post1
本文基础
需要在操作系统中已经成功安装完成如下环境,这部分内容不在本文讨论范围
-
cuda 12.4
-
cudnn 复制库函数到上面的cuda目录
-
VS build环境 包括VC++库 WinSDK
-
anaconda环境 相当于自动包括了所有的python版本
系统环境需要注意的几点
-
显卡驱动cuda版本可以高于用的cuda库的版本
-
如果需要安装多个cuda库的版本,从最低版本的开始安装
-
cudnn需要验证邮箱,B站上有提供百度网盘下载,直接目录覆盖cuda即可
程序员小袁
https://www.bilibili.com/video/BV1eBRvYKEXS/ -
我使用的是YanWenKun 2025/1/25的版本,git上下载很困难,容易断线还不能续传,使用了B站UP
啦啦啦的小黄瓜
https://www.bilibili.com/video/BV1cPPqe6Egb/
提供的夸克盘
https://pan.quark.cn/s/ef8c64027412
使用conda创建环境的步骤
我安装的是anacoda
https://www.anaconda.com/download
Anaconda3-2025.06-0-Windows-x86_64.exe
conda环境切换,回到上一个环境
conda deactivate
–如果需要删除旧的conda env
conda env remove -n pytorch3d_replica -y
创建conda env 指定python版本为3.12.8,按照ComfyUI-3D-Pack对python版本的要求一致
python 3.12.8 torch2.5.1 cuda12.4
conda create -n ComfyUI-3D-Pack python=3.12.8 -y
conda activate ComfyUI-3D-Pack
E:
cd E:\ComfyUI-ommh\env\
–安装可以直接pip install的包,限定特定版本,会冲突的后面再用单独的命令安装,两个命令选一个
pre_requirement.txt 文件是我导出的所有可以直接用pip install 方式安装的python包
从原始导出包中去掉了含cuda的,使用wheel的,通过git+http://下载的,需要编译的(尤其是pytorch3d)
pip install -r pre_requirement.txt --force-reinstall -i https://pypi.tuna.tsinghua.edu.cn/simple/
pip install -r pre_requirement.txt -i https://pypi.tuna.tsinghua.edu.cn/simple/
由预编译WHL包安装的 全部共6个 文末有提供下载
其中4个从github下载的whl
dlib @ https://github.com/eddiehe99/dlib-whl/releases/download/v19.24.6-alpha/dlib-19.24.6-cp312-cp312-win_amd64.whl#sha256=69f7cad674c25ab6784d76225a5d3f2f0827528ca228ec3eb3da8f7b8c8e3fd1
texture_baker @ https://github.com/YanWenKun/Comfy3D-WinPortable/releases/download/r7-wheels/texture_baker-0.0.1-cp312-cp312-win_amd64.whl#sha256=e5fe916b25281ec0ef9f8016339bfa32358772253c7b17344b8f38f193afece8
triton @ https://github.com/woct0rdho/triton-windows/releases/download/v3.1.0-windows.post7/triton-3.1.0-cp312-cp312-win_amd64.whl#sha256=d713dfad3672f0ff36bcbe37e73019f95be70de61056b9d178419dba6886f90c
uv_unwrapper @ https://github.com/YanWenKun/Comfy3D-WinPortable/releases/download/r7-wheels/uv_unwrapper-0.0.1-cp312-cp312-win_amd64.whl#sha256=36135e16d051ec44efb1be39f60e1b767faf4550c98848513635410790292519
其中2个从Comfy3D-WinPortable下载预编译wheel 需要根据python版本 torch版本 cuda版本进行选择
下载地址
https://github.com/MrForExample/Comfy3D_Pre_Builds/tree/main/_Build_Wheels/_Wheels_win_py312_torch2.5.1_cu124
kiui @ file:///D:/a/Comfy3D-WinPortable/Comfy3D-WinPortable/pt25-cu124/Comfy3D_Pre_Builds/_Build_Wheels/_Wheels_win_py312_torch2.5.1_cu124/kiui-0.2.14-py3-none-any.whl#sha256=6276853933b6f47e0fd3d0c80b3108357dcbd373a3f14766c5485963302825c8
nvdiffrast @ file:///D:/a/Comfy3D-WinPortable/Comfy3D-WinPortable/pt25-cu124/Comfy3D_Pre_Builds/_Build_Wheels/_Wheels_win_py312_torch2.5.1_cu124/nvdiffrast-0.3.3-py3-none-any.whl#sha256=245c0cb214c2502841f5c6f8f269b7850c07b535231e7b23de67ed3ddfe1e395
首先安装nvdiffrast
nvdiffrast需要的numpy等级高需要先安装 然后降回1.26.4 重装别的包
cd .\wheel
pip install --force-reinstall nvdiffrast-0.3.3-py3-none-any.whl
装完nvdiffrast会报错,因为0.3.3的nvdiffrast会导致numpy版本升级到2,报错的信息为部分lib需要numpy版本为1
其次重装对numpy版本要求为1.26.4的包
pip install --force-reinstall numpy==1.26.4
pip install gpytoolbox==0.3.3
pip install numba==0.61.0
最后安装剩下的5个预安装包,通过在预安装的环境下使用python -m pip freeze > requirements.txt导出
pip install --force-reinstall dlib-19.24.6-cp312-cp312-win_amd64.whl
pip install --force-reinstall kiui-0.2.14-py3-none-any.whl
pip install --force-reinstall texture_baker-0.0.1-cp312-cp312-win_amd64.whl
pip install --force-reinstall triton-3.1.0-cp312-cp312-win_amd64.whl
pip install --force-reinstall uv_unwrapper-0.0.1-cp312-cp312-win_amd64.whl
不需要本地重新编译的,可以直接从git通过pip install进行安装
pip install git+https://github.com/WASasquatch/cstr.git@0520c29a18a7a869a6e5983861d6f7a4c86f8e9b
pip install git+https://github.com/WASasquatch/ffmpy.git@f000737698b387ffaeab7cd871b0e9185811230d
pip install git+https://github.com/WASasquatch/img2texture.git@d6159abea44a0b2cf77454d3d46962c8b21eb9d3
pip install git+https://github.com/EasternJournalist/utils3d.git@3e124377f4adde34e443804cd44fb1d4bbb88ac0
–安装完成后的版本号
cstr 0.1.0 @ git+https://github.com/WASasquatch/cstr@0520c29a18a7a869a6e5983861d6f7a4c86f8e9b
ffmpy 0.3.0 @ git+https://github.com/WASasquatch/ffmpy.git@f000737698b387ffaeab7cd871b0e9185811230d
img2texture 1.0.6 @ git+https://github.com/WASasquatch/img2texture.git@d6159abea44a0b2cf77454d3d46962c8b21eb9d3
utils3d 0.0.2 @ git+https://github.com/EasternJournalist/utils3d.git@3e124377f4adde34e443804cd44fb1d4bbb88ac0
需要命令行选择CUDA版本进行安装的 在这里会把torch版本降下来 前面安装完后 torch是2.8
pip install torch==2.5.1 torchvision==0.20.1 torchaudio==2.5.1 xformers==0.0.29.post1 -f https://mirrors.aliyun.com/pytorch-wheels/cu124pip install torch-scatter -f https://data.pyg.org/whl/torch-2.5.1+cu124.html
pip install torch-scatter -f https://mirrors.tuna.tsinghua.edu.cn/pytorch-geometric/whl/torch-2.5.1+cu124.htmlpip install kaolin==0.17.0 -f https://nvidia-kaolin.s3.us-east-2.amazonaws.com/torch-2.5.1_cu124.html
pytorch3d库
这个库必须进行编译安装的,安装顺序在最后必须在上面2项的torch安装完成后才能进行,关键步骤在此,至少我的P40只能通过这种方式才能顺利编译成功,环境参数里是使用的wheel库安装的,但批处理里是最后重编译安装的,这里我是通过git clone拉取的pytorch3d包,没有使用压缩包里的extra目录下的
pytorch3d @ file:///D:/a/Comfy3D-WinPortable/Comfy3D-WinPortable/pt25-cu124/Comfy3D_Pre_Builds/_Build_Wheels/_Wheels_win_py312_torch2.5.1_cu124/pytorch3d-0.7.8-cp312-cp312-win_amd64.whl#sha256=656bcf0cb666301b06e1ee9ef52542fea2907b06f711858ba6b974729e4640a5
必须用下面的方法编译安装 checkout出的是0.7.8的版本
git clone https://github.com/facebookresearch/pytorch3d.git
cd ..\pytorch3d
git checkout 50f8efaset TORCH_CUDA_ARCH_LIST=6.1
set FORCE_CUDA=1
set CMAKE_ARGS=-DBUILD_opencv_world=ON -DWITH_CUDA=ON -DCUDA_FAST_MATH=ON -DWITH_CUBLAS=ON -DWITH_NVCUVID=ONpip install -e .
– 编译安装耗时极长,10几分钟
Running setup.py develop for pytorch3d-------------------------- ------------- 2/3 [pytorch3d]
其他5个包必须通过本地编译安装,最后安装,这5个extras的包在extra目录里直接复制出来使用
cd..
pip install --force-reinstall .\extras\pointnet2_ops
pip install --force-reinstall .\extras\simple-knn
pip install --force-reinstall .\extras\diff-gaussian-rasterization
pip install --force-reinstall .\extras\vox2seq
pip install .\extras\diffoctreerast
该组件用于 Triplane Gaussian
pointnet2_ops 3.0.0 @ file:///E:/ComfyUI-ommh/Comfy3D-WinPortable/20250121/Comfy3D_WinPortable/extras/pointnet2_ops
该组件用于 Gaussian Splatting
simple_knn 0.0.0 @ file:///E:/ComfyUI-ommh/Comfy3D-WinPortable/20250121/Comfy3D_WinPortable/extras/simple-knn
Differential Gaussian Rasterization
diff_gaussian_rasterization 0.0.0 @ file:///E:/ComfyUI-ommh/Comfy3D-WinPortable/20250121/Comfy3D_WinPortable/extras/diff-gaussian-rasterization
vox2seq
vox2seq 0.0.0 @ file:///E:/ComfyUI-ommh/Comfy3D-WinPortable/20250121/Comfy3D_WinPortable/extras/vox2seq
Differential Octree Rasterization
diffoctreerast 0.0.0 @ file:///E:/ComfyUI-ommh/Comfy3D-WinPortable/20250121/Comfy3D_WinPortable/extras/diffoctreerast
确保使用 NumPy 1.26.4的版本
pip install --force-reinstall numpy==1.26.4
修改启动批处理程序的内容
在原来的启动bat文件前增加如下:
@echo off
:: 替换为你的 Anaconda 安装路径
set ANACONDA_PATH=C:\ProgramData\anaconda3\condabin:: 调用 conda.bat 激活环境
call "%ANACONDA_PATH%\conda.bat" activate ComfyUI-3D-Pack
这里的ComfyUI-3D-Pack是我设置的conda环境的名字
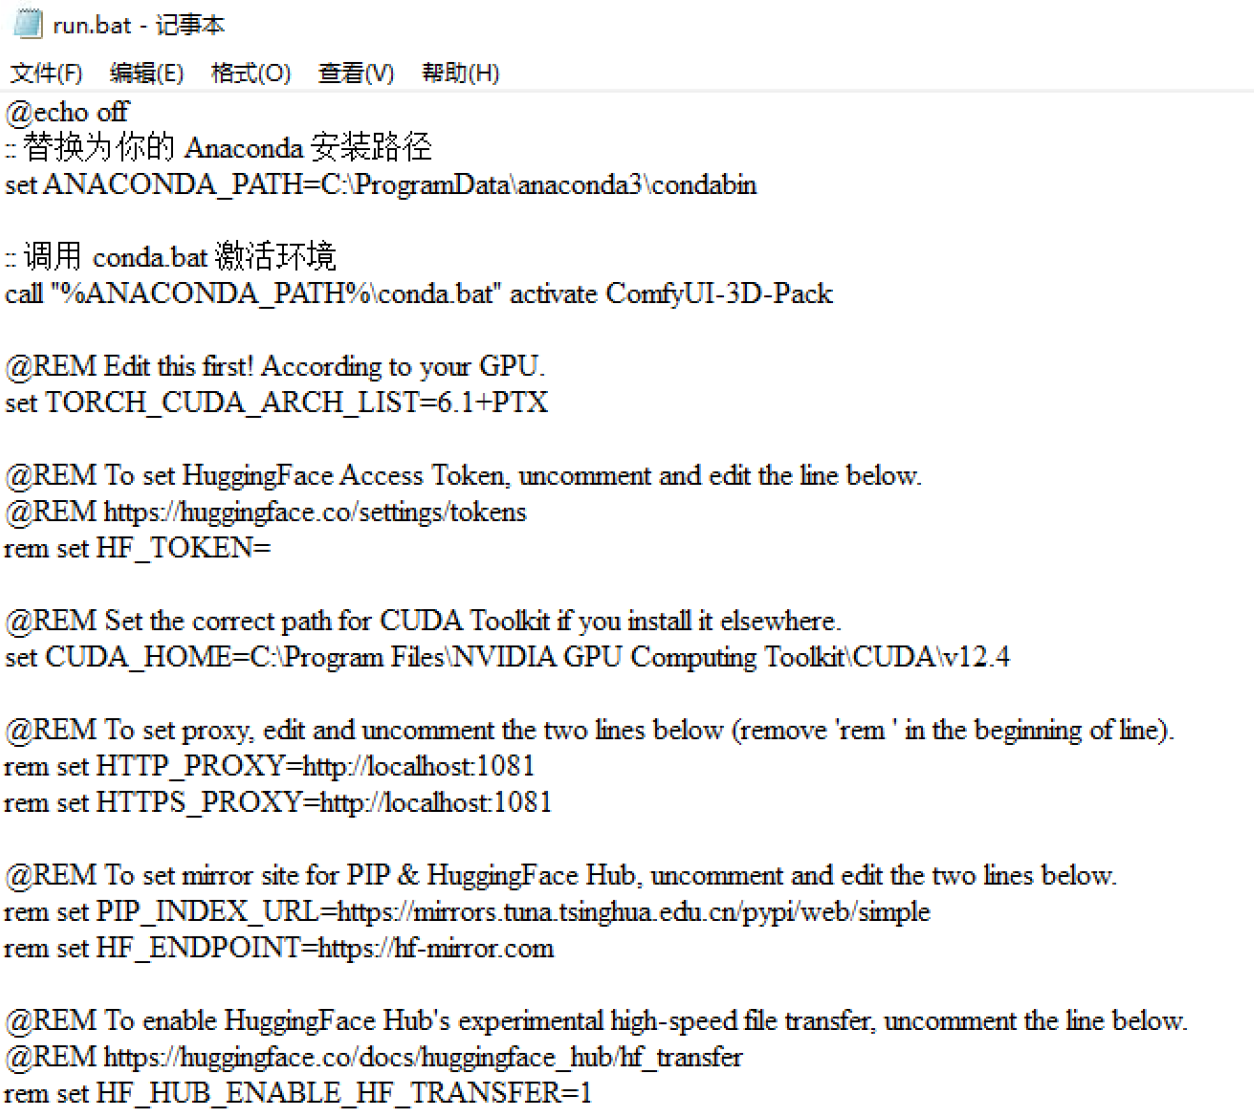
由于使用了anaconda的环境,因此原始目录里的 python_standalone目录也可以删除了
批处理里相应的部分也需要对应修改
还需要在原来的comfyui里增加运行参数:
--disable-cuda-malloc
这个必须增加,不然ComfyUI-3D-Pack依然导入失败,其他参数看个人

成功加载了ComfyUI-3D-Pack的custom_nodes, 不再是imported failed

复制一个环境
命令行
conda create --name 新环境名称 --clone 被复制环境名称
即可,这样一台电脑上就可以共存多个python环境了,用于运行不同的需求的工作流变得很方便,可以在不同的端口上启用对环境要求不相同的工作流
相关下载
文件下载
https://download.csdn.net/download/coldwind811201/91681082