企业级高性能WEB服务器Nginx
nginx安装
1.nginx编译安装
#在nginx官网获取安装包
[root@webserver mnt]# wget https://nginx.org/download/nginx-1.24.0.tar.gz#解压安装包
[root@webserver mnt]# tar zxf nginx-1.24.0.tar.gz
[root@webserver mnt]# cd nginx-1.24.0/#安装编译nginx需要的环境软件
[root@webserver mnt]# dnf install gcc pcre-devel zlib-devel openssl-devel -y	#创建运行nginx的用户,-M不指定家目录
[root@webserver nginx-1.24.0]# useradd -s /sbin/nologin -M nginx
[root@webserver nginx-1.24.0]# ls
auto  CHANGES  CHANGES.ru  conf  configure  contrib  html  LICENSE  man  README  src#配置编译环境
[root@webserver nginx-1.24.0]# ./configure --prefix=/usr/local/nginx \	#指定安装路径
--user=nginx \ 														# 指定nginx运行用户
--group=nginx \ 													# 指定nginx运行组
--with-http_ssl_module \ 											# 支持https://
--with-http_v2_module \ 											# 支持http版本2
--with-http_realip_module \ 										# 支持ip透传
--with-http_stub_status_module \ 									# 支持状态页面
--with-http_gzip_static_module \ 									# 支持压缩
--with-pcre \	 													# 支持正则
--with-stream \ 													# 支持tcp反向代理
--with-stream_ssl_module \ 											# 支持tcp的ssl加密
--with-stream_realip_module 										# 支持tcp的透传ip#开始编译
[root@webserver nginx-1.24.0]# make#安装nginx
[root@webserver nginx-1.24.0]# make install#完成安装以后,有四个主要的目录
[root@webserver nginx-1.24.0]# ls /usr/local/nginx/
client_body_temp  conf  fastcgi_temp  html  logs  proxy_temp  sbin  scgi_temp  uwsgi_temp
#conf	保存nginx所有的配置文件目录
#html	保存nginx服务器的web文件
#logs	保存nginx服务器访问日志错误日志等
#sbin	保存nginx二进制启动脚本
2.添加nginx到环境变量
[root@webserver nginx-1.24.0]# echo export PATH=$PATH:/usr/local/nginx/sbin/ >> ~/.bash_profile
#使新添加的参数生效
[root@webserver nginx-1.24.0]# source ~/.bash_profile
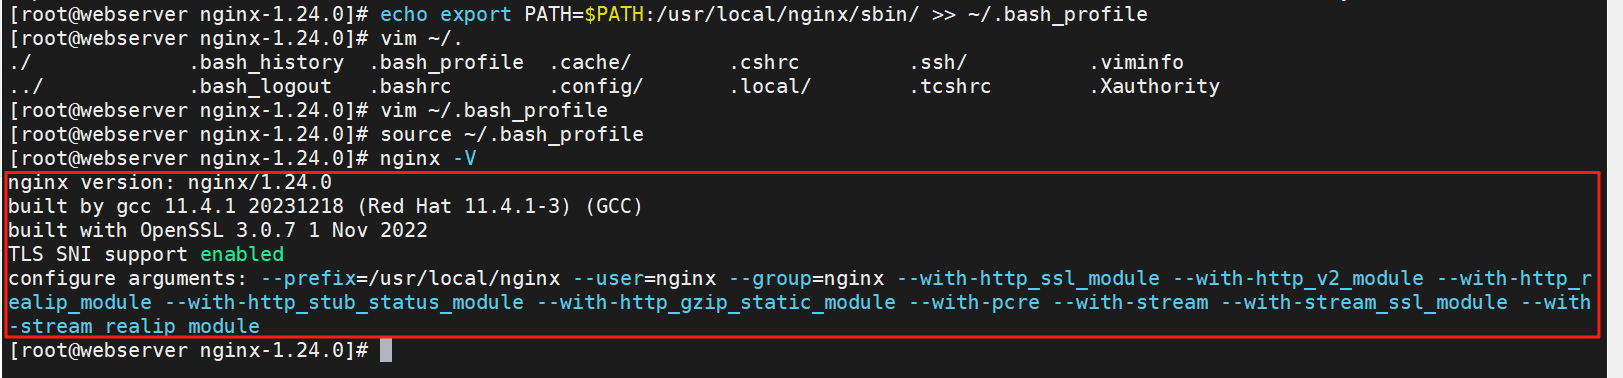
#验证版本及编译参数
[root@webserver nginx-1.24.0]# nginx -V
3.平滑升级和回滚
nginx的平滑升级与回滚是在不重启服务的情况下来操作,避免正在访问的服务中断
1.编译要升级版本
#对要升级的版本进行编译
[root@nginx mnt]# tar zxf nginx-1.26.1.tar.gz
[root@nginx mnt]# cd nginx-1.26.1/
[root@nginx nginx-1.26.1]# ls
auto  CHANGES  CHANGES.ru  conf  configure  contrib  html  LICENSE  man  README  src
#关闭编译时的显示的调试信息
[root@nginx nginx-1.26.1]# vim auto/cc/gcc
# debug
#CFLAGS="$CFLAGS -g"
#修改HTTP响应头信息的server软件信息
[root@nginx nginx-1.26.1]# vim src/core/nginx.h
#define NGINX_VERSION      "6.6.6"
#define NGINX_VER          "fjw/" NGINX_VERSION
[root@nginx nginx-1.26.1]# ./configure --prefix=/usr/local/nginx --user=nginx --group=nginx --with-http_ssl_module --with-http_v2_module --with-http_realip_module --with-http_stub_status_module --with-http_gzip_static_module --with-pcre --with-stream --with-stream_ssl_module --with-stream_realip_module
[root@nginx nginx-1.26.1]# make
2. 平滑升级
#切换到二进制启动脚本目录,进行平滑升级
[root@nginx ~]# cd /usr/local/nginx/sbin/#对旧版本进行备份
[root@nginx sbin]# cp nginx nginx.old#把要升级的新版本拷贝过来
[root@nginx sbin]# /bin/cp -f /mnt/nginx-1.26.1/objs/nginx /usr/local/nginx/sbin/nginx
[root@nginx sbin]# ll
total 11156
-rwxr-xr-x 1 root root 5746872 Jul 25 01:08 nginx
-rwxr-xr-x 1 root root 5671480 Jul 25 01:05 nginx.old
[root@nginx sbin]# ps aux | grep nginx
root 42282 0.0 0.0 9876 2052 ? Ss 01:10 0:00 nginx: master process
nginx 42283 0.0 0.1 14208 4996 ? S 01:10 0:00 nginx: worker process
root 42287 0.0 0.0 221664 2176 pts/0 S+ 01:10 0:00 grep --color=auto #-USR2对旧nginx进行平滑升级,重载生成新进程
[root@nginx sbin]# kill -USR2 42282 #旧nginx,masterPID
[root@nginx sbin]# ps aux | grep nginx
root 42282 0.0 0.0 9876 2436 ? Ss 01:10 0:00 nginx: master process
nginx 42283 0.0 0.1 14208 4996 ? S 01:10 0:00 nginx: worker process
root 42288 0.0 0.1 9876 6528 ? S 01:13 0:00 nginx: master process
nginx 42289 0.0 0.1 14208 4996 ? S 01:13 0:00 nginx: worker process
root 42291 0.0 0.0 221664 2176 pts/0 S+ 01:13 0:00 grep --color=auto #-WINCH回收旧nginx也是masterPID
[root@nginx sbin]# kill -WINCH 42283
[root@nginx sbin]# ps aux | grep nginx
root 42282 0.0 0.0 9876 2436 ? Ss 01:10 0:00 nginx: master process
root 42288 0.0 0.1 9876 6528 ? S 01:13 0:00 nginx: master process
nginx 42289 0.0 0.1 14208 4996 ? S 01:13 0:00 nginx: worker process
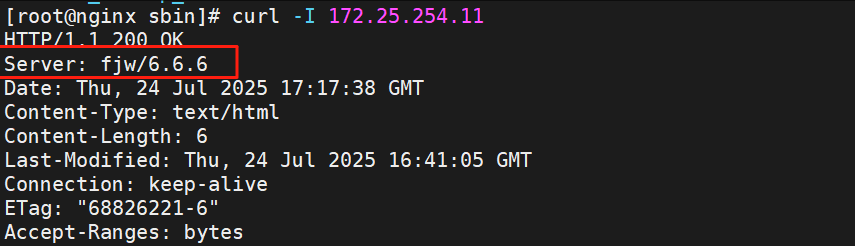
root 42294 0.0 0.0 221664 2176 pts/0 S+ 01:14 0:00 grep --color=auto #查看版本,新版本生效
[root@nginx sbin]# nginx -V
nginx version: fjw/6.6.6
......
测试
[root@nginx sbin]# curl -I 172.25.254.11
#如果旧版本的进程没用的话就可以kill -9删除了
[root@nginx sbin]# kill -9 42283
3.版本回滚
#对nginx版本进行回滚
#如果发现升级后新版本有问题,可以重新垃圾旧版本的worker
[root@nginx sbin]# cp nginx nginx.new
[root@nginx sbin]# ls
nginx nginx.new nginx.old
[root@nginx sbin]# mv nginx.old nginx
mv: overwrite 'nginx'? y
[root@nginx sbin]# ls
nginx nginx.new
#重新拉起旧版本nginx的worker
[root@nginx sbin]# kill -HUP 42282 #master
#回收新版本的worker
[root@nginx sbin]# kill -WINCH 42288 #master的pid
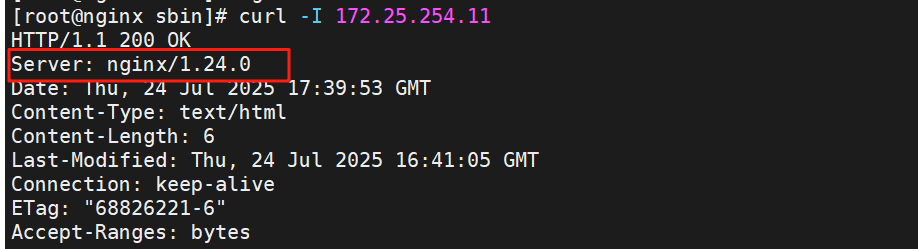
[root@nginx sbin]# nginx -V
nginx version: nginx/1.24.0
测试
[root@nginx sbin]# curl -I 172.25.254.11
#如果新版本的进程没用的话就可以kill -9删除了
[root@nginx sbin]# kill -9 4228
4.nginx生成启动文件systemd
生成systemd可以实现开机自启动
#百度搜索模板
systemd site:nginx.org    #搜索内容 site:搜索网址[root@webserver ~]# cd /lib/systemd/system
[root@webserver system]# vim nginx.service
[Unit]
Description=The NGINX HTTP and reverse proxy server
After=syslog.target network.target remote-fs.target nss-lookup.target[Service]
Type=forking
PIDFile=/usr/local/nginx/logs/nginx.pid			#指定nginx启动的pid
ExecStartPre=/usr/local/nginx/sbin/nginx -t		#指定nginx -t检查配置文件命令
ExecStart=/usr/local/nginx/sbin/nginx			#指定nginx启动命令
ExecReload=/bin/kill -s HUP $MAINPID
ExecStop=/bin/kill -s QUIT $MAINPID
PrivateTmp=true[Install]
WantedBy=multi-user.target#使编写的配置生效
[root@webserver system]# systemctl daemon-reload
#在启动时要确保nginx已经关闭不然会冲突导致报错
[root@webserver system]# systemctl enable --now nginx
nginx核心配置详解
1.nginx主配置文件说明
主配置文件结构:四部分
main block:主配置段,即全局配置段#事件驱动相关的配置
event {
...
}#http/https 作为web服务器相关配置段
http {
...
}#默认配置文件不包括下面两个部分
#mail 作为邮件服务器相关配置段
mail {
...
}#stream 反向代理相关配置段
stream {
...
}
2.全局配置参数
默认打开全局配置参数
3.events配置参数
[root@nginx ~]# vim /usr/local/nginx/conf/nginx.conf
events {worker_connections  100000;		#单个工作进程最大并发数use epoll;						#使用epoll机制来实现高并发
}									#Nginx支持众多的事件驱动,#比如:select、poll、epoll,只能设置在events模块中设置
4.http块配置参数
http块是Nginx服务器配置中的重要部分,缓存、代理和日志格式定义等绝大多数功能和第三方模块都可以在这设置,http块可以包含多个server块,而一个server块中又可以包含多个location块。
[root@nginx ~]# vim /usr/local/nginx/conf/nginx.conf
http {#在响应报文中将指定的文件扩展名映射至MIME对应的类型include       mime.types;				#可以识别文本,图像,音频,视频等其他的数据default_type  application/octet-stream;	#没有识别的默认类型,例如php,ngxin不识别需要安装php才能渲染呈现log_format  main  '$remote_addr - $remote_user [$time_local] "$request" ''$status $body_bytes_sent "$http_referer" ''"$http_user_agent" "$http_x_forwarded_for"';access_log  logs/access.log  main;		#使用定义为main的日志格式,存放在根目录的logs/access.log中sendfile        on;						#零拷贝功能,sendfile系统调用在两个文件描述符之间直接传递数据(完全在内核中操作)#tcp_nopush     on;#keepalive_timeout  0;keepalive_timeout  65;					#长连接超时时间,单位是s#gzip  on;								#开启压缩功能server {#web服务配置}include "/usr/local/nginx/conf.d/*.conf";	#导入其他路径的配置文件,子配置文件#要放在默认发布文件目录下,不然会覆盖默认
}
5.核心配置示例
1.nginx的高并发配置
#编辑配置文件设置参数
[root@nginx ~]# vim /usr/local/nginx/conf/nginx.conf
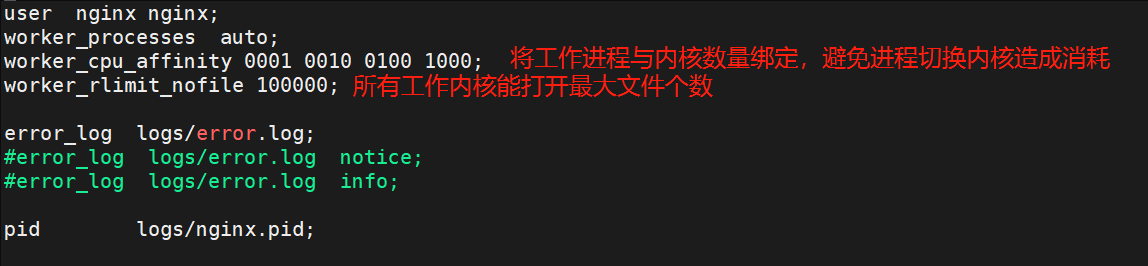
user nginx nginx;
worker_processes auto;
worker_cpu_affinity 0001 0010 0100 1000;
worker_rlimit_nofile 100000; #设置每个工作进程最大能打开的文件个数,此参数要与系统级别的最大打开文件数相同要与ulimit -n的个数相同error_log logs/error.log;
#error_log logs/error.log notice;
#error_log logs/error.log info;pid logs/nginx.pid;events {worker_connections 100000; #设置单个工作进程最大并发数use epoll;
}#设置系统的每个进程打开的最大打开文件数
[root@nginx ~]# vim /etc/security/limits.conf
* - nofile 100000 #打开文件最大个数
* - nproc 100000 #打开程序最大个数
[root@nginx ~]# ulimit -n 100000 #设置当前或者重启shell
[root@nginx ~]# ulimit -n #查看个数
100000#安装apache工具包中的压力测试工具ab
[root@webserver ~]# dnf install httpd-tools -y
#-n总请求数 -c每次并发数
[root@webserver ~]# ab -n 100000 -c 5000 http://172.25.254.10/index.html2.识别php文件为text/html类型
[root@nginx ~]# vim /usr/local/nginx/html/index.php
<?phpphpinfo()
?>
[root@nginx ~]# curl -I 172.25.254.10/index.php
HTTP/1.1 200 OK
Server: nginx/1.26.1
Date: Sun, 03 Aug 2025 12:31:48 GMT
Content-Type: application/octet-stream			#php不属于mime类型中,所以使用默认
Content-Length: 23
Last-Modified: Sun, 03 Aug 2025 11:17:36 GMT
Connection: keep-alive
ETag: "688f4550-17"
Accept-Ranges: bytes[root@Nginx ~]# vim /usr/local/nginx/conf/nginx.conf
default_type text/html;
[root@nginx ~]# curl -I 172.25.254.10/index.php
HTTP/1.1 200 OK
Server: nginx/1.26.1
Date: Sun, 03 Aug 2025 12:35:22 GMT
Content-Type: text/html							#将识别类型改为text/html
Content-Length: 23
Last-Modified: Sun, 03 Aug 2025 11:17:36 GMT
Connection: keep-alive
ETag: "688f4550-17"
Accept-Ranges: bytes[root@Nginx ~]# vim /usr/local/nginx/conf/nginx.conf
default_type test/php;
[root@nginx ~]# curl -I 172.25.254.10/index.php
HTTP/1.1 200 OK
Server: nginx/1.26.1
Date: Sun, 03 Aug 2025 12:35:22 GMT
Content-Type: test/php								#可以自定义将识别不出来的设为想要的类型
Content-Length: 23
Last-Modified: Sun, 03 Aug 2025 11:17:36 GMT
Connection: keep-alive
ETag: "688f4550-17"
Accept-Ranges: bytes
3.基于域名的web站点发布
#创建基于域名的发布根目录
[root@nginx ~]# mkdir /web/html -p
#生成发布文件
[root@nginx ~]# echo index.html > /web/html/index.html
#创建子配置目录
[root@nginx ~]# mkdir /usr/local/nginx/conf.d
#创建子配置文件
[root@nginx ~]# vim /usr/local/nginx/conf.d/vhosts.conf
server {listen 80;server_name www.fy.org;root /web/html;index index.html;
}#添加本地解析
[root@nginx ~]# vim /etc/hosts
[root@nginx ~]# nginx -t
[root@nginx ~]# nginx -s reload
#测试
[root@nginx ~]# curl www.fy.org
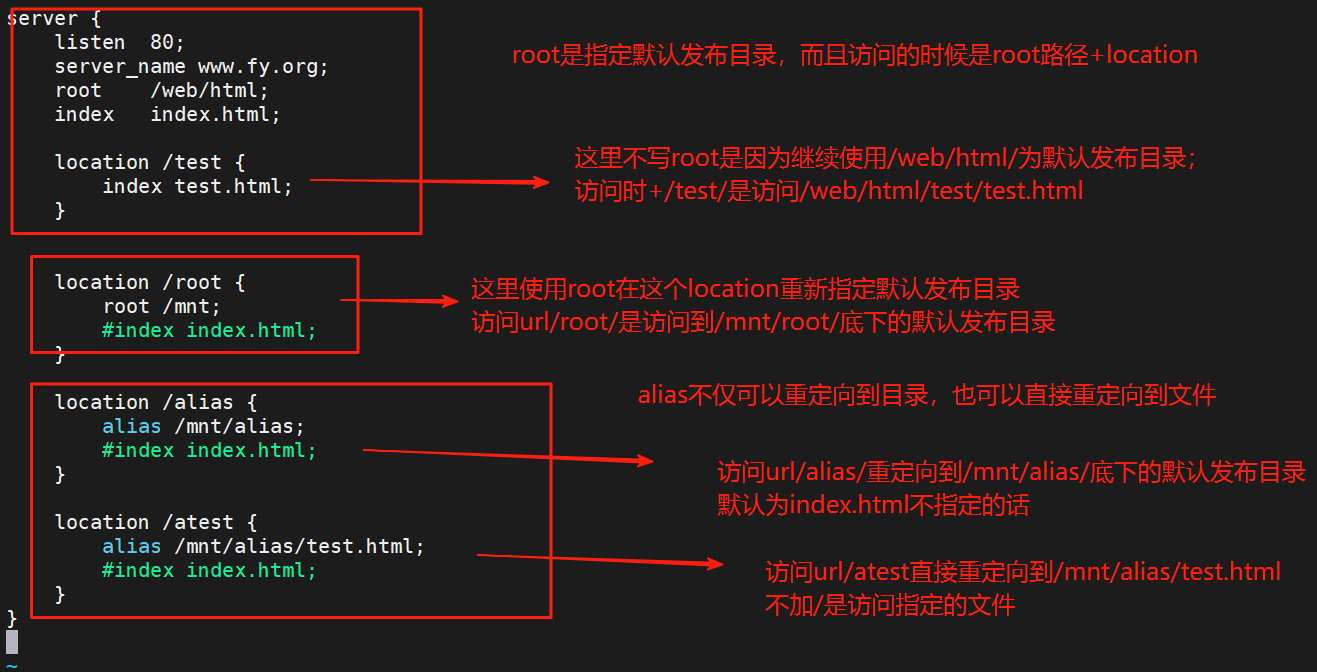
index.html4.root和alias
-
root:指定web的家目录,在定义location的时候,文件的绝对路径等于 root+location
-
alias:定义路径别名,会把访问的路径重新定义到其指定的路径,文档映射的另一种机制;仅能用于 location上下文,此指令使用较少
测试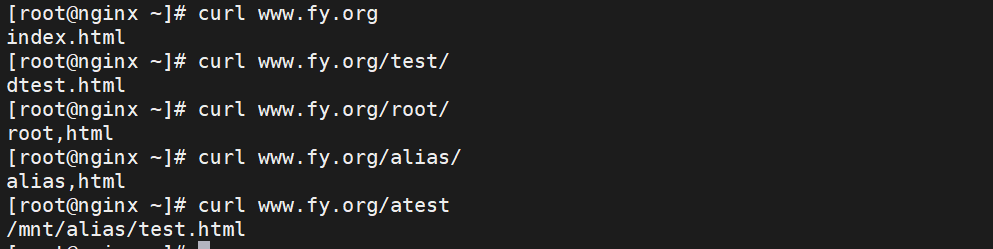
补充
[root@nginx ~]# vim /usr/local/nginx/conf.d/vhosts.conf
location /fjw {root /mnt;}#当location后面/跟的是一个文件时,直接访问的是/mnt/fjw这个文件
测试
[root@nginx ~]# echo 11 > /mnt/fjw
[root@nginx ~]# curl www.fy.org/fjw
11
5.location的详细使用
location是用于匹配请求 URI(统一资源标识符)的核心配置指令,它可以根据不同的 URI 路径设置不同的处理规则(如反向代理、静态文件访问、重定向等)。
修饰符与匹配规则
Nginx 的`location`匹配遵循 “优先匹配特定规则,再匹配通用规则”的原则,不同修饰符对应不同的优先级(从高到低排序):
| 修饰符 | 名称 | 匹配规则 | 优先级 |
|---|---|---|---|
= | 精确匹配 | 仅匹配与匹配路径完全一致的 URI。 | 最高 |
^~ | 前缀匹配(优先) | 匹配以匹配路径为前缀的 URI,且一旦匹配成功,不再检查其他正则匹配,区分大小写,也包含正则。 | 次高 |
| 无 | 一般匹配(普通) | 匹配以匹配路径为前缀的 URI,但优先级低于正则匹配,不识别正则表达式。 | 较低 |
~ | 正则匹配(区分大小写) | 按正则表达式匹配 URI,区分大小写。 | 较高 |
~* | 正则匹配(不区分大小写) | 按正则表达式匹配 URI,不区分大小写(如匹配.html和.HTML)。 | 较高 |
#匹配优先级从高到低:
"=" > "^~" > "~/~*",不带符号
1.示例-精准匹配
[root@nginx ~]# vim /usr/local/nginx/conf.d/vhosts.conf
server {listen  80;server_name www.fy.org;root    /web/html;index   index.html;location = /test {return 200 "punct = \n";	#returun 200.只要访问/test无论是否存在都会返回200存在成功,并输出"punct = \n"}
}#测试
[root@nginx ~]# curl www.fy.org/test
punct =[root@nginx ~]# curl www.fy.org/test1
<html>
<head><title>404 Not Found</title></head>[root@nginx ~]# curl www.fy.org/1test
<html>
<head><title>404 Not Found</title></head>
<body>
<center><h1>404 Not Found</h1></center>
2.示例-正则前缀匹配
[root@nginx ~]# vim /usr/local/nginx/conf.d/vhosts.conf
server {listen  80;server_name www.fy.org;root    /web/html;index   index.html;#   location = /test {
#       return 200 "punct = \n";
#   }location ^~ /test {return 200 "punct = ^~\n";}
}#测试
[root@nginx ~]# curl www.fy.org/test
punct = ^~
[root@nginx ~]# curl www.fy.org/test/a/b
punct = ^~
[root@nginx ~]# curl www.fy.org/testc
punct = ^~
[root@nginx ~]# curl www.fy.org/aatestc
\<html>
<head><title>404 Not Found</title></head>
<body>
<center><h1>404 Not Found</h1></center>
<hr><center>nginx/1.26.1</center>
</body>
</html>
[root@nginx ~]# curl www.fy.org/TEST		#区分大小写
<html>
<head><title>404 Not Found</title></head>
<body>
<center><h1>404 Not Found</h1></center>
<hr><center>nginx/1.26.1</center>
</body>
</html>
3.示例-正则匹配(区分大小写)
[root@nginx ~]# vim /usr/local/nginx/conf.d/vhosts.conf
server {listen  80;server_name www.fy.org;root    /web/html;index   index.html;#   location = /test {
#       return 200 "punct = \n";
#   }#   location ^~ /test {
#       return 200 "punct = ^~\n";
#   }location ~ /test {return 200 "punct = ~\n";}
}#测试
[root@nginx ~]# curl www.fy.org/test
punct = ~
[root@nginx ~]# curl www.fy.org/testa
punct = ~
[root@nginx ~]# curl www.fy.org/test/a/
punct = ~
[root@nginx ~]# curl www.fy.org/atest
<html>
<head><title>404 Not Found</title></head>
<body>
<center><h1>404 Not Found</h1></center>
<hr><center>nginx/1.26.1</center>
</body>
</html>
[root@nginx ~]# curl www.fy.org/a/test		#匹配的是url要加/
punct = ~
[root@nginx ~]# curl www.fy.org/a/TEST		#也区分大小写
<html>
<head><title>404 Not Found</title></head>
4.示例-正则匹配(不区分大小写)
[root@nginx ~]# vim /usr/local/nginx/conf.d/vhosts.conf
server {listen  80;server_name www.fy.org;root    /web/html;index   index.html;#   location = /test {
#       return 200 "punct = \n";
#   }#   location ^~ /test {
#       return 200 "punct = ^~\n";
#   }#   location ~ /test {
#       return 200 "punct = ~\n";
#   }location ~* /test {return 200 "punct = ~*\n";}
}#测试
#效果基本与正则匹配一致,只是不区分大小写
[root@nginx ~]# curl www.fy.org/test
punct = ~*
[root@nginx ~]# curl www.fy.org/TEST
punct = ~*
[root@nginx ~]# curl www.fy.org/a/TEST
punct = ~*
[root@nginx ~]# curl www.fy.org/aTEST
<html>
<head><title>404 Not Found</title></head>
5.示例-一般匹配
[root@nginx ~]# vim /usr/local/nginx/conf.d/vhosts.conf
server {listen  80;server_name www.fy.org;root    /web/html;index   index.html;#   location = /test {
#       return 200 "punct = \n";
#   }#   location ^~ /test {
#       return 200 "punct  ^~\n";
#   }#   location ~ /test {
#       return 200 "punct  ~\n";
#   }#   location ~* /test {
#       return 200 "punct  ~*\n";
#   }location /test {return 200 "punct \'\' \n";}
}#测试
#类似前缀匹配^~
[root@nginx ~]# curl www.fy.org/test
punct ''
[root@nginx ~]# curl www.fy.org/test/a
punct ''
[root@nginx ~]# curl www.fy.org/testa
punct ''
[root@nginx ~]# curl www.fy.org/atest
<html>
<head><title>404 Not Found</title></head>
[root@nginx ~]# curl www.fy.org/a/test/a
<html>
<head><title>404 Not Found</title></head>
6.示例-"\"的作用
[root@nginx ~]# vim /usr/local/nginx/conf.d/vhosts.conf
server {listen  80;server_name www.fy.org;root    /web/html;index   index.html;#   location = /test {
#       return 200 "punct = \n";
#   }#   location ^~ /test {
#       return 200 "punct  ^~\n";
#   }#   location ~ /test {
#       return 200 "punct  ~\n";
#   }#   location ~* /test {
#       return 200 "punct  ~*\n";
#   }#   location /test {
#       return 200 "punct \'\' \n";
#   }location ~* \.(png|JPG|CSS)$ {			#命中结尾的文件,且不区分大小写return 200 "punct ~\n";}
}#测试
[root@nginx ~]# curl www.fy.org/fjw.css
punct ~
[root@nginx ~]# curl www.fy.org/fjw.png
punct ~
[root@nginx ~]# curl www.fy.org/fjw.PNG
punct ~
[root@nginx ~]# curl www.fy.org/fjw
<html>
<head><title>404 Not Found</title></head>
7.示例-检测优先级
[root@nginx ~]# vim /usr/local/nginx/conf.d/vhosts.conf
server {listen  80;server_name www.fy.org;root    /web/html;index   index.html;location = /test {return 200 "=\n";}location ^~ /test {return 200 "^~\n";}location ~* /test {				#~*与~优先级一致,谁在上面谁优先级就高,区别就是~*区分大小写return 200 "~*\n";}location ~ /test {return 200 "~\n";}
}
#测试
[root@nginx ~]# curl www.fy.org/test
=
[root@nginx ~]# curl www.fy.org/testa
^~
[root@nginx ~]# curl www.fy.org/a/test
~
[root@nginx ~]# curl www.fy.org/a/TEST
~*
[root@nginx ~]# curl www.fy.org/TEST
~*
补充
#^~ 与 无符号 不能同时存在不然会报错只能存在其一
#由于无符号的前缀匹配优先级最低
server {listen  80;server_name www.fy.org;root    /web/html;index   index.html;location /test {return 200 "haha\n";			#优先级最低}location = /test {return 200 "=\n";}location ~ /test {return 200 "~\n";}location ~* /test {return 200 "~*\n";}
}
#测试
[root@nginx ~]# curl www.fy.org/test
=
[root@nginx ~]# curl www.fy.org/testa
~
[root@nginx ~]# curl www.fy.org/Testa
~*
#当把其他location注释后剩下无符号的前缀匹配才能生效
[root@nginx ~]# curl www.fy.org/test
haha
6.NginxWeb页面账户认证
#使用不了htpasswd时要下载httpd-tools包
#创建加密信息,-c创建,-m使用md5加密,-b非交互生成
[root@webserver ~]# htpasswd -cmb /usr/local/nginx/.httpasswd admin fjw
#进行创建后,想要添加用户认证信息不用加-c不用会覆盖
[root@webserver ~]# htpasswd -cm /usr/local/nginx/.httpasswd fjw yyy
[root@webserver ~]# vim /usr/local/nginx/conf.d/xixi.conf
[root@webserver ~]# cat /usr/local/nginx/.httpasswd
admin:$apr1$ZT2EvYbr$jnH/kOKG/kl7FhROtSsAn1
fjw:$apr1$V0/Pg44B$R63GtnSgfWH.ff0tEoTlf.
#生成测试文件
[root@webserver ~]# mkidr /web/login/index.html
[root@webserver ~]# echo login > /web/login/index.html[root@webserver ~]# vim /usr/local/nginx/conf.d/xixi.conf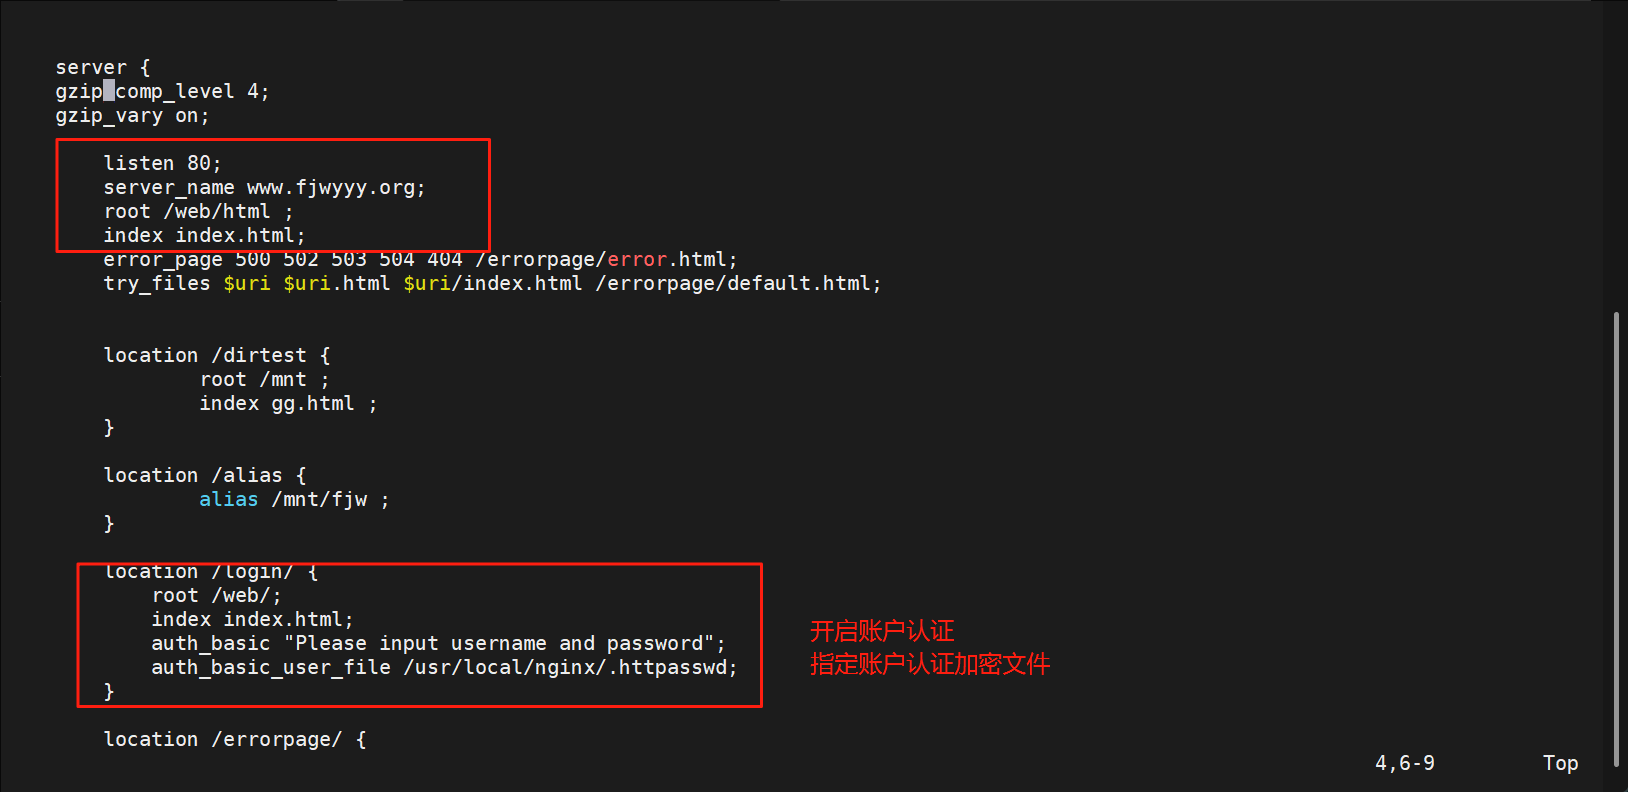
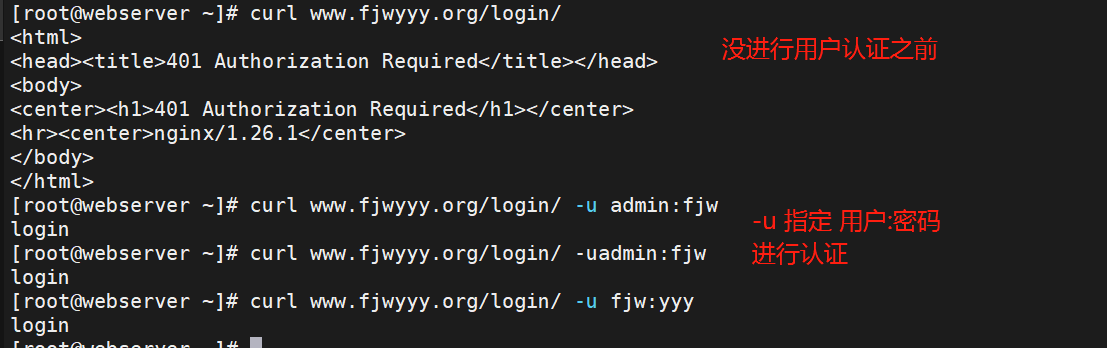
测试
7.自定义错误页面
#生成测试文件
[root@webserver ~]# mkdir /web/errorpage/error.html
[root@webserver ~]# echo errorerror /web/errorpage/error.html[root@webserver ~]# vim /usr/local/nginx/conf.d/xixi.conf
测试

补充
#也可不适用location+root来映射,可以直接使用绝对路径
server {listen  80;server_name www.fy.org;root    /web/html;index   index.html;error_page 500 502 503 504 404 /web/errorpage/error.html;	#使用绝对路径error_log   /usr/local/nginx/logs/fy.org.err;access_log  /usr/local/nginx/logs/fy.org.access;try_files $uri $uri.html $uri/index.html /web/errorpage/default.html;#   location /errorpage/ {
#       root /web/;
#   }
}
#测试效果一样
8.自定义错误日志
#通过自定义错误日志可以把基于域名的虚拟主机的访问日志跟真实主机的日志分开防止过于乱
[root@webserver ~]# vim /usr/local/nginx/conf.d/xixi.conf
测试
9.检测文件是否存在
-
try_files会按顺序检查文件是否存在,返回第一个找到的文件或文件夹(结尾加斜线表示为文件夹),如 果所有文件或文件夹都找不到,会进行一个内部重定向到最后一个参数。
-
只有最后一个参数可以引起一 个内部重定向,之前的参数只设置内部URI的指向。
-
最后一个参数是回退URI且必须存在,否则会出现内 部500错误。
-
一般为最后一个参数创建一个默认页面
#创建默认页面
[root@nginx ~]# echo default > /web/errorpage/default.html[root@nginx ~]# vim /usr/local/nginx/conf.d/vhosts.conf
server {listen  80;server_name www.fy.org;root    /web/html;index   index.html;error_page 500 502 503 504 404 /errorpage/error.html;error_log   /usr/local/nginx/logs/fy.org.err;access_log  /usr/local/nginx/logs/fy.org.access;try_files $uri $uri.html $uri/index.html /errorpage/default.html;	#try_files参数#如果都不存在就看default.htmllocation /errorpage/ {root /web/;}
}
#测试
#访问没有的资源时
[root@nginx ~]# curl www.fy.org/test
default
#创建资源
[root@nginx ~]# echo /web/html/test.html > /web/html/test.html
[root@nginx ~]# curl www.fy.org/test
/web/html/test.html
10.长连接配置
长连接配置一般在主配置文件设置,在http块中设置,设置后子配置文件的全部站点都生效;
#默认配置
http {#keepalive_timeout  0;			#长连接超时次数,在长连接期间发送三次请求就超时断开keepalive_timeout  65;			#长连接超时时间}
#测试
#设置参数
keepalive_timeout  3;
keepalive_timeout  65 60;
#开启长连接后,返回客户端的会话保持时间为60s,单次长连接累计请求达到指定次数请求或65秒就会被断开,第二个数字60为发送给客户端应答报文头部中显示的超时时间设置为60s:如不设置客户端将不显示超时时间。#安装测试软件
[root@nginx ~]# dnf install telnet -y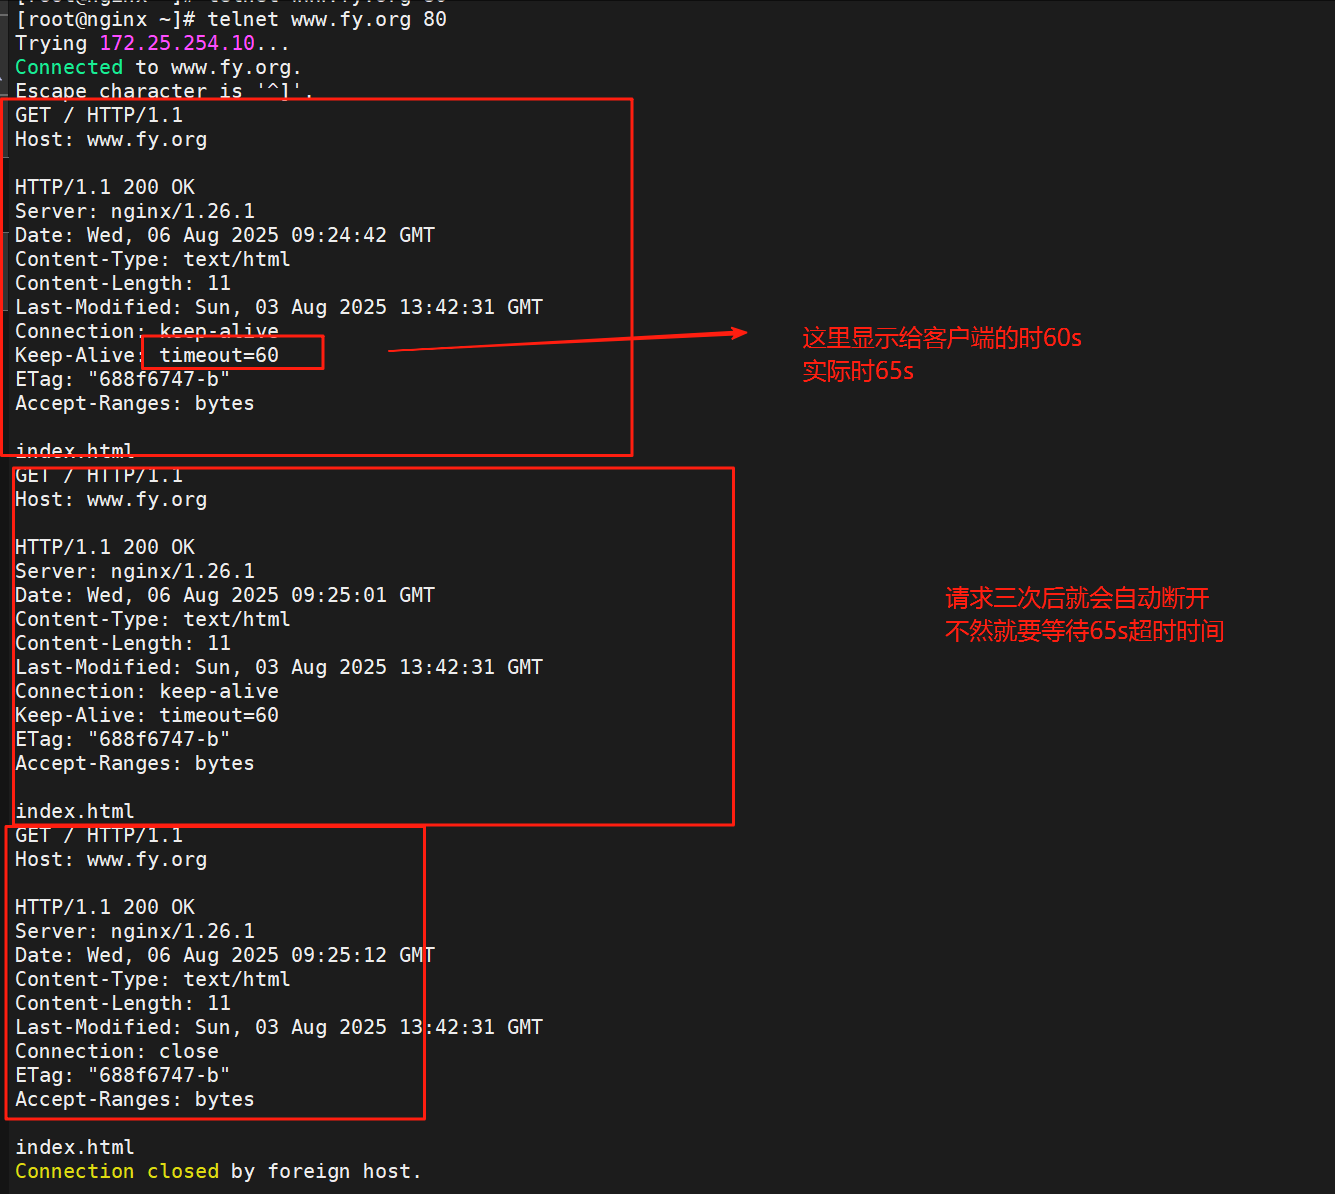
11.配置下载服务器
#创建目录,生成提供下载文件
[root@nginx ~]# mkdir /web/download
[root@nginx ~]# dd if=/dev/zero of=/web/download/fjw bs=1M count=500[root@nginx ~]# vim /usr/local/nginx/conf.d/vhosts.conf
server {listen  80;server_name www.fy.org;root    /web/html;index   index.html;error_page 500 502 503 504 404 /web/errorpage/error.html;error_log   /usr/local/nginx/logs/fy.org.err;access_log  /usr/local/nginx/logs/fy.org.access;try_files $uri $uri.html $uri/index.html /web/errorpage/default.html;[root@nginx ~]# mkdir /web/download
[root@nginx ~]# dd if=/dev/zero of=/web/download/fjw bs=1M count=500#   location /errorpage/ {
#       root /web/;
#   }location /download/ {root /web/;autoindex on;						#开启自动索引功能,由于没默认发布文件,要想作为下载服务器就要自动索引存在的文件autoindex_exact_size off;			#计算文件确切大小,off为显示大概大小(kb,mb,gb)autoindex_localtime on;				#on显示本机时间而不是格林威治时间autoindex_format html;				#设置网页显示格式,默认为html,可以设置xml,jsonset $limit_rate 1024k;				#限制下载速度/s,默认不限速}
}
测试

访问网页
nginx高级配置
1.状态页
#创建认证用户,一般状态页要认证才能查看不是所有人都能看
[root@nginx ~]# htpasswd -cmb /usr/local/nginx/.htpasswd admin fjw
server {listen  80;server_name www.fy.org;root    /web/html;index   index.html;error_page 500 502 503 504 404 /web/errorpage/error.html;error_log   /usr/local/nginx/logs/fy.org.err;access_log  /usr/local/nginx/logs/fy.org.access;try_files $uri $uri.html $uri/index.html /web/errorpage/default.html;location /status {stub_status;	#打开状态页功能auth_basic "status page"		#认证提示auth_basic_user_file "/usr/local/nginx/.htpasswd";	#认证存放文件}
测试
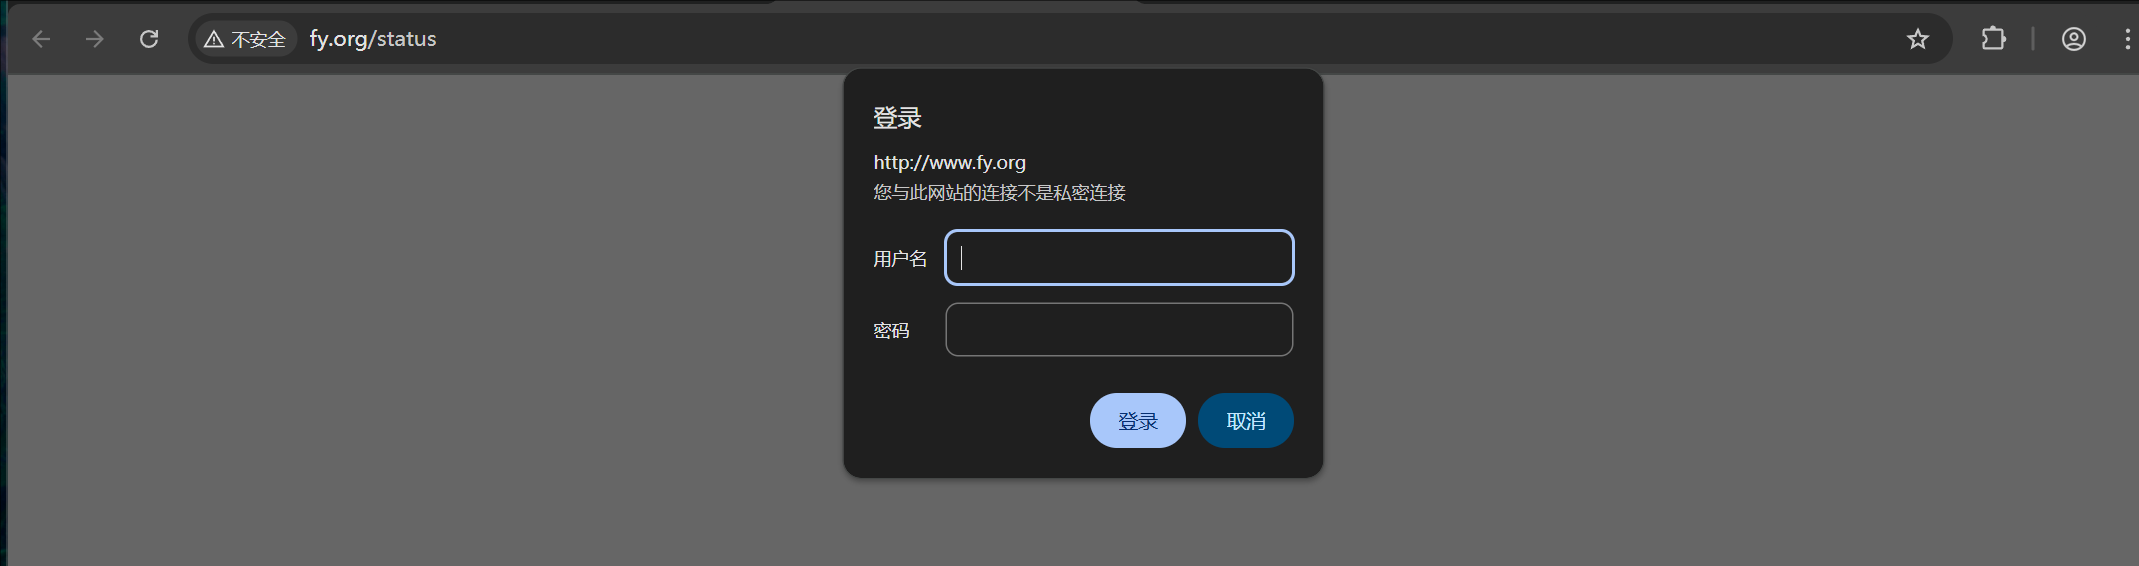
输入认证后查看状态页信息
#状态页信息参数
Active connections: 	#当前处于活动状态的客户端连接数#包括连接等待空闲连接数=reading+writing+waitingaccepts:			    #统计总值,Nginx自启动后已经接受的客户端请求连接的总数。handled:				#统计总值,Nginx自启动后已经处理完成的客户端请求连接总数#通常等于accepts,除非有因worker_connections限制等被拒绝的连接requests:				#统计总值,Nginx自启动后客户端发来的总的请求数Reading:				#当前状态,正在读取客户端请求报文首部的连接的连接数#数值越大,说明排队现象严重,性能不足Writing:				#当前状态,正在向客户端发送响应报文过程中的连接数,数值越大,说明访问量很大Waiting: 				#当前状态,正在等待客户端发出请求的空闲连接数开启 keep-alive的情况下,这个值等于active – (reading+writing)
2.压缩功能
Nginx支持对指定类型的文件进行压缩然后再传输给客户端,而且压缩还可以设置压缩比例,压缩后的文 件大小将比源文件显著变小,样有助于降低出口带宽的利用率,降低企业的IT支出,不过会占用相 应的CPU资源。
Nginx对文件的压缩功能是依赖于模块 ngx_http_gzip_module,默认是内置模块。
#配置参数如下
#启用或禁用gzip压缩,默认关闭
gzip on | off;#压缩比由低到高从1到9,默认为1,值越高压缩后文件越小,但是消耗cpu比较高。基本设定未4或者5
gzip_comp_level 4;#禁用IE6 gzip功能,早期的IE6之前的版本不支持压缩
gzip_disable "MSIE [1-6]\.";#gzip压缩的最小文件,小于设置值的文件将不会压缩
gzip_min_length 1k;#启用压缩功能时,协议的最小版本,默认HTTP/1.1
gzip_http_version 1.0 | 1.1;#指定Nginx服务需要向服务器申请的缓存空间的个数和大小,平台不同,默认:32 4k或者16 8k;
gzip_buffers number size;#指明仅对哪些类型的资源执行压缩操作;默认为gzip_types text/html,不用显示指定,否则出错
gzip_types mime-type ...;#如果启用压缩,是否在响应报文首部插入“Vary: Accept-Encoding”,一般建议打开
gzip_vary on | off;#预压缩,即直接从磁盘找到对应文件的gz后缀的式的压缩文件返回给用户,无需消耗服务器CPU
#注意: 来自于ngx_http_gzip_static_module模块
gzip_static on | off;
#实验配置
[root@nginx ~]# vim /usr/local/nginx/conf/nginx.conf
http {
......gzip  on;gzip_comp_level 4;gzip_disable "MSIE [1-6]\.";gzip_min_length 1024k;gzip_vary on;gzip_static on;
......
}[root@nginx ~]# nginx -t
[root@nginx ~]# nginx -s reload#生成测试文件
[root@nginx ~]# echo small > /usr/local/nginx/html/small.html
[root@nginx ~]# du -sh /usr/local/nginx/conf.d/vhosts.conf
4.0K    /usr/local/nginx/conf.d/vhosts.conf
[root@nginx ~]# cp /web/download/fjw /usr/local/nginx/conf.d/big.html
[root@nginx ~]# du -sh /usr/local/nginx/conf.d/big.html
500M    /usr/local/nginx/conf.d/big.html#测试
#--head 仅获取响应头,不下载正文	--compressed告知服务器可接受压缩格式的响应
[root@nginx ~]# curl --head --compressed 172.25.254.10/big.html
HTTP/1.1 404 Not Found
Server: nginx/1.26.1
Date: Wed, 06 Aug 2025 13:05:10 GMT
Content-Type: text/html
Content-Length: 153
Connection: keep-alive
Keep-Alive: timeout=60[root@nginx ~]# curl --head --compressed 172.25.254.10/big.html
HTTP/1.1 200 OK
Server: nginx/1.26.1
Date: Wed, 06 Aug 2025 13:06:48 GMT
Content-Type: text/html
Last-Modified: Wed, 06 Aug 2025 13:06:33 GMT
Connection: keep-alive
Keep-Alive: timeout=60
Vary: Accept-Encoding
ETag: W/"68935359-1f400000"
Content-Encoding: gzip			#显示被压缩
3.版本隐藏
[root@nginx nginx-1.26.1]# vim src/core/nginx.h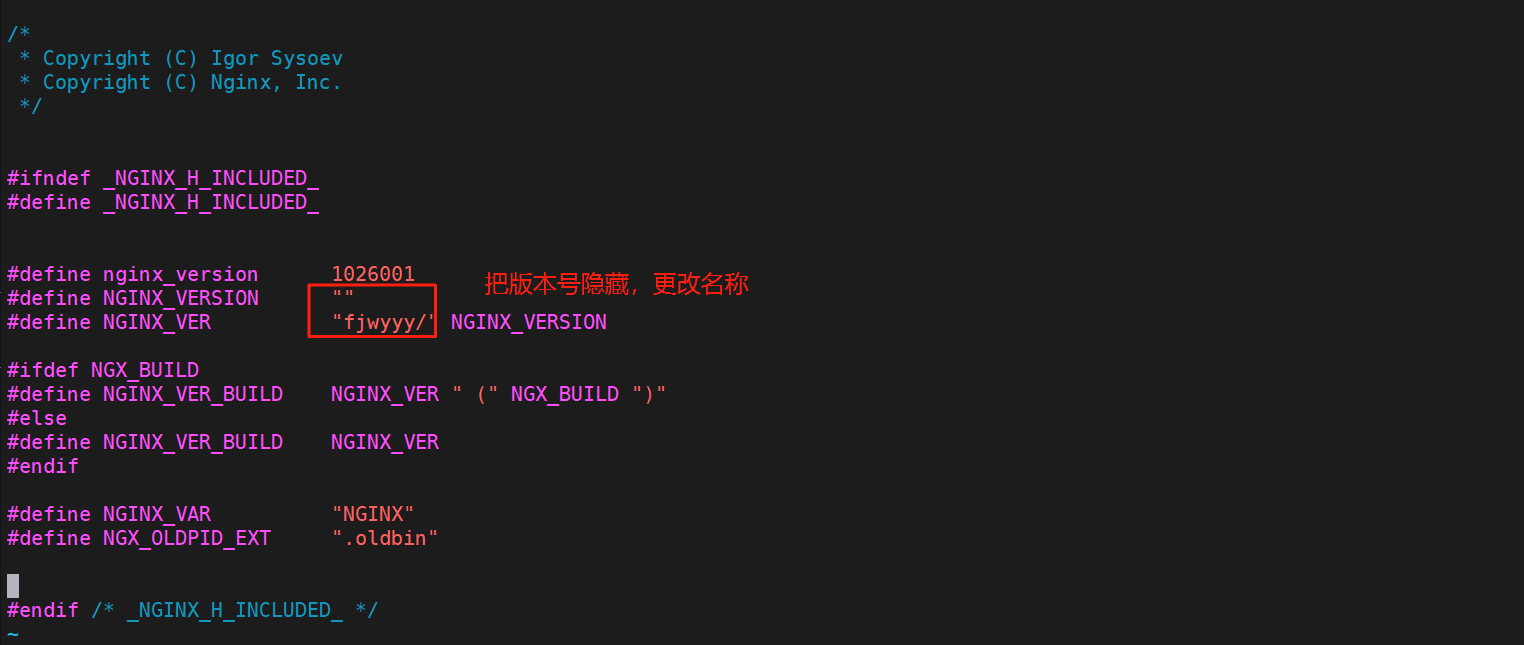
测试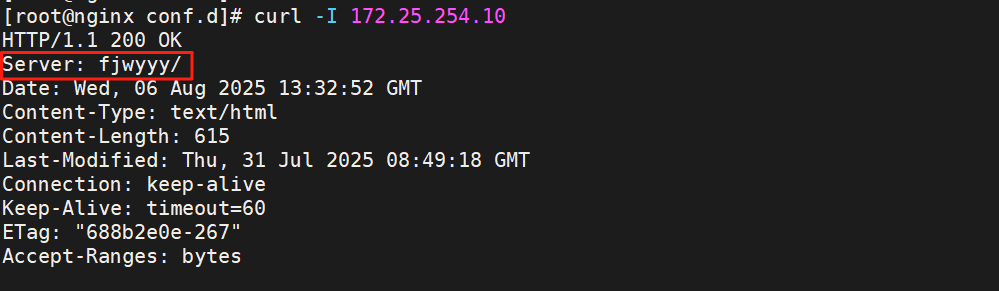
4.变量使用
引用nginx的变量需要添加模块
-
nginx的变量可以在配置文件中引用,作为功能判断或者日志等场景使用
-
变量可以分为内置变量和自定义变量
-
内置变量是由nginx模块自带,通过变量可以获取到众多的与客户端访问相关的值。
内置变量
#以下是常用的内置变量
$remote_addr;
#存放了客户端的地址,注意是客户端的公网IP$args;
#变量中存放了URL中的所有参数
#例如:https://search.jd.com/Search?keyword=手机&enc=utf-8
#返回结果为: keyword=手机&enc=utf-8$is_args
#如果有参数为? 否则为空$document_root;
#保存了针对当前资源的请求的系统根目录,例如:/webdata/nginx/timinglee.org/lee。$document_uri;
#保存了当前请求中不包含参数的URI,注意是不包含请求的指令
#比如:http://lee.timinglee.org/var?\id=11111会被定义为/var
#返回结果为:/var$host;
#存放了请求的host名称limit_rate 10240;
echo $limit_rate;
#如果nginx服务器使用limit_rate配置了显示网络速率,则会显示,如果没有设置, 则显示0$remote_port;
#客户端请求Nginx服务器时随机打开的端口,这是每个客户端自己的端口$remote_user;
#已经经过Auth Basic Module验证的用户名$request_body_file;
#做反向代理时发给后端服务器的本地资源的名称$request_method;
示例:
#请求资源的方式,GET/PUT/DELETE等$request_filename;
#当前请求的资源文件的磁盘路径,由root或alias指令与URI请求生成的文件绝对路径,
#如:webdata/nginx/timinglee.org/lee/var/index.html$request_uri;
#包含请求参数的原始URI,不包含主机名,相当于:$document_uri?$args,
#例如:/main/index.do?id=20190221&partner=search$scheme;
#请求的协议,例如:http,https,ftp等$server_protocol;
#保存了客户端请求资源使用的协议的版本,例如:HTTP/1.0,HTTP/1.1,HTTP/2.0等$server_addr;
#保存了服务器的IP地址$server_name;
#虚拟主机的主机名$server_port;
#虚拟主机的端口号$http_user_agent;
#客户端浏览器的详细信息$http_cookie;
#客户端的所有cookie信息$cookie_<name>
#name为任意请求报文首部字部cookie的key名$http_<name>
#name为任意请求报文首部字段,表示记录请求报文的首部字段,name的对应的首部字段名需要为小写,如果有
横线需要替换为下划线
$http_<name>的示例
echo $http_user_agent;
echo $http_host;$sent_http_<name>
#name为响应报文的首部字段,name的对应的首部字段名需要为小写,如果有横线需要替换为下划线,此变量有
问题$arg_<name>
#此变量存放了URL中的指定参数,name为请求url中指定的参数
#实验配置
[root@nginx ~]# vim /usr/local/nginx/conf.d/vhosts.conf
server {listen  80;server_name www.fy.org;root    /web/html;location /vars {default_type text/html;echo $remote_addr;echo $args;echo $is_args;echo $document_root;echo $document_uri;echo $host;echo $remote_port;echo $remote_user;echo $request_method;echo $request_filename;echo $request_url;echo $scheme;echo $server_protocol;echo $server_addr;echo $server_name;echo $server_port;echo $server_user_agent;echo $http_cookie;echo $cookie_key1;echo $http_Accept;echo $arg_name;}
}#测试
[root@nginx ~]# curl -A "fjwyyy" -b "fjw=a,key1=2" -ufjw:fjw www.fy.org/vars?name=fjw
172.25.254.10
name=fjw
?
/web/html
/vars
www.fy.org
41430
fjw
GET
/web/html/vars
/vars?name=fjw
http
HTTP/1.1
172.25.254.10
www.fy.org
80
fjwyyy
fjw=a,key1=2
2
*/*
fjw
自定义变量
[root@nginx ~]# vim /usr/local/nginx/conf.d/vhosts.conf
server {listen  80;server_name www.fy.org;root    /web/html;location /var {default_type text/html;set $name fjwyyy;echo $name;set $tomcat_port 8080;echo $tomcat_port;}
}#测试
[root@nginx ~]# curl www.fy.org/var
fjwyyy
8080