vue3组件通信的几种方法,详解
props
概念:
Props 是 Vue 组件间通信的一种基本方式,用于父组件向子组件(父→子)传递数据。
基本用法
父组件(传递 props)
<template><ChildComponent :title="pageTitle" :content="pageContent" />
</template><script setup>
import { ref } from 'vue'
import ChildComponent from './ChildComponent.vue'const pageTitle = ref('Vue 3 教程')
const pageContent = ref('学习 Vue 3 的组件通信')
</script>子组件(接收 props)
<script setup lang="ts">
const props = defineProps({//  接收props属性title,contenttitle: String,//  类型限定content: String
})// 使用 props
console.log(props.title)
</script>
子传父(子→父)
props 本身是单向数据流(父 → 子),不能直接用 props 实现子传父的通信。但可以通过 props 传递函数 的方式,让子组件调用父组件的方法,间接实现子传父的通信。
虽然可以用 props 传递函数实现子传父,但 Vue 官方推荐使用 emit 方式,因为它更符合 Vue 的设计模式,代码更清晰。(理解 props 子传父其中的原理即可)
方法:父组件传递回调函数给子组件
- 父组件 传递一个函数给子组件(通过 props)
- 子组件 在适当的时机(如按钮点击、数据变化时)调用该函数
- 父组件 在回调函数中接收子组件传递的数据
示例
父组件
<template><h4>子组件给的数据:{{ data }}</h4><Child :sendData="getData"/>
</template><script setup lang="ts">
import Child from './Child.vue'
import { ref } from 'vue'// 数据
let data = ref('')// 此方法给传递给子组件调用传参给父
function getData(value: string) {data.value = value
}
</script>
子组件
<template><button @click="sendData(data)">把数据给父组件</button>
</template><script setup lang="ts">
import { ref } from 'vue'// 数据
let data= ref('我被传给父组件了')// 声明接收props
const props = defineProps(['sendData'])</script>
Props 验证
可以指定 Props 的类型和验证规则:
defineProps({// 基础类型检查propA: Number,// 多个可能的类型propB: [String, Number],// 必填的字符串propC: {type: String,required: true // true代表必填的意思},// 带有默认值的数字propD: {type: Number,default: 100 // 默认值},// 自定义验证函数propE: {validator(value) {return ['success', 'warning', 'danger'].includes(value)}},// 函数类型的默认值propF: {type: Function,default() {return 'Default function'}}
})
单向数据流
Vue 的 props 遵循单向数据流原则:
父组件的 props 更新会流向子组件
子组件不应该直接修改 props
如果需要修改 props 的值,应该在子组件中使用 data 或 ref 来存储 props 的初始值:
<script setup>
import { ref } from 'vue'const props = defineProps(['initialCounter'])
const counter = ref(props.initialCounter)
</script>
注意事项:
- 非 Prop 的 Attribute(属性):会被自动添加到组件的根元素上,可以通过 inheritAttrs: false 和 v-bind="$attrs" 控制
- 动态 Prop:可以使用 v-bind 动态赋值
<BlogPost :title="post.title" />- 对象传递:可以传递整个对象
<BlogPost v-bind="post" />//const post = reactive{
//      id: 123,
//      title: 'title'
//}//等价于<BlogPost :id="post.id" :title="post.title" />
emit(自定义事件)
在 Vue3 中,自定义事件是实现组件间通信的重要机制,特别是在父子组件或非直接关联组件之间传递数据和触发行为。
基本概念:
1. 什么是自定义事件
定义:由 Vue 组件显式声明并触发的事件,不同于浏览器原生事件
目的:实现子组件向父组件(或其它组件)的反向通信
特点:遵循 Vue 的事件系统规范,支持数据传递和验证
2. 与原生 DOM 事件的区别
| 特性 | 自定义事件 | 原生 DOM 事件 |
|---|---|---|
| 触发源 | Vue 组件通过 emit() 触发 | 浏览器自动触发 |
| 命名规范 | 推荐 kebab-case (如 user-updated) | 全小写 (如 click) |
| 事件对象 | 自定义数据对象 | 原生 Event 对象 |
| 冒泡机制 | 默认不冒泡 | 遵循 DOM 事件流 |
基本用法:
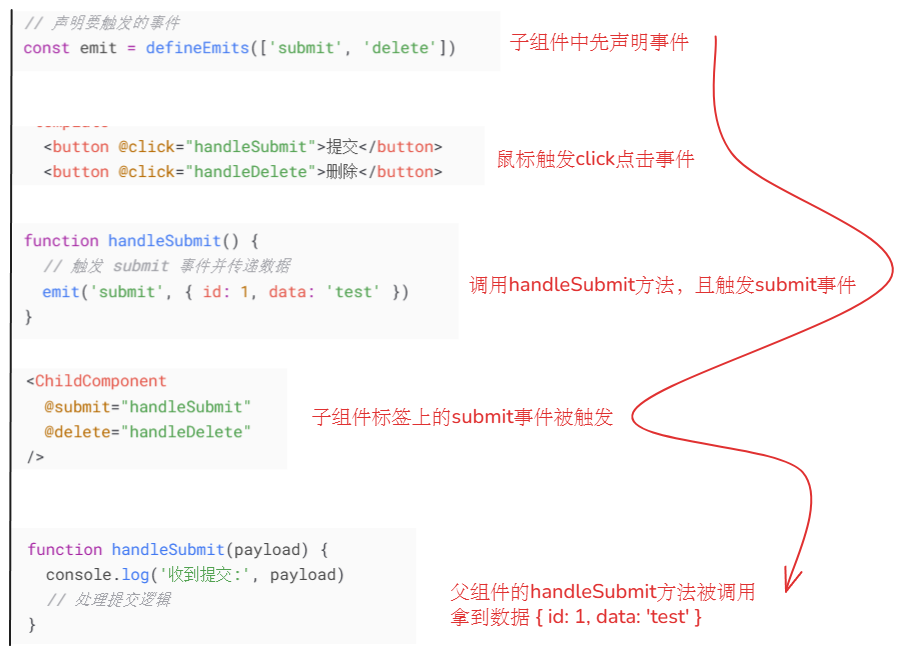
子组件触发事件 (emit)
<script setup>
// 声明要触发的事件
const emit = defineEmits(['submit', 'delete'])function handleSubmit() {// 触发 submit 事件并传递数据emit('submit', { id: 1, data: 'test' })
}function handleDelete() {// 触发 delete 事件emit('delete')
}
</script><template><button @click="handleSubmit">提交</button><button @click="handleDelete">删除</button>
</template>
父组件监听事件
<script setup>
import ChildComponent from './ChildComponent.vue'function handleSubmit(payload) {console.log('收到提交:', payload)// 处理提交逻辑
}function handleDelete() {console.log('收到删除请求')// 处理删除逻辑
}
</script><template><ChildComponent @submit="handleSubmit"@delete="handleDelete"/>
</template>
大致流程
验证触发的事件:
可以验证 emit 的事件参数是否符合预期:
<script setup>
const emit = defineEmits({// 无验证click: null,// 验证 submit 事件submit: ({ email, password }) => {if (email && password) {return true} else {console.warn('Invalid submit event payload!')return false}}
})function submitForm() {emit('submit', { email: 'test@example.com', password: '123456' })
}
</script>
props 和 emit 是后续组件通信方式的基础,对于后续内容的理解至关重要。
mitt(事件总线)
概念:
Mitt 是一个小巧的(200字节)事件总线库,可以在 Vue 3 中用来实现组件间的通信,特别是在非父子组件或远房组件之间,即任意组件之间通信。
基本用法:
安装 Mitt
npm install mitt
# 或
yarn add mitt
创建事件总线
创建一个单独的文件(如 eventBus.js)来导出事件总线实例:
// src/utils/eventBus.js
import mitt from 'mitt';const emitter = mitt();export default emitter;
发送事件 (传递数据)
在需要发送事件的组件中:
<script setup>
import emitter from '@/utils/eventBus';function sendMessage() {// 发送事件,可以携带数据emitter.emit('message', { text: 'Hello from Component A!' });// 也可以发送不带数据的事件emitter.emit('some-event');
}
</script><template><button @click="sendMessage">发送消息</button>
</template>
接收事件 (接收数据)
在需要接收事件的组件中:
<script setup>
import { onMounted, onUnmounted } from 'vue';
import emitter from '@/utils/eventBus';// 处理消息的函数
function handleMessage(payload) {console.log('收到消息:', payload.text);
}onMounted(() => {// 监听事件emitter.on('message', handleMessage);emitter.on('some-event', () => {console.log('some-event 被触发了');});
});onUnmounted(() => {// 组件卸载时取消监听emitter.off('message', handleMessage);
});
</script><template><div>接收消息的组件</div>
</template>
高级用法:
监听所有事件
emitter.on('*', (type, payload) => {console.log('所有事件监听:', type, payload);
});
取消所有监听
emitter.all.clear();一次性监听
function handler(payload) {console.log(payload);emitter.off('event-name', handler);
}emitter.on('event-name', handler);
注意事项:
内存管理:记得在组件卸载时取消事件监听,避免内存泄漏
命名冲突:使用有意义且唯一的事件名称
适度使用:对于简单的父子组件通信,props 和 emits 仍然是首选
v-model
概念:
v-model 在 Vue 3 中是一个强大的指令,用于实现父子组件之间的双向数据绑定。
基本实现原理:
父组件到子组件的通信流程
步骤 1: 父组件传递数据
<ChildComponent v-model="message" />这实际上是语法糖,等价于:
<ChildComponent :modelValue="message"@update:modelValue="newValue => message = newValue"
/>
步骤 2: 子组件接收 prop
defineProps(['modelValue'])子组件通过
modelValueprop 接收父组件传递的值
步骤 3: 子组件触发更新
defineEmits(['update:modelValue'])子组件声明它可以触发
update:modelValue事件当子组件数据变化时,通过
$emit('update:modelValue', newValue)通知父组件
完整示例
父组件 (ParentComponent.vue):
<template><!-- 1. 使用 v-model 绑定数据 --><ChildComponent v-model="message" /><!-- 显示当前值 --><p>父组件中的值: {{ message }}</p>
</template><script setup>
import { ref } from 'vue'
import ChildComponent from './ChildComponent.vue'// 2. 创建响应式数据
const message = ref('初始值')
</script>
子组件 (ChildComponent.vue):
<template><!-- 3. 绑定父组件传来的值到 input --><input :value="modelValue" @input="handleInput"/>
</template><script setup>
// 4. 接收父组件传递的值
const props = defineProps(['modelValue'])// 5. 声明要触发的事件
const emit = defineEmits(['update:modelValue'])// 6. 处理输入变化
function handleInput(e) {// 7. 通知父组件更新值emit('update:modelValue', e.target.value)
}
</script>
多个 v-model 绑定实现原理
父组件到多个子组件属性的通信
步骤 1: 父组件绑定多个属性
<UserFormv-model:username="user.name"v-model:email="user.email"
/>
v-model:username 等价于:
:username="user.name"
@update:username="newValue => user.name = newValue"
步骤 2: 子组件接收多个 props
defineProps(['username', 'email'])步骤 3: 子组件触发多个更新事件
defineEmits(['update:username', 'update:email'])完整示例
父组件 (ParentForm.vue):
<template><UserFormv-model:username="formData.username"v-model:email="formData.email"/><p>用户名: {{ formData.username }}</p><p>邮箱: {{ formData.email }}</p>
</template><script setup>
import { reactive } from 'vue'
import UserForm from './UserForm.vue'const formData = reactive({username: '',email: ''
})
</script>
子组件 (UserForm.vue):
<template><div><label>用户名:</label><input:value="username"@input="$emit('update:username', $event.target.value)"/><label>邮箱:</label><input:value="email"@input="$emit('update:email', $event.target.value)"/></div>
</template><script setup>
defineProps(['username', 'email'])
defineEmits(['update:username', 'update:email'])
</script>
v-model 修饰符的实现原理
自定义修饰符的工作流程
步骤 1: 父组件使用修饰符
<CustomInput v-model.capitalize="text" />步骤 2: 子组件接收修饰符
defineProps({modelValue: String,modelModifiers: {default: () => ({})}
})modelModifiers会自动包含使用的修饰符例如
.capitalize会使modelModifiers变为{ capitalize: true }
步骤 3: 子组件处理修饰符逻辑
function emitValue(value) {let processedValue = valueif (props.modelModifiers.capitalize) {processedValue = value.charAt(0).toUpperCase() + value.slice(1)}emit('update:modelValue', processedValue)
}
完整示例
父组件 (ModifierParent.vue):
<template><CustomInput v-model.capitalize="text" /><p>处理后的值: {{ text }}</p>
</template><script setup>
import { ref } from 'vue'
import CustomInput from './CustomInput.vue'const text = ref('')
</script>
子组件 (CustomInput.vue):
<template><input:value="modelValue"@input="processInput($event.target.value)"/>
</template><script setup>
const props = defineProps({modelValue: String,modelModifiers: {default: () => ({})}
})const emit = defineEmits(['update:modelValue'])function processInput(value) {let processedValue = value// 检查是否使用了 capitalize 修饰符if (props.modelModifiers.capitalize) {processedValue = value.charAt(0).toUpperCase() + value.slice(1)}emit('update:modelValue', processedValue)
}
</script>
使用计算属性的高级模式
计算属性实现双向绑定的流程
步骤 1: 创建计算属性
const internalValue = computed({get() {return props.modelValue},set(value) {emit('update:modelValue', value)}
})
步骤 2: 在模板中使用 v-model
<input v-model="internalValue" />完整示例
父组件 (ComputedParent.vue):
<template><AdvancedInput v-model="message" /><p>父组件值: {{ message }}</p>
</template><script setup>
import { ref } from 'vue'
import AdvancedInput from './AdvancedInput.vue'const message = ref('')
</script>
子组件 (AdvancedInput.vue):
<template><div><!-- 直接使用 v-model 绑定计算属性 --><input v-model="internalValue" /><!-- 显示处理后的值 --><p>子组件处理后的值: {{ internalValue }}</p></div>
</template><script setup>
import { computed } from 'vue'const props = defineProps(['modelValue'])
const emit = defineEmits(['update:modelValue'])const internalValue = computed({get() {// 返回父组件传递的值return props.modelValue},set(value) {// 对值进行处理后通知父组件const processedValue = value.toUpperCase() // 示例:转为大写emit('update:modelValue', processedValue)}
})
</script>
总结:
v-model 本质:是
:modelValue和@update:modelValue的语法糖多 v-model:通过
v-model:propName格式实现多个双向绑定修饰符处理:通过
modelModifiersprop 检测并处理修饰符计算属性模式:提供更灵活的数据处理方式
组合式 API:使用
defineProps和defineEmits声明接口
$attrs
基本概念:
在Vue3中,$attrs是一个包含父组件传递给子组件但未被子组件显式声明为props的所有属性的对象。它是组件间通信的一个重要工具,特别适用于创建(爷爷→中间组件→孙子)高阶组件或需要透传属性的场景。
特点:
自动收集:包含父组件传递的所有非props和非emit的属性
透传机制:默认会自动继承到组件的根元素上
不包含:已经被声明为props或emits的属性
Vue3变化:在Vue3中,
$attrs包含了 class 和 style,这与Vue2不同
基本用法:
<!-- 父组件 -->
<template><ChildComponent title="Hello" data-test="123" class="child-style" />
</template><!-- 子组件 -->
<template><GrandChild v-bind="$attrs"/><!-- 这里会接收所有未声明的属性 -->
</template>//孙组件
<template><div>title:{{ props.title }}</div><div>data-test:{{ props.data-test }}</div><div>class:{{ props.class }}</div>
</template><script setup>
const props = defineProps(['title','data-test','class'])</script>
在Vue3的组合式API中,我们可以使用 useAttrs() 函数来访问 $attrs 的功能。
<script setup>
import { useAttrs } from 'vue';const attrs = useAttrs();});
</script><template><div :class="attrs.class"></div>
</template>
本质上 $attrs 还是依靠 props 来实现组件通信的。
$refs 和 $parent
$refs 组件通信
$refs 用于直接访问子组件或 DOM 元素。
使用流程
在模板中为子组件添加 ref 属性
<template><child-component ref="childRef" />
</template>
在 script 中访问子组件
<script setup>
import { ref, onMounted } from 'vue'const childRef = ref(null)onMounted(() => {// 访问子组件的方法或属性childRef.value.childMethod()console.log(childRef.value.childProperty)
})
</script>
完整示例
父组件
<template><div><Child ref="childRef" /><button @click="callChildMethod">调用子组件方法</button></div>
</template><script setup>
import { ref } from 'vue'
import Child from './Child.vue'const childRef = ref(null)const callChildMethod = () => {if (childRef.value) {childRef.value.sayHello()console.log('子组件数据:', childRef.value.message)}
}
</script>
子组件
<template><div><p>{{ message }}</p></div>
</template><script setup>
import { ref } from 'vue'const message = ref('来自子组件的消息')const sayHello = () => {console.log('Hello from Child component!')message.value = '父组件调用了我的方法'
}</script>
$parent 组件通信
$parent 用于访问父组件实例,在 Vue3 中不推荐过度使用,因为它会使组件紧密耦合。
使用方法
父组件 Parent.vue
<template><div><Child /><p>父组件消息: {{ message }}</p></div>
</template><script setup>
import { ref } from 'vue'
import Child from './Child.vue'const message = ref('来自父组件的初始消息')const updateMessage = (newMsg) => {message.value = newMsg
}
</script>
子组件 Child.vue
<template><div><button @click="callParentMethod">调用父组件方法</button></div>
</template><script setup>
import { getCurrentInstance } from 'vue'const instance = getCurrentInstance()const callParentMethod = () => {if (instance.parent) {instance.parent.exposed.updateMessage('子组件修改了父组件的消息')}
}
</script>
注意事项
$parent会使组件紧密耦合,不利于复用在 Vue3 组合式 API 中,需要使用
getCurrentInstance()获取当前实例父组件的方法和属性需要通过
exposed访问
provide 和 inject
概念:
provide 和 inject 是 Vue3 提供的一种组件通信方式,允许祖先组件向其所有子孙后代组件传递数据,而不必通过 props 层层传递。
特点:
跨层级通信:可以在任意深度的组件层级间传递数据
解耦组件:不需要通过中间组件传递 props
响应式:提供的数据可以是响应式的
使用流程:
提供数据 (Provide)
在祖先组件中使用 provide 函数提供数据:
<script setup>
import { provide, ref, reactive } from 'vue'// 提供静态数据
provide('theme', 'dark')// 提供响应式数据
const count = ref(0)
provide('count', count)// 提供响应式对象
const user = reactive({name: 'John',age: 30
})
provide('user', user)</script>
注入数据 (Inject)
在后代组件中使用 inject 函数注入数据:
<script setup>
import { inject } from 'vue'// 注入数据
const theme = inject('theme', 'light') // 第二个参数是默认值
const count = inject('count')
const user = inject('user')</script>
选择建议:
父子组件:优先使用 props/emits 或 v-model
祖孙/深层组件:使用 provide/inject
非父子关系组件:
简单场景:Event Bus
复杂场景:Pinia/Vuex
全局状态:Pinia/Vuex
需要直接访问子组件:使用 refs