MoneyPrinterTurbo根据关键词自动生成视频
文章目录
- 简介
- Conda
- Conda简介
- 定义:
- 常用命令
- Conda下载安装
- Conda使用
- Pexels
- 生成Api_Key
- MoneyPrinterTurbo
- MoneyPrinterTurbo使用
- 创建MoneyPrinterTurbo使用环境
- 创建虚拟环境
- 激活
- 安装依赖
- 修改配置文件
- 启动并测试
- 再次启动
简介
Conda
网址:https://docs.conda.io/en/latest
Conda简介
Conda 是一个开源的软件包管理系统和环境管理系统,用于安装多个版本的软件包及其依赖关系,并在它们之间轻松切换。
定义:
Conda 是为 Python 程序创建的,适用于 Linux,OS X 和Windows,也可以打包和分发其他软件 [1]。
最流行的 Python 环境管理工具
常用命令
conda list
列出当前 conda 环境所链接的软件包 [2]
conda create
# 创建一个 conda 环境,名称为 tf [2]
conda create -n 环境名 -c 镜像源
Conda下载安装
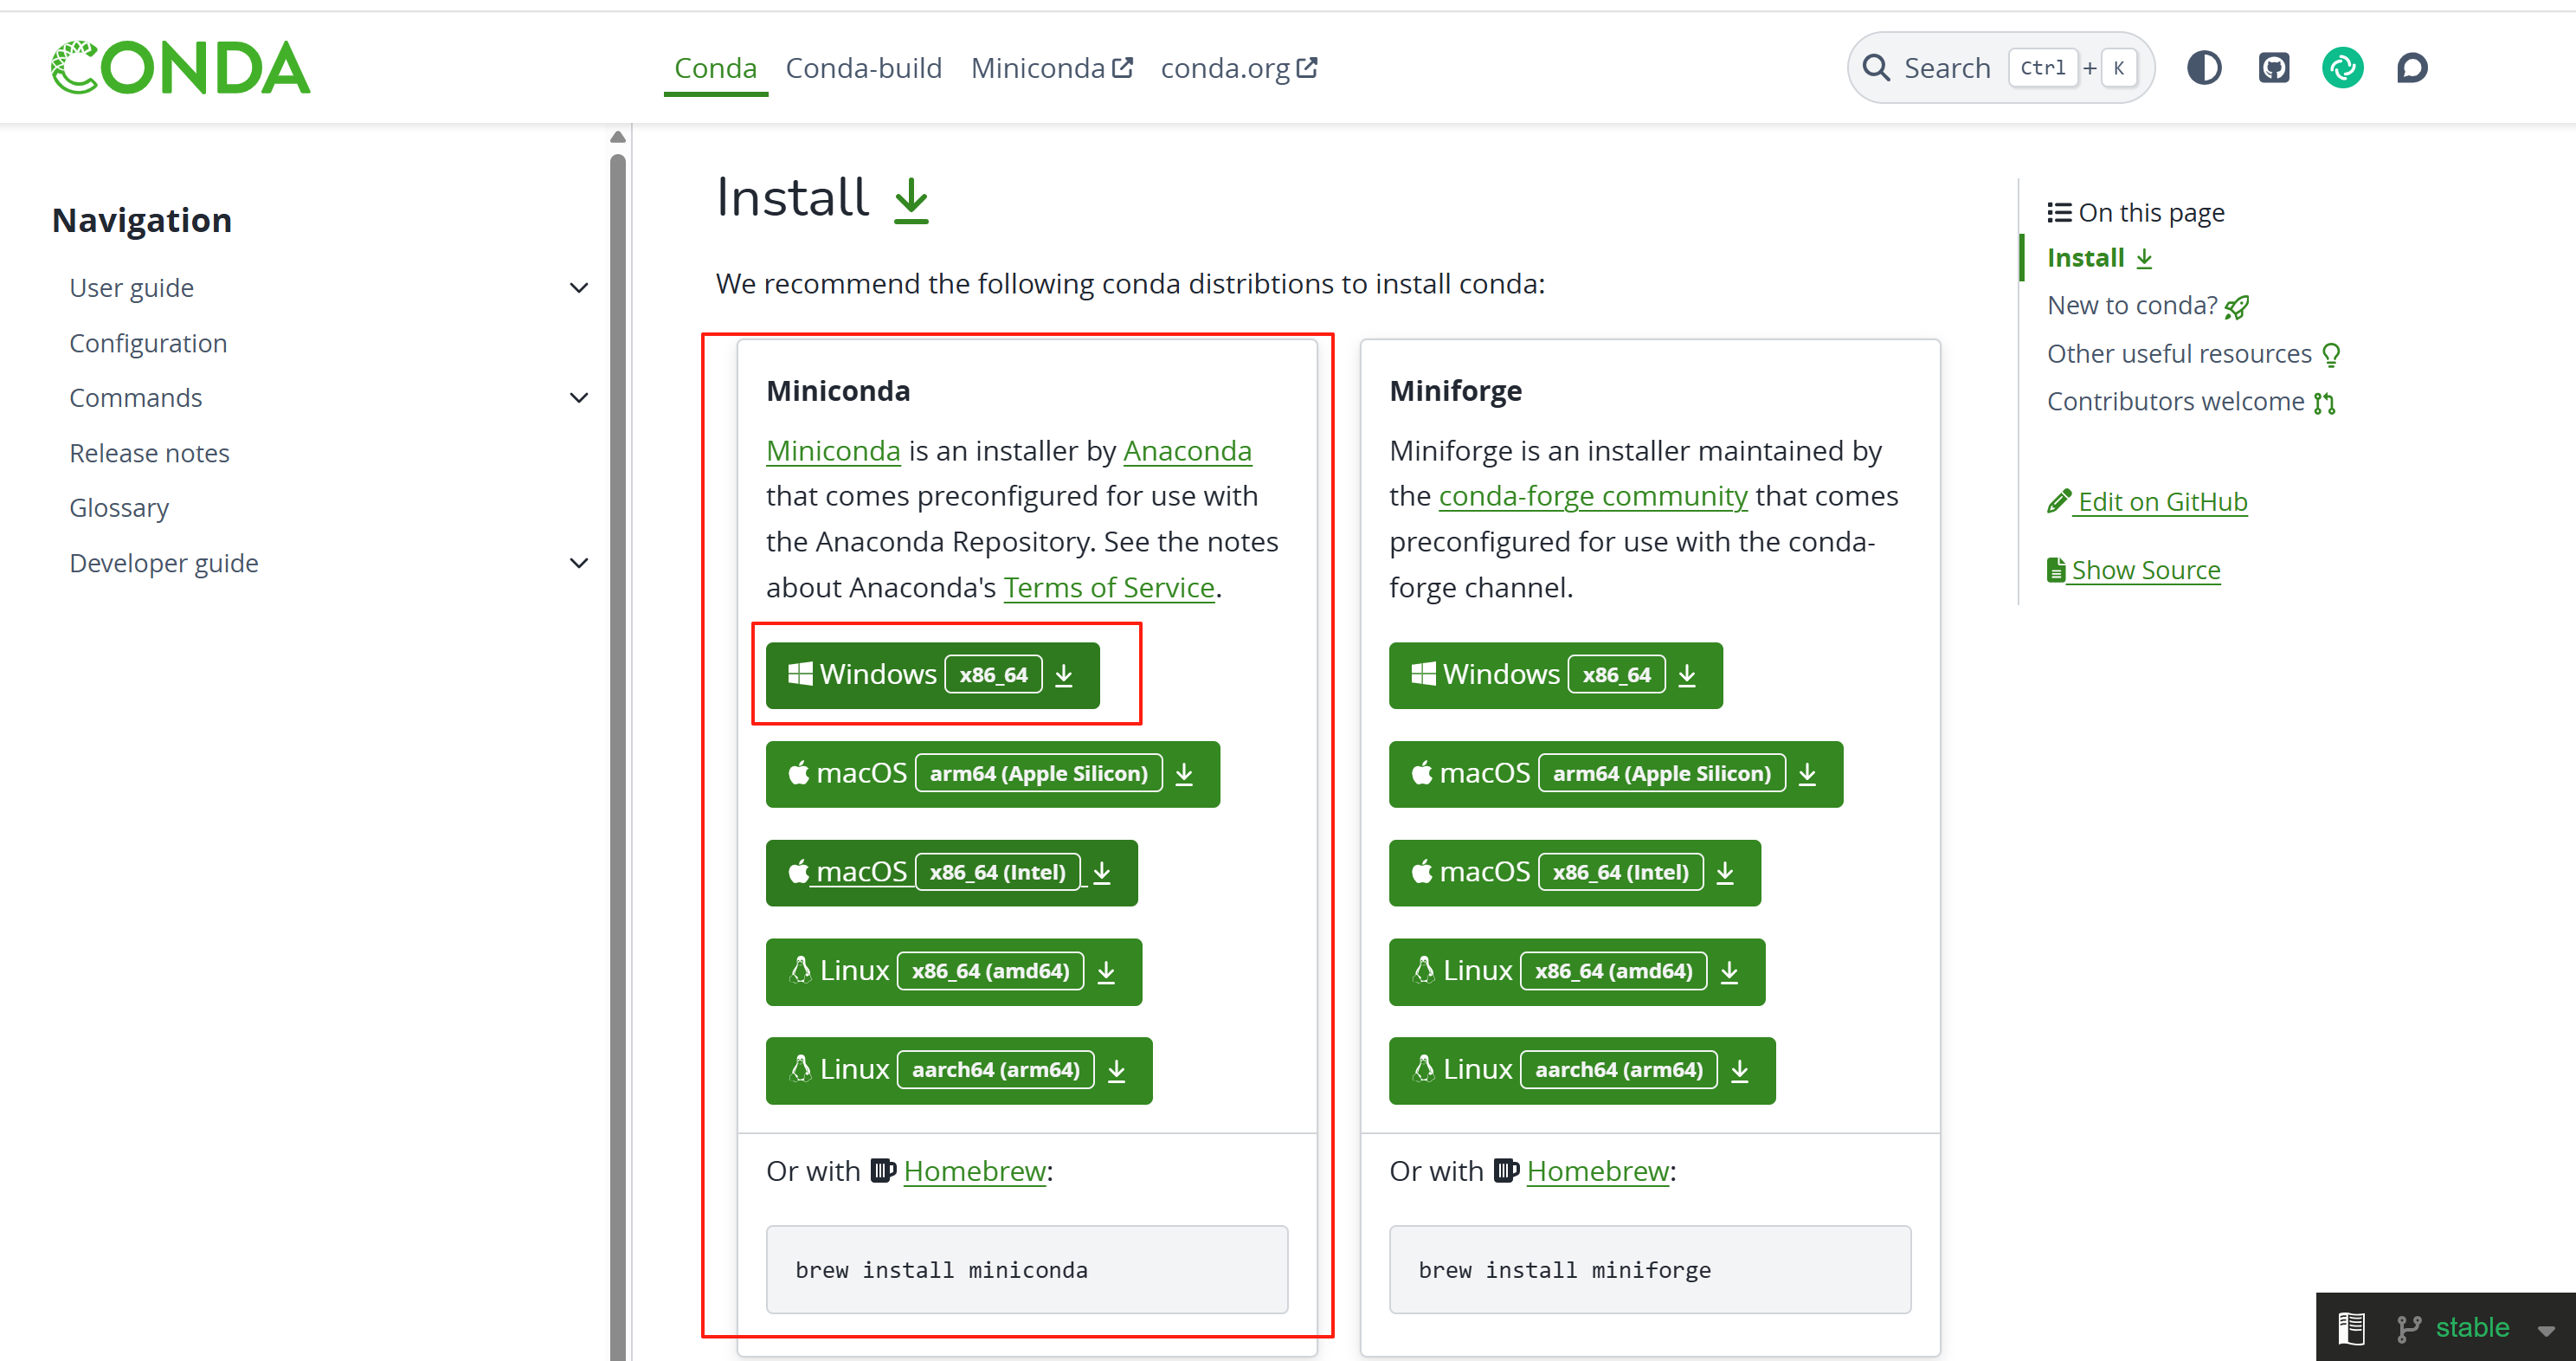
点击上面的链接,登录Conda官网,选择适合的版本进行下载
下载成功后,选择合适的安装位置,尽量不要安装在C盘,且最好不要有中文
然后一路next便可安装成功,安装成功后,本地电脑会出现下面两个项目
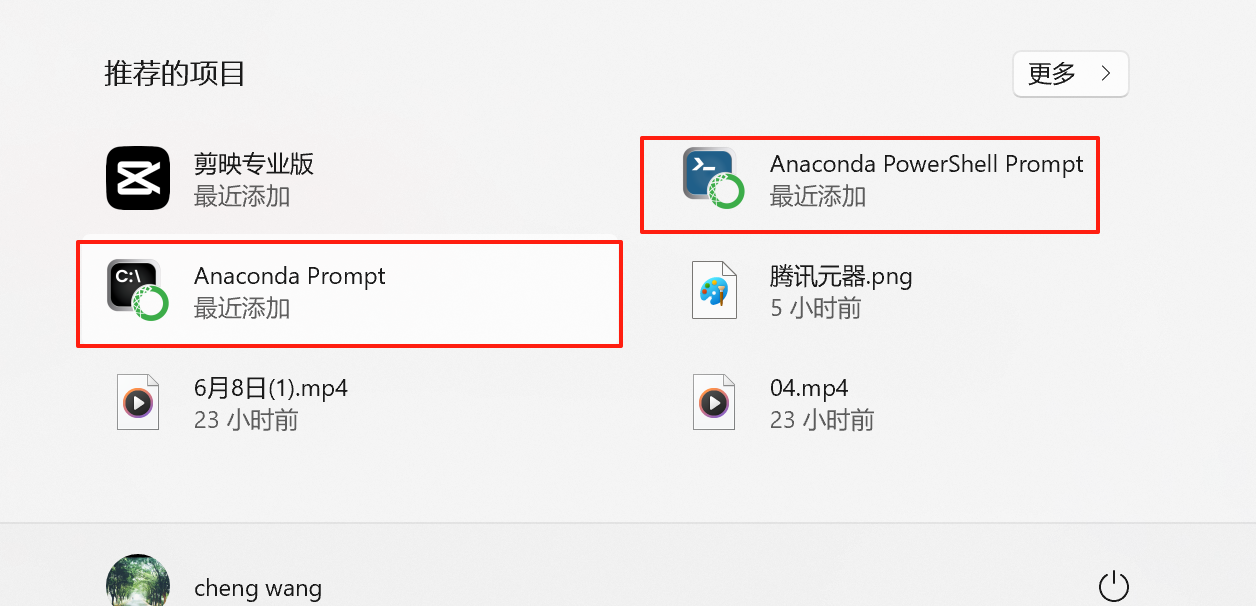
Conda使用
点击Anaconda PowerShell Prompt,可以输入下面命令查看版本:
conda --version
Conda是给MoneyPrinterTurbo安装虚拟环境的工具,需要提前安装
Pexels
网址:https://www.pexels.com/zh-cn/api/key/
生成Api_Key
登录网址注册后,可以生成Api_Key
MoneyPrinterTurbo
MoneyPrinterTurbo-Portable-Windows-1.2.6.7z
百度网盘: https://pan.baidu.com/s/1IOsTm2LZaHLlDtHo7KIjlw?pwd=7anu 提取码: 7anu
MoneyPrinterTurbo使用
下载完成后,解压即可使用
创建MoneyPrinterTurbo使用环境
创建虚拟环境
在解压目录下的MoneyPrinterTurbo目录下
conda create -n MoneyPrinterTurbo python=3.11
激活
在上一步完成的基础上,继续执行激活命令
conda activate MoneyPrinterTurbo
安装依赖
pip install -r requirements.txt
修改配置文件
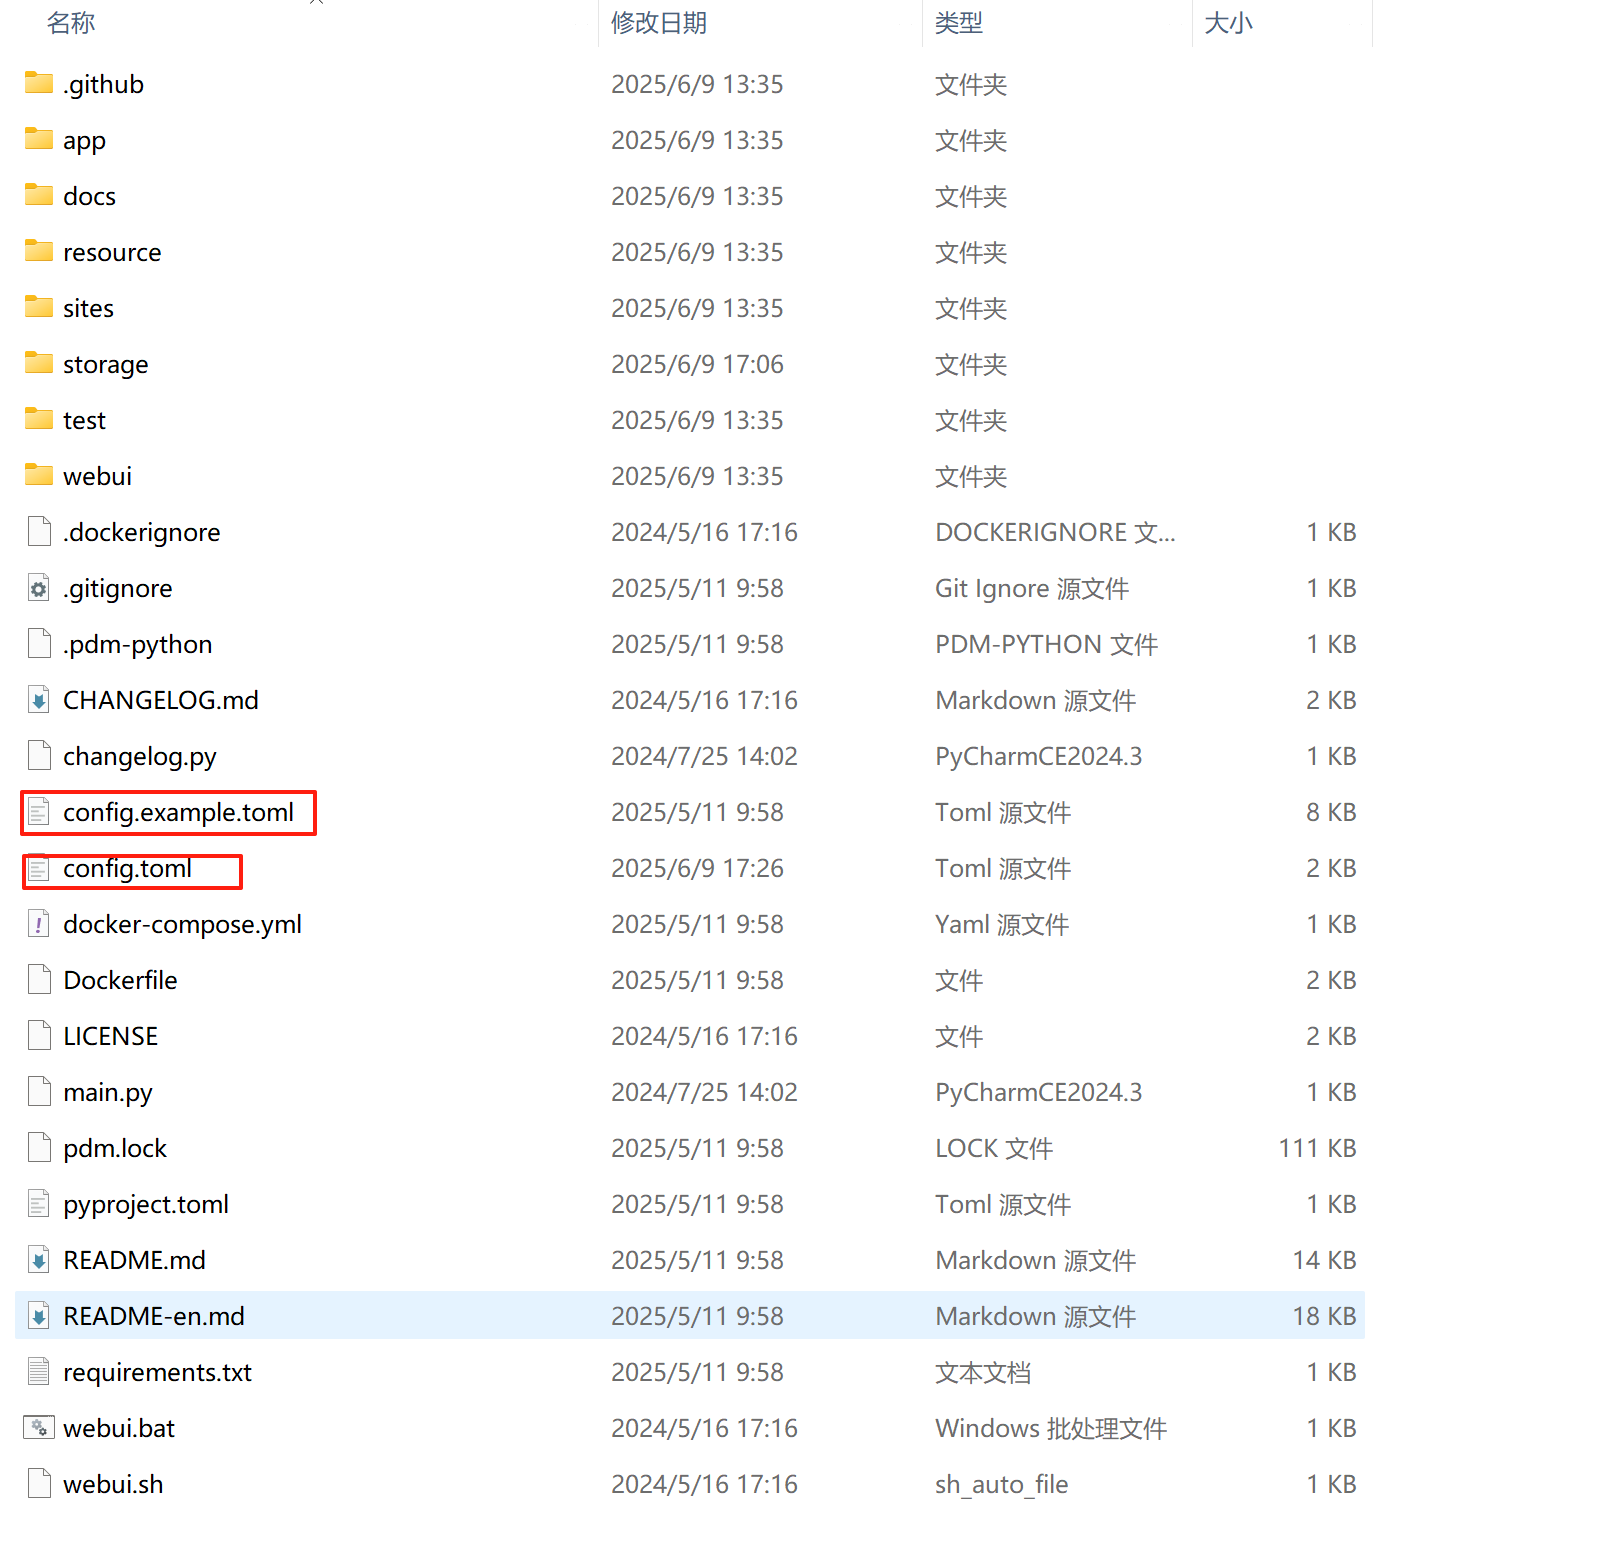
将config.example.toml复制成config.toml文件
修改配置如下:
[app]
video_source = "pexels" # "pexels" or "pixabay"# 是否隐藏配置面板
hide_config = false# Pexels API Key
# Register at https://www.pexels.com/api/ to get your API key.
# You can use multiple keys to avoid rate limits.
# For example: pexels_api_keys = ["123adsf4567adf89","abd1321cd13efgfdfhi"]
# 特别注意格式,Key 用英文双引号括起来,多个Key用逗号隔开
pexels_api_keys = ["VdkQFCH83gmWA8MnbOsVEfcwxNqwgVyU9AK6AyglrIQ42tRztqPHBwr4"]# Pixabay API Key
# Register at https://pixabay.com/api/docs/ to get your API key.
# You can use multiple keys to avoid rate limits.
# For example: pixabay_api_keys = ["123adsf4567adf89","abd1321cd13efgfdfhi"]
# 特别注意格式,Key 用英文双引号括起来,多个Key用逗号隔开
pixabay_api_keys = []# 支持的提供商 (Supported providers):
#   openai
#   moonshot    (月之暗面)
#   azure
#   qwen        (通义千问)
#   deepseek
#   gemini
#   ollama
#   g4f
#   oneapi
#   cloudflare
#   ernie       (文心一言)
llm_provider = "qwen"########## Ollama Settings
# No need to set it unless you want to use your own proxy
#ollama_base_url = ""
# Check your available models at https://ollama.com/library
#ollama_model_name = ""########## OpenAI API Key
# Get your API key at https://platform.openai.com/api-keys
#openai_api_key = ""
# No need to set it unless you want to use your own proxy
openai_base_url = ""
# Check your available models at https://platform.openai.com/account/limits
#openai_model_name = "gpt-4o-mini"########## Moonshot API Key
# Visit https://platform.moonshot.cn/console/api-keys to get your API key.
moonshot_api_key = "sk-7szdfZ03frtN3IBz70O0U5oBFsWLDQWOJmh6ZNB1zMk2RNoP"
moonshot_base_url = "https://api.moonshot.cn/v1"
moonshot_model_name = "moonshot-v1-8k"########## OneAPI API Key
# Visit https://github.com/songquanpeng/one-api to get your API key
#oneapi_api_key = ""
#oneapi_base_url = ""
#oneapi_model_name = ""########## G4F
# Visit https://github.com/xtekky/gpt4free to get more details
# Supported model list: https://github.com/xtekky/gpt4free/blob/main/g4f/models.py
g4f_model_name = "gpt-3.5-turbo"########## Azure API Key
# Visit https://learn.microsoft.com/zh-cn/azure/ai-services/openai/ to get more details
# API documentation: https://learn.microsoft.com/zh-cn/azure/ai-services/openai/reference
#azure_api_key = ""
#azure_base_url = ""
#azure_model_name = "gpt-35-turbo"        # replace with your model deployment name
#azure_api_version = "2024-02-15-preview"########## Gemini API Key
#gemini_api_key = ""
#gemini_model_name = "gemini-1.0-pro"########## Qwen API Key
# Visit https://dashscope.console.aliyun.com/apiKey to get your API key
# Visit below links to get more details
# https://tongyi.aliyun.com/qianwen/
# https://help.aliyun.com/zh/dashscope/developer-reference/model-introduction
qwen_api_key = "sk-c860168de7184769abd0b068a4486ad9"
qwen_model_name = "qwen-max"########## DeepSeek API Key
# Visit https://platform.deepseek.com/api_keys to get your API key
deepseek_api_key = "sk-c03753147d7c48d486a33ff24d480123"
deepseek_base_url = "https://api.deepseek.com"
deepseek_model_name = "deepseek-chat"# Subtitle Provider, "edge" or "whisper"
# If empty, the subtitle will not be generated
subtitle_provider = "edge"#
# ImageMagick
#
# Once you have installed it, ImageMagick will be automatically detected, except on Windows!
# On Windows, for example "C:\Program Files (x86)\ImageMagick-7.1.1-Q16-HDRI\magick.exe"
# Download from https://imagemagick.org/archive/binaries/ImageMagick-7.1.1-29-Q16-x64-static.exeimagemagick_path = "D:\\devSoftware\\AI_create_vedio\\ImageMagickInstall\\ImageMagick-7.1.1-Q16-HDRI\\magick.exe"#
# FFMPEG
#
# 通常情况下,ffmpeg 会被自动下载,并且会被自动检测到。
# 但是如果你的环境有问题,无法自动下载,可能会遇到如下错误:
#   RuntimeError: No ffmpeg exe could be found.
#   Install ffmpeg on your system, or set the IMAGEIO_FFMPEG_EXE environment variable.
# 此时你可以手动下载 ffmpeg 并设置 ffmpeg_path,下载地址:https://www.gyan.dev/ffmpeg/builds/# Under normal circumstances, ffmpeg is downloaded automatically and detected automatically.
# However, if there is an issue with your environment that prevents automatic downloading, you might encounter the following error:
#   RuntimeError: No ffmpeg exe could be found.
#   Install ffmpeg on your system, or set the IMAGEIO_FFMPEG_EXE environment variable.
# In such cases, you can manually download ffmpeg and set the ffmpeg_path, download link: https://www.gyan.dev/ffmpeg/builds/# ffmpeg_path = "C:\\Users\\harry\\Downloads\\ffmpeg.exe"
########################################################################################## 当视频生成成功后,API服务提供的视频下载接入点,默认为当前服务的地址和监听端口
# 比如 http://127.0.0.1:8080/tasks/6357f542-a4e1-46a1-b4c9-bf3bd0df5285/final-1.mp4
# 如果你需要使用域名对外提供服务(一般会用nginx做代理),则可以设置为你的域名
# 比如 https://xxxx.com/tasks/6357f542-a4e1-46a1-b4c9-bf3bd0df5285/final-1.mp4
# endpoint="https://xxxx.com"# When the video is successfully generated, the API service provides a download endpoint for the video, defaulting to the service's current address and listening port.
# For example, http://127.0.0.1:8080/tasks/6357f542-a4e1-46a1-b4c9-bf3bd0df5285/final-1.mp4
# If you need to provide the service externally using a domain name (usually done with nginx as a proxy), you can set it to your domain name.
# For example, https://xxxx.com/tasks/6357f542-a4e1-46a1-b4c9-bf3bd0df5285/final-1.mp4
# endpoint="https://xxxx.com"
endpoint = ""# Video material storage location
# material_directory = ""                    # Indicates that video materials will be downloaded to the default folder, the default folder is ./storage/cache_videos under the current project
# material_directory = "/user/harry/videos"  # Indicates that video materials will be downloaded to a specified folder
# material_directory = "task"                # Indicates that video materials will be downloaded to the current task's folder, this method does not allow sharing of already downloaded video materials# 视频素材存放位置
# material_directory = ""                    #表示将视频素材下载到默认的文件夹,默认文件夹为当前项目下的 ./storage/cache_videos
# material_directory = "/user/harry/videos"  #表示将视频素材下载到指定的文件夹中
# material_directory = "task"                #表示将视频素材下载到当前任务的文件夹中,这种方式无法共享已经下载的视频素材material_directory = ""# Used for state management of the task
enable_redis = false
redis_host = "localhost"
redis_port = 6379
redis_db = 0
redis_password = ""# 文生视频时的最大并发任务数
max_concurrent_tasks = 5[whisper]
# Only effective when subtitle_provider is "whisper"# Run on GPU with FP16
# model = WhisperModel(model_size, device="cuda", compute_type="float16")# Run on GPU with INT8
# model = WhisperModel(model_size, device="cuda", compute_type="int8_float16")# Run on CPU with INT8
# model = WhisperModel(model_size, device="cpu", compute_type="int8")# recommended model_size: "large-v3"
model_size = "large-v3"
# if you want to use GPU, set device="cuda"
device = "CPU"
compute_type = "int8"[proxy]
### Use a proxy to access the Pexels API
### Format: "http://<username>:<password>@<proxy>:<port>"
### Example: "http://user:pass@proxy:1234"
### Doc: https://requests.readthedocs.io/en/latest/user/advanced/#proxies# http = "http://10.10.1.10:3128"
# https = "http://10.10.1.10:1080"[azure]
# Azure Speech API Key
# Get your API key at https://portal.azure.com/#view/Microsoft_Azure_ProjectOxford/CognitiveServicesHub/~/SpeechServices
speech_key = ""
speech_region = ""[siliconflow]
# SiliconFlow API Key
# Get your API key at https://siliconflow.cn
api_key = ""[ui]
# UI related settings
# 是否隐藏日志信息
# Whether to hide logs in the UI
hide_log = false
必须要配置的参数:
- pexels_api_keys:视频来源,必须要配置
- llm_provider:大语言模型,必须要进行配置
- qwen_api_key:根据上面的大语言模型,进行配置api_key,必须要进行配置
启动并测试
配置完上面的文件后,如果命令行前面带(MoneyPrinterTurbo)使用webui.bat命令便可启动,否则参考再次启动
webui.bat

再次启动
再次启动项目需要使用conda

进入目录,先激活在使用webui.bat再次启动
//先进入目录
cd D:\devSoftware\AI_create_vedio\MoneyPrinterTurbo-Portable-Windows-1.2.6\MoneyPrinterTurbo
//激活
conda activate MoneyPrinterTurbo
//启动
webui.bat

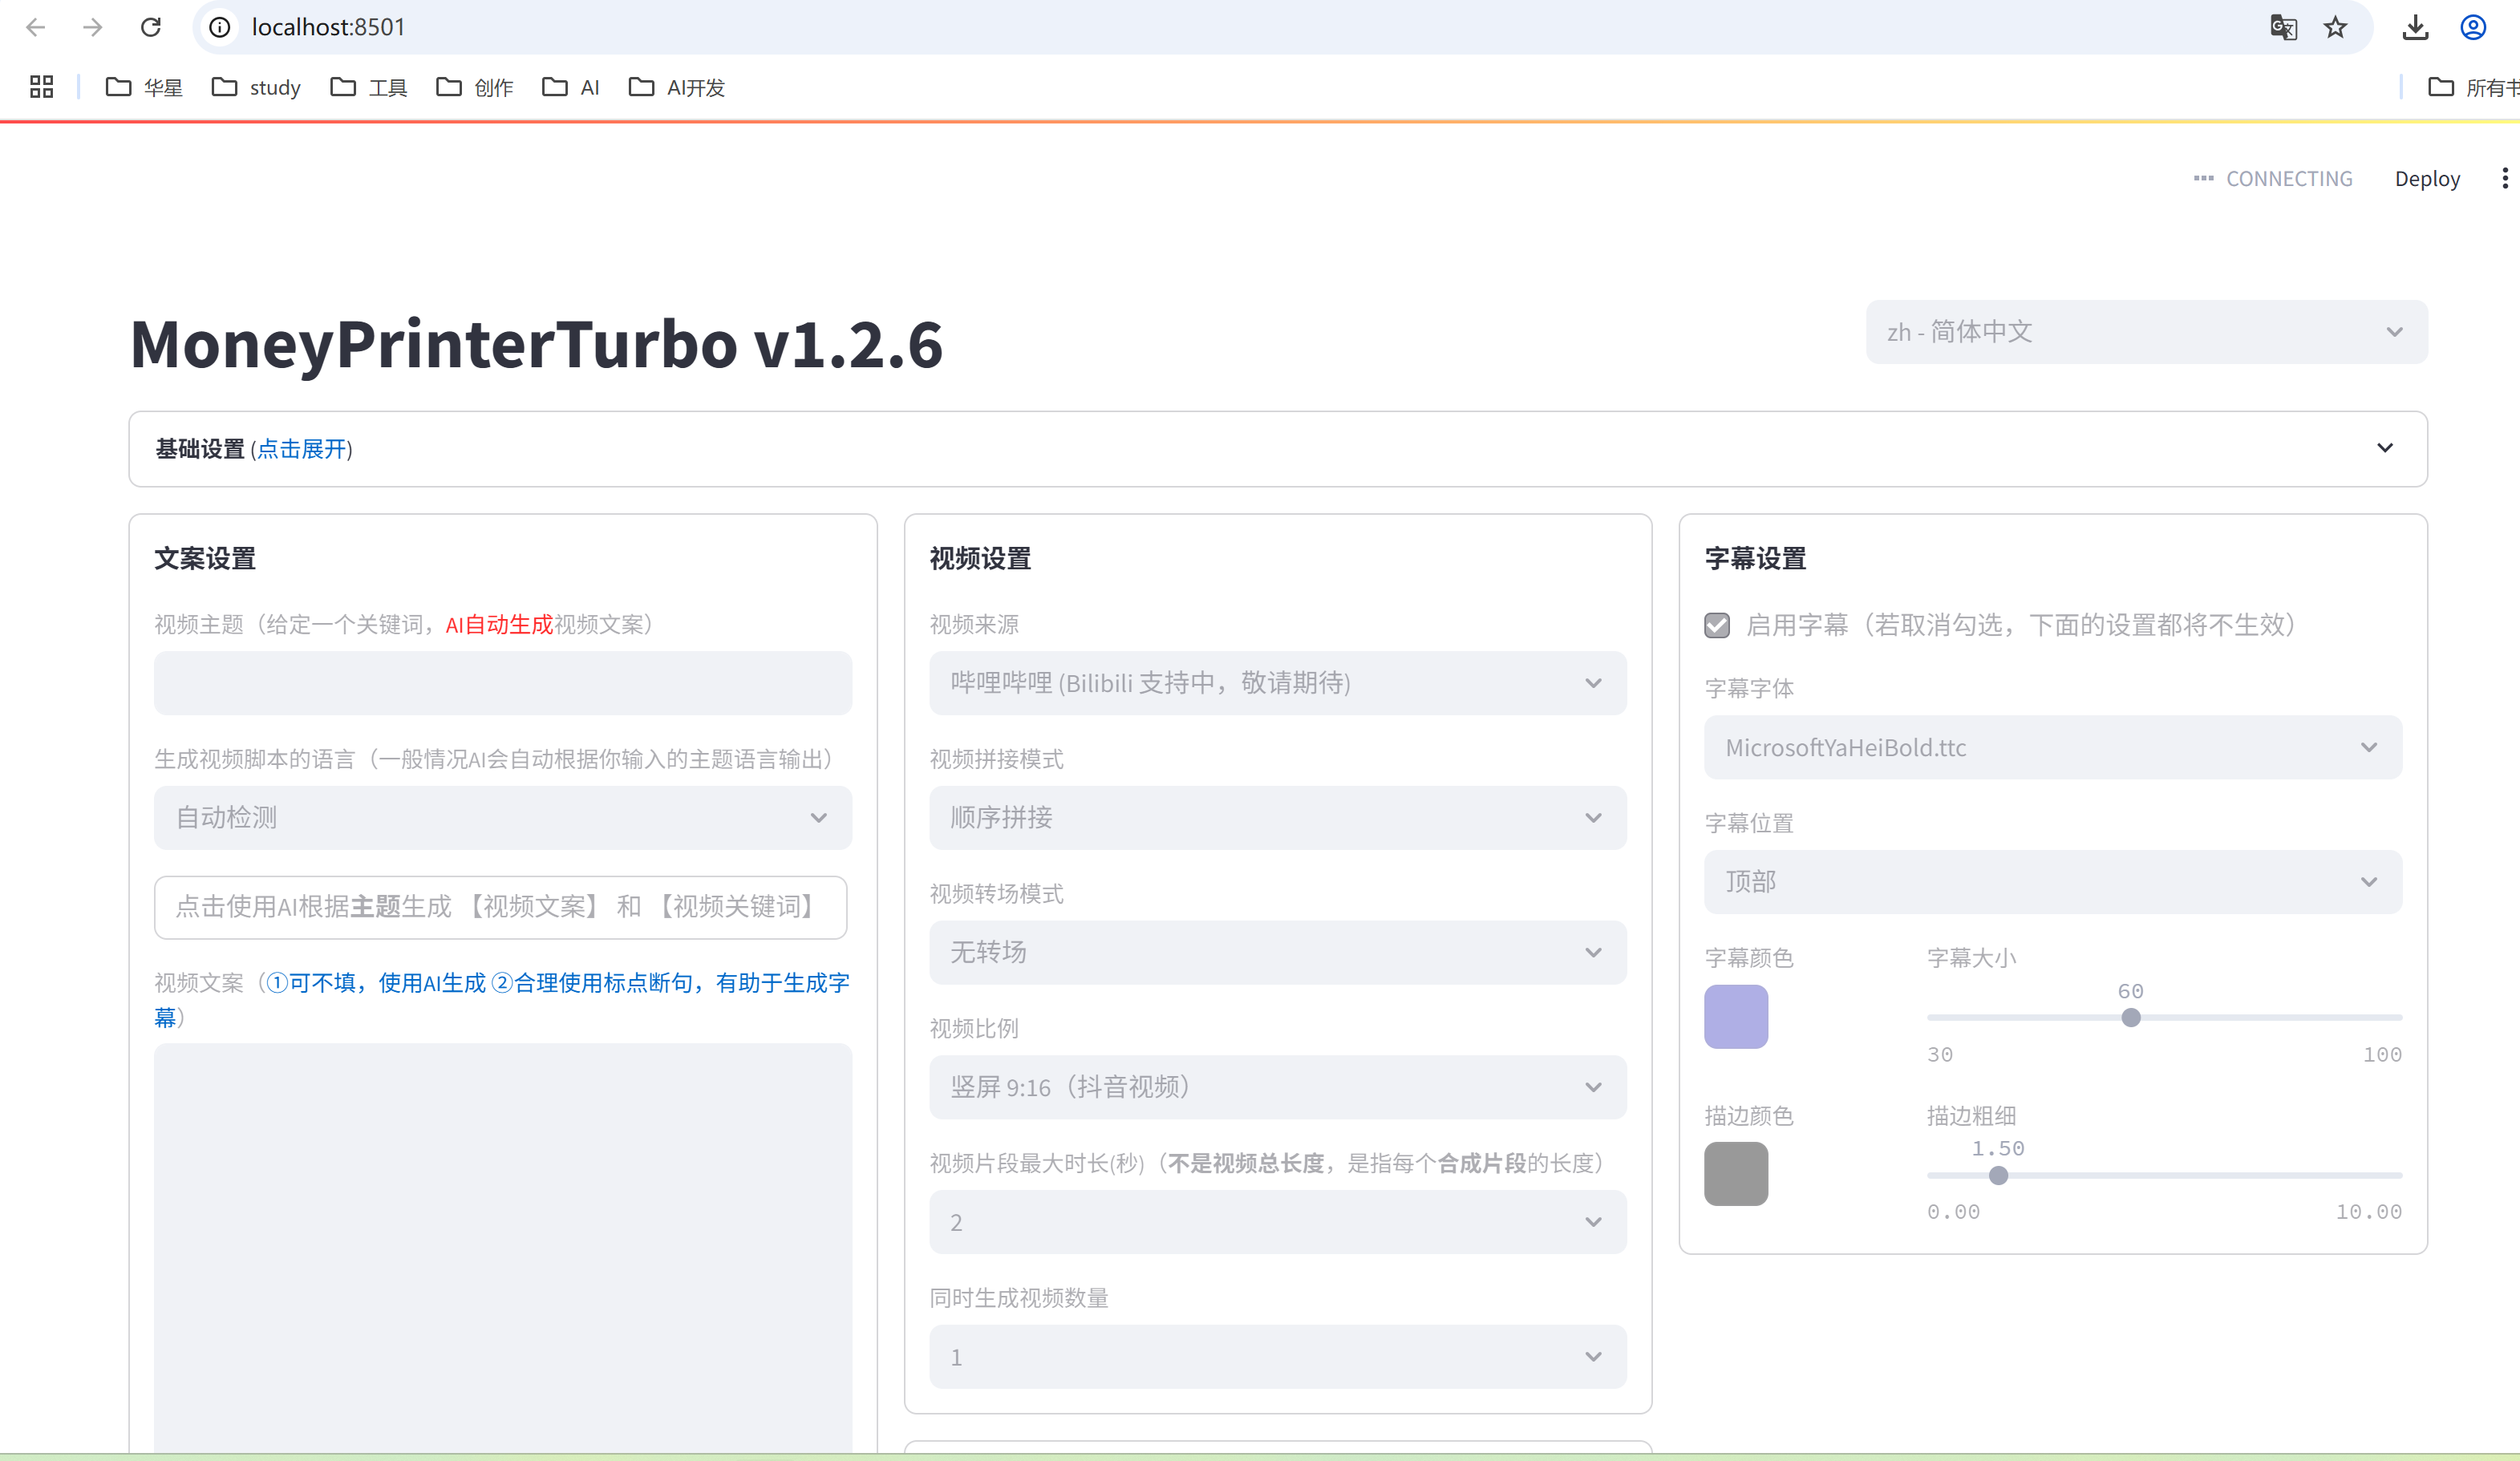
启动后页面如下: