《操作系统真象还原》第十四章(1)——文件系统概念、创建文件系统
文章目录
- 前言
- 文件系统概念简介
- inode、间接块索引表、文件控制块FCB简介
- 目录项与目录简介
- 超级块与文件系统布局
- 创建文件系统
- 创建超级块、i结点、目录项
- 编写超级块头文件super_block.h
- 编写i节点头文件inode.h
- 编写目录相关头文件dir.h
- 编写常用宏头文件fs.h
- 创建文件系统
- 编写fc.c
- 测试扫描分区功能
- 挂载分区
- 完善fs.c
- 检验挂载分区功能
- 结语
前言
上一章写完硬盘驱动,我们已经可以往硬盘内读写数据了。但是我们的系统还没有文件系统,因而整个14章就是要实现我们操作系统的文件系统。
这一章非常非常长,总共有15个小节,不管是文本量还是代码量都很大,我可能要分成5、6篇博客来完成。
这篇博客计划完成14.1、14.2小节内容,包括文件系统概念简介,创建文件系统和挂载分区两部分。
文件系统概念简介
本节通过学习linux如何管理文件,了解文件系统中几个重要的概念。
inode、间接块索引表、文件控制块FCB简介
块是若干扇区的集合,块大小是扇区的整数倍。
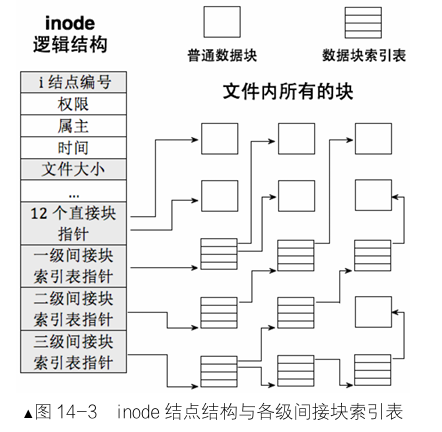
unix文件系统比较先进,它将文件以索引结构来组织,避免了访问某一数据块需要从头把其前所有数据块再遍历一次的缺点。采用索引结构的文件系统,文件中的块依然可以分散到不连续的零散空间中,保留了磁盘高利用率的优点,更重要的是文件系统为每个文件的所有块建立了一个索引表,索引表就是块地址数组,每个数组元素就是块的地址,数组元素下标是文件块的索引,第n个数组元素指向文件中的第n个块,这样访问任意一个块的时候,只要从 索引表中获得块地址就可以了,速度大大提升。包含此索引表的索引结构称为inode,即index node,索引结点,用来索引、跟踪一个文件的所有块。
索引方法的问题在于,如果每个块都有一个索引,那么当块的数量很多时,索引占的空间就很多了,如果所有索引都在一个表格里,那么这个索引表会变得非常非常大,不利于我们使用。
解决的方法就是引入分级索引。将一部分块放在索引表中,如果文件很大,将其他块放在另一个索引表,具体 做法是:每个索引表中共15个索引项,暂时称此索引表为 老索引表。老索引表中前 12 个索引项是文件的前 12 个块 的地址,它们是文件的直接块,即可直接获得地址的块。 若文件大于 12 个块,那就再建立个新的块索引表,新索引表称为一级间接块索引表,表中可容纳 256 个块的地址, 各表项都是块的地址,这 256 个块地址需要通过一级间接块索引表才能获得,因此称为“间接块”,这也是 一级间接块索引表中包含“间接”二字的原因。此表也要占用一个物理块来存储,该物理块的地址存储到老 索引表的第13个索引项中。有了一级间接块索引表,文件最大可达12+256=268 个块。要是 文件超过268个块怎么办?我们可以再建立二级间接块索引表,此表中各表项存储的是一级间接块索引表,然后在老索引表中第 14个索引项存储二级间接块索引表所在块的地址。有了二级间接块索引表, 文件最大可达(12+256+256*256)个块。 再不够的话,可以再建立三级间接块索引表,表中各表项存储 的是二级间接块索引表,然后在二级间接块索引表中建立一级 间接块索引表,三级间接块索引表所在块的地址记录在老索引表的第 15 个索引项中。
简介块索引示意图
文件系统为实现文件管理方案,必然会创造出一些辅助管理的数据结构,只要用于管理、控制 文件相关信息的数据结构都被称为FCB(File Contrl Block),即文件控制块,inode也是这种结构,因此inode 是FCB 的一种。
inode 的数量等于文件的数量,为方便管理,分区中所有文件的 inode 通过一个大表格来维护,此表格 称为inode_table,在计算机中表格都可以用数组来表示,因此inode_table本质上就是inode数组,数组元素的下标便是文件inode的编号。
inode是文件 在文件系统上的元信息(文件本身的元信息是它自己的文件头)。保存着inode序号,权限,文件拥有者,文件创建、修改、访问时间,文件大小,实体块指针等信息。
目录项与目录简介
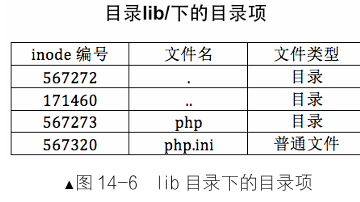
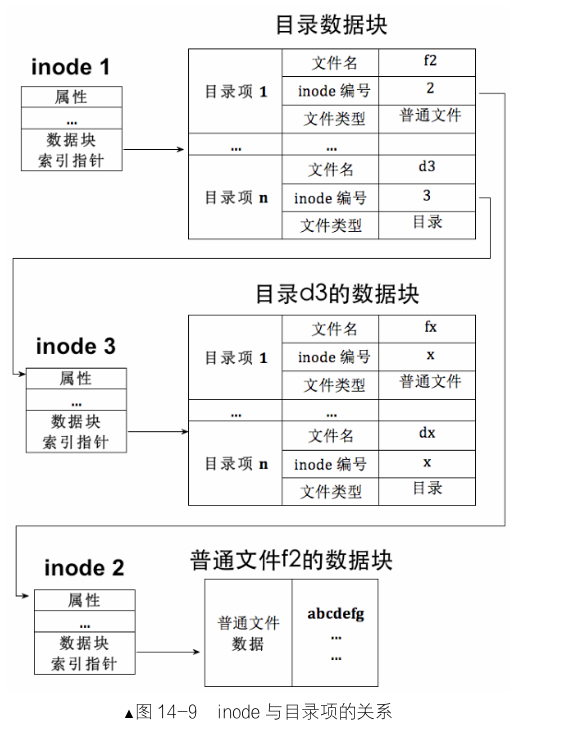
对于文件系统,目录和文件没有区别,它们都有与之匹配的inode。文件系统只关心inode,目录/普通文件的区分是便于人类使用的。普通文件inode指向的数据块就是文件本身的数据,目录文件的inode数据块部分是这个目录下的目录项。
什么是目录项?目录项中包含文件名、inode编号和文件类型,它们三 个的作用有两个,一是标识此Inode表示的文件是目录,还是普通 文件,也就是inode所指向数据块中的内容是什么。二是将文件名与inode做个绑定关联,这样用户便可 以通过文件名来找到文件的实体数据。
这是目录项示意图
总结梳理下以上所介绍的内容
- 每个文件都有自己单独的inode,inode是文件实体数据块在文件系统上的元信息。
- 所有文件的inode集中管理,形成inode数组,每个inode的编号就是在该inode数组中的下标。
- inode 中的前12个直接数据块指针和后3个间接块索引表用于指向文件的数据块实体。
- 文件系统中并不存在具体称为“目录”的数据结构,同样也没有称为“普通文件”的数据结构,统一用同一种inode表示。inode表示的文件是普通文件,还是目录文件,取决于inode所指向数据块中的实际内容是什么,即数据块中的内容要么是普通文件本身的数据,要么是目录中的目录项。
- 目录项仅存在于inode指向的数据块中,有目录项的数据块就是目录,目录项所属的inode指向的所有数据块便是目录。
- 目录项中记录的是文件名、文件inode的编号和文件类型,目录项起到的作用有两个,一是粘合文件名及inode,使文件名和inode关联绑定,二是标识此inode所指向的数据块中的数据类型(比如是普 通文件,还是目录,当然还有更多的类型)。
- inode 是文件的“实质”,但它并不能直接引用,必须通过文件名找到文件名所在的目录项,然后 从该目录项中获得inode的编号,然后用此编号到inode数组中去找相关的inode,最终找到文件的数据块。
二者关系示意图
超级块与文件系统布局
超级块是保存文件系统元信息的元信息。简单来说,inode数组起始地址在哪里?inode数组有多大?有多少inode?根目录地址?诸如此类的信息保存在超级块里。
超级块是文件系统元信息的“配置文件”,它是在为分区创建文件系统时 创建的,所有有关文件系统元信息的配置都在超级块中,因此超级块的位置和 大小不能再被“配置”了,必须是固定的,它被固定存储在各分区的第2个扇 区,通常是占用一个扇区的大小,具体大小与实际文件系统类型为准。
超级块逻辑结构示意图

ext2文件系统布局示意图
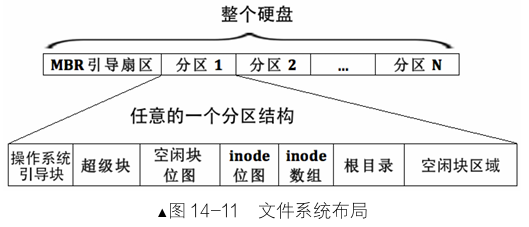
我们的文件系统就是简化后的ext2。
创建文件系统
14.2,本节将在硬盘 file_hd_80M.img 的各分区上创建文件系统,后续的文件操作都要基于本节的工作。
创建超级块、i结点、目录项
本节我们新建了一个目录fs,相关文件都写在这个目录下。
编写超级块头文件super_block.h
#ifndef __FS_SUPER_BLOCK_H
#define __FS_SUPER_BLOCK_H#include "../lib/kernel/stdint.h"
struct super_block
{uint32_t magic;         // 标识文件系统类型uint32_t sec_cnt;       // 本分区扇区数uint32_t inode_cnt;     // 本分区inode数uint32_t part_lba_base; // 分区起始lbauint32_t block_bitmap_lba;   // 块位图起始lbauint32_t block_bitmap_sects; // 块位图占用扇区数uint32_t inode_bitmap_lba;   // indoe位图起始lbauint32_t inode_bitmap_sects; // inode位图占用扇区数uint32_t inode_table_lba;   // inode表起始lbauint32_t inode_table_sects; // inode表占用扇区数uint32_t data_start_lba; // 数据块起始lbauint32_t root_inode_no;  // 根目录i结点号uint32_t dir_entry_size; // 目录项大小uint8_t pad[460]; // 占位,凑足512字节大小
} __attribute__((packed));
#endif
编写i节点头文件inode.h
#ifndef __FS_INODE_H
#define __FS_INODE_H#include "../lib/kernel/stdint.h"
#include "../lib/kernel/list.h"/*inode结构体*/
struct inode
{uint32_t i_no;        // 编号uint32_t i_size;      // 大小uint32_t i_open_cnts; // 记录此文件被打开次数bool write_deny;      // 写文件时检查此标识,确保不存在并行uint32_t i_sectors[13]; // 这个数组前12项是直接块,13项存储一级间接块指针struct list_elem inode_tag;
};
#endif
编写目录相关头文件dir.h
#ifndef __FS_DIR_H
#define __FS_DIR_H#include "../lib/kernel/stdint.h"
#include "fs.h" //提供enum file_types
struct inode;   // inode前向声明#define MAX_FILE_NAME_LEN 16 // 最大文件名长度
/*目录结构体*/
struct dir
{struct inode *inode;uint32_t dir_pos;     // 记录在此目录下的偏移uint8_t dir_buf[512]; // 目录的数据缓冲区
};/*目录项结构体*/
struct dir_entry
{char filename[MAX_FILE_NAME_LEN]; // 普通文件或目录名称uint32_t i_no;                    // 对应的i结点编号enum file_types f_type;           // 文件类型
};
#endif
编写常用宏头文件fs.h
#ifndef __FS_FS_H
#define __FS_FS_H#define MAX_FILES_PER_PART 4096 // 每个扇区最大支持文件数
#define BITS_PER_SECTOR 4096    // 每扇区的位数
#define SECTOR_SIZE 512         // 每扇区的字节数
#define BLOCK_SIZE SECTOR_SIZE  // 块字节大小 我们设置为1个块==1个扇区enum file_types
{FT_UNKNOWN,  // 未知文件类型FT_REGULAR,  // 普通文件类型FT_DIRECTORY // 目录文件类型
};
void filesys_init(void);
#endif
创建文件系统
编写fc.c
写在fc目录下,本部分完成后有200多行代码。
#include "fs.h"
#include "inode.h"
#include "dir.h"
#include "super_block.h"
#include "../lib/kernel/stdint.h"
#include "../lib/kernel/list.h"
#include "../lib/string.h"
#include "../lib/stdio.h"
#include "../device/ide.h"
#include "../kernel/debug.h"static void partition_format(struct disk *hd, struct partition *part)
{uint32_t boot_sector_sects = 1; // 根目录扇区uint32_t super_block_sects = 1; // 超级块扇区// inode位图所占扇区uint32_t inode_bitmap_sects = DIV_ROUND_UP(MAX_FILES_PER_PART, BITS_PER_SECTOR);// inode表所占扇区uint32_t inode_table_sects = DIV_ROUND_UP(((sizeof(struct inode) * MAX_FILES_PER_PART)), SECTOR_SIZE);uint32_t used_sects = boot_sector_sects + super_block_sects + inode_bitmap_sects + inode_table_sects;uint32_t free_sects = part->sec_cnt - used_sects;// 块位图所占扇区uint32_t block_bitmap_sects = DIV_ROUND_UP(free_sects, BITS_PER_SECTOR);uint32_t block_bitmap_bit_len = free_sects - block_bitmap_sects;block_bitmap_sects = DIV_ROUND_UP(block_bitmap_bit_len, BITS_PER_SECTOR);// 将超级块初始化struct super_block sb;sb.magic = 0x20250325;sb.sec_cnt = part->sec_cnt;sb.inode_cnt = MAX_FILES_PER_PART;sb.part_lba_base = part->start_lba;sb.block_bitmap_lba = sb.part_lba_base + 2;sb.block_bitmap_sects = block_bitmap_sects;sb.inode_bitmap_lba = sb.block_bitmap_lba + sb.block_bitmap_sects;sb.inode_bitmap_sects = inode_bitmap_sects;sb.inode_table_lba = sb.inode_bitmap_lba + sb.inode_bitmap_sects;sb.inode_table_sects = inode_table_sects;sb.data_start_lba = sb.inode_table_lba + sb.inode_table_sects;sb.root_inode_no = 0;sb.dir_entry_size = sizeof(struct dir_entry);printk("%s info:\n""  magic:              0x%x\n""  part_lba_base:      0x%x\n""  all_sectors:        0x%x\n""  inode_cnt:          0x%x\n""  block_bitmap_lba:   0x%x\n""  block_bitmap_sects: 0x%x\n""  inode_bitmap_lba:   0x%x\n""  inode_bitmap_sects: 0x%x\n""  inode_table_lba:    0x%x\n""  inode_table_sects:  0x%x\n""  data_start_lba:     0x%x\n",part->name,sb.magic, sb.part_lba_base, sb.sec_cnt, sb.inode_cnt,sb.block_bitmap_lba, sb.block_bitmap_sects, sb.inode_bitmap_lba,sb.inode_bitmap_sects, sb.inode_table_lba, sb.inode_table_sects,sb.data_start_lba);// 1.将超级块写入本分区1扇区ide_write(hd, part->start_lba + 1, &sb, 1);printk("  super_blcok_lba:    0x%x\n", part->start_lba + 1);// 开辟一块缓冲区,大小为三个属性中最大的uint32_t buf_size = (sb.block_bitmap_sects >= sb.inode_bitmap_sects) ? sb.block_bitmap_sects : sb.inode_bitmap_sects;buf_size = (buf_size >= sb.inode_table_sects) ? buf_size : sb.inode_table_sects;buf_size *= SECTOR_SIZE;uint8_t *buf = (uint8_t *)sys_malloc(buf_size);// 2.将块位图初始化并写入sb.block_bitmap_lbabuf[0] |= 0x01; // 0号块留给根目录uint32_t block_bitmap_last_byte = block_bitmap_bit_len / 8;uint8_t block_bitmap_last_bit = block_bitmap_bit_len % 8;// last_size是保存位图的最后一个扇区中,多余出的位uint32_t last_size = (SECTOR_SIZE - block_bitmap_last_byte % SECTOR_SIZE);// 先将超出实际块数的部分设置为已占用1memset(&buf[block_bitmap_last_byte], 0xff, last_size);// 在将有效位重新设置为未占用0uint8_t bit_idx = 0;while (bit_idx <= block_bitmap_last_bit){// 通过取反+左移,实现逐位清零buf[block_bitmap_last_byte] &= ~(1 << bit_idx++);}ide_write(hd, sb.block_bitmap_lba, buf, sb.block_bitmap_sects);// 3.将inode位图初始化并写入sb.inode_bitmap_lba// 清空缓冲区memset(buf, 0, buf_size);buf[0] |= 0x1;/*inode_table中有4096个inode,正好一个扇区,*inode_bitmap扇区没有多余无效位,不需要进一步处理*/ide_write(hd, sb.inode_bitmap_lba, buf, sb.inode_bitmap_sects);// 4 将inode数组初始化并写入sb.inode_table_lba// 初始化了第一个indoememset(buf, 0, buf_size);struct inode *i = (struct inode *)buf;i->i_size = sb.dir_entry_size * 2; // 留出..和.目录i->i_no = 0;i->i_sectors[0] = sb.data_start_lba;ide_write(hd, sb.inode_table_lba, buf, sb.inode_table_sects);// 5.将根目录写入sb.data_start_lbamemset(buf, 0, buf_size);struct dir_entry *p_de = (struct dir_entry *)buf;// 初始化当前目录.memcpy(p_de->filename, ".", 1);p_de->i_no = 0;p_de->f_type = FT_DIRECTORY;p_de++;// 初始化父目录..memcpy(p_de->filename, "..", 2);p_de->i_no = 0;p_de->f_type = FT_DIRECTORY;ide_write(hd, sb.data_start_lba, buf, 1);printk("  root_dir_lba:       0x%x\n", sb.data_start_lba);printk("%s format done\n", part->name);sys_free(buf);
}/*在磁盘上搜索文件系统,若没有则格式化分区创建文件系统*/
void filesys_init()
{uint8_t channel_no = 0, dev_no, part_idx = 0;// 开辟超级块缓冲区struct super_block *sb_buf = (struct super_block *)sys_malloc(SECTOR_SIZE);if (sb_buf == NULL){PANIC("alloc memory failed!");}printk("searching filesystem......\n");while (channel_no < channel_cnt) // channel_cnt声明在ide.h,实现在ide.c{dev_no = 0;while (dev_no < 2) // 一个通道可以挂载2个设备{if (dev_no == 0){dev_no++;continue;}struct disk *hd = &channels[channel_no].devices[dev_no];struct partition *part = hd->prim_parts; // 初始指向4个主分区while (part_idx < 12) // 4主分区+8逻辑分区{if (part_idx == 4){part = hd->logic_parts; // 开始处理逻辑分区}if (part->sec_cnt != 0){memset(sb_buf, 0, SECTOR_SIZE);// 读取超级块,根据魔数判断是否存在文件系统ide_read(hd, part->start_lba + 1, sb_buf, 1);// 魔数匹配,说明存在我的文件系统if (sb_buf->magic == 0x20250325){printk("%s has file system\n", part->name);}// 不匹配,认为不存在文件系统,于是创建我的操作系统else{// 提示正在进行初始化printk("formatting %s's partition %s......\n", hd->name, part->name);// 调用函数创建每个分区的文件系统partition_format(hd,part);}}part_idx++;part++; // 进入下一分区}dev_no++; // 进入下一磁盘}channel_no++; // 进入下一通道}sys_free(sb_buf);
}
测试扫描分区功能
makefile
BUILD_DIR = ./build
ENTRY_POINT = 0xc0001500
AS = nasm
CC = gcc
LD = ld
LIB = -I lib/ -I lib/kernel/ -I lib/user/ -I kernel/ -I device/
ASFLAGS = -f elf
CFLAGS =  -Wall -m32 -fno-stack-protector $(LIB) -c -fno-builtin -W -Wstrict-prototypes -Wmissing-prototypes
LDFLAGS =  -m elf_i386 -Ttext $(ENTRY_POINT) -e main -Map $(BUILD_DIR)/kernel.map
OBJS = $(BUILD_DIR)/main.o $(BUILD_DIR)/init.o $(BUILD_DIR)/interrupt.o \$(BUILD_DIR)/timer.o $(BUILD_DIR)/kernel.o $(BUILD_DIR)/print.o \$(BUILD_DIR)/debug.o $(BUILD_DIR)/string.o $(BUILD_DIR)/memory.o \$(BUILD_DIR)/bitmap.o $(BUILD_DIR)/thread.o $(BUILD_DIR)/list.o \$(BUILD_DIR)/switch.o $(BUILD_DIR)/sync.o $(BUILD_DIR)/console.o \$(BUILD_DIR)/keyboard.o $(BUILD_DIR)/ioqueue.o $(BUILD_DIR)/tss.o \$(BUILD_DIR)/process.o $(BUILD_DIR)/syscall-init.o $(BUILD_DIR)/syscall.o \$(BUILD_DIR)/stdio.o $(BUILD_DIR)/ide.o $(BUILD_DIR)/fs.o################	c代码编译   ##################
$(BUILD_DIR)/main.o: kernel/main.c lib/kernel/print.h \lib/kernel/stdint.h kernel/init.h kernel/debug.h \kernel/memory.h thread/thread.h kernel/interrupt.h \device/console.h userprog/process.h lib/user/syscall.h \userprog/syscall-init.h lib/stdio.h$(CC) $(CFLAGS) $< -o $@$(BUILD_DIR)/init.o: kernel/init.c kernel/init.h lib/kernel/print.h \lib/kernel/stdint.h kernel/interrupt.h device/timer.h \kernel/memory.h thread/thread.h device/console.h \device/keyboard.h userprog/tss.h userprog/syscall-init.h \device/ide.h fs/fs.h$(CC) $(CFLAGS) $< -o $@$(BUILD_DIR)/interrupt.o: kernel/interrupt.c kernel/interrupt.h \lib/kernel/stdint.h kernel/global.h kernel/io.h \lib/kernel/print.h$(CC) $(CFLAGS) $< -o $@$(BUILD_DIR)/timer.o: device/timer.c device/timer.h lib/kernel/stdint.h \kernel/io.h lib/kernel/print.h kernel/interrupt.h \thread/thread.h kernel/debug.h$(CC) $(CFLAGS) $< -o $@$(BUILD_DIR)/debug.o: kernel/debug.c kernel/debug.h \lib/kernel/print.h kernel/interrupt.h$(CC) $(CFLAGS) $< -o $@$(BUILD_DIR)/string.o: lib/string.c lib/string.h \kernel/debug.h$(CC) $(CFLAGS) $< -o $@$(BUILD_DIR)/memory.o: kernel/memory.c kernel/memory.h \lib/kernel/stdint.h lib/kernel/bitmap.h kernel/debug.h \lib/string.h thread/sync.h thread/thread.h$(CC) $(CFLAGS) $< -o $@$(BUILD_DIR)/bitmap.o: lib/kernel/bitmap.c lib/kernel/bitmap.h \lib/string.h kernel/interrupt.h lib/kernel/print.h \kernel/debug.h$(CC) $(CFLAGS) $< -o $@$(BUILD_DIR)/thread.o: thread/thread.c thread/thread.h \lib/kernel/stdint.h lib/kernel/list.h lib/string.h \kernel/memory.h kernel/interrupt.h kernel/debug.h \lib/kernel/print.h userprog/process.h$(CC) $(CFLAGS) $< -o $@$(BUILD_DIR)/list.o: lib/kernel/list.c lib/kernel/list.h \lib/kernel/stdint.h kernel/interrupt.h kernel/debug.h$(CC) $(CFLAGS) $< -o $@$(BUILD_DIR)/sync.o: thread/sync.c thread/sync.h \lib/kernel/stdint.h thread/thread.h kernel/debug.h \kernel/interrupt.h$(CC) $(CFLAGS) $< -o $@$(BUILD_DIR)/console.o: device/console.c device/console.h \lib/kernel/print.h thread/sync.h$(CC) $(CFLAGS) $< -o $@$(BUILD_DIR)/keyboard.o: device/keyboard.c device/keyboard.h \lib/kernel/print.h kernel/interrupt.h kernel/io.h \lib/kernel/stdint.h device/ioqueue.h$(CC) $(CFLAGS) $< -o $@$(BUILD_DIR)/ioqueue.o: device/ioqueue.c device/ioqueue.h \lib/kernel/stdint.h thread/thread.h thread/sync.h \kernel/interrupt.h kernel/debug.h$(CC) $(CFLAGS) $< -o $@$(BUILD_DIR)/tss.o: userprog/tss.c userprog/tss.h \lib/kernel/stdint.h thread/thread.h kernel/global.h \lib/kernel/print.h lib/string.h$(CC) $(CFLAGS) $< -o $@$(BUILD_DIR)/process.o: userprog/process.c userprog/process.h \kernel/global.h lib/kernel/stdint.h thread/thread.h \kernel/debug.h userprog/tss.h device/console.h \lib/string.h kernel/interrupt.h$(CC) $(CFLAGS) $< -o $@$(BUILD_DIR)/syscall.o: lib/user/syscall.c lib/user/syscall.h$(CC) $(CFLAGS) $< -o $@$(BUILD_DIR)/syscall-init.o: userprog/syscall-init.c userprog/syscall-init.h \lib/kernel/stdint.h lib/user/syscall.h thread/thread.h \lib/kernel/print.h$(CC) $(CFLAGS) $< -o $@$(BUILD_DIR)/stdio.o: lib/stdio.c lib/stdio.h \lib/kernel/stdint.h lib/string.h kernel/debug.h \lib/user/syscall.h$(CC) $(CFLAGS) $< -o $@$(BUILD_DIR)/ide.o: device/ide.c device/ide.o \lib/stdio.h kernel/debug.h kernel/global.h \thread/sync.h kernel/io.h device/timer.h \kernel/interrupt.h lib/string.h fs/super_block.h$(CC) $(CFLAGS) $< -o $@$(BUILD_DIR)/fs.o: fs/fs.c fs/fs.o\fs/inode.h fs/super_block.h fs/dir.h \lib/stdio.h lib/string.h kernel/debug.h \device/ide.h$(CC) $(CFLAGS) $< -o $@##############    汇编代码编译    ###############
$(BUILD_DIR)/kernel.o: kernel/kernel.S$(AS) $(ASFLAGS) $< -o $@$(BUILD_DIR)/print.o: lib/kernel/print.S$(AS) $(ASFLAGS) $< -o $@$(BUILD_DIR)/switch.o: thread/switch.S$(AS) $(ASFLAGS) $< -o $@##############    连接所有目标文件    #############
$(BUILD_DIR)/kernel.bin: $(OBJS)$(LD) $(LDFLAGS) $^ -o $@.PHONY : mk_dir hd clean allmk_dir:if [ ! -d $(BUILD_DIR) ]; then mkdir $(BUILD_DIR); fihd:dd if=$(BUILD_DIR)/kernel.bin \of=/home/hongbai/bochs/bin/os_hd_60M.img \bs=512 count=200 seek=10 conv=notruncclean:cd $(BUILD_DIR) && rm -f ./*build: $(BUILD_DIR)/kernel.binall: mk_dir build hd
截图
一开始还没有分区,所以第一次会扫描并创建分区,结果如图
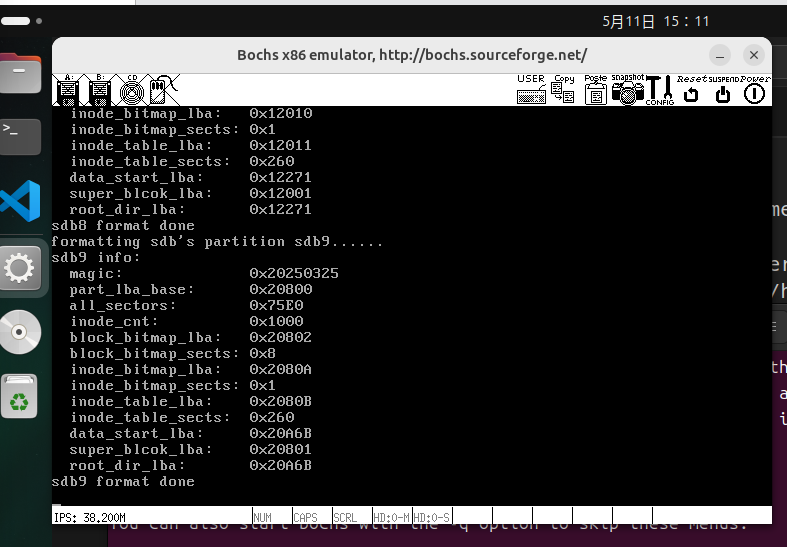
再次运行,已有分区,结果如图
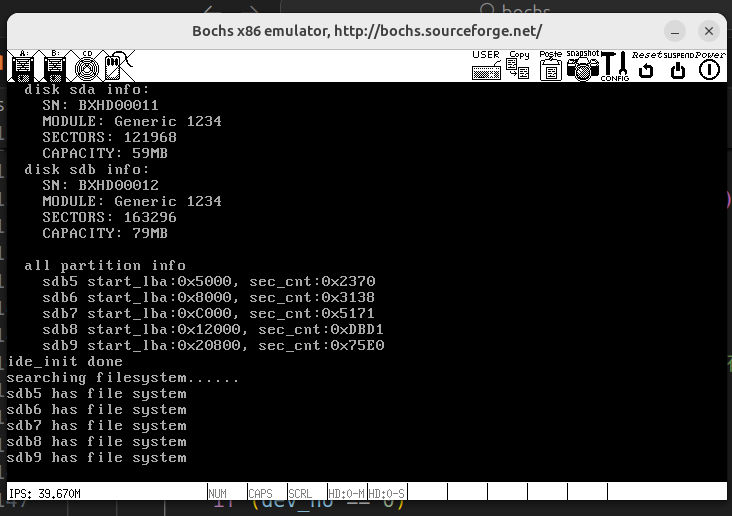
发现主分区1似乎没有文件系统。
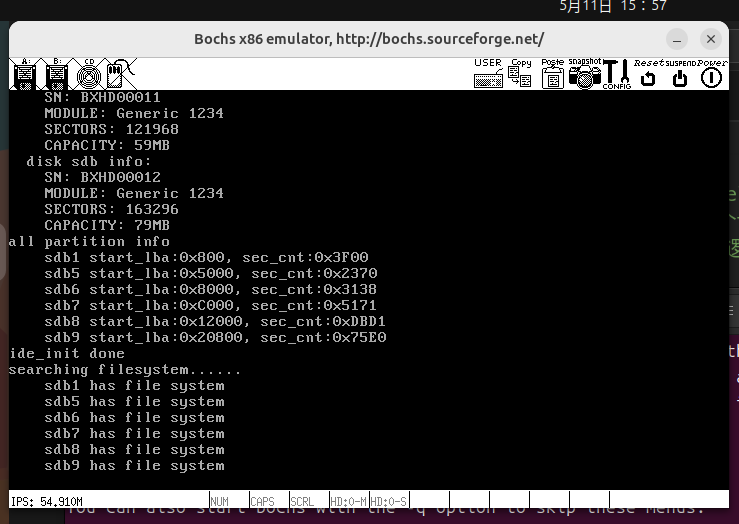
一番调试研究,发现问题处在上一章ide.c里。处理逻辑分区时数组用的是主分区的数组,导致主分区被覆盖。
这是调整后的截图
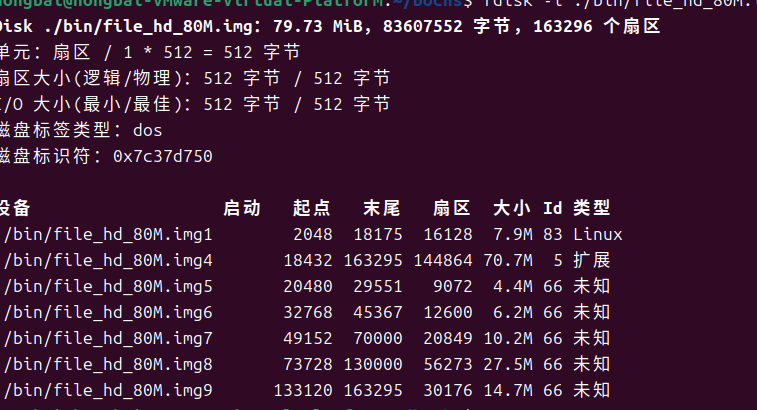
在linux命令行中输入fdisk -l ./bin/file_hd_80M.img,查看fdisk分区情况,进行比较
ok那么这一小部分算是结束。
挂载分区
对于linux系统,内核所在的分区是默认分区,根目录固定存在。其他的新分区需要用mount命令,挂载在默认分区的某个目录下,才能正常使用。当分区不再使用时,也可以用umount命令卸载分区。
回顾windows和linux安装过程,我们都是把操作系统写在某个分区里,比如windows系统就在c盘。但是我们的系统盘和文件盘是两个硬盘,而且系统盘上也没有文件系统。所以我们的挂载分区功能是简单版——只需要实现选择待操作分区的功能。
挂载分区的实质是把该分区文件系统的元信息从硬盘上读出来加载到内存中,这样硬盘资源的变化都 用内存中元信息来跟踪,如果有写操作,及时将内存中的元信息同步写入到硬盘以持久化。
完善fs.c
这次代码写完后有250+行,主要是新增了挂载的函数
#include "fs.h"
#include "inode.h"
#include "dir.h"
#include "super_block.h"
#include "../lib/kernel/stdint.h"
#include "../lib/kernel/list.h"
#include "../lib/string.h"
#include "../lib/stdio.h"
#include "../device/ide.h"
#include "../kernel/debug.h"struct partition *cur_part; // 记录默认情况下操作的分区/* 在分区链表中找到名为part_name的分区,并将其指针赋值给cur_part */
static bool mount_partition(struct list_elem *pelem, int arg)
{char *part_name = (char *)arg;struct partition *part = elem2entry(struct partition, part_tag, pelem);if (!strcmp(part->name, part_name)){cur_part = part;struct disk *hd = cur_part->my_disk;// 创建用来保存超级块的缓冲区struct super_block *sb_buf = (struct super_block *)sys_malloc(SECTOR_SIZE);// 在内存创建cur_part的超级块cur_part->sb = (struct super_block *)sys_malloc(sizeof(struct super_block));if (cur_part->sb == NULL){PANIC("alloc memory failed!");}/*读入超级块到缓冲区*/memset(sb_buf, 0, SECTOR_SIZE);ide_read(hd, cur_part->start_lba + 1, sb_buf, 1);/*把缓冲区超级块数据复制到cur_part的sb中*/memcpy(cur_part->sb, sb_buf, sizeof(struct super_block));/*为什么要先读入缓冲区,再把缓冲区数据复制到相应的变量中?*缓冲区大小就是1扇区512字节,和硬盘读取标准对齐,而实际超级块结构体小于512字节*如果直接读入实际结构体,会导致硬盘读写很慢。*//*将分区的块位图写入内存*/// 开辟内存空间给位图指针cur_part->block_bitmap.btmp_bits = (uint8_t *)sys_malloc(sb_buf->block_bitmap_sects * SECTOR_SIZE);if (cur_part->block_bitmap.btmp_bits == NULL){PANIC("alloc memory failed!");}// 设置位图长度cur_part->block_bitmap.btmp_bytes_len = sb_buf->block_bitmap_sects * SECTOR_SIZE;// sb_buf->block_bitmap_sects等价于cur_part->sb->block_bitmap_sects// 给位图指针赋值ide_read(hd, sb_buf->block_bitmap_lba, cur_part->block_bitmap.btmp_bits, sb_buf->block_bitmap_sects);/*将分区的inode位图写入内存*/cur_part->inode_bitmap.btmp_bits = (uint8_t *)sys_malloc(sb_buf->inode_bitmap_sects * SECTOR_SIZE);if (cur_part->inode_bitmap.btmp_bits == NULL){PANIC("alloc memory failed!");}cur_part->inode_bitmap.btmp_bytes_len = sb_buf->block_bitmap_sects * SECTOR_SIZE;ide_read(hd, sb_buf->inode_bitmap_lba, cur_part->inode_bitmap.btmp_bits, sb_buf->inode_bitmap_sects);list_init(&cur_part->open_inodes);printk("mount %s done!\n", part->name);/*返回true是为了配合定义在list.c的list_traversal函数,和本函数功能无关*返回true时list_traversal停止对链表的遍历*/return true;}return false;
}static void partition_format(struct disk *hd, struct partition *part)
{uint32_t boot_sector_sects = 1; // 根目录扇区uint32_t super_block_sects = 1; // 超级块扇区// inode位图所占扇区uint32_t inode_bitmap_sects = DIV_ROUND_UP(MAX_FILES_PER_PART, BITS_PER_SECTOR);// inode表所占扇区uint32_t inode_table_sects = DIV_ROUND_UP(((sizeof(struct inode) * MAX_FILES_PER_PART)), SECTOR_SIZE);uint32_t used_sects = boot_sector_sects + super_block_sects + inode_bitmap_sects + inode_table_sects;uint32_t free_sects = part->sec_cnt - used_sects;// 块位图所占扇区uint32_t block_bitmap_sects = DIV_ROUND_UP(free_sects, BITS_PER_SECTOR);uint32_t block_bitmap_bit_len = free_sects - block_bitmap_sects;block_bitmap_sects = DIV_ROUND_UP(block_bitmap_bit_len, BITS_PER_SECTOR);// 将超级块初始化struct super_block sb;sb.magic = 0x20250325;sb.sec_cnt = part->sec_cnt;sb.inode_cnt = MAX_FILES_PER_PART;sb.part_lba_base = part->start_lba;sb.block_bitmap_lba = sb.part_lba_base + 2;sb.block_bitmap_sects = block_bitmap_sects;sb.inode_bitmap_lba = sb.block_bitmap_lba + sb.block_bitmap_sects;sb.inode_bitmap_sects = inode_bitmap_sects;sb.inode_table_lba = sb.inode_bitmap_lba + sb.inode_bitmap_sects;sb.inode_table_sects = inode_table_sects;sb.data_start_lba = sb.inode_table_lba + sb.inode_table_sects;sb.root_inode_no = 0;sb.dir_entry_size = sizeof(struct dir_entry);printk("%s info:\n""  magic:              0x%x\n""  part_lba_base:      0x%x\n""  all_sectors:        0x%x\n""  inode_cnt:          0x%x\n""  block_bitmap_lba:   0x%x\n""  block_bitmap_sects: 0x%x\n""  inode_bitmap_lba:   0x%x\n""  inode_bitmap_sects: 0x%x\n""  inode_table_lba:    0x%x\n""  inode_table_sects:  0x%x\n""  data_start_lba:     0x%x\n",part->name,sb.magic, sb.part_lba_base, sb.sec_cnt, sb.inode_cnt,sb.block_bitmap_lba, sb.block_bitmap_sects, sb.inode_bitmap_lba,sb.inode_bitmap_sects, sb.inode_table_lba, sb.inode_table_sects,sb.data_start_lba);// 1.将超级块写入本分区1扇区ide_write(hd, part->start_lba + 1, &sb, 1);printk("  super_blcok_lba:    0x%x\n", part->start_lba + 1);// 开辟一块缓冲区,大小为三个属性中最大的uint32_t buf_size = (sb.block_bitmap_sects >= sb.inode_bitmap_sects) ? sb.block_bitmap_sects : sb.inode_bitmap_sects;buf_size = (buf_size >= sb.inode_table_sects) ? buf_size : sb.inode_table_sects;buf_size *= SECTOR_SIZE;uint8_t *buf = (uint8_t *)sys_malloc(buf_size);// 2.将块位图初始化并写入sb.block_bitmap_lbabuf[0] |= 0x01; // 0号块留给根目录uint32_t block_bitmap_last_byte = block_bitmap_bit_len / 8;uint8_t block_bitmap_last_bit = block_bitmap_bit_len % 8;// last_size是保存位图的最后一个扇区中,多余出的位uint32_t last_size = (SECTOR_SIZE - block_bitmap_last_byte % SECTOR_SIZE);// 先将超出实际块数的部分设置为已占用1memset(&buf[block_bitmap_last_byte], 0xff, last_size);// 在将有效位重新设置为未占用0uint8_t bit_idx = 0;while (bit_idx <= block_bitmap_last_bit){// 通过取反+左移,实现逐位清零buf[block_bitmap_last_byte] &= ~(1 << bit_idx++);}ide_write(hd, sb.block_bitmap_lba, buf, sb.block_bitmap_sects);// 3.将inode位图初始化并写入sb.inode_bitmap_lba// 清空缓冲区memset(buf, 0, buf_size);buf[0] |= 0x1;/*inode_table中有4096个inode,正好一个扇区,*inode_bitmap扇区没有多余无效位,不需要进一步处理*/ide_write(hd, sb.inode_bitmap_lba, buf, sb.inode_bitmap_sects);// 4 将inode数组初始化并写入sb.inode_table_lba// 初始化了第一个indoememset(buf, 0, buf_size);struct inode *i = (struct inode *)buf;i->i_size = sb.dir_entry_size * 2; // 留出..和.目录i->i_no = 0;i->i_sectors[0] = sb.data_start_lba;ide_write(hd, sb.inode_table_lba, buf, sb.inode_table_sects);// 5.将根目录写入sb.data_start_lbamemset(buf, 0, buf_size);struct dir_entry *p_de = (struct dir_entry *)buf;// 初始化当前目录.memcpy(p_de->filename, ".", 1);p_de->i_no = 0;p_de->f_type = FT_DIRECTORY;p_de++;// 初始化父目录..memcpy(p_de->filename, "..", 2);p_de->i_no = 0;p_de->f_type = FT_DIRECTORY;ide_write(hd, sb.data_start_lba, buf, 1);printk("  root_dir_lba:       0x%x\n", sb.data_start_lba);printk("%s format done\n", part->name);sys_free(buf);
}/*在磁盘上搜索文件系统,若没有则格式化分区创建文件系统*/
void filesys_init()
{uint8_t channel_no = 0, dev_no, part_idx = 0;// 开辟超级块缓冲区struct super_block *sb_buf = (struct super_block *)sys_malloc(SECTOR_SIZE);if (sb_buf == NULL){PANIC("alloc memory failed!");}printk("searching filesystem......\n");while (channel_no < channel_cnt) // channel_cnt声明在ide.h,实现在ide.c{dev_no = 0;while (dev_no < 2) // 一个通道可以挂载2个设备{if (dev_no == 0){dev_no++;continue;}struct disk *hd = &channels[channel_no].devices[dev_no];struct partition *part = hd->prim_parts; // 初始指向4个主分区while (part_idx < 12) // 4主分区+8逻辑分区{if (part_idx == 4){part = hd->logic_parts; // 开始处理逻辑分区}if (part->sec_cnt != 0){memset(sb_buf, 0, SECTOR_SIZE);// 读取超级块,根据魔数判断是否存在文件系统ide_read(hd, part->start_lba + 1, sb_buf, 1);// 魔数匹配,说明存在我的文件系统if (sb_buf->magic == 0x20250325){printk("    %s has file system\n", part->name);}// 不匹配,认为不存在文件系统,于是创建我的操作系统else{// 提示正在进行初始化printk("formatting %s's partition %s......\n", hd->name, part->name);// 调用函数创建每个分区的文件系统partition_format(hd, part);}}part_idx++;part++; // 进入下一分区}dev_no++; // 进入下一磁盘}channel_no++; // 进入下一通道}sys_free(sb_buf);/*确定默认操作分区*/char default_part[8] = "sdb1";/*挂载分区*/list_traversal(&partition_list, mount_partition, (int)default_part);
}
检验挂载分区功能
makefile不变,运行后截图如下
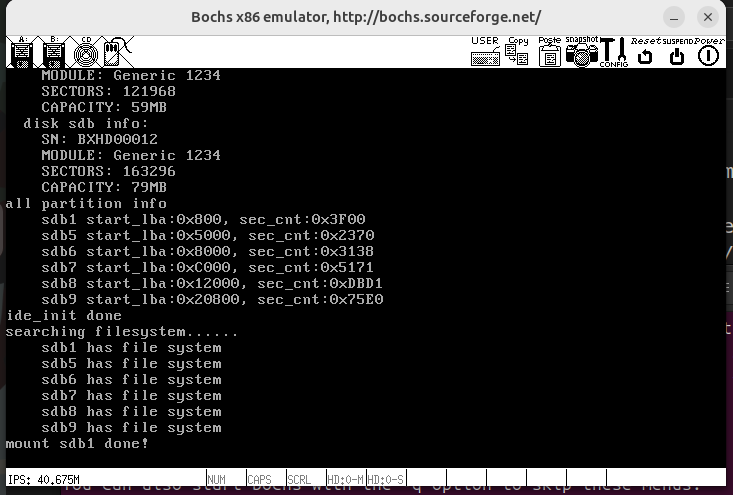
那么14.2算是圆满结束
结语
现在是2025年5月11日17点33分,今天过去大半了,只能说文件系统这部分代码量确实大。最开始计划昨晚完成这篇博客,结果还是高估自己了,直到现在才完成。本来这篇博客计划完成三小节内容的,最后缩减到了两小节,14.3放到下一篇博客开头吧。
整体来说这两次测试还算顺利,还找到个13章的bug,希望后面能一直顺利下去。
今晚再写一点,下周能自由支配的时间不多,进度可能还会被拖慢。