深入解析:实现一个详细的日志过滤器(LogFilter)
文章目录
- 前言
- 技术积累
- 过滤器(Filter)
- 过滤器的工作原理
- 过滤器的生命周期
- 缓存请求之 ContentCachingRequestWrappe
- 缓存响应之ContentCachingResponseWrapper
- 实战演示
- 添加依赖
- 创建 LogFilter 类
- 总结
前言
在现代 Web 应用开发中,日志记录是一个至关重要的环节。它不仅帮助我们调试问题,还能监控应用性能、分析用户行为,并确保系统的稳定性和安全性。本文将详细介绍如何实现一个详细的日志过滤器 LogFilter,记录 HTTP 请求和响应的详细信息,包括请求地址、方法、参数、头信息和体信息,以及响应的状态码、头信息和体信息。此外,我们还将探讨相关的理论和技术知识。
技术积累
过滤器(Filter)
过滤器 是 Java Servlet 规范中定义的一种组件,用于在请求到达目标资源(如 Servlet、JSP 页面等)之前或响应返回客户端之前对请求和响应进行处理。过滤器可以用于多种用途,如日志记录、权限控制、字符编码转换、压缩响应内容等。
过滤器的工作原理
请求到达过滤器:客户端发送请求到服务器,请求首先到达过滤器。
过滤器处理请求:过滤器可以对请求进行预处理,如设置字符编码、添加请求头等。
继续过滤链:过滤器调用 filterChain.doFilter 方法,将请求传递给下一个过滤器或目标资源。
目标资源处理请求:目标资源处理请求并生成响应。
过滤器处理响应:过滤器可以对响应进行后处理,如记录响应信息、修改响应头等。
响应返回客户端:过滤器将处理后的响应返回给客户端。
过滤器的生命周期
init: 过滤器初始化,通常用于加载配置信息。
doFilter: 处理请求和响应。
destroy: 过滤器销毁,通常用于释放资源
缓存请求之 ContentCachingRequestWrappe
大家都应该知道请求body只能够读取一次,你们我们可以通过ContentCachingRequestWrappe来进行处理。
ContentCachingRequestWrapper 是 spring boot 自带的请求体重复利用的工具,不过他也有缺点:
That means if the request:
content is not consumed, then the content is not cached
and cannot be retrieved via {@link #getContentAsByteArray()}
也就是说,用ContentCachingRequestWrapper的前提:
- 你要消费这个请求数据;
- 能过 getContentAsByteArray 方法获取缓存内容。
缓存响应之ContentCachingResponseWrapper
使用ContentCachingResponseWrapper可以对响应内容进行缓存和修改。通过包装器,开发者可以在最终响应之前修改响应头、响应体或添加额外的信息。这对于实现响应的压缩、加密或添加自定义的响应头等功能非常有帮助。
实战演示
添加依赖
首先,在 pom.xml 文件中添加所需的依赖:
<dependencies><!-- Spring Boot Web --><dependency><groupId>org.springframework.boot</groupId><artifactId>spring-boot-starter-web</artifactId></dependency><!-- Hutool --><dependency><groupId>cn.hutool</groupId><artifactId>hutool-all</artifactId><version>5.8.11</version></dependency><!-- Lombok --><dependency><groupId>org.projectlombok</groupId><artifactId>lombok</artifactId><optional>true</optional></dependency><!-- SLF4J --><dependency><groupId>org.slf4j</groupId><artifactId>slf4j-api</artifactId></dependency>
</dependencies>
创建 LogFilter 类
创建一个名为 LogFilter 的类,并实现 Filter 接口。这个类将负责记录请求和响应的详细信息。
/*** 日志过滤器,记录请求和响应的详细信息** @author senfel* @version 1.0* @date 2025/4/27 10:00*/
@Component
@Order(1)
@Slf4j
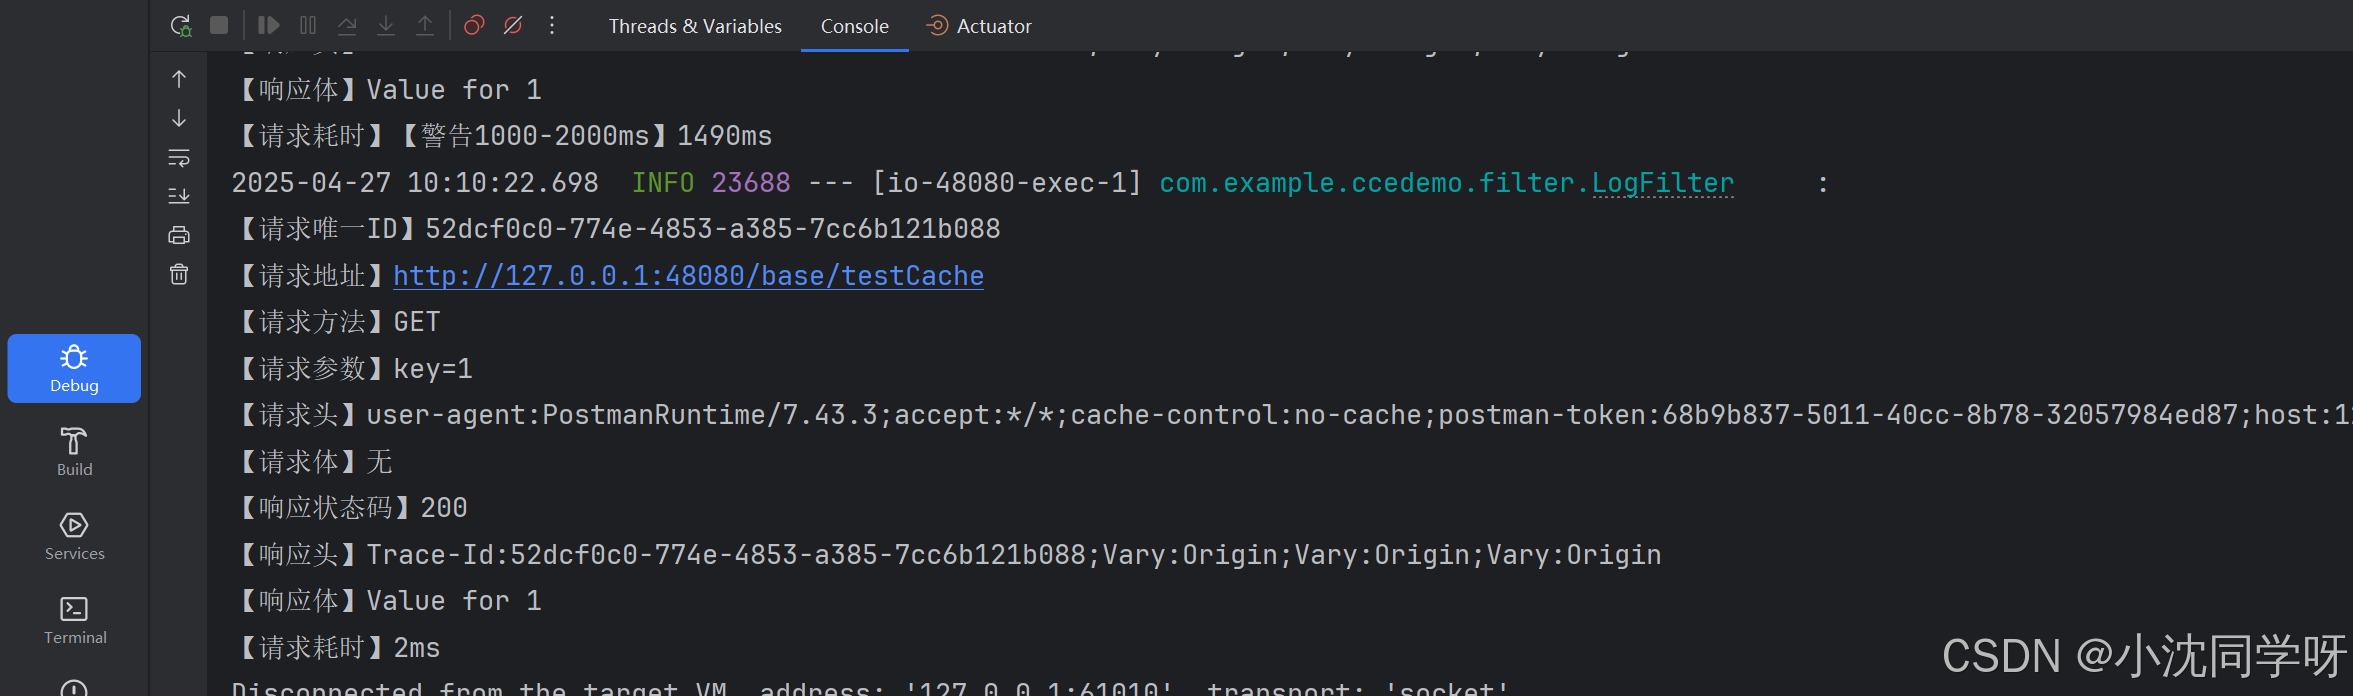
public class LogFilter implements Filter {/*** 过滤请求和响应* @param servletRequest* @param servletResponse* @param filterChain* @throws IOException* @throws ServletException*/@Overridepublic void doFilter(ServletRequest servletRequest, ServletResponse servletResponse, FilterChain filterChain) throws IOException, ServletException {long startTime = System.currentTimeMillis();HttpServletRequest request = (HttpServletRequest) servletRequest;HttpServletResponse response = (HttpServletResponse) servletResponse;request.setCharacterEncoding(StandardCharsets.UTF_8.name());response.setCharacterEncoding(StandardCharsets.UTF_8.name());ContentCachingRequestWrapper contentCachingRequestWrapper = new ContentCachingRequestWrapper(request);ContentCachingResponseWrapper contentCachingResponseWrapper = new ContentCachingResponseWrapper(response);String traceId = IdUtil.fastUUID();contentCachingResponseWrapper.addHeader("Demo-Trace-Id", traceId);// 继续过滤链filterChain.doFilter(contentCachingRequestWrapper, contentCachingResponseWrapper);StringBuilder stringBuilder = new StringBuilder();stringBuilder.append("\n【请求唯一ID】");stringBuilder.append(traceId);// 请求信息logRequestInfo(stringBuilder, contentCachingRequestWrapper);// 响应信息logResponseInfo(stringBuilder, contentCachingResponseWrapper);// 回写响应contentCachingResponseWrapper.copyBodyToResponse();long endTime = System.currentTimeMillis();long useTime = endTime - startTime;stringBuilder.append("\n【请求耗时】");if (useTime >= 500 && useTime < 1000) {stringBuilder.append("【警告500-1000ms】");} else if (useTime >= 1000 && useTime < 2000) {stringBuilder.append("【警告1000-2000ms】");} else if (useTime >= 2000 && useTime < 3000) {stringBuilder.append("【警告2000-3000ms】");} else if (useTime >= 3000) {stringBuilder.append("【警告3000ms以上】");}stringBuilder.append(useTime).append("ms");log.info(stringBuilder.toString());}/*** 记录请求信息* @param logStr* @param request*/private void logRequestInfo(StringBuilder logStr, ContentCachingRequestWrapper request) {// 打印请求地址logStr.append("\n【请求地址】").append(request.getRequestURL());logStr.append("\n【请求方法】").append(request.getMethod());// 打印请求参数logStr.append("\n【请求参数】");Enumeration<String> parameterNames = request.getParameterNames();int index = 0;while (parameterNames.hasMoreElements()) {if (index > 0) {logStr.append("&");}index++;String paramName = parameterNames.nextElement();String[] paramValues = request.getParameterValues(paramName);logStr.append(paramName);logStr.append("=");logStr.append(String.join(", ", paramValues));}// 打印请求头logStr.append("\n【请求头】");Enumeration<String> headerNames = request.getHeaderNames();index = 0;while (headerNames.hasMoreElements()) {if (index > 0) {logStr.append(";");}index++;String headerName = headerNames.nextElement();String headerValue = request.getHeader(headerName);logStr.append(headerName);logStr.append(":");logStr.append(headerValue);}// 打印请求体(如果需要)byte[] contentAsByteArray = request.getContentAsByteArray();if (contentAsByteArray.length > 0) {logStr.append("\n【请求体】").append(new String(contentAsByteArray, StandardCharsets.UTF_8));} else {logStr.append("\n【请求体】").append("无");}}/*** 记录响应信息* @param logStr* @param response*/private void logResponseInfo(StringBuilder logStr, ContentCachingResponseWrapper response) {// 打印响应状态码logStr.append("\n【响应状态码】");logStr.append(response.getStatus());// 打印响应头logStr.append("\n【响应头】");int index = 0;for (String headerName : response.getHeaderNames()) {if (index > 0) {logStr.append(";");}index++;logStr.append(headerName);logStr.append(":");logStr.append(response.getHeader(headerName));}// 打印响应体byte[] contentAsByteArray = response.getContentAsByteArray();if (contentAsByteArray.length > 0) {logStr.append("\n【响应体】");logStr.append(new String(contentAsByteArray, StandardCharsets.UTF_8));} else {logStr.append("\n【响应体】").append("无");}}
}
总结
综上所述,在我们的项目中,增加一个记录所有 HTTP 请求和响应的详细信息的日志过滤器还是比较简单。相比于获取 URL、方法、参数、头信息等信息,获取请求body和响应body才是重中之重。值得注意的是springframework给我们提供了ContentCachingRequestWrapper、ContentCachingResponseWrapper两个缓存包装类,让我们可以简单的获取数据,简直不要太好。