Cartographer点云数据从预处理到扫描匹配
目录
1. global_trajectory_builder.cc
2. 扫描匹配前的点云预处理
2.1. local_trajectory_build_2d.h与local_trajectory_build_2d.cc
2.2 LocalTrajectoryBuilder2D::AddRangeData()
2.2.1 多个雷达点云数据的时间同步
2.2.1.1 RangeDataCollator::AddRangeData()
2.2.1.1.1 检查scan话题名称
2.2.1.1.2 对点云的强度数组按照点云的点数进行重置大小,并设置默认值。
2.2.1.1.3 如果id_to_pending_data_中有残留 与当前点云同话题名的未处理的点云数据。
2.2.1.1.4 如果id_to_pending_data_中没有残留,直接将当前点云添加到 等待时间同步的map 中。
2.2.1.1.5 计算时间同步的开始时间与结束时间。然后进行时间同步CropAndMerge()。
2.2.1.2 RangeDataCollator::CropAndMerge()
2.2.1.2.1 结果对象的定义。
2.2.1.2.2 遍历id_to_pending_data_这个map中存放的所有点云。
2.2.1.2.3 [for循环中] 获取数据索引。
2.2.1.2.4 [for循环中] 找到当前点云中 第一个时间戳大于等于current_start_的点的索引。
2.2.1.2.5 [for循环中] 找到当前点云中 第一个时间戳大于current_end_的点的索引。
2.2.1.2.6 [for循环中] 丢弃点云中时间比起始时间早的点。
2.2.1.2.7 [for循环中] 将点云中current_start和current_end之间的点,向result中添加。
2.2.1.2.8 [for循环中] 判断当前遍历到的map中的点云中的点被用了多少。
2.2.1.2.9 对result中的点云 按照每个点的时间从小到大进行排序。
2.2.2 激光点云去畸变
2.2.2.1 位姿推测器的检查。
2.2.2.2 获取每一个点采集时刻tracking_frame(imu)在local_frame中的位姿。
2.2.2.3 初始化去畸变后的点云集。
2.2.2.4 对每一个点进行去畸变处理。
2.2.3 点云坐标变换与滤波过滤
2.2.3.1 点云坐标变换
2.2.3.2 体素滤波过滤(voxel_filter.cc)
2.2.3.3 自适应体素滤波过滤(local_trajectory_builder_2d.cc)
3. scan-matching
4. scan-matching结果
继续上一篇笔记的内容,进行激光点云数据处理的介绍。本篇笔记还未完成......
1. global_trajectory_builder.cc
GlobalTrajectoryBuilder这个类重载了五个AddSensorData()函数,分别处理点云、imu、odom、gps、landmark数据。处理点云数据的AddSensorData()函数内容如下
/*** @brief 点云数据的处理, 先进行扫描匹配, 然后将扫描匹配的结果当做节点插入到后端的位姿图中* * @param[in] sensor_id topic名字* @param[in] timed_point_cloud_data 点云数据*/void AddSensorData(const std::string& sensor_id,const sensor::TimedPointCloudData& timed_point_cloud_data) override {CHECK(local_trajectory_builder_)<< "Cannot add TimedPointCloudData without a LocalTrajectoryBuilder.";// 1. 进行扫描匹配, 返回匹配后的结果 // person: scan-matchingstd::unique_ptr<typename LocalTrajectoryBuilder::MatchingResult>matching_result = local_trajectory_builder_->AddRangeData(sensor_id, timed_point_cloud_data);if (matching_result == nullptr) {// The range data has not been fully accumulated yet.return;}kLocalSlamMatchingResults->Increment();std::unique_ptr<InsertionResult> insertion_result;// matching_result->insertion_result 的类型是 LocalTrajectoryBuilder2D::InsertionResult// 2. 如果雷达成功插入到地图中if (matching_result->insertion_result != nullptr) {kLocalSlamInsertionResults->Increment();// 将匹配后的结果 当做节点 加入到位姿图中auto node_id = pose_graph_->AddNode(matching_result->insertion_result->constant_data, trajectory_id_,matching_result->insertion_result->insertion_submaps);CHECK_EQ(node_id.trajectory_id, trajectory_id_);// 这里的InsertionResult的类型是 TrajectoryBuilderInterface::InsertionResultinsertion_result = absl::make_unique<InsertionResult>(InsertionResult{node_id, matching_result->insertion_result->constant_data,std::vector<std::shared_ptr<const Submap>>(matching_result->insertion_result->insertion_submaps.begin(),matching_result->insertion_result->insertion_submaps.end())});}// 3. 将结果数据传入回调函数中, 进行保存if (local_slam_result_callback_) {local_slam_result_callback_( // MapBuilderBridge::AddTrajectorytrajectory_id_, matching_result->time, matching_result->local_pose,std::move(matching_result->range_data_in_local),std::move(insertion_result));}}2. 扫描匹配前的点云预处理
std::unique_ptr<typename LocalTrajectoryBuilder::MatchingResult>matching_result = local_trajectory_builder_->AddRangeData(sensor_id, timed_point_cloud_data);if (matching_result == nullptr) {// The range data has not been fully accumulated yet.return;}GlobalTrajectoryBuilder::AddSensorData()中第一步,调用了local_trajectory_builder_ 的AddRangeData(sensor_id, timed_point_cloud_data);进行激光点云的扫描匹配,并返回结果。
其中sensor_id为string类型的激光扫描话题名称,timed_point_cloud_data是sensor::TimedPointCloudData类型的点云数据。
// 带时间戳的单个数据点的坐标
struct TimedRangefinderPoint {Eigen::Vector3f position;float time; // 相对点云最后一个点的时间, 最后一个点的时间为0, 其他点的时间都为负的
};
using TimedPointCloud = std::vector<TimedRangefinderPoint>;
// 时间同步前的点云
struct TimedPointCloudData {common::Time time; // 点云最后一个点的时间Eigen::Vector3f origin; // 以tracking_frame_到雷达坐标系的坐标变换为原点TimedPointCloud ranges; // 数据点的集合, 每个数据点包含xyz与time, time是负的// 'intensities' has to be same size as 'ranges', or empty.std::vector<float> intensities; // 强度,空的
};2.1. local_trajectory_build_2d.h与local_trajectory_build_2d.cc
假设当前进行2d建图,则local_trajectory_builder_ 的类型为LocalTrajectoryBuilder2D,该类的一些内容:
class LocalTrajectoryBuilder2D {public:// 将点云插入到地图后的resultstruct InsertionResult {std::shared_ptr<const TrajectoryNode::Data> constant_data;std::vector<std::shared_ptr<const Submap2D>> insertion_submaps; // 最多只有2个子图的指针};// 扫描匹配的resultstruct MatchingResult {common::Time time;transform::Rigid3d local_pose;sensor::RangeData range_data_in_local; // 经过扫描匹配之后位姿校准之后的雷达数据// 'nullptr' if dropped by the motion filter.std::unique_ptr<const InsertionResult> insertion_result;};
private:const proto::LocalTrajectoryBuilderOptions2D options_;ActiveSubmaps2D active_submaps_;              // 只保存两个活跃的子图MotionFilter motion_filter_;                    // 运动过滤器,作用不大scan_matching::RealTimeCorrelativeScanMatcher2Dreal_time_correlative_scan_matcher_;                                              // 相关性扫描匹配器scan_matching::CeresScanMatcher2D ceres_scan_matcher_;    // ceres扫描匹配器std::unique_ptr<PoseExtrapolator> extrapolator_;                          // 位姿估计器int num_accumulated_ = 0;sensor::RangeData accumulated_range_data_;absl::optional<std::chrono::steady_clock::time_point> last_wall_time_;absl::optional<double> last_thread_cpu_time_seconds_;absl::optional<common::Time> last_sensor_time_;RangeDataCollator range_data_collator_;                   // 雷达时间同步
};LocalTrajectoryBuilder2D的构造函数:
/*** @brief 构造函数* * @param[in] options * @param[in] expected_range_sensor_ids 所有range类型的话题*/
LocalTrajectoryBuilder2D::LocalTrajectoryBuilder2D(const proto::LocalTrajectoryBuilderOptions2D& options,const std::vector<std::string>& expected_range_sensor_ids): options_(options),active_submaps_(options.submaps_options()),motion_filter_(options_.motion_filter_options()),real_time_correlative_scan_matcher_(options_.real_time_correlative_scan_matcher_options()),ceres_scan_matcher_(options_.ceres_scan_matcher_options()),range_data_collator_(expected_range_sensor_ids){}
这里使用了一系列options对其成员进行了初始化,这些参数都能在Cartographer的trajectory_builder.lua中找到。
range_data_collator_是用expected_range_sensor_ids,也就是当前系统订阅的所有range类型的话题,来初始化的。
2.2 LocalTrajectoryBuilder2D::AddRangeData()
/*** @brief 处理点云数据, 进行扫描匹配, 将点云写成地图* * @param[in] sensor_id 点云数据对应的话题名称* @param[in] unsynchronized_data 传入的点云数据* @return std::unique_ptr<LocalTrajectoryBuilder2D::MatchingResult> 匹配后的结果*/
std::unique_ptr<LocalTrajectoryBuilder2D::MatchingResult>
LocalTrajectoryBuilder2D::AddRangeData(const std::string& sensor_id,const sensor::TimedPointCloudData& unsynchronized_data)
{
......
}
LocalTrajectoryBuilder2D::AddRangeData()函数定义如上,其函数体内容较多,接下来一步一步看。
2.2.1 多个雷达点云数据的时间同步
// 进行多个雷达点云数据的时间同步, 点云的坐标是相对于tracking_frame的
// 返回时间同步完成的点云auto synchronized_data =range_data_collator_.AddRangeData(sensor_id, unsynchronized_data);    // 点云被拷贝了if (synchronized_data.ranges.empty()) {LOG(INFO) << "Range data collator filling buffer.";return nullptr;}
这里调用了range_data_collator_的AddRangeData()函数对点云进行时间同步。因为Cartographer运行同时订阅多个激光扫描话题。
RangeDataCollator::AddRangeData()的返回值为时间同步完成的点云:
// 时间同步后的点云
struct TimedPointCloudOriginData {struct RangeMeasurement {TimedRangefinderPoint point_time;    // 带时间戳的单个数据点的坐标 xyzfloat intensity;                            // 强度值size_t origin_index;                    // 属于第几个origins的点};common::Time time;                    // 点云的时间std::vector<Eigen::Vector3f> origins;     // 点云是由几个点云组成, 每个点云的原点std::vector<RangeMeasurement> ranges; // 数据点的集合
};
2.2.1.1 RangeDataCollator::AddRangeData()
RangeDataCollator::AddRangeData()的内容如下:
/*** @brief 多个雷达数据的时间同步* * @param[in] sensor_id 雷达数据的话题* @param[in] timed_point_cloud_data 雷达数据* @return sensor::TimedPointCloudOriginData 根据时间处理之后的数据*/
sensor::TimedPointCloudOriginData RangeDataCollator::AddRangeData(const std::string& sensor_id,sensor::TimedPointCloudData timed_point_cloud_data) { // 第一次拷贝CHECK_NE(expected_sensor_ids_.count(sensor_id), 0);// 从sensor_bridge传过来的数据的intensities为空timed_point_cloud_data.intensities.resize(timed_point_cloud_data.ranges.size(), kDefaultIntensityValue);// TODO(gaschler): These two cases can probably be one.// 如果同话题的点云, 还有没处理的, 就先处同步没处理的点云, 将当前点云保存if (id_to_pending_data_.count(sensor_id) != 0) {// current_end_为上一次时间同步的结束时间// current_start_为本次时间同步的开始时间current_start_ = current_end_;// When we have two messages of the same sensor, move forward the older of// the two (do not send out current).// 本次时间同步的结束时间为这帧点云数据的结束时间current_end_ = id_to_pending_data_.at(sensor_id).time;auto result = CropAndMerge();// 保存当前点云id_to_pending_data_.emplace(sensor_id, std::move(timed_point_cloud_data));return result;}// 先将当前点云添加到 等待时间同步的map中id_to_pending_data_.emplace(sensor_id, std::move(timed_point_cloud_data));// 等到range数据的话题都到来之后再进行处理if (expected_sensor_ids_.size() != id_to_pending_data_.size()) {return {};}current_start_ = current_end_;// We have messages from all sensors, move forward to oldest.common::Time oldest_timestamp = common::Time::max();// 找到所有传感器数据中最早的时间戳(点云最后一个点的时间)for (const auto& pair : id_to_pending_data_) {oldest_timestamp = std::min(oldest_timestamp, pair.second.time);}// current_end_是本次时间同步的结束时间(所有传感器数据中最早的时间戳(点云最后一个点的时间))// 是待时间同步map中的 所有点云中最早的时间戳current_end_ = oldest_timestamp;return CropAndMerge();
}
2.2.1.1.1 检查scan话题名称
// const std::set<std::string> expected_sensor_ids_;
CHECK_NE(expected_sensor_ids_.count(sensor_id), 0);
expected_sensor_ids_集合中保存着Cartographer当前订阅的所有scan的话题名称。这里检查话题名称是否存在于set中。
2.2.1.1.2 对点云的强度数组按照点云的点数进行重置大小,并设置默认值。
constexpr static float kDefaultIntensityValue = 0.f;
timed_point_cloud_data.intensities.resize(timed_point_cloud_data.ranges.size(), kDefaultIntensityValue);2.2.1.1.3 如果id_to_pending_data_中有残留 与当前点云同话题名的未处理的点云数据。
优先处理上次处理过程剩余的点云。
std::map<std::string, sensor::TimedPointCloudData> id_to_pending_data_; // 待处理的数据 // 如果同话题的点云, 还有没处理的, 就先同步没处理的点云, 将当前点云保存if (id_to_pending_data_.count(sensor_id) != 0) {// current_end_为上一次时间同步的结束时间// current_start_为本次时间同步的开始时间current_start_ = current_end_;// When we have two messages of the same sensor, move forward the older of// the two (do not send out current).// 本次时间同步的结束时间为这帧点云数据的结束时间current_end_ = id_to_pending_data_.at(sensor_id).time;auto result = CropAndMerge();// 保存当前点云id_to_pending_data_.emplace(sensor_id, std::move(timed_point_cloud_data));return result;}id_to_pending_data_是一个map,根据scan话题名称,存储点云数据。使用上一次时间同步的结束时间作为本次时间同步的开始时间,使时间连续。
本次时间同步的结束时间current_end_ 是 点云中最后一个点的采集时间id_to_pending_data_.at(sensor_id).time; 就是struct TimedPointCloudData中的Time time。
CropAndMerge()函数进行了点云的时间同步,下面再讲。
然后采用std::move()的形式将当前话题的点云保存到map中。因为函数返回后timed_point_cloud_data的生命周期也就结束了,当前直接将其当作右值使用。
返回同步完成的点云。
2.2.1.1.4 如果id_to_pending_data_中没有残留,直接将当前点云添加到 等待时间同步的map 中。
id_to_pending_data_.emplace(sensor_id, std::move(timed_point_cloud_data));// 等到range数据的话题都到来之后再进行处理if (expected_sensor_ids_.size() != id_to_pending_data_.size()) {return {};}如果收到的点云数据与订阅的点云话题数量不符合,就先退出,等待所有点云话题都到达再处理。
2.2.1.1.5 计算时间同步的开始时间与结束时间。然后进行时间同步CropAndMerge()。
current_start_ = current_end_;// We have messages from all sensors, move forward to oldest.common::Time oldest_timestamp = common::Time::max();// 找到所有不同话题的点云的最早时间戳for (const auto& pair : id_to_pending_data_) {oldest_timestamp = std::min(oldest_timestamp, pair.second.time);}// current_end_是是待时间同步map中的 所有点云中最早的时间戳current_end_ = oldest_timestamp;return CropAndMerge();pair.second.time就是struct TimedPointCloudData中的Time time。是点云中最后一个点的采集时间。
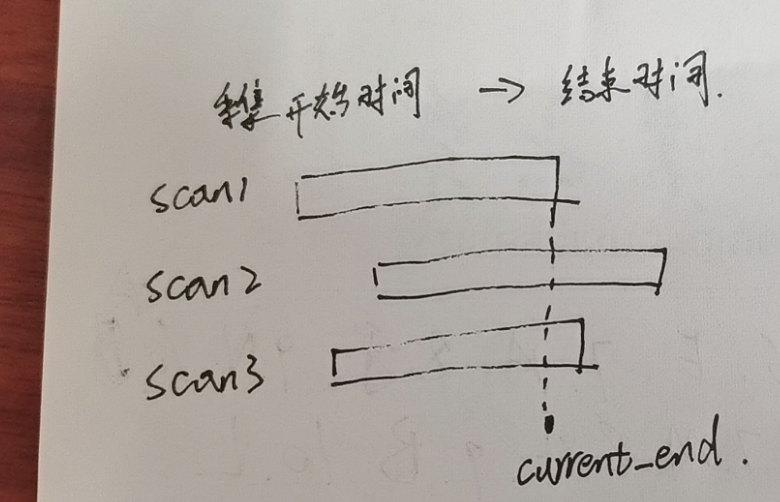
current_end的示意如上图。
2.2.1.2 RangeDataCollator::CropAndMerge()
RangeDataCollator::CropAndMerge()的内容如下:
// 对时间段内的数据进行截取与合并, 返回时间同步后的点云
sensor::TimedPointCloudOriginData RangeDataCollator::CropAndMerge() {sensor::TimedPointCloudOriginData result{current_end_, {}, {}};bool warned_for_dropped_points = false;// 遍历所有的传感器话题for (auto it = id_to_pending_data_.begin();it != id_to_pending_data_.end();) {// 获取数据的引用sensor::TimedPointCloudData& data = it->second;const sensor::TimedPointCloud& ranges = it->second.ranges;const std::vector<float>& intensities = it->second.intensities;// 找到点云中 最后一个时间戳小于current_start_的点的索引auto overlap_begin = ranges.begin();while (overlap_begin < ranges.end() &&data.time + common::FromSeconds((*overlap_begin).time) <current_start_) {++overlap_begin;}// 找到点云中 最后一个时间戳小于等于current_end_的点的索引auto overlap_end = overlap_begin;while (overlap_end < ranges.end() &&data.time + common::FromSeconds((*overlap_end).time) <=current_end_) {++overlap_end;}// 丢弃点云中时间比起始时间早的点, 每执行一下CropAndMerge()打印一次logif (ranges.begin() < overlap_begin && !warned_for_dropped_points) {LOG(WARNING) << "Dropped " << std::distance(ranges.begin(), overlap_begin)<< " earlier points.";warned_for_dropped_points = true;}// Copy overlapping range.if (overlap_begin < overlap_end) {// 获取下个点云的index, 即当前vector的个数std::size_t origin_index = result.origins.size();result.origins.push_back(data.origin);  // 插入原点坐标// 获取此传感器时间与集合时间戳的误差, const float time_correction =static_cast<float>(common::ToSeconds(data.time - current_end_));auto intensities_overlap_it =intensities.begin() + (overlap_begin - ranges.begin());// reserve() 在预留空间改变时, 会将之前的数据拷贝到新的内存中result.ranges.reserve(result.ranges.size() +std::distance(overlap_begin, overlap_end));// 填充数据for (auto overlap_it = overlap_begin; overlap_it != overlap_end;++overlap_it, ++intensities_overlap_it) {sensor::TimedPointCloudOriginData::RangeMeasurement point{*overlap_it, *intensities_overlap_it, origin_index};// current_end_ + point_time[3]_after == in_timestamp +// point_time[3]_before// 针对每个点时间戳进行修正, 让最后一个点的时间为0point.point_time.time += time_correction;  result.ranges.push_back(point);} // end for} // end if// Drop buffered points until overlap_end.// 如果点云每个点都用了, 则可将这个数据进行删除if (overlap_end == ranges.end()) {it = id_to_pending_data_.erase(it);} // 如果一个点都没用, 就先放这, 看下一个数据else if (overlap_end == ranges.begin()) {++it;} // 用了一部分的点else {const auto intensities_overlap_end =intensities.begin() + (overlap_end - ranges.begin());// 将用了的点删除, 这里的赋值是拷贝data = sensor::TimedPointCloudData{data.time, data.origin,sensor::TimedPointCloud(overlap_end, ranges.end()),std::vector<float>(intensities_overlap_end, intensities.end())};++it;}} // end for// 对各传感器的点云 按照每个点的时间从小到大进行排序std::sort(result.ranges.begin(), result.ranges.end(),[](const sensor::TimedPointCloudOriginData::RangeMeasurement& a,const sensor::TimedPointCloudOriginData::RangeMeasurement& b) {return a.point_time.time < b.point_time.time;});return result;
}
接下来进行分步讲解:
2.2.1.2.1 结果对象的定义。
sensor::TimedPointCloudOriginData result{current_end_, {}, {}};bool warned_for_dropped_points = false;result就是同步完成的点云,其中使用current_end_作为点云的时间戳。current_end_也就是同步完成的点云的最后一个点的采集时间。
warned_for_dropped_points用于标记是否有点被丢弃。
2.2.1.2.2 遍历id_to_pending_data_这个map中存放的所有点云。
for (auto it = id_to_pending_data_.begin();it != id_to_pending_data_.end();) {
......
}
2.2.1.2.3 [for循环中] 获取数据索引。
// 获取数据的引用sensor::TimedPointCloudData& data = it->second;const sensor::TimedPointCloud& ranges = it->second.ranges;const std::vector<float>& intensities = it->second.intensities;it->second就是点云。it->second.ranges是点云中点的位置的集合(vector)。it->second.intensities是点云中点的强度的集合(vector)。
2.2.1.2.4 [for循环中] 找到当前点云中 第一个时间戳大于等于current_start_的点的索引。
auto overlap_begin = ranges.begin();while (overlap_begin < ranges.end() &&data.time + common::FromSeconds((*overlap_begin).time) <current_start_) {++overlap_begin;}overlap_begin是vector的迭代器,用于遍历点数组。(*overlap_begin).time是点云中每一个点相对于点云时间戳的差值。data.time + common::FromSeconds((*overlap_begin).time)就是每个点的时间戳。
一般来说,每个点的时间戳都不会小于current_start_。只有一种特殊情况:
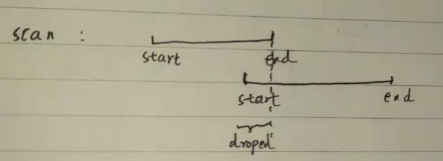
这两个scan来自于同一个话题,但下面第二帧点云的起始时间比上一帧点云的结束时间要早。则第二帧中的第二帧start到第一帧的end之间的点都会被丢弃。
2.2.1.2.5 [for循环中] 找到当前点云中 第一个时间戳大于current_end_的点的索引。
auto overlap_end = overlap_begin;while (overlap_end < ranges.end() &&data.time + common::FromSeconds((*overlap_end).time) <=current_end_) {++overlap_end;}
2.2.1.2.6 [for循环中] 丢弃点云中时间比起始时间早的点。
if (ranges.begin() < overlap_begin && !warned_for_dropped_points) {LOG(WARNING) << "Dropped " << std::distance(ranges.begin(), overlap_begin)<< " earlier points.";warned_for_dropped_points = true;}这就是[4]中提到的现象的处理。
2.2.1.2.7 [for循环中] 将点云中current_start和current_end之间的点,向result中添加。
// Copy overlapping range.if (overlap_begin < overlap_end) {std::size_t origin_index = result.origins.size();result.origins.push_back(data.origin); // 插入当前点云采集原点的坐标// 获取 此传感器点云的时间戳 与 结果集合的时间戳 的误差// data.time > current_end_const float time_correction =static_cast<float>(common::ToSeconds(data.time - current_end_));auto intensities_overlap_it =intensities.begin() + (overlap_begin - ranges.begin());// reserve() 在预留空间改变时, 会将之前的数据拷贝到新的内存中result.ranges.reserve(result.ranges.size() +std::distance(overlap_begin, overlap_end));// 填充数据for (auto overlap_it = overlap_begin; overlap_it != overlap_end;++overlap_it, ++intensities_overlap_it) {// 构造同步后的点云sensor::TimedPointCloudOriginData::RangeMeasurement point{*overlap_it, *intensities_overlap_it, origin_index};// 针对每个点时间戳进行修正, 让最后一个点的时间为0point.point_time.time += time_correction; result.ranges.push_back(point);} // end for} // end if2.2.1.2.8 [for循环中] 判断当前遍历到的map中的点云中的点被用了多少。
// Drop buffered points until overlap_end.// 如果点云每个点都用了, 则可将这个数据进行删除if (overlap_end == ranges.end()) {it = id_to_pending_data_.erase(it);} // 如果一个点都没用, 就先放这, 看下一个数据else if (overlap_end == ranges.begin()) {++it;} // 用了一部分的点else {const auto intensities_overlap_end =intensities.begin() + (overlap_end - ranges.begin());// 将用了的点删除, 这里的赋值是拷贝data = sensor::TimedPointCloudData{data.time, data.origin,sensor::TimedPointCloud(overlap_end, ranges.end()),std::vector<float>(intensities_overlap_end, intensities.end())};++it;}2.2.1.2.9 对result中的点云 按照每个点的时间从小到大进行排序。
std::sort(result.ranges.begin(), result.ranges.end(),[](const sensor::TimedPointCloudOriginData::RangeMeasurement& a,const sensor::TimedPointCloudOriginData::RangeMeasurement& b) {return a.point_time.time < b.point_time.time;});return result;2.2.2 激光点云去畸变
完成激光点云的时间同步后,继续回到 LocalTrajectoryBuilder2D::AddRangeData()函数。接下来进行激光点云去畸变:
2.2.2.1 位姿推测器的检查。
// 同步后点云的时间戳const common::Time& time = synchronized_data.time;// Initialize extrapolator now if we do not ever use an IMU.// 如果不用imu, 就在雷达这初始化位姿推测器if (!options_.use_imu_data()) {InitializeExtrapolator(time);}if (extrapolator_ == nullptr) {// Until we've initialized the extrapolator with our first IMU message, we// cannot compute the orientation of the rangefinder.LOG(INFO) << "Extrapolator not yet initialized.";return nullptr;}CHECK(!synchronized_data.ranges.empty());// TODO(gaschler): Check if this can strictly be 0.CHECK_LE(synchronized_data.ranges.back().point_time.time, 0.f);// 计算第一个点的时间const common::Time time_first_point =time +common::FromSeconds(synchronized_data.ranges.front().point_time.time);// 只有在extrapolator_初始化时, GetLastPoseTime()是common::Time::min()if (time_first_point < extrapolator_->GetLastPoseTime()) {LOG(INFO) << "Extrapolator is still initializing.";return nullptr;}关于extrapolator_的内容会在后面的笔记中讲,当前先略过。
2.2.2.2 获取每一个点采集时刻tracking_frame(imu)在local_frame中的位姿。
std::vector<transform::Rigid3f> range_data_poses;range_data_poses.reserve(synchronized_data.ranges.size());bool warned = false;// 预测得到每一个时间点的位姿for (const auto& range : synchronized_data.ranges) {common::Time time_point = time + common::FromSeconds(range.point_time.time);// 如果该时间比上次预测位姿的时间还要早,说明这个点的时间戳往回走了, 就报错// 位姿估计器是用的上一帧点云的结果进行校准的if (time_point < extrapolator_->GetLastExtrapolatedTime()) {// 一个循环只报一次错if (!warned) {LOG(ERROR)<< "Timestamp of individual range data point jumps backwards from "<< extrapolator_->GetLastExtrapolatedTime() << " to " << time_point;warned = true;}time_point = extrapolator_->GetLastExtrapolatedTime();}// person: 点云每个点的坐标处于tracking_frame坐标系// Step: 2 预测出 每个点的时间戳时刻, tracking frame 在 local slam 坐标系下的位姿range_data_poses.push_back(extrapolator_->ExtrapolatePose(time_point).cast<float>());}位姿推测器使用odom和imu的数据进行机器人运动的计算。这里从位姿推测器中获取到每一个点采集时刻tracking_frame(imu)在local_frame中的位姿保存到range_data_poses中。用于对每个点去畸变。
2.2.2.3 初始化去畸变后的点云集。
if (num_accumulated_ == 0) {// 'accumulated_range_data_.origin' is uninitialized until the last// accumulation.accumulated_range_data_ = sensor::RangeData{{}, {}, {}};}accumulated_range_data_用于保存去畸变后的点,其数据格式为:
/*** @brief local_slam_data中存储所有雷达点云的数据结构* * @param origin  点云的原点在local坐标系下的坐标* @param returns 所有雷达数据点在local坐标系下的坐标, 记为returns, 也就是hit* @param misses  是在光线方向上未检测到返回的点(nan, inf等等)或超过最大配置距离的点*/
struct RangeData {Eigen::Vector3f origin;PointCloud returns;PointCloud misses; // local坐标系下的坐标
};
2.2.2.4 对每一个点进行去畸变处理。
// Drop any returns below the minimum range and convert returns beyond the// maximum range into misses.// 对每个数据点进行处理for (size_t i = 0; i < synchronized_data.ranges.size(); ++i) {// 获取点在tracking frame 下点的坐标const sensor::TimedRangefinderPoint& hit = synchronized_data.ranges[i].point_time;// 将点云的origins坐标转到 local slam 坐标系下// person: origin_in_local = T(local_imu) * P(imu_orign)const Eigen::Vector3f origin_in_local =range_data_poses[i] *synchronized_data.origins.at(synchronized_data.ranges[i].origin_index);// Step: 3 运动畸变的去除//将相对于tracking_frame的hit(激光点)坐标 转成 local坐标系下的坐标// person: P(local_point) = T(local_imu) * P(imu_point)sensor::RangefinderPoint hit_in_local =range_data_poses[i] * sensor::ToRangefinderPoint(hit);// 根据 这个激光点在local_frame的坐标 与 点的采集原点(机器人所在位置/tracking_frame)// 在local_frame的坐标,计算该点相对于采集原点的坐标(x/y/z)变化量const Eigen::Vector3f delta = hit_in_local.position - origin_in_local;// 重新计算这个点的测距长度const float range = delta.norm();// param: min_range max_rangeif (range >= options_.min_range()) {if (range <= options_.max_range()) {// 在这里可以看到, returns里保存的是local slam下的去畸变之后的点的坐标accumulated_range_data_.returns.push_back(hit_in_local);} else {// Step: 4 超过max_range时的处理: 用一个距离进行替代, 并放入misses里hit_in_local.position =origin_in_local +// param: missing_data_ray_length, 是个比例, 不是距离options_.missing_data_ray_length() / range * delta;accumulated_range_data_.misses.push_back(hit_in_local);}}}++num_accumulated_; // 有效点云帧数量+1代码中通过将 在tracking_frame坐标系中的hit(激光点)坐标 转成 local坐标系下的坐标,完成了激光点去畸变的过程。将在测距范围内的点,保存在accumulated_range_data_.returns中;将在测距范围外的点,保存在accumulated_range_data_.misses中。
最终点的坐标都是在local_frame坐标系。
2.2.3 点云坐标变换与滤波过滤
完成激光点云的去畸变后,继续回到 LocalTrajectoryBuilder2D::AddRangeData()函数。接下来准备进入扫描匹配:
// param: num_accumulated_range_data 几帧有效的点云数据进行一次扫描匹配if (num_accumulated_ >= options_.num_accumulated_range_data()) { // 默认值为1// 计算2次有效点云数据的的时间差const common::Time current_sensor_time = synchronized_data.time;absl::optional<common::Duration> sensor_duration;if (last_sensor_time_.has_value()) {sensor_duration = current_sensor_time - last_sensor_time_.value();}last_sensor_time_ = current_sensor_time;// 重置变量num_accumulated_ = 0;// 获取机器人当前姿态const transform::Rigid3d gravity_alignment = transform::Rigid3d::Rotation(extrapolator_->EstimateGravityOrientation(time));// TODO(gaschler): This assumes that 'range_data_poses.back()' is at time// 'time'.// note: 地图的原点就是第一帧点云的这个origin// 以最后一个点的时间戳估计出的 机器人坐标T(local_imu) 为这帧数据的原点accumulated_range_data_.origin = range_data_poses.back().translation();return AddAccumulatedRangeData(time,// 将点云变换到local原点处, 且姿态为0TransformToGravityAlignedFrameAndFilter(// range_data_poses.back():机器人的位姿gravity_alignment.cast<float>() * range_data_poses.back().inverse(),accumulated_range_data_),gravity_alignment, sensor_duration);}return nullptr;gravity_alignment保存机器人相对于重力方向的姿态,用于将点云投影到水平面。暂时忽略位姿推测器相关内容。
return的LocalTrajectoryBuilder2D::AddAccumulatedRangeData()函数执行扫描匹配。在参数传递时,使用LocalTrajectoryBuilder2D::TransformToGravityAlignedFrameAndFilter()函数对点云进行变换与体素滤波过滤。
2.2.3.1 点云坐标变换
LocalTrajectoryBuilder2D::TransformToGravityAlignedFrameAndFilter()需要两个参数,一个是一个位姿变换,一个是去畸变后的点云。
暂时忽略gravity_alignment.cast<float>(),看一下range_data_poses.back().inverse()。
range_data_poses.back()表示最后一个点采集时刻机器人的tracking_frame(imu)在local_frame坐标系中的位姿,可以记作。则range_data_poses.back().inverse()可以看作
,也就是
。
而accumulated_range_data_中点的坐标是在local_frame坐标系的坐标,可以记作。
暂时忽略gravity_alignment.cast<float>(),则range_data_poses.back().inverse() * accumulated_range_data_中点的坐标 == 。
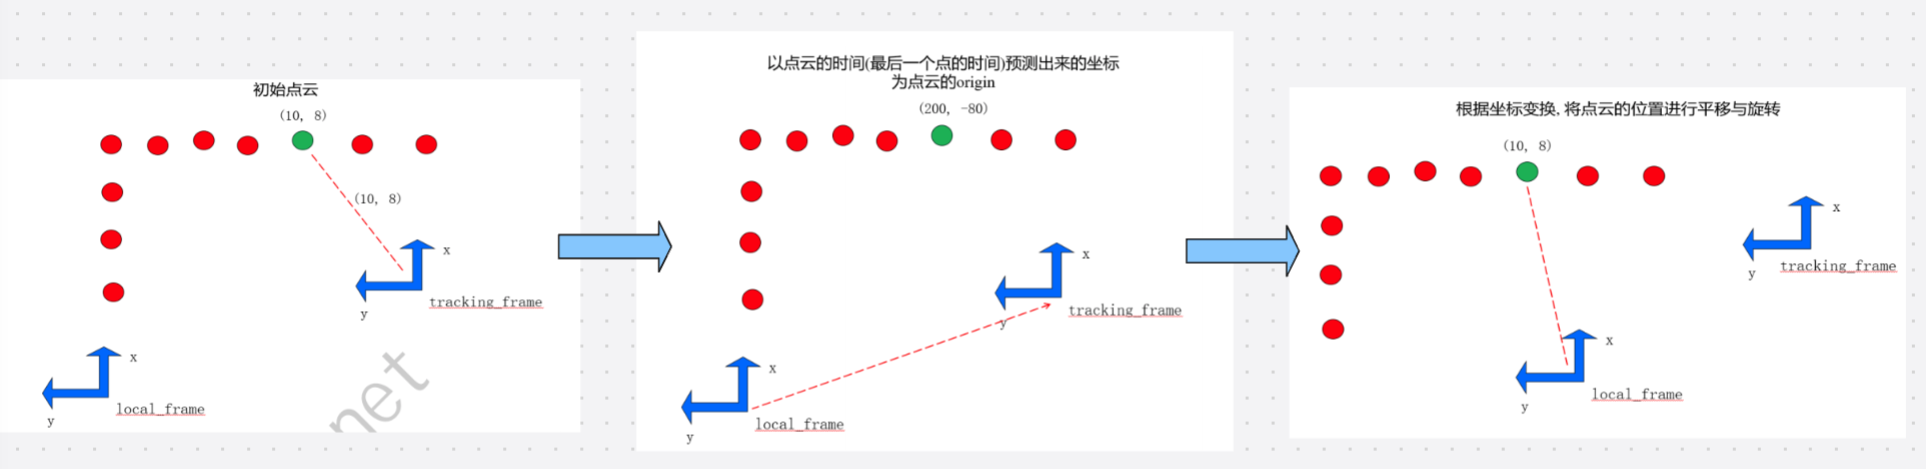
所以代码又将点的坐标转换到tracking_frame坐标系下的形式了。但代码中又以机器人在local坐标系中的坐标作为点云采集的原点坐标:
// 以最后一个点的时间戳估计出的 机器人坐标T(local_imu) 为这帧数据的原点
accumulated_range_data_.origin = range_data_poses.back().translation();
点云的坐标和原点在处理过程中发生了如下变化:
再看一下TransformToGravityAlignedFrameAndFilter()的具体内容:
/*** @brief 先进行点云的旋转与z方向的滤波, 然后再进行体素滤波减少数据量* * @param[in] transform_to_gravity_aligned_frame 将点云变换到原点处, 且姿态为0的坐标变换* @param[in] range_data 传入的点云* @return sensor::RangeData 处理后的点云 拷贝*/
sensor::RangeData
LocalTrajectoryBuilder2D::TransformToGravityAlignedFrameAndFilter(const transform::Rigid3f& transform_to_gravity_aligned_frame,const sensor::RangeData& range_data) const {// Step: 5 将原点位于机器人当前位姿处的点云 转成 原点位于local坐标系原点处的点云, 再进行z轴上的过滤const sensor::RangeData cropped =sensor::CropRangeData(sensor::TransformRangeData(range_data, transform_to_gravity_aligned_frame),options_.min_z(), options_.max_z()); // param: min_z max_z// Step: 6 对点云进行体素滤波return sensor::RangeData{cropped.origin,sensor::VoxelFilter(cropped.returns, options_.voxel_filter_size()), // param: voxel_filter_sizesensor::VoxelFilter(cropped.misses, options_.voxel_filter_size())};
}
其中进行了两步内容。第一步进行了点云的坐标变换,并且滤除了z坐标小于min_z,大于max_z的点,因为可能是3D点云。
第二步对转换后的点云进行了体素滤波过滤。
2.2.3.2 体素滤波过滤(voxel_filter.cc)
return sensor::RangeData{cropped.origin,sensor::VoxelFilter(cropped.returns, options_.voxel_filter_size()), // param: voxel_filter_size = 0.025sensor::VoxelFilter(cropped.misses, options_.voxel_filter_size())
};需要注意的是,在trajector_builder_2d.lua文件中体素滤波的立方体的边长voxel_filter_size = 0.025,在trajector_builder_3d.lua文件中voxel_filter_size = 0.15。
(1)VoxelFilter()
PointCloud VoxelFilter(const PointCloud& point_cloud, const float resolution) {// 得到标记后的点                   // person: 将体素网格中 代表网格中心的点 标记出来const std::vector<bool> points_used = RandomizedVoxelFilterIndices(point_cloud.points(), resolution,[](const RangefinderPoint& point) { return point.position; });// 生成滤波后的点云             // person: 判断每个点是否被标记,将标记点取出std::vector<RangefinderPoint> filtered_points;for (size_t i = 0; i < point_cloud.size(); i++) {if (points_used[i]) {filtered_points.push_back(point_cloud[i]);}}std::vector<float> filtered_intensities;CHECK_LE(point_cloud.intensities().size(), point_cloud.points().size());for (size_t i = 0; i < point_cloud.intensities().size(); i++) {if (points_used[i]) {filtered_intensities.push_back(point_cloud.intensities()[i]);}}return PointCloud(std::move(filtered_points),std::move(filtered_intensities));
}体素滤波的过程会将点云根据立方体的边长voxel_filter_size 分割成一个个小立方体,使用 处于立方体质心的点 来代表当前的小立方体,从而达到过滤的效果。核心功能是在保持点云整体结构的同时减少点的数量。
RandomizedVoxelFilterIndices()函数完成了对所有处于质心的点的标记,返回了一个与点云数组等大的数组,将所有处于质心的点的下标位置设置为true,其他位置为false,从而完成标记。
函数剩余内容根据标记数组的内容对点云进行判别,保留标记点云,并返回。
(2)RandomizedVoxelFilterIndices()
接下来看一下RandomizedVoxelFilterIndices()函数是如何选择质心的:
template <class T, class PointFunction>
std::vector<bool> RandomizedVoxelFilterIndices(const std::vector<T>& point_cloud, const float resolution,PointFunction&& point_function)
{std::minstd_rand0 generator;// std::pair<int, int>的第一个元素保存该voxel内部的点的个数, 第二个元素保存该voxel中选择的那一个点的序号absl::flat_hash_map<VoxelKeyType, std::pair<int, int>>voxel_count_and_point_index;// 遍历所有的点, 计算for (size_t i = 0; i < point_cloud.size(); i++) {// 获取VoxelKeyType对应的value的引用auto& voxel = voxel_count_and_point_index[GetVoxelCellIndex(point_function(point_cloud[i]), resolution)];voxel.first++;// 如果这个体素格子只有1个点, 那这个体素格子里的点的索引就是iif (voxel.first == 1) {voxel.second = i;} else {// 生成随机数的范围是 [1, voxel.first]std::uniform_int_distribution<> distribution(1, voxel.first);// 生成的随机数与个数相等, 就让这个点代表这个体素格子if (distribution(generator) == voxel.first) {voxel.second = i;}}}// 为体素滤波之后的点做标记std::vector<bool> points_used(point_cloud.size(), false);for (const auto& voxel_and_index : voxel_count_and_point_index) {points_used[voxel_and_index.second.second] = true;}return points_used;
}-
数据结构:
voxel_count_and_point_index(哈希表)记录每个体素的信息:- 键:
VoxelKeyType(体素唯一索引)。 - 值:
std::pair<int, int>,前者为体素内的点总数,后者为当前选中保留的点的索引。
- 键:
for循环遍历点云,对每个点,通过GetVoxelCellIndex找到其所属体素,在哈希表中定位该体素的记录:
auto& voxel = voxel_count_and_point_index[GetVoxelCellIndex(point_function(point_cloud[i]), resolution)]; point_function是一个lambda表达式,用于获取点的坐标。GetVoxelCellIndex()函数将三维空间按resolution(体素边长)划分为立方体网格(体素),并计算当前点所属体素的唯一索引:
// 计算该点处于的voxel的序号
VoxelKeyType GetVoxelCellIndex(const Eigen::Vector3f& point,const float resolution) {const Eigen::Array3f index = point.array() / resolution;    // 计算坐标与分辨率的比值// 对浮点坐标四舍五入,得到整数形式的体素网格坐标const uint64_t x = common::RoundToInt(index.x());   const uint64_t y = common::RoundToInt(index.y());const uint64_t z = common::RoundToInt(index.z());// 将三维整数坐标编码为一个uint64_t类型的VoxelKeyType,唯一标识该点所在的体素。return (x << 42) + (y << 21) + z;
}则auto& voxel中voxel的类型为absl::flat_hash_map中std::pair<int, int>的引用。for循环的操作:
-
遍历点云处理:
- 对每个点,通过
GetVoxelCellIndex找到其所属体素,在哈希表中定位该体素的记录。 - 体素内点计数(
voxel.first)加 1。 - 若为体素内第一个点(
voxel.first == 1),直接将当前点索引(i)设为该体素的保留点。 - 若为后续点(
voxel.first > 1),使用蓄水池抽样随机替换保留点:- 生成
[1, 体素当前点数]范围内的随机整数。 - 若随机数等于当前点数,则将当前点索引(
i)替换为该体素的保留点。
- 生成
效果:每个体素最终仅保留 1 个点,且该点是体素内所有点的等概率随机样本。
- 对每个点,通过
RandomizedVoxelFilterIndices()函数结尾创建了一个与点云数组等大的vector<bool>,遍历哈希表,将所有体素的保留点索引对应的数组位置设为true。返回该数组,指示输入点云中哪些点被保留(true),哪些被过滤(false)。
2.2.3.3 自适应体素滤波过滤(local_trajectory_builder_2d.cc)
2.2.3.1和2.2.3.2小节完成了对LocalTrajectoryBuilder2D:: TransformToGravityAlignedFrameAndFilter()函数功能的介绍,接下来回到LocalTrajectoryBuilder2D::AddRangeData()结尾,看其return中执行的AddAccumulatedRangeData()函数。
std::unique_ptr<LocalTrajectoryBuilder2D::MatchingResult>
LocalTrajectoryBuilder2D::AddAccumulatedRangeData(const common::Time time,const sensor::RangeData& gravity_aligned_range_data,const transform::Rigid3d& gravity_alignment,const absl::optional<common::Duration>& sensor_duration)
{
......
}
// 对 returns点云 进行自适应体素滤波,返回的点云的数据类型是PointCloudconst sensor::PointCloud& filtered_gravity_aligned_point_cloud =sensor::AdaptiveVoxelFilter(gravity_aligned_range_data.returns,options_.adaptive_voxel_filter_options());if (filtered_gravity_aligned_point_cloud.empty()) {return nullptr;}函数中又对点云中的有效点云(returns)进行了自适应体素滤波,其目的为:
- 使点云点数不少于预设最小值(
options.min_num_points())- 在满足条件 1 的前提下,点云尽可能稀疏(体素尽可能大,点数少),以减少后续计算量
options_.adaptive_voxel_filter_options()的内容为:
adaptive_voxel_filter = {max_length = 0.5, -- 尝试确定最佳的立方体边长, 边长最大为0.5min_num_points = 200, -- 如果存在 较多点 并且大于'min_num_points', 则减小体素长度以尝试获得该最小点数max_range = 50., -- 距远离原点超过max_range 的点被移除},执行自适应体素滤波的函数如下:
PointCloud AdaptiveVoxelFilter(const PointCloud& point_cloud,const proto::AdaptiveVoxelFilterOptions& options) {return AdaptivelyVoxelFiltered(// param: adaptive_voxel_filter.max_range 距远离原点超过max_range的点被移除// 这里的最大距离是相对于local坐标系原点的options, FilterByMaxRange(point_cloud, options.max_range()));
}其又调用FilterByMaxRange()函数对点云中长度超过50米的点进行过滤,但前期处理中已经对点云中长度超过30米的点进行了过滤。之后调用AdaptivelyVoxelFiltered()函数进行实际滤波:
PointCloud AdaptivelyVoxelFiltered(const proto::AdaptiveVoxelFilterOptions& options,const PointCloud& point_cloud)
{// 数量小于等于这个值的点云足够稀疏,满足要求if (point_cloud.size() <= options.min_num_points()) {return point_cloud;}// 先按照max_length=0.5 进行一次固定体素滤波PointCloud result = VoxelFilter(point_cloud, options.max_length());// 如果按照最大边长进行体素滤波之后还超过这个数了, 就说明已经是这个参数下最稀疏的状态了, 直接返回if (result.size() >= options.min_num_points()) {return result;}for (float high_length = options.max_length();high_length > 1e-2f * options.max_length(); high_length /= 2.f) {float low_length = high_length / 2.f;result = VoxelFilter(point_cloud, low_length);if (result.size() >= options.min_num_points()) {while ((high_length - low_length) / low_length > 1e-1f) {const float mid_length = (low_length + high_length) / 2.f;const PointCloud candidate = VoxelFilter(point_cloud, mid_length);if (candidate.size() >= options.min_num_points()) {low_length = mid_length;result = candidate;} else {high_length = mid_length;}}return result;}}return result;
}
分步分析其中内容:
(1)直接返回的特殊情况。
// 数量小于等于这个值的点云足够稀疏,满足要求if (point_cloud.size() <= options.min_num_points()) {return point_cloud;}(2)最大体素边长进行一次固定体素滤波,检测点云中点的数量是否太多。
// 先按照max_length=0.5 进行一次固定体素滤波PointCloud result = VoxelFilter(point_cloud, options.max_length());// 如果按照最大边长进行体素滤波之后还超过这个数了, 就说明已经是这个参数下最稀疏的状态了, 直接返回if (result.size() >= options.min_num_points()) {return result;}体素网格的边长越大,过滤后剩余的点越少。但如果边长太大,会过滤掉太多点,使点云局部信息丢失。如果使用最大体素边长进行滤波后,剩余的点还大于options.min_num_points(),也不能继续扩大边长进行滤波了。就将当前滤波的结果返回。
(3)自适应体素大小搜索(核心逻辑)
当步骤 (2)的结果点数不足时,通过迭代缩小体素边长,寻找满足点数要求的最小体素:
for (float high_length = options.max_length();high_length > 1e-2f * options.max_length(); high_length /= 2.f) {float low_length = high_length / 2.f;result = VoxelFilter(point_cloud, low_length);if (result.size() >= options.min_num_points()) {while ((high_length - low_length) / low_length > 1e-1f) {const float mid_length = (low_length + high_length) / 2.f;const PointCloud candidate = VoxelFilter(point_cloud, mid_length);if (candidate.size() >= options.min_num_points()) {low_length = mid_length;result = candidate;} else {high_length = mid_length;}}return result;}}max_length == 0.5。
-
外层循环(二分搜索范围确定):
从max_length()开始,每次将体素边长减半(high_length /= 2),直到边长小于max_length() * 1e-2(缩小 100 倍):- 对每个缩小后的边长(
low_length = high_length / 2)进行滤波。 - 若某次滤波结果点数≥
min_num_points(),则进入内层二分搜索,精确寻找最优边长。
- 对每个缩小后的边长(
-
内层循环(二分精确搜索):
在[low_length, high_length]区间内二分查找,直到边长精度满足要求(差值≤10%):- 计算中间边长
mid_length = (low_length + high_length) / 2。 - 若中间边长滤波结果点数≥阈值:更新
low_length = mid_length(尝试更大体素)。 - 否则:更新
high_length = mid_length(必须更小体素)。 - 最终返回满足条件的最大体素对应的滤波结果。
- 计算中间边长
(4)极限情况处理
若经过多次缩小体素(直到0.01 * max_length())仍无法满足点数要求:
返回最后一次滤波结果(即使点数不足,已无法通过缩小体素改善)。
3. scan-matching
扫描匹配的内容之后进行补充。
4. scan-matching结果
scan-matching的结果是一个 std::unique_ptr<typename LocalTrajectoryBuilder::MatchingResult>智能指针。MatchingResult的内容为:
// tag: TrajectoryNode
// 节点在global坐标系下的位姿, 与前端的结果
struct TrajectoryNode {// 前端匹配所用的数据与计算出的local坐标系下的位姿struct Data {common::Time time;// Transform to approximately gravity align the tracking frame as// determined by local SLAM.Eigen::Quaterniond gravity_alignment;// Used for loop closure in 2D: voxel filtered returns in the// 'gravity_alignment' frame.sensor::PointCloud filtered_gravity_aligned_point_cloud;// Used for loop closure in 3D.sensor::PointCloud high_resolution_point_cloud;sensor::PointCloud low_resolution_point_cloud;Eigen::VectorXf rotational_scan_matcher_histogram;// The node pose in the local SLAM frame.transform::Rigid3d local_pose;};
}
local_pose:扫描匹配计算得到的机器人在local坐标系的位姿。
// 将点云插入到地图后的resultstruct InsertionResult {std::shared_ptr<const TrajectoryNode::Data> constant_data;std::vector<std::shared_ptr<const Submap2D>> insertion_submaps; // 最多只有2个子图的指针};// 扫描匹配的resultstruct MatchingResult {common::Time time;transform::Rigid3d local_pose;sensor::RangeData range_data_in_local; // 经过扫描匹配之后位姿校准之后的雷达数据// 'nullptr' if dropped by the motion filter.std::unique_ptr<const InsertionResult> insertion_result;};range_data_in_local:经过扫描匹配之后位姿校准之后的雷达数据。
本篇笔记还未完成......