【YOLO学习笔记】YOLOv11详解
一、网络结构和yaml
文件解读
YOLOv5以后的版本网络结构都基本固定了,像v8,v10,v11都很类似。

yolov11文件位置:ultralytics/cfg/models/11/yolo11.yaml
YOLOv8和v11的yaml文件对比:
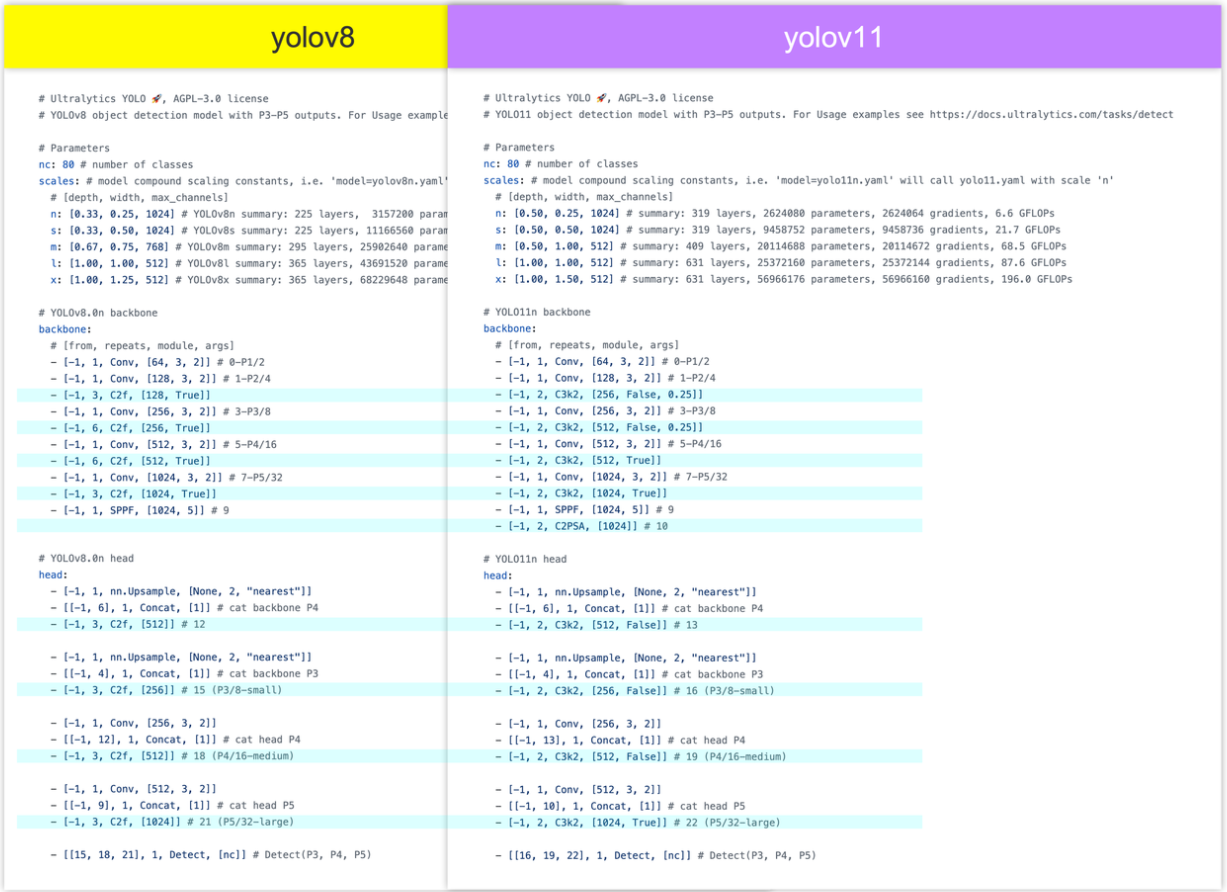
蓝色标注出了v8和v11不同之处,发现主要有两个不同点:
- C2f模块全部换成了C3k2模块。代码层面的C3k2是继承自C2f
- backbone最后的SPPF后又添加了 C2PSA模块,( 基于 yolo v10 的 PSA 模块,在PSA外面包了一层CSP结构 )
二、C3k2模块
C3k2配置文件说明
举例: [-1, 2, C3k2, [256, False, 0.25]]
-
-1:该模块的输入来自哪一个模块的输出。-1表示当前C3k2模块的输入来自上一个模块的输出 -
2:模块内需要包含几个C3k模块,而不是C3k3整体重复的次数,实际个数需要乘以该网络版本( n、s、m、l、x )对应的depth

-
C3k2:模块名称,等于搭建该模块的类的名称,搭建网络时用于找到同名的类去搭建模块 -
[256, False, 0.25]:C3k2模块必须的参数-
256:该模块的输出channel数。实际输出channel数需要乘以该网络版本( n、s、m、l、x )对应的width

-
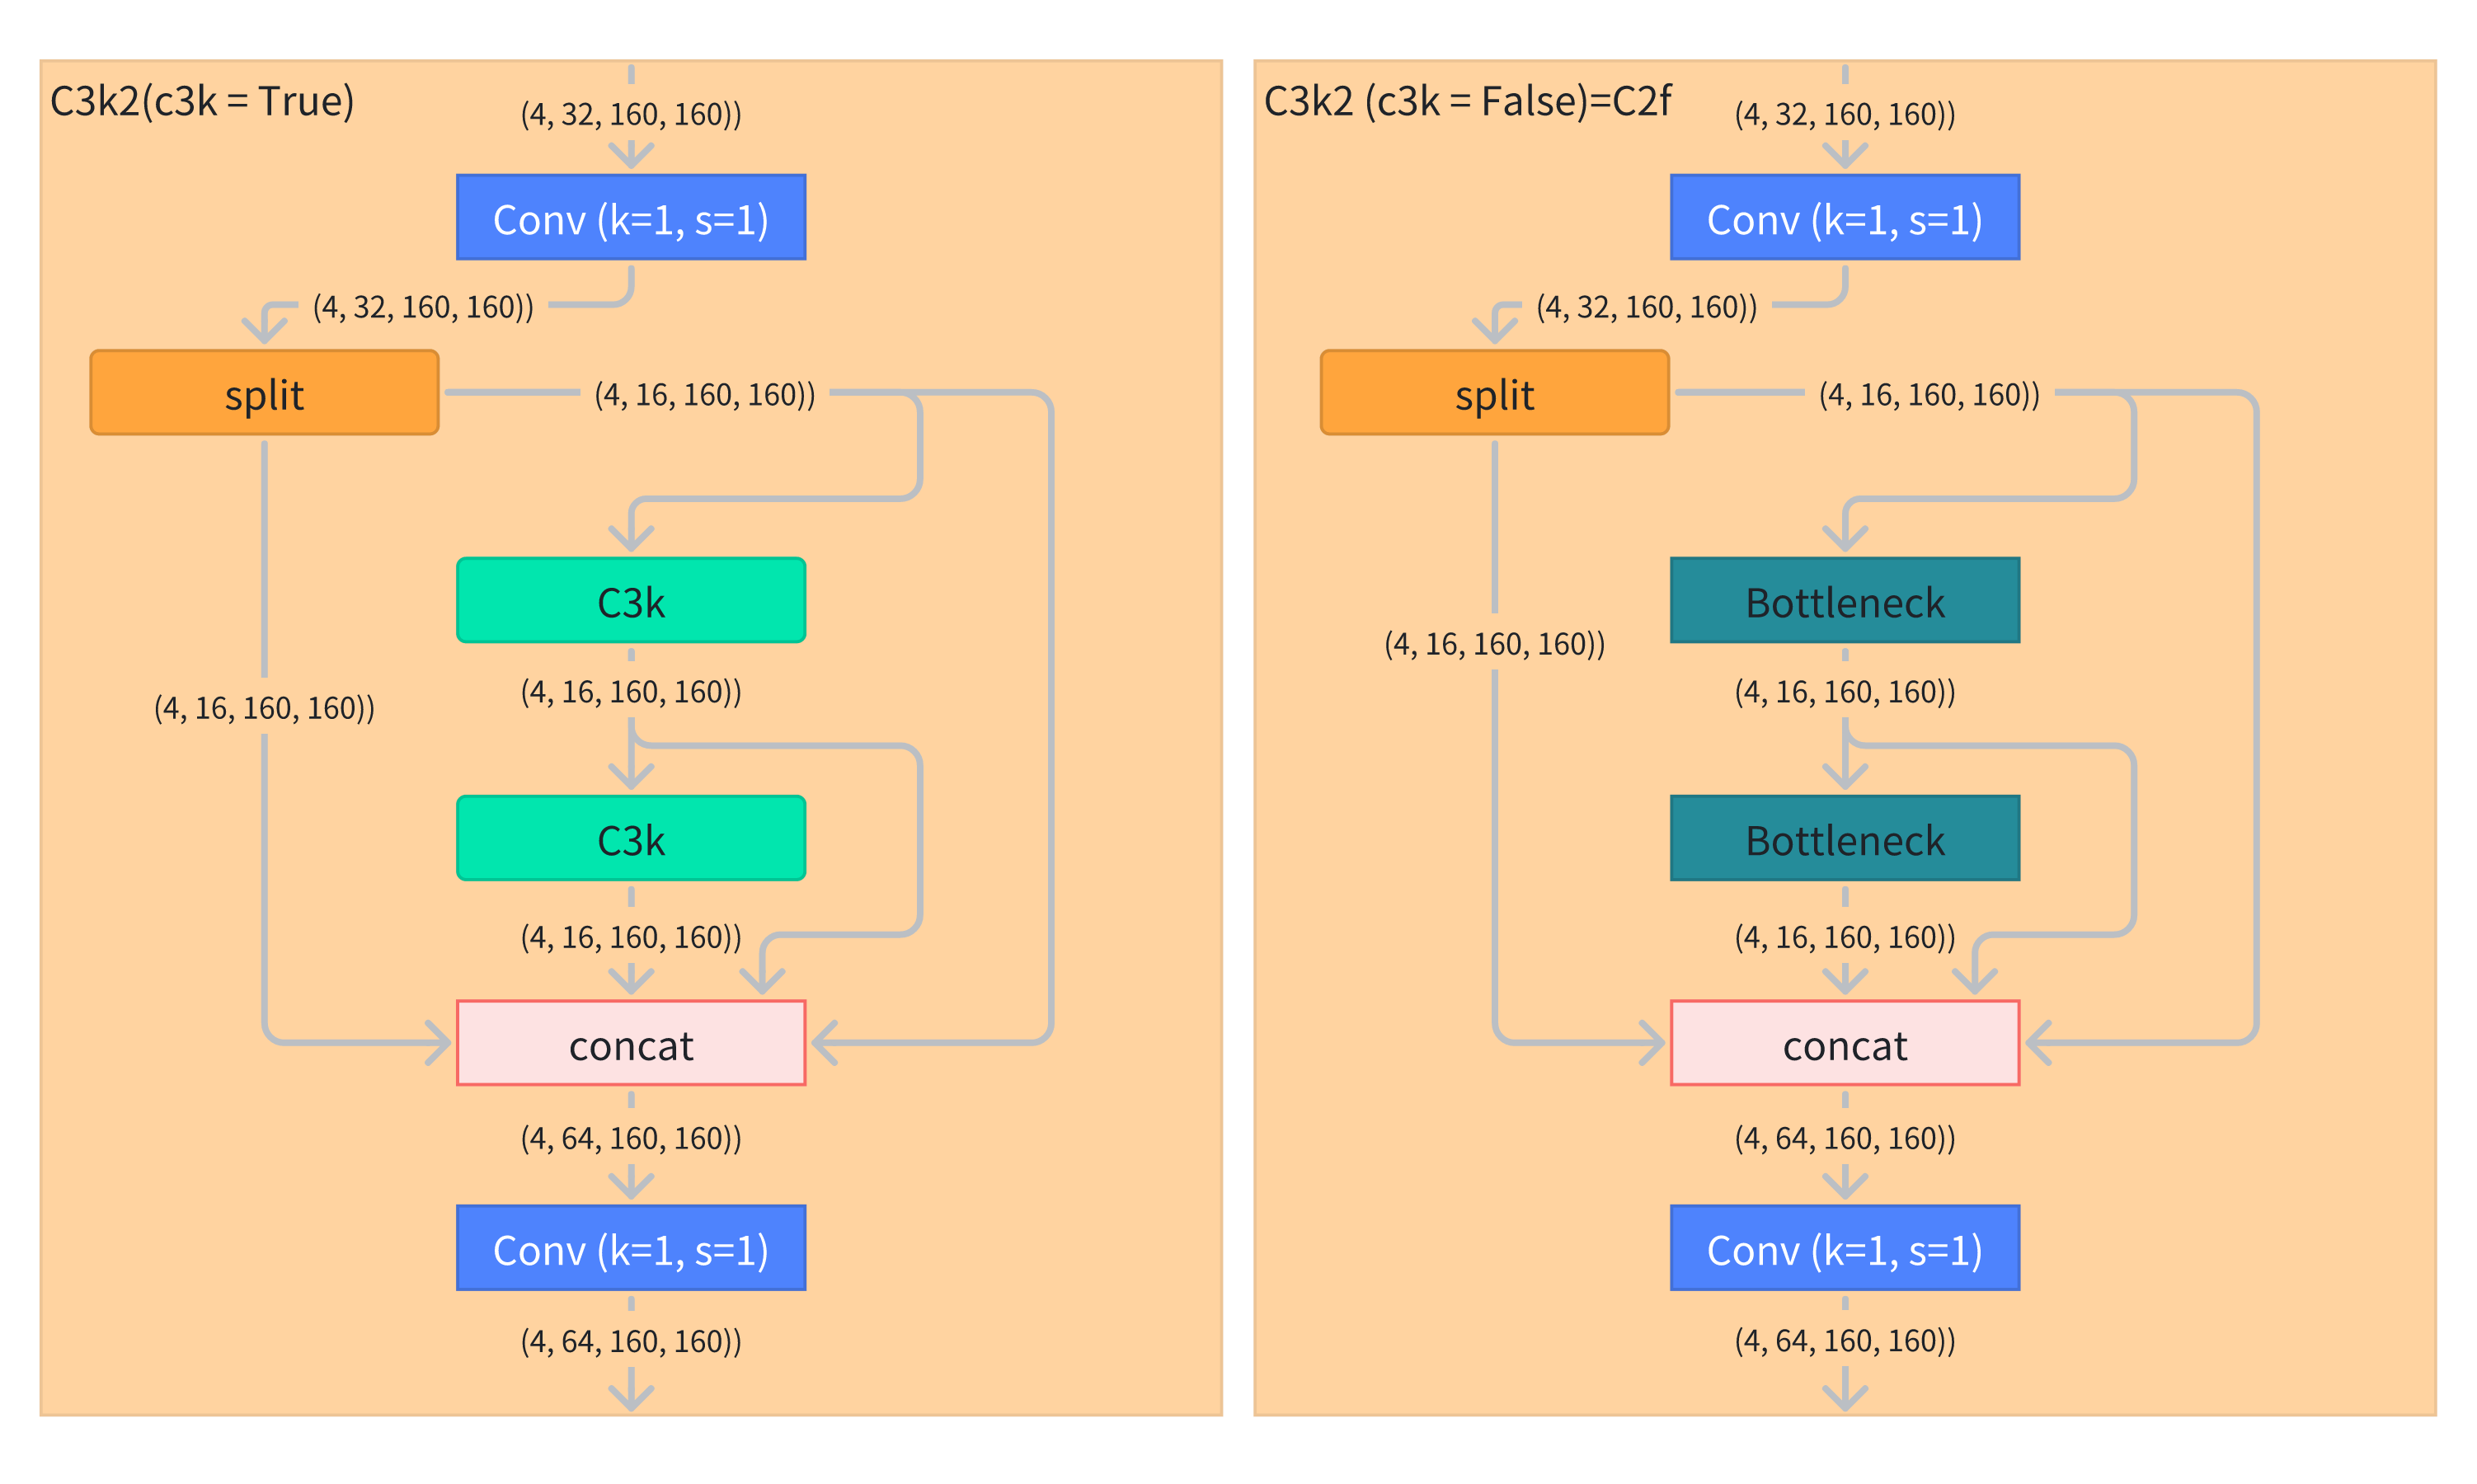
False:- True表示内部使用C3k模块;
- False表示内部使用
Bottleneck模块,这时C3k2模块退化为C2f模块。 前一个重复次数决定的是C2f中Bottleneck重复的次数。
但是一般使用场景是,将值指定为False,然后代码中判断该模型是否为较大的
M/L/X版本,代码判断的逻辑:if m is C3k2 and scale in "mlx": # for M/L/X sizesargs[3] = True # args = [32, 64, 1, False, 0.25]- 如果是较大的
M/L/X版本,则将值置为True,使用C3k2模块 - 如果是较小的
N/S版本,则值保持为False,使用C2f模块
-
0.25:用于控制C3k2模块内部的channel数。- 设计的模块中的channel数一般需要先减少再增加或者先增加再减小,
- 其用于控制增加或减小的倍数,也就是控制C3k2/C2f模块的第一个卷积层的输出channel数和最后一个卷积层的输出channel数。
-
以下代码片段出自于ultralytics/nn/modules/block.py文件中,
这里片段仅含有C2f, C3k2, C3, C3k, Bottleneck, Conv六个模块的类的定义。
import torch
import torch.nn as nnclass C2f(nn.Module):"""Faster Implementation of CSP Bottleneck with 2 convolutions."""def __init__(self, c1, c2, n=1, shortcut=False, g=1, e=0.5):"""Initializes a CSP bottleneck with 2 convolutions and n Bottleneck blocks for faster processing."""super().__init__()self.c = int(c2 * e)  # hidden channelsself.cv1 = Conv(c1, 2 * self.c, 1, 1)self.cv2 = Conv((2 + n) * self.c, c2, 1)  # optional act=FReLU(c2)self.m = nn.ModuleList(Bottleneck(self.c, self.c, shortcut, g, k=((3, 3), (3, 3)), e=1.0) for _ in range(n))def forward(self, x):"""Forward pass through C2f layer."""y = list(self.cv1(x).chunk(2, 1))y.extend(m(y[-1]) for m in self.m)return self.cv2(torch.cat(y, 1))def forward_split(self, x):"""Forward pass using split() instead of chunk()."""y = list(self.cv1(x).split((self.c, self.c), 1))y.extend(m(y[-1]) for m in self.m)return self.cv2(torch.cat(y, 1))class C3k2(C2f):"""Faster Implementation of CSP Bottleneck with 2 convolutions."""def __init__(self, c1, c2, n=1, c3k=False, e=0.5, g=1, shortcut=True):"""Initializes the C3k2 module, a faster CSP Bottleneck with 2 convolutions and optional C3k blocks."""super().__init__(c1, c2, n, shortcut, g, e)self.m = nn.ModuleList(C3k(self.c, self.c, 2, shortcut, g) if c3k else Bottleneck(self.c, self.c, shortcut, g) for _ in range(n))class C3(nn.Module):"""CSP Bottleneck with 3 convolutions."""def __init__(self, c1, c2, n=1, shortcut=True, g=1, e=0.5):"""Initialize the CSP Bottleneck with given channels, number, shortcut, groups, and expansion values."""super().__init__()c_ = int(c2 * e)  # hidden channelsself.cv1 = Conv(c1, c_, 1, 1)self.cv2 = Conv(c1, c_, 1, 1)self.cv3 = Conv(2 * c_, c2, 1)  # optional act=FReLU(c2)self.m = nn.Sequential(*(Bottleneck(c_, c_, shortcut, g, k=((1, 1), (3, 3)), e=1.0) for _ in range(n)))def forward(self, x):"""Forward pass through the CSP bottleneck with 2 convolutions."""return self.cv3(torch.cat((self.m(self.cv1(x)), self.cv2(x)), 1))class C3k(C3):"""C3k is a CSP bottleneck module with customizable kernel sizes for feature extraction in neural networks."""def __init__(self, c1, c2, n=1, shortcut=True, g=1, e=0.5, k=3):"""Initializes the C3k module with specified channels, number of layers, and configurations."""super().__init__(c1, c2, n, shortcut, g, e)c_ = int(c2 * e)  # hidden channels# self.m = nn.Sequential(*(RepBottleneck(c_, c_, shortcut, g, k=(k, k), e=1.0) for _ in range(n)))self.m = nn.Sequential(*(Bottleneck(c_, c_, shortcut, g, k=(k, k), e=1.0) for _ in range(n)))class Bottleneck(nn.Module):"""Standard bottleneck."""def __init__(self, c1, c2, shortcut=True, g=1, k=(3, 3), e=0.5):"""Initializes a standard bottleneck module with optional shortcut connection and configurable parameters."""super().__init__()c_ = int(c2 * e)  # hidden channelsself.cv1 = Conv(c1, c_, k[0], 1)self.cv2 = Conv(c_, c2, k[1], 1, g=g)self.add = shortcut and c1 == c2def forward(self, x):"""Applies the YOLO FPN to input data."""return x + self.cv2(self.cv1(x)) if self.add else self.cv2(self.cv1(x))class Conv(nn.Module):"""Standard convolution with args(ch_in, ch_out, kernel, stride, padding, groups, dilation, activation)."""default_act = nn.SiLU()  # default activationdef __init__(self, c1, c2, k=1, s=1, p=None, g=1, d=1, act=True):"""Initialize Conv layer with given arguments including activation."""super().__init__()self.conv = nn.Conv2d(c1, c2, k, s, autopad(k, p, d), groups=g, dilation=d, bias=False)self.bn = nn.BatchNorm2d(c2)self.act = self.default_act if act is True else act if isinstance(act, nn.Module) else nn.Identity()def forward(self, x):"""Apply convolution, batch normalization and activation to input tensor."""return self.act(self.bn(self.conv(x)))def forward_fuse(self, x):"""Perform transposed convolution of 2D data."""return self.act(self.conv(x))def autopad(k, p=None, d=1):  # kernel, padding, dilation"""Pad to 'same' shape outputs."""if d > 1:k = d * (k - 1) + 1 if isinstance(k, int) else [d * (x - 1) + 1 for x in k]  # actual kernel-sizeif p is None:p = k // 2 if isinstance(k, int) else [x // 2 for x in k]  # auto-padreturn pif __name__ == '__main__':torch.manual_seed(0)c3k2 = C3k2(c1=32, c2=64, n=2, c3k=True, e=0.25)input = torch.randn((4, 32, 160, 160))output = c3k2(input)print(output.shape)    # torch.Size([4, 64, 160, 160])
参考:Axure
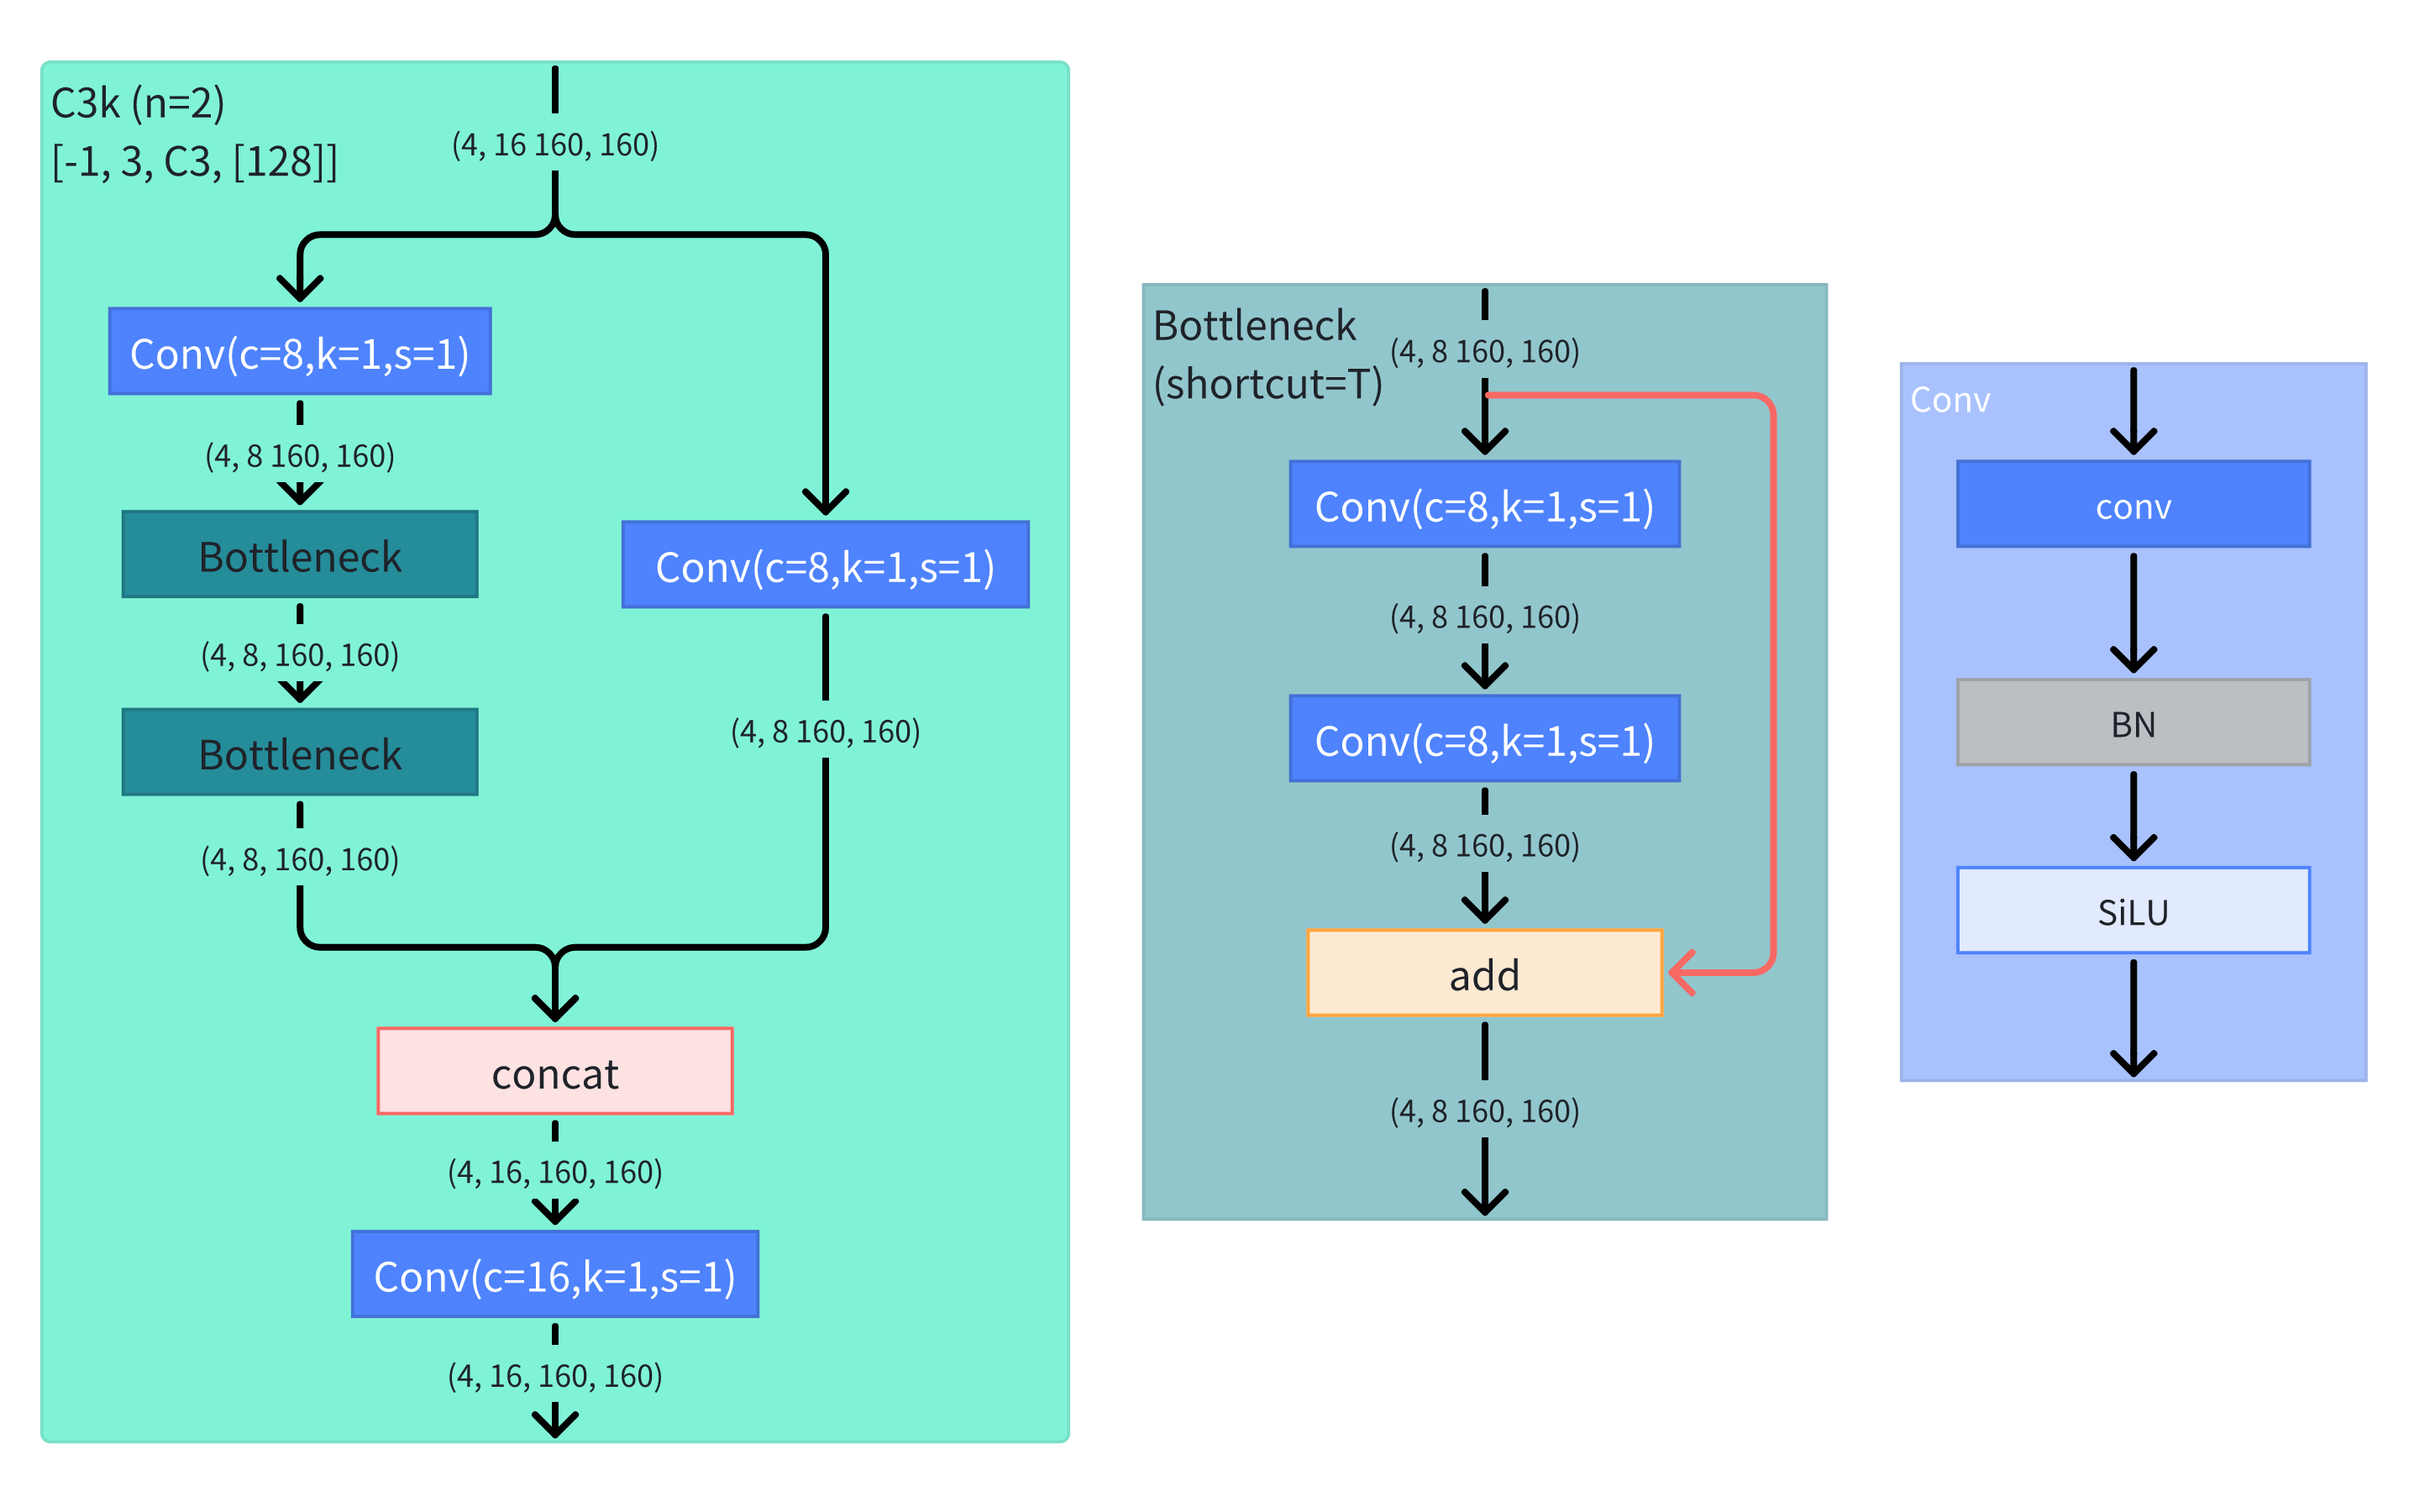
C3k2和C2f代码与网络结构图
示例结构图:
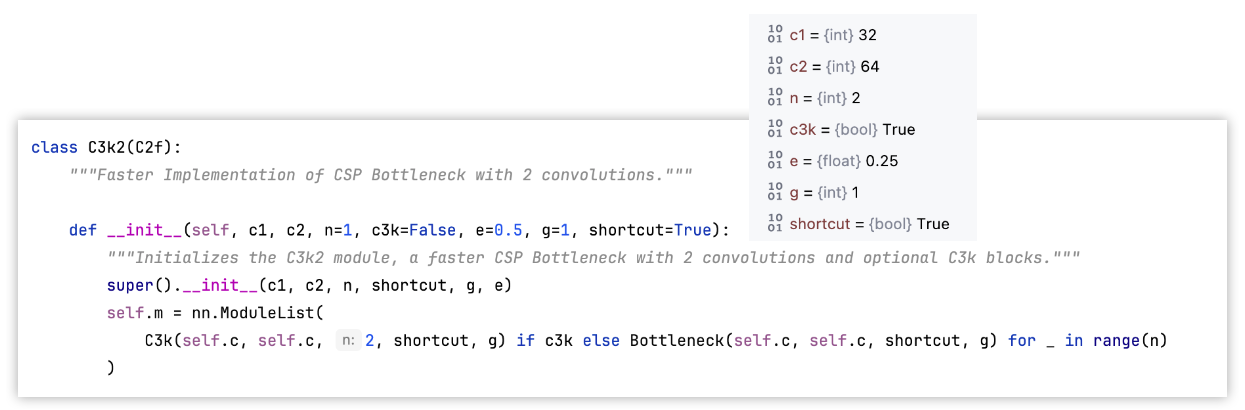
__init__方法参数:
- c1:输入通道数
- c2:输出通道倒数
- n:叠加n个C3k,示例中为2就堆叠两个C3k模块
- c3k:如果为True,就使用C3k模块。
- e:模块内部channl缩放比例
- g:Bottleneck中,卷积层的group数量。这里可以参考分组卷积
- shortcut:Bottleneck中是否有残差连接
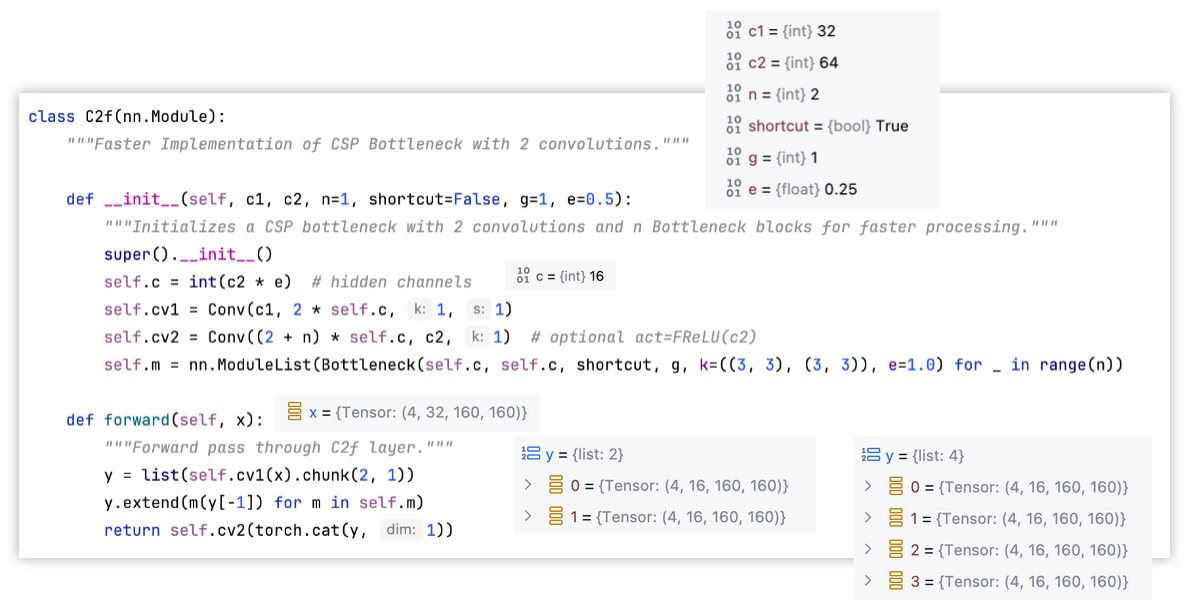
__init__方法中定义的属性:
self.c:隐藏层的channel数,由输入通道数c1乘e计算得出。self.cv1:第一个CBS块,Conv类实例化。输出通道数为2*self.cself.m:n个Bottleneck块堆叠。C3k2继承自C2f类仅重写了这个属性的对象。self.cv2:最后一个CBS块
forward()方法:
- 对于输入先经过
cv1卷积 - 再用
chunk(2, 1)方法实现了结构图中的split层,将张量沿第1个维度,就是通道维度上拆成2份。以结构图中的例子,对(4, 32, 160, 160)拆分成了(4, 16, 160, 160)和(4, 16, 160, 160),记录在list变量y中。 - 对
y的最后一个数据,依次经过self.m的每个块,每次一次是输出都通过extend()方法追加到y中。 - 把
y中的各个数据沿第1个维度上用cat()方法进行拼接 - 最后经过
cv2卷积
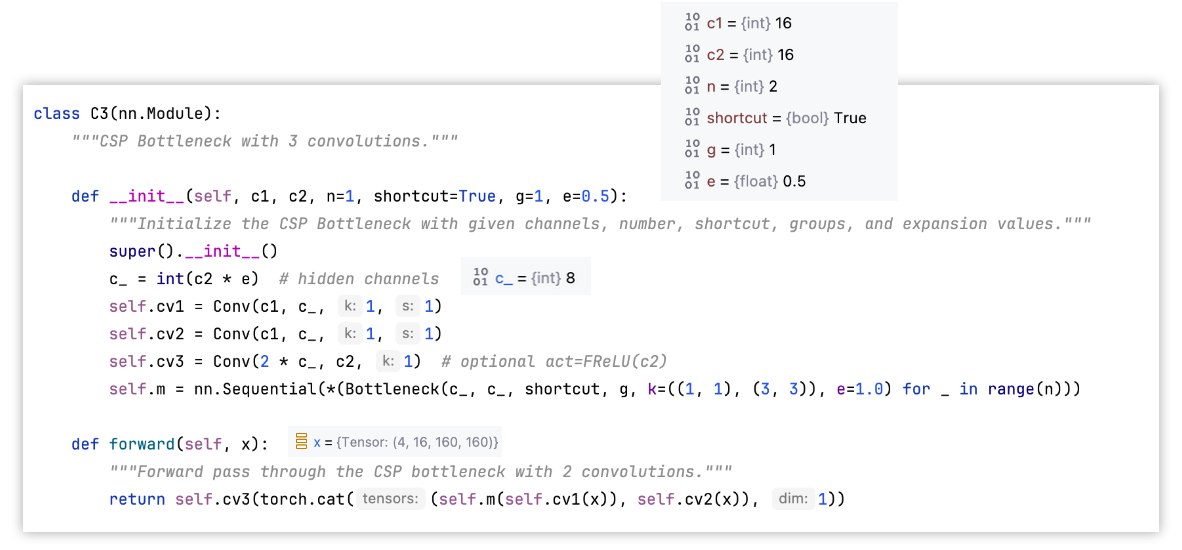
C3配置文件说明
举例: [-1, 3, C3, [128]]
-1:输入来自哪一层。-1表示当前模块的输入来自上一模块的输出3:其中的Bottleneck模块重复次数,实际个数需要乘以该网络版本( n、s、m、l、x )对应的depthC3:模块名称,等于搭建该模块的类的名称,用于找到该类去搭建模块[128]:该模块的输出channel数。实际输出channel数需要乘以该网络版本( n、s、m、l、x )对应的width
C3k和C3模块
C3k类继承自C3,C3再yolov5中有。
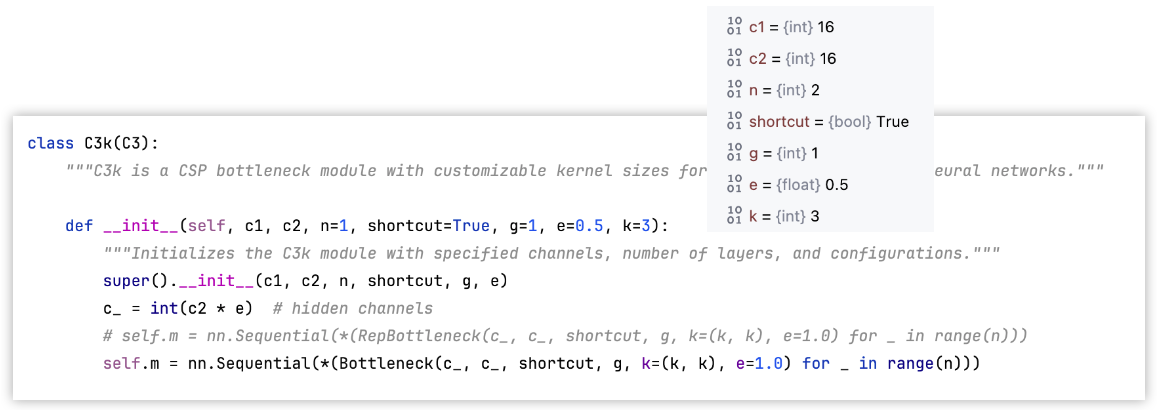
C3k的__init__()方法的输入参数:
- c1,c2:输入输出channel数
- n:C3k中用的Bottleneck数量
- shortcut:Bottleneck是否做残差连接
- g:Bottleneck中卷积层组数
- e:控制前两个Conv层的输出channel数
- k:Bottleneck中卷积层卷积核大小
三、C2PSA模块
C2PSA配置文件说明
示例结构:[-1, 2, C2PSA, [1024]]
-1:输入来自哪一层。-1表示当前层的输入来自上一层的输出2:C2PSA模块内需要包含几个PSA模块,实际个数需要乘以该网络版本( n、s、m、l、x )对应的 depthC2PSA:模块名称,与搭建该模块的类的名称相同,用于找到该类去搭建模块[1024]: 该模块的输出 channel 数。实际输出 channel 数需要乘以该网络版本( n、s、m、l、x )对应的 width
代码:
import torch
import torch.nn as nnclass Conv(nn.Module):"""Standard convolution with args(ch_in, ch_out, kernel, stride, padding, groups, dilation, activation)."""default_act = nn.SiLU()  # default activationdef __init__(self, c1, c2, k=1, s=1, p=None, g=1, d=1, act=True):"""Initialize Conv layer with given arguments including activation."""super().__init__()self.conv = nn.Conv2d(c1, c2, k, s, autopad(k, p, d), groups=g, dilation=d, bias=False)self.bn = nn.BatchNorm2d(c2)self.act = self.default_act if act is True else act if isinstance(act, nn.Module) else nn.Identity()def forward(self, x):"""Apply convolution, batch normalization and activation to input tensor."""return self.act(self.bn(self.conv(x)))def forward_fuse(self, x):"""Perform transposed convolution of 2D data."""return self.act(self.conv(x))def autopad(k, p=None, d=1):  # kernel, padding, dilation"""Pad to 'same' shape outputs."""if d > 1:k = d * (k - 1) + 1 if isinstance(k, int) else [d * (x - 1) + 1 for x in k]  # actual kernel-sizeif p is None:p = k // 2 if isinstance(k, int) else [x // 2 for x in k]  # auto-padreturn pclass Attention(nn.Module):"""Attention module that performs self-attention on the input tensor.Args:dim (int): The input tensor dimension.num_heads (int): The number of attention heads.attn_ratio (float): The ratio of the attention key dimension to the head dimension.Attributes:num_heads (int): The number of attention heads.head_dim (int): The dimension of each attention head.key_dim (int): The dimension of the attention key.scale (float): The scaling factor for the attention scores.qkv (Conv): Convolutional layer for computing the query, key, and value.proj (Conv): Convolutional layer for projecting the attended values.pe (Conv): Convolutional layer for positional encoding."""def __init__(self, dim, num_heads=8, attn_ratio=0.5):"""Initializes multi-head attention module with query, key, and value convolutions and positional encoding."""super().__init__()self.num_heads = num_headsself.head_dim = dim // num_headsself.key_dim = int(self.head_dim * attn_ratio)self.scale = self.key_dim**-0.5nh_kd = self.key_dim * num_headsh = dim + nh_kd * 2self.qkv = Conv(dim, h, 1, act=False)self.proj = Conv(dim, dim, 1, act=False)self.pe = Conv(dim, dim, 3, 1, g=dim, act=False)def forward(self, x):"""Forward pass of the Attention module.Args:x (torch.Tensor): The input tensor.Returns:(torch.Tensor): The output tensor after self-attention."""B, C, H, W = x.shapeN = H * Wqkv = self.qkv(x)q, k, v = qkv.view(B, self.num_heads, self.key_dim * 2 + self.head_dim, N).split([self.key_dim, self.key_dim, self.head_dim], dim=2)attn = (q.transpose(-2, -1) @ k) * self.scaleattn = attn.softmax(dim=-1)x = (v @ attn.transpose(-2, -1)).view(B, C, H, W) + self.pe(v.reshape(B, C, H, W))x = self.proj(x)return xclass PSABlock(nn.Module):"""PSABlock class implementing a Position-Sensitive Attention block for neural networks.This class encapsulates the functionality for applying multi-head attention and feed-forward neural network layerswith optional shortcut connections.Attributes:attn (Attention): Multi-head attention module.ffn (nn.Sequential): Feed-forward neural network module.add (bool): Flag indicating whether to add shortcut connections.Methods:forward: Performs a forward pass through the PSABlock, applying attention and feed-forward layers.Examples:Create a PSABlock and perform a forward pass>>> psablock = PSABlock(c=128, attn_ratio=0.5, num_heads=4, shortcut=True)>>> input_tensor = torch.randn(1, 128, 32, 32)>>> output_tensor = psablock(input_tensor)"""def __init__(self, c, attn_ratio=0.5, num_heads=4, shortcut=True) -> None:"""Initializes the PSABlock with attention and feed-forward layers for enhanced feature extraction."""super().__init__()self.attn = Attention(c, attn_ratio=attn_ratio, num_heads=num_heads)self.ffn = nn.Sequential(Conv(c, c * 2, 1), Conv(c * 2, c, 1, act=False))self.add = shortcutdef forward(self, x):"""Executes a forward pass through PSABlock, applying attention and feed-forward layers to the input tensor."""x = x + self.attn(x) if self.add else self.attn(x)x = x + self.ffn(x) if self.add else self.ffn(x)return xclass C2PSA(nn.Module):"""C2PSA module with attention mechanism for enhanced feature extraction and processing.This module implements a convolutional block with attention mechanisms to enhance feature extraction and processingcapabilities. It includes a series of PSABlock modules for self-attention and feed-forward operations.Attributes:c (int): Number of hidden channels.cv1 (Conv): 1x1 convolution layer to reduce the number of input channels to 2*c.cv2 (Conv): 1x1 convolution layer to reduce the number of output channels to c.m (nn.Sequential): Sequential container of PSABlock modules for attention and feed-forward operations.Methods:forward: Performs a forward pass through the C2PSA module, applying attention and feed-forward operations.Notes:This module essentially is the same as PSA module, but refactored to allow stacking more PSABlock modules.Examples:>>> c2psa = C2PSA(c1=256, c2=256, n=3, e=0.5)>>> input_tensor = torch.randn(1, 256, 64, 64)>>> output_tensor = c2psa(input_tensor)"""def __init__(self, c1, c2, n=1, e=0.5):"""Initializes the C2PSA module with specified input/output channels, number of layers, and expansion ratio."""super().__init__()assert c1 == c2self.c = int(c1 * e)self.cv1 = Conv(c1, 2 * self.c, 1, 1)self.cv2 = Conv(2 * self.c, c1, 1)self.m = nn.Sequential(*(PSABlock(self.c, attn_ratio=0.5, num_heads=self.c // 64) for _ in range(n)))def forward(self, x):"""Processes the input tensor 'x' through a series of PSA blocks and returns the transformed tensor."""a, b = self.cv1(x).split((self.c, self.c), dim=1)b = self.m(b)return self.cv2(torch.cat((a, b), 1))if __name__ == '__main__':torch.manual_seed(0)c2psa = C2PSA(c1=256, c2=256, n=2, e=0.5)input = torch.randn((4, 256, 20, 20))output = c2psa(input)print(output.shape)    # torch.Size([4, 256, 20, 20])
C2PSA代码与结构图
C2PSA
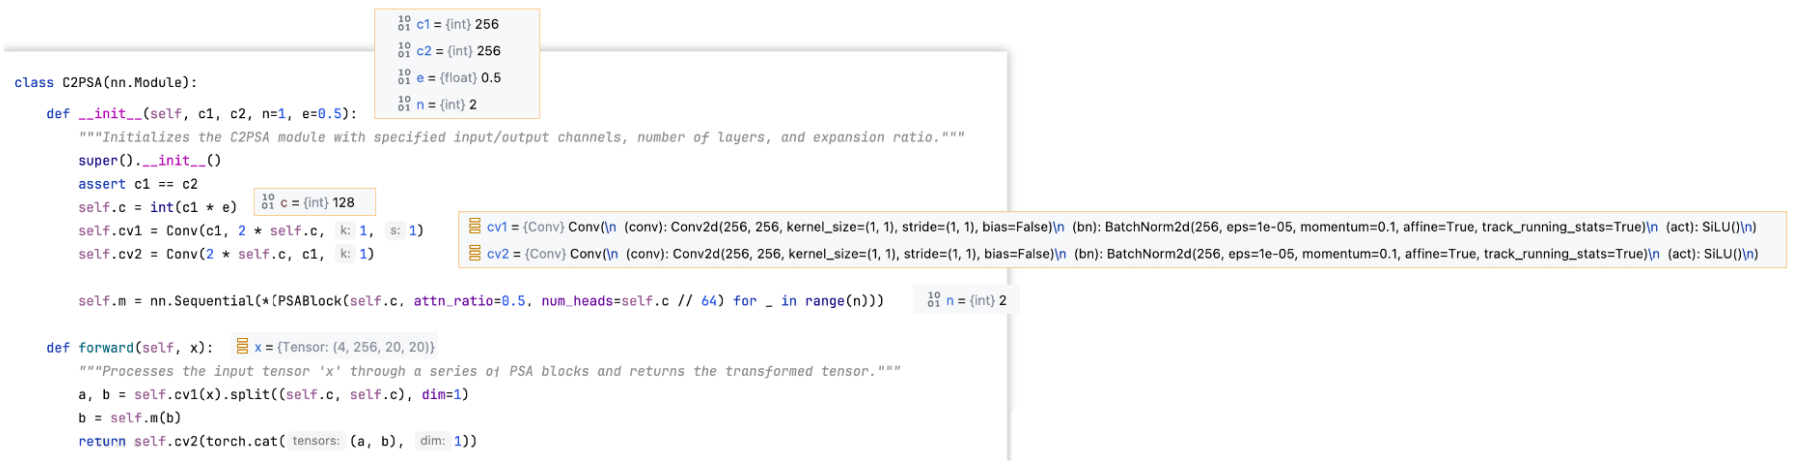

PSA
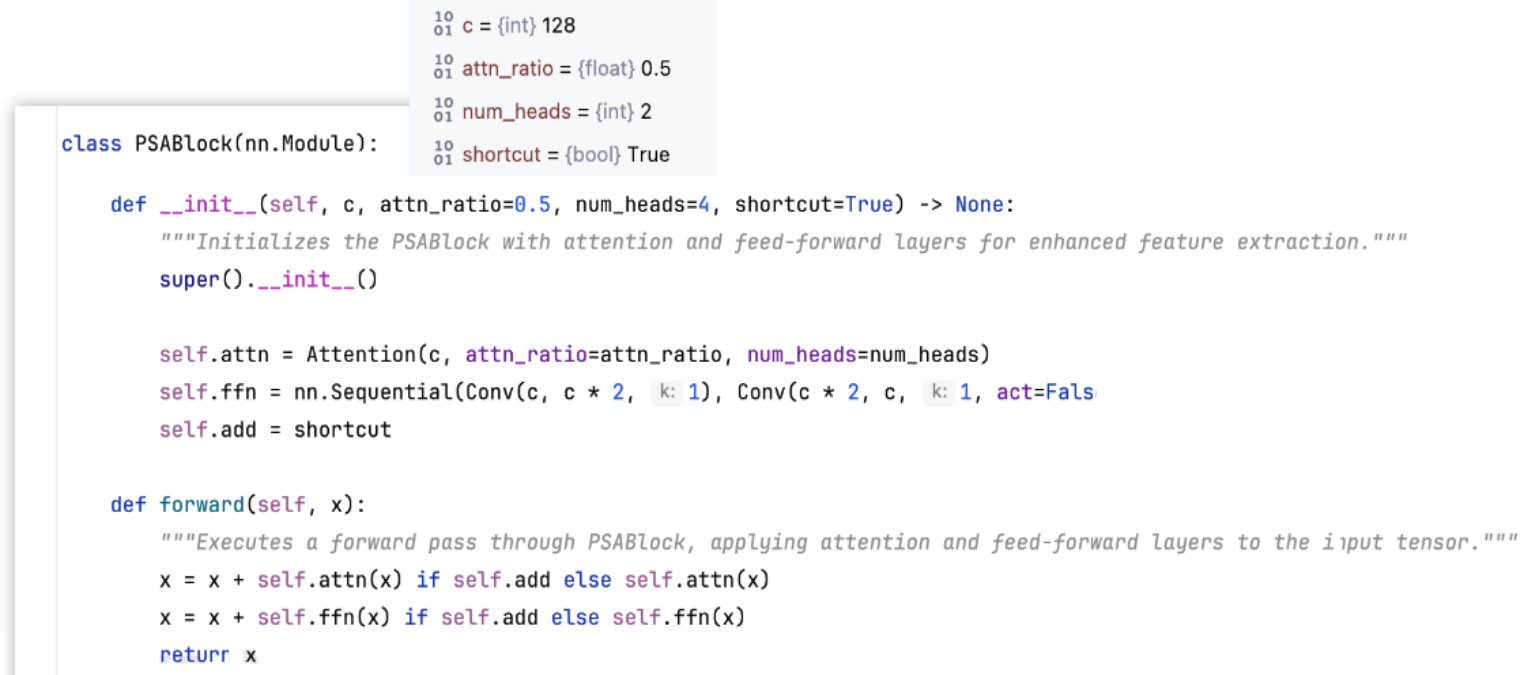
输入参数:
-
c:输入channel数
-
attn_ratio:控制Q和K的维度。比如下图多头注意力

-
num_heads:head的个数。是由输入channel数计算得出能分成几个head(
self.c除以64) -
shortcut:是否残差连接
__init__()方法的属性定义:
self.attn:Attention模块,后面细说。self.ffn:前馈神经网络FFN,也就是MLP。两层Conv块,通道数先翻倍再还原。self.add:shortcut,默认为True。Attention和FFN模块是否用残差连接。

Attention

__init__()输入参数:
- dim:特征向量长度
- num_heads:head个数
- attn_radio:默认0.5,控制K和Q
forward()方法
对于例子输入张量x形状(4, 128, 20, 20),N=H*W高乘宽得到像素个数,也是token数
- 经过
self.qkv(),就是一个没有激活层的Conv块,只是线性层。 - 再view改变形状为
(4, 2, 128, 128),用split拆为三个