【数据结构】带哨兵位双向循环链表
一、链表的分类
01 链表的分类
① 单向或双向
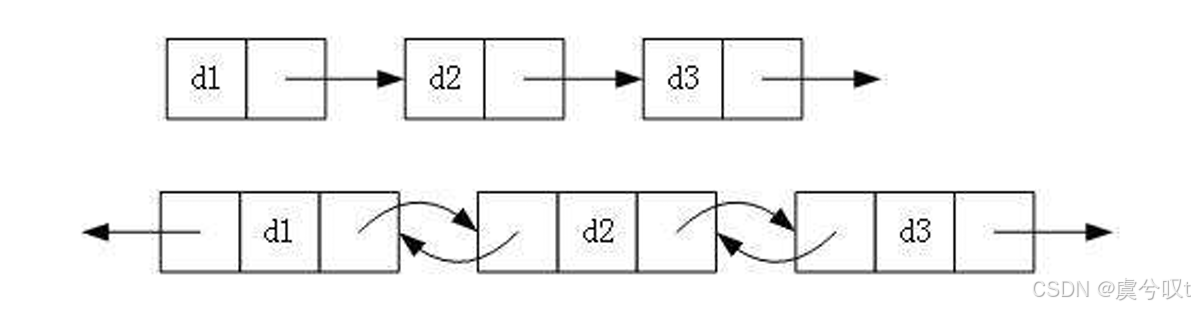
② 带头结点或不带头结点
③ 循环或非循环
02 常用的链表
根据上面的分类我们可以细分出8种不同类型的链表,这么多链表我们一个个讲解这并没有意义。我们实际中最常用的链表是 "无头单向非循环链表" 和 "带头双向循环链表" ,至于 "无头单项非循环链表" 我们在上一章已经讲述过了,我们下面将讲解 "带头双向循环列表"
解读:
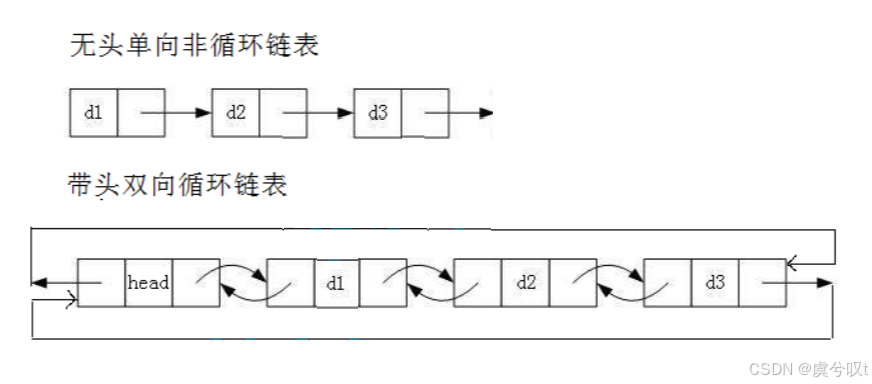
① 无头单向非循环链表:结构简单,一般不会单独用来存储数据。实际中更多是作为其他数据结构的子结构,如哈希桶、图的邻接表等。
② 带头双向循环链表:结构最复杂,但是实现反而简单。一般用来单独存储数据,实际中使用的链表数据结构都是带头双向链表。另外,这个结构虽然结构复杂,但是使用代码实现后会发现结构会带来很多优势。双向链表严格来说只需要快速的实现两个接口,insert 和 earse 头尾的插入和删除就可以搞定了,这就是结构的优势。
二、双向循环链表的定义
01 定义双向循环链表
typedef int DListNodeDataType;typedef struct DoubleListNode {DListNodeDataType data;struct DoubleListNode* prev;	// 前驱结点指针struct DoubleListNode* next;	// 后继结点指针
}DListNode;
02 接口函数
// 初始化
DListNode* DListInit();
// 创建新结点
DListNode* CreateNewNode(DListNodeDataType x);
// 打印
void DListPrint(DListNode* pHead);
// 尾插
void DListPushBack(DListNode* pHead, DListNodeDataType x);
// 头插
void DListPushFront(DListNode* pHead, DListNodeDataType x);
// 尾删
void DListPopBack(DListNode* pHead);
// 头删
void DListPopFront(DListNode* pHead);
// 查找
DListNode* DListFind(DListNode* pHead, DListNodeDataType x);
// 在 pos 位置之前插入
void DListInsert(DListNode* pos, DListNodeDataType x);
// 删除 pos 位置的结点
void DListEarse(DListNode* pos);
三、接口函数的实现
01 初始化(DListInit)
DList.h:
// 初始化
DListNode* DListInit();
DList.c:
/* 初始化 */
DListNode* DListInit() {// 哨兵位头结点DListNode* pHead = (DListNode*)malloc(sizeof(DListNode));pHead->next = pHead;pHead->prev = pHead;return pHead;
}
02 打印(DListPrint)
DList.h:
// 打印
void DListPrint(DListNode* pHead);
DList.c:
/* 打印 */
void DListPrint(DListNode* pHead) {assert(pHead != NULL);DListNode* cur = pHead->next;while (cur != pHead) {printf("%d ", cur->data);cur = cur->next;}printf("\n");
}
03 创建新结点(CreateNewNode)
创建新节点要经常用,为了方便复用,根据经验我们先把 CreateNewNode 写好:
/* 创建新结点 */
DListNode* CreateNewNode(DListNodeDataType x) {DListNode* new_node = (DListNode*)malloc(sizeof(DListNode));if (new_node == NULL) {printf("malloc failed");exit(-1);}new_node->data = x;new_node->next = NULL;new_node->prev = NULL;return new_node;
}
04 尾插(DListPushBack)
DList.h:
// 尾插
void DListPushBack(DListNode* pHead, DListNodeDataType x);
因为不用改变 pList,所以不需要使用二级指针。
DList.c:
/* 尾插 */
void DListPushBack(DListNode* pHead, DListNodeDataType x)
{assert(pHead != NULL);DListNode* tail = pHead->prev;DListNode* new_node = CreateNewNode(x);// pHead  tail  new_nodetail->next = new_node;new_node->prev = tail;pHead->prev = new_node;new_node->next = pHead;
}
解读:
① 首先防止 pHead 为空。
② 因为要实现尾插,我们要找出尾部节点。我们这里并不需要像之前学单链表时需要创建寻尾指针找到尾部节点,直接用 pHead->prev 就可以了。是不是非常的方便?随后创建新节点,直接调用我们刚才写的 CreateNewNode 接口即可。
③ 实现尾插操作,画出来可以更好地写出代码。在注释里写一个简单地思路草图也是可以的,只要画好他们之间的链接关系,再写代码会变得非常简单:
思路草图: pHead tail new_node(尾插目标)
然后再根据尾插的思路,我们就可以轻松写出代码了。
Test.c:
#include "DList.h"void TestList1()
{DListNode* pList = DListInit();DListPushBack(pList, 1);DListPushBack(pList, 2);DListPushBack(pList, 3);DListPushBack(pList, 4);DListPrint(pList);
}int main()
{TestList1();return 0;
}
运行结果如下:

05 头插(DListPushFront)
DList.h:
// 头插
void DListPushFront(DListNode* pHead, DListNodeDataType x);
解读:双向链表头插,即在第一个数据前面,也就是哨兵位和第一个数据之间插入一个数据。
DList.c:
/* 头插 */
void DListPushFront(DListNode* pHead, DListNodeDataType x)
{assert(pHead != NULL);DListNode* new_node = CreateNewNode(x);DListNode* pHeadNext = pHead->next;// pHead new_node pHeadNextpHead->next = new_node;new_node->next = pHeadNext;new_node->prev = pHead;pHeadNext->prev = new_node;
}
解读:
① 首先防止 pHead 为空。
② 既然是插入,那就创建新节点。双向链表头插,我们要找到第一个节点,通过 pHead->next 就可以拿到了,我们将它取名为 pHeadNext(表示第一个节点)。在哨兵位和第一个数据之间插入数据,画出草图就是:
思路草图: pHead new_node(头插目标) pHeadnext
根据草图我们开始写代码,将他们互相链接起来即可!
Test.c:
void TestList2()
{DListNode* pList = DListInit();DListPushFront(pList, 1);DListPushFront(pList, 2);DListPushFront(pList, 3);DListPushFront(pList, 4);DListPrint(pList);
}
运行结果如下:

06 尾删(DListPopBack)
DList.h:
// 尾删
void DListPopBack(DListNode* pHead);
DList.c:
/* 尾删 */
void DListPopBack(DListNode* pHead)
{assert(pHead != NULL);assert(pHead->next != pHead);// pHead tailPrev tailDListNode* tail = pHead->prev;DListNode* tailPrev = tail->prev;free(tail);tailPrev->next = pHead;pHead->prev = tailPrev;
}
解读:
① 首先防止 pHead 为空,这里还要预防下哨兵位被不小心干掉的情况,哨兵位指向自己就说明链表为空,链表为空就不能再继续删除了,断言 pHead->next == pHead 就可以了。
② 因为是尾删,我们要把尾部指针和它的前驱指针标出来。我们来画一下思路草图:
思路草图: pHead tailPrev tail(待删目标)
另外,这里使用前驱指针是为了避免 free 掉之后就没法链接了。
我们有了 tailPrev 了,所以我们先 free 掉 tail 也关系,此时 tail 已经被释放掉了,再进行链接就可以了。
Test.c:
void TestList3()
{DListNode* pList = DListInit();DListPushFront(pList, 1);DListPushFront(pList, 2);DListPushFront(pList, 3);DListPushFront(pList, 4);DListPrint(pList);DListPopBack(pList);DListPrint(pList);
}
运行结果如下:

07 头删(DListPopFront)
DList.h:
// 头删
void DListPopFront(DListNode* pHead);
DList.c:
/* 头删 */
void DListPopFront(DListNode* pHead)
{assert(pHead != NULL);assert(pHead->next != pHead);// pHead pHeadNext pHeadNextNextDListNode* pHeadNext = pHead->next;DListNode* pHeadNextNext = pHeadNext->next;pHead->next = pHeadNextNext;pHeadNextNext->prev = pHead;free(pHeadNext);
}
Test.c:
void TestList4()
{DListNode* pList = DListInit();DListPushFront(pList, 1);DListPushFront(pList, 2);DListPushFront(pList, 3);DListPushFront(pList, 4);DListPrint(pList);DListPopFront(pList);DListPrint(pList);
}
运行结果如下:

08 查找(DListFind)
DList.h:
// 查找
DListNode* DListFind(DListNode* pHead, DListNodeDataType x);
DList.c:
/* 查找 */
DListNode* DListFind(DListNode* pHead, DListNodeDataType x)
{assert(pHead);DListNode* cur = pHead->next;while (cur != pHead) {if (cur->data == x)return cur;cur = cur->next;}return NULL;
}
解读:很简单,和打印的思路一样。只需要创建一个 cur 从第一个有效节点(pHead->next)开始遍历链表就可以了。如果 cur->data 和传入的 x,即需要查找的值相同就返回 cur,cur 是带有值和地址的。如果整个链表都走完了还没有找到相同的值,就返回 NULL 。
09 在 pos 位置之前插入(DListInsert)
DList.h:
// 在 pos 位置之前插入
void DListInsert(DListNode* pos, DListNodeDataType x);
DList.c:
/* 在 pos 位置之前插入 */
void DListInsert(DListNode* pos, DListNodeDataType x)
{assert(pos != NULL);DListNode* new_node = CreateNewNode(x);DListNode* posPrev = pos->prev;// posPrev new_node posposPrev->next = new_node;new_node->prev = posPrev;new_node->next = pos;pos->prev = new_node;
}
解读:
① 防止 pos 传入为空。
② 首先创建新节点。因为是在 pos 位置之前插入,为了方便,我们先标出 pos 的前驱指针 posPrev,随后我们画出草图:
思路草图:posPrev newnode(待插目标) pos
此时,DListInsert 就大功告成了!它就是双向链表最核心的两个接口之一,我们可以将这个万能的 "pos位置之前插入" 复用到我们刚才写的尾插和头插,即 DListPushBack 和 DListPushFront 中:
/* 尾插 */
void DListPushBack(DListNode* pHead, DListNodeDataType x)
{assert(pHead != NULL);//DListNode* tail = pHead->prev;//DListNode* new_node = CreateNewNode(x);//// pHead  tail  new_node//tail->next = new_node;//new_node->prev = tail;//pHead->prev = new_node;//new_node->next = pHead;DListInsert(pHead, x);
}
/* 头插 */
void DListPushFront(DListNode* pHead, DListNodeDataType x)
{assert(pHead != NULL);//DListNode* new_node = CreateNewNode(x);//DListNode* pHeadNext = pHead->next;//// pHead new_node pHeadNext//pHead->next = new_node;//new_node->next = pHeadNext;//new_node->prev = pHead;//pHeadNext->prev = new_node;DListInsert(pHead->next, x);
}
10 删除 pos 位置的结点(DListErase)
DList.h:
// 删除 pos 位置的结点
void DListEarse(DListNode* pos);
DList.c:
/* 删除 pos 位置的结点 */
void DListErase(DListNode* pos)
{assert(pos != NULL); DListNode* posPrev = pos->prev; DListNode* posNext = pos->next; // posPrev  pos  posNextposPrev->next = posNext;posNext->prev = posPrev;free(pos);pos = NULL;
}
解读:
① 防止 pos 传入为空。
② 既然要删除 pos 位置的节点,我们先标出 pos 的前驱指针 posPrev 和 pos 的后继指针 posNext ,随后我们画出草图:
思路草图: posPrev pos posNext
此时,DListErase 也搞定了!我们可以将这个万能的 "pos位置删除" 复用到之前写的尾删和头删那里,即 DListPopBack 和 DListPopFront 中:
/* 尾删 */
void DListPopBack(DListNode* pHead)
{assert(pHead != NULL);assert(pHead->next != pHead);//// pHead tailPrev tail//DListNode* tail = pHead->prev;//DListNode* tailPrev = tail->prev;//free(tail);//tailPrev->next = pHead;//pHead->prev = tailPrev;DListErase(pHead->prev);
}
/* 头删 */
void DListPopFront(DListNode* pHead)
{assert(pHead != NULL);assert(pHead->next != pHead);//// pHead pHeadNext pHeadNextNext//DListNode* pHeadNext = pHead->next;//DListNode* pHeadNextNext = pHeadNext->next;//pHead->next = pHeadNextNext;//pHeadNextNext->prev = pHead;//free(pHeadNext);DListErase(pHead->next);
}
四、完整代码
DList.h:
#pragma once
#include <stdio.h>
#include <stdlib.h>
#include <assert.h>typedef int DListNodeDataType;typedef struct DoubleListNode {DListNodeDataType data;struct DoubleListNode* prev;	// 前驱结点指针struct DoubleListNode* next;	// 后继结点指针
}DListNode;// 初始化
DListNode* DListInit();
// 创建新结点
DListNode* CreateNewNode(DListNodeDataType x);
// 打印
void DListPrint(DListNode* pHead);
// 尾插
void DListPushBack(DListNode* pHead, DListNodeDataType x);
// 头插
void DListPushFront(DListNode* pHead, DListNodeDataType x);
// 尾删
void DListPopBack(DListNode* pHead);
// 头删
void DListPopFront(DListNode* pHead);
// 查找
DListNode* DListFind(DListNode* pHead, DListNodeDataType x);
// 在 pos 位置之前插入
void DListInsert(DListNode* pos, DListNodeDataType x);
// 删除 pos 位置的结点
void DListErase(DListNode* pos);
DList.c:
#include "DList.h"/* 初始化 */
DListNode* DListInit() {// 哨兵位头结点DListNode* pHead = (DListNode*)malloc(sizeof(DListNode));pHead->next = pHead;pHead->prev = pHead;return pHead;
}/* 打印 */
void DListPrint(DListNode* pHead) {assert(pHead != NULL);DListNode* cur = pHead->next;while (cur != pHead) {printf("%d ", cur->data);cur = cur->next;}printf("\n");
}/* 创建新结点 */
DListNode* CreateNewNode(DListNodeDataType x) {DListNode* new_node = (DListNode*)malloc(sizeof(DListNode));if (new_node == NULL) {printf("malloc failed");exit(-1);}new_node->data = x;new_node->next = NULL;new_node->prev = NULL;return new_node;
}/* 尾插 */
void DListPushBack(DListNode* pHead, DListNodeDataType x)
{assert(pHead != NULL);//DListNode* tail = pHead->prev;//DListNode* new_node = CreateNewNode(x);//// pHead  tail  new_node//tail->next = new_node;//new_node->prev = tail;//pHead->prev = new_node;//new_node->next = pHead;DListInsert(pHead, x);
}/* 头插 */
void DListPushFront(DListNode* pHead, DListNodeDataType x)
{assert(pHead != NULL);//DListNode* new_node = CreateNewNode(x);//DListNode* pHeadNext = pHead->next;//// pHead new_node pHeadNext//pHead->next = new_node;//new_node->next = pHeadNext;//new_node->prev = pHead;//pHeadNext->prev = new_node;DListInsert(pHead->next, x);
}/* 尾删 */
void DListPopBack(DListNode* pHead)
{assert(pHead != NULL);assert(pHead->next != pHead);//// pHead tailPrev tail//DListNode* tail = pHead->prev;//DListNode* tailPrev = tail->prev;//free(tail);//tailPrev->next = pHead;//pHead->prev = tailPrev;DListErase(pHead->prev);
}/* 头删 */
void DListPopFront(DListNode* pHead)
{assert(pHead != NULL);assert(pHead->next != pHead);//// pHead pHeadNext pHeadNextNext//DListNode* pHeadNext = pHead->next;//DListNode* pHeadNextNext = pHeadNext->next;//pHead->next = pHeadNextNext;//pHeadNextNext->prev = pHead;//free(pHeadNext);DListErase(pHead->next);
}/* 查找 */
DListNode* DListFind(DListNode* pHead, DListNodeDataType x)
{assert(pHead);DListNode* cur = pHead->next;while (cur != pHead) {if (cur->data == x)return cur;cur = cur->next;}return NULL;
}/* 在 pos 位置之前插入 */
void DListInsert(DListNode* pos, DListNodeDataType x)
{assert(pos != NULL);DListNode* new_node = CreateNewNode(x);DListNode* posPrev = pos->prev;// posPrev new_node posposPrev->next = new_node;new_node->prev = posPrev;new_node->next = pos;pos->prev = new_node;
}/* 删除 pos 位置的结点 */
void DListErase(DListNode* pos)
{assert(pos != NULL); DListNode* posPrev = pos->prev; DListNode* posNext = pos->next; // posPrev  pos  posNextposPrev->next = posNext;posNext->prev = posPrev;free(pos);pos = NULL;
}