PiscCode使用 MediaPipe 检测人脸关键点多样展示
在计算机视觉中,人脸关键点检测是很多应用的基础:表情识别、3D 动作捕捉、AR 滤镜、人机交互……都需要知道人脸上五官和轮廓的位置。
谷歌的 MediaPipe 提供了高效的人脸关键点检测模型(FaceLandmarker),可以在实时视频流上运行。本文将基于 MediaPipe,构建一个 FrameObject 类,实现四种人脸可视化方式,并拼接成一个四宫格输出。
1. 背景知识:MediaPipe FaceLandmarker
MediaPipe 的 FaceLandmarker 能够检测出人脸 468 个关键点,并支持:
blendshapes 表情系数(微表情分析)
3D transformation matrix(姿态估计)
它不仅能找到五官(眼睛、鼻子、嘴巴),还能绘制完整的面部网格,非常适合做实时 AR 应用。
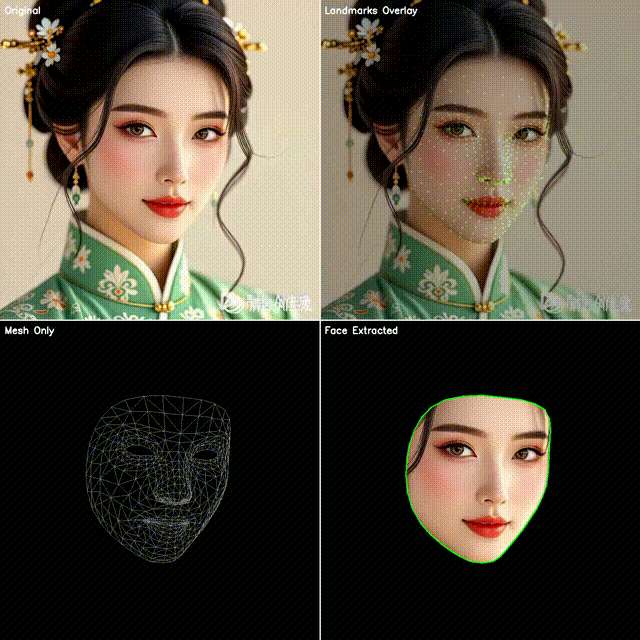
2. 四宫格效果展示
本文代码会生成一个四宫格图像:
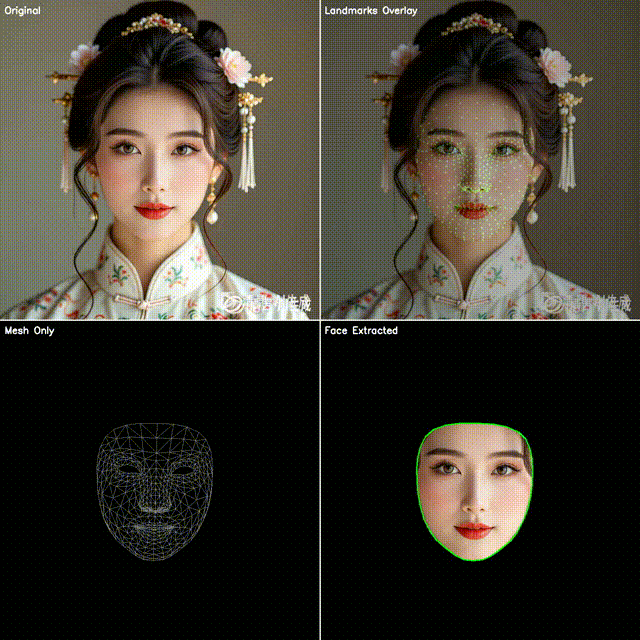
左上:原始视频帧
右上:点位覆盖(绿色小圆点叠加在人脸上)
左下:点位连成网格(脸部 3D 拓扑结构)
右下:抠出脸部区域(使用凸包作为轮廓)
这样既能直观看到模型的检测效果,也能快速应用到不同的业务场景。
3. 核心代码解析
(1) 初始化 FaceLandmarker
base_options = python.BaseOptions(model_asset_path="face_landmarker.task") options = vision.FaceLandmarkerOptions( base_options=base_options, output_face_blendshapes=True, output_facial_transformation_matrixes=True, num_faces=1 ) self.detector = vision.FaceLandmarker.create_from_options(options)output_face_blendshapes=True→ 获取表情系数(可做表情识别)num_faces=1→ 限制检测单人脸,提升性能
(2) 点位绘制
for landmark in face_landmarks: x = int(landmark.x * w) y = int(landmark.y * h) cv2.circle(overlay, (x, y), 2, (0, 255, 0), -1)每个 landmark 都是归一化坐标(0~1),需乘上图像宽高后绘制小圆点。
(3) 网格绘制
solutions.drawing_utils.draw_landmarks( image=connected_mesh, landmark_list=face_landmarks_proto, connections=mp.solutions.face_mesh.FACEMESH_TESSELATION, landmark_drawing_spec=None, connection_drawing_spec=mp.solutions.drawing_styles.get_default_face_mesh_tesselation_style() )这里使用了 MediaPipe 内置的 FACEMESH_TESSELATION(468 点三角网格)。效果类似于 3D 建模的线框图。
(4) 脸部抠出
points_array = np.array(points, dtype=np.int32) hull = cv2.convexHull(points_array) mask = np.zeros((h, w), dtype=np.uint8) cv2.fillConvexPoly(mask, hull, 255) face_extracted = cv2.bitwise_and(frame, frame, mask=mask)先取 landmark 点,计算凸包(Convex Hull)
生成掩码,提取人脸区域
轮廓线用绿色标注
(5) 四宫格拼接
top_row = np.hstack([top_left, top_right]) bottom_row = np.hstack([bottom_left, bottom_right]) result = np.vstack([top_row, bottom_row])再加上分隔线和标题文字,最终形成直观的四宫格效果。
4. 应用场景
import cv2
import numpy as np
import mediapipe as mp
from mediapipe import solutions
from mediapipe.framework.formats import landmark_pb2
from mediapipe.tasks import python
from mediapipe.tasks.python import visionclass FrameObject:def __init__(self, model_path="文件路径/face_landmarker.task"):"""初始化 Mediapipe FaceLandmarker"""base_options = python.BaseOptions(model_asset_path=model_path)options = vision.FaceLandmarkerOptions(base_options=base_options,output_face_blendshapes=True,output_facial_transformation_matrixes=True,num_faces=1)self.detector = vision.FaceLandmarker.create_from_options(options)def _create_landmark_overlay(self, frame, detection_result):"""创建只有点位的覆盖层"""if not detection_result.face_landmarks:return np.zeros_like(frame)overlay = np.zeros_like(frame)h, w = frame.shape[:2]for face_landmarks in detection_result.face_landmarks:for landmark in face_landmarks:x = int(landmark.x * w)y = int(landmark.y * h)cv2.circle(overlay, (x, y), 2, (0, 255, 0), -1)return overlaydef _create_connected_mesh(self, frame, detection_result):"""创建点连网格"""if not detection_result.face_landmarks:return np.zeros_like(frame)connected_mesh = np.zeros_like(frame)for face_landmarks in detection_result.face_landmarks:face_landmarks_proto = landmark_pb2.NormalizedLandmarkList()face_landmarks_proto.landmark.extend([landmark_pb2.NormalizedLandmark(x=lm.x, y=lm.y, z=lm.z)for lm in face_landmarks])# 只绘制网格连接线solutions.drawing_utils.draw_landmarks(image=connected_mesh,landmark_list=face_landmarks_proto,connections=mp.solutions.face_mesh.FACEMESH_TESSELATION,landmark_drawing_spec=None,connection_drawing_spec=mp.solutions.drawing_styles.get_default_face_mesh_tesselation_style())return connected_meshdef _create_mesh_overlay(self, frame, detection_result):"""将网格覆盖在原帧上"""if not detection_result.face_landmarks:return frame.copy()mesh_overlay = frame.copy()for face_landmarks in detection_result.face_landmarks:face_landmarks_proto = landmark_pb2.NormalizedLandmarkList()face_landmarks_proto.landmark.extend([landmark_pb2.NormalizedLandmark(x=lm.x, y=lm.y, z=lm.z)for lm in face_landmarks])# 绘制网格连接线(使用半透明效果)solutions.drawing_utils.draw_landmarks(image=mesh_overlay,landmark_list=face_landmarks_proto,connections=mp.solutions.face_mesh.FACEMESH_TESSELATION,landmark_drawing_spec=None,connection_drawing_spec=mp.solutions.drawing_utils.DrawingSpec(color=(0, 255, 0), thickness=1, circle_radius=1))return mesh_overlaydef _extract_face_region(self, frame, detection_result):"""抠出脸部区域"""if not detection_result.face_landmarks:return np.zeros_like(frame)h, w = frame.shape[:2]face_extracted = np.zeros_like(frame)for face_landmarks in detection_result.face_landmarks:# 创建脸部轮廓的凸包points = []for landmark in face_landmarks:x = int(landmark.x * w)y = int(landmark.y * h)points.append([x, y])if len(points) > 2:points_array = np.array(points, dtype=np.int32)# 使用凸包来获取脸部轮廓hull = cv2.convexHull(points_array)# 创建脸部掩码mask = np.zeros((h, w), dtype=np.uint8)cv2.fillConvexPoly(mask, hull, 255)# 应用掩码提取脸部face_extracted = cv2.bitwise_and(frame, frame, mask=mask)# 可选:在提取的脸部周围绘制轮廓cv2.drawContours(face_extracted, [hull], -1, (0, 255, 0), 2)return face_extracteddef do(self, frame, device=None):"""处理单帧图像,返回四宫格结果"""if frame is None:return None# 转换为RGBrgb_frame = cv2.cvtColor(frame, cv2.COLOR_BGR2RGB)mp_image = mp.Image(image_format=mp.ImageFormat.SRGB, data=rgb_frame)# 检测人脸关键点try:detection_result = self.detector.detect(mp_image)except:# 如果检测失败,返回原始帧return frame# 创建四个不同的视图h, w = frame.shape[:2]# 左上:原帧top_left = frame.copy()# 右上:点位覆盖原帧(原来的中间向右挪)top_right = frame.copy()overlay = self._create_landmark_overlay(frame, detection_result)top_right = cv2.addWeighted(top_right, 0.7, overlay, 0.3, 0)# 左下:点连网格bottom_left = self._create_connected_mesh(frame, detection_result)# 右下:脸部抠出bottom_right = self._extract_face_region(frame, detection_result)# 创建顶部行(原帧、点位覆盖原帧)top_row = np.hstack([top_left, top_right])# 创建底部行(网格、脸部抠出)bottom_row = np.hstack([bottom_left, bottom_right])# 合并为最终结果result = np.vstack([top_row, bottom_row])# 添加分隔线cv2.line(result, (w, 0), (w, h*2), (255, 255, 255), 2)cv2.line(result, (0, h), (w*2, h), (255, 255, 255), 2)# 添加标题titles = ["Original", "Landmarks Overlay", "Mesh Only", "Face Extracted"]for i, title in enumerate(titles):x_pos = (i % 2) * w + 10y_pos = (i // 2) * h + 30cv2.putText(result, title, (x_pos, y_pos), cv2.FONT_HERSHEY_SIMPLEX, 0.7, (255, 255, 255), 2)return result
视频会议美颜 / 虚拟背景
利用人脸抠出和网格,结合滤镜渲染。表情识别 / 情绪分析
使用 blendshapes 系数,分析表情变化。AR 滤镜 / 虚拟试妆
通过关键点和网格,实时叠加贴纸或化妆效果。3D 动作捕捉
利用 transformation matrix,将人脸运动映射到虚拟角色。
5. 总结
本文基于 MediaPipe FaceLandmarker,实现了一个 人脸关键点四宫格可视化工具。它不仅能帮助开发者直观理解检测结果,还能快速扩展到 AR、表情识别、抠图等应用场景。
下一步可以尝试:
实时摄像头输入(OpenCV VideoCapture)
多人脸检测(设置
num_faces > 1)结合深度学习模型做情绪分类