Vue Router 嵌套路由与布局系统详解:理解 component = router-view 的核心概念
在Vue单页应用开发中,很多开发者对Vue Router的工作原理感到困惑。本文将重点解释一个核心概念:component 就等于 <router-view>,理解了这个概念,你就掌握了Vue Router的精髓。
🔥 核心概念:component = router-view
最重要的理解
component 配置的组件会直接替换对应的 <router-view>!
这不是渲染在里面,不是包含关系,而是直接替换!
// 路由配置
{path: '/login',component: LoginComponent  // LoginComponent 直接替换 <router-view>
}
<!-- App.vue -->
<template><div id="app"><router-view />  <!-- 这个位置会被 LoginComponent 直接替换 --></div>
</template>
结果:
<div id="app"><!-- <router-view /> 消失了,直接变成了 LoginComponent 的内容 --><div class="login-container"><form>登录表单</form></div>
</div>
💡 为什么说 component = router-view?
1. 直接替换关系
<!-- 替换前 -->
<div id="app"><router-view />
</div><!-- 替换后(当访问 /login 时)-->
<div id="app"><!-- router-view 被 LoginComponent 完全替换 --><div class="login-page"><h1>用户登录</h1><form>...</form></div>
</div>
2. 一对一的对应关系
// 每个 component 对应一个 router-view 的替换
{path: '/login',component: LoginComponent    // 替换 App.vue 的 <router-view>
}{path: '/dashboard',component: Layout,           // 替换 App.vue 的 <router-view>children: [{path: 'home',component: HomeComponent // 替换 Layout 内部的 <router-view>}]
}
🎯 通过对比深度理解
场景1:独立页面 - 直接替换
// 路由配置
{path: '/login',component: () => import('@/views/login')
}
<template><div id="app"><router-view />  <!-- 第一层 router-view --></div>
</template>
访问 /login 的替换过程:
<!-- 替换前 -->
<div id="app"><router-view />
</div><!-- 替换后 -->
<div id="app"><!-- router-view 被完全替换成 login 组件 --><div class="login-container"><div class="login-form"><input placeholder="用户名" /><input placeholder="密码" /><button>登录</button></div></div>
</div>
关键理解:<router-view /> 消失了,变成了登录组件的完整内容!
场景2:嵌套路由 - 双重替换
// 路由配置
{path: '/user',component: Layout,  // Layout 替换 App.vue 的 router-viewchildren: [{path: 'profile',component: ProfileComponent  // ProfileComponent 替换 Layout 内的 router-view}]
}
第一层替换(App.vue):
<!-- 替换前 -->
<div id="app"><router-view />
</div><!-- 替换后:Layout 组件替换了 router-view -->
<div id="app"><div class="app-wrapper">        <!-- Layout 组件的内容 --><sidebar />                     <!-- 侧边栏 --><div class="main-container"><navbar />                    <!-- 顶部导航 --><app-main><router-view />             <!-- Layout 内部的第二层 router-view --></app-main></div></div>
</div>
第二层替换(Layout 内部):
<div id="app"><div class="app-wrapper"><sidebar /><div class="main-container"><navbar /><app-main><!-- 第二层 router-view 被 ProfileComponent 替换 --><div class="profile-container"><h1>个人中心</h1><form>个人信息表单</form></div></app-main></div></div>
</div>
⚡ 关键洞察:双层替换机制
访问 /user/profile 时的完整替换过程:
步骤1: App.vue 的 <router-view>↓ 被 Layout 组件替换步骤2: Layout 内部的 <router-view>↓ 被 ProfileComponent 替换结果: 既有完整的管理后台布局,又有具体的个人中心内容用代码表示:
// 伪代码表示替换过程
App.vue.template = `<div id="app">${component}  // component 直接替换 router-view 的位置</div>
`// 当 component = Layout 时
App.vue.rendered = `<div id="app"><div class="app-wrapper"><sidebar /><navbar /><app-main>${childComponent}  // 子路由的 component 替换 Layout 内的 router-view</app-main></div></div>
`
🔍 深入理解:为什么这样设计?
1. 组件化的本质
<!-- router-view 本质上就是一个动态组件 -->
<component :is="currentComponent" /><!-- 等价于 -->
<router-view />
2. Vue 的组件替换机制
// Vue 内部的处理逻辑(简化版)
const currentComponent = matchRoute(currentPath).component
// 直接用 currentComponent 替换 <router-view> 的位置
3. 嵌套的威力
每一层的 router-view 都是一个独立的替换点
每一层的 component 都可以包含新的 router-view
形成无限嵌套的可能
🎨 可视化理解
单层替换:
[App.vue]│├── <div id="app">└── <router-view /> ←── 替换点│└── 被 component 替换│├── LoginComponent├── AboutComponent └── ContactComponent双层替换:
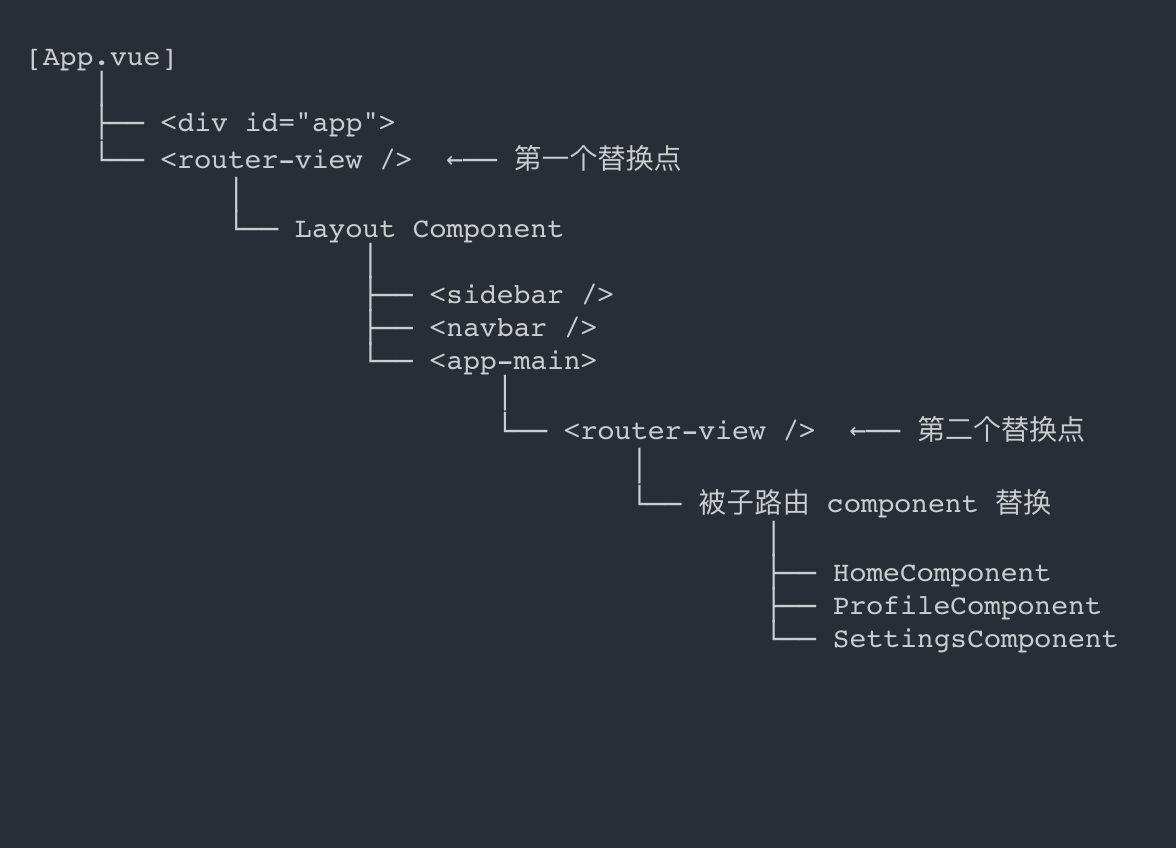
[App.vue]│├── <div id="app">└── <router-view /> ←── 第一个替换点│└── Layout Component│├── <sidebar />├── <navbar />└── <app-main>│└── <router-view /> ←── 第二个替换点│└── 被子路由 component 替换│├── HomeComponent├── ProfileComponent└── SettingsComponent🚀 实战应用:基于替换理解进行开发
1. 独立页面开发
// 知道了 component = router-view,开发独立页面很简单
{path: '/login',component: LoginPage  // LoginPage 会完全占据屏幕
}{path: '/404',  component: NotFoundPage  // NotFoundPage 会完全占据屏幕
}
2. 管理后台开发
// 管理后台页面需要布局框架
{path: '/admin',component: AdminLayout,  // AdminLayout 提供管理后台框架children: [{path: 'users',component: UserManagement  // 在 AdminLayout 的框架内显示},{path: 'settings',component: SystemSettings  // 在 AdminLayout 的框架内显示  }]
}
3. 多级嵌套开发
// 复杂的多级嵌套
{path: '/complex',component: MainLayout,     // 第一层替换children: [{path: 'section',component: SectionLayout,  // 第二层替换children: [{path: 'detail',component: DetailPage    // 第三层替换}]}]
}
💯 总结:component = router-view 的核心要点
1. 直接替换关系
- component 不是渲染在 router-view 里面
- component 是直接替换 router-view 的位置
- 替换后,原来的 router-view 标签消失
2. 一一对应关系
- 每个 router-view 对应一个替换机会
- 每个 component 需要一个 router-view 来替换
- 嵌套路由 = 多层替换
3. 组件的责任
- Layout 组件:提供布局框架 + 内部的 router-view
- 页面组件:提供具体内容,替换掉 router-view
- App.vue:提供应用容器 + 最顶层的 router-view
4. 开发思维
- 需要布局?使用 Layout 组件作为 component
- 独立页面?直接使用页面组件作为 component
- 多级嵌套?每层都要有自己的 router-view
🎯 记住这个公式
router-view 的位置 = component 的位置
component 替换 router-view
嵌套路由 = 多层替换
Layout 的作用 = 提供框架 + 新的 router-view
理解了 component = router-view 这个核心概念,Vue Router 的所有机制都会变得清晰明了。这不仅仅是一个技术细节,而是理解整个 Vue 路由系统的关键!
现在,当你看到任何 Vue Router 配置时,都能立即理解组件会在哪里渲染,以及如何构建复杂的嵌套路由系统。这就是从新手到专家的关键一步!